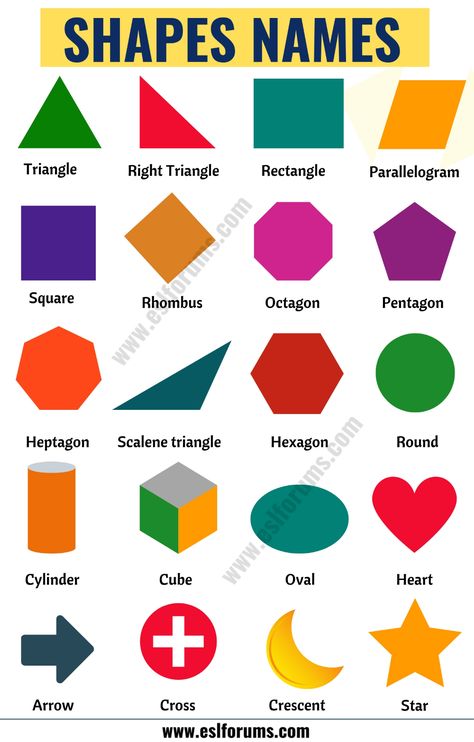
Block shapes names
It turns out Tetris blocks actually have names and they're incredibly weird
What's the name for that long Tetris block? Or the square one? Or the T-shaped lad? Simon,Timothy and Mortimer, right? Wrong.
Advertisement
Twitter user @vecchitto has unearthed a goldmine in the form of a very old Tetris instruction booklet, presumably produced for morons that cannot grasp basic logic.
I found the original instruction booklet for #Tetris and... did anyone know that these pieces had names?? pic.twitter.com/SvtxvIcUz6
— vecchitto (@vecchitto) February 24, 2019
Advertisement
What we're witnessing here is a thing of beauty. An insight into the inner workings of a madman.
According to this wonderful booklet, the seven types of Tetris block all have their own individual names, each more batshit than the last.
Do any of the names make sense? Absolutely not. But are they a joy to behold, some 35 years after the game's initial release? Yes, extremely.
Advertisement
Let's try to work out the inspiration behind these utterly insane Tetris block names, while also determining whether there are any better options.
Why? For journalism.
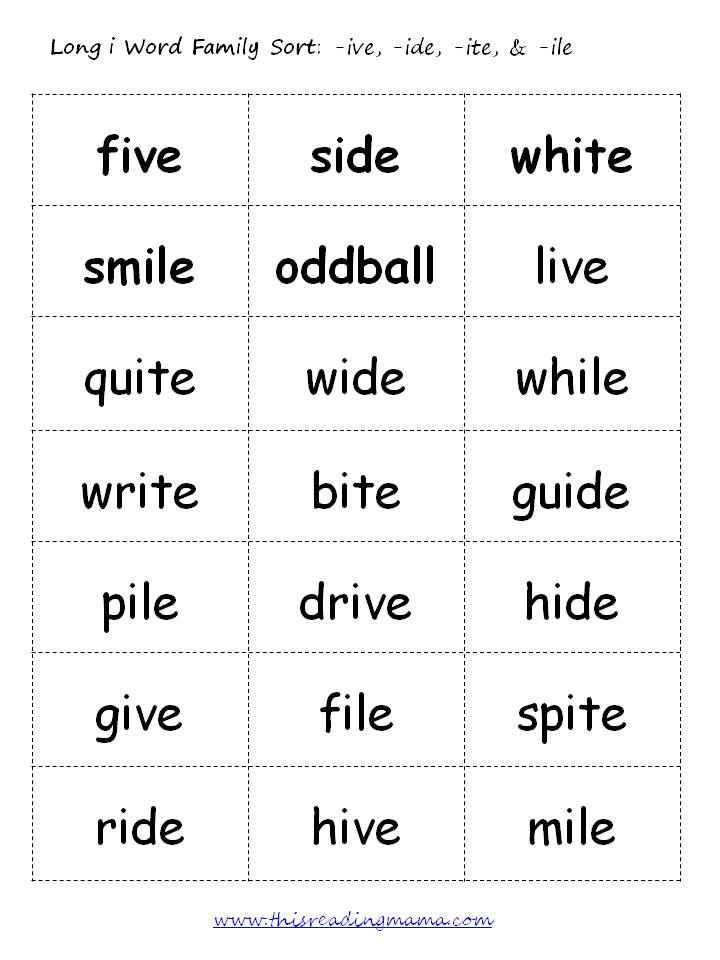
Orange Ricky
Advertisement
Question 1: Why Ricky?
Question 2: Why Orange Ricky?
This is very clearly the 'L' shape Tetris block, also known as the loser block, the corner piece, the corridor, the 'looking kind of dumb with her finger and her thumb in the shape of an L on her forehead' block. To call it 'Orange Ricky' is to insult a man named Richard who has just returned from his first ever foray into the world of spray tanning.
The name makes no sense. The block comes in a multitude of colours, not just orange.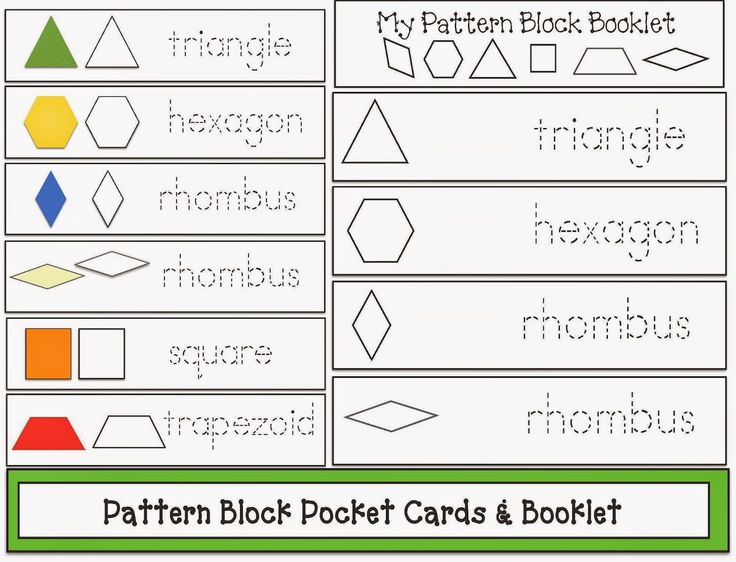 Also, if you're giving it a British man's name, it's obviously going to be Dean or Joshua. The block doesn't look like a Ricky. It is not a man who forgets to get a round in. It is not a Ricky. We must rename it 'L'.
Advertisement
Hero
Question 1: Why Hero?
Question 2: Actually, fuck it, why not?
You know what, Hero isn't a terrible name for this piece. Sure, it's frequently referred to as 'the long one', Lanky Larry, underscore, line, poor crop yield, accurate representation of my eyebrows when I was 14, hyphen, graph showing the general public's interest in Brexit, etc. But let's entertain them.
Hero is actually kind of wholesome. It conjures up the intended effect of this Tetris block on the game. You've lined up a big stack of bois, but you need this guy to come along and get things moving. Truly, he is a hero. He will save the day, if you let him. *Enrique Iglesias voice* let him be your hero.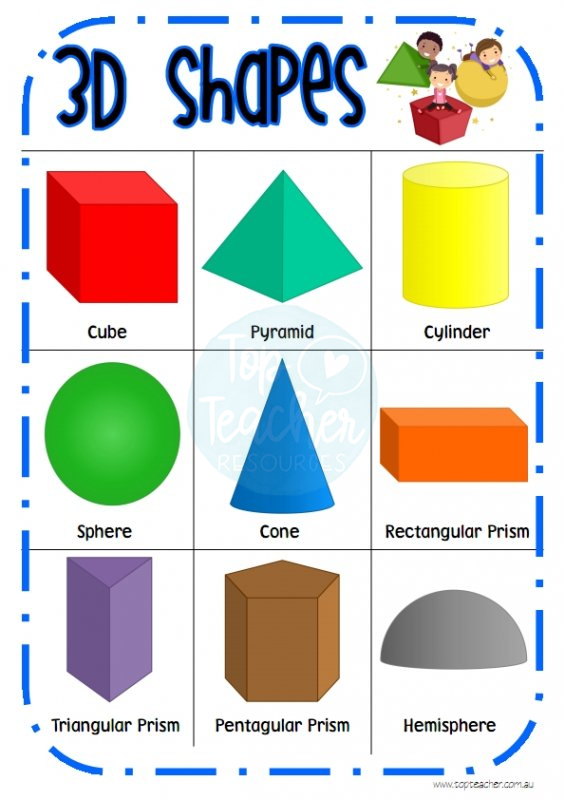
Blue Ricky
Question 1: This is the same as Orange Ricky though, isn't it?
Question 2: Was a very dim child tasked with coming up with these names?
If they wanted logic to prevail, the Tetris creators could've just named this block a Reverse Orange Ricky, given that that is precisely what it is. But no, they instead went for a stupid name for a stupid block. It should be called a rich person's couch, or two thirds of an uppercase 'L'. I don't know. I don't really have a better option right now. It's just very silly and nobody would ever remember that it's called Blue Ricky. That is the name of a very spicy sex position, probably.
Teewee
Question 1: Is a Teewee the teacher's version of a Shewee?
Question 2: Is this all just a practical joke at this point?
That is a 'T', or a cross, or a boner. It is not a teewee, whatever that is. This Tetris piece is three quarters of a plus sign.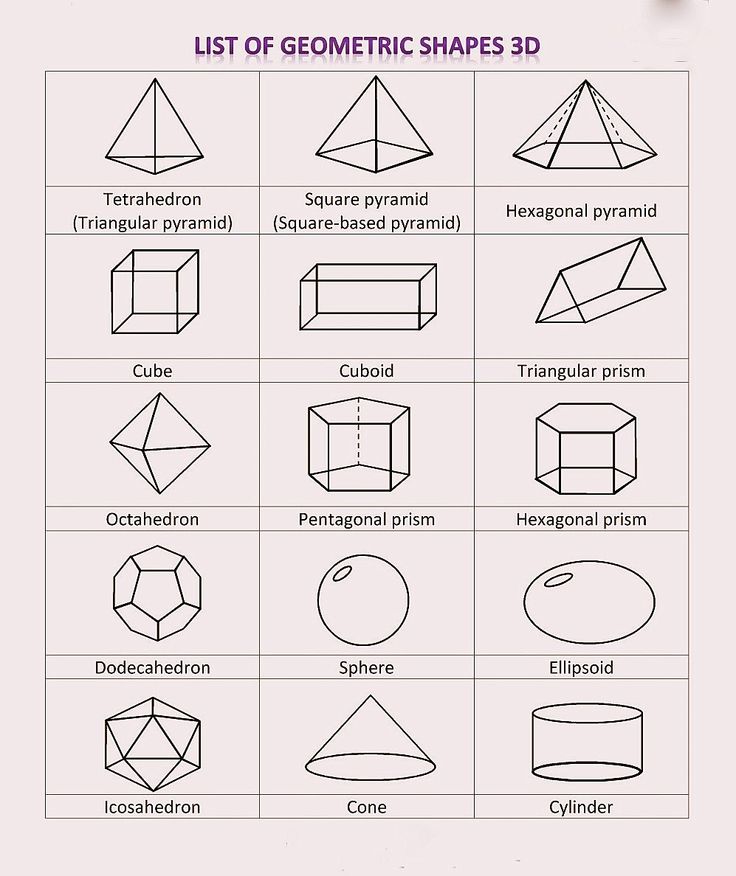 It usually fucks up the game because you can't get it turned around in time to have the intended outcome. It is a jester of a Tetris block. Teewee is a prick. I hate him with my life.
Cleveland Z
Question 1: What?
Question 2: Do you pronounce it 'zee' or 'zed'?
Of course! The Cleveland Z! Also known as the 'Z'. Perhaps it originated in Cleveland, this little guy. Worked hard at school, got into a good college, came away with a good degree and then fulfilled its dreams of being a Tetris puzzle piece. Rather than using its birth name (Ricky), it has opted for its hometown to finally put it on the map.
When you think about it, do Tetris pieces even need names? We all just call them what we want anyway, like every member of the Nolan Sisters. You follow your heart, going with what feels right. Tetris doesn't need to be formalised. I hate this.
Smashboy
Question 1: What is a Smashboy?
Question 2: Did a square name this?
Smashboy - a boy who smashes, or a smash that is a boy? Smash is a type of instant mashed potato, which means this block is made of mashed potato, logically.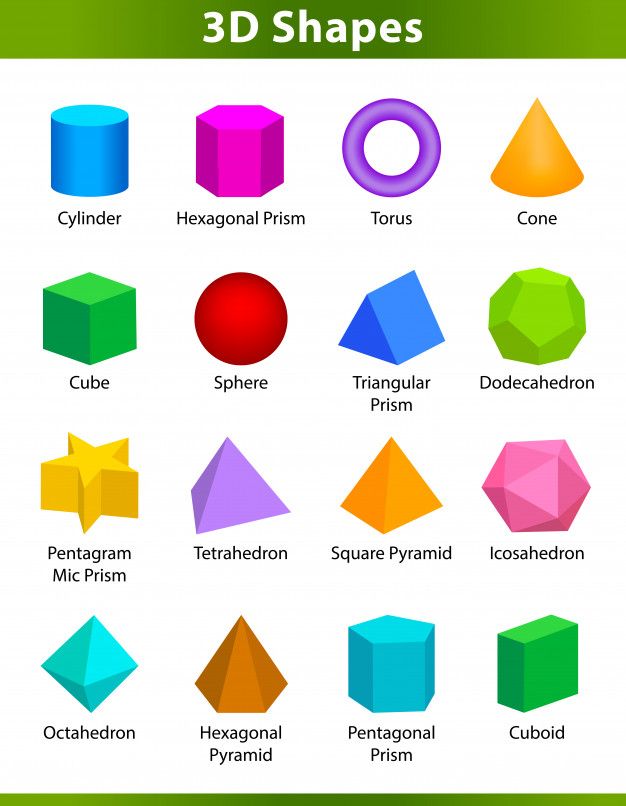 It is also a boy, not that gender matters when you're playing Tetris. Out of curiosity, what gender do you assign to the other Tetris pieces? Submit your answers at the bottom, please.
Regardless of its stupid-as-heck name, Smashboy is arguably the best Tetris block you can receive. He fits into most places and gives you a fully-rounded outcome. Other names for this guy are square, block, accurate depiction of The Rock's body type, wombat droppings (they poop cubes) and / or fudge. NO further questions on this matter, thank you.
Rhode Island Z
Question 1: This is definitely all just a joke, isn't it?
Question 2: Is Tetris playing us now?
It's not even a 'Z', it's backwards. It's a 'Z' looking in the mirror, checking out its form after another gruelling gym session, frustrated by the lack of any immediate progress in its body, trying to be patient but struggling to stay focussed with such a lack of visible results.
Why does Rhode Island even come into it? I looked up Cleveland and Rhode Island maps and neither areas are shaped like these Tetris blocks.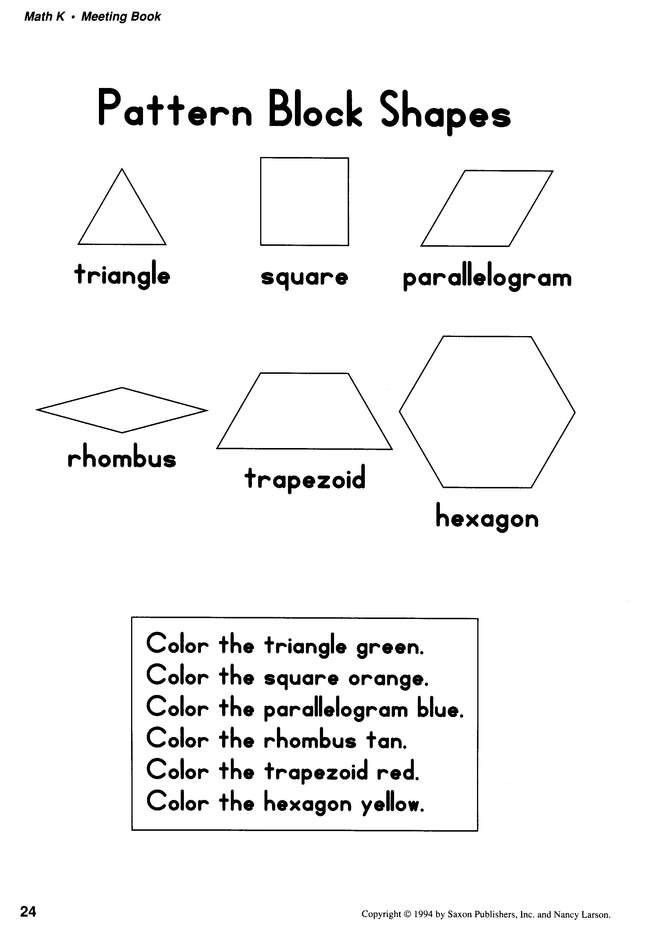 Someone is having a laugh. This is a scam. I am never playing Tetris again. I hate the internet. Goodbye.
Images via Twitter
- Share article
-
- Read more about:
- Life,
- Viral,
- Gaming,
- Funny,
- Nostalgia,
- Tetris.
Introduction to Block Building with Children
I was incredibly lucky to not only receive my Masters in Education from a graduate school (Bank Street) that understands the importance of block building as an integral part of the social studies curriculum, but also train at the school (City and Country) that was founded by Caroline Pratt who invented the unit blocks we use today. In the early 1900s Pratt understood the importance of open-ended materials as the center of a child’s education.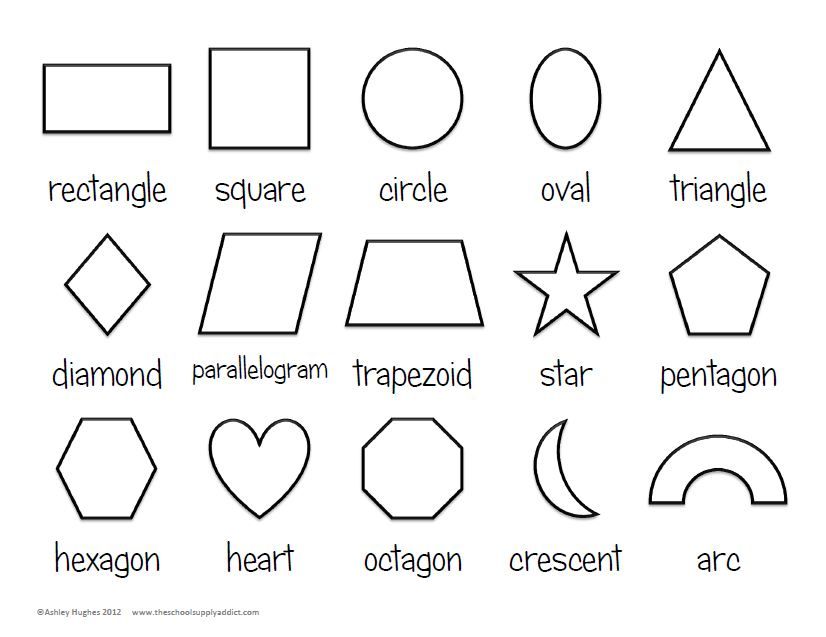 Pratt developed the unit blocks for use at City and Country School but never marketed them under her name and therefore you will find unit blocks through a variety of companies, but the basic ideals remain the same. This post will serve as an Introduction to Block Building with Children including the areas of development block building supports, the basic shapes, the stages of block building, the ideal environment for block building, managing a block building environment and accessories that will aid the block building experience.
This post contains affiliate links for your convenience.
CLICK HERE TO PURCHASE WOODEN UNIT BLOCK
AREAS OF DEVELOPMENT ENHANCED BY BLOCKING BUILDING WITH CHILDREN
I’ll admit it when I entered graduate school I had no idea about block building. I signed up for the Block Building Class completely confused as to how a class on the graduate school level was about building blocks. I mean, don’t you just build blocks? By the end of the first class I was humbled about the complexities of early childhood education and specifically how beneficial block building is to a child’s education. The use of blocks in your classroom or home promotes all aspects of a child’s development.
shape recognition
symmetry
measurement
counting
1-to-1 correspondence
fractions
size
sharing ideas
naming buildings
creating stories
creating signs
labeling
mapping
symbolic representation
balance
experimentation
inclined ramps
stability
gravity
gross motor development
hand-eye coordination
sharing
patience
cooperation
pride of ones work
respecting peer’s work
THE BLOCK SHAPES
The specific shapes, lengths, widths and heights of the wooden blocks are crucial to the success of the block building experience. Pratt designed the unit blocks in an incredibly thoughtful manner through years of experimentation and direct observation in the early 1900s. A basic block set begins with the unit block and then expands with blocks two and four times as long but with the same width and thickness, cylinders, curves and half units.
BLOCK BUILDING HELPS CHILDREN EXPLORE FRACTIONS
All blocks except for the cylinders and curves can be created from the unit block via multiplication or division.
While the small square block is generally considered the half unit it is interesting to note that some of the other blocks can be placed together two create one unit block. This is such a genius way of teaching fractions.
THE STAGES OF BLOCK BUILDING WITH CHILDREN
Repetition is the key to a successful education. Children need time, space and security to explore materials without any end product in mind. You can begin to introduce block building as soon children are capable of picking up the smaller blocks.
Stage 1
Children will carry blocks from one place to another without any real thought of building.
Stage 2
Stacking blocks in rows or small irregular towers.
Stage 3
Bridging is used. Two blocks are used with a space in between and another block connecting at the top.
Stage 4
Enclosures are created. This became a favorite part of my children’s block building after we visited the zoo.
Stage 5
Increased use of blocks, height, pattern and balance.
Stage 6
Dramatic play begins to appear. Children begin to name structures.
Stage 7
Building structures that represent everyday life.
THE BLOCK BUILDING ENVIRONMENT
Ideally a block building area should have a great deal of space. Hardwood floors are easier to build on than a rug. Yes, it does make a bit of noise if the blocks fall, but play spaces and classrooms were not meant to be quite places.
HOW TO STORE UNIT BLOCKS
How you store the wooden blocks is also part of the learning process. A large shelving unit like the one above is very useful. Look for one that has separate compartments. This will make the sorting process easier. Click here to purchase a similar block shelf. . Blocks are sorted by type. You can trace the shapes on colored contact paper (sticky back paper) and attach to your shelf. This will help the children become independent during block clean up. It is also a natural way to explore shape recognition and sorting skills.
THE CLEAN UP PROCESS
Almost everyday we have intricate block building structures that leave no blocks left on the shelves. The clean up process can be overwhelming to children when they look at how many blocks need to be sorted back on the shelves. Cleaning up needs to be part of the learning process and consistently practiced. Teach children to start from the top of their structures and work their way down to the bottom of block structures. Blocks are not to be crashed into. This is overwhelming and does not show respect for the materials. Do not assume that children understand that blocks should be sorted according to the labels. This is a teachable moment. Gather your children or students and model how to clean up. “I have a triangle block. Hmm, where does it go? I need to find the red triangle shape! Here it is! The triangle block goes behind the red triangle shape.” Have children come up and try to do the same with another block.
Do you have reluctant cleaners? Make it a game! Draw pictures of the block shapes on pieces of heavy paper and keep in a basket. At cleanup time have each child choose a shape. The child is responsible for cleaning up just that shape. This helps make the process less overwhelming. Want to practice counting and 1-to-1 correspondence? Have a basket full of numbers. Children pick a number and need to clean up the corresponding number of blocks.
The clean up process is a great opportunity to point out how working cooperatively as a team makes the cleaning easier and more fun!
BLOCK BUILDING ACCESSORIES
In the early stages of block building we focus solely on the wooden blocks. As children become more adapt at building and add dramatic play to the block building process I add a few accessories. Accessories are a great way to tie in a unit of study or a recent experiential trip. After our first beach vacation we added a basket of shells and some blue fabric. When studying our backyard bugs I placed a basket of pretend bugs. The children loved making little homes for our creatures. Here is a list of some of our favorite accessories. Please keep in mind to limit the amount of accessories as the focus should be on the block building
colored cube blocks
colored glass stones
shells
wooden people
animals
tree blocks
small pieces of fabric
small sheets of tin foil
toy cars
small pieces of paper (index cards) and markers to make signs and labels
Interested in creating your own block center? Start by purchasing good quality wooden unit blocks.
SHARE ON FACEBOOK!
You may also enjoy our posts on an Introduction to Painting.
Prohibition and permission of figure changes
Visio Online (Plan 2) Microsoft Visio Professional 2021 Microsoft Visio Standard 2021 Visio Professional 2019 Visio Standard 2019 Visio Professional 2016 Visio Standard 2016 Visio Professional 2013 Visio 2013 Visio Premium 2010 Visio 2010 Visio Standard 2010 Visio 2007 Visio Standard 2007 More...Less
To prevent drawings from being modified in Visio, you can prevent shapes from being selected and from changing their attributes (such as width and height). nine0003
To protect the figure, the tab "Designer" must be visible. This tab is hidden by default.
Enable Developer tab
-
On the File tab, select Options .
-
Press button Optional and scroll down to the General section.
-
Select "Run in developer mode" and press the button "OK".
Preventing and resolving shape attribute changes
nine0012Select a shape in the document.
On the Developer tab, in the Shape Layout group, click the Protect button.
Select the shape attributes you want to lock, or clear the checkboxes of the attributes you want to unlock, and then click OK .
Note: If the shape can be selected for editing (using one of the available pen tools), pen strokes can be added to and removed from the shape even if various shape attributes are selected in the Protect dialog box. To prohibit making changes to the shape, block it from being selected.
Locking and unlocking shapes from selection
-
Select the figure or figures to be protected.
-
On the Developer tab, in the Shape Layout group, click the Protect button. Visio opens the Protect dialog box.
Note: For more information on all options in this dialog box, see the Security dialog box. nine0003
-
Press the "From selection" button and press the "OK" button twice.
-
On the Developer tab , in the Show or Hide group, select the Picture Explorer field.
nine0013 -
In the Protect group, select the Shapes check box, and then click the OK button.
In the window Document Explorer right-click the document name, and then select Protect document from the shortcut menu.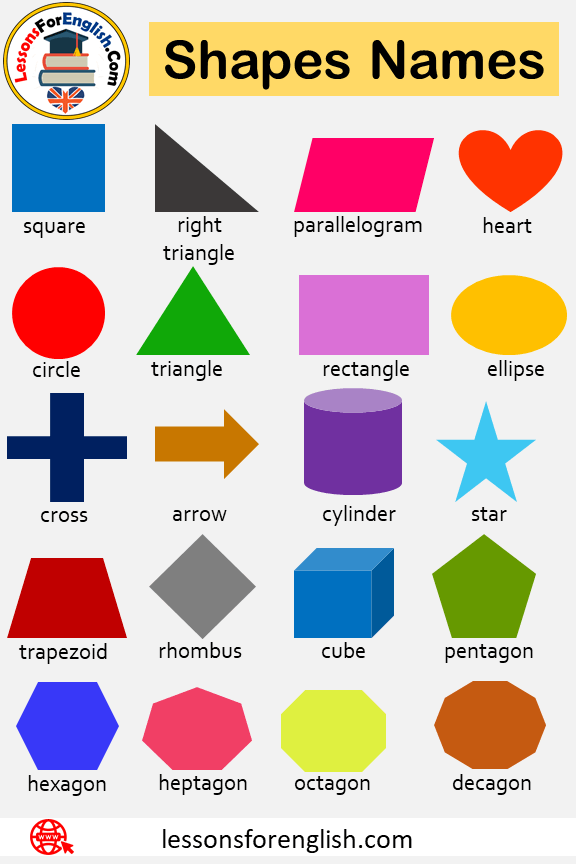
To allow shapes to be reselected, follow the previous steps, but then after squeezing it, click OK.
Preventing and resolving shape attribute changes
-
Select a shape.
-
In menu "Format" select item "Protection".
-
Select the shape attributes you want to lock, or clear the checkboxes of the attributes you want to unlock, and then click OK .
Note: While you can select a shape to edit for editing (using one of the available pen tools), ink strokes can be added to and removed from the shape even if various shape attributes are selected in the Protect dialog box. To prohibit making changes to the shape, block it from being selected. nine0003
Locking and unlocking shapes from selection
-
Select the figure or figures to be protected.

-
In menu "Format" select item "Protection".
nine0013 -
From menu "View" select item "Picture Explorer Window".
-
Right-click on the document name and select "Protect Document". nine0008
-
In the Protect group, select the Shapes check box, and then click the OK button.
Press the "From selection" button and press the "OK" button twice.
To unblock the shape from being selected, follow the previous steps, but then hide it, and then click OK.
nine0000 Custom block creation | AnyLogic DocumentationProcess Modeling Library BlocksCreating Custom Agent TypesCreating Custom Resource Types
If your model's process diagram has repeating processes defined by the same block chains, you can create your own agent type that includes a repeatable sequence of blocks. Then it will be possible to replace each occurrence of such a sequence of blocks with one non-standard block, which will greatly simplify your process diagram. nine0003
Starting with AnyLogic 8.3, the custom block creation script has become much easier.
How to create a custom box
- Click and hold the mouse button to select the process diagram blocks you want to place in your custom box.
- Right-click on one of the highlighted boxes and select Create Process Diagram Box from the context menu.
- A dialog box will appear Create Agents . In field New type name enter the name of your block. Press OK .
- You will see that one block will appear in place of the selected blocks. This is an instance of a new agent type created in your model. You can find it in the model tree displayed in panel Projects .
- The number of input ports for the created block will correspond to the number of input ports for the first block in the block chain of the process diagram on the basis of which this custom block was created.
 The output ports of a custom block are respectively created according to the output ports of the last block of that block chain. nine0020
 - The default block icon is a regular rectangle. To change the appearance of an icon, open the graphical diagram by double-clicking on the appropriate agent type in the Projects panel and draw the necessary shapes on the diagram using the elements of the Presentation palette. To make a shape part of an icon, select the Icon check box in the Properties panel of that shape. We recommend placing icon shapes between block ports. nine0020
- If the blocks included in your custom block have any parameters, these parameters will be exposed to the interface of the custom block. To customize a parameter created in your custom block, select it and set properties Label and Control type in section Value editor of panel Properties . These settings determine how the parameter will be reflected in the properties of your custom block, i.