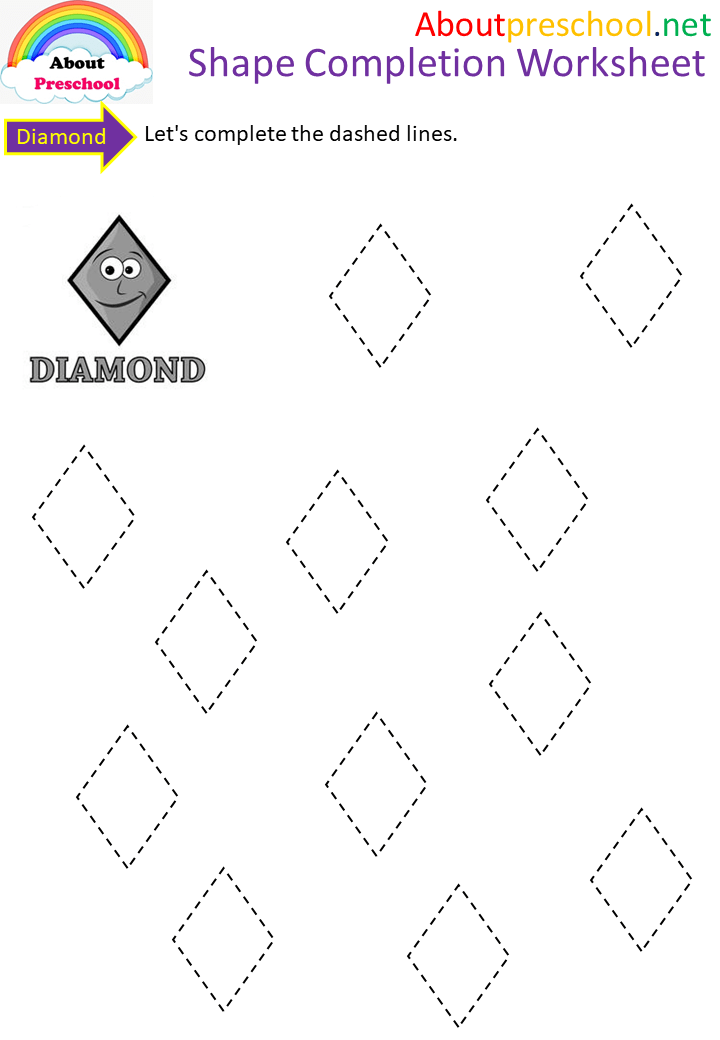
Sight word match
Sight Words Memory | Sight Words: Teach Your Child to Read
- Overview
- Materials
- Activity
- Confidence Builder
- Extension
- Assessment
- Printable Memory Cards
- Additional Resources
- Questions and Answers
Sight Words Memory is the standard Memory card game — sometimes called the Concentration game — with the additional element of having the student read the word on each card as they turn it over. This provides a lot of opportunities for repetition in sight reading.
Sight Words Memory
Learning the Sight Words Memory game is easier if the child has previously played the standard Memory game, but the game is simple enough that this is not necessary.
Memory works very well as a solo game. Memory can also be played in a group of up to four players.
↑ Top
Memory can be played with just a set of the Memory Cards.
- Memory Cards
- Printer
- Cardstock printer paper (approx. 110 lb / 200 gsm)
- Scissors
Create Memory Cards with our Memory Card Creator and print the cards out on cardstock paper. Then cut out the cards along the dotted lines. The set should contain two copies of each word you want to review.
Begin with a small set of cards (10 word pairs), and as your child’s competence with the activity increases, increase the number of cards you use in a game. An advanced student can handle up to 25 word pairs.
↑ Top
The game is played in much the same way as the standard Memory Card Game, with the addition of the players reading the word on each card as they play the game. The goal is to collect as many pairs of matching word cards as possible.
Video: How to Play Sight Words Memory
To set up the game, shuffle the cards and arrange them, face down, in a grid. For example, a deck of 30 cards (15 word pairs) is best laid out in a 5×6 grid, 5 columns of 6 cards each. The child picks one card and turns it over so the word is visible, reading the word on the card. The child then picks a second card and also turns it over, reading the word on the second card.
If the words on the two overturned cards match, the player removes the pair, placing them by her side, and gets another turn. If the words do not match, the player turns the cards back over so the words are no longer showing, and the player to her right takes the next turn.
If a child is unable to read a word or reads a word incorrectly, give the child a bit of coaching to help them correct the mistake and learn the word.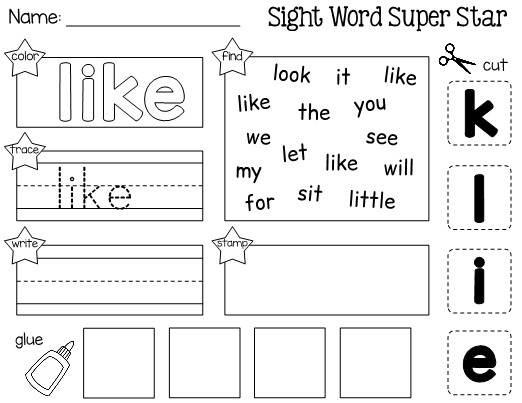
Play continues until all the words are matched and there are no cards left unclaimed.
If a child is struggling with this game, you can read through all the word cards with them prior to the start of play to help refresh their recall of the words. You can also make the game easier by using a smaller deck of cards with fewer word pairs. For an advanced child, you can increase the number of words you use, so it becomes more difficult to find matching cards.
↑ Top
To make the game a little easier, especially for a younger child, simply use fewer pairs of cards.
↑ Top
When the child finds a matching pair of word cards, have her use the word in a sentence before she can add the cards to her “keep” pile.
↑ Top
When assessing a child’s mastery of the words, be sure to separate their reading skills from their skill at playing the Memory game. A child might have mastered the sight words on the cards and also have some difficulty remembering which card is where in the grid. Such a child might be fine with more advanced words but need a smaller number of cards. Another child who struggles to read the words will probably also have trouble remembering the location of the word cards.
↑ Top
You can create your own custom Memory Game Cards, with developmentally appropriate word sets. As the child’s sight words vocabulary expands, you should start to expand your card set with new words and gradually remove the words that have been mastered and no longer need intensive repetition.
7.1 Custom Sight Words Memory Cards
The Memory Card Creator creates custom Memory Card sets. The generator lets you use combine existing words lists such as Dolch Sight Words and Fry Sight Words, and add your own custom words.
7.2 Blank Memory Cards
- Blank Memory Cards (Write in your own words)
7.
 3 Dolch Sight Words Memory Cards
- Pre-K Dolch Words (40 words)
- Kindergarten Dolch Words (52 words)
- 1st Grade Dolch Words (41 words)
- 2nd Grade Dolch Words (46 words)
- 3rd Grade Dolch Words (41 words)
- Noun Dolch Words (95 words)
7.4 Fry Sight Words Memory Cards
- 1st 100 Fry Words (100 words)
- 2nd 100 Fry Words (100 words)
- 3rd 100 Fry Words (100 words)
- 4th 100 Fry Words (100 words)
- 5th 100 Fry Words (100 words)
- 6th 100 Fry Words (100 words)
- 7th 100 Fry Words (100 words)
- 8th 100 Fry Words (100 words)
- 9th 100 Fry Words (100 words)
- 10th 100 Fry Words (100 words)
7.5 Top 150 Written Words Memory Cards
- 1st 50 Words (50 words)
- 2nd 50 Words (50 words)
- 3rd 50 Words (50 words)
To download a template, right-click and select Save As.
These Memory Game Cards are governed by the the Creative Commons Attribution 3.0 Unported License. This license lets you use the cards in any manner you want, as long as you leave the attribution logo on the cards. We made these cards so you could use them, and we are only too happy if you use them in your school, library, daycare facility, or for-profit tutoring business. You do not need to contact us for permission to use the materials.
↑ Top
- Primary Games
- Learning Games for Kids
- DolchWord.net
↑ Top
Leave a Reply
10 Interactive Online Games to Teach Sight Words to Beginning Readers
Sight words and high frequency words are an important part of teaching new readers. These words have to be memorized, which means they require a lot of repetition and practice. I love using these online games to teach sight words in my classroom.
Sight word instruction can be really challenging in the classroom because you have a classroom filled with students who learn different things in different ways at different paces. 🥴
It requires so much repetition and practice, yet all of our students need those things in different ways.
I tackle sight word instruction from all sides. We read them in sentences, practice them with music and movement, do art projects, and more!
These 10 online games to teach sight words are FREE and super interactive. [Free as of August 2019] They give students the chance to practice identifying, matching and reading sight words, all while playing fun games.
Note: Did you know there is a difference between sight words and high frequency words? I thought they were the same for the longest time. Knowing their differences has helped me with my instruction. Read more about that here!
Sight Word Bingo
This classic bingo game from abcya.com is a favorite for all of my students. The little amoeba monster at the top says a word, then the student identifies it and clicks it.
This game words great on a computer or on an interactive white board. I have my students take turns at the SmartBoard in my classroom during a center or we do it whole group when we have a minute to spare.
No matter when we use it, it’s a student favorite. 👍🏼
Sight Word Smash
Students love this fun, sight word identification game. The computer says a word. Then they use the pointer to find it and smash it.
I like this game because the word is on more than one block so students get the repetition of seeing and identifying the word multiple times!
Sight Word Memory
There are many, many sight word memory games online but this one is my favorite. I like that the computer says the word as you flip the card, whether it’s a match or not.
Seeing and hearing a word multiple times is perfect for auditory and visual learners. I also appreciate that when they finish a level, they can keep playing with new words!
Sight Words in Space
Students love this space themed sight word game.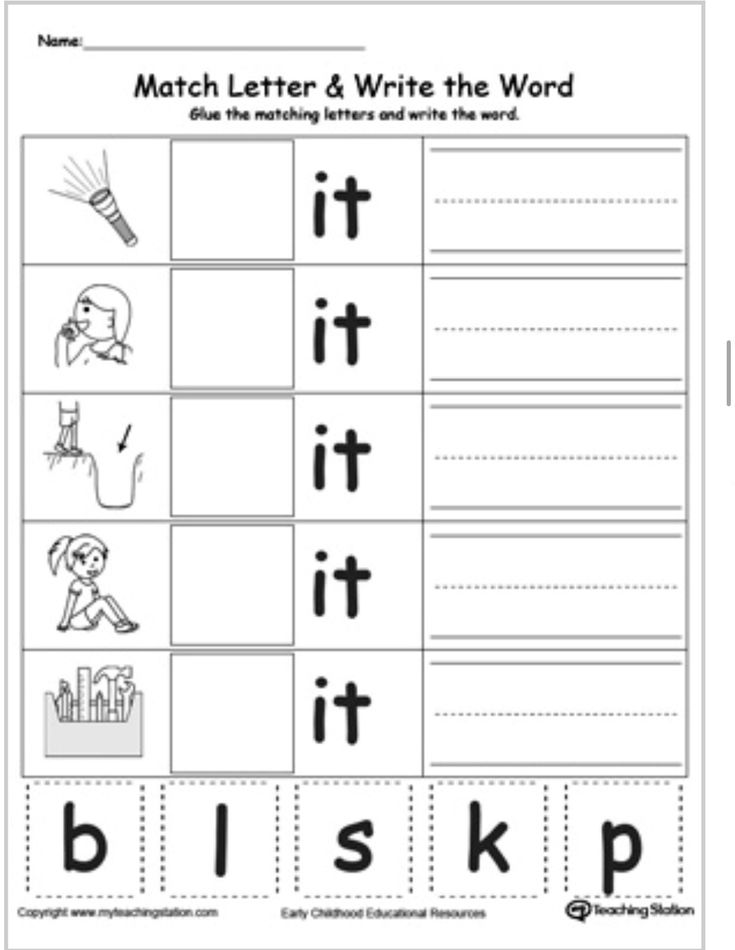 A cat says the word they are trying to find. Words float by in power cells and they have to click the right one.
The words are floating up so students have to identify them quickly. Just like in Sight Word Smash, words appear more than one time, too. 👏
Listen & Spell
I absolutely love this Listen & Spell game! We know that readers struggle with sight words because they do not follow phonics rules or because they are too advanced. We also know that students learn to read and write words at the same time.
This game gives them the chance to spell sight words with a limited number of letters at the bottom. First it says the word, then students use the yellow letters to spell it. The only letters available are letters that are in the word.
Playing this game helps students move on from “identifying” to “creating” on Bloom’s Taxonomy, which we know helps make information stick. Students will gain confidence in writing their sight words as well as reading them!
Sight Word Jigsaw
This identification game uses the same concepts as matching, except students are able to see all of the words at one time.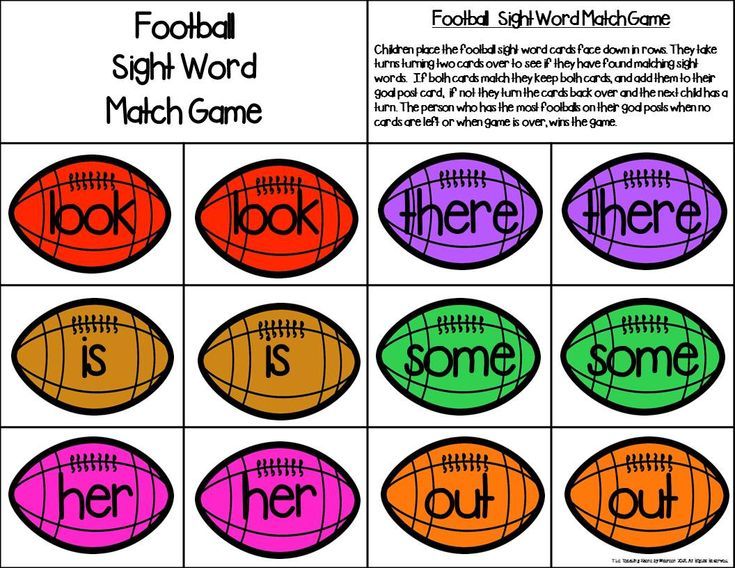 They click the sound button on one of the yellow pieces to hear the word they are looking for. Then they find the blue word puzzle piece and drag it over.
I like that this game adds the element of looking at several words to find the correct one. It gives students practice at quickly identifying words by their beginning sounds.
Popcorn Words
Students playing this game are working the popcorn machine at a movie theater. A monkey comes up to the counter and says a sight word. Students click on the correct sight word to give it to the monkey.
Once they have handed out 10 popcorn buckets correctly, they get to play a quick in-between game and then are promoted. Their goal is to become the manager. I’m sure it will not surprise you to hear that my students beg to play this game!
Kitten Hop
This silly game is another favorite of my students. They are playing a kitten who bounces from yarn ball to yarn ball. The computer says a sight word. That word is on one of the four yarn balls in front of the one your kitten is on.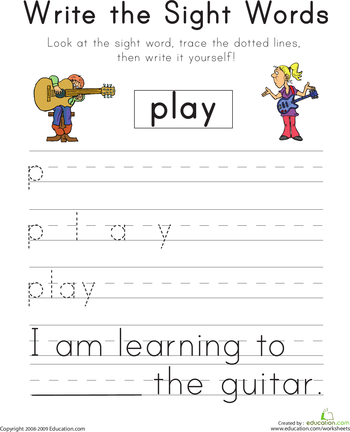
Students love this game because they are racing three other kittens. The winner is the one who reaches the couch at the end of the game first. They have to be quick at matching the sight word their hear to the correct ball of year if they want to win!
Note: this game has options at the beginning for choosing a color, a name, etc. You will want to teach your students how to do this quickly (and set that expectation) so that they can do it independently.
Starfall Sight Words
Though I’ve already included a Memory Sight Word game, who doesn’t love Starfall? In this sight word game, the students need to determine if it is the same sight word by sight alone as it is not read until the match is made. But I love that they have three stars in the upper left corner to show their progress to the next level.
Once the student completes the game, they can move on to Level 2, where the sight words are slightly more difficult. The students love moving up a level to show their achievement!
My Reading Tools
In My Reading Tools, students see a kangaroo get several tools to become a better reader.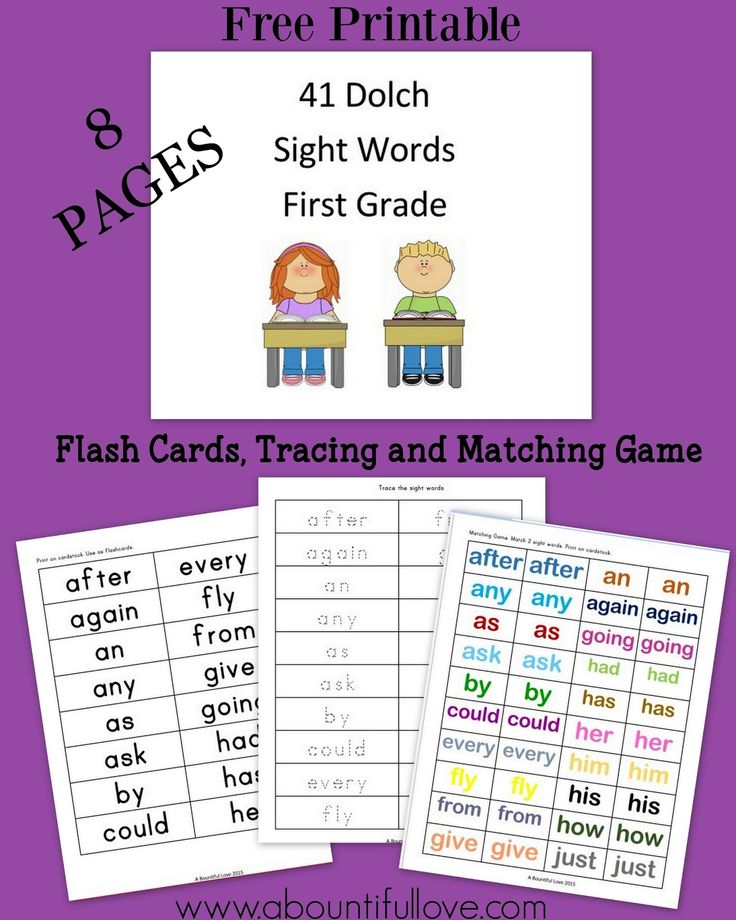 The first tool is a flashlight. He uses it to highlight words in a dark cave.
This game is more challenging than the rest because students are asked to finish the sentence with the word spelled correctly. The computer reads the sentence. Then students hover their flashlight around the cave to find the word. 🔦
In this example, I was looking for the word “again.” The other options in the cave were misspelled words “agin,” “agane,” etc. This game is perfect for students who are confidently reading many sight words and are ready for a challenge!
These 10 online games to teach sight words are perfect for giving students extra practice and lots of repetition during centers in my classroom. Did I miss any of your favorites? How do you like to practice sight words? Let me know below! 👇
Digital Sight Word Lessons with Practice
Are you looking for digital ways to teach sight words?
I mean, what’s the point of practicing a word (even with the fun and free sight word games shared above) if a student has not explicitly been taught a sight word? 🤔
For this very reason, I’ve created 150 sight word lessons with practice.
These Google Slides lesson and practice can be used with any free Google accounts and are so easy to assign in Google Classroom!
As you assign words to your students one at a time, they will learn, identify, build, read in context, and master the new sight word. It’s explicit instruction and practice, all in one.
Don’t just take my word for it, watch the lesson in action in the video below. 👇🏽
While the lessons DO have audio, this preview video does not. 🎧 Students can have the words and sentences read to them, if needed.
You can purchase the 150 Digital Sight Word Lessons and Practice (for use with Google Slides™️ on my website or TpT.
Click HERE to buy on Teachers Pay Teachers
Click on the button below to purchase on my website (where you get lifetime access)!
Sight Words Distance Learning | Digital Sight Word Lessons | Homeschool
$25.00
Are you looking for the perfect way to teach new sight words and review old sight words while distance learning? You NEED this resource. Digital sight word activities can be fun, but what good are they if students haven’t learned the sight word yet? Should they practice something that they haven’t learned about yet?
Enter: Digital Sight Words Learn and Practice! This 100% digital sight word resource is every sight word teacher’s dream! Yes, that you includes you, homeschool parents!
Each sight word activity (there are 100 words included!) guides students through learning the word, reading the word, identifying the word, building/spelling the word, and using the word.
Digital sight word activities can be fun, but what good are they if students haven’t learned the sight word yet? Should they practice something that they haven’t learned about yet?
Enter: Digital Sight Words Learn and Practice! This 100% digital sight word resource is every sight word teacher’s dream! Yes, that you includes you, homeschool parents!
Each sight word activity (there are 100 words included!) guides students through learning the word, reading the word, identifying the word, building/spelling the word, and using the word.
Buy Now
This is such a fabulous digital sight word program and SO well-made!!!! Very creative…love the stickers they can give themselves at the end! -Lacy S.
Sighting rifled weapons / Articles / Weapons.ru
What does a shotgun mean? This means that the person using it knows not only all its capabilities, but also the features that can have a negative or positive impact when using this gun on different hunts. So, you have become the owner of a rifled gun, whether it is a carbine, a tee, a fitting or something else. As a rule, two types of sights are installed on rifled weapons, this is an open sight, consisting of a rear sight and a front sight, and an optical sight. In this article I will try to tell you how to zero in a rifled gun using both types of sights for aiming. nine0003
A few words about sighting cartridges. You need to shoot the weapon with those cartridges that are supposed to be used more often than others. All other shooting should be carried out after the gun has been zeroed in with the main type of cartridge with a mandatory note in a notebook or somewhere else of their features revealed during shooting.
The zeroing target should be something like this: on a sheet of light paper measuring 75x75 cm, a circle with a diameter of about 20 cm is drawn and painted over with black paint, this is for shooting with an open sight, and another similar target, but with a circle with a diameter of 10 cm for shooting with optical sight. The main sighting distance is 100 m, since usually in various kinds of literature on weapons, the external ballistic characteristics of the cartridge (the excess of the bullet's flight path over the aiming line, the speed and energy of the bullet, etc.) are given at distances that are multiples of 100, that is, for 100, 200, 300 m, and it is easier to operate with this data when applied to your weapon model. nine0003
Sighting shooting must be carried out lying down and from the stop, the stop must not be hard. Hunting weapons are aimed at the aiming point. When aiming with an open sight, it is best to choose the lower edge of the circle (as in sports shooting) as the point of aim, where you can aim with the greatest uniformity. Since in the future it will be necessary to determine the average offset of the hit from the aiming point of the series of shots, it is better to draw two lines through the aiming point in advance on each target: vertical and horizontal. nine0003
So, it seems that everything is prepared: the shooting position, targets and a shield for their fastening, a distance of 100 m is measured. , make two shots. Why is detailed sighting at 100m preceded by closer range shooting? The fact is that sometimes, it happens, the aiming line so noticeably does not coincide with the axis of the channel Ш of the barrel, that at a considerable distance it is impossible to hit even a large target and it is not immediately possible to determine from which side of the target the bullet flies. nine0003
The first shots give some deviation of the place where the bullets hit from the aiming point. If there is confidence that the miss is not the fault of the shooter, but of the weapon, one should proceed to correct the aiming line with the help of sights, since the task is to combine the point of impact with the aiming point. I ask the reader to be careful. We correct the point of impact with the help of the front sight: if the bullet hit to the right of the aiming point and you need to move the hit to the left, the front sight needs to be moved to the right; if the bullet hit to the left of the aiming point, then move the front sight to the left; if the bullet went up, a higher front sight is needed, and down, respectively, a low one. If the adjustment is carried out using the rear sight, then when the point of impact is shifted to the right, the rear sight must be moved to the left, if the bullet hits to the left - the rear sight is moved to the right, the bullet lowers - the rear sight is raised, high - lowered. This means that the front sight is moved in the direction opposite to the desired displacement of the point of impact, and the rear sight is moved in the same direction. nine0003
How do you determine how far you need to move the front sight (left or right) to achieve a relatively accurate hit? Approximately, it can be assumed that the movement of the front sight should be as many times less than the horizontal deviation of the point of impact from the aiming point, in which the distance from the shooter's eye to the target is less than from the front sight to the target. Of course, starting zeroing, it should be noted the risks of the initial position of the front sight and rear sight.
Having achieved accurate hits at a short distance, they continue sighting from a distance of 100 m.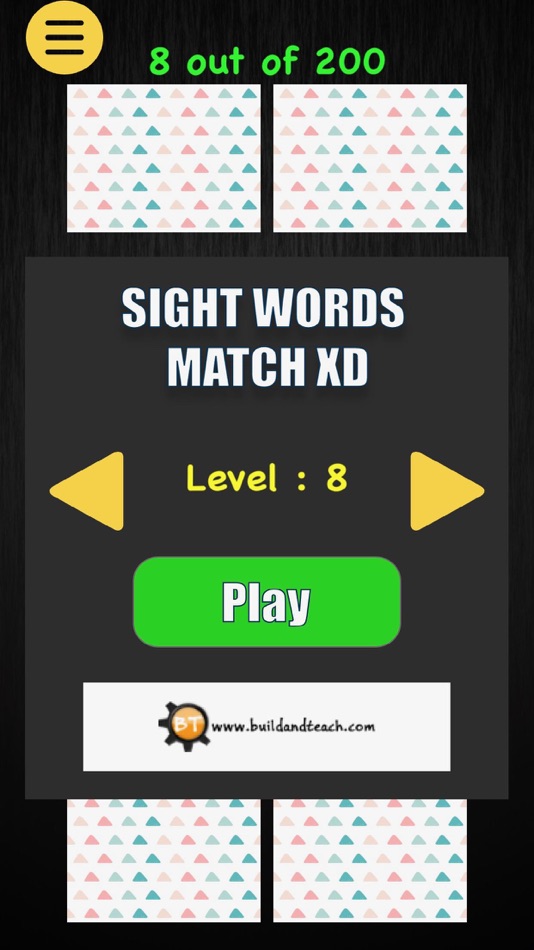 But then the flaws of the carried out zeroing at 50 m become more noticeable, and even the previously imperceptible, but inevitable dispersion of bullets with increasing firing distance is revealed. Having made a series of at least three (preferably five) shots, we geometrically find the middle point of impact (the horizontal and vertical lines previously drawn on the target will help here) and, by manipulating the sight and front sight, we make sure that it is as close as possible to the aiming point. Now you need to make trial shots with other types of cartridges, if any, and mark for yourself how the points of impact have changed compared to the main cartridge, whether their accuracy of combat (scattering) is better or worse. nine0003
The next stage of sighting is shooting at long distances: at 200 and 300 m. We increase the circles on the targets accordingly. For 200m a circle with a diameter of 30cm will suffice, and for 300m a circle of 40cm will suffice. It is also necessary to increase the overall size of the target, especially down from the circle, in order to be able to determine the drop of a bullet at these distances with a sight set to shoot at 100m. If you have a sector sight installed on your weapon, then you need to find out the price of its division, i.e. determine which division you need to set the sector of the sight to ensure an accurate hit at 200 and 300 m. Sectors indicating the distance on the sight correspond to one type of cartridge and weapon. For example, you shoot well from a three-line rifle with a 300 m cartridge with a light bullet, and the sight sector is also at the 300 m division. The KO-44 carbine has exactly the same sector sight, but shooting at the same distance, with the same cartridge and with the same setting the sight to 300, the bullet will lower due to the short barrel of the carbine, since incomplete combustion of gunpowder with a short barrel reduces the muzzle velocity of the bullet. A heavy bullet will also lower. nine0003
Now about zeroing the optical sight. You need to start again by setting the target at 50 m. We select the aiming point and aim at it through an open sight, and then try to fix the weapon in this position. At the same time, with the help of adjusting drums, we bring the crosshair or stump of the optical sight to the point where the gun is pointed with the help of an open sight. After that, a trial shot is made. In general, the process of zeroing in a weapon is simple and boils down to bringing the crosshairs of the sight to the point where the bullet hits. But for this it is necessary to prepare some devices so that with their help it is possible to fix the weapon in the same position in which the shot was fired. Then everything goes according to the previous scheme. Shooting at 100m, then at 200m and 300m. The change in point of impact depends on the movement of the scope as well as on the movement of the front sight. To move the point of impact to the left, the crosshair must be moved to the right and vice versa, and to move the point of impact down, the crosshair must be moved up and vice versa. nine0003
The adjustment turrets have graduations, and at the end of sighting, record their values for each firing distance and for each type of cartridge. Naturally, the side drum must be installed permanently.
After shooting, for a complete picture of how your gun hits, make 1-2 shots from a distance of 5-8 m, so that in the event of an unexpectedly close appearance of a large animal, and this may be an attacking animal, accurately put a bullet in the most lethal place . nine0003
I want to remind you once again that in the process of zeroing it is absolutely necessary to establish how much the bullet falls when shooting at long distances (200 and 300 m) with a sight set at 100 m. This is important to know so that when an animal appears at a great distance and for a short time do not move the clamp of the sight and do not move the crosshairs of the optics (especially since the drums are closed with protective caps on the latest models of optical sights), but make a visual correction and make a quick and accurate shot. nine0003
A. Blum
Hunting and game management 12/2001
Features and differences of mounting the sight with the help of the dovetail rail from different manufacturers
the first way to install sights on weapons. In the simplest case, the sight rings were installed in grooves cut by a cutter on the gun body. At the same time, the ease of mounting allows manufacturers not to adhere to any standards (unlike, for example, Weaver or Picatinny rails) and set their own rules. In this article, I have summarized my experience of installing scopes (using rings or brackets) on a dovetail, which I do in advising hunters literally every day. nine0003
Contents of the article
- The very first fastening - the history of the origin of
- What are the types of "dovetail"
- Rounded
- Straight base
- External bar for the body of the weapon
- Adapter strip with vented strip and Weaver
- Dovetail side bar
nine0042 Dovetail bar width - Types of stoppers used
- Stop wall
- Locking pins
- Locking holes
- Stop grooves
- Examples of use on weapons
- Rifle "Diana"
- Carbines "Los" and "Bars"
- IZH-94 (MR-94)
- Dovetail side bar - AK (Saiga, Vepr), SVD (Tiger), SKS, etc.
- With locking recess, example CZ 550
- DIY dovetail bar installation
The very first fastener
Let's start with the history of this fastener. The receivers of the first guns had the simplest appearance, designed mainly for the simplicity of the mechanisms for feeding a bullet into the barrel, but not for mounting sights. Many guns with a long history still force hobbyists to come up with different solutions for mounting sights. In general, the body of the sight also has the form of a cylinder. That is, we need to connect the cylindrical shape of the sight and the receiver. So on the first guns there were small grooves, which in the cut looked like a trapezoid. Such a figure was very similar to the same dovetail. Such fastening was not an innovation, since something similar exists in the connection of logs. nine0003
Types of dovetails
The dovetail mount is the simplest version of the mounting for most shotguns from various gun manufacturers. So, let's list the main versions of this mount:
"Dovetail" with a rounded shape
The upper part of the seat is a continuation of the circumference of the receiver. To produce such an attachment, it was simply necessary to mill small grooves from two edges. The ease of manufacture brought with it the problem of mounting, as many scope rings or red dot sights themselves have a straight base. nine0003
Dovetail with straight base
The straight base, as seen in the cut, involves sanding the top of the seat. For this mount at the moment there are various options for mounts.
External Dovetail Bar
For many rifles, no bars were originally installed by the manufacturer, and the previous two methods imply precise and significant mechanical action on the body of the weapon. In addition, this method is not available for all guns, for example, if the thickness of the receiver does not allow. Therefore, for some types of weapons, the installation of an external bar "dovetail" and weaver is used. Weaver is used more often, due to the presence of a standard and greater distribution among imported sights and brackets. The most common way to install the strap directly on the body of the receiver. Usually in this case it is necessary to contact gunsmiths, but if you are confident in your abilities, below we explain in detail how to install such a bar on a weapon. nine0003
The following are the most common external dovetail rails:
Quite a popular dovetail rail for TOZ small caliber rifles. The plank has a straight base with reduced grooves. Stoppers are bearings installed at the end.
A variant of the "dovetail" bar with a straight shape and a stop "wall" from Novosibirsk "TochPribor". Read more...
Adapter strip with vented strip and Weaver
For some over/under shotguns, the scope can only be mounted on a ventilated rail, which is reinforced with dovetail or weaver adapters. For example, for "IZH-27" (MP-27) and "TOZ-34". In addition to creating a seat, such an adapter bar allows you to adjust the alignment of the sight relative to the shot axis, and, unlike rings, it distributes the impact load on the ventilated bar and allows you to install more massive sights. nine0003
Side dovetail rail
The use of a dovetail rail on the side of the receiver has become widespread - on weapons where it is not possible to use the upper body of the weapon. Here are just a few of them (with reference to the relevant articles):
- Kalashnikov and its civilian modifications (Vepr, Saiga)
- SVD and "Tiger"
- Mosin and KO-44
- SCS nine0042 SVT
-
MTs 20-01, MTs 20-07, TOZ-106
On some guns, the side mount is due to the top supply of cartridges or ejection of cartridges, a rotary bolt or a non-rigidly fixed receiver cover (as on AK).
All possible dovetail side rails and brackets for them are collected in this catalog section.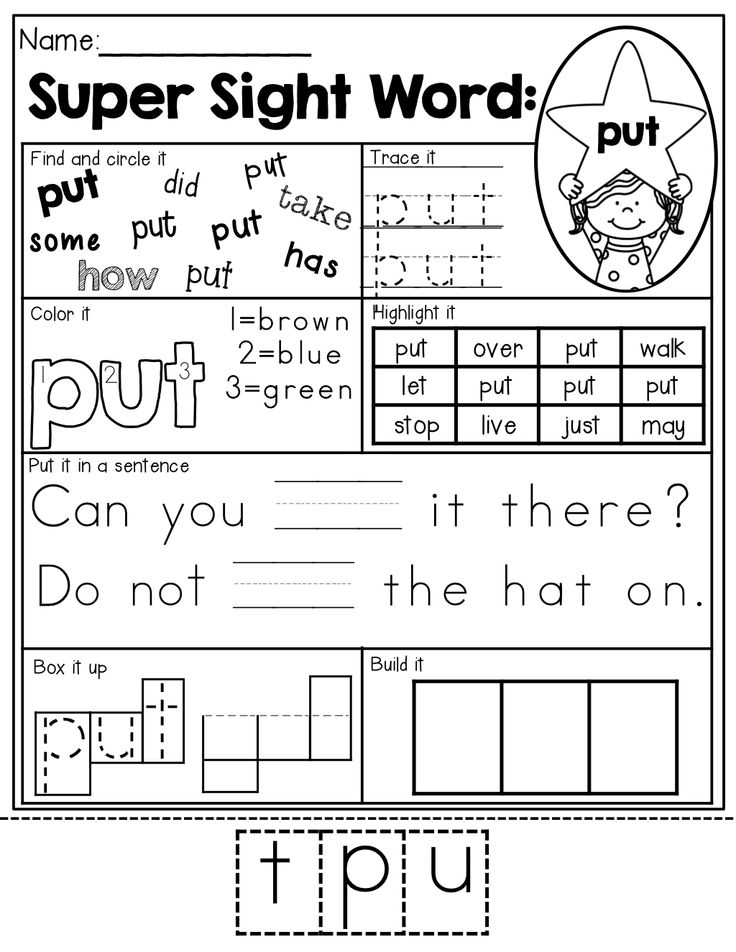 There is plenty to choose from here;)
The uniqueness of the side mount is that it is quick-detachable, and most importantly - without loss of sighting after removal and subsequent installation of optics. nine0003
The presence of skids allows you to run over the brackets. But the main thing for side mounting is the presence of stoppers. For different types of weapons, various stoppers are provided. This is due to the brace of the butt. For example, for the "Tiger" it is common to have a stopper on the far edge of the bar relative to the shooter's eye, for the "Saiga" - on the near one.
There are numerous side mounts for mounting sights, both for rings and for the Weaver rail. Many manufacturers produce side brackets for mounting night sights. When choosing such brackets, it is necessary to take into account the guying of the sight (depending on the distance of the exit pupil), the height of the mounting bar, and the correct position along the axis of the gun. nine0003
Installation of the dovetail side bar is the same as the top bar and is described at the end of this article.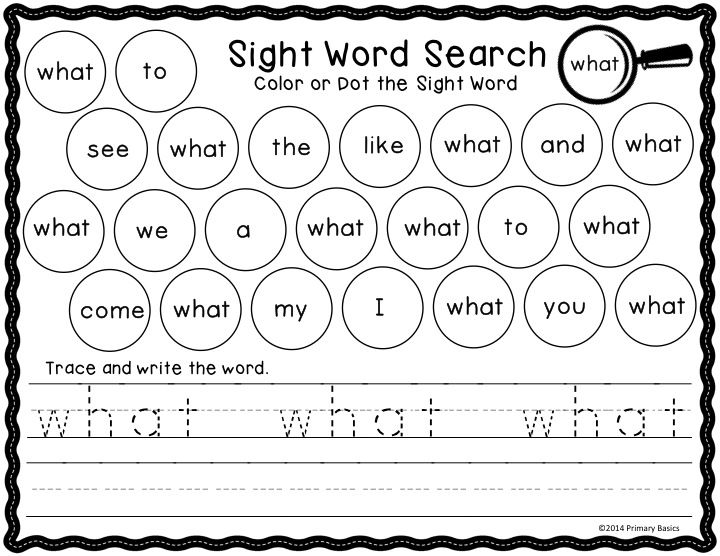
Dovetail rail width
As mentioned above, due to the lack of a single dovetail standard, almost every weapon manufacturer offers its own options. First of all, this concerns the width of the bar: starting with Turkish guns, in which the width is about 6 mm along the upper edge, ending with Czech ones, in which the dovetail width is 19mm. For domestic production, 11 mm straps are still characteristic, which are most widely used on pneumatic and small-caliber rifles.
The most "painful" example of a non-standard bar width is the Czech CZ shotguns, popular in Russia and the CIS. So, the width of the dovetail bar is:
- 11 mm for CZ 452, CZ 455, CZ 512, BRNO;
- 16 mm for CZ 527, BRNO;
- 19 mm for CZ 550, CZ 557, CZ 555;
, which, in combination with the length of the cartridge (the distance between the front and rear rails), as well as the forward (from the shooter) and back (to the shooter) reach of the sight, leads to a huge number of options for rings, brackets (monoblocks) and transition bars.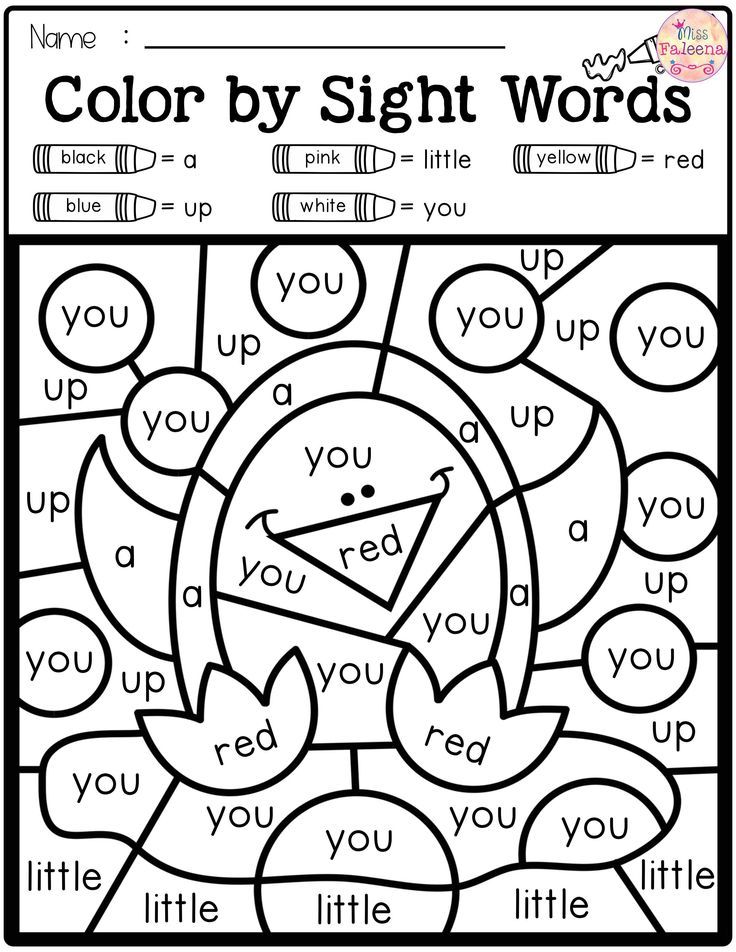 The Czech manufacturer Kozap coped best with the task of covering the entire range of brackets for CZ, and we analyzed the whole variety of brackets and rings for CZ in a separate article.
But “ours” also have their own jokes, for example, it would seem that one model IZH-94 (MP-94, Taiga and North) dovetail bar can be from 5.6 to 11 mm! Below is a little more about this. Therefore, before ordering rings, a transition bar or a dovetail reflex sight, be sure to measure the width of the bar on your weapon and pay attention to this parameter in the ordered product!
There are also quite "amazing" cases (it's hard to find a decent word). For some reason, the dovetail grooves 11 mm wide on the receiver on some samples of the MP-155 are made at different angles. A collimator sight for a standard dovetail, if it sits on them, will be shifted to the side and a little overwhelmed. Therefore, on such MP-155s, they first put the Weaver transition bar, on which the sight is already installed.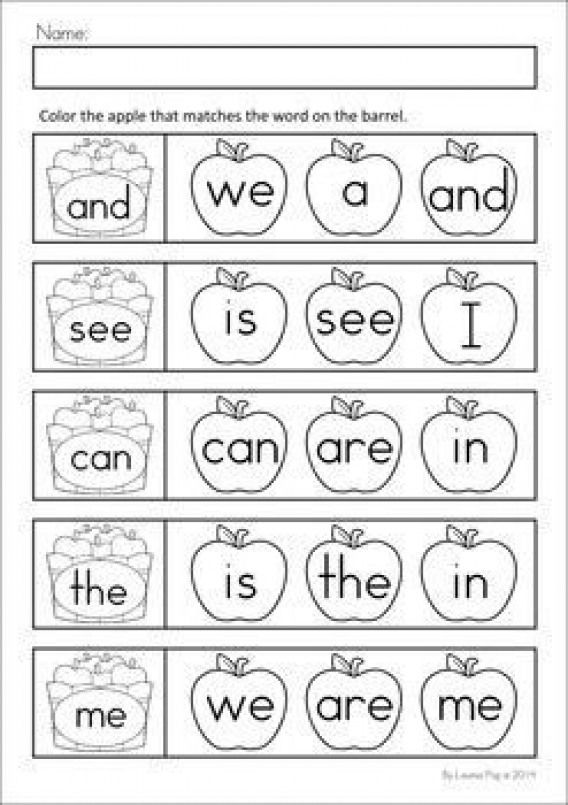 Read more about creating a seat for the sight on the MP-155 read here. nine0003
Types of stoppers used
Quite an important aspect of dovetail mounting is the presence of stoppers. Many air rifles boast no recoil, but what about firearms? When recoiling, the gun goes in the direction of the shooter, if you remember Newton's law, it becomes clear that the reverse force leads the sights in the opposite direction. With a fairly large return, the sight can move along the bar, thereby disrupting zeroing. There are several options to prevent sight drift:
- Stop wall. It is a small barrier to prevent the "walking" of the sight. It is located mainly at the end of the bar relative to the shooter's eye. When installing the optics, it is necessary to move the bracket close to the stopper.
- Locking pins. Designed for recesses in the bracket for mounting optical sights or collimators. They can be located anywhere on the landing bar.
- Locking holes.
 Are calculated on presence of sliding stoppers of arms. Location in any part of the landing strip is possible. nine0043
There is another way - limiting the grooves. A fairly common option for ensuring the strength of the installation. The edges of the seat go to zero, when installed, the brackets move to the end of the grooves, thereby stopping. Most often found on planks with a rounded shape.
Examples of use on weapons
Approaching the most important thing - installation, you need to clarify what type your seat belongs to. For the selection of brackets, OpticsTrade consultants will always come to the rescue. We can offer to consider the types of "dovetail" on the example of some guns:
Straight shape with locking holes on the example of Diana rifles
These rifles have a simple dovetail seat. Made in the form of a longitudinal place with a straight base. It must be taken into account that these air rifles have a significant return in relation to the sights. By the way, when installing sights, we recommend considering Hawke Airmax pneumatic sights, as they can withstand double recoil with a reinforced spring.
See this article for more recommendations on choosing a scope for pneumatics. nine0003
The seat has a locking hole to secure the installation. The two most popular Diana brackets for mounting optical sights are manufactured by the Tula company EST (Bracket "Diana" EST) and the Novosibirsk Central Design Bureau "Tochpribor" (Bracket "Diana" Tochpribor). EST offers two bracket options for mounting rings 25.4 and 30 mm, Tochpribor only 25.4 mm. Brackets from both manufacturers are designed for installation along the entire length of the seat, and also have retractable stoppers. If the Diana bracket from Tochpribor has a standard stopper, which is pushed into the hole with a screwdriver, then ECT made a convenient spring fixation. The latter has two clamps, and Tochpriborovsky tightens with a solid bar. The difference between the brackets is the height. Bracket Diana (EST) has the ability to view an open sight, with an optical one installed (it is necessary to take into account the diameter of the lens). Bracket Diana (Tochpribor) provides a lower fit. nine0003
ECT Diana Bracket with unique spring lock system. Read more...
Rounded shape of separate bases with locking pins on the example of carbines Los and Bars
A distinctive feature of the "dovetail" is the separate bases. It is important to consider during installation that the brackets will not “run into” the bar. For installation, you need to throw the bracket from the side. Difference at a glance of the identical seats of the Los-7 and Los-9 carbinesis the distance between the separate bases. For many manufacturers of night vision sights, it is common to give the name of the bracket - "Moose", but in fact it can be clarified that it will be Los-7 and its analogues. The protruding stoppers are clearly visible in the photo. To install the optics, the brackets must have an appropriate opening, as can be seen in the version of the universal dovetail adapter bracket on the Weaver for Los-7, Los-9, Bars carbines:
Bracket Base Weaver-U (Europrism) + power transmission racks is a universal bracket, as it has the ability to move racks along the bar, while the width of the dovetail bar can be in the range from 8 to 12 mm. Read more...
Straight shape with limited grooves on the example of the combined shotgun IZH-94 (MR-94)
I would like to consider these shotguns separately, since the dovetail has a short installation length. In this case, there are two width options - 5.4 and 9.5 mm at the base of the bar. With such a rather non-standard bar, there are still options for brackets. Basically, this is the same Tula manufacturer of ECT, but Belarusian engineers proposed a transitional version from the dovetail to Weaver both for a width of 5.4 mm and for 9.5 mm. Adapter mounts are a fairly common solution, as many scopes are more adapted to the Weaver rail (Night Vision Scope), which allows you to create a universal seat.
All rings, brackets and adapter plates for MP-94 (IZH-94) we have combined in this section of the catalog.
Version of the bracket for an optical sight with the expectation of installation on a small bar "dovetail", 9.6 mm wide (for IZH-94 "North"). More..
Transition from a dovetail, 5.4 mm wide to a standard weaver bar from the Belarusian manufacturer Polesskaya Okhota LLC. Czech rifle 550. As a consideration of the dovetail, we can't get past it. The mount is two separate places with a straight base. But what is non-standard is the width of the rail - 19mm. Since the width of the Weaver bar is 21 mm, many people confuse these fasteners. For installation of sights on 550, individual brackets are used. This is typical for many foreign guns. But in this review, it is interesting to consider the original stopper solution at 550. On the near (relative to the shooter's eye) seat, on the left side, there is a recess for the stopper. Brackets for the 550 must take this fact into account. The most popular decision when choosing a bracket is associated with the transition from such a non-standard dovetail to the weaver bar. There are many such brackets, here are some of them:
Mating bracket CZ 550 from the Vologda Optical and Mechanical Plant. The photo clearly shows the protruding stopper on the left side of the bracket. Read more...
Updated in 2016, the bracket for the CZ 550 from the Izhevsk manufacturer Roza Vetrov does not have a characteristic stopper for the CZ 550. At the same time, the designers have developed a unique system for rigidly fixing the bracket on the dovetail bar. Read more...
It is worth noting that not only the CZ 550 has a non-standard dovetail, for example, the CZ 527 model has a width of 16 mm, and the CZ 455 - 12 mm. We presented an overview of these brackets in a separate article - We select a sight on the CZ. nine0003
Installing the bar
Due to the widest distribution of brackets and sights for the dovetail bar, it is most often chosen to create a seat on weapons - models in which for various reasons it is not installed at the factory. On most shotguns and carbines, the bar is attached directly to the receiver: top or side.
Usually setting the rail, this simple plumbing job, is done in gun shops, but you can do it yourself if you are sure that the internal mechanisms of the gun allow you to install screws or rivets. nine0003
The installation sequence is the same for all strips. We have prepared the instructions described below based on the experience of user impeller from the forum site Guns.ru for the side bracket "ECT". The point is that for installation you should already have a set of sight + rings + dovetail rail.
- Before drilling the receiver.
- Degrease the sight bar. Degrease the box.
- We glue the bar to the box with cyanoacrylate glue, for example, "Super MOMENT". nine0043
- Let the glue dry.
- We install on the bar of crowns with a sight.
- We apply, we look, we try.
- Here and below we recommend using a cold zeroing cartridge for the appropriate caliber: just make sure that the laser dot is on or close to the zeroed reticle.
- If you don't like it. nine0127
- We remove crowns with a sight.
 Lightly tapping with a mallet or a suitable piece of wood - knock down the bar (glue is fragile to shock loads).
 - Wash off adhesive residue with acetone.
- Repeat the "glued, figured" operation. Until we reach the desired result.
- If you like.
- Carefully tilt the box. On the centers of the holes in the bar.
- We knock down the bar, as described above, we clean the surfaces. nine0043
- Carefully drill holes with a thin drill.
- We take a drill bit of a slightly larger diameter - for threading.
- We cut the thread.
- We glue the surfaces with a two-component adhesive.
- Screw on the bar.
- If the bracket is still a little crooked on the box, we correct it with spacers of different thicknesses in the rings of the bracket.
Learn more