Diy clay handprint ornament
DIY SALT DOUGH HANDPRINT ORNAMENT
Making DIY gifts is a lot of fun. Salt Dough Crafts are popular and this salt dough handprint is such a fun project to make and also to give as a gift.
You will find a “how-to” video at the bottom of this post.
DIY SALT DOUGH HANDPRINT ORNAMENTThis page may contain affiliate links for your shopping convenience. The links help support the blog as we may earn a small commission at no extra cost to you, our readers.
If you like salt dough crafts, these adorable thumbprint salt dough magnets are quick and easy to make. This DIY photo lamp using your own family pictures is also a unique gift idea you can make at home.
DIY Salt Dough is something that has been around for ages! I remember making a salt dough handprint ornament when I was little around Christmas time. I thought it would be cute to do all of my boy’s handprints and hang them on the wall.
Salt Dough keepsakes are a very inexpensive craft, made with items from around the house. If you’re wanting to send a handprint kit as a gift, I found an affordable one here: baby’s handprint ornament kit.
I also found this one: marshmallow clay handprint kit. I think marshmallow clay would be super fun to make at home!
SALT DOUGH RECIPEPRINTABLE RECIPE AT END OF POST
- 1 cup flour
- 1 cup salt
- 1/2 cup water
- Bowls (one for mixing, another for cutting out your circle)
- Spoon
INSTRUCTIONS:
- Mix the salt and flour in a large bowl
- Make a well in the salt/flour mixture and add the water
- Knead until smooth and shape into a ball
If you want to color your salt dough, simply mix in a few drops of food coloring while you are kneading it.
You can let your salt dough handprints air dry, but they can also be dried in the oven. Bake at 200 F until dry. The amount of time on the size and thickness of your masterpiece.
Thin flat ornaments may only take 45-60 minutes, but thicker ones like the ones I did can take 2-3 hours or more.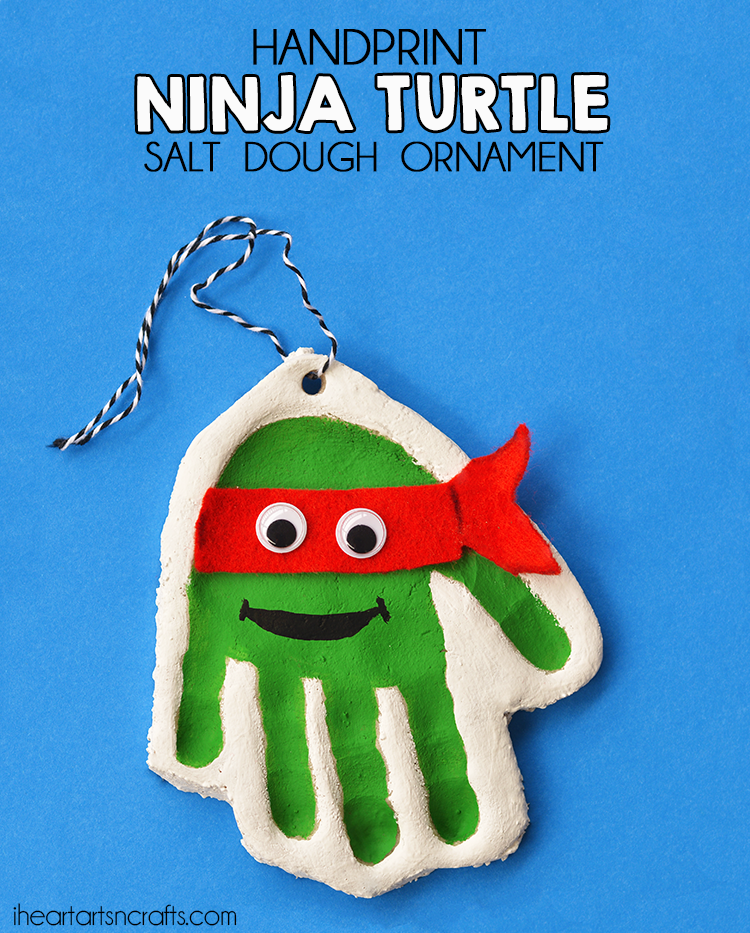
Make sure you store any leftover dough in an airtight container or it will get all dry and crumbly.
I can’t wait to have the salt dough handprint hanging on the wall, it’s going to be a great addition to our home décor and one that I can treasure as my children grow.
There are many other ornaments you can make with kids, to give as gifts at Christmas or anytime, really. I like buying the DIY ornaments (plastic if you have little ones!) and filling them with glitter. There are tons of things you can do with them, though.
Ingredients
- 1 cup flour
- 1 cup salt
- 1/2 cup water
- Bowls (one for mixing, another for cutting out your circle)
- Spoon
Instructions
Mix the salt and flour in a large bowl.
Make a well in the salt/flour mixture and add the water.
Knead until smooth and shape into a ball.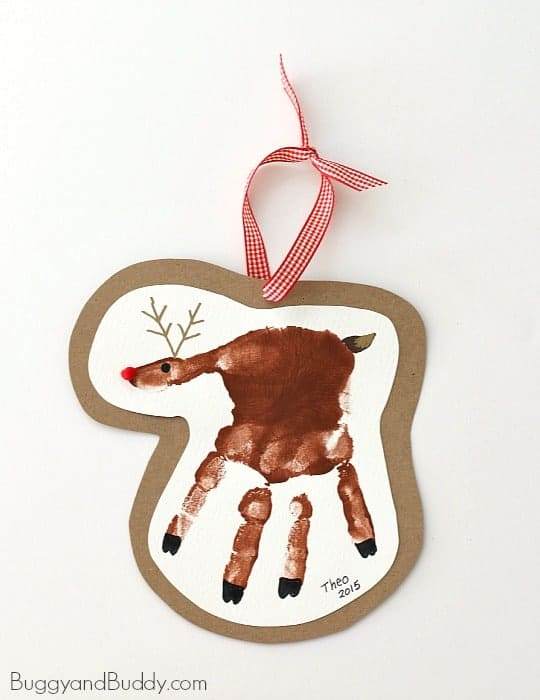
If you want to color your salt dough, simply mix in a few drops of food coloring while you are kneading it.
You can let your salt dough handprints air dry, but they can also be dried in the oven. Bake at 200 F until dry. The amount of time on the size and thickness of your masterpiece.
Thin flat ornaments may only take 45-60 minutes, but thicker ones like the ones I did can take 2-3 hours or more.
Make sure you store any leftover dough in an airtight container or it will get all dry and crumbly.
If you enjoyed this post be sure to check out our boards on Pinterest.
Love salt dough projects? Get more inspiration from these books:
Let’s Get Crafty With Salt Dough
Salt Dough Crafts for Kids (FREE ebook)
You’ll love this FAIRY GARDEN with SALT DOUGH FAIRY GARDEN ACCESSORIES.
You may also like this after school routine clock.
You can sign-up to get an email update each day. You can also connect with us on:
- Google+
- Blog Lovin’
Post submitted to Mommy Moment by Jennifer H.
This post is linked up to I Gotta Create, Tutorials Tips and Tidbits, The Style Sisters, Tidy Mom, Craftberry Bush, Growing Home, Sew Creative
Salt Dough Recipe - The Easiest Way to Make Salt Dough!
Kim147 Comments
All activities should be supervised by an adult. As an Amazon Associate, I earn from qualifying purchases. This post may contain affiliate links.
Learn how to make your own salt dough ornament with this easy Salt Dough Recipe. You only need a few ingredients from your kitchen to make this salt dough! We cover all of our tips and tricks to make sure your salt dough ornaments will last for years!
RELATED: Salt Dough Ornament Recipe
Table of Contents
- Salt Dough Recipe – for Handprints & Ornaments
- Salt Dough Ingredients
- How to Make Salt Dough – an Easy Salt Dough Recipe!
- Why Is My Salt Dough Puffing Up?
- How Do I Seal Salt Dough Ornaments?
- What Kind of Paint Should I Use?
- How to Decorate Salt Dough Handprints
- How Many Ornaments Does this Make?
- Tips for Making Perfect Salt Dough
- Salt Dough Handprint & Ornament Recipe
- Get the Recipe
- More Salt Dough Ornament Ideas
Salt Dough Recipe – for Handprints & Ornaments
One of our favorite things to do with salt dough is to make handprint ornaments.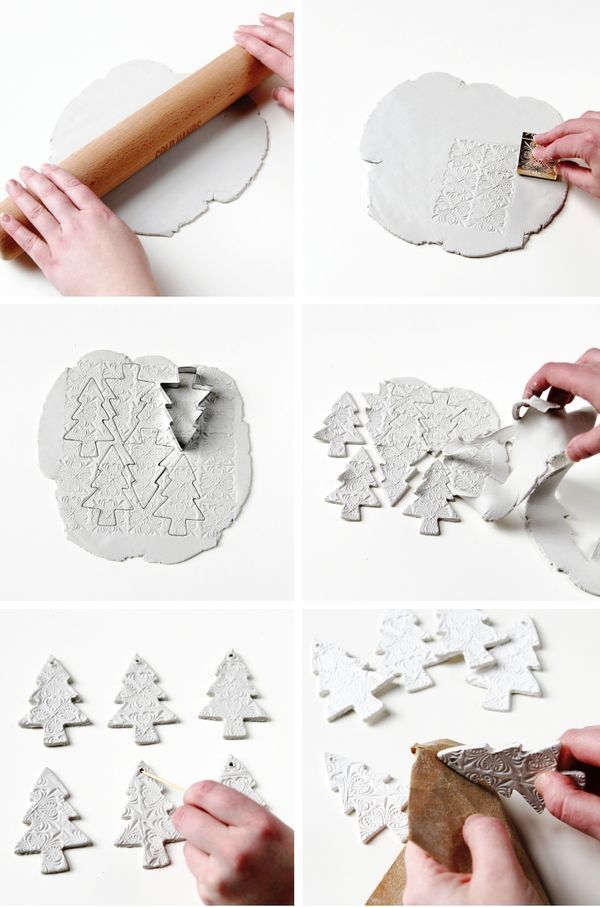 But you can also use this same recipe and use cookie cutters and paint shapes instead!
For the handprint ornaments – you can make a new one every year and have a nice memento for the Christmas tree!
Don’t forget to add the year on the back of the salt dough ornament to keep track of the different years.
Salt Dough Ingredients
- 4 cups all purpose flour (Note: you want regular all purpose flour, not self-rising)
- 1 cup salt
- 1.5 cups warm water
How to Make Salt Dough – an Easy Salt Dough Recipe!
1. Combine all of your ingredients (flour, salt, warm water) and mix well until it starts to form a dough.
2. Take the dough out of the bowl and knead for at least 10 minutes.
If your dough is too dry, add a little bit more water in and continue to knead.
The dough should be smooth and roll out with not too many bumps. It should also be easy to press a handprint into it.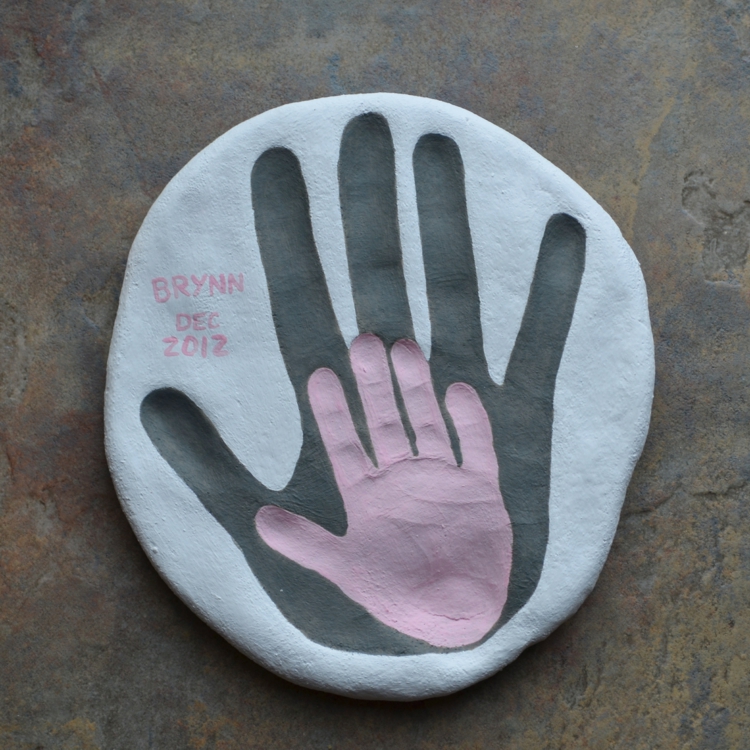 If you’re finding it’s too hard or not smooth enough, continue to knead some more. If it’s still too dry, add a little bit more water (but not too much or it may get too wet).
Roll out the dough to between 1/4 to 1/2 inch thickness. If the dough is too thick it will take too long to dry.
Press the hand into the dough.
3. Use a circle shaped bowl to trace around your handprint.
Cut out the handprint with a knife (adults to do this part).
You can also print off a circle shape or heart shape to trace around with a knife (adults to do this part).
If you have a smaller handprint you can use a circle or large heart cookie cutter.
TIP: It’s easier to press the handprint first, and then trace around it. If you have dough left over you can roll it out again and do another handprint.
4. Using a straw, make a hole in the top of the ornament.
5. Let the ornaments air dry for a day.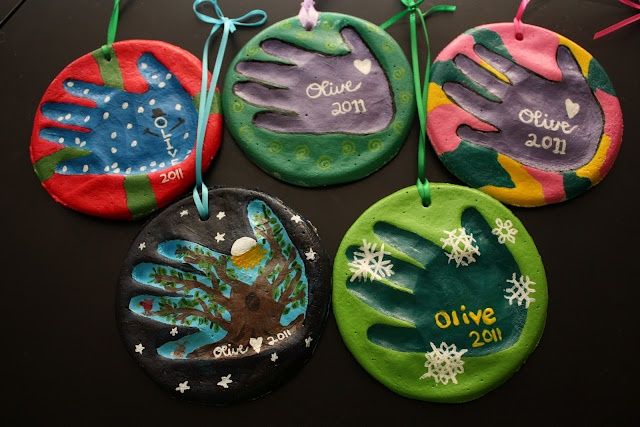
If you have time, let the ornaments air dry for a day. This will cut down on the baking time required and help to prevent puffing. If you do not have time, you can bake right away instead.
Bake at 250 degrees Fahrenheit for 1-2 hours. Once the top of the ornaments look dry and solid, flip over and bake on the other side.
NOTE: It’s important that you check that your oven temperature is set to Fahrenheit. One of the most common reasons the ornaments burn and puff up is that the oven temperature is Celsius. If you have a Celsius setting then you’ll want to use the lowest oven temperature, closer to 120 degrees Celsius.
If your ornaments are still doughy, put them back in for another hour. It will depend on your thickness how long you need to bake for. The thinner ornaments will take less time but thicker may take more. If it’s taking too long in the oven, let them finish drying by air drying them for a few more days. Make sure to flip them over so the bottoms also get exposed to air.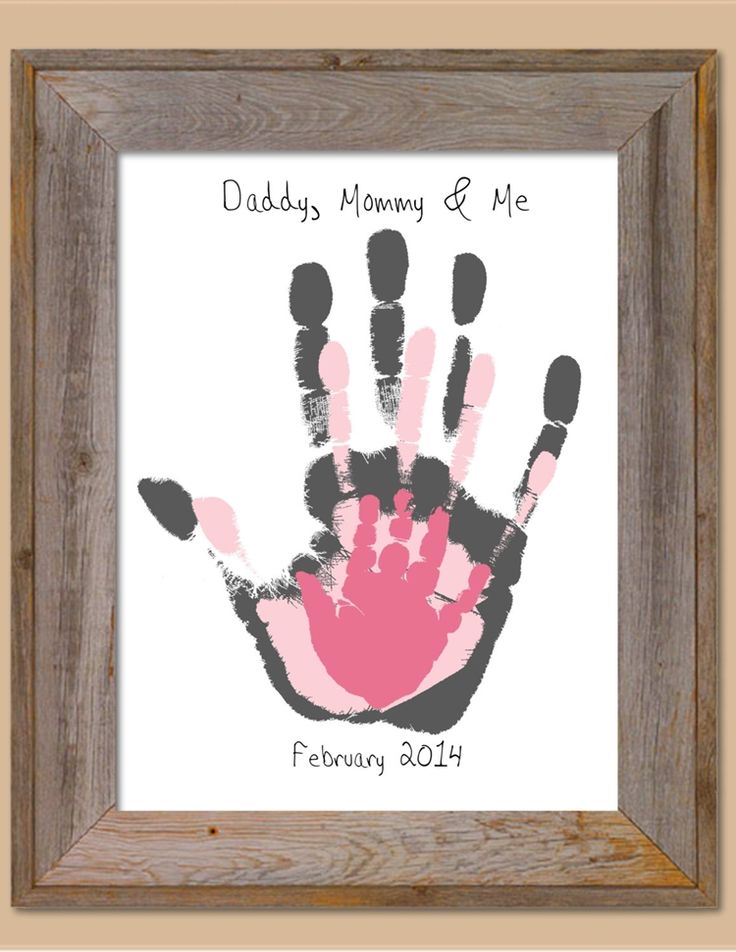
6. Once your ornaments are fully dry you can paint them.
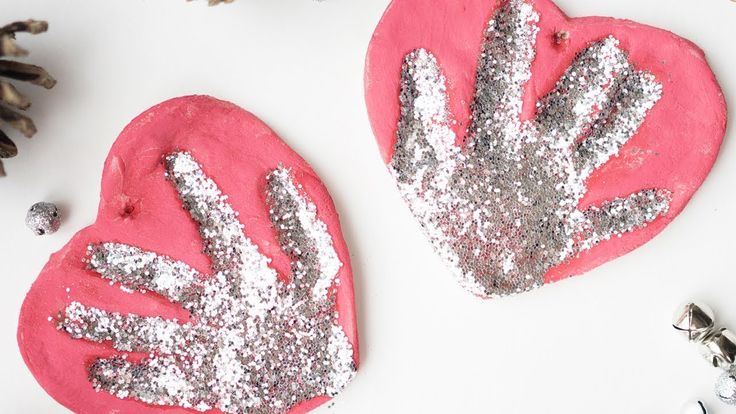
Paint the handprint and leave the remaining ornament plain. Or you can paint the whole ornament white and then paint the center handprint once the base coat has dried.
If you want to add glitter into the handprint, decorate the whole ornament with paint first, then fill the handprint with glue. Shake glitter onto the glue.
After the paint has dried, make sure to seal with with either mod podge or a clear glaze spray. Seal the ornaments after you paint them and the paint has fully dried.
7. Tie ribbon or twine through the hole for hanging on the Christmas tree.
Why Is My Salt Dough Puffing Up?
The number one reason salt dough is puffing is due to the oven temperature. If the temperature is too high the salt dough will puff up. It is better to let your ornaments air dry for a day and then bake them. This will prevent the puffing.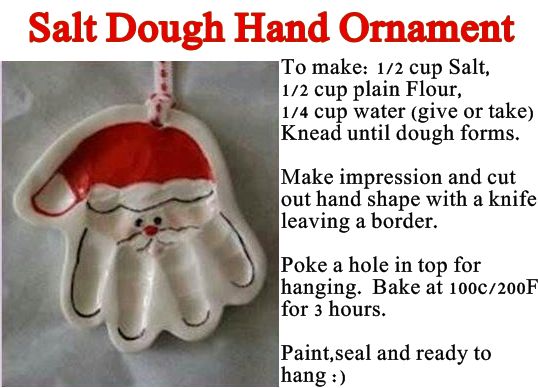 If you need to bake right away, bake at the lowest temperature (200-250 degrees Fahrenheit).
Note: Make sure to check your oven temperature is Fahrenheit and not Celsius.
You also want to make sure you are using regular, all purpose flour and not self-rising flour.
How Do I Seal Salt Dough Ornaments?
Once you are done, don’t forget to seal with either mod podge or a clear glaze spray. We like this spray for a durable finish. Adults should do the spraying and always follow directions of the product chosen.
Sealing the final ornaments will help stop them from cracking in a few years and prevent moisture from getting in.
What Kind of Paint Should I Use?
I like to use non-toxic acrylic paint for salt dough ornaments. The color will go on much thicker and more vibrant than kids paint. We like this brand of acrylic paint.
How to Decorate Salt Dough Handprints
You can use a heart for the shape around the handprints or you can use a circle.
For this one, we used a large heart cookie cutter as the handprints were small (baby handprints):
If you have larger handprints, you can trace around a heart print-out or use a knife (adults only) to draw a heart shape around the handprint.
We painted this one with acrylic red paint but you could choose green or even silver or gold. Then you can leave the handprint portion of the salt dough ornament either natural or use glue and add glitter to it like we did.
How Many Ornaments Does this Make?
Depending on the handprint size and thickness of the salt dough – you can get approximately 8 handprints. If you’re using the dough to make small cookie cutter ornaments you’ll get approximately 15.
If you’re hoping to make this for a classroom or with a larger group of kids, I would recommend bringing an extra batch just in case. The quantity can vary depending on size of cookie cutters, handprints and thickness of the dough.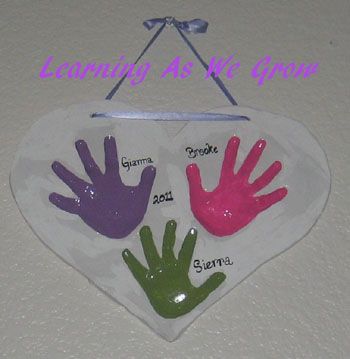 I like to roll out the dough and continue to knead together the scraps to use as much as I can.
Tips for Making Perfect Salt Dough
- Knead well to make the dough smooth – I like to knead at least 10 minutes.
- Let the ornaments air dry for a day first, if possible. This cuts back on the oven baking time and helps to prevent puffing.
- Don’t forget to flip the ornaments when baking or air drying so that the bottoms will be exposed to air.
- Seal with our recommended sealers mentioned above so that the ornaments will last for many years.
- Store the ornaments in a cool, dry place and keep away from moisture. Sealing the ornaments also prevents moisture from getting in.
Prep Time15 mins
Active Time2 hrs
- ▢ 4 cups all purpose flour
- ▢ 1 cup salt
- ▢ 1.5 cups warm water
- ▢ Clear Glaze Finish or Mod Podge
Combine all of your ingredients and knead for 10 minutes.
 If your dough is too dry add a little bit more water in and continue to knead.
Roll out the dough to a thickness that you'd like your salt dough ornament to be. We like between 1/4 to 1/2 inch thickness.
Using a large cookie cutter, cut out different shapes for your salt dough ornaments. If making handprints, place the handprints first and then trace around them.
Have your child place their hand into the salt dough ornament. If the dough is too hard to get an imprint it may be too dry. Continue to knead until smooth. You can also add in a little bit more water.
Using a straw, make a hole in the top for where you want to hang your salt dough ornament.
If possible, let the ornaments air dry for a day.
Preheat your oven to 250 degrees Fahrenheit. Bake for 1-2 hours. If your ornaments are still doughy, put back in for another hour. (It will depend on your thickness how long you need to bake for. The thinner ornaments will take less time but thicker may take more).
If you encounter too much puffing, roll out thinner ornaments and this will help reduce the puffing. If the ornament is still a bit doughy, bake for longer or let sit out a few days to harden before decorating. The thickness of the dough will determine how long you have to bake them for. We prefer to bake them at 250 degrees Fahreneheit for longer and let them air dry for a few days to prevent puffing.
Once cool, you can decorate by painting with non-toxic acrylic paint.
Spray with a clear glaze finish or finish with mod podge. Do this before adding the glitter.
To make the hand glittery, fill the handprint with glue then sprinkle glitter on top of the glue, shake off the excess and let it dry.
Kids will love helping to make this salt dough recipe. They will also have fun decorating the salt dough ornaments by painting them.
Finally, just a friendly reminder to keep these out of reach of pets (they can be toxic to dogs due to the salt content).
See over 25+ of the best Salt Dough Ornaments here for more great ideas!
These salt dough ornaments are also fun to make – and you can make these for any season or holiday too!
Casts of hands in the category "Beauty and Health"
CASTS OF HANDS / Set for creating a 3D cast "For two" PORUCH
In stock in Poltava
Delivery across Ukraine
399 UAH
RUCH
Buy
/ CASTS OF HAND SET PORUCH
In stock in Poltava
Delivery across Ukraine
0003
399 UAH
Buy
3D Set of Hands, Hands of Hands 3D
In a warehouse in Uzhgorod
Delivery in Ukraine
428 UAH
Buy
3D Hand Closures + Steas
Delivery from g .Ol000 499 UAH
Buy
Family casts of hands 3D
In stock in Kyiv
Delivery in Ukraine
499 UAH
Buy
3D cast of hands for the familyOl000
Delivery across Ukraine
1 643 UAH
1 478.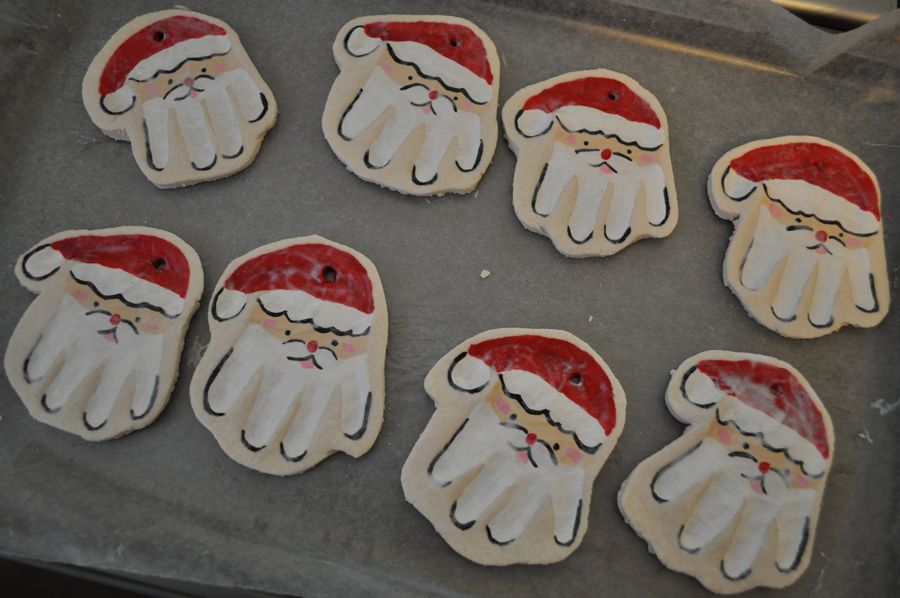 70 UAH
Buy
Set for creating a 3d cast of hands For two
Delivery from Dnipro
900 UAH 50003Buy Now
Set for creating a 3D cast of the hand of a child up to 3 years old (capacity 1.1 liters). TM Zlipok daymart
Delivery across Ukraine
330 UAH
Buy
TM Zlipok daymart set for creating a 3D cast of the hands of an adult and a child up to 8 years old (capacity 3.4 liters).
Delivery from Pavlograd
550 UAH
Buy
See also
Love Story set for creating a 3D cast of two hands (capacity 5.5 liters). Gift for lovers. TM Zlipok
Delivery from Pavlograd
for 650 UAH
from 5 sellers
650 UAH
Buy
Set for creating a 2D cast of a child's hand up to 8 years old. Stop moments. TM Zlice Daymart
Delivery from Pavlograd
320 UAH
Buy
3D Hand cast + Gift box
Delivery
608 UAH
Buy
Set for creating a 3D cast of two hands of an adult and child co-ZLIPOK
Running out of stock
Delivery across Ukraine
580 UAH
Buy now
Set for creating a 3D cast of a baby's hand up to 3 years old (capacity 1.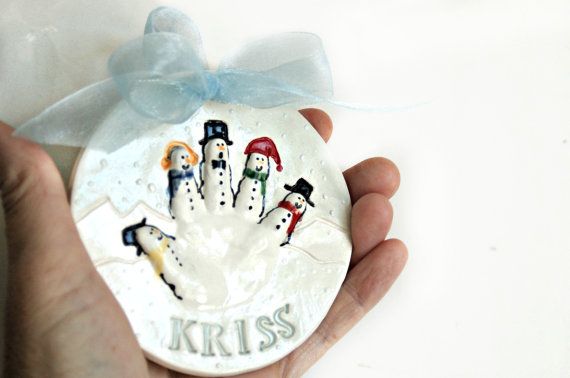 1 liters). TM Zlipok
Delivery across Ukraine
for 330 UAH
from 2 sellers
330 UAH
Buy
TM Zlipok kit for creating a 3D cast of hands together for an adult and a child up to 3.4 years old (capacity).
Delivery across Ukraine
for 550 UAH
from 2 sellers
550 UAH
Buy now
Set for creating a 2D cast of a child's hand up to 8 years old. Stop moments. TM Zlice
Delivery in Ukraine
to 320 UAH
from 2 sellers
320 UAH
Buy
3D Hand cast + Dome
Delivery in Ukraine
9000 1 558 UAHBuy
Hand Impression Set Family Gift
Delivery in Ukraine
600 UAH
Buy
Set for creating Hand cast Gift
Delivery in Ukraine
460 UAH
Set for creating 3D Hands of hands Gift
Delivery
450 UAH
Buy
Set for creating a 3D cast "For two" PORUCH
In stock in Poltava
Delivery across Ukraine
614 UAH
Buy Now
Set for creating a 3D impression of the hand of a baby up to 3 years old (capacity 1.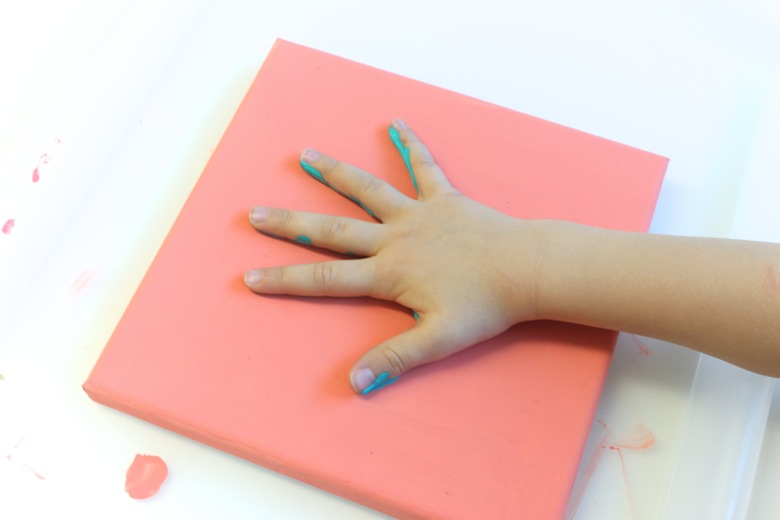 1 liters). TM Zlipok hotdeal
Delivery across Ukraine
330 UAH
Buy
TM Zlipok hotdeal kit for creating a 3D cast of the hands of an adult and a child together up to 8 years old (capacity 3.4 liters).
Delivery from Pavlograd
550 UAH
Buy
Clay keeps the memory of the hands of the master, how to work with polymer clay - Do it yourself at the dacha
Ask your grandparents what the smell of their childhood is? There was a smell of fresh milk, freshly cut grass, water from the well and bread from the oven.
Children's years for everyone will remain in the memory of the sweetest and dearest. But there is one favorite aroma of all - this is the smell of mother's hands. What they can’t do: feed, soothe, put to bed, arrange a real shadow theater in your nursery. There is no job that mother's hands cannot do.
Even all the delights of modern technology will not replace the care of the mother. Each of your great-grandmothers remembers a bundle of bright rags with hair made of woolen threads - it was a charm that protected the owner from the evil eye. And the newlyweds were given such dolls to find a strong family, in which there are many children. Whistles and dishes were made from clay, toys and spoons were carved from wood. Each thing had its own history and traditions associated with it. But even in our time, toys and crafts made by hand have not lost due attention. All over the world, craftsmen work day and night, doing their favorite thing. They make funny bears and bunnies, sculpt angels and bells from clay, and skilled workers sculpt excellent decorations from polymer clay. nine0003
Polymer Clay is a special material, it needs a careful attitude and a special technique. As the dough for pies is kneaded with love, so with clay - all the warmth of the hands and a piece of the master's soul is invested in another brooch or bracelet. On the market now you can find jewelry for every taste, wallet size and mood. But sometimes you want to buy something that is made especially for you.
Contact the craftswomen at the fair who work to order, and after a while your favorite product will be ready. nine0003
When choosing a master, pay attention to his work. Ask what techniques he uses, whether he sculpts according to ready-made forms or is it a creation of his hands. Real masters can repeat the bend of each petal, blade of grass, heart.
Flowers, as if just plucked, as if alive, under dew drops, are ready to decorate a bracelet or necklace. The price at first glance may seem high, but the time that a worker spends on decorating is priceless. nine0003
The clay warms up in the hands, is divided into small particles, and only then takes the form of real masterpieces - tea roses, colorful gerberas, fluffy dandelions, delicate lilies.
Each petal is carefully collected and attached to the next, and so on in a circle until the whole flower is collected.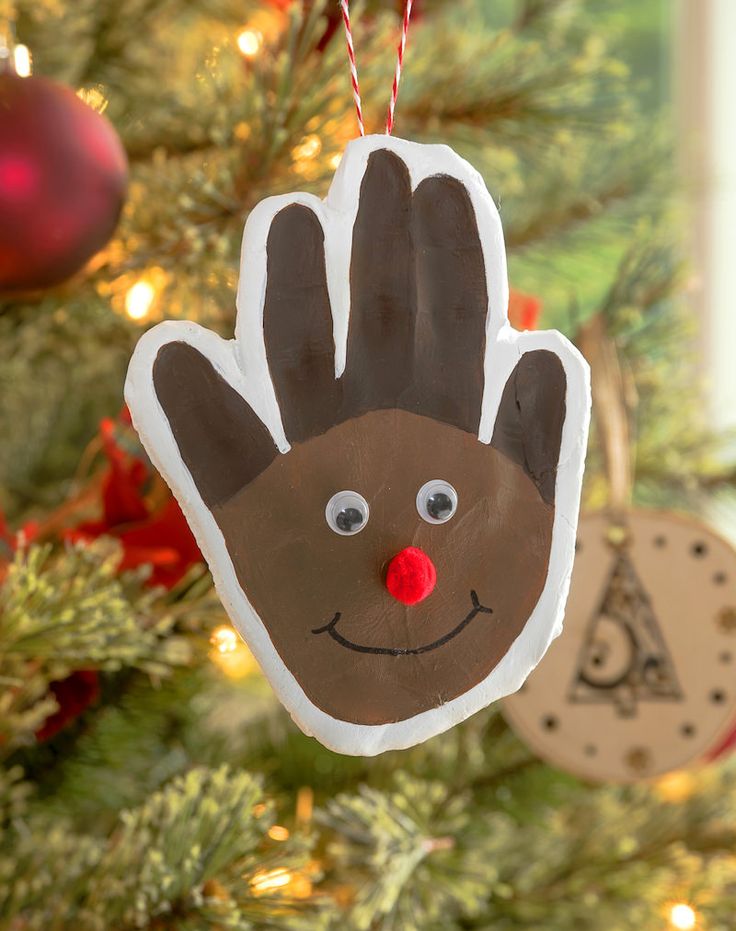 The stamens of the flower are the hardest part of the job. They must be performed perfectly, because only then the flower will sparkle with a rainbow of colors and will look harmonious in a bouquet. nine0003
One necklace may require up to twenty flowers and buds, the same components, assembled in a new way, give the product individuality and uniqueness. You can order a whole ensemble of jewelry in one color scheme or style.
Perhaps this will be a gift that contains your feelings and a special attitude.
But the products created by you will acquire special significance. Mastering the technique of sculpting from polymer clay is quite easy. You just have to be patient and try more and more new options. Start with simple things, stock up on ready-made forms and tools. nine0003
Choose the material with which you are most interested and easier to work with. Self-hardening clay is the best choice for beginners. Unlike material that needs to be baked, it takes shape and hardens in the air.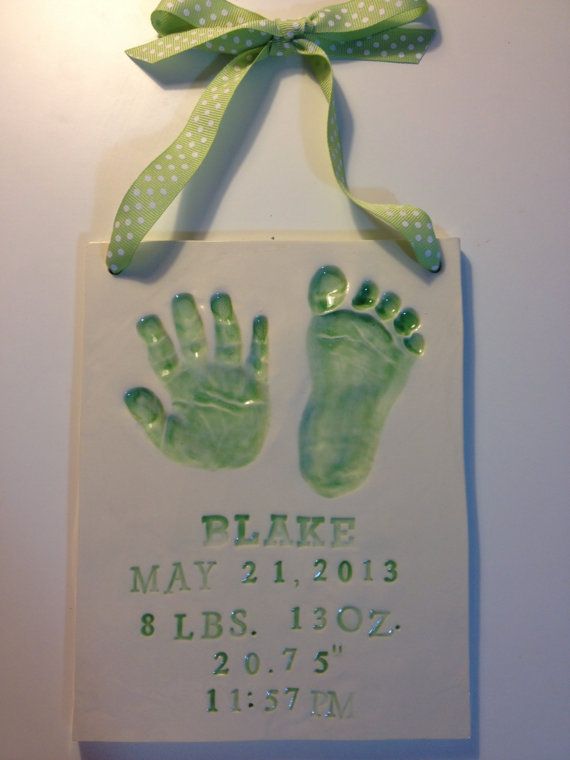 Therefore, the finished product cannot be spoiled.
But if you have already tried this technique, then proceed to a more complex option - baked clay . Now there are special thermometers for working with clay. Exceeding even one degree of temperature can lead to damage to the product. But like anything, it takes time. Becoming a master, you will have one more reason to be proud of yourself, there will always be ready-made gifts that will surprise you with their complexity and originality. You can diversify everyday clothes with a bright accessory. In addition, your hobby will bring a decent income. nine0003
And remember, these decorations are eternal, they will keep you warm from year to year, emphasize your special style and taste, causing envious looks from neighbors and acquaintances. Imprints of memory shimmering under the sun of gray everyday life!
Jewelry, accessories and decor items made of polymer clay are no longer a rarity today.
Numerous online stores and thematic resources offer author's products in assortment. Handmade in the price and respect. nine0003
But not only the material itself is popular, but also the question that beginners ask with enviable regularity - “where to start? Is it difficult?"
I will answer: it is easy, and will bring you a lot of pleasure from the process and result, and if you wish and skill - some additional income.
What is polymer clay (it is also called plastic and plastic)?
The basis of polymer clay is polyvinyl chloride (PVC). To the touch, it resembles plasticine, only more plastic and less sticky. Under the influence of temperature, it becomes hard, similar to something between ceramic and plastic. nine0003
Don't let the firing process intimidate you - you don't need a special kiln for this, as you would with ceramics. An ordinary oven is enough, since the temperature of polymerization (hardening) of different brands of polymer clay is only 110-130 degrees Celsius.
When firing clay, you need to follow several rules: do not exceed the temperature indicated on the package (when burning, the material releases toxic substances), do not bake products on the dishes from which you eat, and if the temperature is still exceeded, turn off the heat, ventilate the room and wash the oven. nine0003
What is needed for creativity? What can you do without, and what is necessary?
First of all, you will need the material itself. You can buy polymer clay of various brands in city stores (usually, these are shops for artists) and in online stores of goods for creativity.
The most popular and easy-to-use materials are imported: Fimo, Cernit and Sculpey.
Brands differ by country of origin, polymerization temperature, color palette and assortment. nine0003
These manufacturers offer polymer clay for making dolls and for molding, glowing in ultraviolet and dark, opaque and translucent, with sparkles and metallic effect, mother-of-pearl and imitating the structure of a stone, and even rubber and liquid polymer clay.
There are also materials of domestic production - these are the brands "Tsvetik", "Sonnet", "Hobby", "Lapsi", "Artifact". Their only advantage is the price: they are much cheaper. The rest of the properties of domestic clays are solid minuses: the material is hard, not plastic, crumbles when kneading, and is very fragile in finished form, in addition, the Russian product line does not differ in such an amazing variety of shades and properties. nine0003
If there is too much information on the assortment, numerous thematic Internet resources will help you figure it out.
In addition to the polymer clay itself, you will need some tools necessary for the job.
First, you need work surface - it can be a piece of glass or tile. In a pinch, a sheet of white paper will also do, although it's better if the surface is strong (because you'll be working with a knife on it) and smooth so the material won't stick.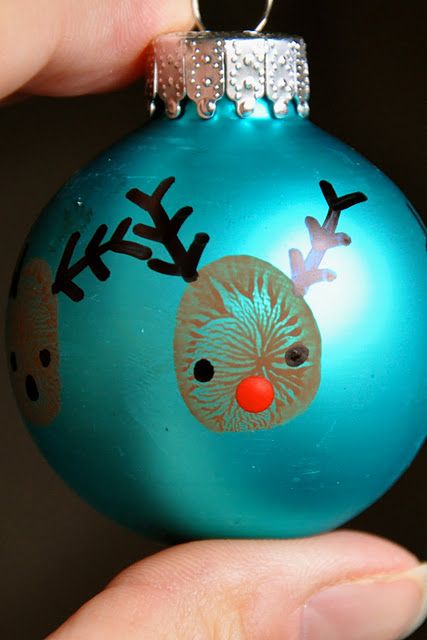 nine0003
Secondly, you will need a sharp and, if possible, thin knife or blade - you can use a stationery blade - to separate pieces of plastic and to give the desired shape to the future product. Accuracy and accuracy directly depend on the sharpness and thickness of the blade.
Thirdly, you will need plastic rolling tool - any cylindrical object - it can be a special roller or a bottle of varnish.
This set will be quite enough to get acquainted with polymer clay.
It is not difficult to bake the product: all you need is an oven, preferably with an accurate thermometer and some kind of baking surface - a baking sheet, a glass plate or something similar. If you use a metal surface, it is better to cover it with baking or writing paper so that the product does not burn.
For further work with polymer clay, you will also need some tools. nine0003
These are waterproof sandpapers of various numbers for removing fingerprints and polishing, a dense fabric (denim, felt, etc.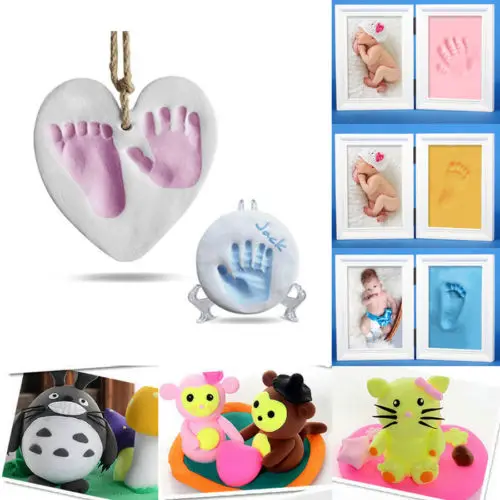 ) for polishing, and preferably varnish, so that your product remains bright, smooth, shiny and more durable.
You can buy special varnishes for plastics, such as Fimo and Sculpey, but you can also choose the right building varnish - water-based acrylic. The question of choosing a varnish is very delicate, and it is better to first study the information on this topic on the Internet. nine0003
If you want to start modeling jewelry, you will need various accessories (earwires, locks, pins, chains, etc.), which you can also find in the assortment in city shops (usually, these are shops with sewing and handicraft products) and specialized online stores.
The sculpting process itself can be described much shorter than the process of choosing materials and tools.
The main thing is to knead the polymer clay well in order to evenly distribute the plasticizer, make the material soft and plastic and remove air bubbles - when heated, they expand and form ugly tubercles on the product.