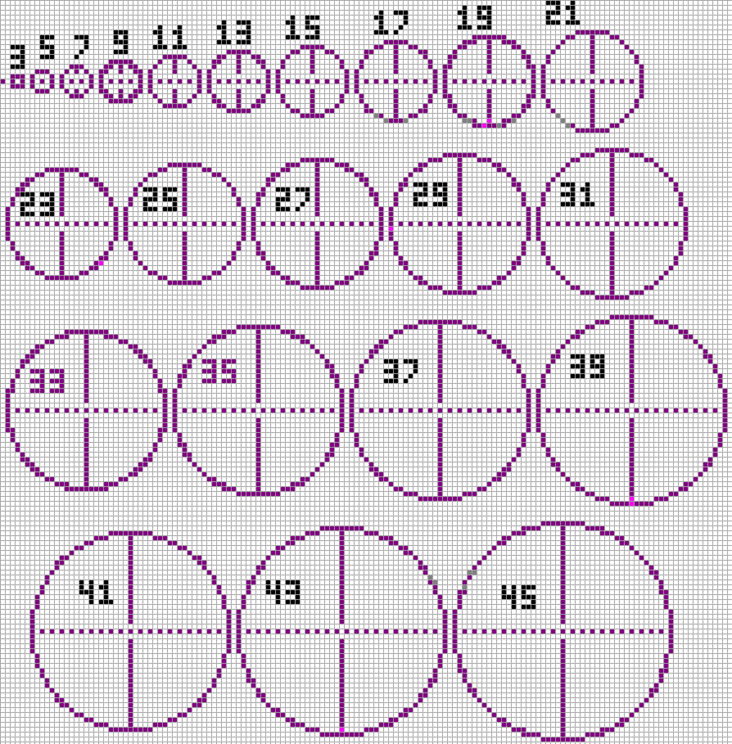
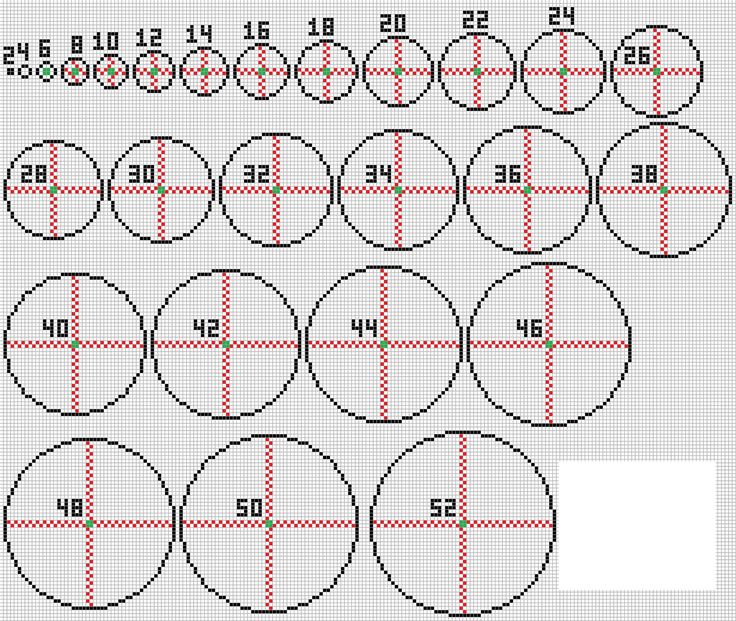
Draw 8 beads around the circle
DIY Star Wars BB-8 Earrings Tutorial with Wooden Beads
Home » DIY Star Wars BB-8 Earrings Tutorial with Wooden Beads
Learn how to make a pair of DIY Star Wars BB-8 earrings from wooden beads and permanent markers with this simple step-by-step tutorial.
Disclosure: This blog post contains affiliate links. As an Amazon Associate and member of other affiliate programs, Keri Houchin earns a commission from qualifying purchases at no additional cost to you.
These BB-8 earrings are much easier to make than they were to photograph!
I’ve been planning to make these since “The Force Awakens” came out. Way too long, right?
But I was worried that I’m not great at drawing and I cannot draw an actual round circle to save my life. Fortunately, this project is very small, so perfection is not important. I looked at a few photos of BB-8 while I was working on this, so you might find that helpful for the details.
I’m going to take you step-by-step through how I made these. After the first step is done, the rest of the project took maybe half an hour. All you need is a few basic jewelry supplies.
How to make BB-8 earrings
Supplies
- 3 half-inch wooden beads (These are similar.)
- white paint
- Sharpie permanent markers in black, orange, and silver
- 2 earrings headpins
- 2 earring fishhooks
- jewelry pliers
Instructions
The first few steps will depend on the beads you’re using. You’ll need two that are whole and one that is cut in half.
If they’re not white, start by spraypainting them. Make sure you don’t fill the hole. Let them dry overnight before going on to the next step. If you have white beads, you can skip the painting.
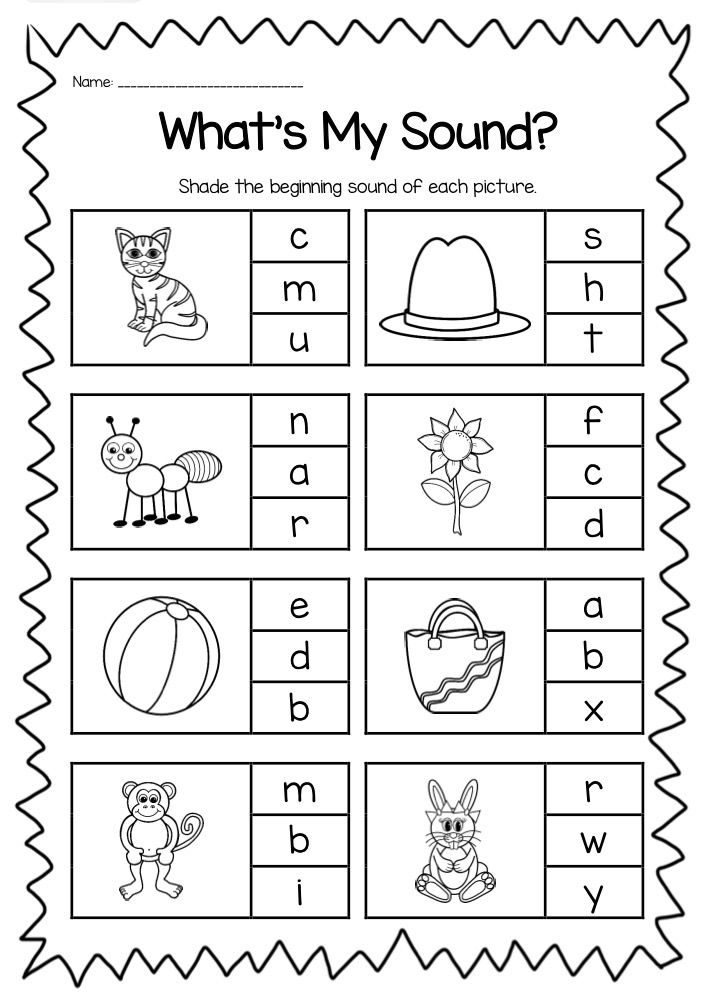
Star by drawing BB-8’s face. Using the black marker, draw a large circle, and leave a small sliver uncolored to look like his “eye.” Draw a smaller circle next to it.
With the silver marker, draw a thick line around the bottom and top of the head. With the orange marker, draw several small squares and rectangles along the top of the lower silver line.
For the body, use the orange marker to draw five circles. Imagine BB-8 is a cube and draw a circle where each of the sides would be. I didn’t draw a circle on the side where his head would attach since it would barely be seen.
Inside each orange circle, draw four connectors. Use the silver marker to draw a circle in the center of each orange circle and add more silver marks to make each of his “cogs” look a bit different.
He’s really so small that too much detail won’t be noticed, so don’t stress about perfection here. You’ll notice that my lines aren’t entirely smooth.
To put BB-8 together, thread a head pin up through the body and head. Trim the top of the pin to be about 1/4 inch long. Fold the top around the earring hook and pinch closed with the pliers.
Repeat the whole process again for the second earring.
Here are a couple more close-ups so you can see the details.
Check out some other fun and creative ideas on One Mama’s Daily Drama:
- 20 Creative Stars Wars Crafts for Adults
- Star Wars Cupcakes with Droid Toppers
- Printable Star Wars Bookmarks
Reader Interactions
Lines and Angles
- Math
- Geometry
- Lines and Angles
- Summary
- ConceptMap
- Summary
- Worksheets
- Exercises
We can also use an abacus to find the difference between two numbers.
Let us find out how with the following example.
5 taken away from 18
Or
18 – 5
Step 1: Draw beads on the abacus to show the number 18.
Step 2: There are 8 beads in the ones rod, strike out 5.
Step 3: Now count the number of beads in the ones rod. It is 3.
And so we get to number 13 on the abacus.
Therefore,
5 taken away from 18 leaves 13
Or, 18 – 5 = 13
Exercise 9.7
A. Subtract the numbers. Draw and then strike out beads on the abacus.
B.
 Story problems.
- Rani had 15 flowers. She gave 3 to her mother. How many flowers are left with Rani?
- There were 17 candies in a jar. Isha ate 5 of them. How many candies are left in the jar?
- Shanaya had 15 ribbon bows. She lost 3 of them. How many ribbon bows are left with her?
- A shopkeeper prepared 20 delicious rolls. He sold 15 of them. How many rolls are left with him now? (Hint: Subtract by drawing lines)
- 14 children were invited to a birthday party.
 6 of them did not come. How many children
attended the birthday party?
6 of them did not come. How many children
attended the birthday party? - There were 18 mangoes in a basket. A monkey ate five of them. How many mangoes are left in the basket?
- There were 16 black and white goats on a farm. 9 of them are white in colour. How many goats are black in colour?
- There were 12 round and square buttons in a box. 3 buttons are square in shape. Find the number of round buttons in the box?
- Rayan scored 14 marks in a maths test.
 Purab
got 18 marks. How many more marks than
Rayan did Purab get?
Purab
got 18 marks. How many more marks than
Rayan did Purab get? - There were 13 red pens and 10 blue pens in a pencil stand. How many more red pens are there than blue pens in the pencil stand?
Braided beaded keychain
Chiv-chiv everyone! I am the smallest bird Tanya from the Bijou family!
I'm just a baby and a beginner, I'm still learning a lot myself.
Today I’ll tell you how to weave a keychain-ball from beads "Rainbow", and inspired us to make such a keychain, of course, the football championship 2018.
Author: Anastasia Smirnova, especially for Cafebijou.
-
1. We measure the monofilament a little more than 1.5 m long, thread the needle, align the ends. We will weave on a double monofilament, the working length should be at least 80 cm
-
2. We collect ten black beads and tie a knot, leaving a non-working end of about 5 cm. Pass the working thread through the first bead, closing the circle
-
3. We collect the following sequence on the thread: three whites, one black, three whites, one black, three whites. Again we pass the thread through the same black bead of the first circle, and then through two more beads of the warp
-
4. Repeat the set, but a little shortened: three whites, then one black, again three whites and one black, and then not three, but one white. As the second we use the corresponding bead of the previous step
-
5.
 Then we pick up the last white one and pass the needle through the black bead of the base, from which this small circle started
 -
6. We pass the thread through two more warp beads and bring it out through one from the previous working one
-
7. Repeat the previous operation: three whites, black, three whites, black, one white, then the corresponding white of the previous circle, one white, lock into the black base bead
-
8. Thus we reach the last black bead of the base. Coming out of it, we do not need to draw three whites, we will use the rows already created. We collect one white, draw through the corresponding white of the nearest circle
-
9. Then pick up another white, one black, three whites, one black, one white and pass through the corresponding white of the opposite circle
-
10.
tightly Don't forget about the last white one. Tighten the thread
 -
11. The first white row is ready, go to black. To do this, we draw a thread from the nearest black bead and collect seven black ones. We enter into the next black one, moving in the same direction
-
12. Dial one more black and close the circle
-
13. Having closed the circle, pass the needle inside the next three white beads and draw it out of the first black bead. Here the procedure is slightly different than in the previous step. First, we draw one new
between the fixed black -
14. Then seven others. We go through the first three 9 again0004
-
15.
 In this way we weave the whole row of black circles, and then we bring out the thread from the middle bead of the white row
 -
16. Pick up one white bead and pass the needle through the second bead from the edge of the nearest black circle
-
17. Then we draw three whites, one black and again three whites. We pass through the penultimate black bead of another black circle
-
18. Don't forget to add the last white before closing the circle
-
19. Inside the already woven rows, go to the next central white bead, remove the needle
from it -
20. Then repeat the previous operation. Weave the whole row of white circles
-
21.
 When ready, you will get half a soccer ball
 -
22. Draw a thread from the central black bead, pick up one white bead, pass through the second white bead from the edge of the neighboring circle
-
23. We collect beads in the following sequence: one white, one black, three white, one black, one white. We introduce the needle into the penultimate white of the previous circle. Do not forget about the white bead before closing the working circle
-
24. Next we need to move on to weaving the next circle in this white row. Now the needle is coming out of the central black one, with which we started this circle
-
25. Then you can draw it through two adjacent black ones, then three white ones and again through black ones, leading out of the central one.
 Then the order of weaving the next circle will be the same as the last
 -
26. But there is another way, more preferable to strengthen the newly created circle. We bring the needle out of the central black one, with which we started, as shown in the figure above. Then we draw it through two white ones - these are the initial beads of a woven circle
-
27. And then, once at the fork, we turn in the other direction, passing through one white, one black, and two white. We collect a new white bead on the needle and insert it into the central black
-
28. Further, everything is the same as in the previous circle: one white one, we pass through the second white one from the edge
-
29.
Then another white one, after it one black one, three white ones, one black one. Closing the circle
-
30. Go to the next black face and repeat the operation. At the end of this row, our ball looks like this
-
31. We bring the needle out of the central black bead (it is located below the two adjacent black ones) and begin to weave a black row. We collect one black, we pass through the adjacent black of the previous row
-
32. Pick up five blacks, go through the remaining black
-
33. Dial one more and close the circle
-
34. Pass the needle through the beginning of the circle and three white beads, and then repeat the operation.
 When this row is ready, the picture should be like this
 -
35. Let's start the last white circle. From the central white bead we bring out the needle, we collect one white one, we introduce black into the second one from the edge. On the needle we collect three whites, one black, three whites. We enter into the penultimate black of another circle
-
36. Don't forget to add the last white bead before closing the circle
-
37. Next, we draw the needle through the beginning of this circle - the central white, the first white, black and take the needle into the black circle. We display on the penultimate bead and dial a new white
-
38. Then we insert the needle into the central white one, pick up a new white one, draw it through the second black one from the edge.
 In theory, then you should dial three whites, black and three more whites, but here we will do otherwise. The penultimate white will be the bead of the previous row
 -
39. And we collect the last white bead, as before, and insert it at the very beginning of this circle - into the central black bead
-
40. Here is a picture obtained at this stage
-
41. Repeat the operation twice more. When the last circle remains, we start it as usual: we withdraw from the central black one, we collect one white one. Draw through the central white bead, pick up another white bead
-
42. Insert the needle into the central black of the next circle. We collect another white one and go through the central white circle, which was the first in this row
-
43.
 We get the following picture
 -
44. We collect on the thread one white, one black and one white. We introduce into the central white bead of the opposite circle
-
45. Don't forget about the closing bead of the circle. Tighten the thread
tightly -
46. Top view turned out like this
-
47. We only need to pull off all the black beads, picking up one additional black bead between them
-
48. Gossip ball. It remains to hide the thread
-
49. We return to the ponytail, which we left at the very beginning of weaving. We tie a neat double knot and pass both threads through several beads, carefully pulling the knot so that it hides
-
50.
 The finished ball can be hung on a ready-made key chain using a connecting ring. Or you can make it yourself0004
 -
51. We thread the nylon thread into a cylinder with a hole to make a loop. We melt the edges of the thread a little with a lighter so that it does not unravel, we tightly tie it with a knot
-
52. We pull the knot inside the cylinder, insert a connecting ring of suitable diameter into the holes
-
53. Attach a carbine to it. Holder ready
-
54. Why do you need a carbine? To fix the keychain on such a thread holder, most often it is necessary to pass the thread through its own loop. first we fasten the keychain, and then we fasten the ball with a carabiner
Rivoli braid 14-16mm.
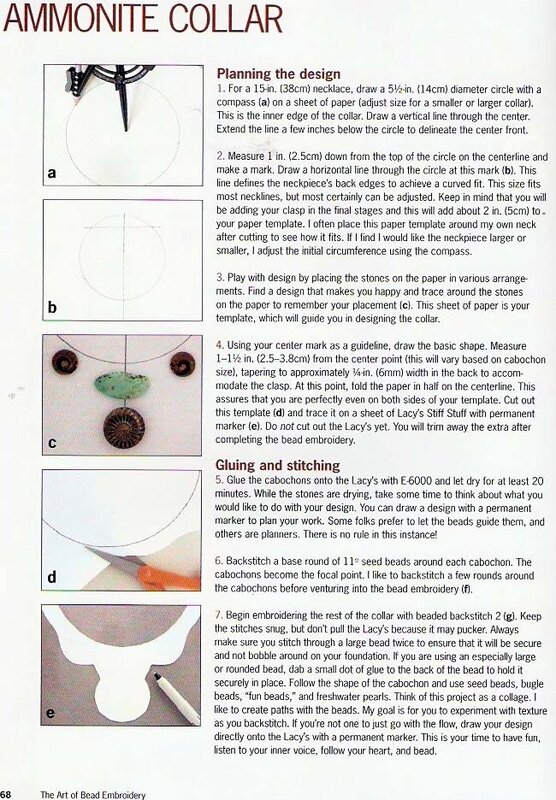
 Earrings "Granada" | Sea hobby
 For earrings we need:
- 2 rivoli or rhinestone buttons 14 or 16 mm (16 is even better),
- beads of the main color of numbers 11 and 8 (I have large gold beads, but if there was an amethyst-violet, I would use it),
- beads finishing color No. 11 and No. 15 (Japanese is better - it has a larger hole),
- thread for beading (I used K.O., but you can use One-G, and Nimo, and capron, probably - the main thing is to have enough thin and strong),
- a beading needle,
- two earwires, of course.
How to braid rivoli, master class
1) Let's start!
We collect one golden bead No. 11, one No. 15, then purple No. 11, again golden No. 15, golden No. 11, bead No. 8 and close the circle, leaving the No. 11th bead, which we dialed first. I do not advise you to make a knot now, and in general it is better to do without knots at the first stage: they can interfere with subsequent passages of the needle.
2) Now do the second circle. We pass the thread immediately into the purple No. 11 bead, from it into the golden No. 11, and pull it up to create an imitation of the Ndebele and the purple bead has shifted closer to the middle of our element. With turquoise, I painted on where the thread passes.
3) Making the second element. We collect two golden beads No. 11, one bead No. 15, we pass through the bead No. 15 on the side of the previous element. And immediately we withdraw the thread from the second typed bead No. 15.
4) We collect a purple bead No. 11, a golden bead No. 15, a golden bead No. 11, a bead No. 8, close the circle - and then follow the description above. Here's what we should get.
5) So we make 11 elements with bead No. 8 below, and we close this round dance with an element with bead No. 11 below. Our thread came out of bead number 15. Now we collect three beads No. 15 and make an “arc” over the purple bead. We enter bead No. 15 on the other side, exit through the next bead No.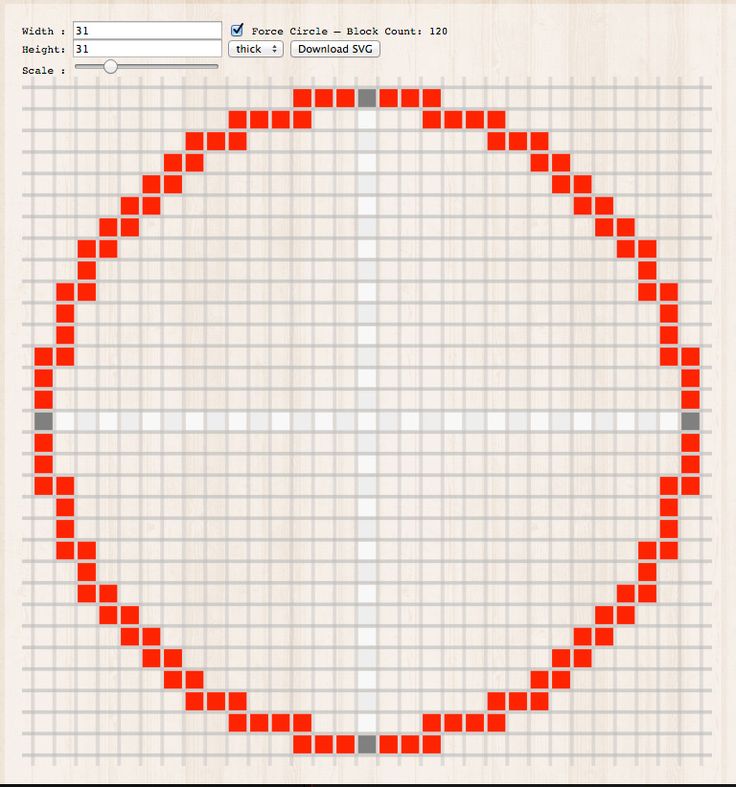 15, and so on in a circle.
6) At this stage, the Ndebele imitation will become clearer. Do not forget to tighten the thread so that the round dance looks flat.
7) The last circle - we go through the 15 mm beads typed in the previous stage, connecting them together so that our rivoli does not fall out from the front side later. We bring the thread into bead No. 8. It should turn out something like the rivoli braid in Granada - I had such a goal, to keep the original braid pattern, it just delighted me!
8) Now go to the wrong side. We collect three purple beads No. 11 and go to the next bead No. 8, again we collect three purple beads, and so on in a circle.
9) We bring the thread out of the second bead No. 11 of purple color.
10) The second circle - we collect two purple beads No. 11 and go to the second bead of the next purple arc, that is, this is the middle of the arc. And also in a circle.
11) Put the rivoli into the resulting basket and tighten (but be careful not to tear the thread!)
12) That's how beautiful it turns out from the front side.
13) The third circle - we collect one bead of golden color No. 11, we pass through two purple beads, again we collect one golden one No. 11, we pass the next two purple beads, and so on.
14) The fourth circle - we collect one golden bead No. 11, we pass into the previously collected golden one, and so we go through the circle with a mosaic.
15) Fifth and sixth circles - we go through the same mosaic, but we are already collecting beads No. 15 so that narrowing occurs. We tighten the thread, and at this stage you can make a couple of knots to secure the braid. We go out along the beads carefully into the bead of the 11th number.
16) The braid is ready, let's start its design. We collect three purple beads No. 11, and pass through the golden bead No. 11, again we collect three purple beads, and again into bead No. 11, and so on. Completing this circle, we leave the first typed purple bead.
17) We collect three golden beads No. 11 and bring the thread into the third purple bead, and through it into the golden one, we go out into the first purple bead of the next arc.