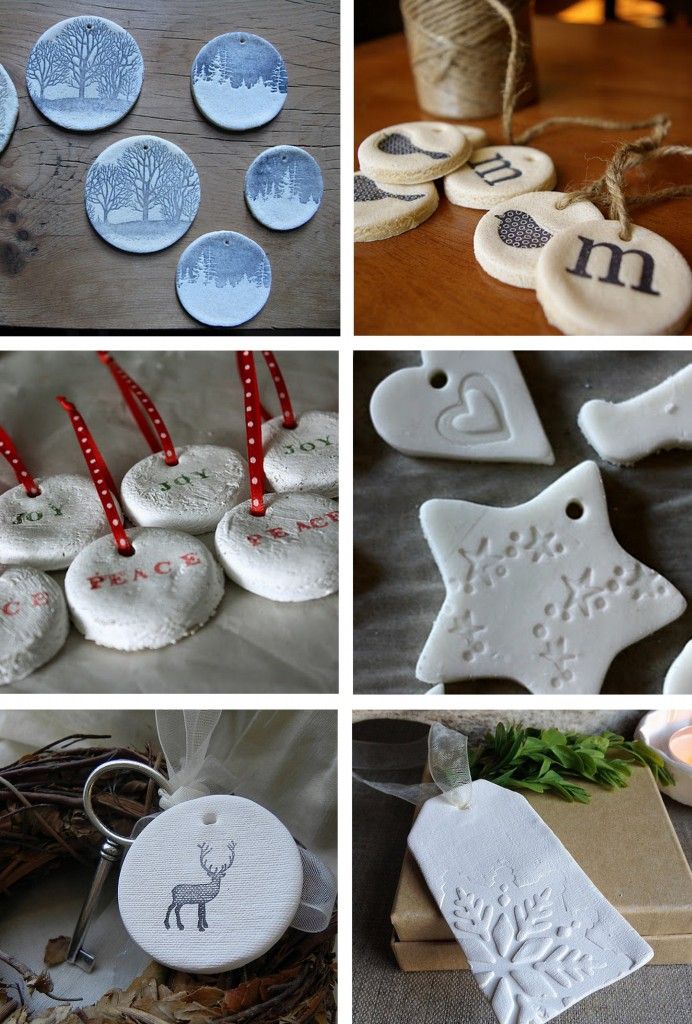
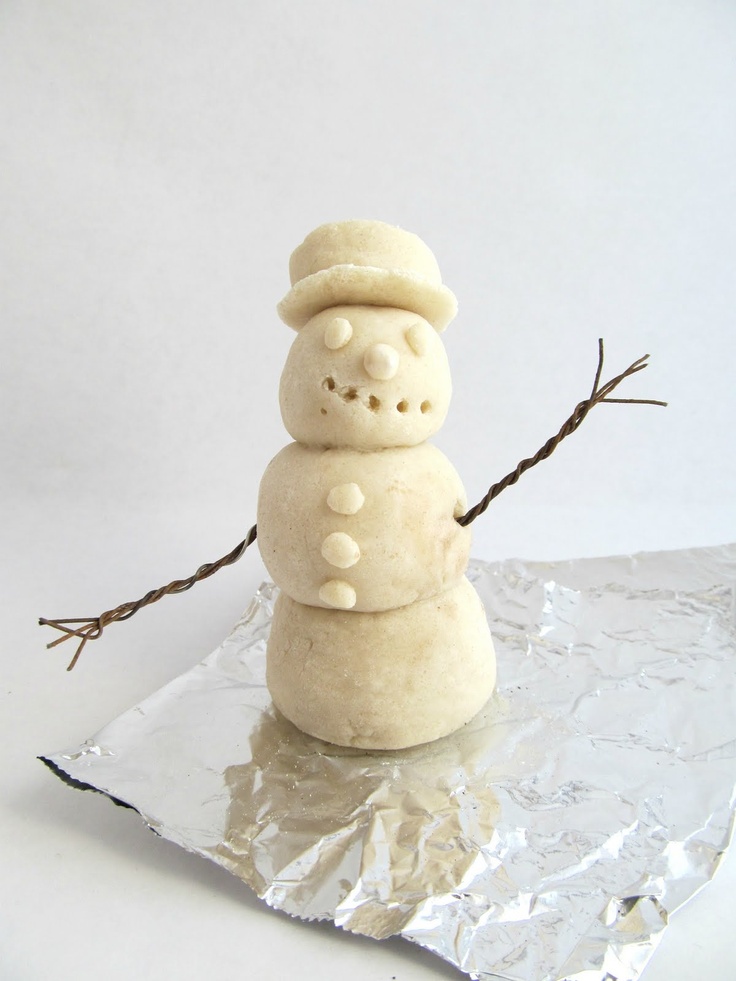
Flour clay ornaments
The Best Salt Dough (for Ornaments and Crafting!) to Make with the Kids
Learn how to make classic salt dough with the kids, with baking, painting, and storage info. This method is straight forward, easy, and thorough—and they a perfect kids holiday gift for grandparents, teachers, and loved ones!
Salt Dough
This salt dough is a staple of childhood and I love doing this Christmas activity with my kids each year—and throughout the rest of the year too! We love to make salt dough handprints, ornaments, and sometimes, just any old shape they want to. It’s an easy project that we can do together—and then share as kid-made holiday gifts, keepsakes, or house decorations.
Salt Dough Recipe
Making salt dough at home is as easy as combining three pantry staples together into a dough. It’s fairly fool proof (as long as you follow the measurements!) and is a recipe that even little kids can help make.
Ingredients in Salt Dough
To make this recipe, you’ll need:
- table salt
- all-purpose flour
- water
TIP: That’s it! (I buy store brand, cheap flour for this since project to keep it very budget-friendly. )
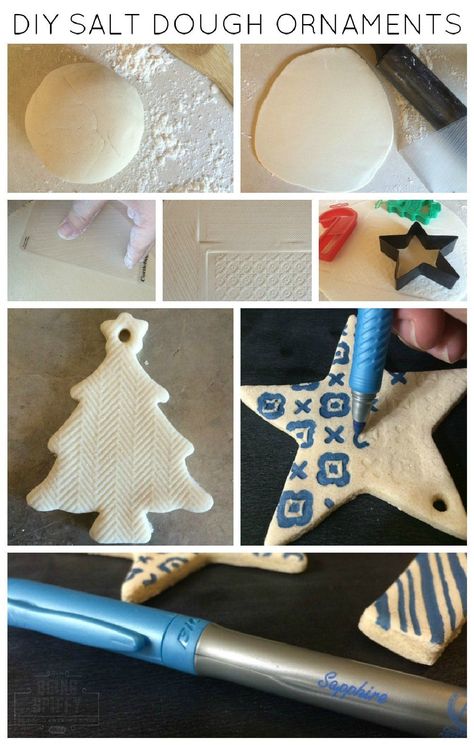
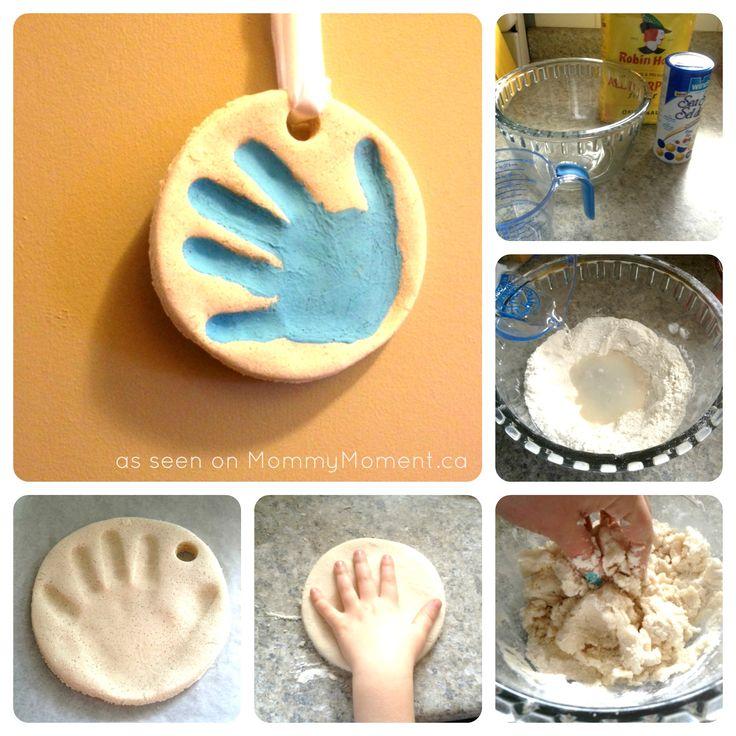
How to Make Salt Dough Ornaments Step-by-Step
Here’s a look at how to make the dough for this salt dough. Scroll down to the bottom of the post for the full information.
- Measure out the flour and water. (photo 1)
- Add the water. (photo 2)
- Stir with a wooden spoon. (photo 3)
- Keep stirring until the dough is mostly together and is hard to stir any longer. (photo 4)
- Knead a few times with hands to bring the dough together. (photo 5)
- Place dough between two pieces of parchment paper and roll out. (photo 6)
TIP: You can divide the dough in sections so multiple kids can have their own dough to work with.
How to Cut Out, Bake and Decorate Salt Dough Ornaments
Once you start rolling, here’s a look at what will follow if you want to make these into ornaments. (Skip the hole poking if you want to just make these as shapes for the kids to paint. )
)
- Roll out, changing directions occasionally, until about 1/4-inch thick. (This may not get precise if you’re working with kids and that’s okay!) (photo 1)
- Stamp cookie cutters. (photo 2)
- Remove the dough around the shapes, then either transfer the whole piece of parchment paper to a cookie sheet OR transfer just the shapes to a parchment-lined cookie sheet. (photo 3)
- Poke holes so you have a place for a string to hang as ornaments. (photo 4)
- Press in a hand to make a handprint, if desired. (photo 5)
- Bake, let cool and decorate! (photo 6)
TIP: Re-roll any remaining dough after Step 3 here to make additional ornaments.
Salt Dough Handprint Ornament
Capturing a handprint in salt dough is a perfect grandparent gift, or a keepsake ornament to make for your own tree. I love pulling out our little collection year after year. Know that getting a good print may take a few tries if doing a baby’s hand!
TIP: Check the size of your round cookie cutter against your child’s hand to make sure that it’s big enough. You may need one that’s 4-5 inches in diameter.
Best Paint for Salt Dough Ornaments
If the kids are wearing smocks, the table is protected, and you are reasonably sure they won’t paint all over their hands and faces, I like using regular acrylic craft paint since it holds up best on crafts. With younger kids who may wind up wearing more of the paint, I’d recommend tempura washable paints.
TIP: We put our paint into the base of old egg cartons since we always have those on hand. You can also use paper plates.
How to Preserve Salt Dough Ornaments
To help preserve your finished dried ornaments, you can coat with a layer or two of Mod Podge or spray with a sealer. Either work well. I’d recommend coating or sealing both sides, so do one side and let it dry, and then do the second side. If using the sealer, do it in a well ventilated area without the kids too close by.
TIP: To store these ornaments from year to year, you’ll want to wrap in bubble wrap. Store in a container that won’t be banged around, dropped or exposed to excess moisture.
Why is my salt dough puffing up?
If you mistakenly use self-rising flour, they may puff. And sometimes it happens randomly. Keep the oven temperature low and if it happens consistently, you can try baking at an even lower temperature for a slightly longer amount of time.
Tips for Making the Best Salt Dough Ornaments
- If the dough is too wet and sticky, knead in a little more flour. If it’s too stiff, add a little more water. There is a big range in the way different flours absorb liquid, so there is a normal range of variation in liquid needs. It should be easy to work with—soft and not too stiff and not excessively sticky.
- Use paper lollipop sticks or a skewer to make your holes.
- Use a 4-5 inch round cookie cutter to make handprint ornaments.
- Tie on baker’s twine or thin ribbon to hang as ornaments.
- Try to get the dough to an even thickness before baking so the ornaments bake evenly.

- Bake for the time indicated and then longer if your ornaments still feel soft. They should be firm to the touch without much give.
- Let cool fully before painting.
- If you want to paint the background of a handprint ornament, do that before you paint the inside of the hand. Let dry before adding a second color. Some people like to paint the whole thing white or cream to give it a more finished look.
- Use acrylic craft paint for older kids who can be trusted with paint and tempura washable paints with younger toddlers.since it holds up best on crafts. With younger kids who may wind up wearing more of the paint, I’d recommend.
- To help preserve your finished dried ornaments, you can coat with a layer or two of Mod Podge or spray with a sealer.
I’d love to hear your feedback on this project and what your kids thought of it, so please comment below to share!
Prep Time 30 minutes
Cook Time 2 hours
Total Time 2 hours 30 minutes
Author Amy Palanjian
Cuisine American
Course Holiday
Calories 1kcal
Servings 2 dozen ornaments
- ▢ 4 cups flour
- ▢ 1 cup table salt
- ▢ 1.
 5 cups water
Mix the ingredients together in a large bowl using a wooden spoon. When it becomes too stiff to stir, use clean hands to bring the dough together.
NOTE: If the dough is too wet and sticky, knead in a little more flour, about 1 tablespoon at a time. If it's too stiff, add a little more water, about 1 tablespoon at a time. There is a big range in the way different flours absorb liquid, so there is a normal range of variation here. It should be easy to work with—soft and not too stiff and not excessively sticky.
Knead a few times until the dough is uniform and soft, about 3-5 minutes.
Divide dough into 2 or 4 sections and roll out to about 1/4-½ inch thick between two sheets of parchment paper. This will help prevent sticking.
Cut out with cookie cutters. Transfer shapes to a parchment-lined baking sheet.
Repeat rolling and cutting out shapes to use up the dough.
Preheat oven to 250 degrees F.

Do a 4-5-inch circle and press in a child's handprint if desired.
Use a paper lollipop stick or a skewer to make a hole to hang as an ornament.
If making ornaments, bake for 90 minutes to 2 hours; if baking handprints, bake for 2-3 hours. Continue baking both ornaments and handprints as needed until they are until just firm to the touch, checking every 20 minutes. (It's not a problem if yours take longer than the initial baking time—it varies based on thickness and size...which will likely vary if you are baking these with kids!) They do not need to be rock hard, but should not feel squishy. Handprints will likely take longer than smaller ornaments and may take closer to 4 hours.
Remove from oven, let cool, and paint if desired with acrylic or washable tempera paint.
Once paint is completely dry, seal with Mod Podge if desired.
Mixing Bowl
parchment paper
Mini Cookie Cutters
- Divide the recipe in half to make a smaller portion of dough if desired.

- Use paper lollipop sticks or a skewer to make your holes.
- Use a 4-5 inch round cookie cutter to make handprint ornaments.
- Tie on baker's twine or thin ribbon to hang as ornaments.
- Try to get the dough to an even thickness before baking so the ornaments bake evenly.
- Bake for the time indicated and then longer if your ornaments still feel soft. They should be firm to the touch without much give but do not need to be rock hard. It is not a sign of a problem if yours take longer than mine did to bake—flours and ovens vary!
- Let cool fully before painting.
- If you want to paint the background of a handprint ornament, do that before you paint the inside of the hand. Let dry before adding a second color.
- Use regular acrylic paint for older kids who can be trusted with paint and washable tempera paint with younger toddlers.
- To help preserve your finished dried ornaments, you can coat with a layer or two of Mod Podge or spray with a sealer.
Calories: 1kcal, Fat: 1g, Saturated Fat: 1g, Polyunsaturated Fat: 1g, Monounsaturated Fat: 1g, Fiber: 3g, Sugar: 1g, Calcium: 31mg, Iron: 6mg
Tried this recipe?Rate in the comments and tag @yummytoddlerfood on IG!
Salt Dough Ornaments (+ How to Make Salt Dough)
Jump to How-ToSalt dough ornaments are the sweetest little homemade gift and such a fun Christmas tradition!
You can make them for the whole family or classroom with hardly any effort and there are plenty of fun personalization options. Kids will have a great time making these!
Click HERE to save this recipe for Salt Dough Ornaments to Pinterest!
Making Salt Dough Ornaments
When my daughter, Madeline, was in elementary school she received a homemade salt dough ornament from one of her friends.
I thought that was the cutest idea for kids to gift to one another and I loved that it was a fun friend gift that didn’t cost a lot of money.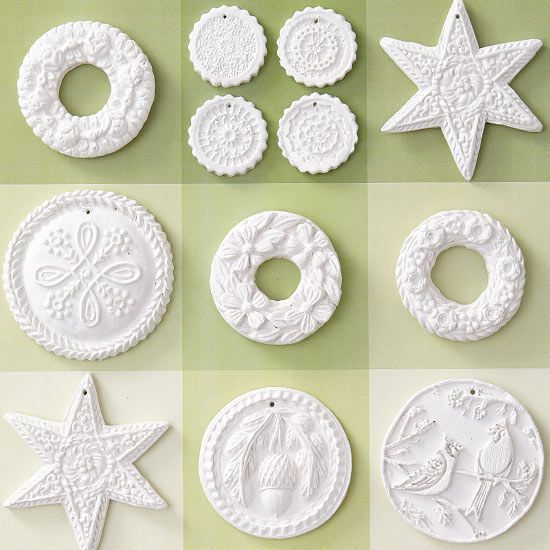
Christmas crafts as gifts for school friends aren’t something I’d really considered before – surely buying stuff was easier? But after she came home with that adorable ornament, I couldn’t stop thinking about it.
In years past, usually on a snowy afternoon when everyone is tired of playing in the snow, we whip up a batch of these cute Salt Dough Ornaments to hand out to friends.
We keep it simple with solid colors, and classic shapes like Christmas trees and snowflakes, but red and white candy canes or yellow bells would be super cute and festive, too.
Salt Dough Ornaments are actually really easy to make and are the perfect activity for kids to do during the month of December. Especially on days that are too cold or snowy to play outside. Usually those days are abundant here in Colorado.
When Kevin and I got married, we decided on decorating two Christmas trees each year — one downstairs in the formal living that is all matchy-matchy and perfect.
It sits in front of the windows and looks so pretty with the tree’s white lights and ornaments in shades of blue, silver, and gold glowing through the windows at night.
Even though it is a decorator tree, there are a few special-to-me ornaments on it that just happen to fit the color scheme, and every year we try to add a couple new ones.
Upstairs in the hallway outside of the kids game room is a tree with all of their collector ornaments. That tree contains all of the cute handmade things the kids made in class in years past, and multi-color lights. It’s totally tacky in the best way possible.
This year, we made a couple extra of these salt dough ornaments to put on our memory-filled tree and I look forward to more in years to come. I don’t think making salt dough ornaments is an activity that kids will ever really grow out of.
This post may include affiliate links. As an Amazon Associate and member of other affiliate programs, I earn a small commission from qualifying purchases.
Salt Dough Ingredients
This is the best salt dough recipe! If you’ve never learned how to make salt dough, don’t fret — it’s so easy to make your own homemade ornaments! Here’s what you will need to make a batch of this salt dough:
- All-purpose flour
- Salt
- Water
- Essential Oils for scenting (optional!)
In addition to these key ingredients to make the dough, you’ll also need some additional materials for shaping and decorating your homemade ornaments:
- mixing bowl
- mixing spoon
- rolling pin
- cookie cutters
- food coloring or acrylic craft paint (or keep them naturally colored)
- drinking straw (this helps cut the hole for threading ribbon or twine to string the ornament)
- parchment paper
- twine or ribbon
That’s it! Any other tools you use are up to your personal preference depending on how you’d like to customize your homemade salt dough ornaments.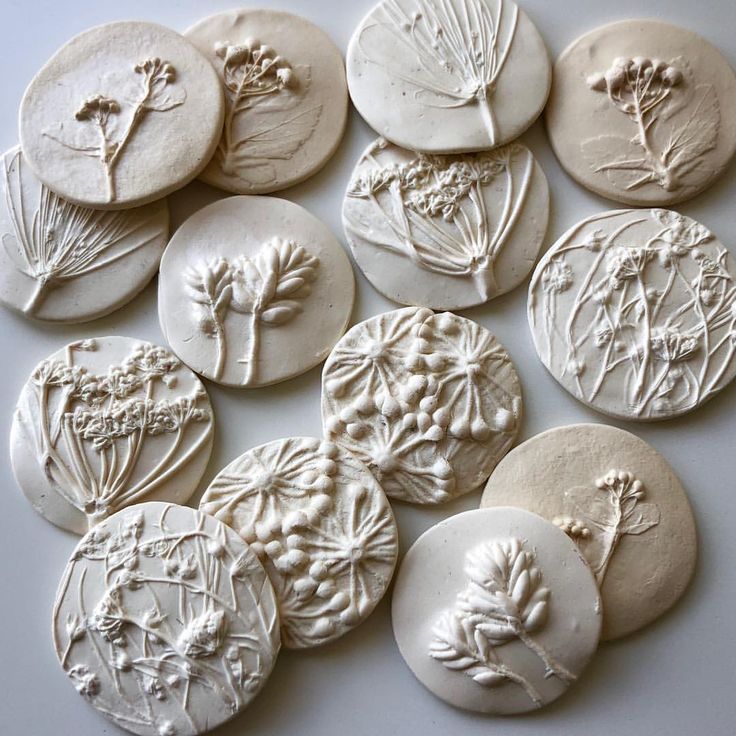
For the complete ingredient list and detailed instructions, scroll to the bottom of this post for the FREE printable recipe card.
Click HERE to save this recipe for Salt Dough Ornaments to Pinterest!
How to Make Salt Dough Ornaments
Salt dough ornaments are super simple to make yourself at home! Here is an overview of the steps you’ll need to follow. For full details, make sure you scroll down to the free printable recipe card which you can keep for your records and use year after year.
- To make this salt dough ornament recipe, you first need to whisk together the salt and flour.
- In a separate bowl, whisk together the water and food coloring (or paint).
- Make a well in the flour mixture and slowly pour in the colored water, mixing after you’ve added half of the liquid.
- Knead the dough for about 10 minutes on top of parchment paper or baking mat until the dough is smooth and colored throughout.
- Roll out the salt dough, then cut it out using your cookie cutters of choice.
- Place the salt dough ornaments on a parchment paper lined baking tray, then cut a hole near the top with a drinking straw.
- Then, bake at 200 degrees F for an hour, or until dry (varies on size and thickness of ornament).
Can I Make Salt Dough Ahead of Time?
Yes, you can make salt dough ahead of time, up to 5 day. Store it in the refrigerator in a completely air tight container or sealed ziplock bag. You can also use a vacuum sealer if you have one.
Storing it air tight is necessary because you don’t want to let the dough get dried out before you’ve had a chance to roll it!
Making salt dough ahead of time is a perfect way to eliminate some of the to-do the day you want to make the dough if you don’t have time to do it all in one day.
This works best when left naturally colored or colored with food coloring. I don’t recommend making it ahead of time if adding acrylic paint as the paint could dry out or degrade when stored for a length of time in the refrigerator.
How Do You Add Color To Salt Dough?
There are two different ways to add customized colors to salt dough – using food coloring or using acrylic paint.
Adding Food Coloring to Salt Dough
Food Coloring To add food coloring to the salt dough, you’ll only need a few drops unless you are looking to achieve very deep colors.
You can mix different colors to create different hues beyond the typical food coloring color options.
I prefer the gel food coloring over traditional food coloring because you don’t need to use a whole bottle of coloring to achieve intensely colored dough.
What Paint Can You Use In Salt Dough?
Acrylic Craft Paint is best for using with salt dough in my experience.
For solid colored salt dough, add 3-6 ounces of acrylic craft paint to the water and mix, then combine (slowly) with the flour and salt mixture. Stir until mixed, and then knead.
When adding paint to the salt dough, make sure you cover all surfaces with parchment paper or butcher paper so you don’t end up damaging your kitchen surfaces.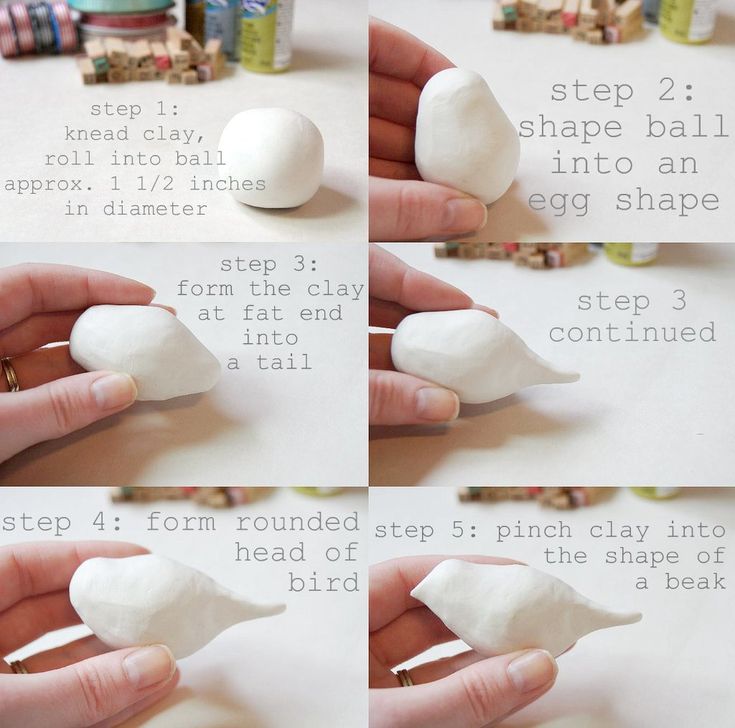
You can also use an old baking mat if you don’t care about it potentially getting stained. I prefer butcher paper or parchment paper because it makes the mess easy to clean up.
When you are kneading the salt dough, you will want want to wear gloves so that the paint doesn’t transfer to your hands. You can use surgical gloves or kitchen cleaning gloves (again, they might stain!).
This time around, as you can see in my photos, I decided to add white acrylic chalk paint to my salt dough to achieve a brighter white color and a matte finish. Then, I stamped the dough using a snowflake rubber stamp.
If the dough is too sticky, simply add extra flour and salt in a 4:1 ratio (such as 4 tablespoons flour and 1 tablespoon salt) until the dough is easily handled. It should be firm but not dry.
Can You Paint Salt Dough After Baking?
Yes, you can bake salt dough after your ornament has completely dried. I recommend acrylic paint for this as well.
You can use small paint brushes to add details to your ornament, which works especially well if your ornament has three dimensional texture to it.
Can You Add Glitter to Salt Dough?
Yes! Adding glitter to salt dough gives a nice affect and can provide fun customization options. Keep reading to learn how to add glitter to salt dough ornaments – there are 3 different ways!
There are a few different ways that you can add glitter to your salt dough.
- One way to add glitter to your salt dough recipe is by adding flakes of glitter – 1 tablespoon at a time until you like the ratio of glitter to dough.
- Another way to incorporate glitter in your salt dough recipe is by adding acrylic paint that contains glitter or shimmer to your water, and then mixing that into the flour and salt when you prepare your dough. When I add paint to my dough, I add 6 ounces of paint to the recipe as written.
- Lastly, you can incorporate glitter in your salt dough ornaments by painting clear craft glue onto parts of your ornament that you want to have glitter and sprinkling loose glitter flakes on top of the glue.
 The ornament should be dry before this method is used.
How to Personalize Salt Dough Ornaments
You could make salt dough ornaments for your family, the classroom, coworkers – you name it!
And your limitations are only set by the cookie cutters you own. If you want to take it one step further, you can even personalize the ornaments for the recipient!
All the different combos you could make, all the Christmas cookie cutters I just happened to have in the pantry… the possibilities are endless.
Here are some of my favorite ways to personalize these salt dough ornaments:
- Take some mini ABC cookie cutters and stamp the middle with the recipient’s last name initial, monogram, or first name.
- Stamp the ornament with that year’s date, or a date of special significance.
- Lightly stamp a design within the cookie cutter using another, smaller cookie cutter.
- Hang two ornaments together on the same string, for example two shapes that have significance for the person you’re giving them to.
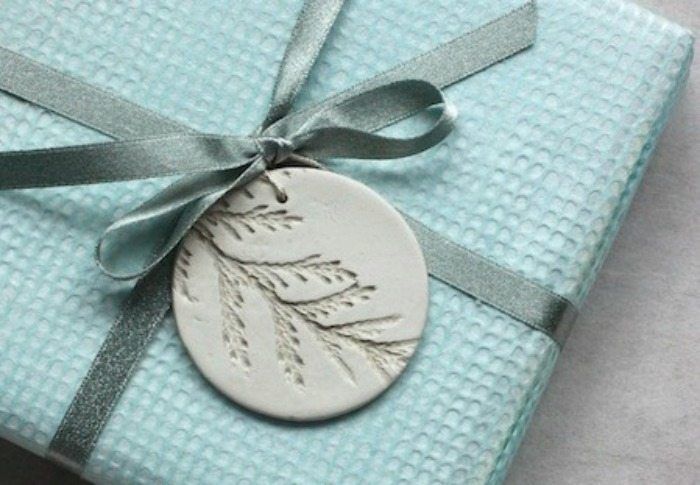
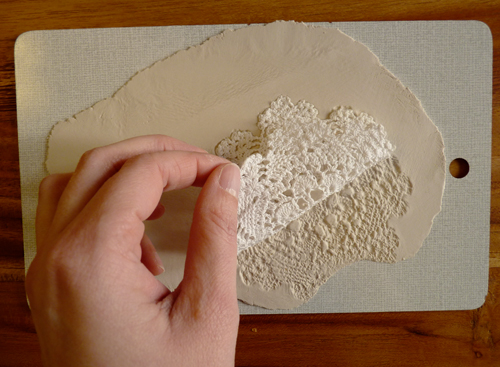
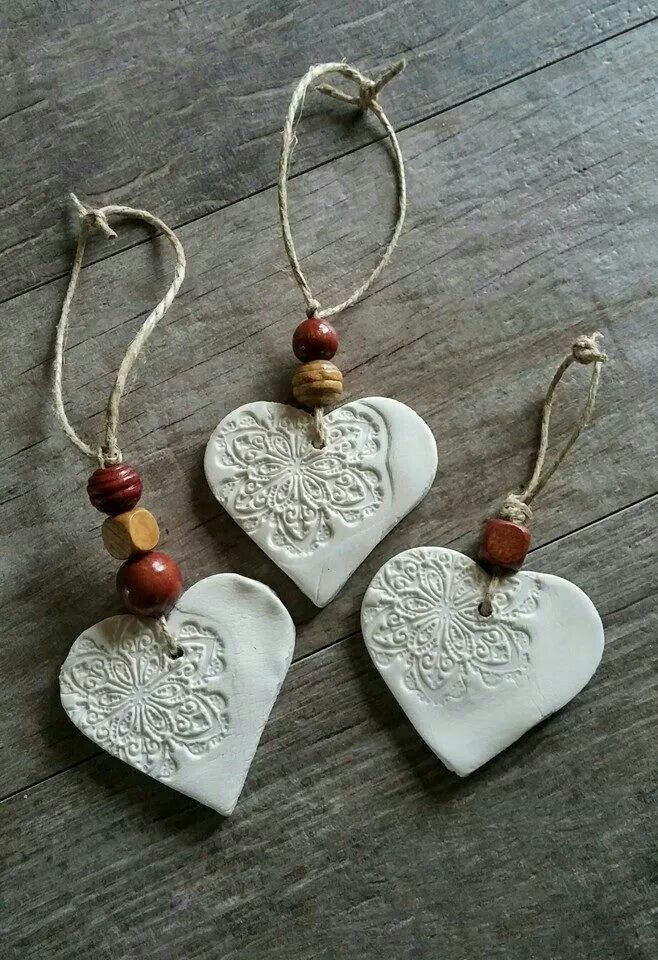
How to Stamp Salt Dough Ornaments with Texture
If you want to add interesting textures or patterns to the surface of your salt dough ornaments, you can do so by pressing different types of materials, tools, or other items that you might have in your home into the surface of the dough before baking.
Some great options for adding texture to your salt dough are:
- lace
- cookie stamps
- leaves
- rosemary sprigs
- pinecones
- pine needles
- rubber crafting stamps
- ribbon
- bottoms of crystal vases
Press the dough firmly with these items to leave an imprint in the dough but don’t press all the way through. You just want to create a texture on the surface that will remain after baking.
Objects or stamps with deeper more pronounced textures and grooves give the best finished appearance after baking and drying. Items that have very small, intricate details will not yield ideal results.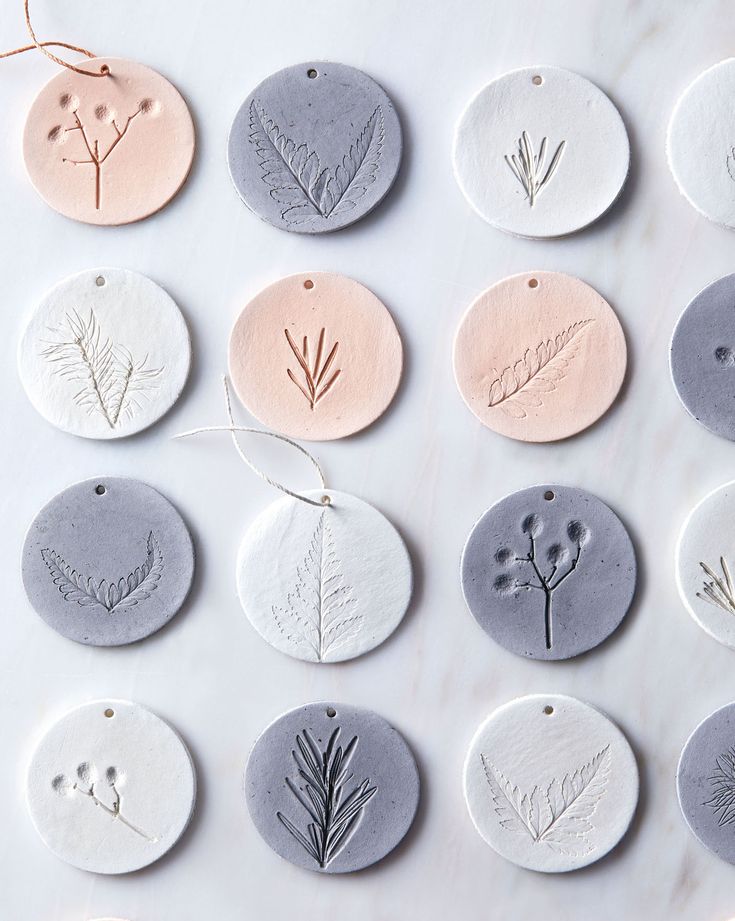
Scented Salt Dough Ornaments
Did you know that you can make scented salt dough ornaments, too? Adding essential oils to your salt dough will give it a great scent that you can enjoy in your home!
Have an artificial tree but love the smell of fresh, real Christmas trees?
Scented Salt Dough ornaments are a great way to give an artificial tree a natural pine scent. Simply add 5-15, depending on your preference, drops of Fir Essential Oil. I like Siberian Fir best!
Another great scent to add to salt dough ornaments is Cinnamon Essential Oil! This will make your house smell like Christmas! A Christmas-y blend that I like is Holiday Joy, which has cinnamon along with orange and a few other essential oils.
The sky is the limit, really! You can add any essential oil scent you like, it doesn’t have to be a holiday themed smell.
For best results, you will want to air dry any salt dough ornaments that you have added essential oils to so that the scent remains longer.
When adding essential oils to your dough I definitely recommend wearing gloves when handling the dough as some people are sensitive to essential oils on their skin.
Have a Salt Dough Ornament Making Party
Pair this fun activity with a mug of your favorite hot cocoa and a round or two of Christmas Book Bingo by the fire.
Grown ups will love this Spiked Peppermint Mocha Hot Chocolate and kiddos will like a mug of Candy Cane Hot Cocoa. If mulled ciders are more your style, try this Spiced Pomegranate Apple Cider.
Just make sure your favorite Christmas Tunes are playing in the background!
That sounds like just about the most perfect winter afternoon I could ask for. I hope it does to you too.
Looking for more fun Christmas activity ideas for kids to pair with making these salt dough ornaments? Check out my post on Tips to Prepare for a Fun Winter Break with Kids
Save this recipe for Salt Dough Ornaments to Pinterest!
How Many Ornaments Does this Salt Dough Recipe Make?
The number of ornaments you will get from this salt dough recipe varies based on the size of the ornament, however this recipe made approximately 10 three inch sized circles in my most recent batch.
After you cut out the shapes for your ornaments, combine any leftover scraps and knead until smooth and combined, then re-roll and cut out more shapes. Repeat until you don’t have any salt dough left.
What Type of Salt Should I Use?
To make this recipe for salt dough, you will use regular table salt! There is no need to buy anything special.
Tips for Making Salt Dough Ornaments
The hardest part of making these salt dough ornaments is simply making sure that your work surface remains dye-free.
I recommend covering your work surface with parchment paper or a plastic table cloth. Something inexpensive that you don’t care if it gets stained or that you can just throw away, the dollar store is great for this. Large sheets of butcher paper also works incredibly well!
Wearing gloves and aprons will help make sure that clothes and fingers aren’t dyed red and green when you’re making your salt dough ornaments.
The number of ornaments you will get from this salt dough recipe varies based on the size of the ornament, however this recipe made approximately 18 three inch sized circles in my most recent batch.
After you cut out the shapes for your ornaments, combine any leftover scraps and knead until smooth and combined, then re-roll and cut out more shapes. Repeat until you don’t have any salt dough left.
Why Does My Salt Dough Puff Up?
Are you wondering why your salt dough ornaments turned out puffy? Typically there are two things that cause salt dough to get puffy: either your oven is too hot or you used self-rising flour.
The first reason that your salt dough ornaments might be puffing is the temperature you bake at. You want your oven to be pretty low. This recipe calls for a 200 degrees F oven.
If you find that your salt dough ornaments are still turning out puffy, then try an even lower temperature. Temperatures lower than 200 degrees F work just fine for baking your salt dough and result in less puffiness. Your ornaments will just take longer to bake and dry out at the lower temperature.
The second reason that a salt dough ornament might puff after baking is because you used self-rising flour.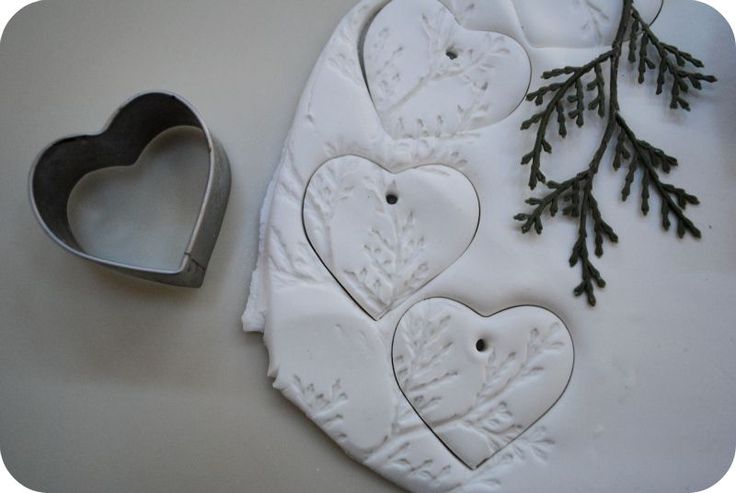 In this recipe it is important to use all-purpose flour as it contains no leavening agents (baking soda, baking powder, etc).
Can You Air Dry Salt Dough Ornaments?
Yes you can make salt dough ornaments without baking them, however I don’t typically choose to make them that way.
No-bake salt dough ornaments take a lot longer to harden because you’re letting them dry out naturally. The benefit to making no-bake salt dough ornaments is that air drying the salt dough eliminates all chance of puffiness.
To air dry your salt dough ornaments, prepare the recipe as instructed, eliminating any cooking spray. Then, place them in a warm, dry place on a flat surface (such as a cookie sheet).
Let the salt dough air dry naturally for about 3-5 days, larger or thicker ornaments may take up to a week to air dry.
How Long Do Salt Dough Ornaments Last?
Properly prepared salt dough ornaments that have fully dried will last for decades!
The most important tip for long lasting salt dough ornaments is to make sure that you let them dry out all the way – and that you don’t let them get damp.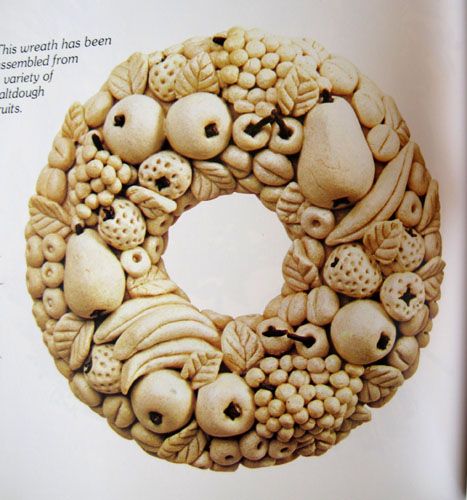 If they dampen, they can mold.
That means, when you pack your Christmas Ornaments up after the Holidays that you need to store them in a way that they won’t get wet.
I recommend air tight plastic ornament bins rather than cardboard boxes, which can get wet and damp due to humidity or leaks in your home. You can even add silica packets to your ornament storage to help mitigate any dampness that does occur.
Salt Dough Ornaments that have gotten wet or have already begun to mold, unfortunately should be thrown out for health reasons. Better safe than sorry!
More Homemade Gift Ideas:
If you love to make homemade gifts for friends, neighbors, teachers, or anyone else on your holiday gift list, you might like to try a couple of these ideas, too.
Instead of throwing out broken bits of crayon, learn How to Make Recycled Crayons and try melting down your scraps and reshaping them into something new. For Christmas-themed crayons, look for silicone molds that are Christmas Tree or snowflake shaped.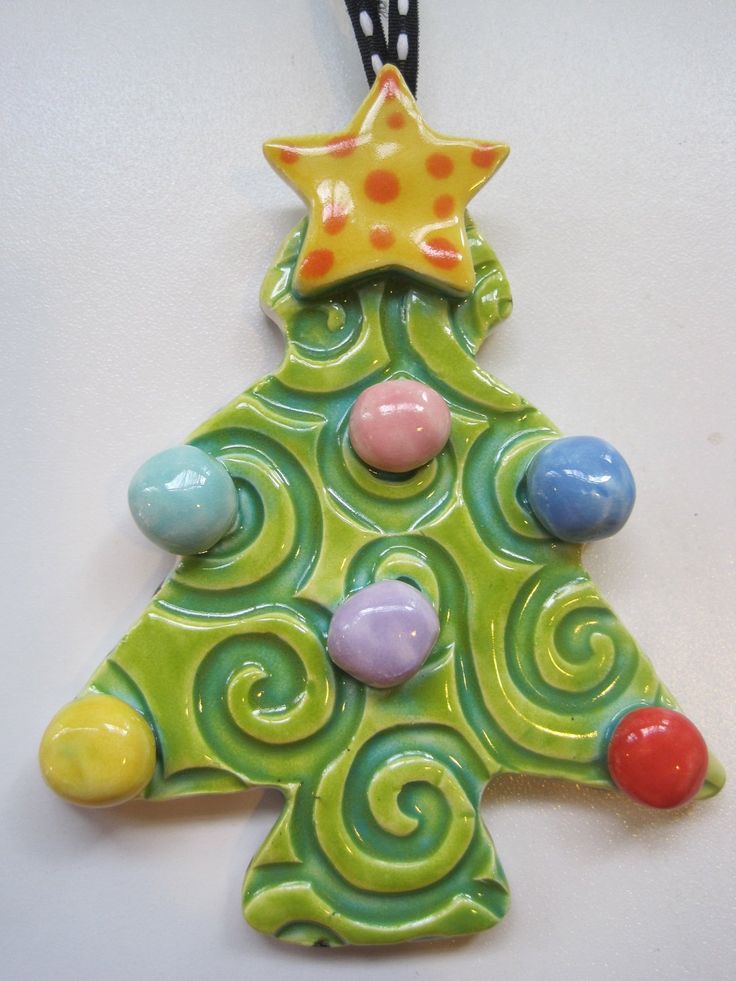
Featuring lemon, oil, sugar and salt, this All-Natural Moisturizing Kitchen Hand Scrub is a simple DIY gift to prepare – perfect for the holiday season. Teachers will love this pampering item. For something extra special, pair it with a mani/pedi gift card or some fun new nail polish colors.
This Rosemary Mint Sugar Scrub is another homemade gift any woman in your life would love. It’s easy to make and can be used all over your body.
Homemade bookmarks make fun crafts for kids and also super cute gifts for them to pass out to friends at school; check out these 8 Cute DIY Bookmark Ideas.
And there are 45 more Homemade gift ideas here!
What are your favorite homemade holiday gifts?
Love this recipe for Salt Dough Ornaments?
Sign up for Good Life Eats email updates and never miss another update!
Materials
- 1 cup All-Purpose Flour
- 1/4 cup Table Salt
- 1/3 cup Water, plus 1 tablespoon
- Food Coloring or Paint
- 1 Drinking Straw
- Nonstick Baking Spray
- Parchment Paper
- 1 roll Colorful Ribbon (1/8 to 1/4-inch wide), Twine, or String
Tools
- Mixing Bowl
- Mixing Spoon
- Surgical Gloves, or kitchen gloves
- Rolling Pin
Instructions
- Preheat your oven to 200°F.
 Place the rack in the center position.
 - Prepare a large baking sheet by lining it with parchment paper. Next, line the work area with butcher paper to prevent your counters or table from becoming stained.
Making the Salt Dough
- In a medium sized mixing bowl, combine the flour and salt until well whisked. In a glass measuring cup, stir in the water and food coloring or paint.
- Make a well in the center of the flour mixture and slowly pour in the colored water, starting with half the amount and adding more as needed to form a firm dough that is moist but not sticky. Stir well.
- While wearing the surgical gloves, knead the dough with your hands for approximately 10 minutes (on top of the parchment paper), or until the dough has become smooth and the color is distributed throughout.
Making the Salt Dough Ornaments
- Use a rolling pin to roll the dough into a 1/8-inch thickness on the parchment paper. Use whatever shaped cookie cutters you’d like to cut out the dough.
- Additionally, you can stamp the dough with various items to create texture or with ABC stamps to personalize the ornaments with someone's initials, last name, or year.
- Combine any scraps that are leftover and knead, then re-roll with the rolling pin and cut out additional ornaments. Repeat until all of the dough has been used.
- After cutting the ornaments, transfer the cut shapes onto the parchment paper lined baking sheet.
- Use the straw to cut a small hole near the top (where you’d like to hang the ornament from). Discard the small circular piece of dough that you remove to create the hole.
Baking the Salt Dough Ornaments
- Place the baking sheet in the preheated oven and bake for 1 hour, or until dry.
- Flip the ornaments half way through baking so that the underneath side can dry out as well.
- When done baking, remove from oven and let cool completely on a wire rack.
- After cooling, thread the ribbon or string through the holes and tie to hang.
Notes
SAFETY PRECAUTIONS:
- Do not ingest this dough. It is not intended for eating.
- Salt dough ornaments are fatal to pets, their body’s cannot handle the salt , so they should be sure to hang them high and out of your pet's reach.
WHAT PAINT CAN YOU USE IN SALT DOUGH?
Acrylic Craft Paint is best for using with salt dough in my experience. For solid colored salt dough, add 3-6 ounces of acrylic craft paint to the water and mix, then combine (slowly) with the flour and salt mixture. Stir until mixed, and then knead.
If the dough is too sticky, simply add extra flour and salt in a 4:1 ratio (such as 4 tablespoons flour and 1 tablespoon salt)
When adding paint to the salt dough, cover all surfaces with parchment paper or butcher paper so you don’t end up damaging your kitchen surfaces. Wear surgical gloves when kneading the dough so paint doesn’t transfer to your hands.
WHAT PAINT CAN YOU USE IN SALT DOUGH?
Do I have to add the paint? No - feel free to use food coloring or don't add any coloring and hand paint the ornaments after they've dried.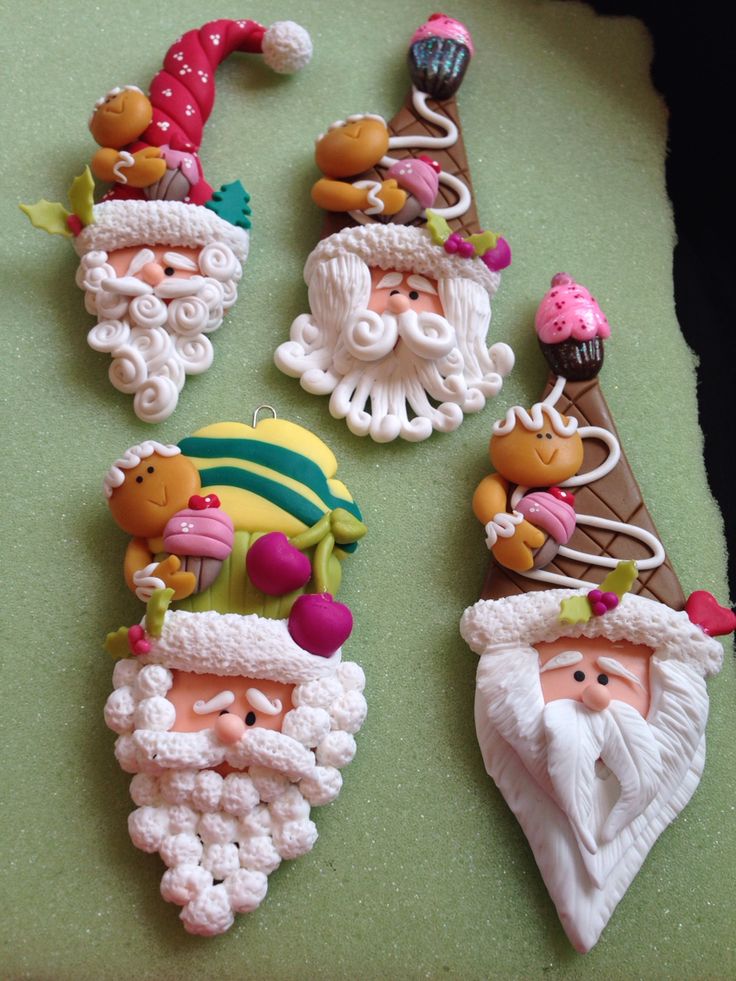
CAN I MAKE SALT DOUGH AHEAD OF TIME?
Yes, up to 5 days. Store it in the refrigerator in a completely air tight container or sealed ziplock bag. You don’t want to let the dough get dried out before you’ve had a chance to roll it!
This works best when left naturally colored or colored with food coloring. I don't recommend making it ahead of time if adding acrylic paint.
HOW MANY ORNAMENTS DOES THIS SALT DOUGH RECIPE MAKE?
The number of ornaments you will get from this salt dough recipe varies based on the size of the ornament, however this recipe made approximately 10 three inch sized circles in my most recent batch.
Recommended Products
As an Amazon Associate and member of other affiliate programs, I earn from qualifying purchases.
-
Gel Food Coloring
-
Adjustable Rolling Pin with Removable Rings
-
Non-slip Silicone Pastry Mat
-
Christmas Cookie Cutters Set
-
Mini ABC and Number Cookie Cutters
-
Baking Sheet
I originally shared this fun recipe for Salt Dough Ornaments on Food Fanatic, but I thought you’d like to see it here on Good Life Eats.
Three salt dough recipes for modeling with children: a master class and interesting facts
January 23, 2022 12:30
117413
Together with the guide of the Museum of International Gingerbread, we understand baking traditions, salt dough recipes and ideas for joint creativity with kids.
If a child likes to do something with his own hands, but plasticine is already tired, try salty dough. It gives limitless scope for creativity - from making your own salt dough to playing with the resulting crafts. It is also an opportunity to spend time together and discuss the traditions of baking, gingerbread and even literacy. So:
- recipes for the salt dough for the article were checked and carefully selected,
- for interesting facts we turned to Elena Chipenko, the tour guide of the Museum of International Gingerbread in Tula (and where else to talk about gingerbread?),
- all the ingredients for salt dough , if they were not at hand, you can buy in VkusVille, including with free delivery.
 Go!
Go!
Classic recipe for salt dough without glue
There are many recipes for salt dough. If you are just starting to get acquainted with it, choose a proven classic recipe. It is very simple - both in preparation and in composition.
You will need:
- Deep bowl for kneading the test
- 200 ml of water
- 300 g of flour
- 300 g of salt (necessarily small)
to prepare a few minutes to prepare a few minutes , but you have to wait until the dough is infused in the refrigerator.
1. Pour 300 g of fine salt into a container.
2. Add 300 g flour (preferably wheat flour), mix.
3. Start adding cold water to the dry mass. A little at a time to see how quickly the flour absorbs moisture. You should get a thick but not dry dough.
4. Knead the dough with your hands until it becomes elastic.
5. Wrap the dough in plastic wrap and refrigerate for 2-3 hours.
Done! You can start getting creative.
Did you know that…
… Ancient Egypt is considered the birthplace of gingerbread. Allegedly, it was then that honey was added to the dough for bread. He, as a natural natural preservative, increased the shelf life of the dough.
But today's popular slimes were accidentally invented by... a little girl. Back in 1978, she played and mixed various ingredients with glue. What happened next, read our report on the production of slimes and kinetic sand.
Do you know what this yellow man is in the photo? This is Fudik, a character from VkusVill who helps to find food and goods for children in the store. Here you can find out how it got to us from space. And here is useful information for parents about what the “Fudik” label on VkusVill products means. You can also buy a coloring game about our hero's space adventures.
1
Space coloring board game
50 g
165 rub 165. 00 165.00
Let us also remind you that you can order with free delivery kits for modeling clay and plasticine:
"Air" plasticine, 24 colors
Plasticine-dough "Marshmallow", 6 colors
Plasticine "Light", 12 colors
Polymer clay, luminous
Polymer clay for modeling, 10 colors
Mass for modeling "Light and ball clay 5+5"
1
Air clay 24 colors
240 g
255 rub 255.00 255.00
1
Marshmallow dough, 6 colors
310 g
175 rub 175. 00 175.00
1
Dough plasticine 6 colors
310 g
165 rub 165.00 165.00
Salt dough with PVA glue
If you add PVA glue to salt dough, it will become more plastic, and figurines made from it will become stronger. By the way, such crafts will also dry faster.
You will need:
- 1 tablespoon of PVA glue
- 100-150 g of water1
- 20012
- 200 g of fine salt
- 1 teaspoon of sunflower oil
- Vanilin, codes or croacal according optional
- deep kneading bowl
Preparation:
1. Combine flour and salt in a bowl.
2. Pour cold water into a separate container and add PVA glue. Stir.
3. Slowly pour the mixture of water and glue into the bowl of flour and salt. You may need a little more or a little less liquid - it all depends on the flour.
4. Try kneading a small piece of dough and stretching it. If it does not crumble, then there is enough water.
5. To make the dough more plastic and less sticky to your hands, you can add a teaspoon of vegetable oil to it.
6. On the table, knead the dough with your hands to form a plastic mass.
7. Wrap the dough in plastic wrap and leave for half an hour. During this time, the flour will release the gluten and the dough will become more elastic.
Tip: If you don't like the smell of glue, add a pinch of cinnamon, vanilla or cocoa to the dough. Then the crafts will be fragrant and more comfortable.
Did you know that…
— the name of the gingerbread is based on spice, that is, the addition of spices. Previously, spices were brought from the East. But not everyone could afford such an expensive ingredient, so they began to add, for example, horseradish to give the gingerbread a spicy taste.
- At the same time, the first mention of the Tula printed gingerbread was found in 1685. It was so long ago that even the New Year was then celebrated on September 1, and only 15 years later Peter I changed this date to January 1. Read more interesting things in the article "How Christmas and New Year were celebrated in St. Petersburg in the 19th century and what they ate on holidays."
— Why are gingerbreads called printed? This is because they are formed using special printed boards with embossed carvings, inscriptions, and drawings. Making such a board for a gingerbread is painstaking and difficult, because you need to take into account the symmetry, observe the multi-level pattern, and cut out the letters and numbers (they, by the way, must be written backwards, one mistake - and the board needs to be redone).
The printing method for making gingerbread is the most popular in our country. In Tula, gingerbread is prepared in this way even today. When creating crafts from salt dough, try adding a pattern from a sand mold - “print” your craft.
By the way, along with the ingredients for the dough, we can bring molds that will be useful for curly cookies - a gingerbread man and a Christmas tree.
Colored salt dough
Colored dough is more fun to make. To make it, just add natural dyes or gouache to the finished base for salt dough.
For the test you will need:
- 150 g of flour
- 150 g of salt
- 100-150 g of water
for natural dyes:
9000 9000 9000 9000
- Kurkuma (yellow)-Kurkuma (yellow) teaspoons
- raw beet juice (pink) - 3 teaspoons
- cocoa (brown) - 3 teaspoons
- flour (beet juice thickener) - 2.5 teaspoons
- salt (beet juice thickener) – 1.
5 teaspoons
Preparation:
- Combine salt and flour in a bowl.
- Gradually add water, mixing thoroughly until a thick paste is obtained.
- On the table, knead the dough with your hands to form a plastic mass.
- Add color according to the instructions below.
For pink, squeeze some juice from fresh beets, add a pinch each of salt and flour, mix. Add the mixture to the prepared salt dough, mix well. Wrap the dough in cling film and put it in the refrigerator to "brew".
For yellow or brown dough, use turmeric or cocoa. Mix them with water, add to the finished dough and knead until a uniform color.
If there are no natural dyes, use regular gouache. Knead the dough on the table. Divide into parts according to the number of colors. Next, lightly knead each piece of dough and place a portion of gouache on top. "Wrap" the paint in the dough, like filling in a pie. Thoroughly knead until a uniform color. Repeat with other colors.
Wrap the colored dough in plastic wrap and refrigerate for 1-2 hours. Ready! And don't worry that there is so much to do by hand - this part of the process is almost more fun than creating future crafts.
Did you know that…
… until now, up to 97% of the work in creating gingerbread is done by hand. At the same time, each manufacturer has his own recipe, which he keeps secret.
You can create your own salt dough recipe by adding a unique combination of colors and spices. And as an idea for figurines, try letters. After all, it turns out that in the old days children were taught to read and write with the help of gingerbread letters. This sweet was a favorite delicacy. Remember the letter - ate the gingerbread, but did not remember - you will be punished. Hence the expression about the stick and the carrot.
When modeling, to create beautiful patterns on the surface of the dough, you will need :
- figured rolling pins (they are sold separately or come in a set with plasticine, for example, in VkusVille there is a kit for modeling "Cooking Pizza")
- toothpicks
1
Pizza making kit
466 g
385 rub 385.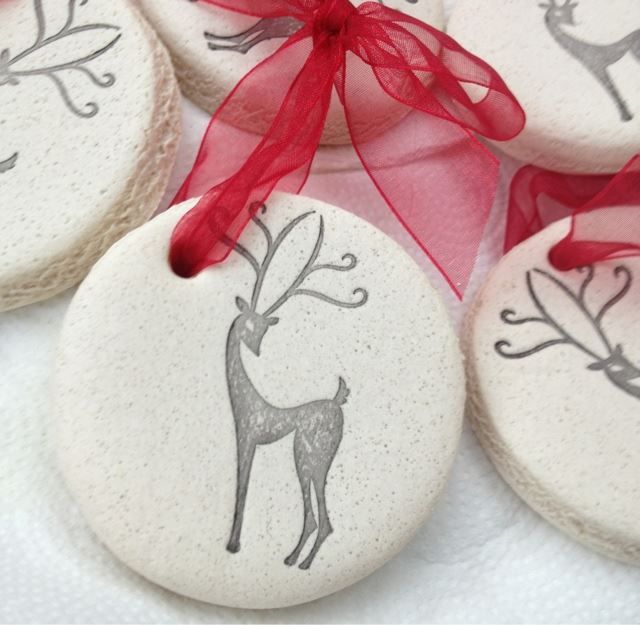 00 385.00
- marker caps
- pasta
- buttons
- beads 90.01 scissors and more Don't limit your imagination!
How much and how to bake salt dough
Making crafts from salt dough is a long and exciting process. After preparing the dough and sculpting, the craft must be dried and then painted.
There are two drying options:
- just leave the craft on the windowsill. A thin one will dry in a day, a more voluminous one may take a couple of days;
- there is a way to speed up the process and dry the craft in the oven. Line a baking sheet with foil or parchment paper and place in a cold oven.
Dry in the oven in three stages:
- 1 hour - at a low temperature of about 50 degrees,
- 1-2 hours - at a temperature of about 100 degrees,
- 30 minutes - at a temperature of 140 degrees.

If you have a gas oven, cut this time in half.
Check if the craft is dry by tapping it. If the craft "rings" - then it's ready. Leave the figurine to cool and then you can paint.
Important: Do not dry crafts in the microwave. With this heating, the figurines are deformed.
While the figurines are drying, you can do this simple paper craft with the remaining gouache. In VkusVille, you can order different kits for creativity, such as paper panels.
Or watch our photo and video tutorial on how to grow microgreens at home: kids will love that the seeds germinate quickly and can be harvested in just a few days.
1
3D panel paper puzzle toy
41 g
215 rub 215.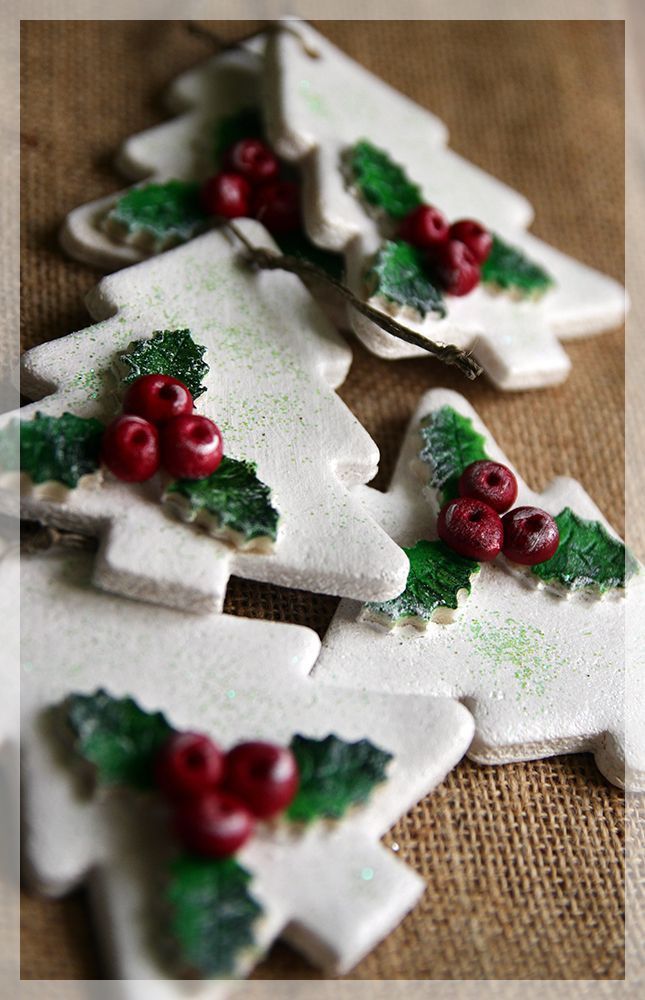 00 215.00
How to color salt dough products
Children can use all their imagination in salt dough products. But I can start painting and decorating only after the figures dry well.
You can color the craft with gouache, watercolors, acrylics and even finger paints.
You can apply some glue and decorate the craft with sequins or beads. And if you make figures from colored dough, just dry it.
To make the colors brighter and not fade, it is permissible to cover the craft with varnish. You can use colorless nail polish or unscented furniture polish. Only acrylic varnish is undesirable, since gouache on crafts can spread.
Q&A
Why does salt dough crack when dried?
The dough cracks because it is too wet and contains too much water. Or you overdid it with vegetable oil. To fix this, simply add more flour to the dough.
How do I keep the dough from sticking to my hands?
Just add a little vegetable oil to the dough while kneading.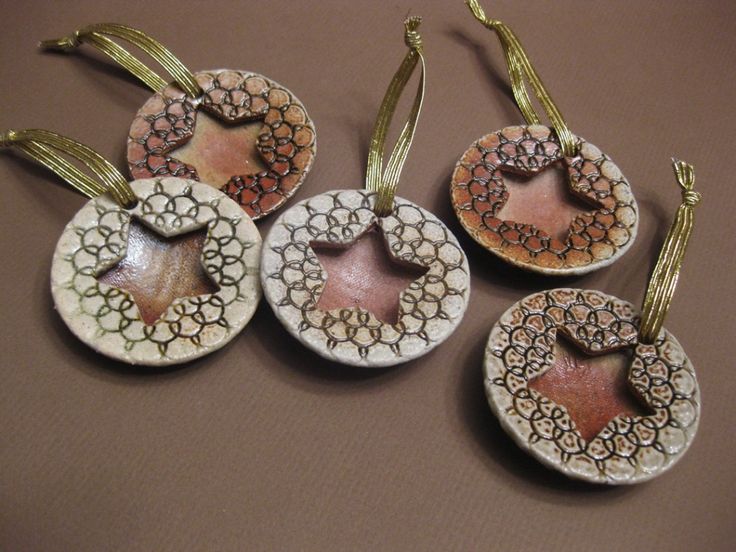
Can salt dough be stored?
Usually the dough is stored for 3-4 days in the refrigerator without loss of properties and plasticity. However, when interacting with air, it can change color and lose elasticity. When storing, make sure that the container with the dough is airtight, or wrap the dough with cling film in several layers and / or a bag.
1
Quick view
Cocoa powder
100 g
158 rub 158.00 158.00
2
Quick view
Ground turmeric, 10 g
10 g
0003
3
Quick view
Premium wheat flour
1 kg
72 rub 72.00 72.00
4
Supermarket
Quick View
Pizza Making Kit
466 g
385 RUB 385. 00 385.00
5
Quick view
Food salt "Iletskaya", grinding №1
180 g0003
The perfect salt dough recipe. Tips for beginners
I'm here: home ›
Creativity
›
Crafts
›
Plasticine
› The perfect salt dough recipe. Beginner Tips
From plasticine
A real miracle when a shapeless plastic mass turns into a playful kitten or a fabulous house. I suggest you feel like a magician and prepare the perfect salty dough for future masterpieces.
1305 t.0
Weight, which keeps its shape perfectly floats and does not deteriorate over time, - dream of all lovers modeling.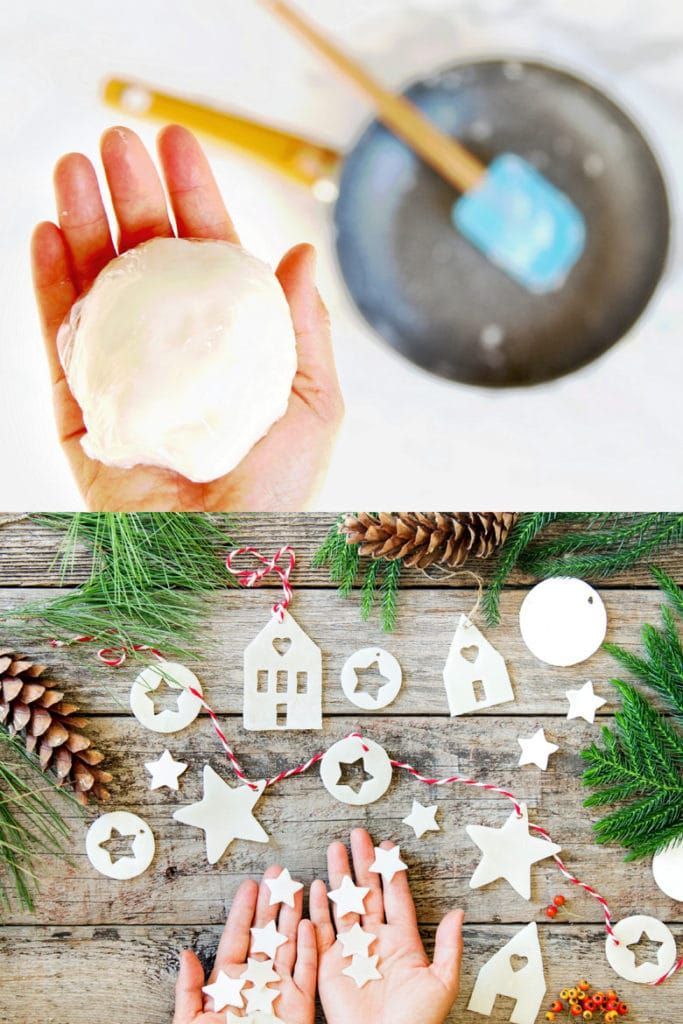 And the dream of all parents - safe plastic mixture without allergens and harmful additives . Salt dough skillfully brings everything together these qualities and thanks to baking better preserved than plasticine.
figurine from salt dough will become an exquisite decoration of your rooms and a wonderful tool for games. How to make salt dough soft and pliable, and even for a long time to keep flour mixture? Desert Boy Knows answer!
Classic salt dough recipe
modeling from salt dough is not a new occupation. The origins of this type of creativity are lost deep in the history of our culture. Remember only Kolobok from a folk tale and the custom of baking larks on Candlemas. Hold the basic salt dough recipe for crafts - continue traditions of ancestors with pleasure!
For making salt dough for you will need:
- 1 glass of fine salt
- 2 cups of flour
- half a glass water,
- 5 Art.
 l. sunflower oil,
 - natural juice or gouache (optional).
K cause!
IN In a deep bowl, mix dry ingredients: salt and flour. Add sunflower oil and pour some water. Knead the dough. To give the mixture a certain color, carefully stir in the carrot (beetroot) juice or diluted in water gouache. If necessary, small add water or flour in portions to adjust the viscosity of the dough.
Important! It is best to store the finished dough in refrigerator no more than a day, tightly wrapping the mass with cling film.
Salt dough recipe for sophisticated works
If you plan to make thin embossed figurines or miniatures salt dough, to the classic recipe you have to add a secret ingredient. Which? Read on - I'll tell you everything!
For making salt dough in a special way the recipe you will need:
- 1.
 5 cups of flour
 - 1 a glass of salt
- 125 ml of water
- 1 Art. l. PVA glue or starch
- food dye.
K cause!
Prepare deep container. Mix flour and salt and add 125 ml of water. Mix thoroughly Ingredients. Now add a dining room a spoonful of starch or PVA glue. Starch increases the plasticity of the mass, and the glue increases its strength. PVA can be replaced 2 tsp wallpaper glue diluted in water, according to instructions. At the end add food coloring and mix well. If you need a lot of different colors, divide the dough into several pieces and add the colors you want. Merry creativity!
Preparing tools for working with salt test
From salt dough can be made that anything - toy products, animals, flowers and luxurious paintings. But so that your the work looked original and intricate, you will need different tools. You don't need to buy anything, use items that are at hand.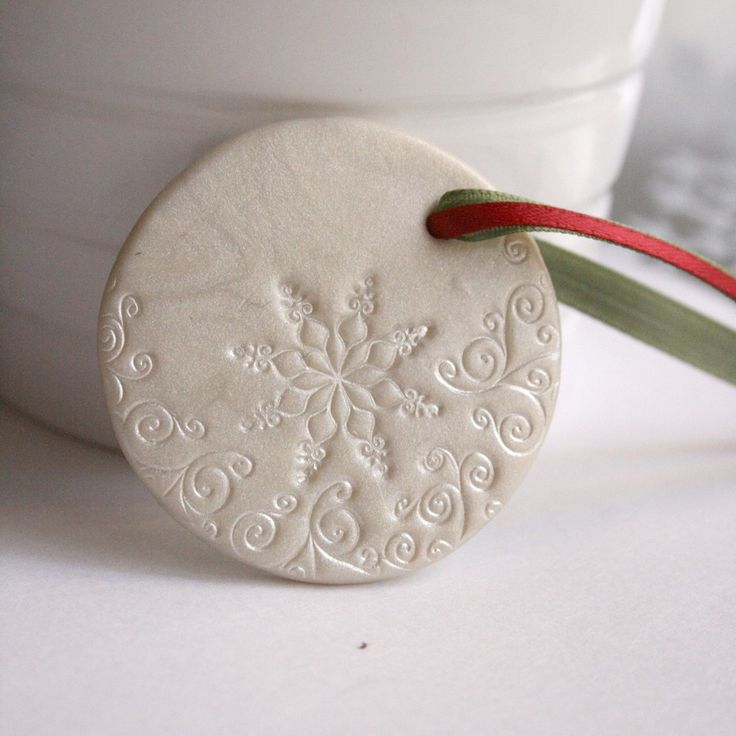
For creating unique patterns on the surface salt dough is ideal:
- curly rolling pin or water bottle
- toothpicks (for punching holes)
- caps from markers,
- rod from a ballpoint pen
- knife for plasticine,
- molds for cookies,
- buttons,
- beads,
- pasta,
- lace and other stamps for embossing,
- press for garlic.
Boldly Experiment with patterns and shapes! IN in case of failure, the item is easy to fix or blind again.
How to dry products from salty test?
To the finished craft pleased the eyes for a long time your guests, it needs to be right dry. Remember: the main rule of drying salt dough products - no sudden changes in temperature.
There are two ways to dry figurines from salt dough:
1. The simplest is natural.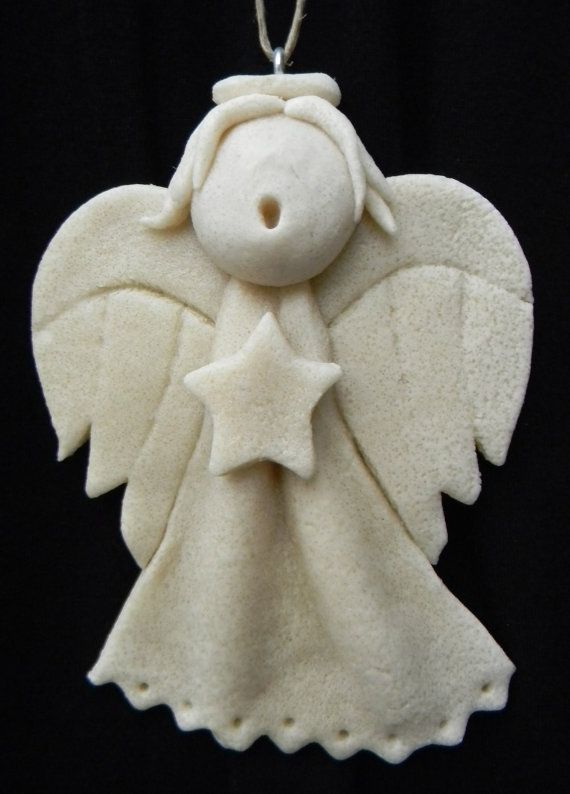 Just leave the figurine to dry room temperature for several days or weeks. In no case can dry the product on a hot battery - it will crack or crumble. Too humid room is also not suitable - the dough, like a sponge, absorbs moisture and can easily get wet. The natural way is extremely easy, however, oh-so-very slow. And to us want to go faster, right?
2. Drying in the oven. Put down figurine on parchment in a cold oven and bake on low heat, gradually increasing the temperature. Regularly turn the product over so that it baked evenly on all sides. After finishing work, the craft immediately do not take it out - let it cool in the oven.
Vo drying time for salt dough refer to the following table.
| Short products (thickness up to 2 cm) | Volumetric work (more than 2 cm thick) |
| 1 hour at 50 °C | 1–2 hours at 50 °C |
| 1-2 hours at 75 °C | 2-3 hours at 75 °C |
| 1 hour at 100 °C | 1–2 hours at 100 °C |
| 1 hour at 125 °C | 2 hours at 125 °C |
0. 5–1 hour at 150 °C 5–1 hour at 150 °C | 1 hour at 150 °C |
Dry dough products can be turned off oven. Warm it up properly and put it down figurines in heat. Wait until the oven cool down. Repeat the process for several once.
In time to work with salt dough fail inevitable. However, don't be upset and put your hands down. If during the drying the craft is cracked or fell away from it detail, return the toy shape will help construction glue PVA or Moment.
cracks and irregularities can be smoothed out by small files for metal. Such for sure found in dad's tools.
Finished it is better to varnish the product - so it longer pleasing to the eye his talented master.
More sculpting ideas here:
- Mushroom polymer clay panel,
- Animals plasticine,
- Interesting plasticine products.

Learn more