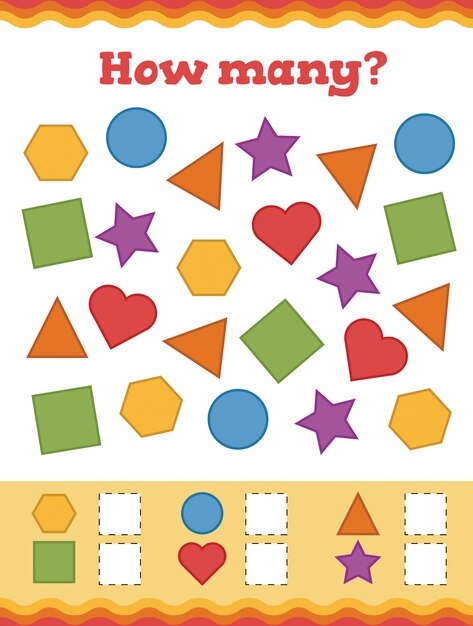
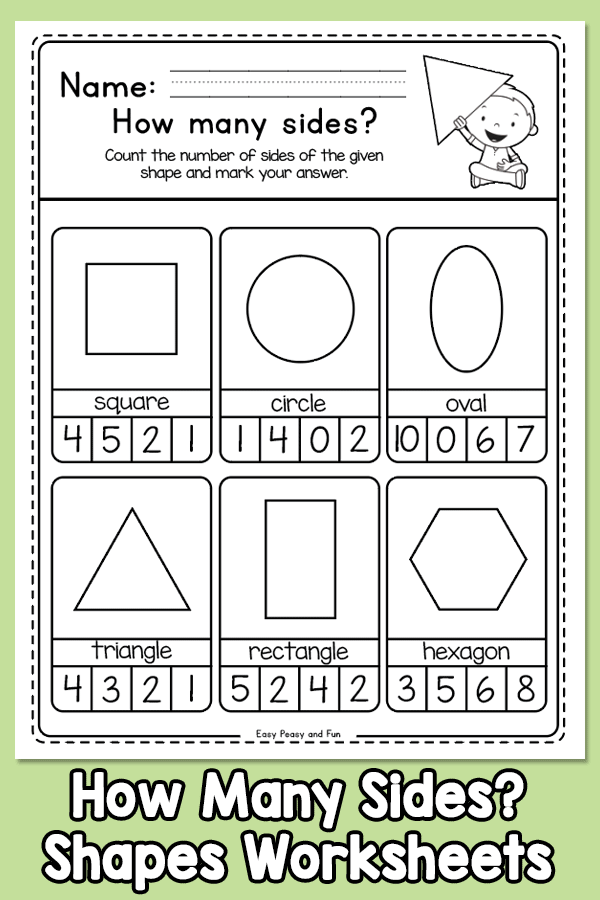
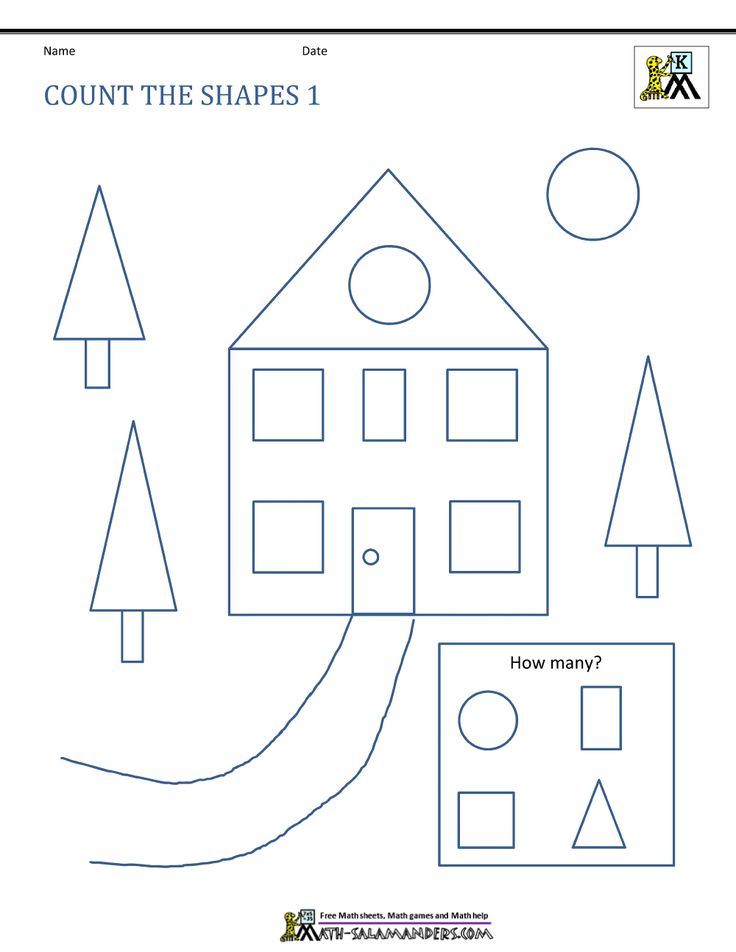
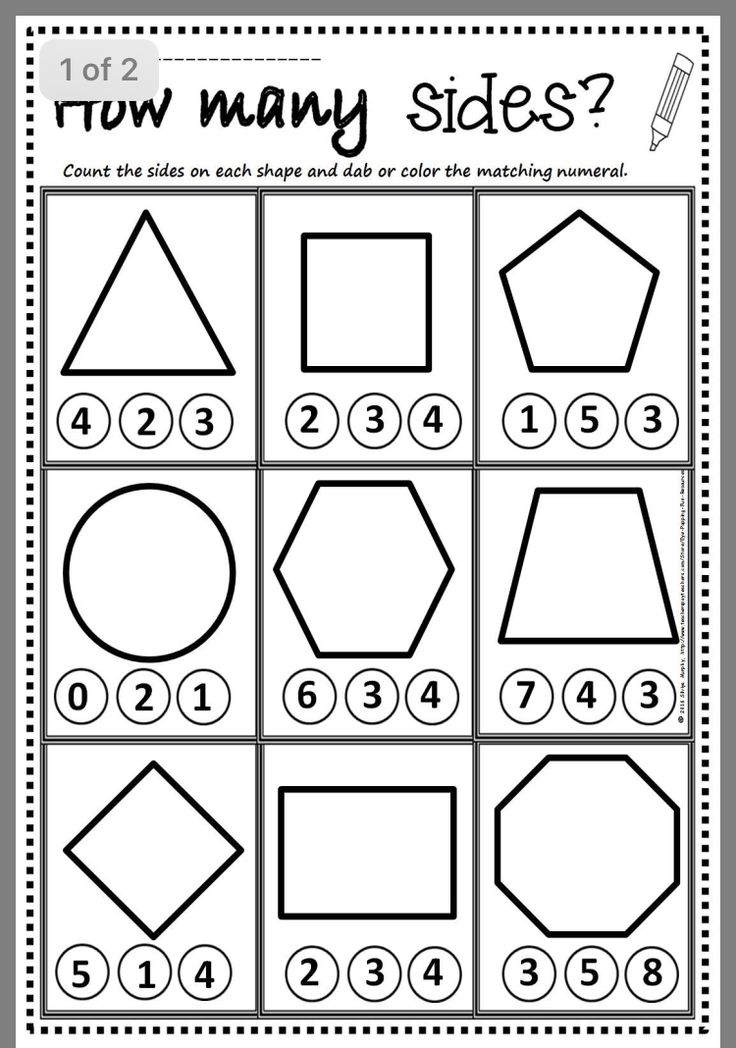
How many shapes
Different Shape Names (with Useful List, Types) • 7ESL
Pin
Are you looking for different shape names in English? Here you will find a list of shapes with different types and useful example sentences. If you work in a business that requires the use of mathematics, for example then it would be very important that you are aware of the English names for shapes.
However, this may not be the only reason that you need to learn this information. When taking part in day-to-day conversations, you will need to learn the shape names in order to describe something or be able to understand what someone is talking about, for example, if a person tells you about ‘the square plate.’ Here, you can learn shape names and further expand your vocabulary.
Table of Contents
Shapes
What Are Shapes?
Shapes are geometric figures, or the pattern an outline falls into. Shapes are often drawn (whether by ink, pencil, or digitally), but they occur in life, also. Frequently, people picture 2D (two-dimensional, or flat) images when they hear the word “shapes,” so most of the objects listed in this lesson will be 2D shapes, but some will be 3D as well.
Different Types of Shapes
There are many, many different types of shapes, and there are names for basically all of them. The following list focuses on more common shapes that you’re more likely to encounter or to need or want to know the name of.
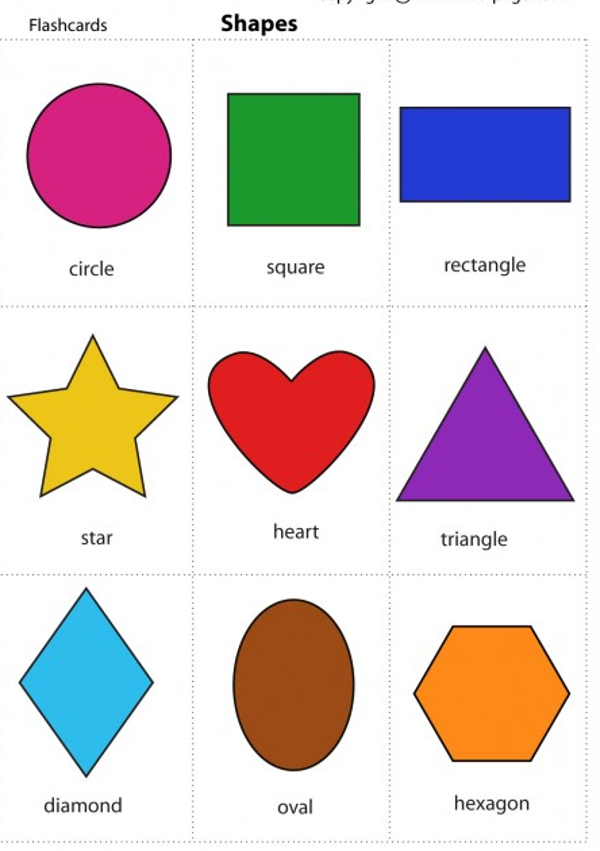
Shape names with pictures
Pin
Two-Dimensional (Flat) Shapes
- Circle: A circle is an equally round shape. Picture the lid of a jar, flat, from above. That is a circle. The wheels on a car are circular, as well. So are the holes in most lined paper and notebooks.
- Oval: An oval is basically a circle that’s been a little squished. The cups of over-the-ear headphones are generally referred to as oval. So is the profile of an egg.
 Some make a distinction between circles that have been squished in the middle versus circles that have been squished at the top, the former being called an ellipse, but common usage treats both as ovals.
 - Rectangle: A rectangle is a shape with four sides, made up of two sets of parallel lines, with four right angles (90 degree angles; picture a capital L). It doesn’t matter whether the sets of sides are the same length. Picture a plain piece of printing paper. This is a rectangle, with one set of sides (generally the top and bottom) shorter than the other set of sides (generally the left and right).
- Square: A square is a very specific type of rectangle, one with four equal sides. Some boxes have a square footprint. Origami paper is square.
- Triangle: A triangle is a shape with three straight sides. These sides can be any length, with any degree of angle, as long as the three sides are joined at their ends. Many warning signs are triangular.
 A slice of a round pizza is mostly triangular (the crust is a little too rounded to be perfect).
 - Pentagon: A pentagon is a shape with five sides. A basic drawing of a house, with two lines for the roof, a line for each side, and a line for the bottom is generally a pentagon.
Shapes with more sides are generally named based on how many sides they have. A hexagon has six sides, heptagon has seven, and an octagon has eight.
Three-Dimensional Shapes
Three-dimensional shapes are ones that aren’t just flat on paper, but also take up room vertically. Only a few are really commonly named.
- Sphere: A sphere is a 3D circle, like a ball.
- Cube: A cube is a 3D square, like a box.
- Pyramid: A pyramid is a 3D triangle. The giant structures in Egypt are pyramids, as is the Luxor in Las Vegas.
Shape Names
It’s important to build a good vocabulary, in any language. The more words you know and understand, the better you can communicate. Even if you don’t use the words often, understanding them allows you to follow along with a conversation, even if it ventures a little outside of your comfort zone. This lesson is specifically focused on different types of shapes.
- Nonagon
- Octagon
- Heptagon
- Hexagon
- Triangle
- Scalene triangle
- Right triangle
- Parallelogram
- Rhombus
- Square
- Pentagon
- Circle
- Oval
- Heart
- Cross
- Arrow
- Cube
- Cylinder
- Star
- Crescent
The math student measured each side of the nonagon until he had measurements for all nine edges.
Pin
OctagonThe sectional shape is a quarter of an octagon.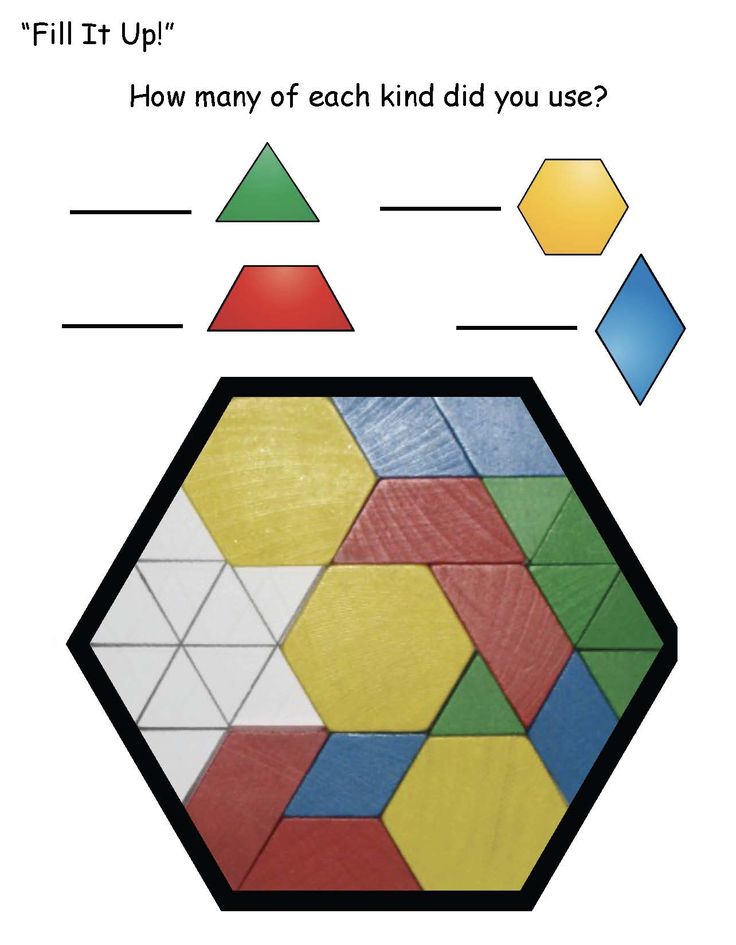
Pin
HeptagonThe pagoda has a base of heptagon.
Pin
HexagonA hexagon is a six – sided figure.
Pin
TriangleThe sum of all the angles of a triangle is 180 degrees.
Pin
Scalene triangleA scalene triangle is a triangle that has three unequal sides.
Pin
Right triangleThe hypotenuse is the longest side of a right triangle.
Pin
ParallelogramThese are the opposite sides of the parallelogram.
Pin
RhombusA rhombus is a simple quadrilateral whose four sides all have the same length.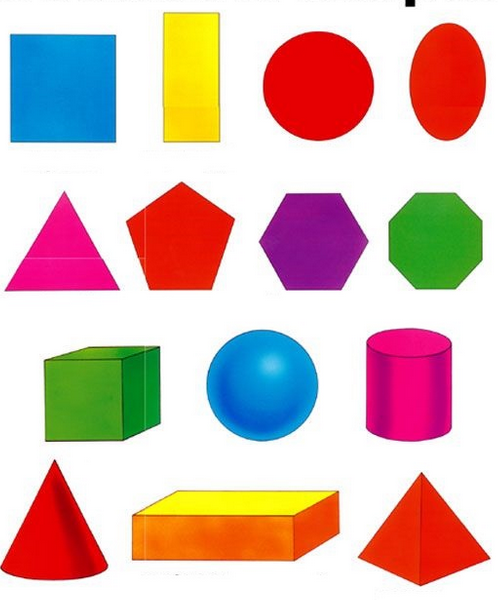
Pin
SquareThe interior angles of a square are right angles or angles of 90 degrees.
Pin
PentagonDraw a pentagon, a regular five-sided figure.
Pin
CircleThe students sit in a circle on the floor.
Pin
OvalThe shape of the earth is an oval.
Pin
HeartThe pool was in the shape of a heart.
Pin
CrossThe cross is the symbol of Christianity.
Pin
ArrowIt flew straight as an arrow.
Pin
CubeThe box was cube-shaped.
Pin
CylinderThe cylinder is rotated 180 degrees.
Pin
StarShe cuts these paper into star-shaped.
Pin
CrescentHe has a crescent–shaped knife.
Pin
Shapes | PictureLearn different shapes with images to improve and expand your vocabulary, especially shapes and colors vocabulary words in English.
PinShapes: Different Shape Names (with Useful List, Types)Shapes Names VideoThere are shapes everywhere, and so references to them happen frequently. Hopefully, after this lesson, you’re feeling prepared to deal with shapes!
Shapes – Definition with Examples
What are Shapes?
In geometry, a shape can be defined as the form of an object or its outline, outer boundary or outer surface.
Everything we see in the world around us has a shape. We can find different basic shapes such as the two-dimensional square, rectangle, and oval or the three-dimensional rectangular prism, cylinder, and sphere in the objects we see around us. These geometric shapes appear in objects we see as credit cards, bills and coins, finger rings, photo frames, dart boards, huts, windows, magician’s wands, tall buildings, flower pots, toy trains, and balloons.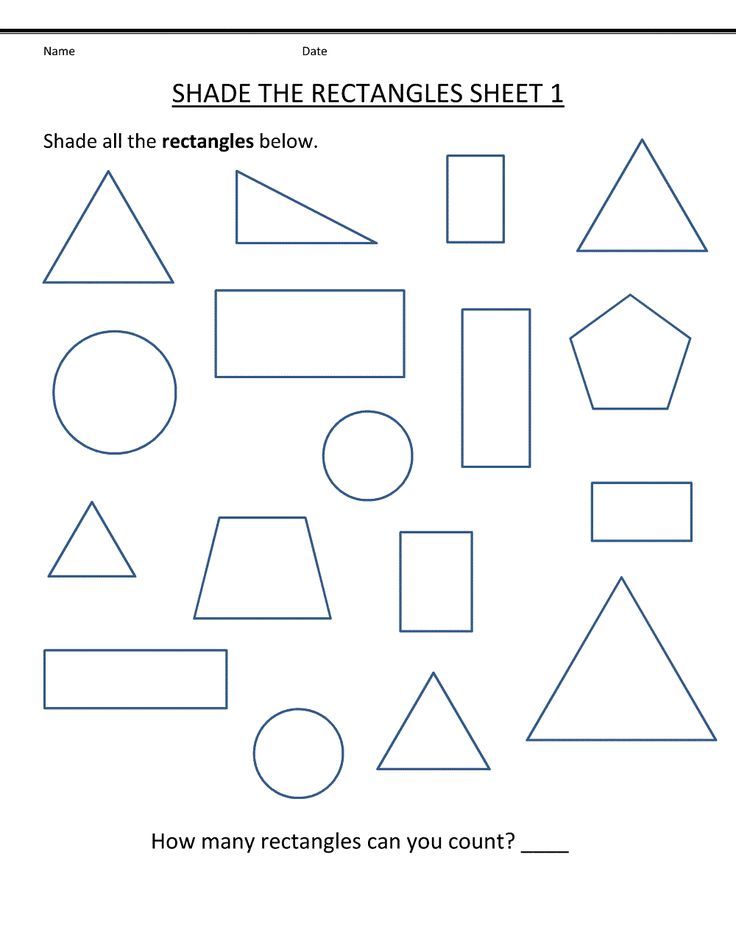
Different Types of Shapes
Shapes can be classified into open and closed shapes.
| In geometry, an open shape can be defined as a shape or figure whose line segments and/or curves do not meet. They do not start and end at the same point. | In geometry, a closed shape can be defined as an enclosed shape or figure whose line segments and/or curves are connected or meet. They start and end at the same point. |
Closed geometric shapes can further be put into two broad categories, namely two-dimensional and three-dimensional shapes.
| The 2-Dimensional shape is flat. | A 3-Dimensional Shape is a solid shape. |
| It has two dimensions, that is, length and width. | It has two dimensions, that is, length, width, and depth. |
Here’s a list of 2-D or two-dimensional shapes with their names and pictures:
| Two-Dimensional Geometric Shapes |
Here’s a list of 3-D or three-dimensional shapes with their names and pictures:
| Three-Dimensional Geometric Shapes |
The color, overall size, and orientation called the non-defining attributes of a two-dimensional or three-dimensional shape do not define or affect the shape in any way. These attributes can change without any effect on the shape.
On the other hand, defining attributes such as the number of sides (parallel or non-parallel, straight or curved), vertices, edges, and faces of a shape, whether the shape is open or closed, and the angle measures determine the shape of a two-dimensional or three-dimensional object. Any change in these defining attributes will change the shape.
Solved Examples on Shapes
Example 1: Name the shapes.
- A polygon with 6 sides.
- Outline of a door.
- When you fold square corner to corner.
- A square and a triangle on top of it.
Solution:
- Hexagon
- Rectangle or quadrilateral
- Triangle
- Pentagon
Example 2: Classify the given letters as open shape or closed shape.
C, D, L, M, O, S, U, V, Z
Solution:
Open shape: C, L, M, S, U, V, Z
Closed shape: D, O
Example 3: Identify the solid shape of given objects.
- Globe
- Book
- Cold drink can
- Dice
Solution:
- Sphere
- Cuboid
- Cylinder
- Cube
Example 4: Why is the crescent-shaped moon not a polygon?
Solution:
Crescent shape moon is not a polygon as it has curved lines.
Practice Problems
1
What is 8-sided polygon known as?
hexagon
heptagon
octagon
quadrilateral
Correct answer is: octagon
A polygon with 8 sides is known as octagon.
2
How many dimensions does a solid shape have?
1
2
3
depends on the shape
Correct answer is: 3
All solid shapes are 3-dimensional shapes.
3
Which of the following statements is incorrect?
closed shapes can have only straight sides.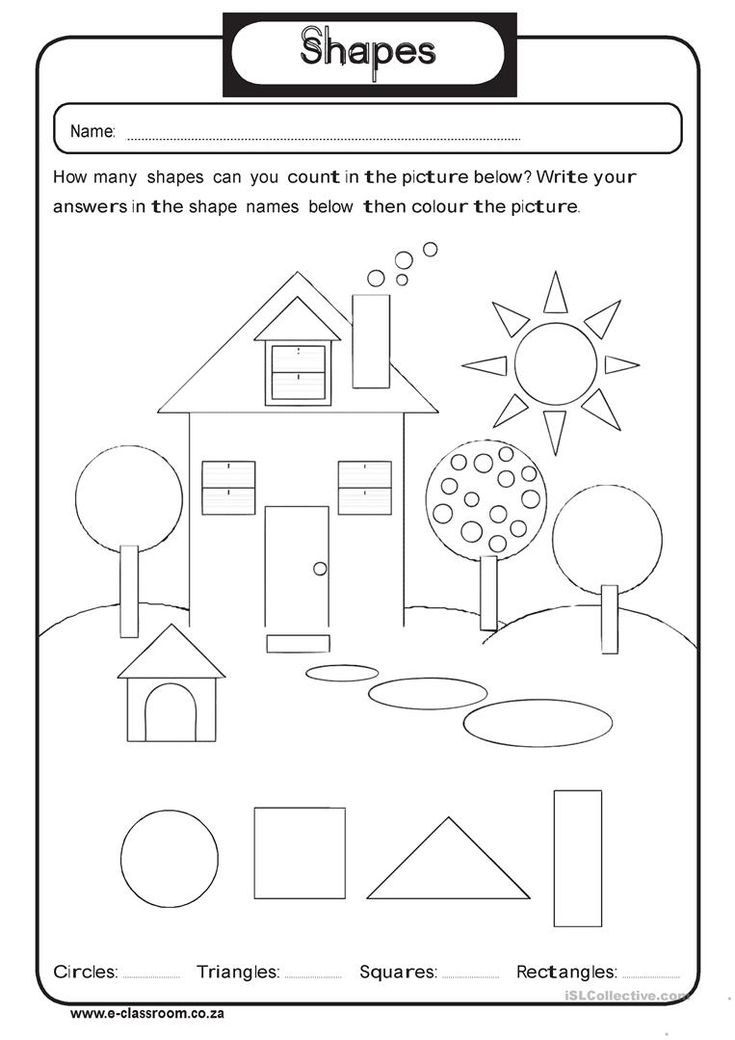
closed shapes have definite area.
start and end point of a closed shape are the same.
start and end point of a open shape are the different.
Correct answer is: closed shapes can have only straight sides.
Closed shapes are shapes whose start and end points are the same. It is not necessary that it is formed by only straight sides.
Form, question, answer, and character limits in Microsoft Forms
Microsoft Forms
Administrator Tasks
Administrator Tasks
Form, question, answer, and character limits in Microsoft Forms
Microsoft Forms More...Less
Tip: Learn more about Microsoft Forms, or get started right away and create a survey or quiz. Want to use more advanced branding, question types, and data analysis? Try Dynamics 365 Customer Voice.
The following tables show the number of forms and tests, the number of surveys, questions per form or test, responses to the form or test, and character limits for Microsoft Forms:
Form, survey, question and answer restrictions
| Office 365 Education | Microsoft 365 Apps for business | US Government Community Cloud (GCC), GCC High, and DoD environments | Personal Microsoft account (Hotmail, Live, or Outlook. | |
| How many forms and tests can be created? | Up to 400 | Up to 400 | Up to 400 | Up to 400 |
| How many surveys can be created? | Up to 400 | Up to 400 | Up to 400 | Up to 400 |
| How many questions are allowed per form or test? | Up to 200 | Up to 200 | Up to 200 | Up to 200 |
| How many responses can a form or test receive? | Up to 5,000,000 | Up to 5,000,000 | GCC: up to 5,000,000 GCCH + DOD: up to 50,000 | Up to 200 free accounts |
 com)
com) Shape constraint includes those in the recycle bin. (For example, 350 active forms in the Microsoft Forms Portal + 50 forms in the Recycle Bin = 400 forms.)
When a respondent completes the form and submits it, this counts as one response (regardless of the number of questions on the form). For example, if a form contains 100 questions and exactly 12 respondents answer all questions, the form will count as 12 responses.
Important: The "One response per user" recommendation only applies to a contiguous set of 50,000 responses and is not guaranteed for the full dataset if the number of responses exceeds 50,000.
Notes:
-
Prior to January 2021, polls created in Teams (meetings, chat and/or channels), Outlook, or PowerPoint are considered part of the 400 forms limit. The additional limit of 400 surveys is now beyond the current limit of 400 forms.
-
If you belong to a team, you and your team members can create up to 400 forms to be displayed on the "Team Forms" tab on the portal's forms.office.com page. The 400 forms that you and your team can create are in addition to the 400 individual forms that can be created as separate forms.
-
If you have a Forms account and a Dynamics 365 Customer Voice (formerly Microsoft Forms Pro) account, the 400 forms limit covers both accounts.
Note: For Likert question type , each "instruction" counts as one question. For example, in a survey, you can use a question about the Likert scale type to collect feedback on an event. For each instruction, you can choose from the following options: Very Dislike, Somewhat Dissatisfied, Dissatisfied and Dissatisfied, Somewhat Satisfied, and Very Satisfied. Two operators: "How satisfied are you with the venue?" and "How satisfied are you with your food?" — will count as two questions.
Tip: If you need more responses, export your existing responses to an Excel workbook, then remove them from your survey or quiz. This will allow you to collect more responses after cleaning.
Features
For forms with more than 50,000 responses, users can export all .csv responses for analysis. The following features are not currently supported for forms with more than 50,000 responses:
-
Summary charts & graphs
-
View individual responses from a forms site
-
Seal
-
Sharing a summary link
-
Manual grading, commenting and posting grades for tests
Character restrictions
| Office 365 Education | Microsoft 365 Apps for business | US Government Community Cloud (GCC), GCC High, and DoD environments | Personal Microsoft account (Hotmail, Live, or Outlook. | |
| How many characters are allowed for each question? | Up to 4000 | Up to 4000 | Up to 4000 | Up to 4000 |
| How many characters are allowed in each answer to one question? | Up to 4000 | Up to 4000 | Up to 4000 | Up to 4000 |
| How many characters are allowed for the total number of responses to a form or test? | Up to 200,000 | Up to 200,000 | Up to 200,000 | Up to 200,000 |
| How many characters are allowed in the form description field? | Up to 1700 | Up to 1700 | Up to 1700 | Up to 1700 |
| How many characters are allowed for each thank you message? | Up to 4000 | Up to 4000 | Up to 4000 | Up to 4000 |
 com)
com) Notes:
-
200,000 characters is the maximum allowed for a total of 9 responses0013 to form . For example, if a form contains five text questions, and the respondent has already reached the 200,000 character limit by the fourth question, they will not be able to provide an answer to the fifth question.
-
There is no limit on the number of parameters in a multiple-choice question. However, the characters in the options are considered to be the characters allowed for each single question answer. If the total number of option characters reaches the 4000 character limit, the respondent will not be able to select additional options.
See also
Questions and answers
Forms - Microsoft Support
A form in Access is a database object that you can use to create a user interface for a database application.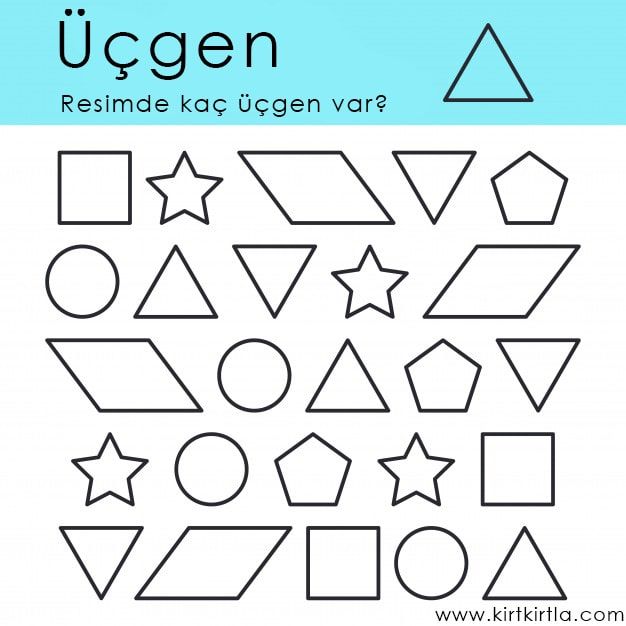 A "linked" form is directly linked to a data source, such as a table or query, and can be used to enter, edit, or display data from that source. It is also possible to create an "unbound" form. It doesn't bind directly to a data source, but it also contains command buttons, labels, or other controls that are required to work with the application.
This article focuses on linked forms. They can be used to control access to data (for example, to determine which fields or rows of data should be displayed). For example, some users may only need a few fields from a table with many fields. A form containing only these fields will make it easier for such users to work with the database. You can also add buttons and other functions to your form to automate common actions.
Forms can be compared to windows through which users see and access a database. An effective form speeds up work with the database, as it eliminates the need to search for the necessary information.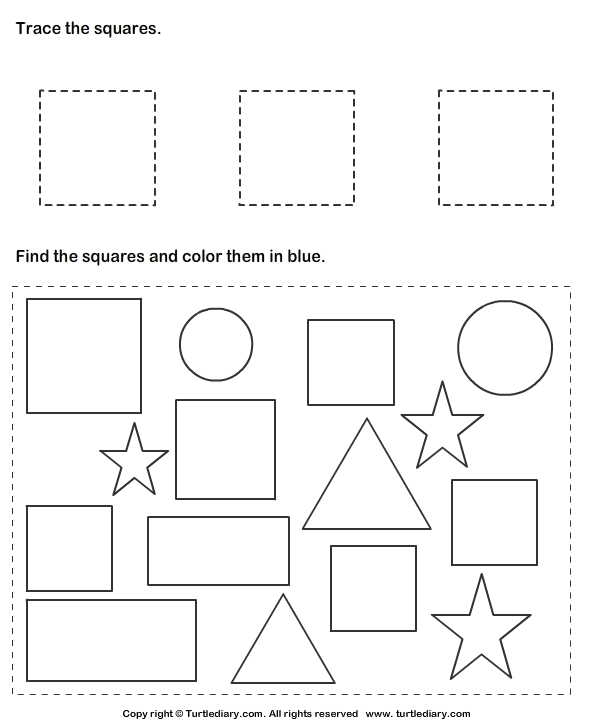 A visually appealing form makes working with the database more pleasant and efficient, and helps prevent incorrect data entry.
Note: This article assumes that you have already created a table (or a query based on one or more tables) and want to create a form to view or work with data.
In this article
-
Create a shape with the Shape tool
-
Create a split shape with the Split Shape tool
-
Create a form that displays multiple records using the Multiple Items tool
-
Create a Form Using the Form Wizard
-
Create a shape with the Blank Shape tool
-
Layout view and design view
-
Setting up a form in Layout view
-
Modifying a Form in Design View
Creating a shape with the Shape tool
The Shape tool allows you to create a shape with a single click. When used, all fields of the underlying data source are added to the form. You can start using the new form right away, or modify it in Layout view or Design view to better suit your needs.
Creating a shape with the Shape tool
-
In the Navigation Pane, click the table or query that contains the data that you want to display in the form.
-
On the Create tab, in the Form group, click the Form button.
The new form will be displayed in Layout view. In this mode, you can make changes to the structure of the form while viewing the data. For example, if necessary, you can adjust the size of the text fields according to the data.
If Access detects a table that has a one-to-many relationship with the table or query that was used to create the form, then the data table is added to the form that is based on the associated table or query. For example, if you create a simple form based on the Employees table and a one-to-many relationship is defined between the Employees and Orders tables, then the data table will display all records in the Orders table that are related to the current employee records. If the data table on the form is not needed, it can be deleted. If there are multiple tables that have a one-to-many relationship with the table that was used to create the form, then Access does not add the data tables to the form.
Creating a split shape with the Split Shape tool
A split form allows you to display data in two views at the same time - Datasheet View and Form View.
A split form differs from a combination of forms and subforms in that both split form views are linked to the same data source and are always in sync with each other. When you select a field in one part of the form, the same field in another part is selected. Data can be added, modified, or deleted in each part of the form (provided that the record source allows updating and the form settings do not prohibit such actions).
Working with a split form allows you to take advantage of both views in one form. For example, you can use the tabular part of a form to quickly find a record and then view or edit it in form view.
To create a split shape using the Split Shape tool:
-
In the Navigation Pane, click the table or query that contains the data that you want to display in the form. You can also open a table or query in Datasheet view.
-
On the Create tab, in the Forms group, click the Other Forms button and select the Split Form command.
The new form will be displayed in Layout view. In this mode, you can make changes to the structure of the form while viewing the data. For example, if necessary, you can adjust the size of the text fields according to the data. For more information about form views, see About Layout View and Design View.
How to create a form that displays multiple records using the Multiple Items tool
If the form was created using the Simple Shape tool, it can only display one record at a time. If you want to create a form that displays multiple records but is more customizable than a table, use the Multiple Items tool.
-
In the Navigation Pane, click the table or query that contains the data that you want to display on the form.
-
On the Create tab, in the Forms group, click the Other forms button and select the Multiple elements command.
A new form will be created and displayed in Layout view. In this mode, you can make changes to the structure of the form while viewing the data.
When using the Multiple Items tool, the form generated by Access looks like a table. The data is arranged in rows and columns, and you see multiple entries at the same time. However, the Multiple Items form provides more customization options than a grid, such as the ability to add graphics, buttons, and other controls. For more information about customizing a form, see Customizing a Form in Layout View and Customizing a Form in Design View.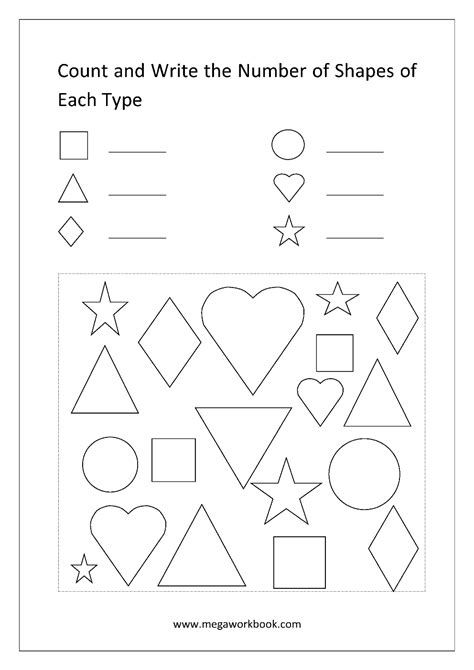
Creating a form using the form wizard
Instead of the various tools described above, you can use the form wizard to precisely select the fields that should be displayed on the form. You can also set up grouping and sorting of data and use fields from several tables or queries, if the relationships between such tables and queries have been previously configured.
-
On the Create tab, in the Forms group, click the Form Wizard button.
-
Follow the instructions on the Form Wizard pages.
Note: To add fields from multiple tables or queries to a form, do not click Next or Finish after selecting fields from the first table or query on the first page of the Form Wizard.
 Instead, repeat these steps to select a different table or query, and click any additional fields that you want to include in the form. Press button 9 to continue0013 Next or Done .
 -
On the last page of the wizard, click Finish .
Creating a shape with the Blank Shape tool
If the form wizard or tools do not suit you, you can start with an empty form. This can be a very quick way to create a form, especially if you only plan to add a few fields to it.
-
On the Create tab, in the Forms group, click the Empty Form button.
An empty form will open in Layout view and the area Field List will be displayed.
-
In the Field list area , click the plus sign ( + ) next to one or more tables that contain the fields you want to include in the form.
-
To add a field to a form, double-click it or drag it onto the form.
-
After adding the first field, you can add several fields at once. To do this, select them by holding down the CTRL key and then drag them onto the shape.
-
Order of tables in area List of fields may vary depending on the selected part of the form.
 If the field you want to add is not visible, select another part of the form and try again.
-
-
Using the tools in the Header group on the Design tab , you can add a company logo, name, or date and time to the form.
-
To add other types of controls to the form, select the ones you need in the group Controls in tab Designer .
To expand the selection of controls, switch to Design view. To do this, right-click the form and select Designer .
Understanding Layout and Design Views
Layout View is an intuitive view that you can use to make almost any change to an Access form.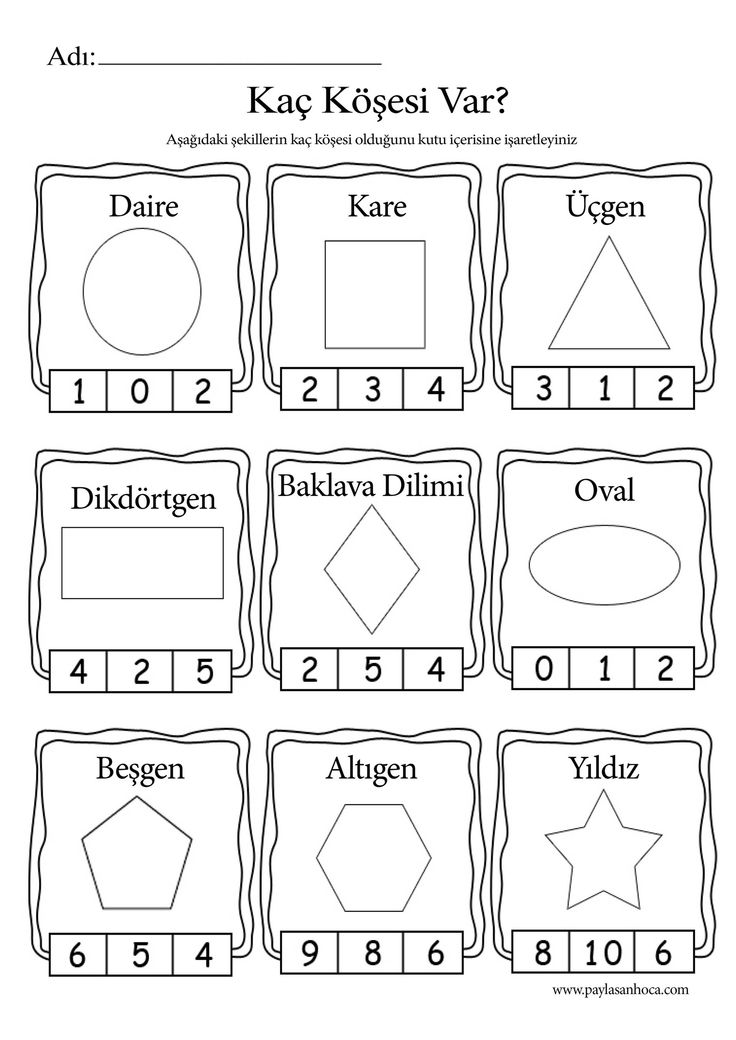
The form is being executed in Layout view. Therefore, you can view your data in the same way as when using a form. However, in this mode you also change the structure of the form. Because you can see the form data when you change it, this view is useful for adjusting the size of controls and performing almost any other task that affects the look and feel of the form.
If you encounter a task that cannot be completed in Layout view, you can switch to Design view. In some situations, a message appears in the application telling you that you need to enter design mode before making any changes.
Constructor The constructor represents the structure of the form in more detail. It displays the title, details, and footer of the form. The form is not executed when it is displayed in design mode. Therefore, you cannot view the underlying data when you make changes to the structure. However, certain tasks are easier to perform in Design view.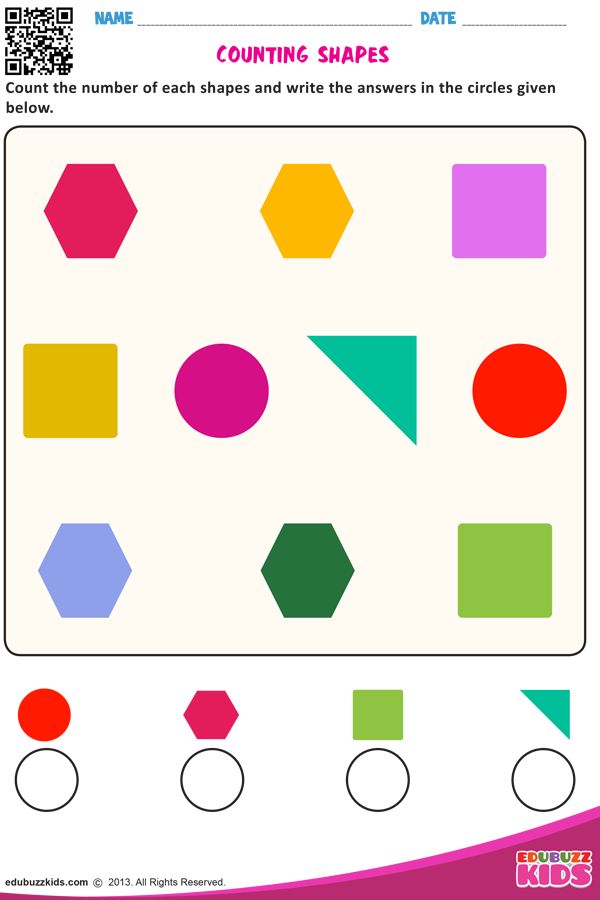 The options available are listed below.
-
add other kinds of form controls, such as bound object frames, page breaks, and charts;
-
change sources for text fields in the fields themselves without opening their property page;
-
resize sections of a form, such as its title or details section;
-
change some form properties that cannot be changed in layout mode.
Setting up a form in layout mode
After creating a form, you can easily customize its structure using Layout view. You can move controls around and resize them based on the data itself. You can add new controls to the form, and you can also set properties for the form and its controls.
To switch to Layout View, right-click the form name in the Navigation Pane and select Layout Mode .
The form will be opened in layout mode.
You can use the property page to change the properties of a form, controls, and sections. To open it, press the F4 key.
To add fields from a base table or query to the form structure, use area List of fields . To display area Field list :
You can drag fields directly from area Field list to the form.
-
To add a single field, double-click it and drag it from Field List to the desired section of the form.
- Learn more
- Simple sentences grade 1
- Sounds of english letters
- Interactive reading programs for kids
- Preschool computer program

- Sesame street alphabet storybooks
- Kindergarten number activity
- All the colors song
- Learn to read books for kindergarten
- Kindergarten ready list
- Sounds of the letters in english
- Learning software for children