How to make different shapes with paper
How to Make Paper 3d Shapes
craft Hands-On Learning Math
- Share
- Tweet
This post may contain affiliate links.
Let’s make 3d Shapes with paper! It’s easier than you may think.
I have always been fascinated with origami and other paper folding crafts. I think it is so neat that from just a piece of paper you can make so many different things. Today I want to share with you how we made 6 different 3D shapes out of paper. Plus I also have printable templates available for you.
Learning to makes these shapes would be great for geometry or just to practice the 3d shapes names.
My kids thought these were really cool. They played around with them for a while. Then they tried making lots of other kinds of shapes out of paper. They were pretty fascinated by it all.
All you need to make these paper 3d shapes is paper, scissors, a pencil, a ruler and tape.
I also have printable templates with a few more 3D geometric shapes, if you want a simpler way to make them! They are available in my shop.
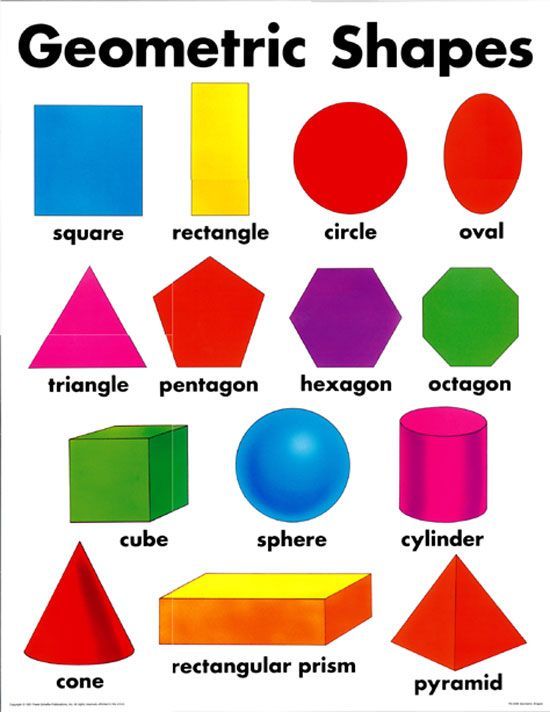
There are 6 common 3d shapes that I am going to teach you about today.
- Cube
- Cuboid (rectangular)
- Cone
- Square-Based Pyramid
- Triangular Prism (tent shaped)
- Octahedron (diamond0like shape)
To make each of these 3d shapes I used an 8 1/2 x 11 sheet of paper to make them.
How to Make a 3d Cone: For the cone, I traced a large circle, then cut a wedge out of the circle. Wrap it up and add a piece of tape to secure it.
How to Make a 3d Cube: For the 3d cube, you need a cross-like shape with even squares. Mine were 2 1/2 inches per side. You need four squares going down and three going across.
How to Make a 3d Triangular Prism: The Triangular Prism is made by dividing the paper into thirds. Then in the center section you will make your triangular cut-outs. I measured the sides of my paper sections to make the triangle side the same length.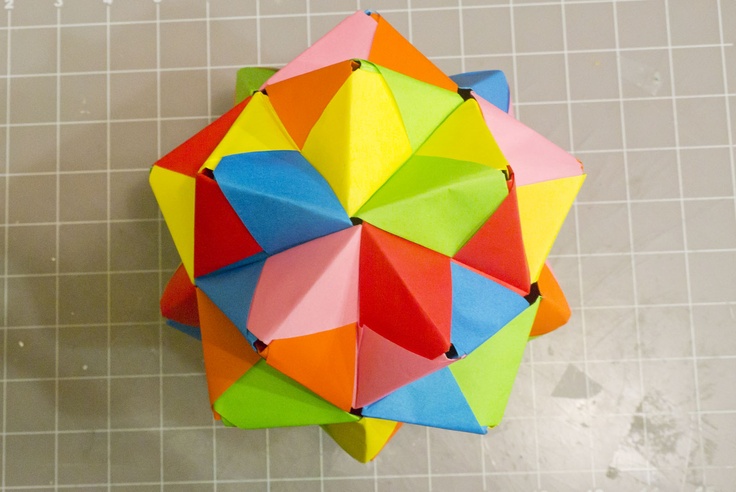 It ended up being 2 3/4 of an inch per side.
How to Make a 3d Square Based Pyramid: A Square-based Pyramid is started with a square and then triangles coming out from each side. Mine is about 3 inches per side. You have to make sure each side of the triangle is equal to the sides of the square.
How to Make a 3d Cuboid: For the cuboid, I divided the paper into fourths. Then one of the sections needs a square cut-out. I made this by cutting into the other parts and removing the sections.
How to Make a 3d Octahedron: The octahedron was the trickiest. It is a series of 8 equilateral triangles. Six of them are in a row facing opposite directions The other two are hanging off the ends.
The 3d octahedron I made 2 inches per side, but it ended up very small. You could probably fit a 2.5 inch one on a paper. To fold this up, you just start folding the triangles and it sort of just bends into the shape. Add tape to keep it all together.
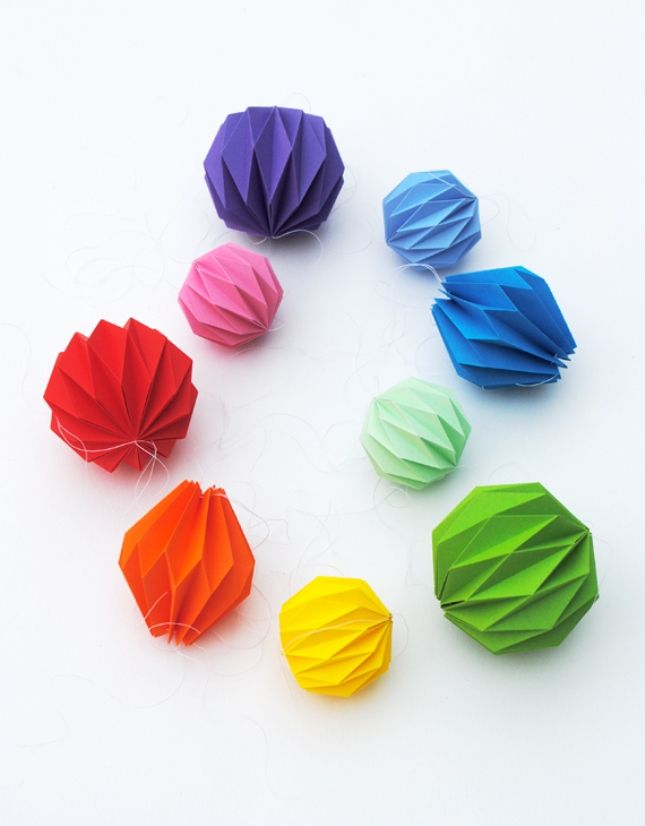
These 3-d geometric shapes would be fun hanging up by a string as a decoration, too!
The 3d shapes set pictured below is available in my shop.
$2.00Add to cart
3-D Alphabet Letters
Engineering: Make Paper Hold Up Books
Rainbow Paper Icosahedron
Stellated Dodecahedron
SaveSave
SaveSave
Hershey Fractions Printable Math Cards
Jumbo Geometric String Painting With Kids
8 Comments
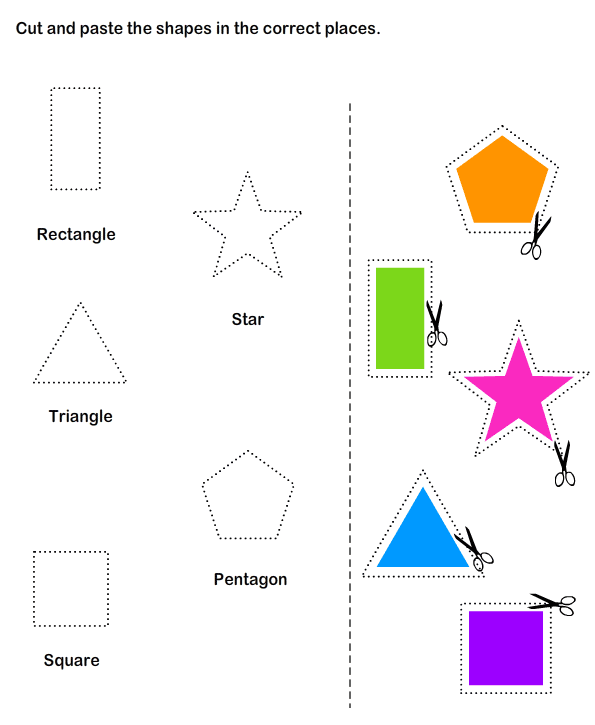
Fun With Shapes Artwork • In the Bag Kids' Crafts
Spread the love
I think the best crafts also teach. Of course, in my opinion, every craft has something to teach our kids, but this one happens to be a little more academic than most. It is an interactive way to teach shapes, colors, and sizes. And then we just add a little imagination to make this amazing fun with shapes artwork!
- Construction paper in variety of colors
- Scissors
- Glue stick
- Cotton (optional)
- Elmer’s glue (optional)
Of course, this shape artwork takes just a few basic supplies.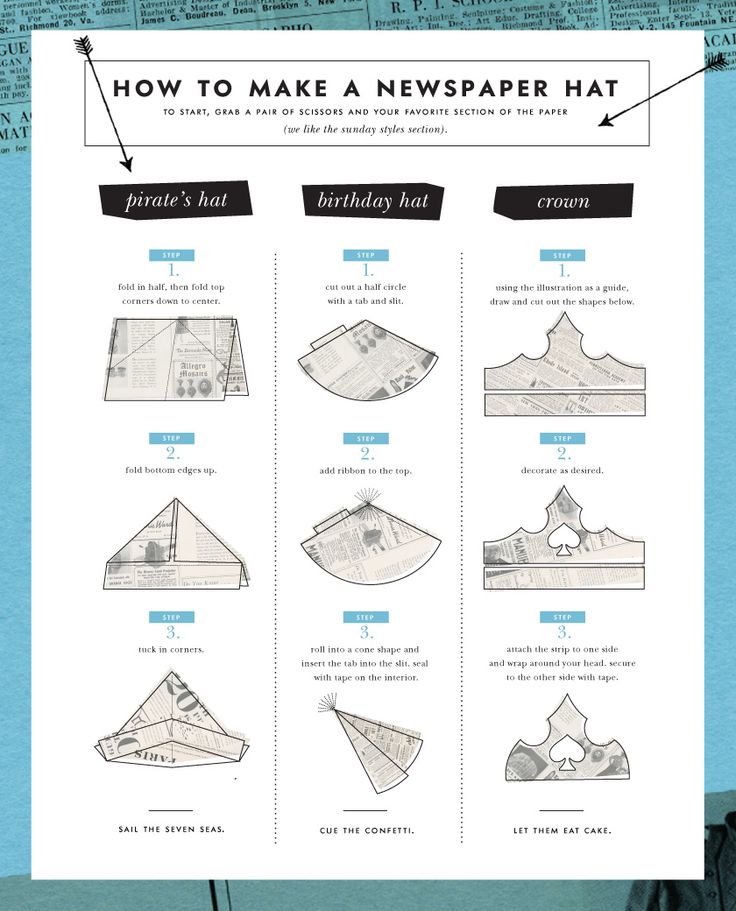 Honestly, if you had nothing more than printer paper and crayons, you could make a version of this project. Not all of the crafts on this site are quite this simple. After all, I want to challenge your kids to be challenged and push their creativity. But you will find that EVERY craft here is made from the same master list and is intended for kids to make (not adults). This is very intentional, because it blesses my heart to see you all creating together as families. I just hope that this approach makes it SO MUCH EASIER!
Find out what to put in your bag…
Step 1: Cut out shapes
- Cut shapes out of different colors of construction paper. Vary them in size, shape and color.
*For little ones who haven’t yet learned to cut, prepare this step in advance.
creating with shapesThis is a great craft for learning the names of shapes, colors and size differences. Plus, it is also good for practicing those scissor skills since we are just cutting very basic shapes. So, as you make this craft with your child, incorporate some learning. (Caution: but be careful not to take over the project. Still let them create and use their imaginations, please!)
I could give you all kinds of tips here about learning to use scissors, but let me just give you one for now. One of the biggest mistakes that kids make when moving from just cutting across a paper to cutting out actual shapes is that they rush. To help a child pace themselves, try singing a mantra while they cut. Start it before they start to cut, even having them open and close their scissors to the rhythm of the song. It should go something like this…take…your…time…cut…on…the…line. And said in a very sing songy, slow, rhythmic way.
One more thing, if you are working with a kiddo who is learning to cut basic shapes, go over the lines they have drawn with a bold marker to make them easier to cut out. And if your little one is just learning to open and close the scissors, snipping things like the edge of the sun or grass is a great warm up to more mature use of scissors. Let them try! After all, what’s the worst that can happen…you just have to cut out another shape. Kids learn best by trying, and even failing, getting better and better each time they try again.
Here is a great post on a few more activities you can do to practice scissor skills: https://www.ot-mom-learning-activities.com/how-to-use-scissors.html
Step 2: Make your art
- Get out a background piece of paper. I chose light blue, but you can pick whatever color is your favorite.
- Now get the shapes that you have cut out and move them around the page until you have the picture that you want. It does not have to be a scene like mine. You can make a robot or a unicorn or just an abstract group of shapes that look pretty. Make slight adjustments with your scissors as needed.
- Glue everything in place where you have it.
- Add details from your bag as you choose, like the cotton clouds that I added. Again, use your imaginations and dig into your craft bag to see what else you have to finish your unique work of art.

More Paper Crafts for Kids to Try
We love paper crafts so much. You can check out this article for 100 paper craft ideas.
- Armadillo Craft
- Crocodile Craft
- Woodland Animal Crafts
- Elephant Craft
- Lion Craft
- Paper Chain Boredom Buster
- Paper Hammerhead Shark Craft
- Ice Cream Sundae Craft
- Bumblebee Craft
- Paper Possum Craft
- Paper Shark Craft
- Paper Mouse Craft
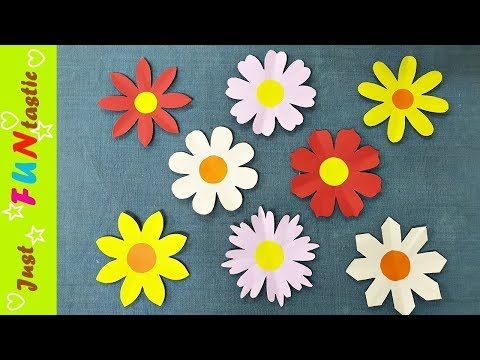
- Simple Paper Flowers
- Paper Hedgehog Craft
- Life-Sized Sunflower
Happy Crafting!
Love,
Save this learning shapes craft for later. Pin it to your favorite Pinterest board…
FUN WITH SHAPES ARTWORK SHAPE CRAFT FOR KIDS FUN WITH SHAPES ARTWORKDIY paper figures for beginners with diagrams and videos
Every day we come into contact with paper. Newspapers, magazines, office sheets are constantly around us. But few people remember that even newsprint is suitable not only for reading and work.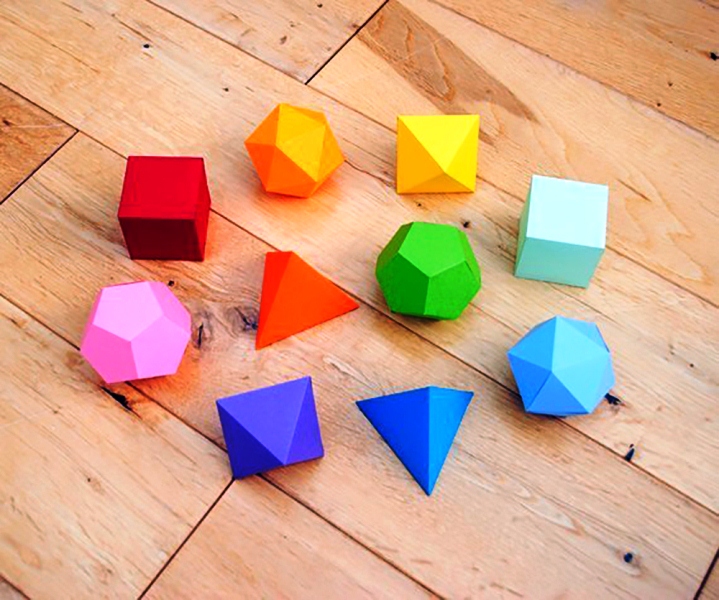 This material makes excellent crafts. In this article we will tell you how to make paper figures with your own hands to the delight of yourself and those around you.
You can get almost any figure from ordinary sheets. It will take a little time, and the satisfaction from creative work will be huge. This pastime is especially useful for young children. Designing the simplest figures develops hand motor skills, imagination, and spatial thinking. It is also a great way to have fun, chat with your child on various topics, explain, show him something new.
There are several ways to create a shape. Let's take a brief look at the most common ones:
- a common craft - using scissors, templates are cut out of paper, which are then glued together. The necessary details are completed;
- origami - a type of Japanese art, where only a square sheet is used, without additional tools;
- quilling - cut strips of paper are tightly curled. Then they are given a shape, which is fixed with glue.
 Example:
In the article we will consider what exactly can be designed using improvised materials.
The change of seasons
The time comes when the child needs to be explained what the season is, the sequence of spring after winter, autumn after summer. Not always the child immediately understands what they want from him. To help, we offer to make crafts of a wonderful tree. For children of two or three years old, a good example will come in handy.
Draw a tree on paper like in the picture. For ease of use, print the image on a printer. There should be four trees for each season.
Color the trees. For winter, draw a blue background and snow on the branches. Draw flowers for spring. The summer tree turns green, in autumn it turns yellow, orange, red.
Cut out the trees, divide into pairs autumn-winter, spring-summer. Fold each piece in half. Glue the halves of the parts in pairs so that the tree can stand.
The craft is ready. Explore the world with children with pleasure.
Origami
Origami is a special kind of art that involves folding paper figures without the use of glue or scissors. For beginners to engage in origami, the muzzles of animals will become the most unpretentious figures. Look at the diagrams of the dog and cat below:
Prepare a square piece of paper, fold it in half. Form the ears and nose. Draw the eyes and nose with a felt-tip pen. The cat is folded in the same way. The difference is that the ears will be on the wrong side.
A more complicated version is a dog with a body.
You will need two prepared drawing sheets.
Bend the muzzle along the existing lines. First, fold the sheet in half, then fold the corners representing the ears down. Wrap the bottom and top corners.
Take the second sheet. Fold it in half, cut out the paws along the dotted line. Wrap the tail. Turn out the formed corner. Connect two finished parts.
It turned out to be a cute puppy.
The following schemes will help you to fold other animals without difficulty:
Spring flower
Tulip is an incredibly delicate flower, reminiscent of spring. Try to do it at your leisure. Prepare one red square, the other green square. Check out the steps shown in the image below. Collecting a tulip is not difficult.
It will be possible to collect a flower without Japanese technology. Draw four petals on colored paper. Cut them out.
Then fold each element in half. Glue them together.
Take a wooden skewer or a regular pencil. Wrap the future stem with green ribbon, cloth. Leaves also draw and cut out. Connect all parts of the flower.
Blue Bunny
Consider the last art form - quilling. We offer to form a charming bunny from thin paper strips.
Make:
- blue special paper;
- glue, scissors;
- winding tool;
- sequins for decoration.

Let's get started. From a strip 115-120 cm long (glue several strips together for the desired length), twist a tight roll. Let it rest (until it unwinds a little), then glue the tip.
For the head, prepare a smaller roll, press it on one side with your fingers to form a teardrop shape.
Tail, hind legs are made in the same way as the head, only smaller. For the ears, roll a strip 27-30 cm long. Squeeze the roll on both sides.
Make the front foot as shown in the picture:
Assemble. Coat all parts with glue and connect them together. Cover the bunny with glitter. Rhinestones can be glued on.
Watch the video to see what other shapes you can make from stripes:
Now you know how to make small paper shapes using different techniques. Having made a large number of them, you can open your own paper theater and play various life situations in it with your child.
Video on the topic of the article
DIY paper figures
Contents
1. The history of Japanese technology
2. The nuances of choosing paper
3. Do you need tools
4. Origami in the interior
5. Step-by-step master classes for beginners
5.1. Origami "Ship"
5.2. Origami "Shirt"
The history of Japanese technology
Origami is a Japanese art, but it originates in ancient China. After all, it was there that paper was invented. But the idea to fold unusual figures out of paper came to the mind of Japanese craftsmen. The ancient monks were the first to master this amazing technique. To bring a gift to the gods, the priests put food in homemade paper boxes - sanbo.
INTERESTING FACT! The word "origami" is translated as "folded paper". It is noteworthy that in Japanese the words "paper" and "god" sound the same - "kami". And "ori" means "folded".
Paper figurines were always present in the temples, they were decorated with statues of deities. Over time, paper ceased to be a scarce commodity, and therefore origami began to be used not only in religious ceremonies. However, the cost of the material was still high, so this type of art was not available to the general population.
Origami became popular among the nobility, at the imperial court. Cavaliers enchanted their companions by skillfully folding paper crafts. The figurines became emblems of noble families, an obligatory decoration at the holidays.
When it was necessary to convey a secret message, the figurine was folded so that no outsider could unfold it. If the message was of a love nature, it was made in the form of romantic attributes.
The popularity of technology increased after the Second World War. Master Akira Yoshizawa created figurines that had a special meaning. He proved that art goes far beyond cranes, frogs and flowers. He invented special folding techniques, presented in the form of drawings.
In the 19th century, art was no longer limited to Japan and spread to other countries. In Europe, technology has found application not only on paper.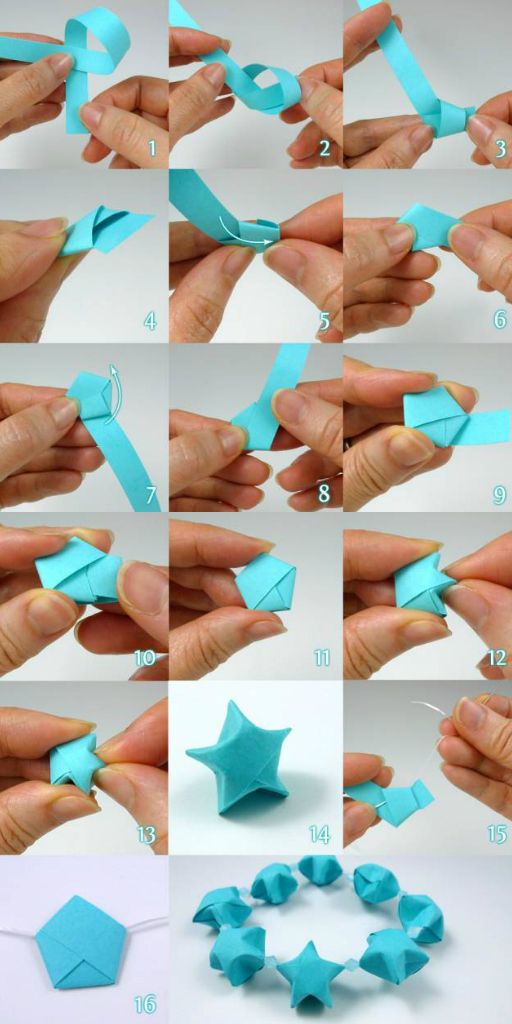 Caps, collars, and other headdresses were folded from the fabric.
Spanish craftsmen came up with the “pajarita” bird, even the technique itself in this country is called differently. Instead of origami, the Spaniards say "make pajarites".
In Germany, origami turned from a hobby into a pedagogy. Teacher Friedrich Fröbel used paper figures to explain elementary geometry to students.
Paper selection considerations
In general, to create a simple figurine, you only need a sheet of paper and your hands. Other tools will come in handy to create a detailed masterpiece. Choosing the right materials can be tricky. What kind of paper is suitable for origami?
- Office paper has a high density, slight roughness. Due to this, modular products can be folded from it. The paper does not slip and holds its shape well. Use both white and colored sheets.
- Simple items can be folded from small square pieces of paper or sticky notes (usually used for notes).
 If there is a glued strip on the sheet, make sure that it is inside the finished product.
 - Kami paper is specifically designed for origami. Sold in cut form, usually in the form of a square. On the one hand, the "kami" is white, on the other - colored. There are also double-sided colored sheets.
- Plain colored paper bought for children. Its quality is different, the cheapest option will not work. Sheets will slip, tear, etc.
- Old magazines. The main thing is that the sheets in them are not thin.
- Wrapping paper. Keep in mind that the glossy surface is slippery, you should not use it for crafts. Choose matte sheets. Kraft paper is especially durable.
- Embossed paper. The best option if you decide to fold the flower.
- Washie handmade paper. It is fibrous and soft, thanks to which the products are also soft, without sharp corners.
- Corrugated paper. The advantage is that it can be pulled without fear of tearing, it is plastic.
 But it is not suitable for all products. Mostly for flowers.
TIP! Use thick paper to make a simple figurine. To create complex products from several modules, use thin but durable paper.
A beginner should not rush to the store for expensive special paper. You can train on scribbled notebook sheets, unnecessary documents, and on everything that is not a pity.
Choose paper for creativity
Do you need tools
Sometimes you may need some tools to create origami.
Adhesive
As a rule, it is needed to glue small details onto the finished figure. If you do not plan to disassemble the product, you want it to stand and please the eye, it makes sense to glue it. PVA or glue stick will do.
When you need to glue two sheets together, you can use spray adhesive. Do not forget about safety rules: spray the aerosol outdoors or ventilate the room well afterwards.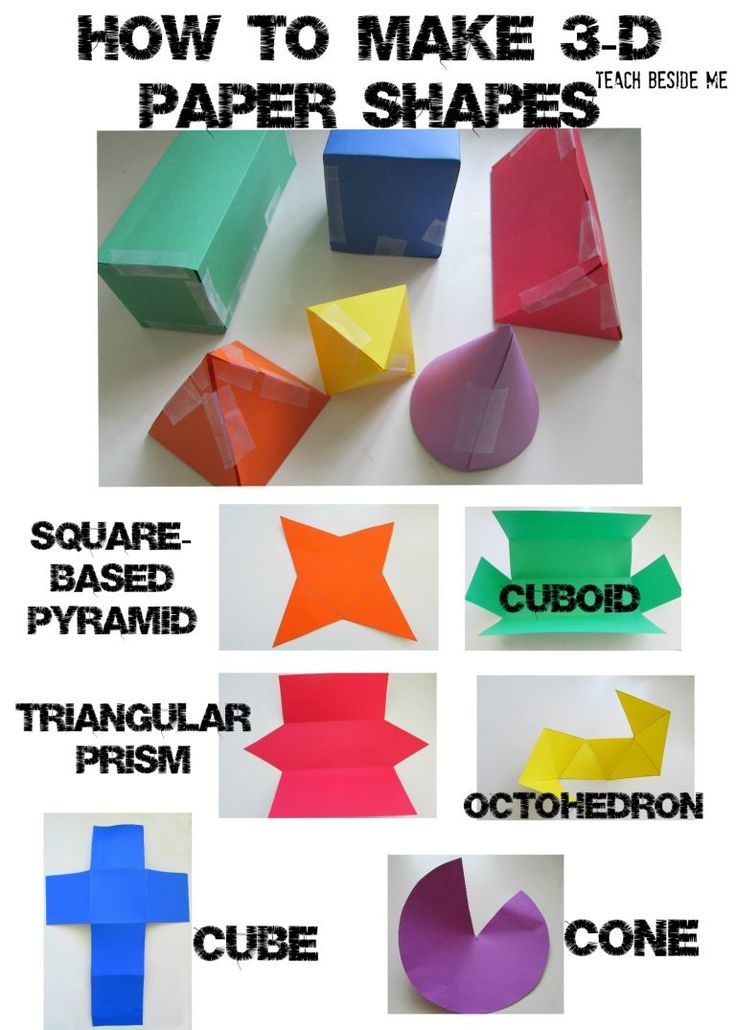
Pick a quality adhesive
Scissors or cutter
They must be sharp and not tight. Otherwise, the cut will remain uneven and wrinkled. It is best to have several options of scissors in reserve. For cutting small details, nail scissors are suitable. Sometimes it is more convenient to use a cutter: cut a line, trim.
Buy handy paper scissors
Coloring materials
If you made a figure out of white paper, but it seems too boring to you, decorate the product with paints, pencils, felt-tip pens, etc.
Sharp pencil
Required for marking paper. This will make it easier to cut the base. The best option is a pencil with a replaceable lead that does not need to be sharpened.
Additional materials
To give the product a finished look, you may need eyes, ribbons, pieces of fabric, beads and other decorations.
Large selection of decorative elements
Origami in the interior
Each origami figurine has a special meaning.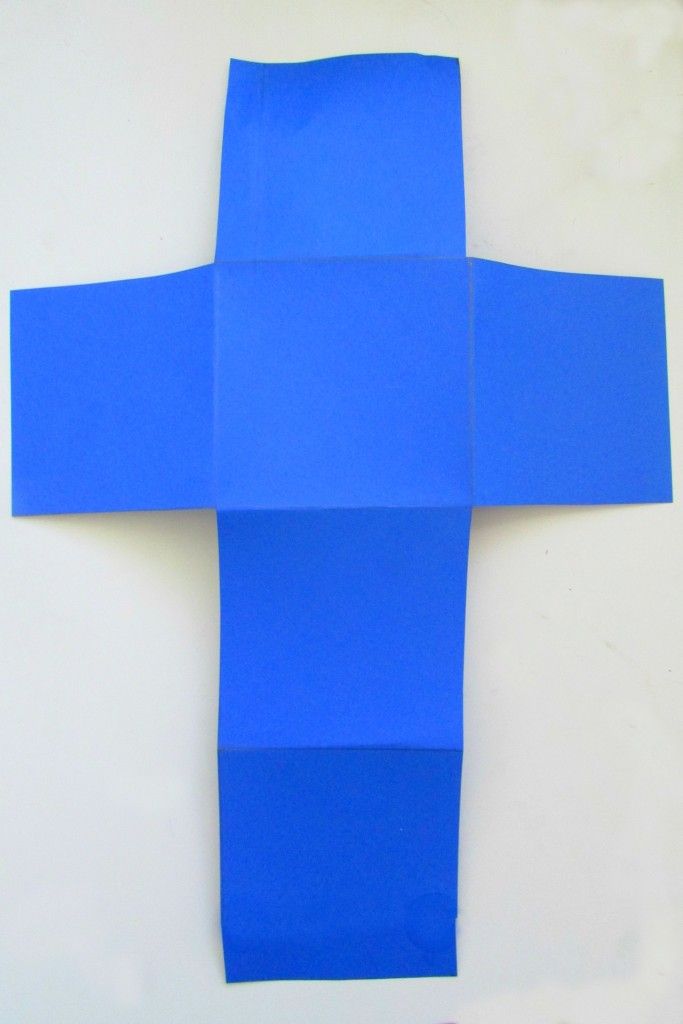 You can decorate any room with such products: a bedroom, a nursery, a living room, an office. Modern designers often use this technique, add origami to the interior. Popular pieces of furniture imitating origami, which look airy, light and stylish.
Walls, shelving, chests of drawers are decorated with three-dimensional figures. Finished products are either simply hung on the wall, or first placed in a frame.
Artificial flowers have long gone out of fashion, they are almost never found in the interior of the premises. But origami flowers are another matter. They are used in decor, paper products look interesting and unusual.
A panel or voluminous paper application is an excellent option for interior decoration. Many small butterflies, as if flying along the wall, will add dynamism to the design. You can stick paper stars on the wall in the nursery, this will make the interior more mysterious and unusual.
In origami there is a special branch - kusudama.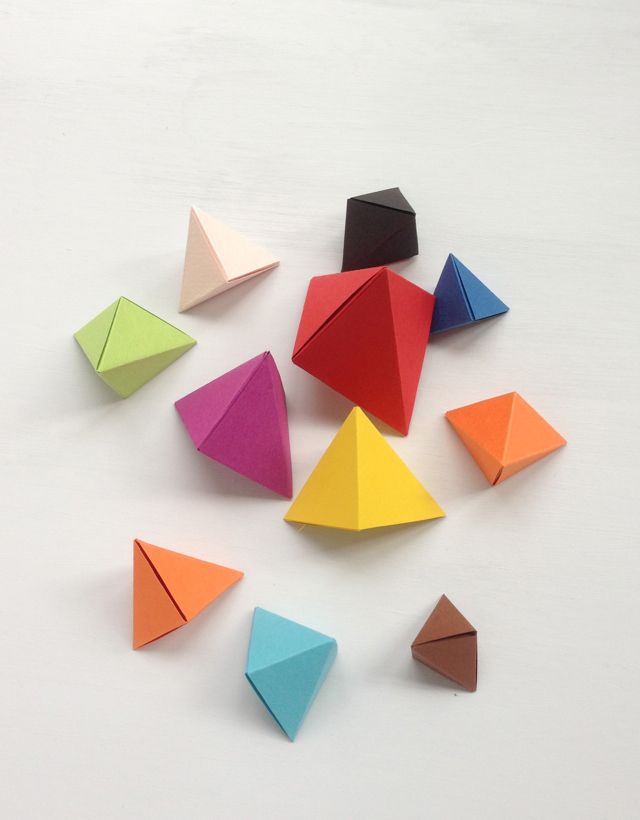 This is a paper ball made of many different colored patterns or colors. Bright products are hung from a chandelier, placed on tables and shelves. Kusudama complements and completes the overall interior design.
Step-by-Step Workshop for Beginners
So you decided to master a new technique for yourself, took a sheet of paper, got ready and ... just sit and look at this sheet. Where to start? We have prepared a couple of simple master classes for you. Thanks to them, you will fold your first figures and understand whether you want to further develop in this direction.
It is unlikely that you will quickly become the second Gonzalo Garcia Calvo. This is a master from Spain who creates impressive creations from a single sheet of paper. Each of his products is worked out to the smallest detail and looks very realistic. Calvo creates various animals, his collection includes more than 160 works.
Seeing the figures of Gonzalo Garcia, you understand that there is something to strive for! But let's start small.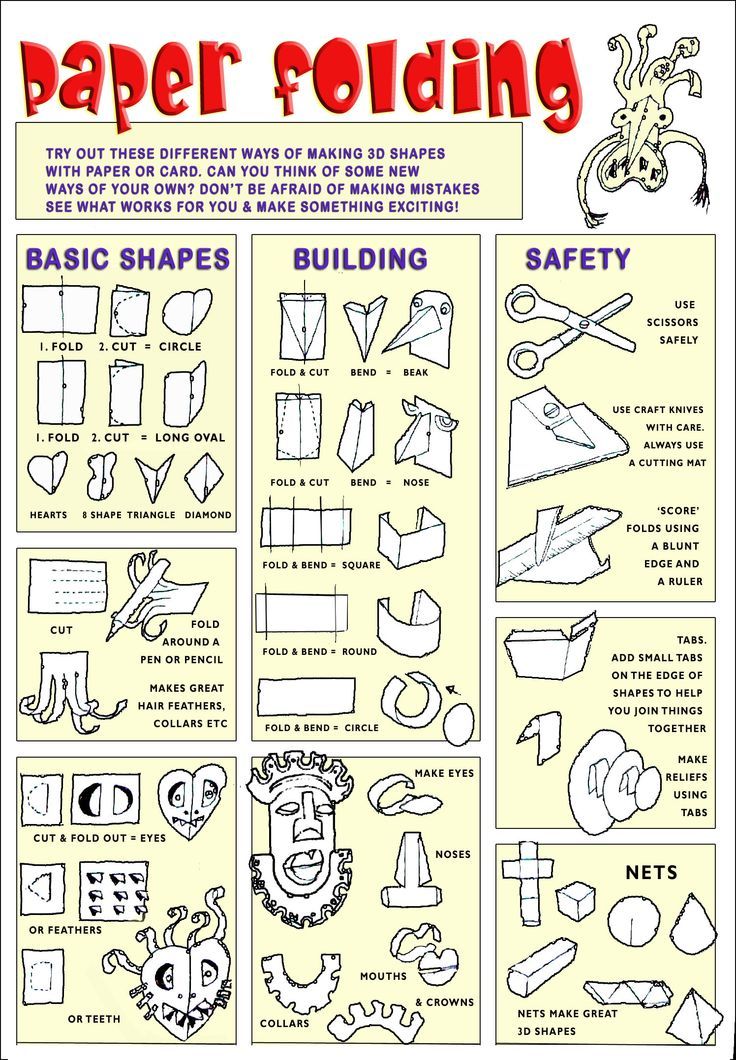
Origami Boat
Step 1
Lay the rectangular sheet vertically. Bend it in half, pulling the bottom to the top.
Pull the lower right corner to the left right corner. Make a small crease at the fold in the paper, then open the paper back.
Step 2
Proceed to folding the triangle. The fold will serve as your guide. Bend the bottom corners towards the middle of the sheet.
Rotate the shape. Fold the bottom rectangular edge towards the triangle.
Step 3
Turn over the future boat. Bend the bottom edge of the rectangle up. Expand the shape.
Bend the lower right corner along the resulting fold. Do the same for the bottom left corner.
Step 4
Fold the bottom edge up. Open the bottom of the figure. Fill the protruding corners into the valves.
Step 5
Bend one corner of the figure up.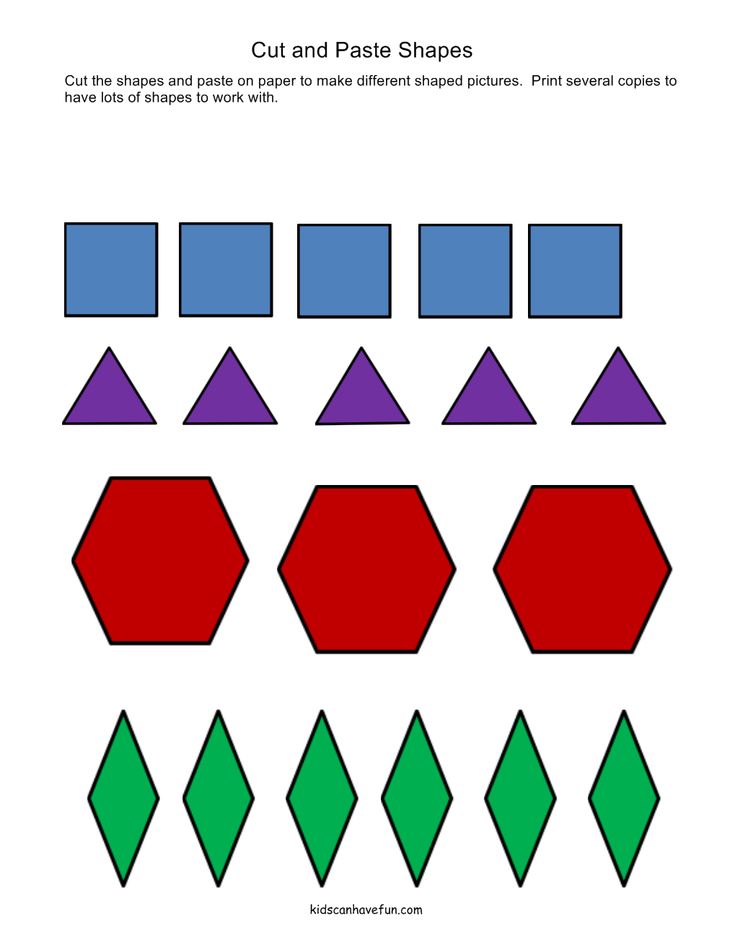 Rotate the figure and do the same with the other corner.
Step 6
Open the left and right doors. Give the figure the shape of a boat, slightly open it. The triangle obtained in the middle acts as a boat.
Origami Shirt
For this origami, you will need a banknote of any denomination.
Step 1
Put the bill up with the side that you plan to hide in the future shirt. Fold the bills in half, pulling the bottom edge to the top. This will mark the center of the figure.
Unfold the bill, then gently fold the top and bottom edges towards the middle.
Try to make the folds as clear and even as possible.
Step 2
Wrap one end of the resulting strip on the other side. This is the future shirt collar, decide for yourself how high it will be. Hold the bill so that it looks up with the folded edges.
Grasp the right corner of the collar and fold it diagonally towards the center crease.