How to make handprints with flour
Salt Dough Recipe - The Easiest Way to Make Salt Dough!
Kim147 Comments
All activities should be supervised by an adult. As an Amazon Associate, I earn from qualifying purchases. This post may contain affiliate links.
Learn how to make your own salt dough ornament with this easy Salt Dough Recipe. You only need a few ingredients from your kitchen to make this salt dough! We cover all of our tips and tricks to make sure your salt dough ornaments will last for years!
RELATED: Salt Dough Ornament Recipe
Table of Contents
- Salt Dough Recipe – for Handprints & Ornaments
- Salt Dough Ingredients
- How to Make Salt Dough – an Easy Salt Dough Recipe!
- Why Is My Salt Dough Puffing Up?
- How Do I Seal Salt Dough Ornaments?
- What Kind of Paint Should I Use?
- How to Decorate Salt Dough Handprints
- How Many Ornaments Does this Make?
- Tips for Making Perfect Salt Dough
- Salt Dough Handprint & Ornament Recipe
- Get the Recipe
- More Salt Dough Ornament Ideas
Salt Dough Recipe – for Handprints & Ornaments
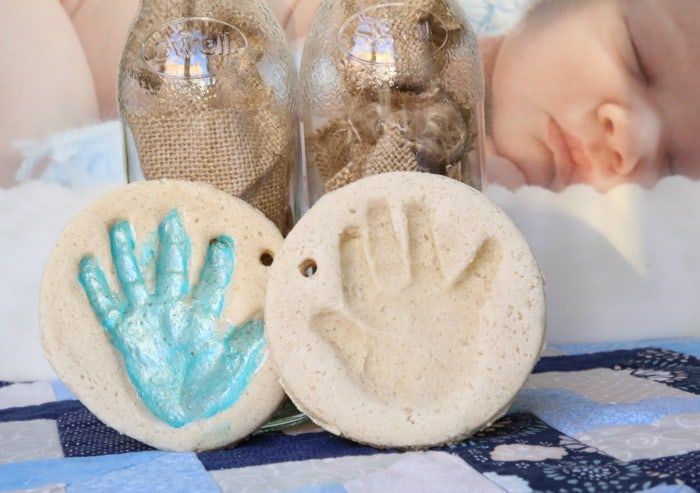
One of our favorite things to do with salt dough is to make handprint ornaments. But you can also use this same recipe and use cookie cutters and paint shapes instead!
For the handprint ornaments – you can make a new one every year and have a nice memento for the Christmas tree!
Don’t forget to add the year on the back of the salt dough ornament to keep track of the different years.
Salt Dough Ingredients
- 4 cups all purpose flour (Note: you want regular all purpose flour, not self-rising)
- 1 cup salt
- 1.5 cups warm water
How to Make Salt Dough – an Easy Salt Dough Recipe!
1. Combine all of your ingredients (flour, salt, warm water) and mix well until it starts to form a dough.
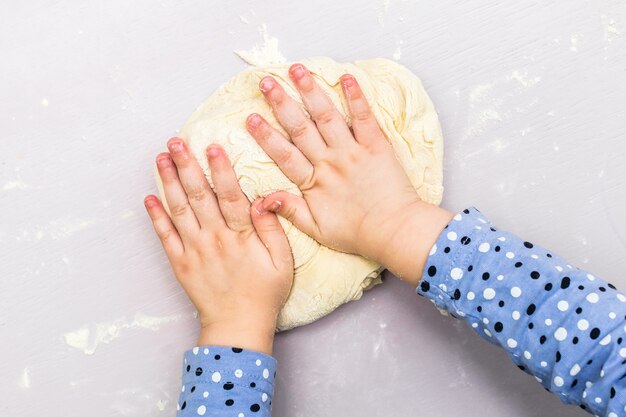
2. Take the dough out of the bowl and knead for at least 10 minutes.
If your dough is too dry, add a little bit more water in and continue to knead.
The dough should be smooth and roll out with not too many bumps. It should also be easy to press a handprint into it. If you’re finding it’s too hard or not smooth enough, continue to knead some more. If it’s still too dry, add a little bit more water (but not too much or it may get too wet).
Roll out the dough to between 1/4 to 1/2 inch thickness. If the dough is too thick it will take too long to dry.
Press the hand into the dough.
3. Use a circle shaped bowl to trace around your handprint.
Cut out the handprint with a knife (adults to do this part).
You can also print off a circle shape or heart shape to trace around with a knife (adults to do this part).
If you have a smaller handprint you can use a circle or large heart cookie cutter.
TIP: It’s easier to press the handprint first, and then trace around it. If you have dough left over you can roll it out again and do another handprint.
4. Using a straw, make a hole in the top of the ornament.
5. Let the ornaments air dry for a day.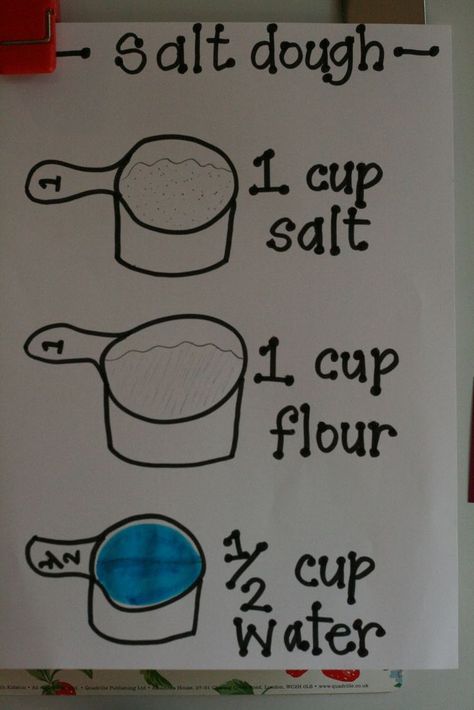
If you have time, let the ornaments air dry for a day. This will cut down on the baking time required and help to prevent puffing. If you do not have time, you can bake right away instead.
Bake at 250 degrees Fahrenheit for 1-2 hours. Once the top of the ornaments look dry and solid, flip over and bake on the other side.
NOTE: It’s important that you check that your oven temperature is set to Fahrenheit. One of the most common reasons the ornaments burn and puff up is that the oven temperature is Celsius. If you have a Celsius setting then you’ll want to use the lowest oven temperature, closer to 120 degrees Celsius.
If your ornaments are still doughy, put them back in for another hour. It will depend on your thickness how long you need to bake for. The thinner ornaments will take less time but thicker may take more. If it’s taking too long in the oven, let them finish drying by air drying them for a few more days. Make sure to flip them over so the bottoms also get exposed to air.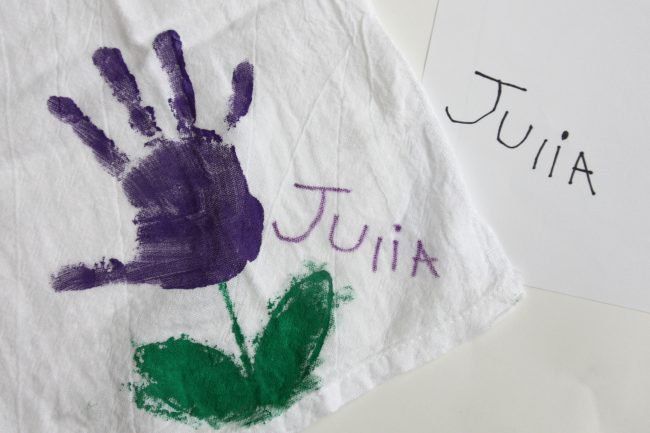
6. Once your ornaments are fully dry you can paint them.
Paint the handprint and leave the remaining ornament plain. Or you can paint the whole ornament white and then paint the center handprint once the base coat has dried.
If you want to add glitter into the handprint, decorate the whole ornament with paint first, then fill the handprint with glue. Shake glitter onto the glue.
After the paint has dried, make sure to seal with with either mod podge or a clear glaze spray. Seal the ornaments after you paint them and the paint has fully dried.
7. Tie ribbon or twine through the hole for hanging on the Christmas tree.
Why Is My Salt Dough Puffing Up?
The number one reason salt dough is puffing is due to the oven temperature. If the temperature is too high the salt dough will puff up. It is better to let your ornaments air dry for a day and then bake them. This will prevent the puffing. If you need to bake right away, bake at the lowest temperature (200-250 degrees Fahrenheit).
Note: Make sure to check your oven temperature is Fahrenheit and not Celsius.
You also want to make sure you are using regular, all purpose flour and not self-rising flour.
How Do I Seal Salt Dough Ornaments?
Once you are done, don’t forget to seal with either mod podge or a clear glaze spray. We like this spray for a durable finish. Adults should do the spraying and always follow directions of the product chosen.
Sealing the final ornaments will help stop them from cracking in a few years and prevent moisture from getting in.
What Kind of Paint Should I Use?
I like to use non-toxic acrylic paint for salt dough ornaments. The color will go on much thicker and more vibrant than kids paint. We like this brand of acrylic paint.
How to Decorate Salt Dough Handprints
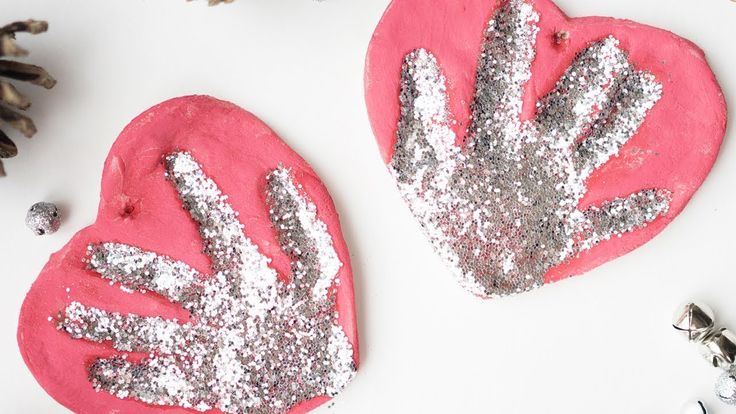
You can use a heart for the shape around the handprints or you can use a circle.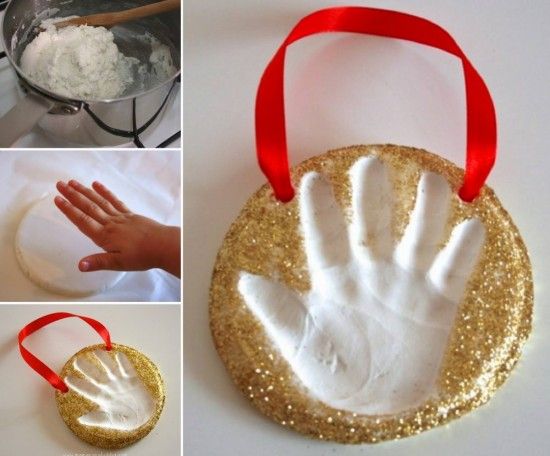
For this one, we used a large heart cookie cutter as the handprints were small (baby handprints):
If you have larger handprints, you can trace around a heart print-out or use a knife (adults only) to draw a heart shape around the handprint.
We painted this one with acrylic red paint but you could choose green or even silver or gold. Then you can leave the handprint portion of the salt dough ornament either natural or use glue and add glitter to it like we did.
How Many Ornaments Does this Make?
Depending on the handprint size and thickness of the salt dough – you can get approximately 8 handprints. If you’re using the dough to make small cookie cutter ornaments you’ll get approximately 15.
If you’re hoping to make this for a classroom or with a larger group of kids, I would recommend bringing an extra batch just in case. The quantity can vary depending on size of cookie cutters, handprints and thickness of the dough.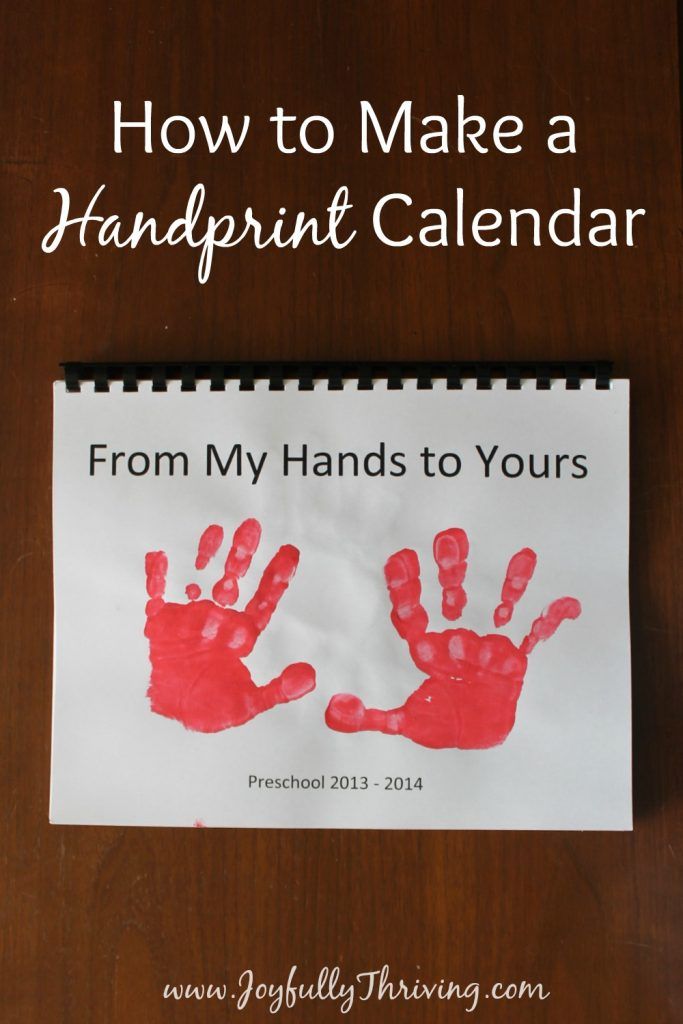 I like to roll out the dough and continue to knead together the scraps to use as much as I can.
Tips for Making Perfect Salt Dough
- Knead well to make the dough smooth – I like to knead at least 10 minutes.
- Let the ornaments air dry for a day first, if possible. This cuts back on the oven baking time and helps to prevent puffing.
- Don’t forget to flip the ornaments when baking or air drying so that the bottoms will be exposed to air.
- Seal with our recommended sealers mentioned above so that the ornaments will last for many years.
- Store the ornaments in a cool, dry place and keep away from moisture. Sealing the ornaments also prevents moisture from getting in.
Prep Time15 mins
Active Time2 hrs
- ▢ 4 cups all purpose flour
- ▢ 1 cup salt
- ▢ 1.5 cups warm water
- ▢ Clear Glaze Finish or Mod Podge
Combine all of your ingredients and knead for 10 minutes.
 If your dough is too dry add a little bit more water in and continue to knead.
Roll out the dough to a thickness that you'd like your salt dough ornament to be. We like between 1/4 to 1/2 inch thickness.
Using a large cookie cutter, cut out different shapes for your salt dough ornaments. If making handprints, place the handprints first and then trace around them.
Have your child place their hand into the salt dough ornament. If the dough is too hard to get an imprint it may be too dry. Continue to knead until smooth. You can also add in a little bit more water.
Using a straw, make a hole in the top for where you want to hang your salt dough ornament.
If possible, let the ornaments air dry for a day.
Preheat your oven to 250 degrees Fahrenheit. Bake for 1-2 hours. If your ornaments are still doughy, put back in for another hour. (It will depend on your thickness how long you need to bake for. The thinner ornaments will take less time but thicker may take more).
If you encounter too much puffing, roll out thinner ornaments and this will help reduce the puffing. If the ornament is still a bit doughy, bake for longer or let sit out a few days to harden before decorating. The thickness of the dough will determine how long you have to bake them for. We prefer to bake them at 250 degrees Fahreneheit for longer and let them air dry for a few days to prevent puffing.
Once cool, you can decorate by painting with non-toxic acrylic paint.
Spray with a clear glaze finish or finish with mod podge. Do this before adding the glitter.
To make the hand glittery, fill the handprint with glue then sprinkle glitter on top of the glue, shake off the excess and let it dry.
Kids will love helping to make this salt dough recipe. They will also have fun decorating the salt dough ornaments by painting them.
Finally, just a friendly reminder to keep these out of reach of pets (they can be toxic to dogs due to the salt content).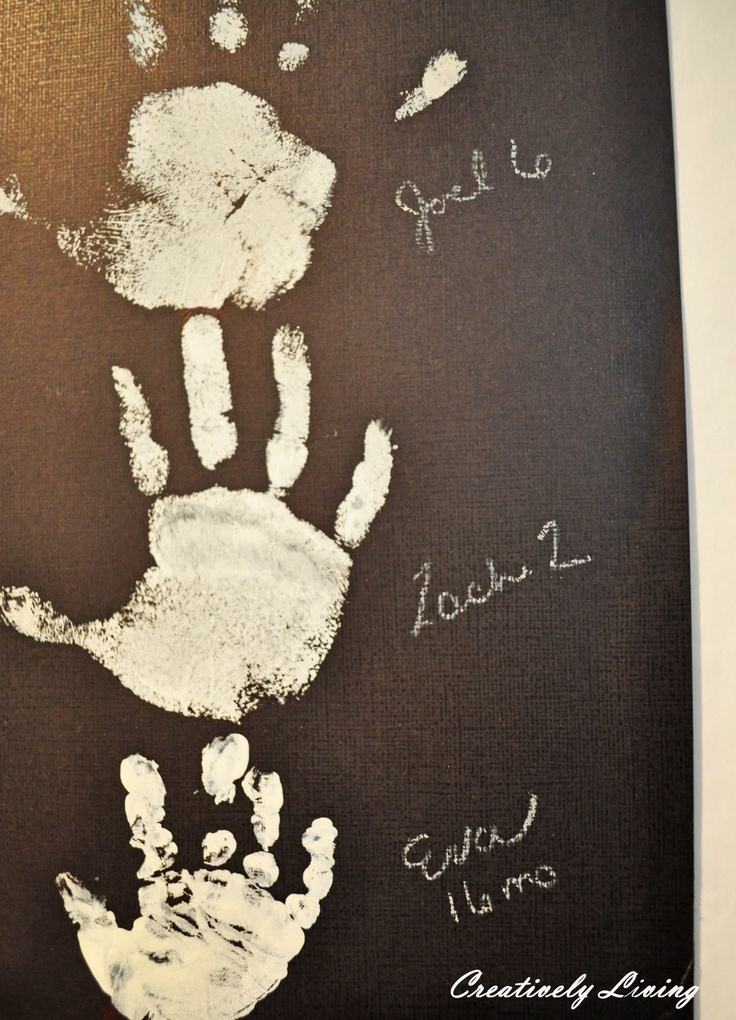
See over 25+ of the best Salt Dough Ornaments here for more great ideas!
These salt dough ornaments are also fun to make – and you can make these for any season or holiday too!
DIY SALT DOUGH HANDPRINT ORNAMENT
Making DIY gifts is a lot of fun. Salt Dough Crafts are popular and this salt dough handprint is such a fun project to make and also to give as a gift.
You will find a “how-to” video at the bottom of this post.
DIY SALT DOUGH HANDPRINT ORNAMENTThis page may contain affiliate links for your shopping convenience. The links help support the blog as we may earn a small commission at no extra cost to you, our readers.
If you like salt dough crafts, these adorable thumbprint salt dough magnets are quick and easy to make. This DIY photo lamp using your own family pictures is also a unique gift idea you can make at home.
DIY Salt Dough is something that has been around for ages! I remember making a salt dough handprint ornament when I was little around Christmas time. I thought it would be cute to do all of my boy’s handprints and hang them on the wall.
Salt Dough keepsakes are a very inexpensive craft, made with items from around the house. If you’re wanting to send a handprint kit as a gift, I found an affordable one here: baby’s handprint ornament kit.
I also found this one: marshmallow clay handprint kit. I think marshmallow clay would be super fun to make at home!
SALT DOUGH RECIPEPRINTABLE RECIPE AT END OF POST
- 1 cup flour
- 1 cup salt
- 1/2 cup water
- Bowls (one for mixing, another for cutting out your circle)
- Spoon
INSTRUCTIONS:
- Mix the salt and flour in a large bowl
- Make a well in the salt/flour mixture and add the water
- Knead until smooth and shape into a ball
If you want to color your salt dough, simply mix in a few drops of food coloring while you are kneading it.
You can let your salt dough handprints air dry, but they can also be dried in the oven. Bake at 200 F until dry. The amount of time on the size and thickness of your masterpiece.
Thin flat ornaments may only take 45-60 minutes, but thicker ones like the ones I did can take 2-3 hours or more.
Make sure you store any leftover dough in an airtight container or it will get all dry and crumbly.
I can’t wait to have the salt dough handprint hanging on the wall, it’s going to be a great addition to our home décor and one that I can treasure as my children grow.
There are many other ornaments you can make with kids, to give as gifts at Christmas or anytime, really. I like buying the DIY ornaments (plastic if you have little ones!) and filling them with glitter. There are tons of things you can do with them, though.
Ingredients
- 1 cup flour
- 1 cup salt
- 1/2 cup water
- Bowls (one for mixing, another for cutting out your circle)
- Spoon
Instructions
Mix the salt and flour in a large bowl.
Make a well in the salt/flour mixture and add the water.
Knead until smooth and shape into a ball.
If you want to color your salt dough, simply mix in a few drops of food coloring while you are kneading it.
You can let your salt dough handprints air dry, but they can also be dried in the oven. Bake at 200 F until dry. The amount of time on the size and thickness of your masterpiece.
Thin flat ornaments may only take 45-60 minutes, but thicker ones like the ones I did can take 2-3 hours or more.
Make sure you store any leftover dough in an airtight container or it will get all dry and crumbly.
If you enjoyed this post be sure to check out our boards on Pinterest.
Love salt dough projects? Get more inspiration from these books:
Let’s Get Crafty With Salt Dough
Salt Dough Crafts for Kids (FREE ebook)
You’ll love this FAIRY GARDEN with SALT DOUGH FAIRY GARDEN ACCESSORIES.
You may also like this after school routine clock.
You can sign-up to get an email update each day. You can also connect with us on:
- Google+
- Blog Lovin’
Post submitted to Mommy Moment by Jennifer H.
This post is linked up to I Gotta Create, Tutorials Tips and Tidbits, The Style Sisters, Tidy Mom, Craftberry Bush, Growing Home, Sew Creative
We make a mold of a child's hand and foot with our own hands
Now my sun is already three and a half months old, and every day she is getting older and bigger, although I don't notice it at all. That is why I wanted to have at least something to remember her the way she is now.
Somehow I came across an ad about making compositions with clay casts of children's hands and feet. Of course, I really liked the idea - after all, having a cast of your favorite feet and hands is much more pleasant than just a print or a contour drawn with a pencil around thin, sweet fingers.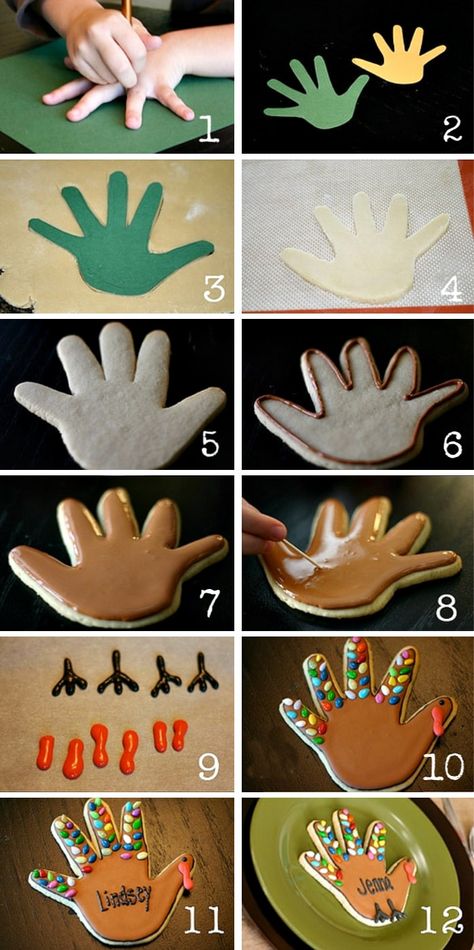 But I decided not to resort to the help of strangers, but to do everything myself - it's much more pleasant, and the baby can be scared of strangers.
I did it like this:
1. I kneaded the salty dough.
It is best to make elastic salty dough according to the following recipe:
2 cups flour
1 cup salt (preferably fine)
1 tbsp. starch / hand cream / vegetable oil
0.5 - 1 tbsp. water
Mix all ingredients thoroughly. The mass should be quite thick. The dough should not crumble. If it turned out to be too thick - add a little water, too thin - salt with flour (it is always necessary to observe the ratio of flour and salt 2: 1).
2. When the dough becomes like this:
Tear off small pieces from it, on which we will make prints of children's legs and arms, something like this:
to the hands and feet of the baby.
3. Now, bring a piece of dough to the child's foot, and firmly take root.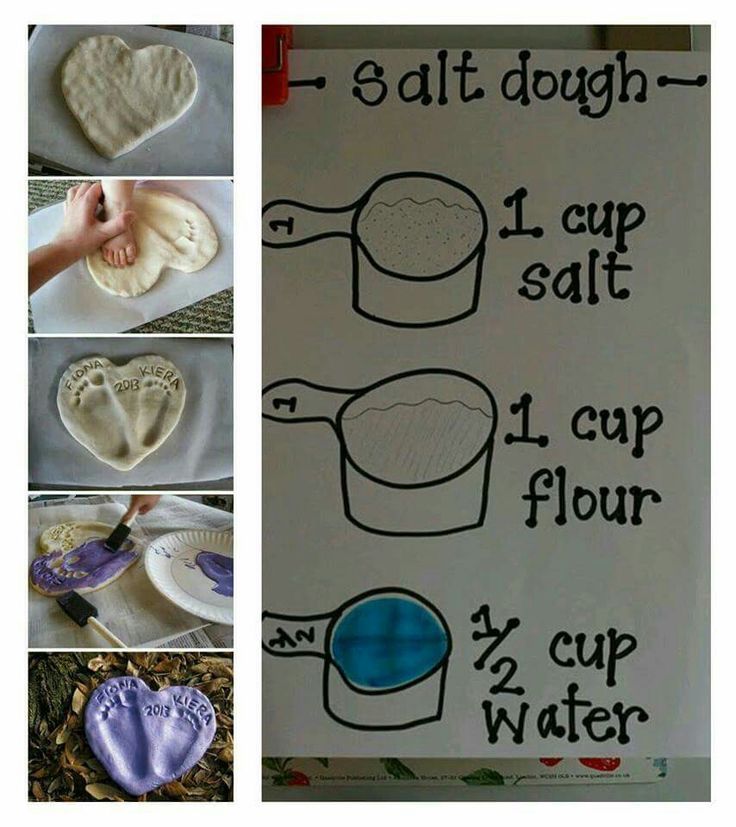 We need to get as deep an imprint as possible. Ideally, all the lines on the baby's foot should be printed on the test, but I will say right away: it is quite difficult to achieve this, in any case, when making prints in this way.
4. Next, repeat the previous procedure with the handles.
Making a pen print is more difficult, especially if the child is not yet six months old - my baby always took pieces of dough with her)))
5. The last two procedures can be repeated ad infinitum. I made about five to seven prints of each foot and each hand in order to be able to choose the most successful ones.
6. Then there are two ways. You can first bake the resulting prints of children's hands and feet in the oven (about 30 minutes at a temperature of 130 degrees), or you can work with raw dough. In the first case, you will be able to use each print several times. In addition, if you bake the dough longer, you can save the trace itself - it also looks very good.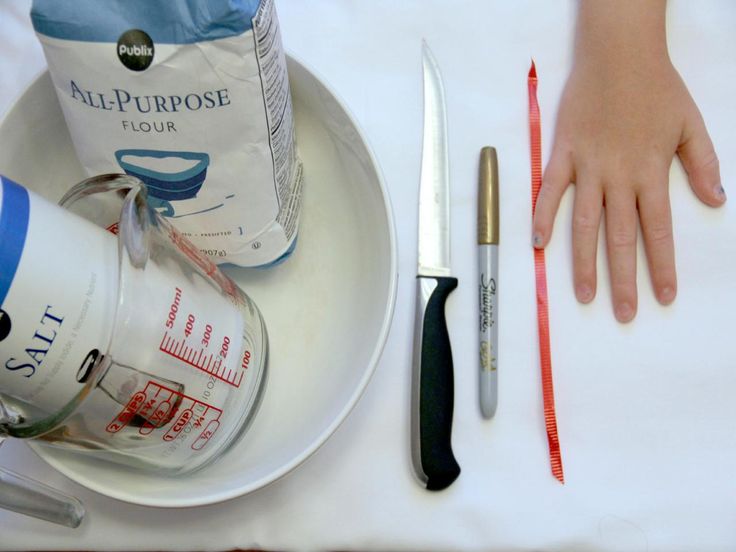 You can make a memorable composition with him)). However, making molds from raw dough is easier and faster.
I've tried both methods, and I liked the second one better.
7. So, we take a baked or raw imprint of a child's foot or pen, and pour plaster into it. This must be done quickly before the plaster has hardened.
Leave the impression to dry directly in the mold for 15 minutes.
If you are using a print made from baked dough, it is best to pre-lubricate it with petroleum jelly or vegetable oil so as not to damage the impression when you remove it from the mold.
8. Remove the molds, remove any leftover dough (if you used raw dough) and dry them. It will take a long time to dry - 3-5 days.
9. Grind plaster casts with a knife and sandpaper. We cut through the fingers, remove all unnecessary, make the surface smooth. Be careful - make sure that all baby lines are preserved.
10. We paint, varnish (the second is not necessary).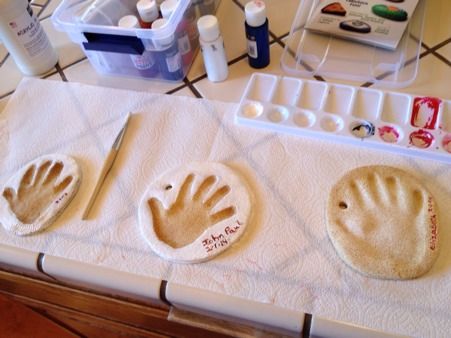 It is better to use acrylic paints, but gouache is also quite suitable. My husband (he was involved in grinding and artistic processing) generally used paints for eggs that were left over from Easter))).
11. Framed. You can come up with a composition with a baby photo, or make a fridge magnet. In general, now you are limited only by your imagination!)
My husband and I want to make such casts every three months up to a year to track the growth of our baby)
Tags: Notes and observations
We make casts of children's hands and do-it-yourself legs!
Hello dear readers, finally I am ripe for a new article!
A year and a half has passed since the last inspiration!
A lot of new things have happened in my life, the most important thing is that my son, Leonid, my second child, was born (in January 2014)!
He is now 6.5 months old. And I again started a business with casts!
How to make a mold of the arms and legs with your own hands from plaster? We answer: "Very simple!"
There are tons of kits for making them in stores, and there are a lot of different tips on the Internet on how to make them!
In 2011, 3 years ago, when I was making casts of Danochka's arms and legs, I first bought a ready-made set.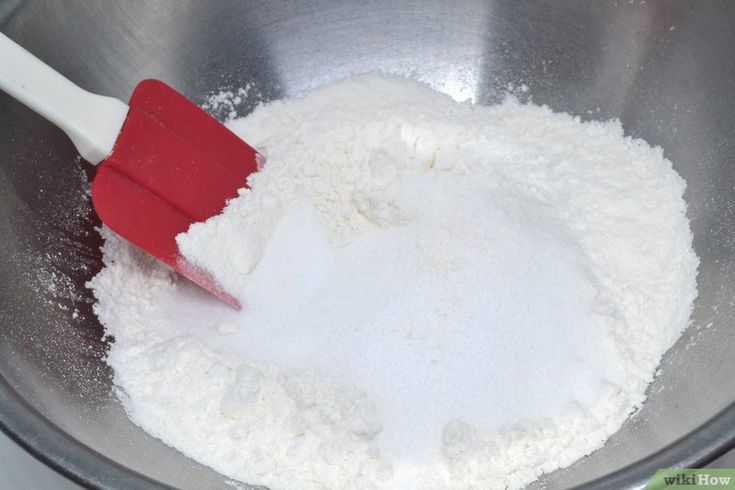 I did everything according to the instructions. She diluted the mixture, put the sleeping child’s hand into a plate, and my Danulya took it and woke up and knocked over all this liquid on me! While I was washing, the second jar of gel dried up. Conclusion: I threw money away!
Then I got into my favorite Internet and saw a lot of recipes for making children's casts from gypsum.
I want to tell you the easiest and easiest way to make casts of your favorite arms and legs, which I liked the most!
To make baby casts you will need:
For the test:
- half a glass of water,
- two tablespoons of sunflower oil,
(oil is needed to make the dough more elastic)
- one glass of flour,
- one glass of salt
(preferably fine, salt is needed to make the dough “obedient”, to keep its shape better)
The volume of my glass is 150 milliliters.
For making impressions themselves:
- plaster,
- water.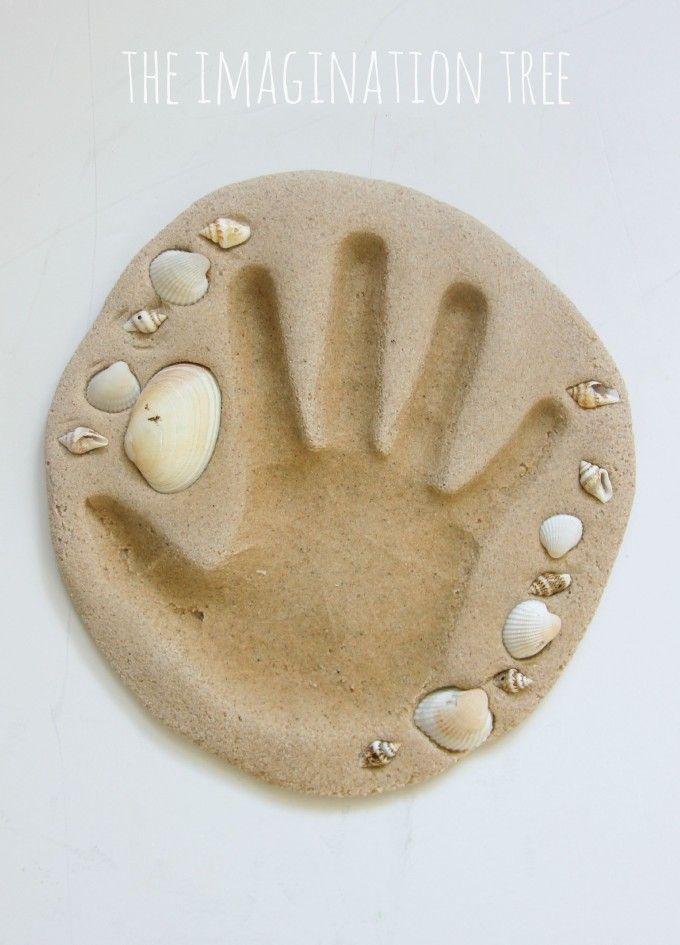
Where can I get plaster for making children's casts?
1. Can be bought at the construction market.
2. You can buy any children's kit for creativity, for example, the Sculptor kit.
I have had this set since 2011 :-)
First we make the dough.
In a bowl, mix salt and flour, pour in oil and water, mix everything.
The dough should be tight! If the dough is runny, add more flour.
Divide the dough in half and roll it out with your hands.
It is necessary to get two small round, but thick (2-3 cm) cakes, so that the cast is more voluminous.
We take a little one, make prints of the legs and handles!
Making a baby footprint
Making an imprint of a child's hand
For the first time with Dana, I made the right arm and the left leg.
The second time with Leonid, I made the right arm and right leg.
It is better to do as the first time, for example, the left arm and right leg or vice versa.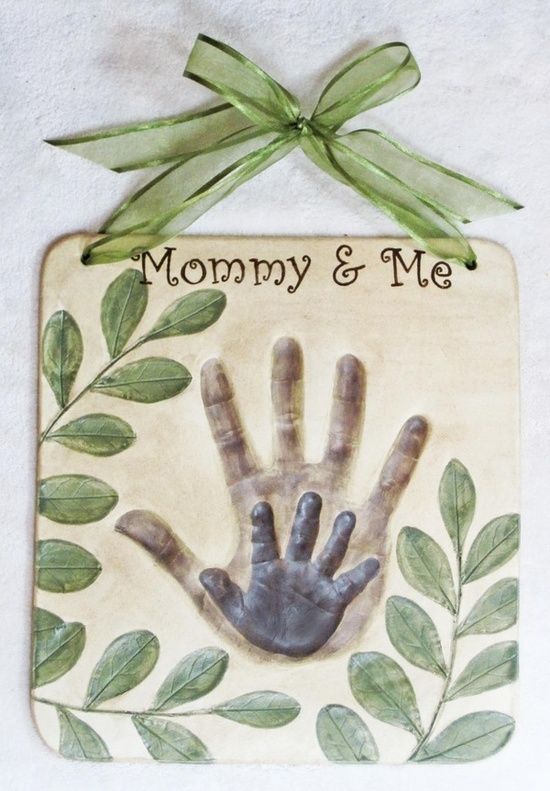
I think it looks so beautiful!
Next, take a disposable glass, pour water, add gypsum and mix everything.
I don’t specifically write the proportions of water and gypsum, since I made liquid gypsum “by eye”.
The consistency should be like sour cream or kefir.
We pour liquid plaster into our children's prints and wait.
When the plaster has hardened, remove the dough and our casts are ready!
The rest of the dough is easily removed with ordinary water.
Baby molds are ready!
It remains to decorate them!
You can color the casts however you like, I used pink and silver nail polish!
First, she painted the children's casts with pink, and then with silver varnish.
Here's what happened.
Then I found a beautiful frame on the Internet, added a photo of the child and signed the age - I printed the photo!
I bought a regular photo frame, put a photo, a pregnancy test, a bracelet and a tag from the hospital!
I glued the finished children's casts, on double-sided tape, on glass!
Here is a beautiful frame with children's casts for a long memory!
You can add baby's first clothes, a pacifier and more.