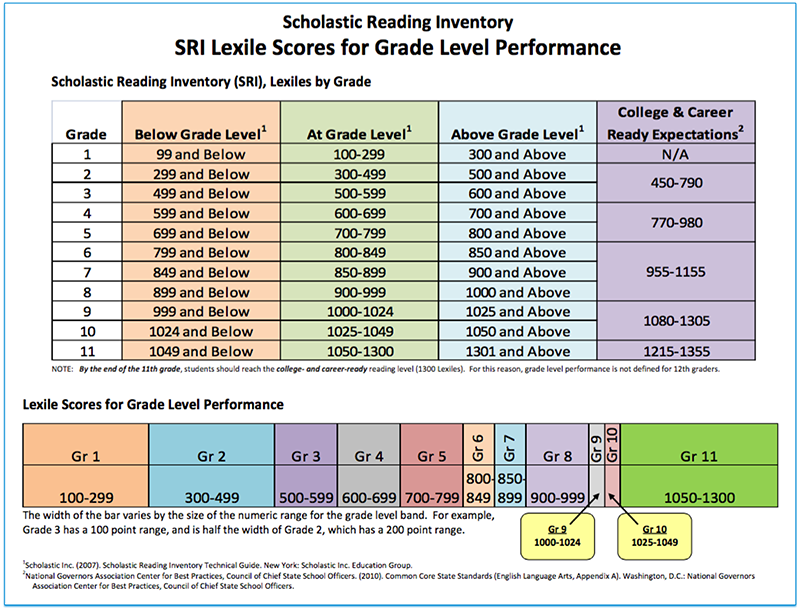
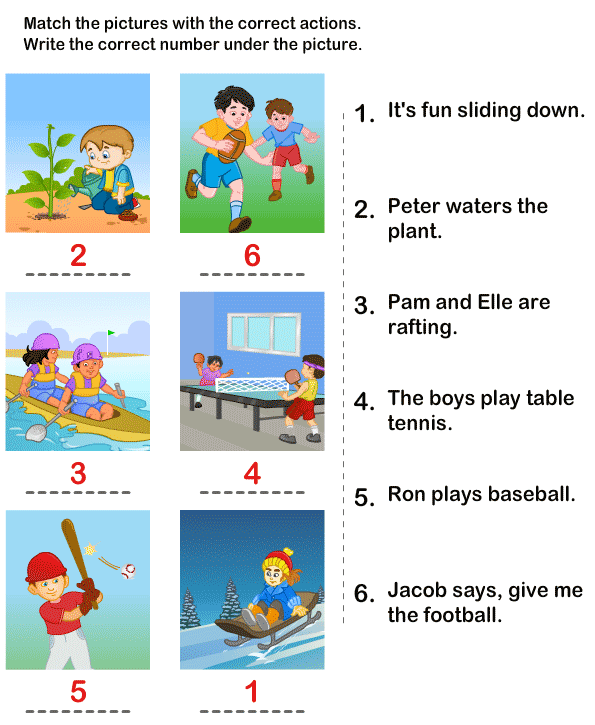
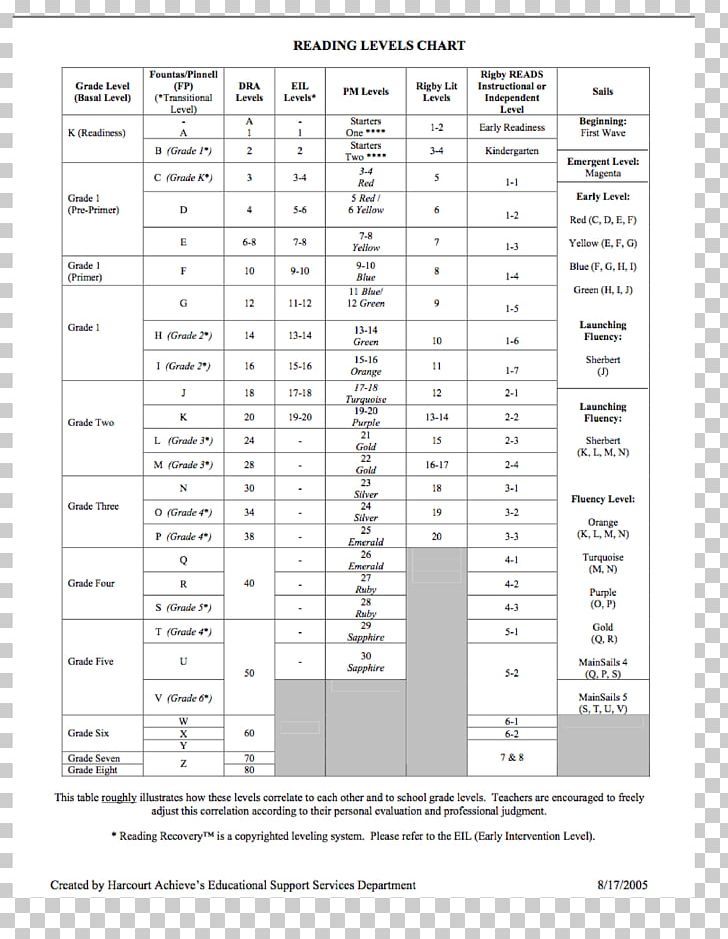
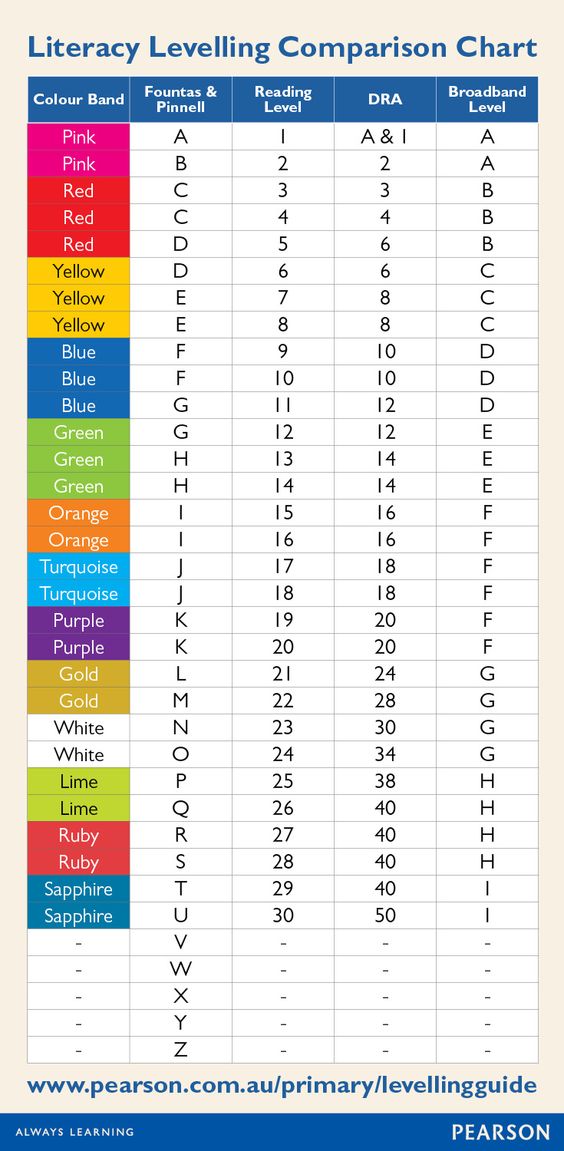
Reading level chart scholastic
Reading Level Chart - TeamTom Education
Reading level charts are an essential tool to compare the different text leveling systems out there. Did you know some text levels attempt to estimate a reader's ability? While other text level charts attempt to explain text complexity or readability?
Well, it can get confusing. That's why we're sharing this free reading level chart!
Between Guiding Reading levels, AR levels, ATOS levels, DRA, Rigby, Lexile Levels, and Grade level expectations, it can be a lot to manage. Hopefully, this free reading level correlation chart will help.
Download the PDF of the Reading Level Chart
Save As PDF
Reading Level Chart
I hope you enjoy the simplicity of the free reading level correlation chart. Here’s a quick explanation of text leveling. With a surge in guided reading over the last five years, more and more teachers and students are working with leveled texts. But, wait, there are so many different levels!
- Scholastic guided reading
- Fountas and Pinnell
- DRA
- Rigby
- Lexile levels
- ATOS
- AR.
Why can’t this just be easy?
I want to make it simpler for you. The free PDF of the reading level chart is for DRA, guided reading, Lexile, and grade levels.
Join our free membership to Word Study Warm-Ups!
First and foremost, reading levels are not exact!
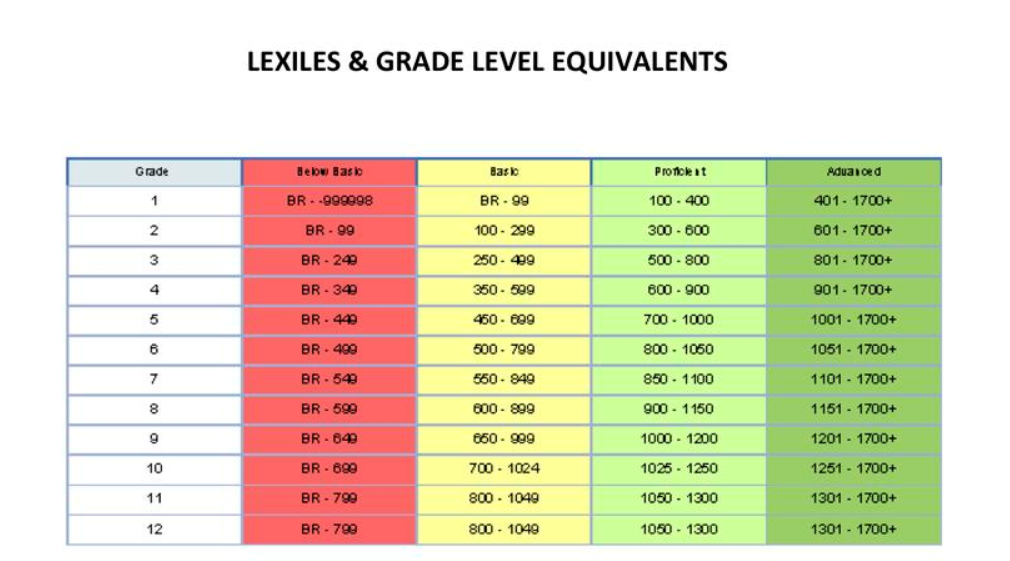
Guided Reading Levels, Developmental Reading Assessment (DRA Levels), Lexile Levels, and ATOS Levels are all tools for determining reading levels of texts and ability levels of readers. The practice of leveling texts by complexity is based on science and statistics, but like any assessment, it is a metric used to plan instruction.
Here are a few words of caution:
- Reading levels label the complexity of texts. They do not label students.
- Reading levels are not definitive and are best thought of as ranges.
A student can move easily between reading levels depending on the topic and the emotional engagement of the student.
Download the PDF version of the Free Reading Level Chart here.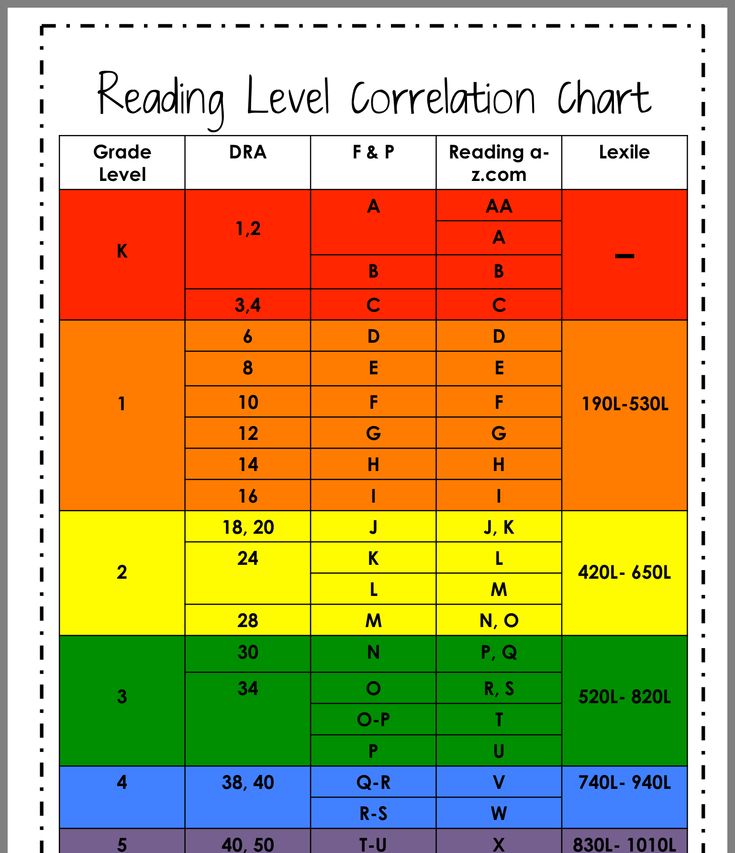
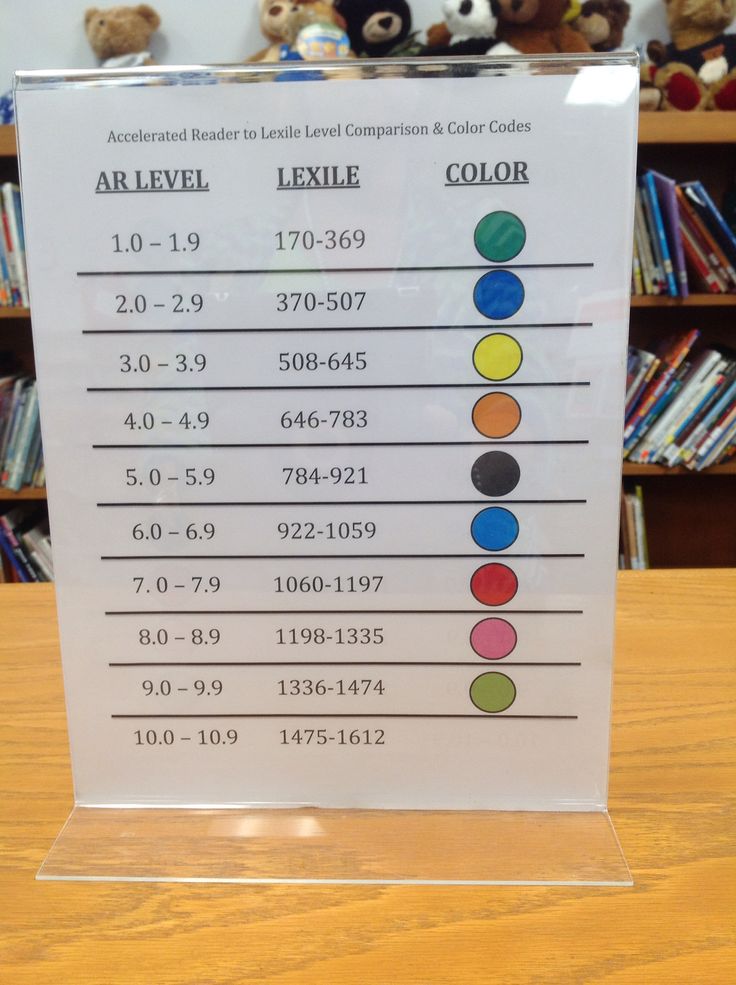
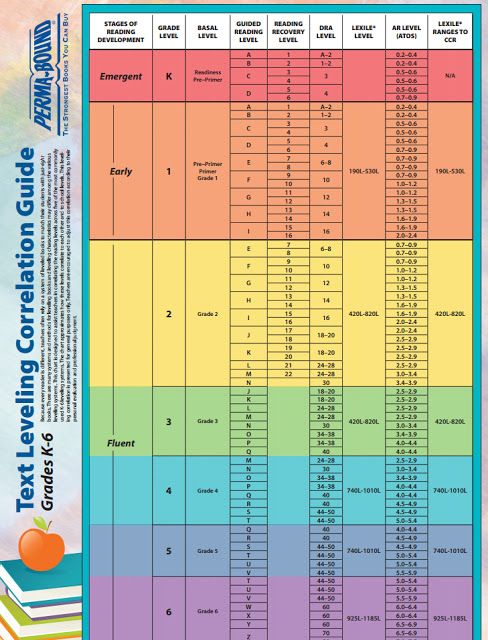
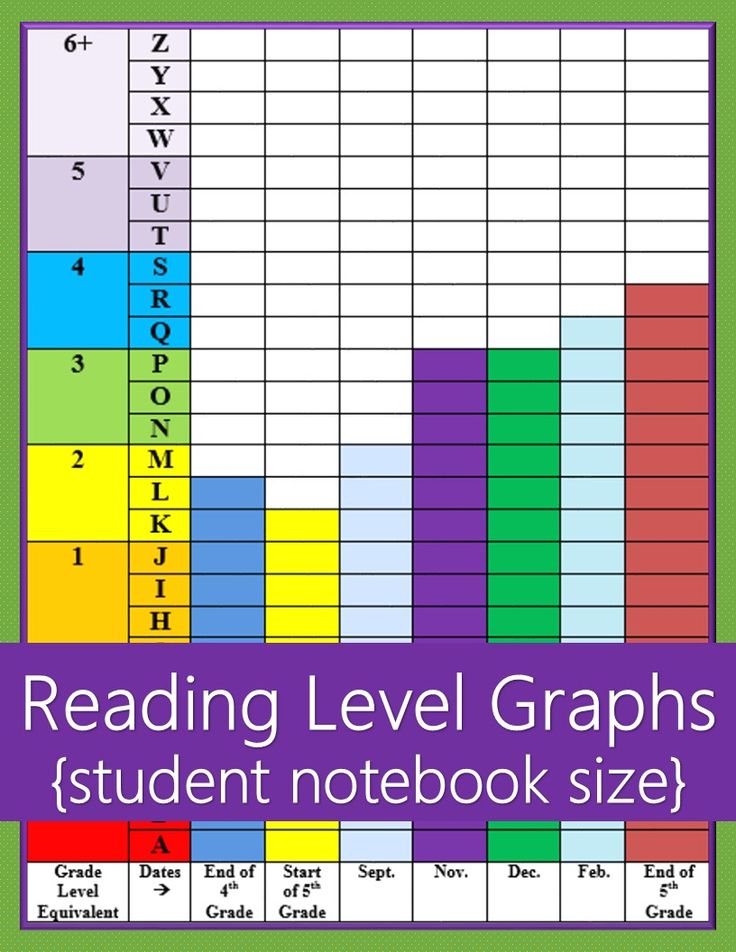
This reading correlation chart compares three of the most common reading levels: scholastic guided reading, DRA, and Lexile. See the download link above.
Levels Aren’t Perfect
You can see the different leveling methods don’t have a perfect overlap. This is why leveling is best thought of as a range, not an exact number.
Also, the grade levels overlap. This is another reason that reading levels do not label students. They describe the overall complexity of the text.
Each leveling comes from a different complexity technique. Reading levels are based on word count, length of words, length of sentences, vocabulary, and other measurable features of the text.
When teaching students in guided reading or small group instruction, you will want to use the students’ instructional reading levels. What is that?
The instruction reading level represents text complexity that students would struggle with alone. However, with teacher scaffolding, they can read successfully. At it’s most basic definition, an instructional level is determined by reading fluency. Instructional level is when a student can fluently read a text at 90-95% accuracy.
If a student is reading a text fluently with 96-100% accuracy, that level of text is considered the independent level. In other words, the student should be able to successfully read texts at this level without help.
Finally, a simple reading chart correlation for Lexile, ATOS, DRA and more!Click To Tweet
Related Reading:
- Why Shared Reading is the Most Effective Instructional Activity in the Reading Classroom
- Reading Strategies for Transitional Readers
- Close Reading for Elementary Students
- Summarizing Video Lesson Bundle
Published/Updated on October 24, 2016
Related Reading in the Topic: Freebies, Reading, Resources
About the author
TeamTom Education
TeamTom Education is dedicated to creating engaging teaching resources and strategies that make learning awesome!
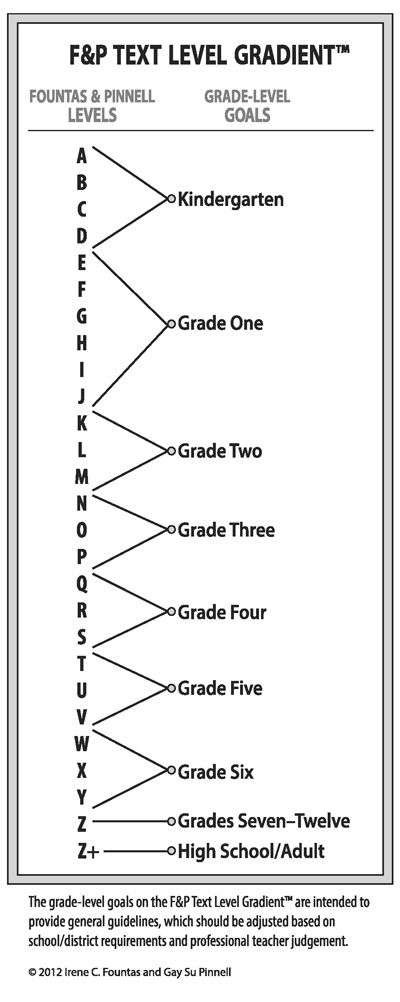
The Guided Reading Levels Chart and What It Means
Have you ever found yourself using a system, but not really knowing why? Maybe you are using it because someone introduced you to it and you just rolled with it.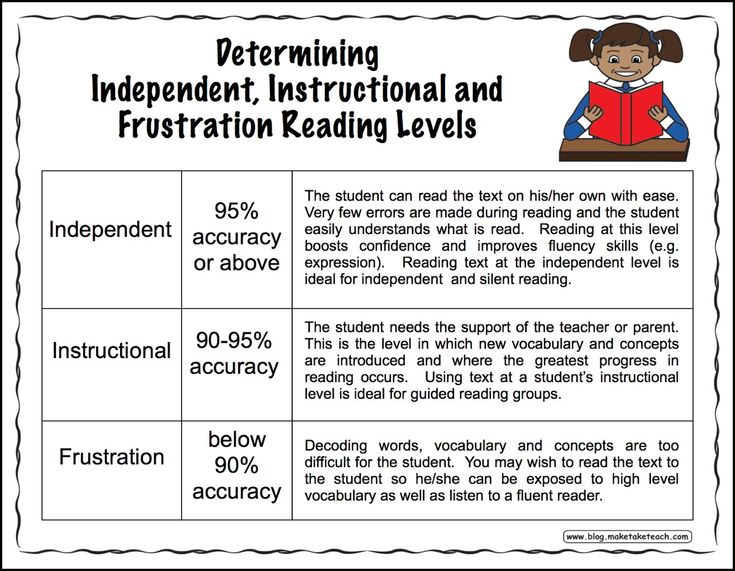 Maybe you have found yourself using it because you knew there was a purpose but weren’t sure what it was. I know I have been in this place. I have been there with guided reading levels and the guided reading levels chart for sure.
When I first started teaching guided reading, I found myself wondering things like, “What does this guided reading level mean?” Or “What does this have to do with how this child is learning to read?” Or even “Why on earth are some numbers and other’s letters?”
I want to help make things clear for you so I am sharing all I can about guided reading levels, the guided reading levels chart, and what it all means.
What are guided reading levels?
Guided reading levels are simply a system developed originally by Irene Fountas and Gay Su Pinnell to help organize reading skills and strategies so that readers are not overwhelmed. The goal of guided reading is to work within a child’s instructional level. Anything above that can cause frustration for the reader and anything below does not allow for enough teachable moments.
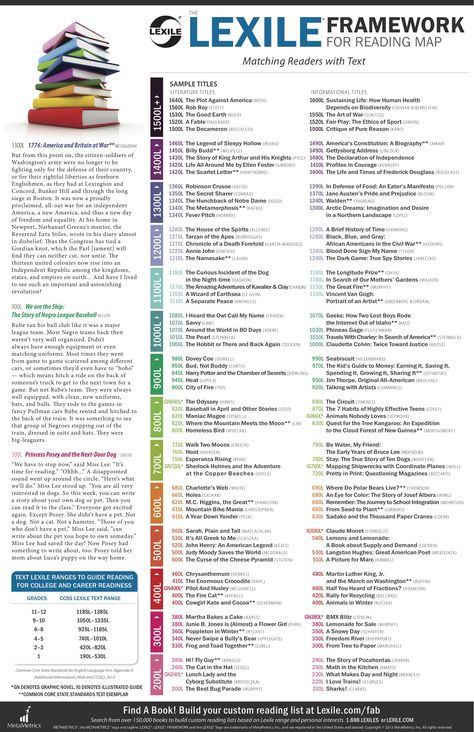
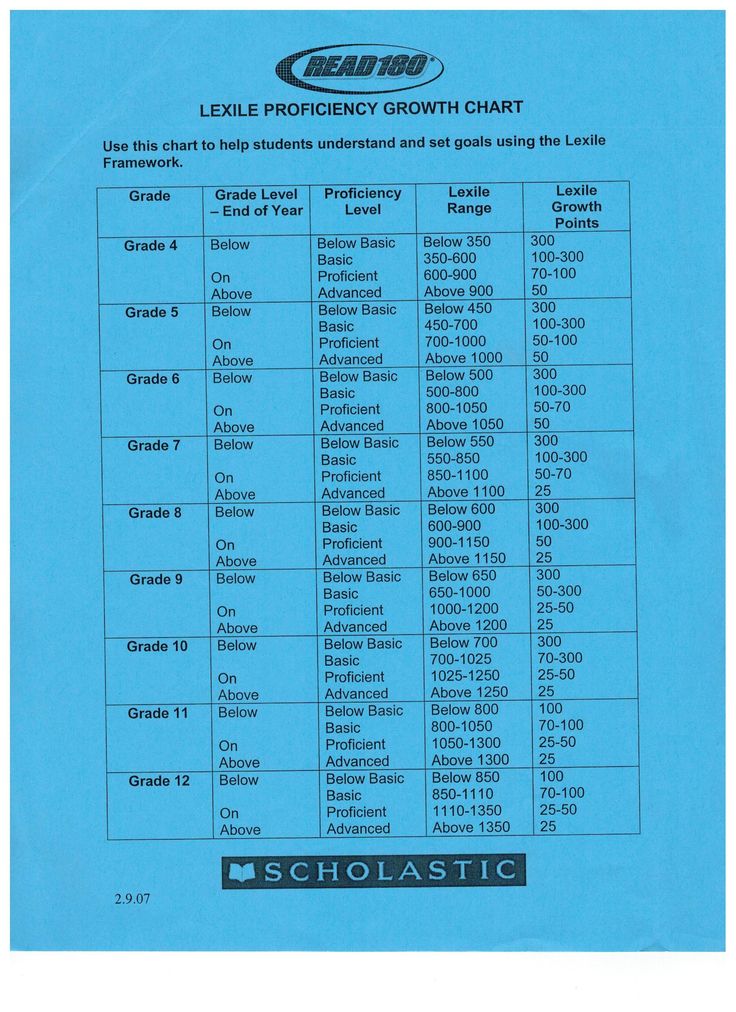
The most common system for leveling is Fountas and Pinnell’s guided reading levels system which uses letters to indicate each level. It ranges from levels A-Z with A being the simplest and Z being the most complex of the guided reading levels. Other popular systems are DRA, which uses numbers, Reading A-Z, and Rigby. Lexile levels are another familiar system that uses large ranges. Personally, I have found this system to be the most difficult to work within.
All good teachers teach within a “system” naturally. Never would we dump algebra on a child who is learning basic number patterns, yet the number patterns will set them up for later success in deeper math concepts!
Books are assigned reading levels and as children are assessed, children are given leveled books to work within that do not overwhelm them. The goal is that they have a useful tool that allows the teacher to come alongside them and coach them through.
Remember, children are not assigned levels.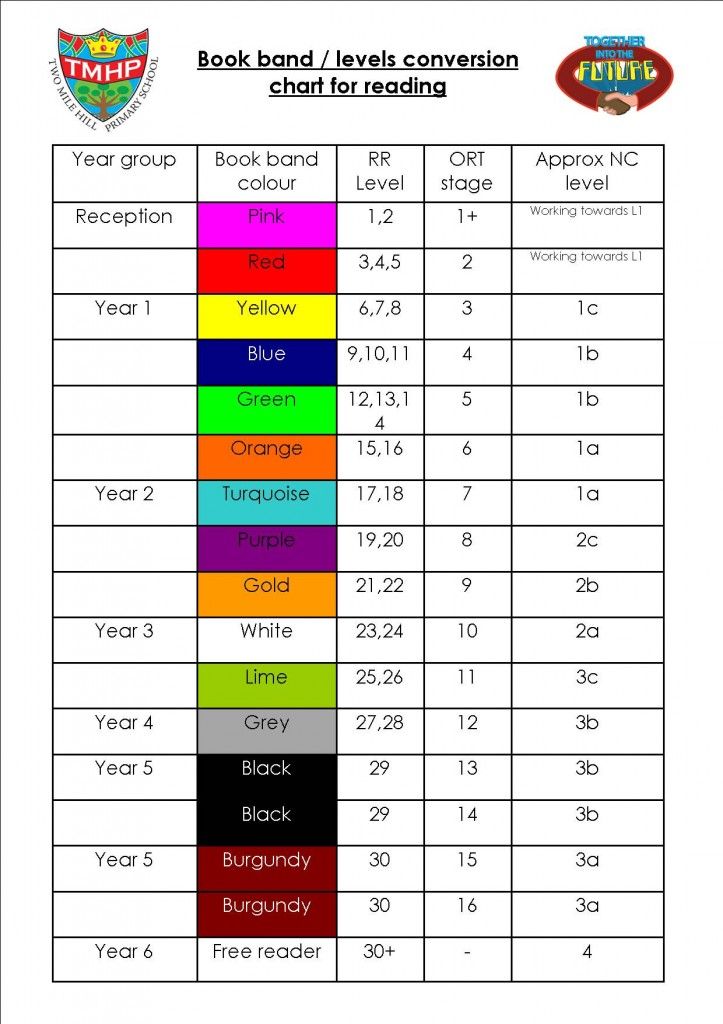 Books are assigned levels.
 This is something that I am guilty of in the past and while it can be wonderful motivation for some as they work to move up levels, it’s also not great for many.
How do you determine a guided reading level?
Guided Reading Levels for Books
Assigning a guided reading level to a book is complex. Many factors are taken into account. Scholastic lists the following:
Genre: The type of book (here’s your guide to children’s book genres)
Text Structure: How the book is organized and presented
Content: The subject matter of a book
Themes and Ideas: The big ideas that are communicated by the author
Language and Literary Features: The types of writing techniques employed by the writer
Sentence Complexity: How challenging the syntax in each sentence is
Vocabulary: The frequency of new words introduced in the book
Words: The ease at which the words in the book can be figured out or decoded by a reader
Illustrations: The correlation and consistency of images and pictures in the books to the words printed on the page
Book and Print Features: The physical aspects of the printed word on the page –Mary Doman, A Parent’s Guide to Guided Reading, Scholastic.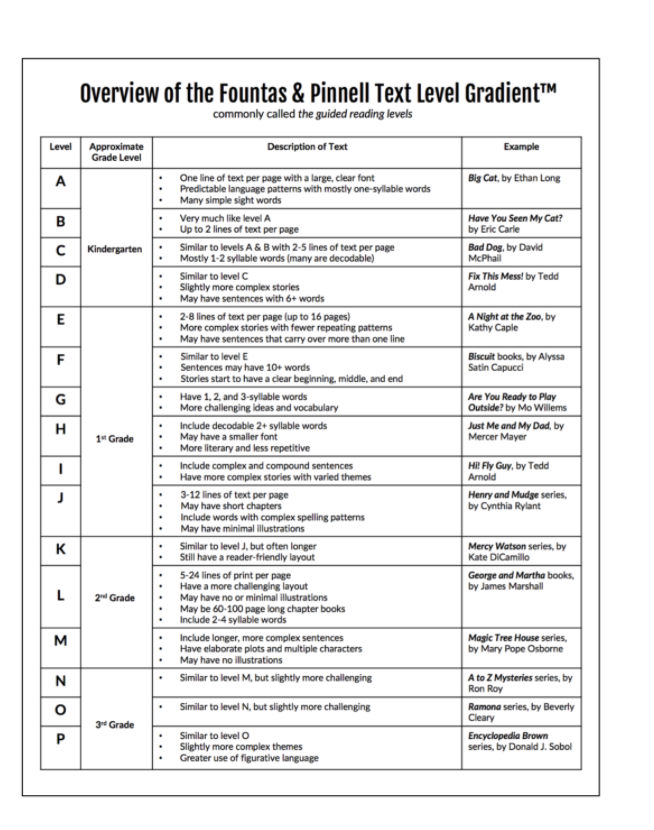 com
com
Just remember there is no perfect book and no perfect system. I know firsthand from leveling my own sets of guided reading books that it’s super tricky and one word can change the whole level! Being aware of your readers’ skills is so important!
Matching Just Right Books with Children
When it comes to matching guided reading levels with readers, there are a few ways you can do this. If you are a teacher, the best way to is to take a running record. This will allow you to get accurate data on the child and really see their strengths and growing points. If you are a parent, you can use a simple five finger test to determine if a book is too hard or just right. Every time a word is missed, the child raises a finger. Once they get to five, they know it’s too tricky right now.
It’s important to remember that when searching for a good fit you take into consideration more than just the text. You must also consider comprehension. If a child is struggling to comprehend the text, then it’s likely too hard.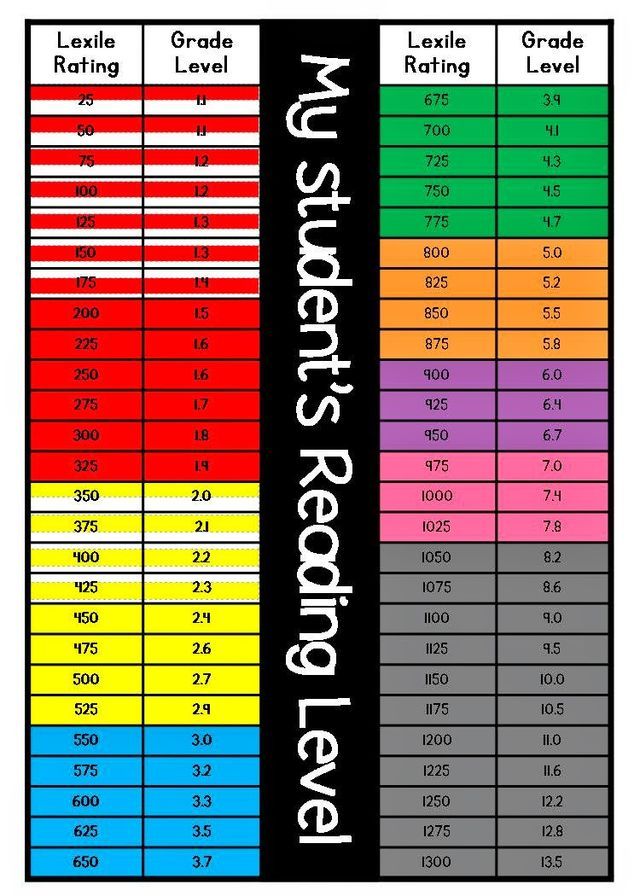 If the child can comprehend it well and can read it well, then it may be too easy for the child.
What does each of the guided reading levels mean?
So what do each of the guided reading levels mean? I love to look at them from the perspective of what they encourage readers to be working towards and how much a child can do when they advance levels.
In my guided reading resource card FREEBIE, all of the strategies, skills, behaviors, and comprehension focuses are explained at each level. They not only help you, the teacher, meet your readers where they are, but they help you have a roadmap to see where they are going next, too.
I love to use them when planning my guided reading lessons!
Where do I go from here?
Once you know where a reader is working and you know that you have leveled text, you may be looking for some easy to follow guided reading lessons. After years of planning my own lessons and hearing from teachers that they weren’t sure where to even begin, I created guided reading lessons for Kindergarten, First Grade, and Second Grade readers.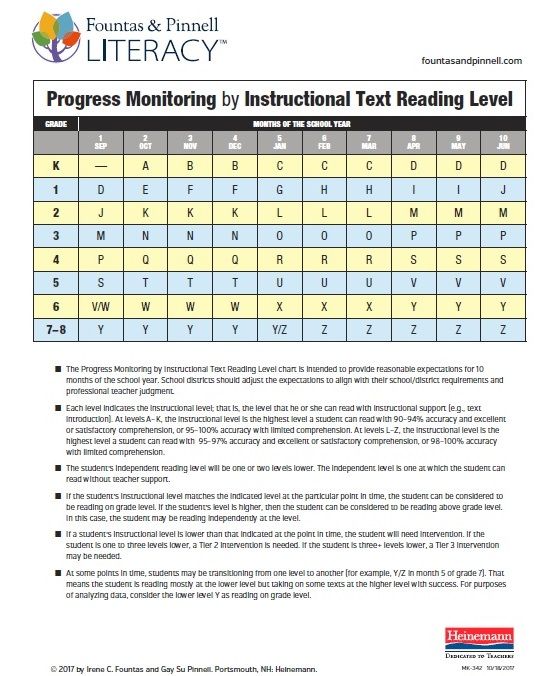
The lessons have an easy to follow format, guided reading books, notes about each level and where students are working, word work activities, comprehension activities to follow up the text reading, and even notes for parents.
Shop Kindergarten Guided Reading Lessons
Shop First Grade Guided Reading Lessons
Shop Second Grade Guided Reading Lessons
No matter where you are in your guided reading journey, it’s important to simply begin and keep moving forward. Teachers, myself included, are always learning, growing, changing our practice, and improving! I’m rooting for you!
pin it
Want to use the latest research to boost your readers during small groups? This FREE guide is packed with engaging ideas to help them grow!
Change the triangular display
Notes:
-
Examples from Excel, although charts are also available in Word, PowerPoint and Outlook word.
 If you use one of these programs, the functions are the same, but there may be slight differences when you get the original diagrams.
 -
The following procedures apply to Office 2013 and newer versions. Office Steps 2010?
Create 3-D chart
-
Select the cells on it that contain the data you want to use for the chart.
-
On the tab Insert click Charts if you only see the icon, or select the chart you want.

You can also click the View All Charts icon in the lower right Charts section. The Chart dialog box opens, in which you can select any type of chart. In each category, there are usually both two-year and three-year ones. Choose one of them.
Changing the 3D format of chart elements
-
On a 3-D chart, click the chart element, such as bars or lines, that you want to change the 3-D format to, or do the following to select it from the list of chart elements.
-
Click the diagram.
Displays the Charting Tools tab with tabs Design and "Format". -
On the Format tab, in the Current Slice group, click the arrow next to the Chart Area box, and then select the desired chart element.
-
-
Keyboard shortcuts. Instead, you can click the chart element for which you want to change the format and press CTRL+1. Skip to step 3.
-
In the group Current selection press the button Selection format .
-
Press button Effects, select the format 3-D , and then select one or more of the following options.
-
Press the Top or Bottom button, and then select the desired format.
In the Width and Height fields, select the desired size.
-
Click Material and select the desired effect.
Note: The availability of these options depends on the selected chart element. Some of the options presented in this dialog box are not available for all charts.
The options in this dialog box work with the selected chart element. Selecting the entire chart creates frames, while selecting a data series only works on the elements of that series.
-
Changing depth and intervals in 3-D chart
You can change the chart depth in 3D axes charts, the gap depth in 3D perspective charts, and the gap width in 3D rulers or holograms.
-
Click on the triangular diagram you want to change.
-
In menu Format , select Selected data series .
-
On the Data Series Format tab, click button Row Options and select the desired Depth and Width options.
Note: The availability of these options depends on the selected chart element. Some of the options presented in this dialog box are not available for charts.
Changing the rotation of a triangular diagram
-
Click the chart area for the 3-D chart that you want to rotate, or select Chart Area from the Chart Elements list from the Current Selection list on the Format tab.
-
Keyboard shortcuts. Instead, you can click the chart area and press CTRL+1. Skip to step 3.
-
On the tab, Format Chart Area , click the Effects button and select Rotate 3-D .
-
Do one or more of the following:
-
To change the rotation angle, click the required rotation angle in the Rotation X and Rotation Y boxes.
Note: Charts can be rotated around the horizontal and vertical axes, but not around the depth axis. Therefore, in the Z field, you cannot specify the angle of rotation .
-
To change the presentation field on the chart, click the desired level of perspective in the Perspective field, or click the Narrow Presentation Fields or Expand buttons until you reach the desired result.
Note: Some options in this dialog box are not available for charts. It is not possible to reset the previous settings.
-
Zoom 3-D chart
You can change the scale of a triangular chart by specifying its height and depth as a percentage of its base.
-
Click the chart area on the chart that you want to change, or select the chart area from the Chart Elements list in the Current Selection list on the Format tab.
-
Keyboard shortcuts. Instead, you can click the chart area and press CTRL+1. Skip to step 3.
-
In the dialog box Format Chart Area, click the Rotate 3-D button .
-
In 3-D rotation properties (3-D Rotation) do the following:
-
To change the depth of the chart, enter a depth percentage in the Depth (% of base) field.
-
To change both the depth and height of the chart, in the Depth (% of base) and Height (% of base), narrow the Auto-gauge checkboxes, and then specify a depth and height percentage.
-
To use right angle axes representation, select the Right Angle Axes box, and then enter the desired percentage of depth in the Depth (% of Base Axis) box.
-
Change the order of data series in a 3-D chart
You can change the order in which data series are printed so that large, voluminous data markers do not block them less.
-
In a chart, click the depth axis, or select Depth Axis from the Chart Elements list from the Current Selection list on the Format tab.
-
On the Format tab, in the Current Fragment group, click the Format Selection button.
-
In category Axis parameters , in area Axis parameters , select the option Series in reverse order.
Using transparency in 3-D chart
While transparency can be used in 3D and 2D charts, it is especially useful in 3D charts where large data markers can hide smaller ones.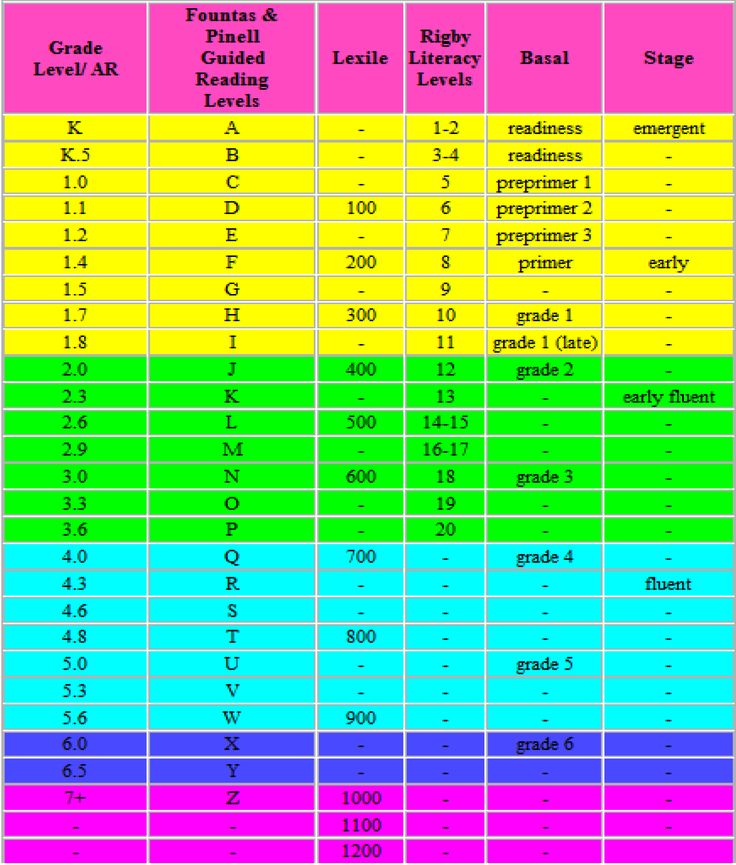
-
In a 3-D chart, click the data series or data point you want to make transparent, or select the data series from the Chart Elements list in the Current Selection list on the Format tab.
-
Keyboard shortcuts. Instead, you can click the chart element for which you want to change the format and press CTRL+1. Skip to step 3.
-
On the Format tab, in the Current Fragment group, click the Format Selection button.
-
Click Fill & line , click the Fill button and choose Solid Fill , Gradient Fill or Pattern or Texture .
-
Click and select a color if you want to change the element's colors.
-
Click it and then drag over the transparency percentage you want.
How to create a scatter or graph in Office 2010
-
Select the cells on it that contain the data you want to use for the chart.
-
On the tab, Insert , in the Charts group, do one of the following:
-
To create a 3-D column chart, click on Column , and then on column 3-D click 3-D Column .
-
To create a three-linear cylinder chart, click the D column, and then in the Cylinder area, select Three-headed cylinder .
-
To create a 3D cone chart, click the D column and then in area Cone select three-dimensional cone.
-
To create a triangular pyramid, click Gogram, and then in the Pyramid area, select triangular pyramid .
-
To create a three d line chart, click Line , and then in the 3-D Line area, click 3-D Line .
-
To create a triangular area chart, click Area, and then in 3-D select 3-D Area .
-
To create a 3D surface chart, click More Charts , and then in the Surface area select 3D Surface Chart or Wire 3-D Surface.
Tip: Hovering over a chart type or subtype displays a tooltip with its name. For more information about supported chart types, see Chart Types.
-
-
On a 3-D chart, click the chart element for which you want to change the 3-D format, or select it from the list of chart elements, do the following:
-
Click the diagram.
Displays the Work Tools tab with charts, adding tabs Design, Layout and Format. -
On the Format tab, in the Current Slice group, click the arrow next to the Chart Area box, and then select the desired chart element.
-
-
Keyboard shortcuts. Instead, you can click the chart element for which you want to change the format and press CTRL+1. Skip to step 3.
-
On the Layout tab, in the Current Fragment group, click the Format Selection button.
-
Click 3-D Format and select one or more of the following options:
-
In the No Size area , click Top and Bottom , and then select the format you want.
 In the Width and Height fields, select the desired size.
 -
In the area of Surface , click Material and select the desired effect.
Note: The availability of these options depends on the selected chart element. Some of the options presented in this dialog box are not available for charts.
-
Tip: You can also use this procedure to change the format of chart elements.
You can change the chart depth in 3D axes charts, the gap depth in 3D perspective charts, and the gap width in 3D rulers or holograms.
-
Click on the triangular diagram you want to change.
-
In menu Format , select Selected data series .
-
On the tab Options, select the desired depth and width options.
-
Click the chart area for the 3-D chart that you want to rotate, or select it from the list of chart elements, do the following:
-
Click the diagram.
Displays the Charts Work Tools tab, adding the Design, Layout, and Format tabs. -
On the Format tab, in the Current Slice group, click the arrow next to the Chart Area box, and then select the desired chart element.
-
-
Keyboard shortcuts. Instead, you can click the chart area and press CTRL+1. Skip to step 3.
-
On the Layout tab, in the Background group, click the Rotate 3-D button.
-
In category 3-D Rotations in area Rotation do the following:
-
To change the rotation angle, click the desired rotation angle in the X and Y fields.
Note: Charts can be rotated around the horizontal and vertical axes, but not around the depth axis.
 Therefore, in the Z field, you cannot specify the angle of rotation .
 -
To change the presentation field on the chart, click the desired level of perspective in the Perspective field, or click the Narrow Presentation Fields or Expand buttons until you reach the desired result.
Note: Some options in this dialog box are not available for charts. It is not possible to reset the previous settings.
-
You can change the scale of a triangular chart by specifying its height and depth as a percentage of its base.
-
Click the chart area for the 3-D chart you want to change, or select it from the list of chart elements, do the following:
-
Click the diagram.
Displays the Charts Work Tools tab, adding the Design, Layout, and Format tabs. -
On the Format tab, in the Current Slice group, click the arrow next to the Chart Area box, and then select the desired chart element.
-
-
Keyboard shortcuts. Instead, you can click the chart area and press CTRL+1. Skip to step 3.
-
On tab Layout in group Background click Rotate 3-D .
-
In category 3-D Rotations in area Scale of the chart, do one of the following:
-
To change the chart depth, enter a depth percentage in the Depth field (% of base).
-
To change both the depth and height of the chart, in the Depth (% of base) and Height (% of base) boxes, narrow the Auto-gauge checkboxes, and then specify a depth and height percentage.
-
To use right angle axes representation, select the Right Angle Axes box, and then enter the desired depth percentage in the Depth (% of base 9) box.0003 axis).
-
You can change the order in which data series are printed so that large, voluminous data markers do not block them less.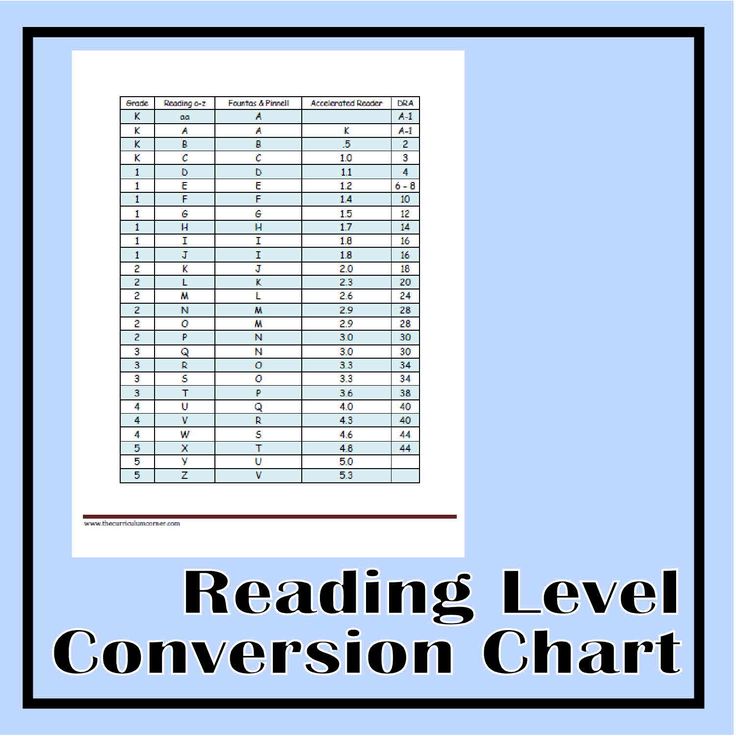
-
In the chart, click the depth axis or select it from the list of chart elements, you can do the following:
-
Click the diagram.
Displays the Charts Work Tools tab, adding the Design, Layout, and Format tabs. -
On the Format tab, in the Current Slice group, click the arrow next to the Chart area 9 box0004 , and then select the desired chart element.
-
-
On the Format tab, in the Current Fragment group, click the Format Selection button.
-
In category Axis parameters , in area Axis parameters , select the option Series in reverse order.
While transparency can be used in 3D and 2D charts, it is especially useful in 3D charts where large data markers can hide smaller ones.
-
On a 3-D chart, click the data series or data point you want to make transparent, or select it from the list of chart elements, you can do the following:
-
Click the diagram.
Displays the Charts Work Tools tab, adding the Design, Layout, and Format tabs. -
On the Format tab, in the Current Slice group, click the arrow next to the Chart Area box, and then select the desired chart element.
-
-
Keyboard shortcuts. Instead, you can click the chart element for which you want to change the format and press CTRL+1. Skip to step 3.
-
On the Layout tab, in the Current Fragment group, click the Format Selection button.
-
Click the Fill button and select Solid Fill, Gradient Fill, or Pattern or Texture.
-
Click it on the panel transparency and then move it to the desired transparency percentage.
About the reading and writing timing chart
We know that timing charts are divided into ideal timing charts and real working timing charts. The ideal sequence ignores the actual high and low conversion time, and what we want to see in the actual process of writing the program is the actual work sequence diagram, which is clearer.
Fig. 1. Ideal time and actual time
The physical sequence diagram only needs to maintain the consistency of the sequence of operations. Below we take an 8080 bus and a specific spi bus, IIC as an example to illustrate how to write logic timing through a timing diagram:0045 1. The following is the read and write sequence of a specific 8080 bus-based LCD:
In fact, this picture mainly distinguishes between the sequence of the WR write control line and data lines. According to the working sequence, first set the NCE chip select low, then set the response bit of the command/data control RS line, first set the WR low, then output the D data line, and then set the WR high.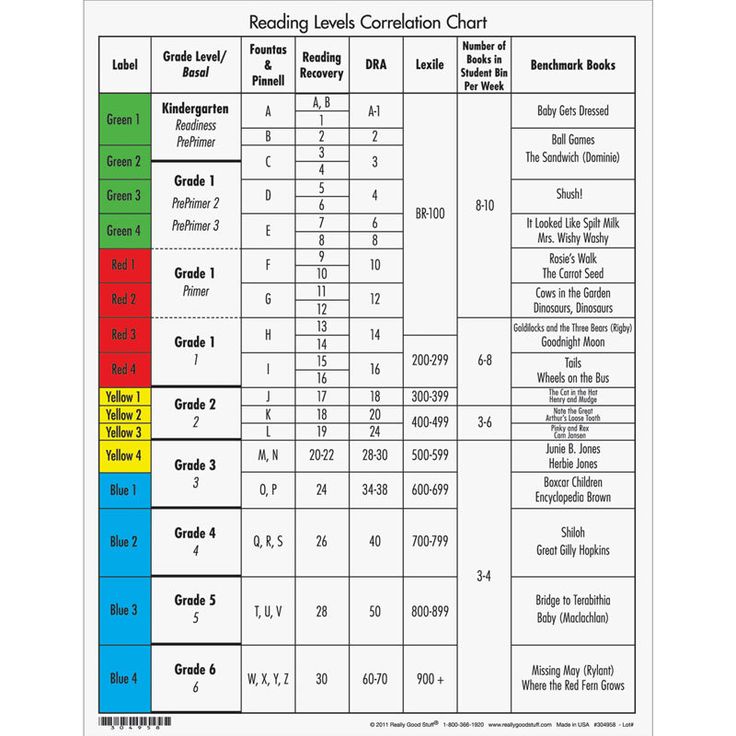 Checking >= 0ns means that after WR is set to high, at least D data is stored. Obviously, the data port of the single-chip microcomputer is always saved after recording, and the conditions are met. Therefore, the logical sequence of the entry is as follows:
{
NCE disabled;
RS sets the response bit;
WR low;
Data output D;
WR high;
}
The 8080 read timing is mainly to distinguish the order of operations between RD and data D. The first <= 1 ns means that data port D is already valid data for 1 ns after RD is driven low. This means that as long as the interval between the RD instruction and the next data read instruction is greater than 1 ns, unique data can be prepared! ! (For example, here <= 20us and our sample 32 input is 13ns, then you have to add a delay between RD and the read value to ensure that the read is a valid value) Two <= 1ns means that when the RD is high port D must be read to 1 ns. Note that for a read sequence, all time D is the period of time that the data port can read valid data (i.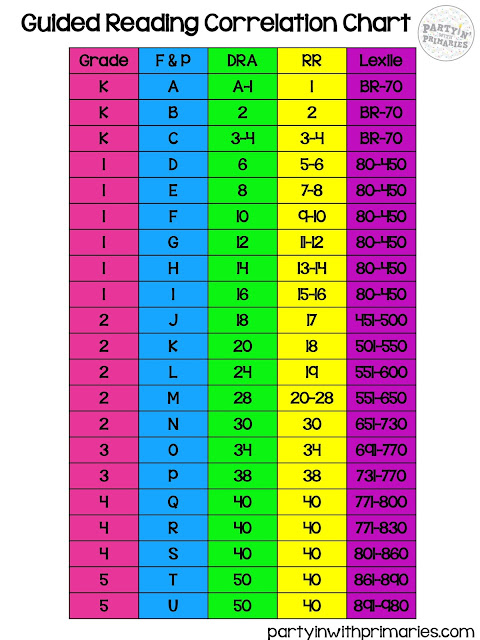 e., the holding time of input data), so it is correct to read data at any time during this period. This means that after RD goes low, our data port is set as input as long as the read value remains valid for 1 ns after RD goes high again! So the read sequence can be written like this:
{
NCE chip selection drop-down menu;
RS installed on request;
RD set low;
D read data;
RD set to high;
}
2. Below is the timing diagram of OLED mode with 4 SPI wires.
This is also very simple, it mainly depends on the relationship between the SDIN data bit and the SCLK clock, i.e. write time
{
SCLK is set low;
SDIN output of a certain bit;
SCLK set to high;
}
3. The figure below shows the timing of the IIC. Here we are only talking about the data transfer part as an example. We see that the clock is driven low first and the data transfer is set
{
SCL is set low;
SDA bit data transmission;
High SCL
}
Corresponds to the timing relationship between clock and data:
We are interested in resequencing within a valid time period, ie the relationship between the rising or falling edge of the data latch and the data. Make sure the soak time is continuous and stable and meets the requirements.
Smart recommendation
Notes for learning regular expressions (1) basic knowledge
1. What is a regular expression? A regular expression is a formula that uses a specific pattern to match a string type. Second, the composition of regular expressions In PHP, regular ...
Chapter 4 Study Notes
Base type and reference type Base type: undefined, null, boolean, number, string. These five basic data types are
mysql one: basic knowledge and simple query
table of contents Basic knowledge Database used in this article Simple query Query conditions Use relational and logical operators Fuzzy query Sort query Basic knowledge Base ...
JMeter environment settings
Unicorn Enterprise Heavy Recruitment Standards for Python Engineers 2019 >>> Transfer from: http://www.yiibai.com/jmeter/jmeter_environment. html JMeter is based on Java Framew...
webpack configuration
Frontend automation build tool Get Started Before running: initialize, generate package.json file Create a new folder in the directory called src directory (you can take it yourself) Create...
You may also like
Intellij Idea Note Template
Intellij Idea IntelliJ Idea template note Add class file comment 1. First Steps -> Settings -> Editor -> IntelliJ Idea Code Life and Templates Add comment function template...
Up transformation conditions
Reprinted at: https://blog.51cto.com/12218412/1867087...
Spring Boot integrates Dubbo demo framework
See previous blog post about Dubbo framework principle: http://www.cnblogs.com/umgsai/p/5836925.html Zoo first run Server side Pom configuration looks like this H...
RxJava Operator Combination Operator (6)
Preface In the previous article we learned about filter operators, and in this article we learned about RxJava combinatorial operators.