Salt dough craft recipe
The Best Salt Dough (for Ornaments and Crafting!) to Make with the Kids
Learn how to make classic salt dough with the kids, with baking, painting, and storage info. This method is straight forward, easy, and thorough—and they a perfect kids holiday gift for grandparents, teachers, and loved ones!
Salt Dough
This salt dough is a staple of childhood and I love doing this Christmas activity with my kids each year—and throughout the rest of the year too! We love to make salt dough handprints, ornaments, and sometimes, just any old shape they want to. It’s an easy project that we can do together—and then share as kid-made holiday gifts, keepsakes, or house decorations.
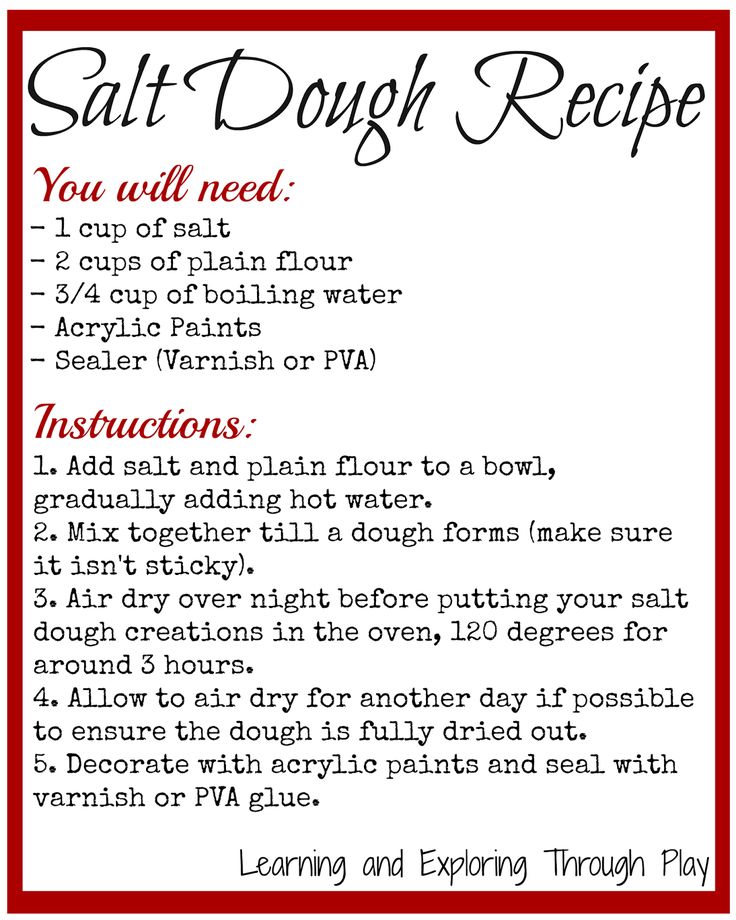
Salt Dough Recipe
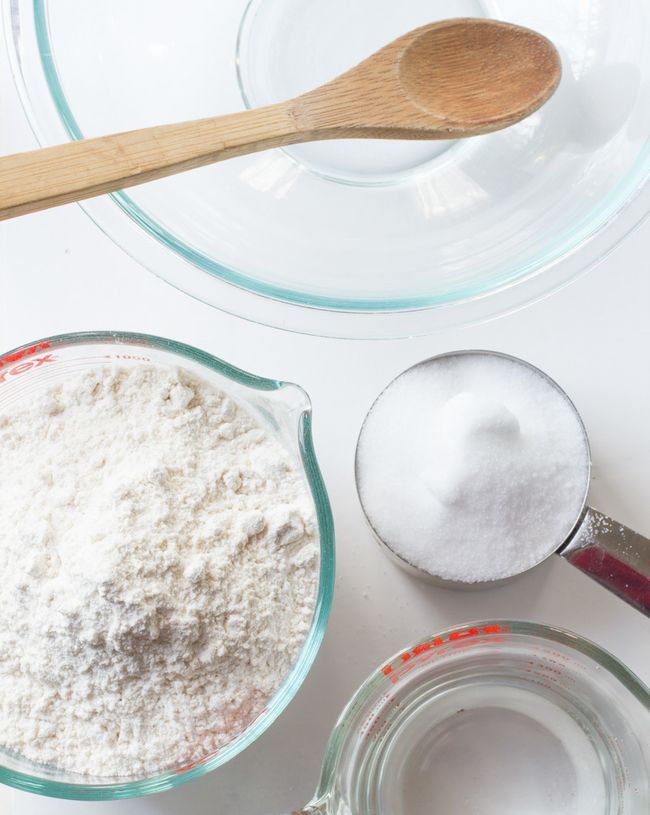
Making salt dough at home is as easy as combining three pantry staples together into a dough. It’s fairly fool proof (as long as you follow the measurements!) and is a recipe that even little kids can help make.
Ingredients in Salt Dough
To make this recipe, you’ll need:
- table salt
- all-purpose flour
- water
TIP: That’s it! (I buy store brand, cheap flour for this since project to keep it very budget-friendly. )
How to Make Salt Dough Ornaments Step-by-Step
Here’s a look at how to make the dough for this salt dough. Scroll down to the bottom of the post for the full information.
- Measure out the flour and water. (photo 1)
- Add the water. (photo 2)
- Stir with a wooden spoon. (photo 3)
- Keep stirring until the dough is mostly together and is hard to stir any longer. (photo 4)
- Knead a few times with hands to bring the dough together. (photo 5)
- Place dough between two pieces of parchment paper and roll out. (photo 6)
TIP: You can divide the dough in sections so multiple kids can have their own dough to work with.
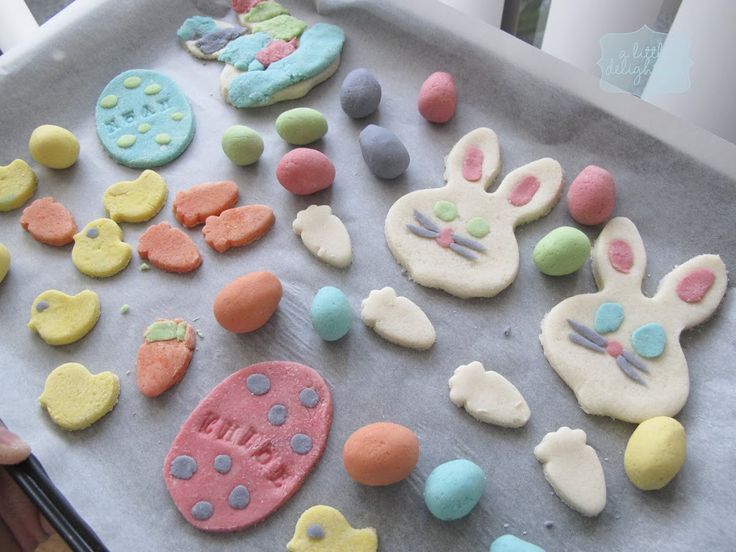
How to Cut Out, Bake and Decorate Salt Dough Ornaments
Once you start rolling, here’s a look at what will follow if you want to make these into ornaments. (Skip the hole poking if you want to just make these as shapes for the kids to paint.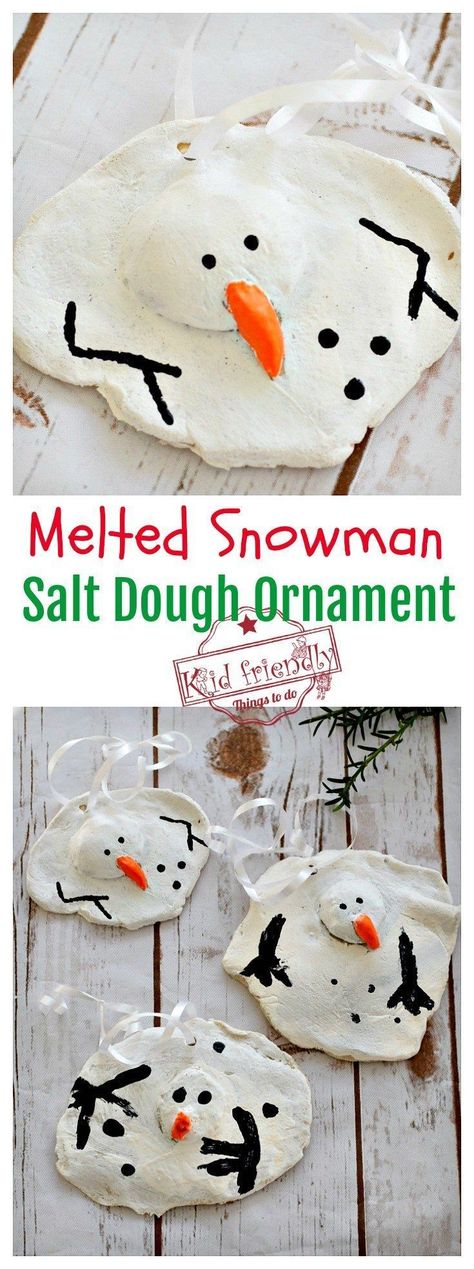 )
)
- Roll out, changing directions occasionally, until about 1/4-inch thick. (This may not get precise if you’re working with kids and that’s okay!) (photo 1)
- Stamp cookie cutters. (photo 2)
- Remove the dough around the shapes, then either transfer the whole piece of parchment paper to a cookie sheet OR transfer just the shapes to a parchment-lined cookie sheet. (photo 3)
- Poke holes so you have a place for a string to hang as ornaments. (photo 4)
- Press in a hand to make a handprint, if desired. (photo 5)
- Bake, let cool and decorate! (photo 6)
TIP: Re-roll any remaining dough after Step 3 here to make additional ornaments.
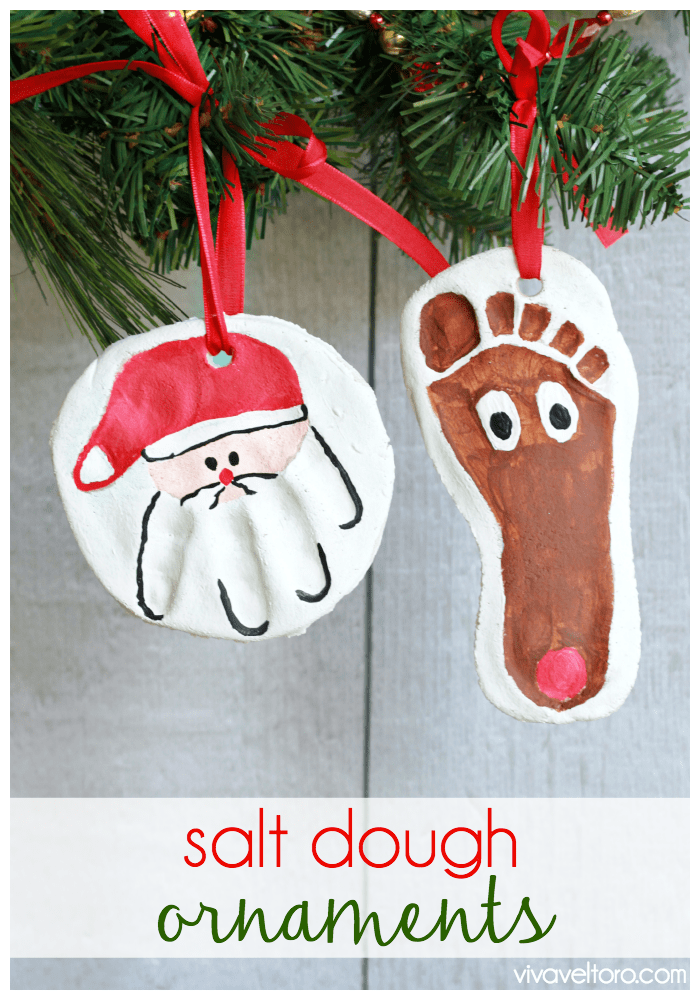
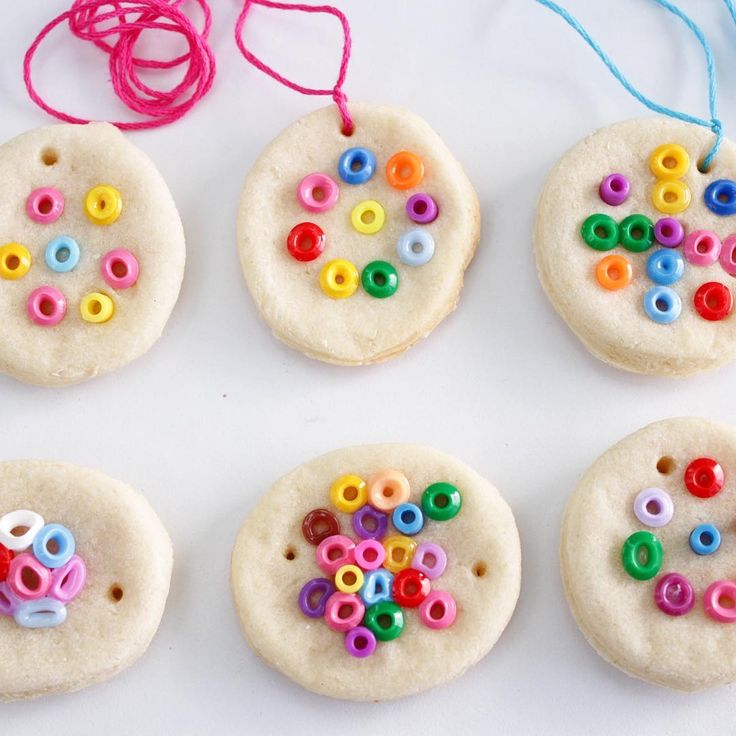
Salt Dough Handprint Ornament
Capturing a handprint in salt dough is a perfect grandparent gift, or a keepsake ornament to make for your own tree. I love pulling out our little collection year after year. Know that getting a good print may take a few tries if doing a baby’s hand!
TIP: Check the size of your round cookie cutter against your child’s hand to make sure that it’s big enough.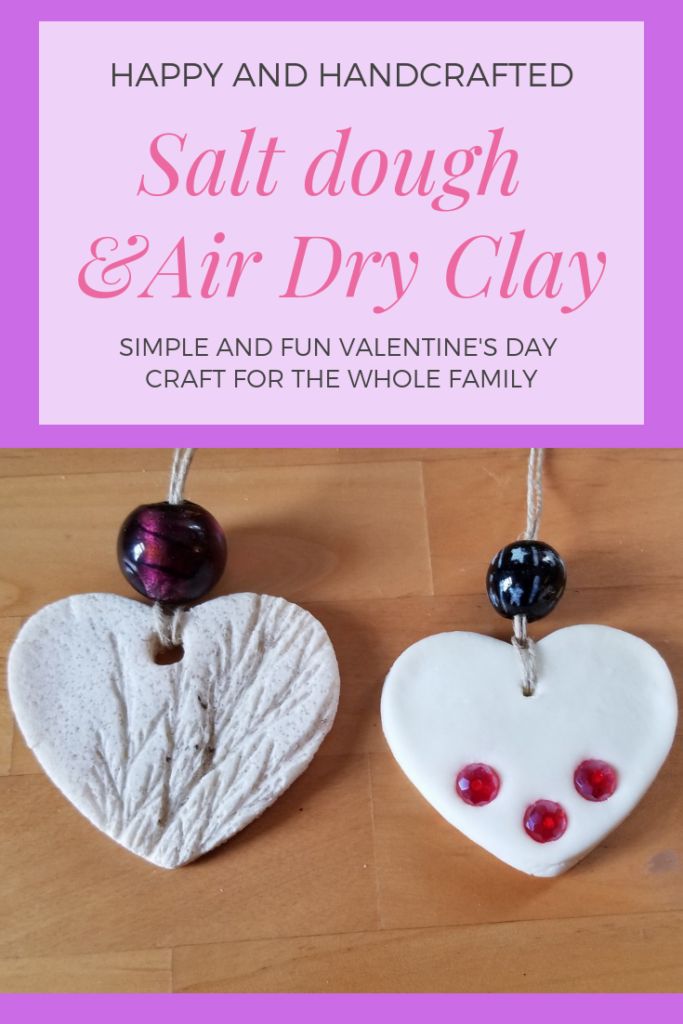 You may need one that’s 4-5 inches in diameter.
Best Paint for Salt Dough Ornaments
If the kids are wearing smocks, the table is protected, and you are reasonably sure they won’t paint all over their hands and faces, I like using regular acrylic craft paint since it holds up best on crafts. With younger kids who may wind up wearing more of the paint, I’d recommend tempura washable paints.
TIP: We put our paint into the base of old egg cartons since we always have those on hand. You can also use paper plates.
How to Preserve Salt Dough Ornaments
To help preserve your finished dried ornaments, you can coat with a layer or two of Mod Podge or spray with a sealer. Either work well. I’d recommend coating or sealing both sides, so do one side and let it dry, and then do the second side. If using the sealer, do it in a well ventilated area without the kids too close by.
TIP: To store these ornaments from year to year, you’ll want to wrap in bubble wrap. Store in a container that won’t be banged around, dropped or exposed to excess moisture.
Why is my salt dough puffing up?
If you mistakenly use self-rising flour, they may puff. And sometimes it happens randomly. Keep the oven temperature low and if it happens consistently, you can try baking at an even lower temperature for a slightly longer amount of time.
Tips for Making the Best Salt Dough Ornaments
- If the dough is too wet and sticky, knead in a little more flour. If it’s too stiff, add a little more water. There is a big range in the way different flours absorb liquid, so there is a normal range of variation in liquid needs. It should be easy to work with—soft and not too stiff and not excessively sticky.
- Use paper lollipop sticks or a skewer to make your holes.
- Use a 4-5 inch round cookie cutter to make handprint ornaments.
- Tie on baker’s twine or thin ribbon to hang as ornaments.
- Try to get the dough to an even thickness before baking so the ornaments bake evenly.
- Bake for the time indicated and then longer if your ornaments still feel soft. They should be firm to the touch without much give.
- Let cool fully before painting.
- If you want to paint the background of a handprint ornament, do that before you paint the inside of the hand. Let dry before adding a second color. Some people like to paint the whole thing white or cream to give it a more finished look.
- Use acrylic craft paint for older kids who can be trusted with paint and tempura washable paints with younger toddlers.since it holds up best on crafts. With younger kids who may wind up wearing more of the paint, I’d recommend.
- To help preserve your finished dried ornaments, you can coat with a layer or two of Mod Podge or spray with a sealer.
I’d love to hear your feedback on this project and what your kids thought of it, so please comment below to share!
Prep Time 30 minutes
Cook Time 2 hours
Total Time 2 hours 30 minutes
Author Amy Palanjian
Cuisine American
Course Holiday
Calories 1kcal
Servings 2 dozen ornaments
- ▢ 4 cups flour
- ▢ 1 cup table salt
- ▢ 1.
 5 cups water
Mix the ingredients together in a large bowl using a wooden spoon. When it becomes too stiff to stir, use clean hands to bring the dough together.
NOTE: If the dough is too wet and sticky, knead in a little more flour, about 1 tablespoon at a time. If it's too stiff, add a little more water, about 1 tablespoon at a time. There is a big range in the way different flours absorb liquid, so there is a normal range of variation here. It should be easy to work with—soft and not too stiff and not excessively sticky.
Knead a few times until the dough is uniform and soft, about 3-5 minutes.
Divide dough into 2 or 4 sections and roll out to about 1/4-½ inch thick between two sheets of parchment paper. This will help prevent sticking.
Cut out with cookie cutters. Transfer shapes to a parchment-lined baking sheet.
Repeat rolling and cutting out shapes to use up the dough.
Preheat oven to 250 degrees F.
Do a 4-5-inch circle and press in a child's handprint if desired.
Use a paper lollipop stick or a skewer to make a hole to hang as an ornament.
If making ornaments, bake for 90 minutes to 2 hours; if baking handprints, bake for 2-3 hours. Continue baking both ornaments and handprints as needed until they are until just firm to the touch, checking every 20 minutes. (It's not a problem if yours take longer than the initial baking time—it varies based on thickness and size...which will likely vary if you are baking these with kids!) They do not need to be rock hard, but should not feel squishy. Handprints will likely take longer than smaller ornaments and may take closer to 4 hours.
Remove from oven, let cool, and paint if desired with acrylic or washable tempera paint.
Once paint is completely dry, seal with Mod Podge if desired.
Mixing Bowl
parchment paper
Mini Cookie Cutters
- Divide the recipe in half to make a smaller portion of dough if desired.

- Use paper lollipop sticks or a skewer to make your holes.
- Use a 4-5 inch round cookie cutter to make handprint ornaments.
- Tie on baker's twine or thin ribbon to hang as ornaments.
- Try to get the dough to an even thickness before baking so the ornaments bake evenly.
- Bake for the time indicated and then longer if your ornaments still feel soft. They should be firm to the touch without much give but do not need to be rock hard. It is not a sign of a problem if yours take longer than mine did to bake—flours and ovens vary!
- Let cool fully before painting.
- If you want to paint the background of a handprint ornament, do that before you paint the inside of the hand. Let dry before adding a second color.
- Use regular acrylic paint for older kids who can be trusted with paint and washable tempera paint with younger toddlers.
- To help preserve your finished dried ornaments, you can coat with a layer or two of Mod Podge or spray with a sealer.
Calories: 1kcal, Fat: 1g, Saturated Fat: 1g, Polyunsaturated Fat: 1g, Monounsaturated Fat: 1g, Fiber: 3g, Sugar: 1g, Calcium: 31mg, Iron: 6mg
Tried this recipe?Rate in the comments and tag @yummytoddlerfood on IG!
Salt Dough Recipe - The Easiest Way to Make Salt Dough!
Kim147 Comments
All activities should be supervised by an adult. As an Amazon Associate, I earn from qualifying purchases. This post may contain affiliate links.
Learn how to make your own salt dough ornament with this easy Salt Dough Recipe. You only need a few ingredients from your kitchen to make this salt dough! We cover all of our tips and tricks to make sure your salt dough ornaments will last for years!
RELATED: Salt Dough Ornament Recipe
Table of Contents
- Salt Dough Recipe – for Handprints & Ornaments
- Salt Dough Ingredients
- How to Make Salt Dough – an Easy Salt Dough Recipe!
- Why Is My Salt Dough Puffing Up?
- How Do I Seal Salt Dough Ornaments?
- What Kind of Paint Should I Use?
- How to Decorate Salt Dough Handprints
- How Many Ornaments Does this Make?
- Tips for Making Perfect Salt Dough
- Salt Dough Handprint & Ornament Recipe
- Get the Recipe
- More Salt Dough Ornament Ideas
Salt Dough Recipe – for Handprints & Ornaments
One of our favorite things to do with salt dough is to make handprint ornaments.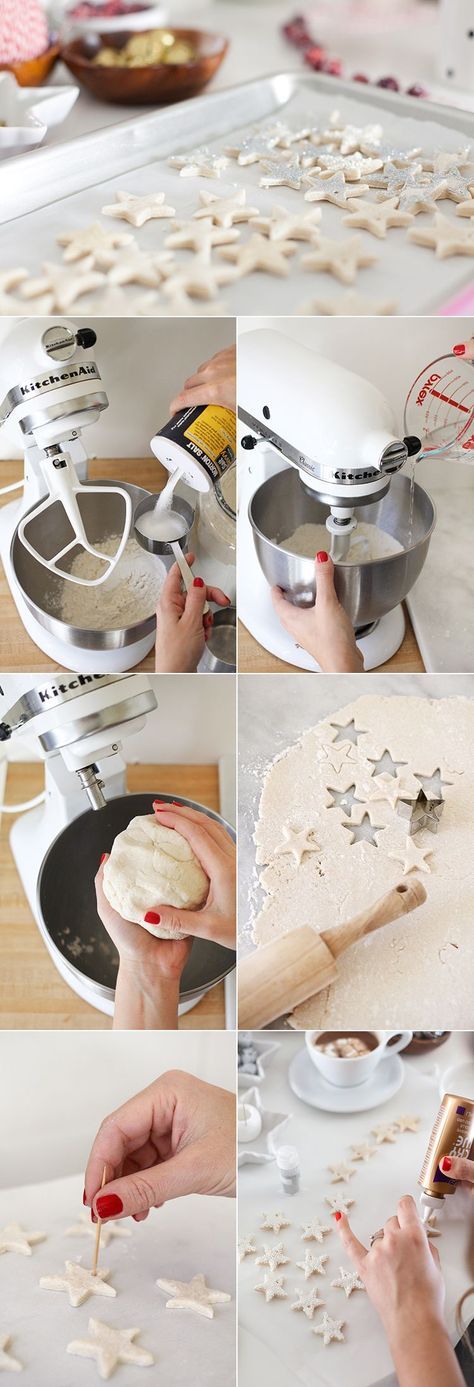 But you can also use this same recipe and use cookie cutters and paint shapes instead!
For the handprint ornaments – you can make a new one every year and have a nice memento for the Christmas tree!
Don’t forget to add the year on the back of the salt dough ornament to keep track of the different years.
Salt Dough Ingredients
- 4 cups all purpose flour (Note: you want regular all purpose flour, not self-rising)
- 1 cup salt
- 1.5 cups warm water
How to Make Salt Dough – an Easy Salt Dough Recipe!
1. Combine all of your ingredients (flour, salt, warm water) and mix well until it starts to form a dough.
2. Take the dough out of the bowl and knead for at least 10 minutes.
If your dough is too dry, add a little bit more water in and continue to knead.
The dough should be smooth and roll out with not too many bumps. It should also be easy to press a handprint into it.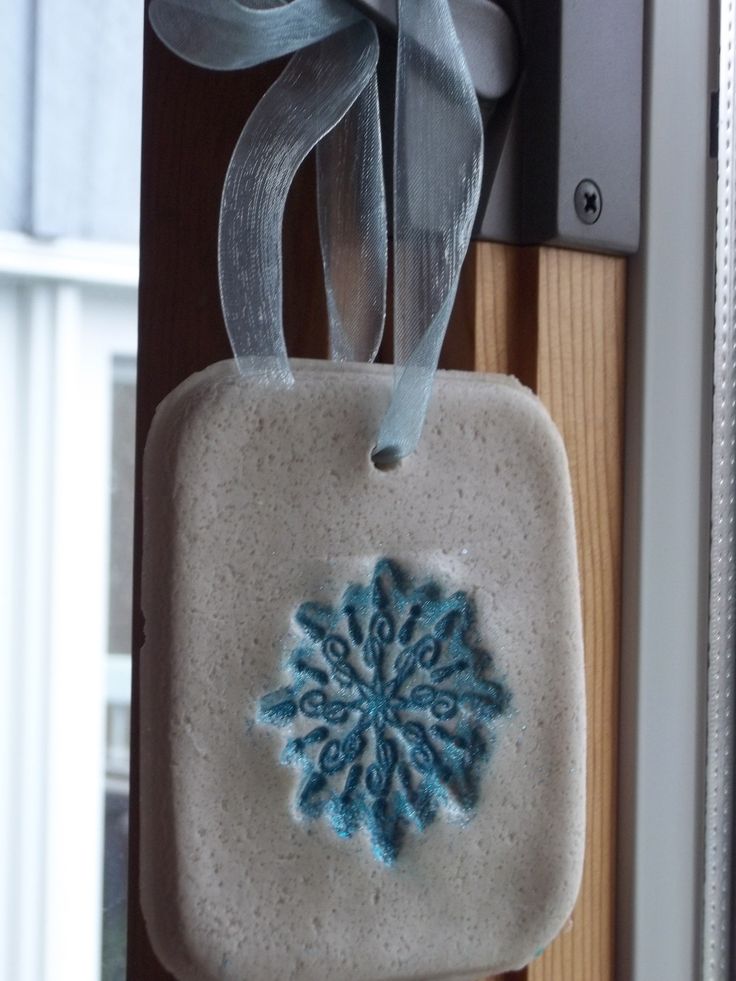 If you’re finding it’s too hard or not smooth enough, continue to knead some more. If it’s still too dry, add a little bit more water (but not too much or it may get too wet).
Roll out the dough to between 1/4 to 1/2 inch thickness. If the dough is too thick it will take too long to dry.
Press the hand into the dough.
3. Use a circle shaped bowl to trace around your handprint.
Cut out the handprint with a knife (adults to do this part).
You can also print off a circle shape or heart shape to trace around with a knife (adults to do this part).
If you have a smaller handprint you can use a circle or large heart cookie cutter.
TIP: It’s easier to press the handprint first, and then trace around it. If you have dough left over you can roll it out again and do another handprint.
4. Using a straw, make a hole in the top of the ornament.
5. Let the ornaments air dry for a day.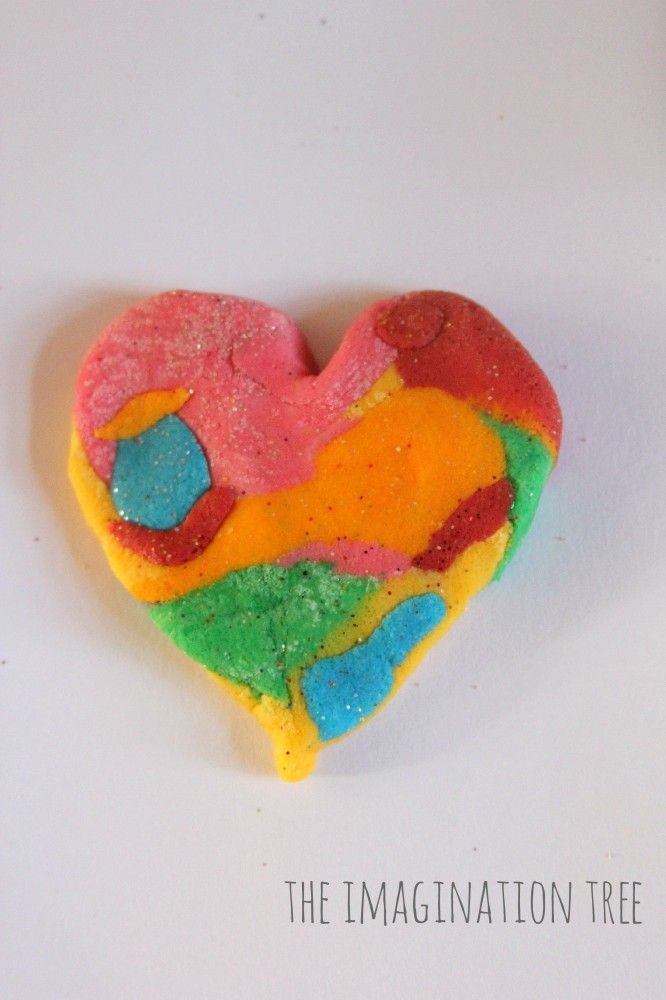
If you have time, let the ornaments air dry for a day. This will cut down on the baking time required and help to prevent puffing. If you do not have time, you can bake right away instead.
Bake at 250 degrees Fahrenheit for 1-2 hours. Once the top of the ornaments look dry and solid, flip over and bake on the other side.
NOTE: It’s important that you check that your oven temperature is set to Fahrenheit. One of the most common reasons the ornaments burn and puff up is that the oven temperature is Celsius. If you have a Celsius setting then you’ll want to use the lowest oven temperature, closer to 120 degrees Celsius.
If your ornaments are still doughy, put them back in for another hour. It will depend on your thickness how long you need to bake for. The thinner ornaments will take less time but thicker may take more. If it’s taking too long in the oven, let them finish drying by air drying them for a few more days. Make sure to flip them over so the bottoms also get exposed to air.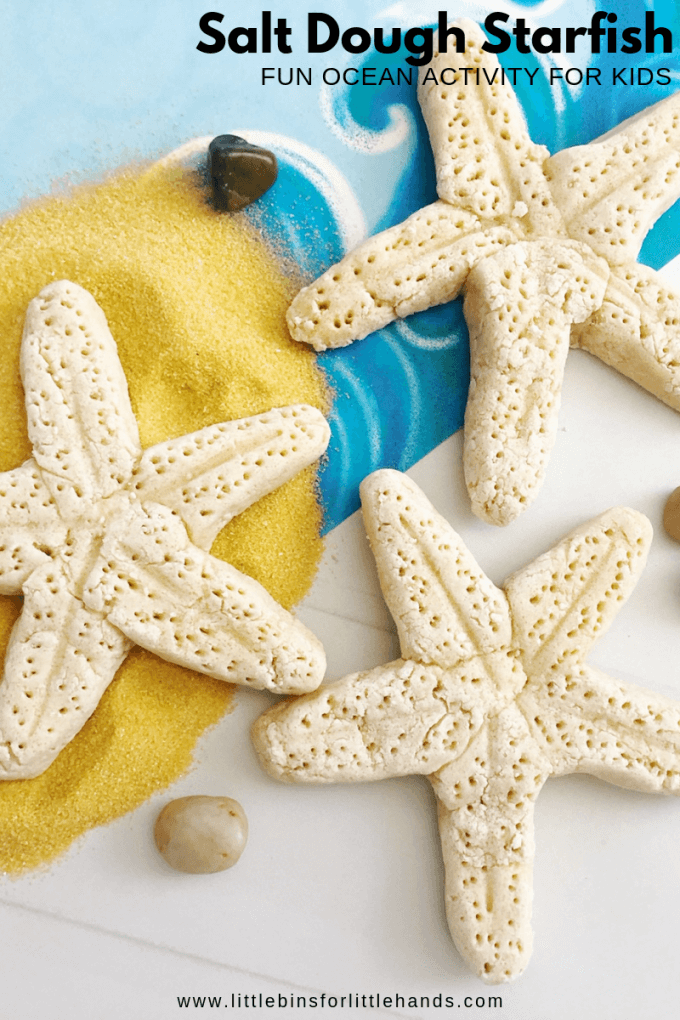
6. Once your ornaments are fully dry you can paint them.
Paint the handprint and leave the remaining ornament plain. Or you can paint the whole ornament white and then paint the center handprint once the base coat has dried.
If you want to add glitter into the handprint, decorate the whole ornament with paint first, then fill the handprint with glue. Shake glitter onto the glue.
After the paint has dried, make sure to seal with with either mod podge or a clear glaze spray. Seal the ornaments after you paint them and the paint has fully dried.
7. Tie ribbon or twine through the hole for hanging on the Christmas tree.
Why Is My Salt Dough Puffing Up?
The number one reason salt dough is puffing is due to the oven temperature. If the temperature is too high the salt dough will puff up. It is better to let your ornaments air dry for a day and then bake them. This will prevent the puffing.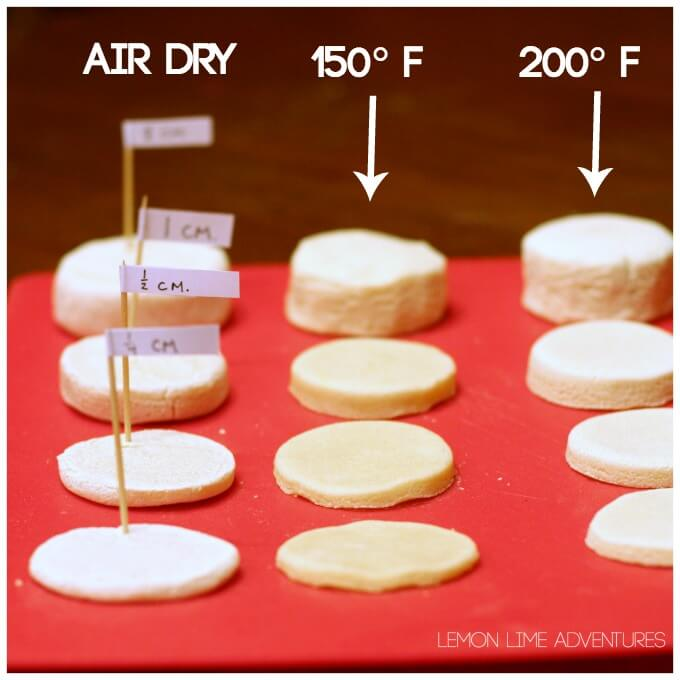 If you need to bake right away, bake at the lowest temperature (200-250 degrees Fahrenheit).
Note: Make sure to check your oven temperature is Fahrenheit and not Celsius.
You also want to make sure you are using regular, all purpose flour and not self-rising flour.
How Do I Seal Salt Dough Ornaments?
Once you are done, don’t forget to seal with either mod podge or a clear glaze spray. We like this spray for a durable finish. Adults should do the spraying and always follow directions of the product chosen.
Sealing the final ornaments will help stop them from cracking in a few years and prevent moisture from getting in.
What Kind of Paint Should I Use?
I like to use non-toxic acrylic paint for salt dough ornaments. The color will go on much thicker and more vibrant than kids paint. We like this brand of acrylic paint.
How to Decorate Salt Dough Handprints
You can use a heart for the shape around the handprints or you can use a circle.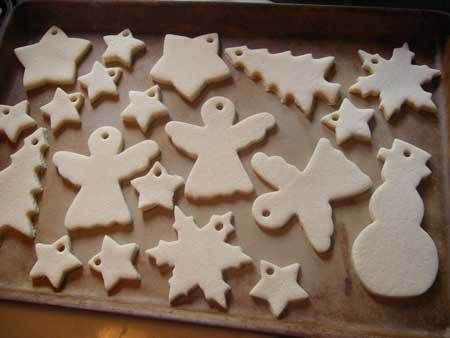
For this one, we used a large heart cookie cutter as the handprints were small (baby handprints):
If you have larger handprints, you can trace around a heart print-out or use a knife (adults only) to draw a heart shape around the handprint.
We painted this one with acrylic red paint but you could choose green or even silver or gold. Then you can leave the handprint portion of the salt dough ornament either natural or use glue and add glitter to it like we did.
How Many Ornaments Does this Make?
Depending on the handprint size and thickness of the salt dough – you can get approximately 8 handprints. If you’re using the dough to make small cookie cutter ornaments you’ll get approximately 15.
If you’re hoping to make this for a classroom or with a larger group of kids, I would recommend bringing an extra batch just in case. The quantity can vary depending on size of cookie cutters, handprints and thickness of the dough. I like to roll out the dough and continue to knead together the scraps to use as much as I can.
Tips for Making Perfect Salt Dough
- Knead well to make the dough smooth – I like to knead at least 10 minutes.
- Let the ornaments air dry for a day first, if possible. This cuts back on the oven baking time and helps to prevent puffing.
- Don’t forget to flip the ornaments when baking or air drying so that the bottoms will be exposed to air.
- Seal with our recommended sealers mentioned above so that the ornaments will last for many years.
- Store the ornaments in a cool, dry place and keep away from moisture. Sealing the ornaments also prevents moisture from getting in.
Prep Time15 mins
Active Time2 hrs
- ▢ 4 cups all purpose flour
- ▢ 1 cup salt
- ▢ 1.5 cups warm water
- ▢ Clear Glaze Finish or Mod Podge
Combine all of your ingredients and knead for 10 minutes.
 If your dough is too dry add a little bit more water in and continue to knead.
Roll out the dough to a thickness that you'd like your salt dough ornament to be. We like between 1/4 to 1/2 inch thickness.
Using a large cookie cutter, cut out different shapes for your salt dough ornaments. If making handprints, place the handprints first and then trace around them.
Have your child place their hand into the salt dough ornament. If the dough is too hard to get an imprint it may be too dry. Continue to knead until smooth. You can also add in a little bit more water.
Using a straw, make a hole in the top for where you want to hang your salt dough ornament.
If possible, let the ornaments air dry for a day.
Preheat your oven to 250 degrees Fahrenheit. Bake for 1-2 hours. If your ornaments are still doughy, put back in for another hour. (It will depend on your thickness how long you need to bake for. The thinner ornaments will take less time but thicker may take more).
If you encounter too much puffing, roll out thinner ornaments and this will help reduce the puffing. If the ornament is still a bit doughy, bake for longer or let sit out a few days to harden before decorating. The thickness of the dough will determine how long you have to bake them for. We prefer to bake them at 250 degrees Fahreneheit for longer and let them air dry for a few days to prevent puffing.
Once cool, you can decorate by painting with non-toxic acrylic paint.
Spray with a clear glaze finish or finish with mod podge. Do this before adding the glitter.
To make the hand glittery, fill the handprint with glue then sprinkle glitter on top of the glue, shake off the excess and let it dry.
Kids will love helping to make this salt dough recipe. They will also have fun decorating the salt dough ornaments by painting them.
Finally, just a friendly reminder to keep these out of reach of pets (they can be toxic to dogs due to the salt content).
See over 25+ of the best Salt Dough Ornaments here for more great ideas!
These salt dough ornaments are also fun to make – and you can make these for any season or holiday too!
Three recipes for salt dough for modeling with children: a master class and interesting facts
January 23 12:30
Together with the guide of the Museum of International Gingerbread, we understand the traditions of baking, recipes for salt dough and ideas for joint creativity with children.
If a child likes to do something with his own hands, but plasticine is already tired, try salty dough. It gives limitless scope for creativity - from making your own salt dough to playing with the resulting crafts. It is also an opportunity to spend time together and discuss the traditions of baking, gingerbread and even literacy. So:
- recipes for salt dough for the article were checked and carefully selected,
- for interesting facts we turned to Elena Chipenko, the tour guide of the Museum of International Gingerbread in Tula (and where else to talk about gingerbread?),
- all the ingredients for salt dough , if they were not at hand, you can buy in VkusVille, including with free delivery.
 Go!
Go!
Classic recipe for salt dough without glue
There are many recipes for salt dough. If you are just starting to get acquainted with it, choose a proven classic recipe. It is very simple - both in preparation and in composition.
You will need:
- Deep bowl for kneading the test
- 200 ml of water
- 300 g of flour
- 300 g salt (mandatory)
Preparation:
to prepare several minutes to prepare a few minutes , but you have to wait until the dough is infused in the refrigerator.
1. Pour 300 g of fine salt into a container.
2. Add 300 g flour (preferably wheat flour), mix.
3. Start adding cold water to the dry mass. A little at a time to see how quickly the flour absorbs moisture. You should get a thick but not dry dough.
4. Knead the dough with your hands until it becomes elastic.
5. Wrap the dough in plastic wrap and refrigerate for 2-3 hours.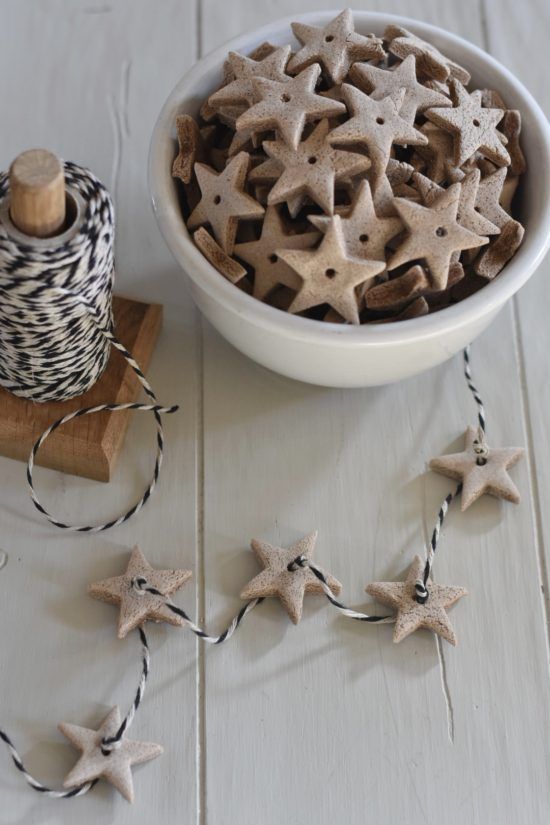
Done! You can start getting creative.
Did you know that…
… Ancient Egypt is considered the birthplace of gingerbread. Allegedly, it was then that honey was added to the dough for bread. He, as a natural natural preservative, increased the shelf life of the dough.
Honey is still added to bread, pastries, drinks and even pickles. Read more about interesting products with honey in the article “Honey Cucumbers: 11 Unusual VkusVill Products with Honey”.
Do you know what this yellow man is in the photo? This is Fudik, a character from VkusVill who helps to find food and goods for children in the store. Here you can find out how it got to us from space. And here is useful information for parents about what the “Fudik” label on VkusVill products means. You can also buy a coloring game about our hero's space adventures.
one
Space coloring board game
50 g
8 rub 8. 00 8.00
Disappearing view
And we also remind you that you can order sets for modeling clay and plasticine with free delivery:
“Air” plasticine, 24 colors plasticine, 6 colors
Plasticine "Light", 12 colors
Polymer clay, luminous
Polymer clay for modeling, 10 colors
Mass for modeling "Light and ball clay 5+5"
one
Air clay 24 colors
240 g
255 rub 255.00 255.00
one
Marshmallow dough, 6 colors
310 g
175 rub 175.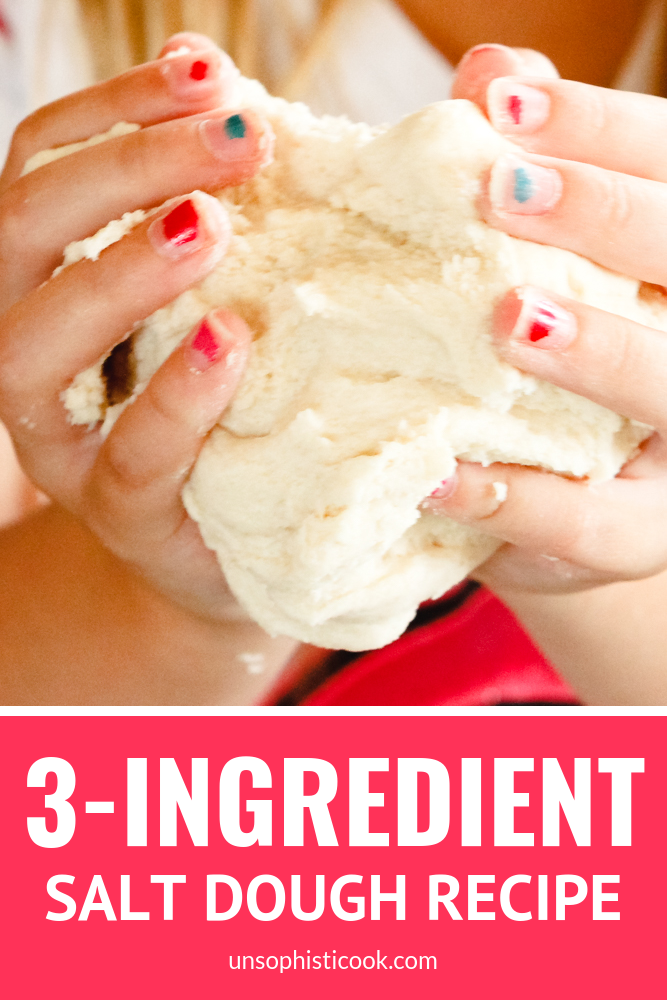 00 175.00
one
Dough plasticine 6 colors
310 g
165 rub 165.00 165.00
Salt dough with PVA glue
If you add PVA glue to salt dough, it will become more plastic, and figurines made from it will become stronger. By the way, such crafts will also dry faster.
You will need:
- 1 tablespoon of PVA glue
- 100-150 g of water1 9000 9 g flour 9000,200 g small salt
- 1 teaspoon of sunflower oil
- vanillin, cinnamon or cocoa according optional
- deep kneading bowl
Preparation:
1. Combine flour and salt in a bowl.
2. Pour cold water into a separate container and add PVA glue. Stir.
3. Slowly pour the mixture of water and glue into the bowl of flour and salt. You may need a little more or a little less liquid - it all depends on the flour.
4. Try kneading a small piece of dough and stretching it. If it does not crumble, then there is enough water.
5. To make the dough more plastic and less sticky to your hands, you can add a teaspoon of vegetable oil to it.
6. On the table, knead the dough with your hands to form a plastic mass.
7. Wrap the dough in plastic wrap and leave for half an hour. During this time, the flour will release the gluten and the dough will become more elastic.
Tip: If you don't like the smell of glue, add a pinch of cinnamon, vanilla or cocoa to the dough. Then the crafts will be fragrant and more comfortable.
Did you know that…
— the name of the gingerbread is based on spice, that is, the addition of spices.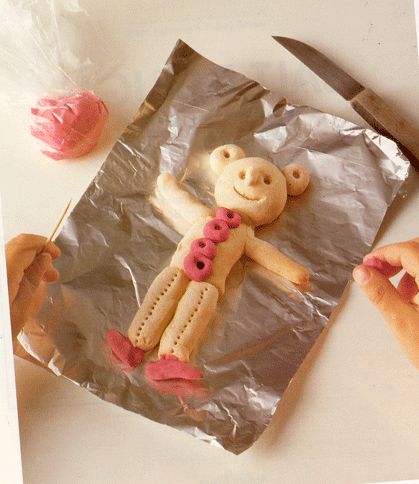 Previously, spices were brought from the East. But not everyone could afford such an expensive ingredient, so they began to add, for example, horseradish to give the gingerbread a spicy taste.
- At the same time, the first mention of the Tula printed gingerbread was found in 1685. It was so long ago that even the New Year was then celebrated on September 1, and only 15 years later Peter I changed this date to January 1. Read more interesting things in the article "How Christmas and New Year were celebrated in St. Petersburg in the 19th century and what they ate on holidays."
— Why are gingerbreads called printed? This is because they are formed using special printed boards with embossed carvings, inscriptions, and drawings. Making such a board for a gingerbread is painstaking and difficult, because you need to take into account the symmetry, observe the multi-level pattern, and cut out the letters and numbers (they, by the way, must be written backwards, one mistake - and the board needs to be redone).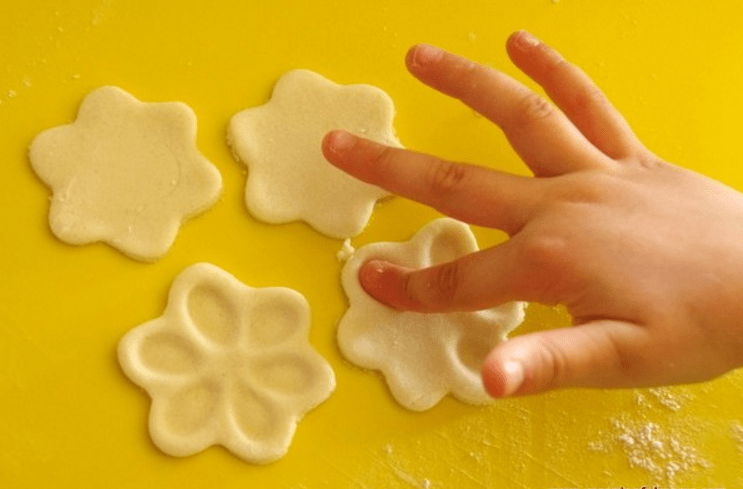
The printing method for making gingerbread is the most popular in our country. In Tula, gingerbread is prepared in this way even today. When creating crafts from salt dough, try adding a pattern from a sand mold - “print” your craft.
By the way, along with the ingredients for the dough, we can bring molds that will be useful for curly cookies - a gingerbread man and a Christmas tree.
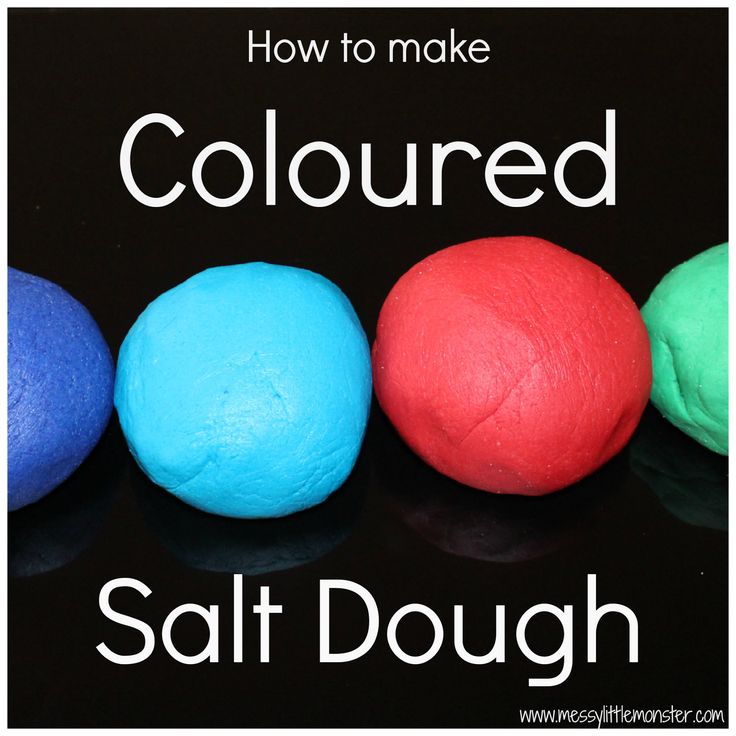
Colored salt dough
Colored dough is more fun to make. To make it, just add natural dyes or gouache to the finished base for salt dough.
For the test you will need:
- 150 g flour
- 150 g salt
- 100-150 g of water
for natural dyes:
- turmeric (yellow color)-3 teaspoons
- raw beet juice (pink) - 3 teaspoons
- cocoa (brown) - 3 teaspoons
- flour (beet juice thickener) - 2.5 teaspoons
- salt (beet juice thickener) – 1.5 teaspoons
Preparation:
- Combine salt and flour in a bowl.
- Gradually add water, mixing thoroughly until a thick paste is obtained.
- On the table, knead the dough with your hands to form a plastic mass.
- Add color according to the instructions below.
For pink, squeeze some juice from fresh beets, add a pinch each of salt and flour, mix. Add the mixture to the prepared salt dough, mix well. Wrap the dough in cling film and put it in the refrigerator to "brew".
For yellow or brown dough, use turmeric or cocoa. Mix them with water, add to the finished dough and knead until a uniform color.
If there are no natural dyes, use regular gouache. Knead the dough on the table. Divide into parts according to the number of colors. Next, lightly knead each piece of dough and place a portion of gouache on top. "Wrap" the paint in the dough, like filling in a pie. Thoroughly knead until a uniform color. Repeat with other colors.
Wrap the colored dough in plastic wrap and refrigerate for 1-2 hours.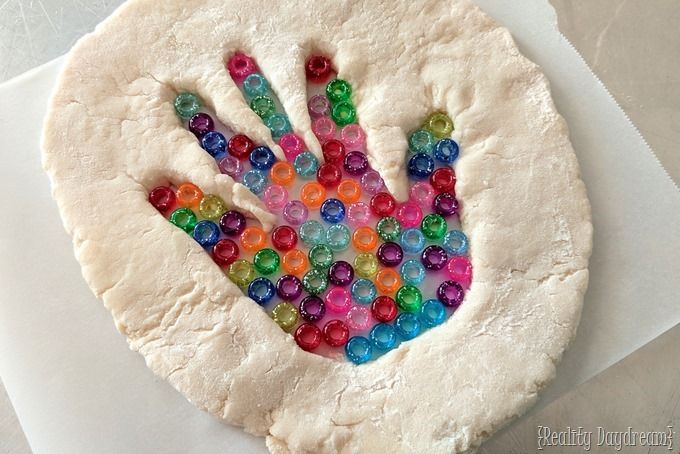 Ready! And don't worry that there is so much to do by hand - this part of the process is almost more fun than creating future crafts.
Did you know that…
… until now, up to 97% of the work in creating gingerbread is done by hand. At the same time, each manufacturer has his own recipe, which he keeps secret.
You can create your own salt dough recipe by adding a unique combination of colors and spices. And as an idea for figurines, try letters. After all, it turns out that in the old days children were taught to read and write with the help of gingerbread letters. This sweet was a favorite delicacy. Remember the letter - ate the gingerbread, but did not remember - you will be punished. Hence the expression about the stick and the carrot.
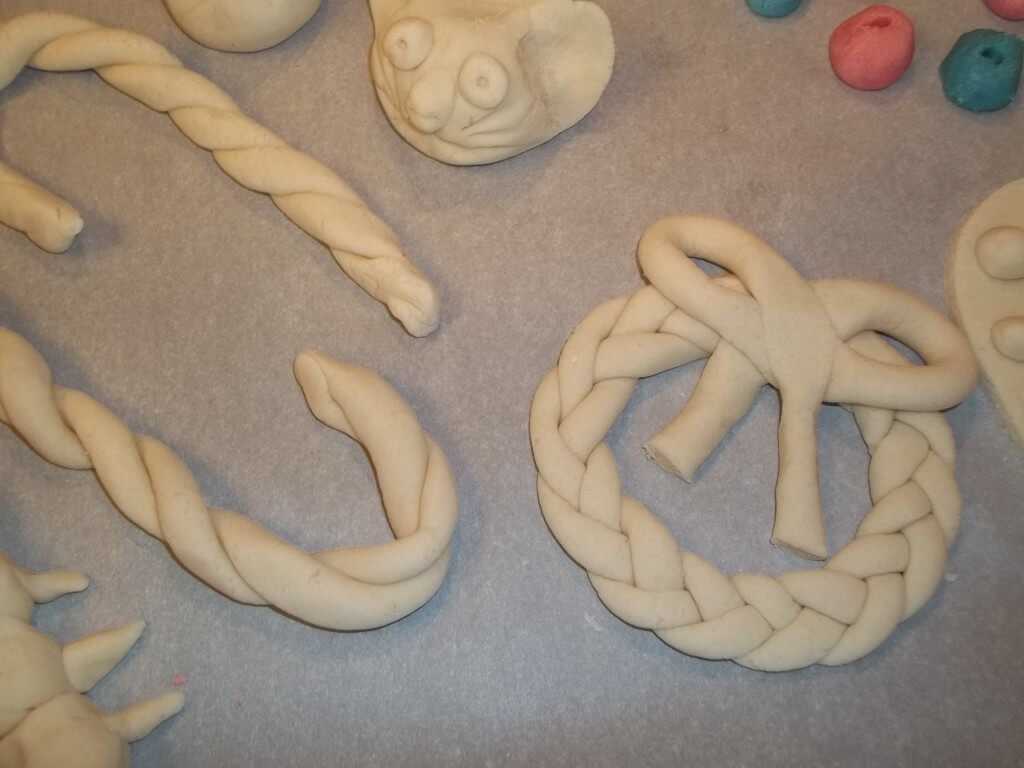
When modeling, to create beautiful patterns on the surface of the dough, you will need :
- figured rolling pins (they are sold separately or come in a set with plasticine, for example, in VkusVille there is a kit for modeling "Cooking Pizza")
- toothpicks
one
Pizza making kit
466 g
385 rub 385.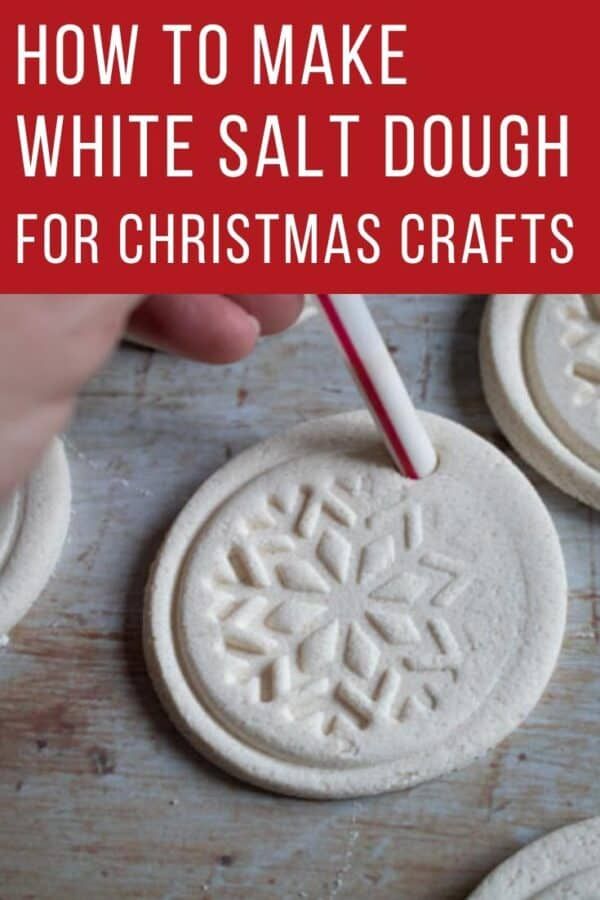 00 385.00
- marker caps
- pasta
- buttons
- beads
- forks, scissors and much more. Don't limit your imagination!
How much and how to bake salt dough
Making crafts from salt dough is a long and exciting process. After preparing the dough and sculpting, the craft must be dried and then painted.
Two drying options:
- just leave the craft on the windowsill. A thin one will dry in a day, a more voluminous one may take a couple of days;
- there is a way to speed up the process and dry the craft in the oven. Line a baking sheet with foil or parchment paper and place in a cold oven.
Dry in the oven in three stages:
- 1 hour - at a low temperature of about 50 degrees,
- 1-2 hours - at a temperature of about 100 degrees,
- 30 minutes - at a temperature of 140 degrees.
If you have a gas oven, cut this time in half.
Check if the craft is dry by tapping it. If the craft "rings" - then it's ready. Leave the figurine to cool and then you can paint.
Important: do not dry crafts in the microwave. With this heating, the figurines are deformed.
While the figures are drying, you can make a paper panel. First you need to color it - with pencils, felt-tip pens, whatever you want. And then assemble a light and delicate voluminous craft..
one
3D panel paper puzzle toy
41 g
215 rub 215.00 215.00
How to color salt dough products
Children can use all their imagination in salt dough products.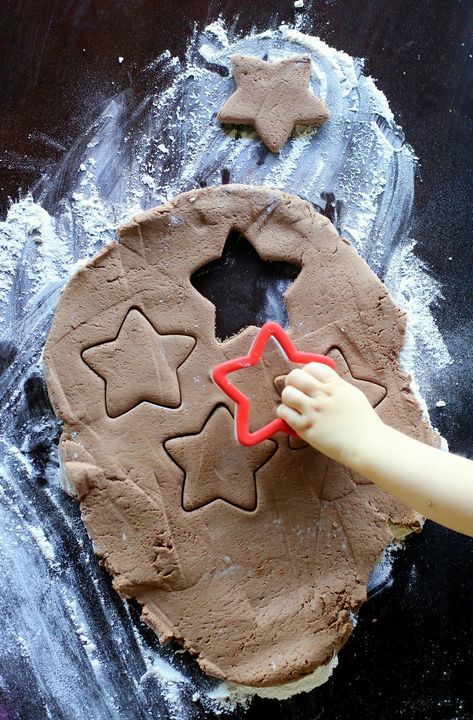 But I can start painting and decorating only after the figures dry well.
You can color the craft with gouache, watercolors, acrylics and even finger paints.
You can apply some glue and decorate the craft with sequins or beads. And if you make figures from colored dough, just dry it.
To make the colors brighter and not fade, it is permissible to cover the craft with varnish. You can use colorless nail polish or unscented furniture polish. Only acrylic varnish is undesirable, since gouache on crafts can spread.
Q&A
Why does salt dough crack when dried?
The dough cracks because it is too wet and contains too much water. Or you overdid it with vegetable oil. To fix this, simply add more flour to the dough.
How do I keep the dough from sticking to my hands?
Just add a little vegetable oil to the dough while kneading.
Can salt dough be stored?
Usually the dough is stored for 3-4 days in the refrigerator without loss of properties and plasticity. However, when interacting with air, it can change color and lose elasticity. When storing, make sure that the container with the dough is airtight, or wrap the dough with cling film in several layers and / or a bag.
Interests
- For children
1
Quick view
Cocoa powder
100 g
RUB 123 123.00 123.00
2
Quick view
Ground turmeric, 10 g
10 g
35 rub 35.00 35.00
3
Now cheaper
Quick view
Premium wheat flour
1 kg0003
4
Supermarket
Quick View
Pizza Making Kit
466 g
385 RUB 385.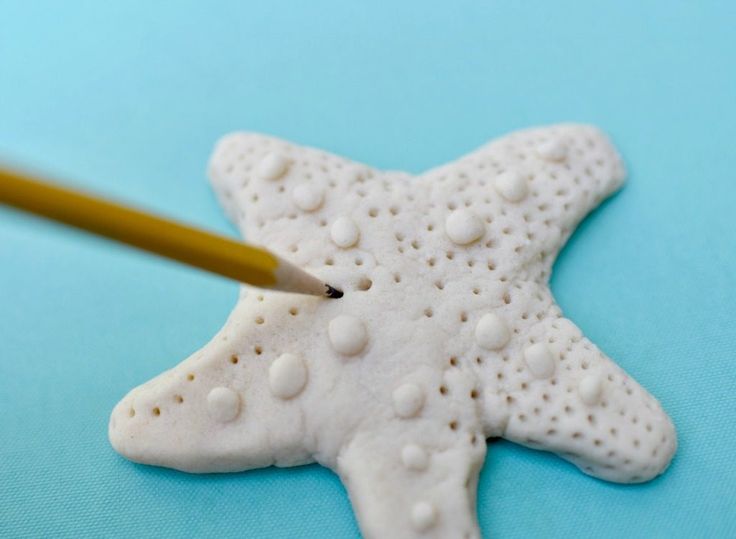 00 385.00
5
Affordable price
Quick view
Food salt "Iletskaya", grinding №1
180 g
52 rub 52.00 52.00
News
February 9 09:00
If you really want to, then… can you? Choosing children's sweets
What to eat?
January 28 13:13
How to choose baby products: Fudik will tell you
How we produce
April 2, 2021 14:08
Children's kefir, cottage cheese and bifilife VkusVill: how to feed the baby
Salt dough for modeling for children
Wheat flour 1 tbsp Salt (fine) 1 tbsp Water is cold 0.5 - 1 tbsp Food coloring 3 - 5 ml.
Salt dough can be stored in the refrigerator for a long time. Our dough is ready for new masterpieces! Sip with pleasure!
Colored salt dough made from natural dyes
Children often taste different objects while learning about the world around them.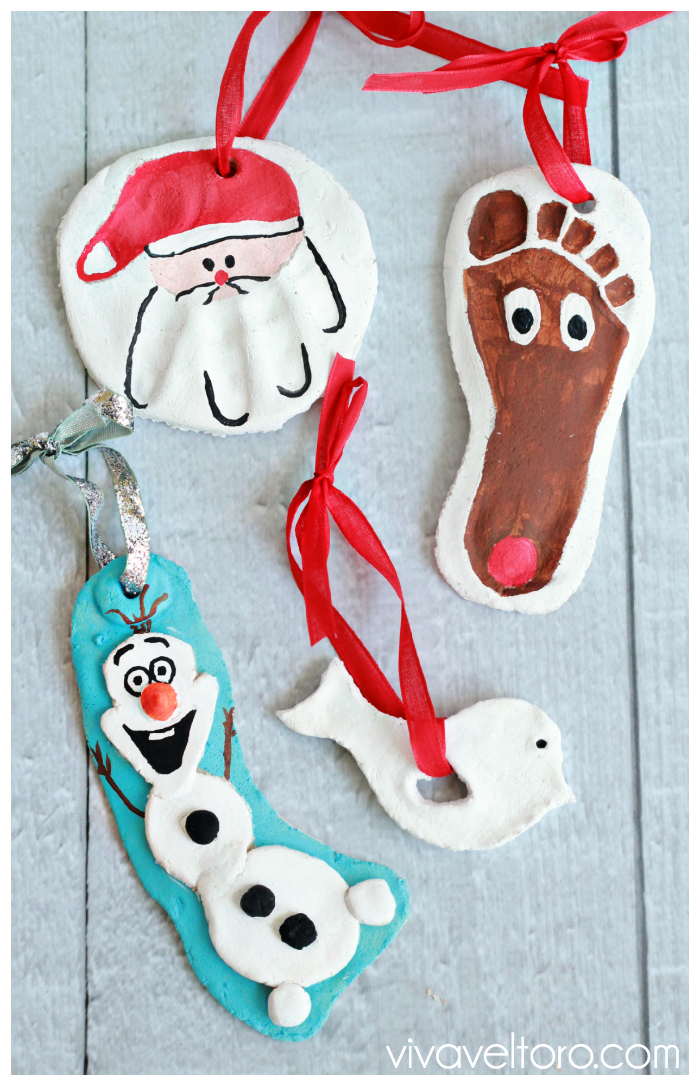 This can happen with salt dough too. If you are making a craft with a small child who still puts everything in his mouth, then we recommend using natural food coloring so as not to worry.
Ingredients:
- Flour (high quality) - 150 gr.
- Cold water - 100 gr.
- Salt (not iodized and crushed) - 150 gr.
For natural dyes:
- Turmeric (yellow) - 3 tsp.
- Raw beetroot juice (pink) - 3 tsp.
- Cocoa (brown) - 3 tsp.
- Flour (thickener for beet juice) - 2.5 tsp.
- Salt (beet juice thickener) - 1.5 tsp.
Method of preparation:
Step 1. Weigh and pour out the required amount of flour and salt.
Step 2. Salt is dissolved in water to the maximum. If all the salt has not completely disappeared, then this is not a problem.
Step 3. Pour the flour into the already salty water.
Step 4. Thoroughly stir the flour to remove any lumps.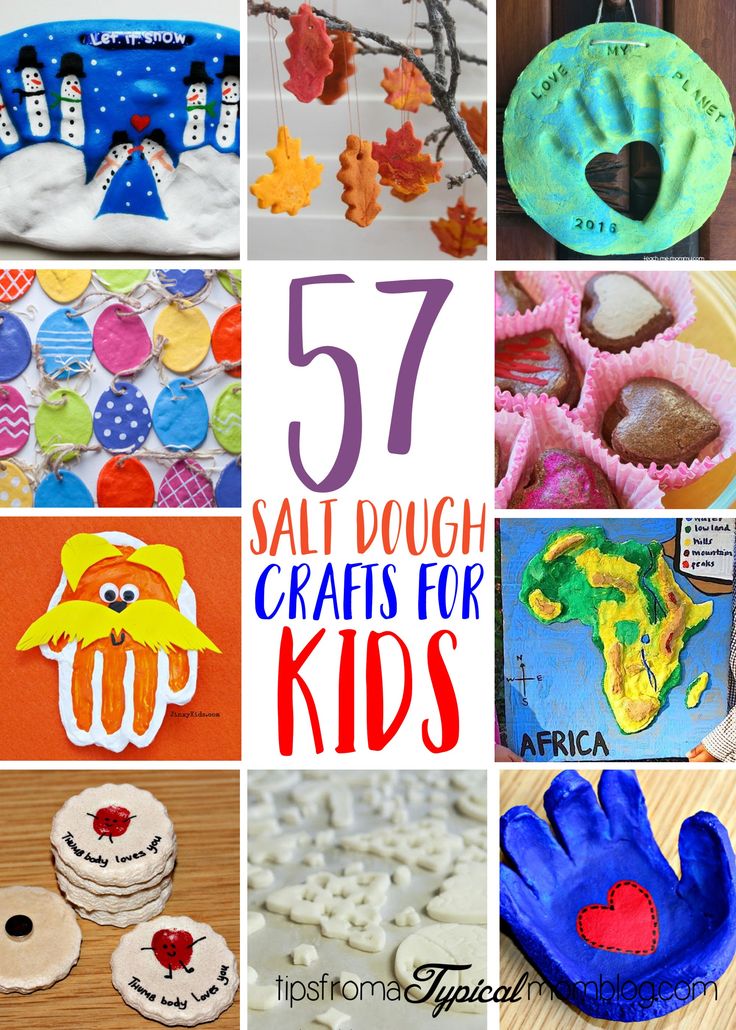 It is best to use a wooden spoon.
Step 5. Knead the dough on a clean table. You should get a mass that will not stick to your hands.
Step 6. Now color the finished dough. We divide the lump into 4 equal parts. We leave one lump of the original color.
Step 7. To create a pink dough, peel the beets and pass them through a fine grater, squeeze out the juice. Mix vegetable juice with 1.5 tsp. salt and 2.5 tsp. flour. Mix well and get a thick mass of bright color. Then we roll out the already prepared white ball a little and place the pink mass in the middle. We collect the edges and roll out the dough between the palms, crushing a little, until the bright paint disperses. When everything is ready, place the ball in a box with a screw cap so that the surface does not become crusty while the rest of the dyes are being made.
Tip: since the beetroot juice stains, it's best to use gloves to avoid getting dirty.
Step 8. We make yellow dough.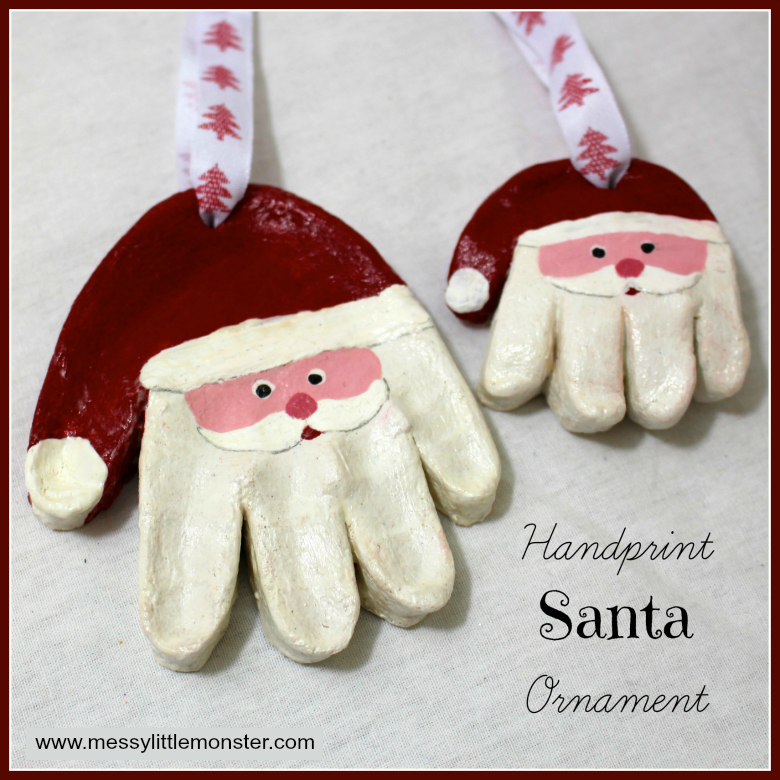 Add 5 tsp to the required amount of turmeric. water and mix. After you get a thick mass, repeat the steps that were performed to create a pink dough.
Step 9. To get a natural brown dye, mix 4 tsp. water with cocoa and again repeat the already familiar steps.
Step 10. Store in a plastic bag or container with a lid in the refrigerator. We got 4 lumps of dough in different colors: white, yellow, brown and pink. Create new and interesting crafts for the joy of the whole family!
Salt dough for modeling at home
Making salt dough at home is quite simple and does not take long. The composition of this recipe includes only natural ingredients, so the "plasticine" is absolutely harmless and will suit even the smallest children. Thanks to vegetable oil, salt dough will not stick to your hands and dry out during use.
Ingredients:
- Salt - 200 gr.
- Flour - 400 gr.
- Water - 200 ml.
- Vegetable oil - 60 ml.
Method of preparation:
Step 1. We prepare all the necessary ingredients for the dough.
Step 2. Pour salt and flour into a clean deep dish. We mix everything well.
Step 3. Pour water to salt and flour, stir thoroughly so that the mass is without lumps.
Step 4. Add vegetable oil and mix everything again until the dough becomes elastic.
Tip: If small lumps of dough separate during kneading,
add a little water. If it sticks to your hands, add flour.
Step 5. Make a ball out of the dough and knead it in your hands. As soon as the ball stops spreading and keeps its shape, the dough is ready.
Eco-friendly molding material is ready! Realize your most interesting ideas with your child! Good luck with your crafts!
Salt dough recipe with wallpaper paste
This salt dough recipe is not entirely natural, as it contains wallpaper paste. Thanks to him, the mixture sets and dries faster.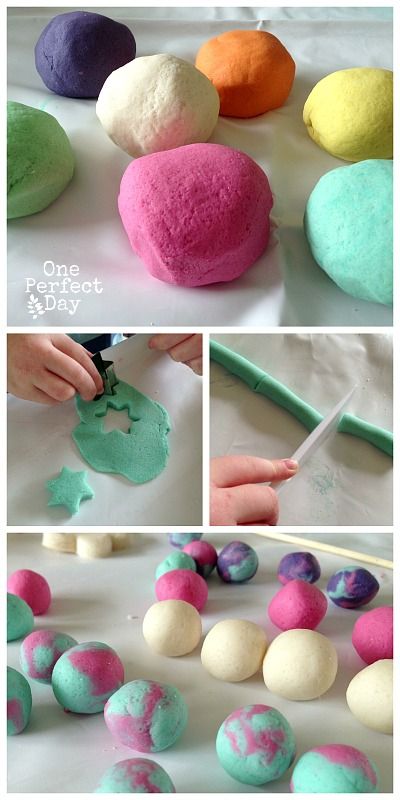 Such material can be safely stored in the refrigerator in an airtight package for about 2 weeks, and it will not lose its properties. If you are making a craft with young children, then it is better to choose a salt dough recipe made from natural ingredients to avoid unpredictable situations.
Ingredients:
- Salt - 200 gr.
- Flour - 200 gr.
- Water - 125 gr.
- Wallpaper paste - 1 tbsp.
- Vegetable oil - 1 tbsp.
Preparation:
Step1 . Getting ready for work. We measure the right amount of flour, salt and water, using a measuring cup.
Step 2. Mix salt, flour, water and glue. If the dough is too liquid, then add a little more salt and flour until the mixture becomes dense.
Step 3. Knead the dough with your hands until it becomes elastic and loses its stickiness.
Step 4. When the mass reaches the desired consistency, wrap it in a plastic bag (you can use a plastic container with a lid) and send it to the refrigerator for 30 minutes.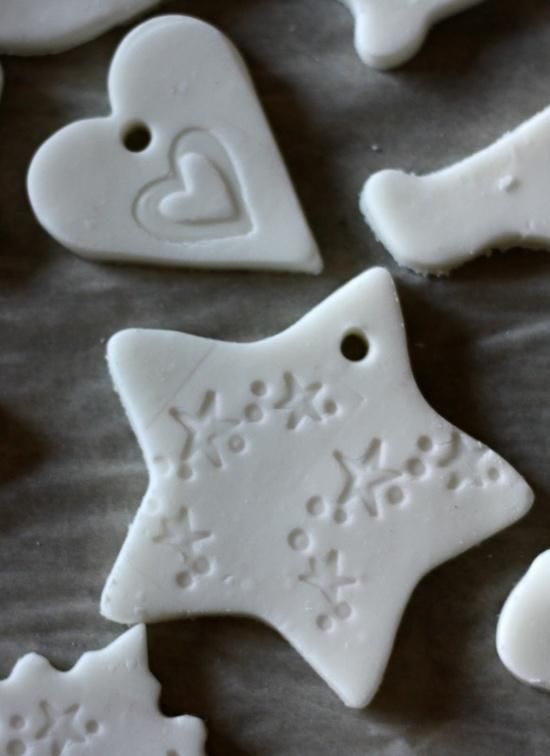
Step 5. Now you can get the salt dough and start sculpting! Good luck!
Homemade Salt Dough Play Doh
Today there are many variations of salt dough available in any store. The most popular "plasticine" among modern children is Play Doh. Our recipe will help you save money on a new toy for your child, while not depriving him of modeling material. Citric acid, which is part of the test, is absolutely safe for the palms, and glycerin will give crafts an unusual glow.
Ingredients:
- Salt - 0.5 tbsp.
- Flour - 1 tbsp.
- Water - 0.5 tbsp.
- Vegetable oil - 1 tbsp.
- Dyes.
- Glycerin - 1 tsp.
Method of preparation:
Step 1. Take a saucepan or saucepan and mix all the ingredients necessary for the dough there.
Step 2. Put the container on medium heat.
Step 3. Pour water into the pot one spoon at a time, stirring constantly.
Step 4. Cook the dough for about 5 minutes until it becomes homogeneous and translucent.
Step 5. Add dyes.
Tip: if you want the whole dough to be the same color, then add
one dye to the whole mass. If several colors are needed, then divide the
dough into the required number of parts and add a dye of a different color to each.
Step 6. Remove the dough from the pan and place it on a board lightly dusted with flour.
Step 7. Knead until the material is homogeneous.
The dough turns out beautiful, elastic and soft, which allows you to create even the most unusual crafts!
Chemical composition
| Nutrient | Quantity | Norm | % of the norm in 100 g | % Per Serving |
|---|---|---|---|---|
| Vitamin A | 0 | 900 mcg | 0 | 0 |
| Vitamin B1 | 0 mg | 1.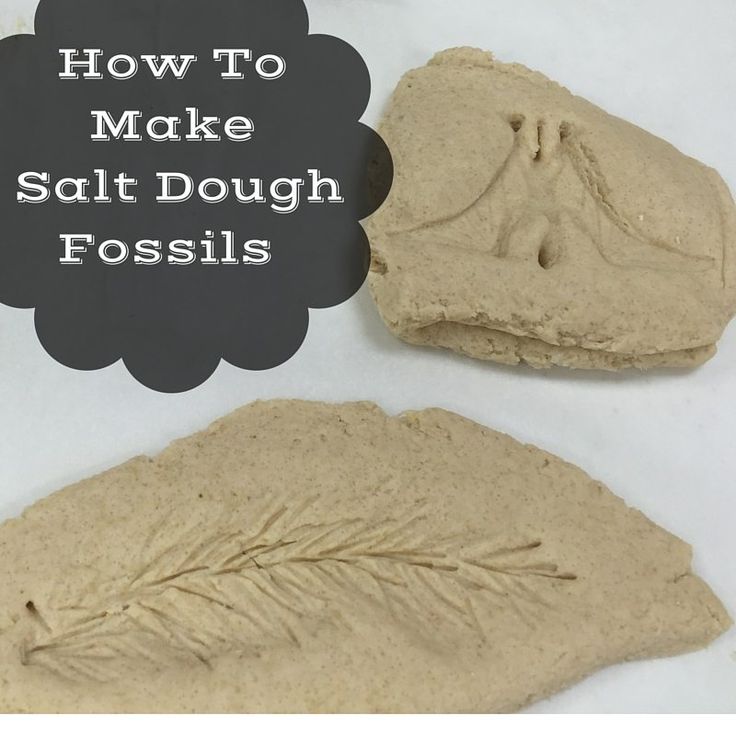 5 mg 5 mg | 3.8 | 2.8 |
| Vitamin B2 | 0 mg | 1.8 mg | 0.8 | 0.6 |
| Vitamin B4 | 13 mg | 500 mg | 3.5 | 2.6 |
| Vitamin B5 | 0.1 mg | 5 mg | 2 | 1.5 |
| Vitamin B6 | 0 mg | 2 mg | 2.9 | 2.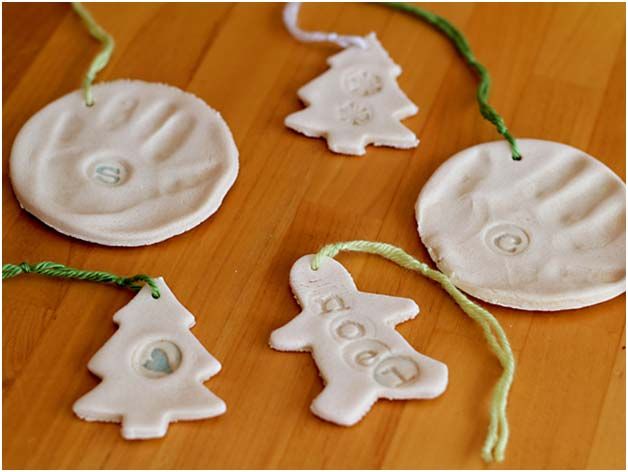 1 1 |
| Vitamin B9 | 6.8 mcg | 400 mcg | 2.3 | 1.7 |
| Vitamin B12 | 0 | 3 mcg | 0 | 0 |
| Vitamin C | 0 | 90 mcg | 0 | 0 |
| Vitamin D | 0 | 10 mcg | 0 | 0 |
| Vitamin E | 0.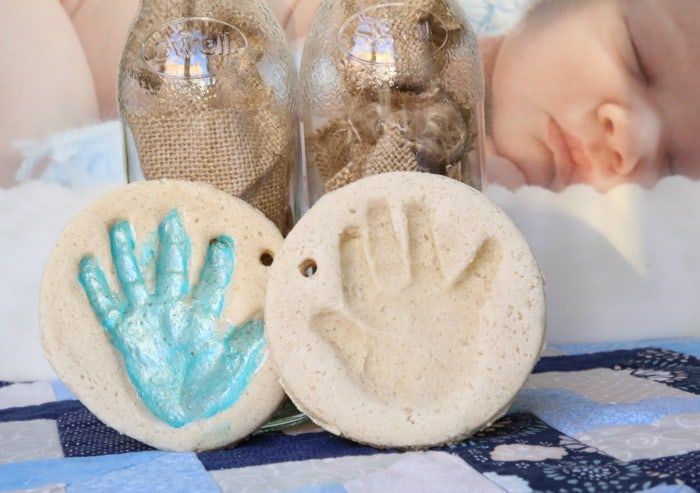 4 mg 4 mg | 15 mg | 3.4 | 2.5 |
| Biotin | 0.5 mg | 50 mg | 1.4 | 1 |
| Vitamin K | 0 | 120 mcg | 0 | 0 |
| Vitamin PP | 0.7 mg | 20 mg | 4.9 | 3.6 |
| Potassium | 33.2 mg | 2500 mg | 1.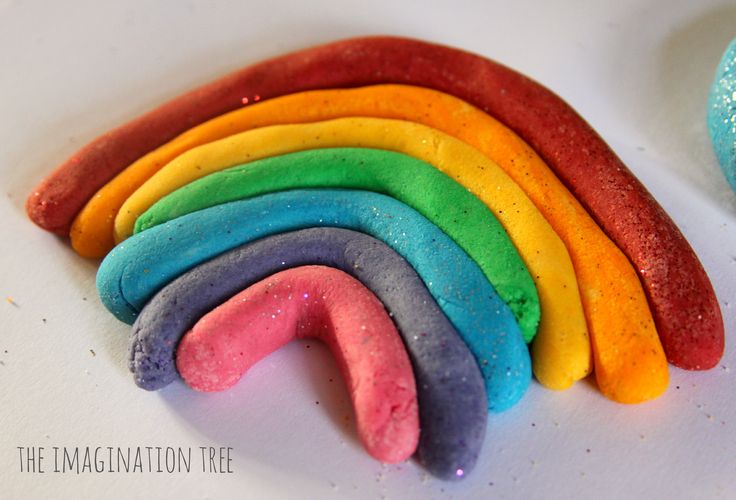 8 8 | 1.3 |
| Calcium | 115.4 mg | 1000 mg | 15.6 | 11.5 |
| Silicon | 1 mg | 30 mg | 4.5 | 3.3 |
| Magnesium | 10.8 mg | 400 mg | 3.6 | 2.7 |
| Sodium | 11614.5 mg | 1300 mg | 1207.3 | 893.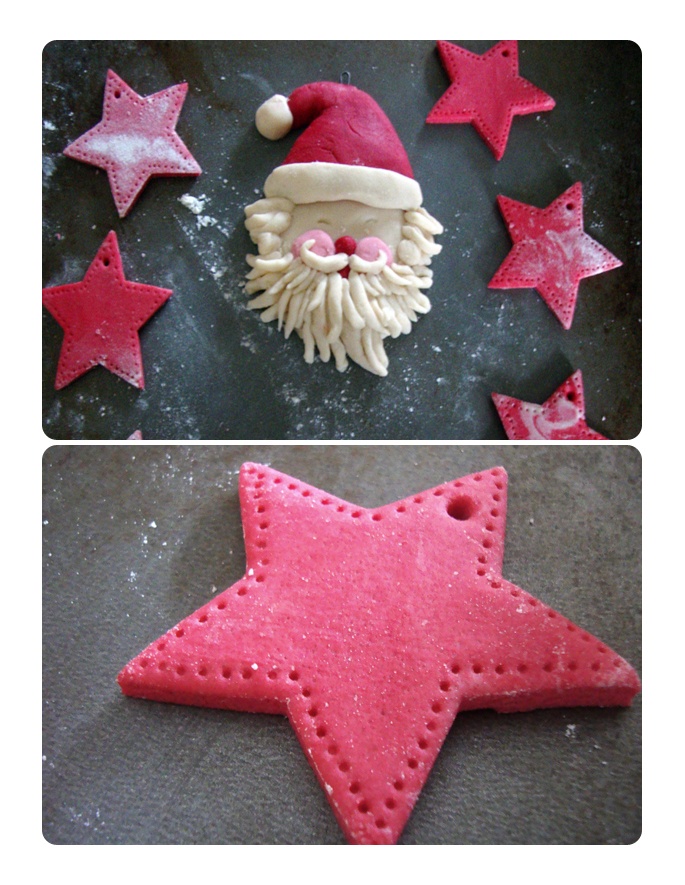 4 4 |
| Sulfur | 71.5 mg | 500 mg | 19.3 | 14.3 |
| Phosphorus | 44 mg | 800 mg | 7.4 | 5.5 |
| Chlorine | 17912 mg | 2300 mg | 1052.4 | 778.8 |
| Aluminum | 0 | 30 mcg | 0 | 0 |
| Iron | 1.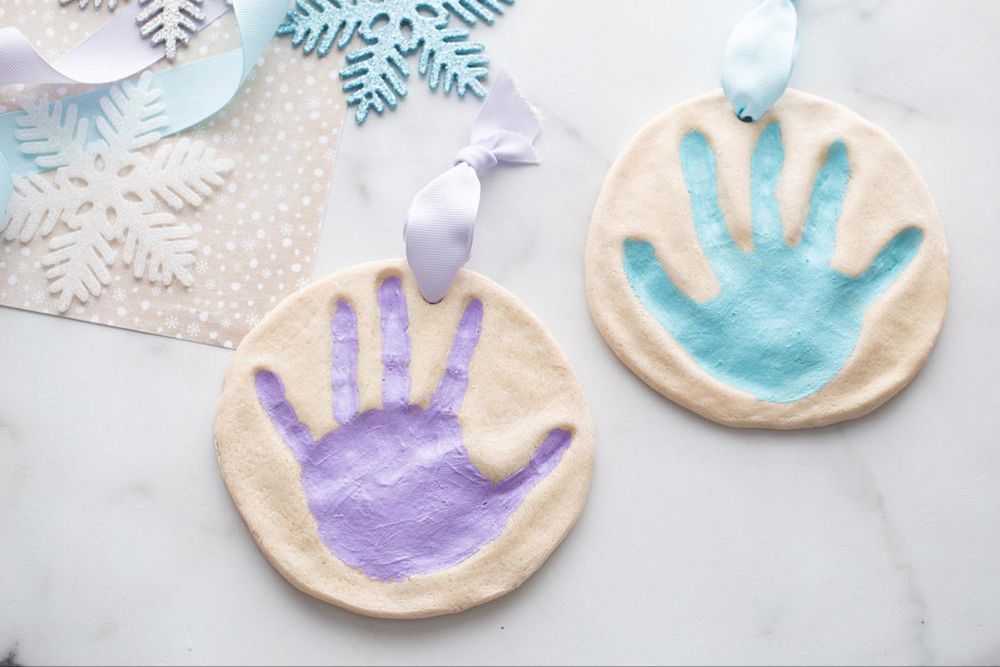 2 mg 2 mg | 18 mg | 8.8 | 6.5 |
| Iodine | 0.4 mcg | 150 mcg | 0.3 | 0.3 |
| Cobalt | 4.9 mcg | 10 mcg | 66.2 | 49 |
| Lithium | 0 | 70 mcg | 0 | 0 |
| Manganese | 0.2 mcg | 2 mcg | 14.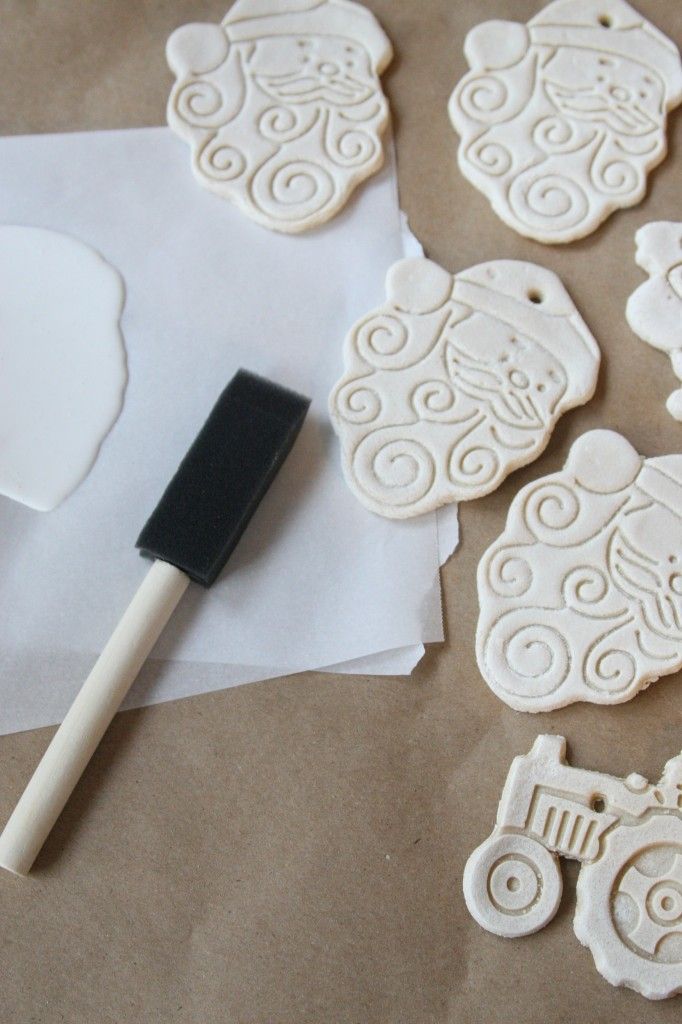 7 7 | 10.9 |
| Copper | 108.1 mcg | 1000 mcg | 14.6 | 10.8 |
| Nickel | 0.6 mcg | 200 mcg | 0.4 | 0.3 |
| Rubidium | 0 | 2 mcg | 0 | 0 |
| Selenium | 1.5 mcg | 55 mcg | 3.8 | 2.8 |
| Fluorine | 18. 9 mcg 9 mcg | 4000 mcg | 0.6 | 0.5 |
| Chrome | 0.6 mcg | 50 mcg | 1.5 | 1.1 |
| Zinc | 0.4 mg | 12 mg | 4 | 3 |
| Bor | 9.3 mcg | 1.2 mcg | 1041.7 | 770.8 |
| Vanadium | 22.5 mcg | 20 mcg | 152 | 112. 
|