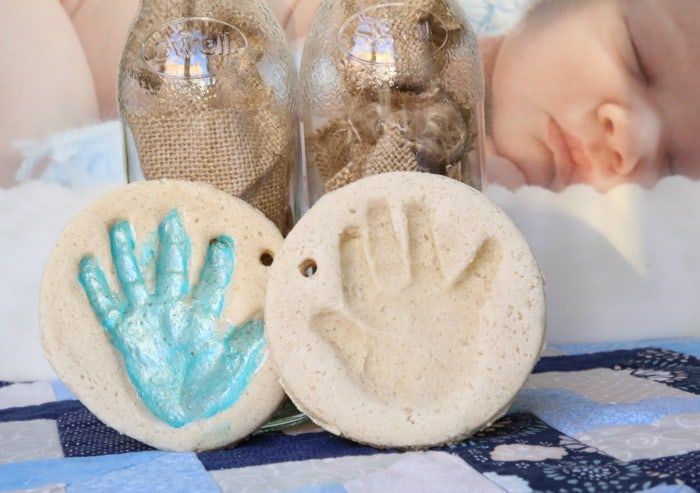
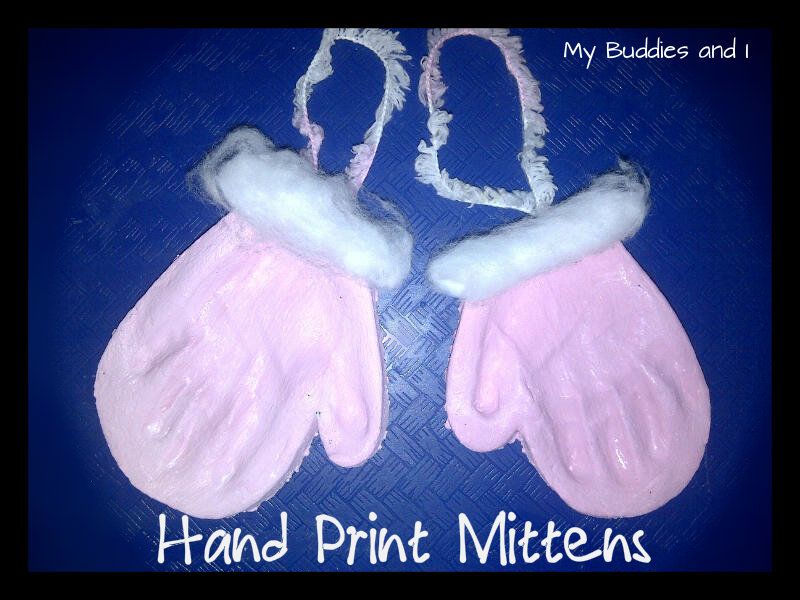
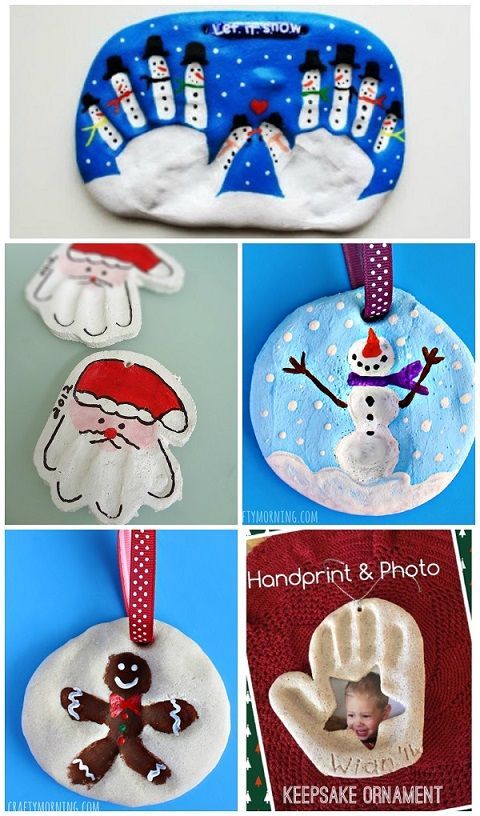
Salt ornaments handprints
Salt Dough Recipe - The Easiest Way to Make Salt Dough!
Kim146 Comments
All activities should be supervised by an adult. As an Amazon Associate, I earn from qualifying purchases. This post may contain affiliate links.
Learn how to make your own salt dough handprint ornament with this easy Salt Dough Recipe. You only need a few ingredients from your kitchen to make this salt dough! We cover all of our tips and tricks to make sure your salt dough ornaments will last for years!
RELATED: Salt Dough Ornament Recipe
Table of Contents
- Salt Dough Recipe – for Handprints & Ornaments
- Salt Dough Ingredients
- How to Make Salt Dough – an Easy Salt Dough Recipe!
- Why Is My Salt Dough Puffing Up?
- How Do I Seal Salt Dough Ornaments?
- What Kind of Paint Should I Use?
- How to Decorate Salt Dough Handprints
- How Many Ornaments Does this Make?
- Tips for Making Perfect Salt Dough
- Salt Dough Handprint & Ornament Recipe
- Get the Recipe
- More Salt Dough Ornament Ideas
Salt Dough Recipe – for Handprints & Ornaments
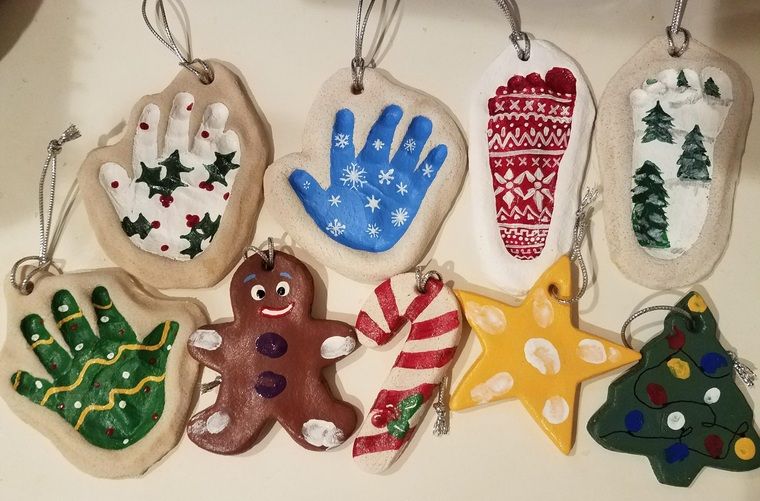
One of our favorite things to do with salt dough is to make handprint ornaments. But you can also use this same recipe and use cookie cutters and paint shapes instead!
For the handprint ornaments – you can make a new one every year and have a nice memento for the Christmas tree!
Don’t forget to add the year on the back of the salt dough ornament to keep track of the different years.
Salt Dough Ingredients
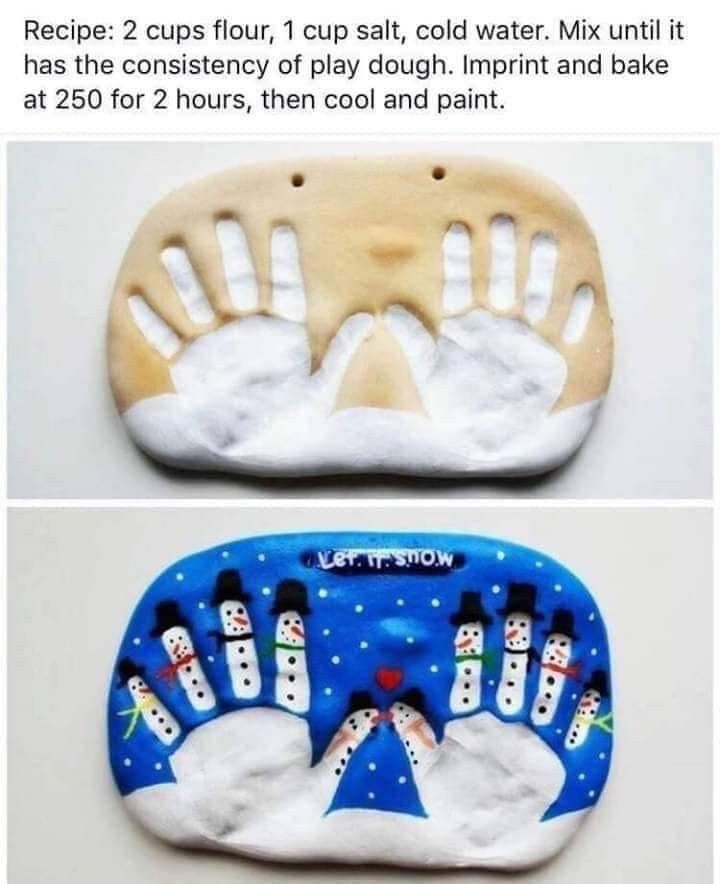
- 4 cups all purpose flour (Note: you want regular all purpose flour, not self-rising)
- 1 cup salt
- 1.5 cups warm water
How to Make Salt Dough – an Easy Salt Dough Recipe!
1. Combine all of your ingredients (flour, salt, warm water) and mix well until it starts to form a dough.
2. Take the dough out of the bowl and knead for at least 10 minutes.
If your dough is too dry, add a little bit more water in and continue to knead.
The dough should be smooth and roll out with not too many bumps. It should also be easy to press a handprint into it.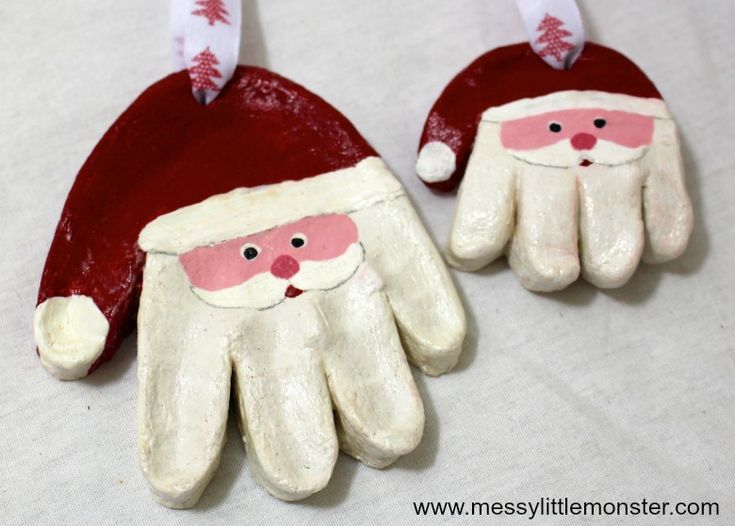 If you’re finding it’s too hard or not smooth enough, continue to knead some more. If it’s still too dry, add a little bit more water (but not too much or it may get too wet).
Roll out the dough to between 1/4 to 1/2 inch thickness. If the dough is too thick it will take too long to dry.
Press the hand into the dough.
3. Use a circle shaped bowl to trace around your handprint.
Cut out the handprint with a knife (adults to do this part).
You can also print off a circle shape or heart shape to trace around with a knife (adults to do this part).
If you have a smaller handprint you can use a circle or large heart cookie cutter.
TIP: It’s easier to press the handprint first, and then trace around it. If you have dough left over you can roll it out again and do another handprint.
4. Using a straw, make a hole in the top of the ornament.
5. Let the ornaments air dry for a day.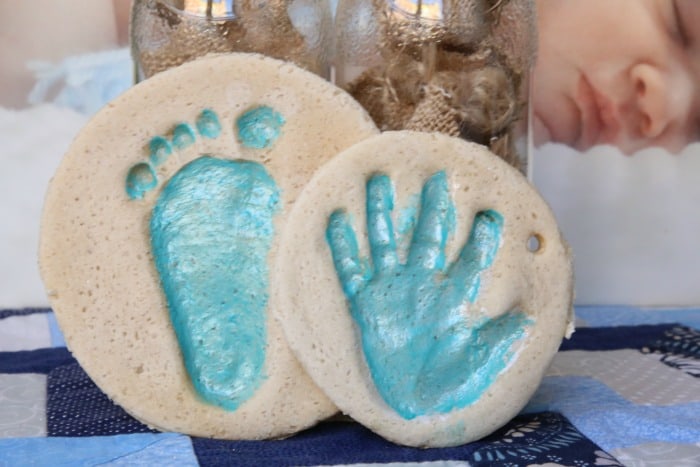
If you have time, let the ornaments air dry for a day. This will cut down on the baking time required and help to prevent puffing. If you do not have time, you can bake right away instead.
Bake at 250 degrees Fahrenheit for 1-2 hours. Once the top of the ornaments look dry and solid, flip over and bake on the other side.
NOTE: It’s important that you check that your oven temperature is set to Fahrenheit. One of the most common reasons the ornaments burn and puff up is that the oven temperature is Celsius. If you have a Celsius setting then you’ll want to use the lowest oven temperature, closer to 120 degrees Celsius.
If your ornaments are still doughy, put them back in for another hour. It will depend on your thickness how long you need to bake for. The thinner ornaments will take less time but thicker may take more. If it’s taking too long in the oven, let them finish drying by air drying them for a few more days. Make sure to flip them over so the bottoms also get exposed to air.
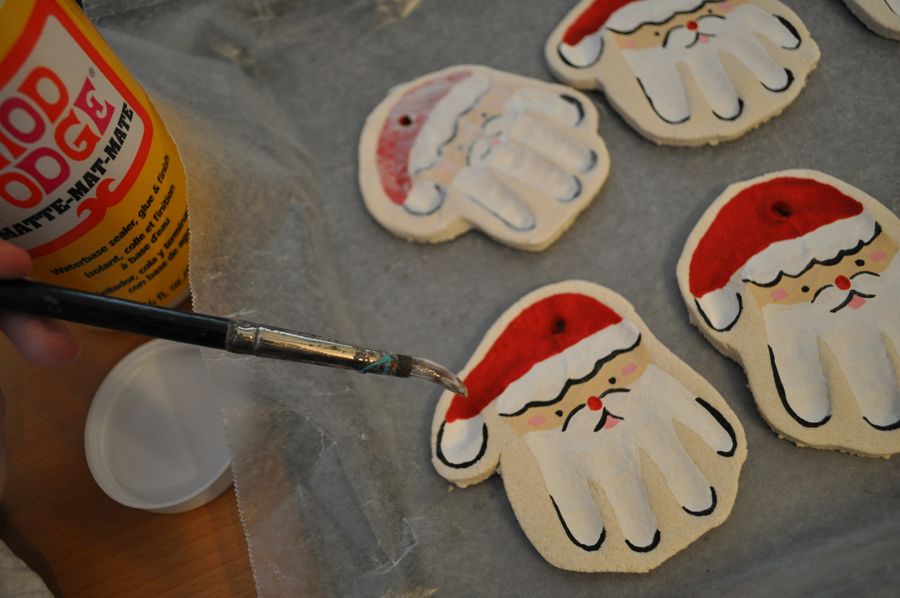
6. Once your ornaments are fully dry you can paint them.
Paint the handprint and leave the remaining ornament plain. Or you can paint the whole ornament white and then paint the center handprint once the base coat has dried.
If you want to add glitter into the handprint, decorate the whole ornament with paint first, then fill the handprint with glue. Shake glitter onto the glue.
After the paint has dried, make sure to seal with with either mod podge or a clear glaze spray. Seal the ornaments after you paint them and the paint has fully dried.
7. Tie ribbon or twine through the hole for hanging on the Christmas tree.
Why Is My Salt Dough Puffing Up?
The number one reason salt dough is puffing is due to the oven temperature. If the temperature is too high the salt dough will puff up. It is better to let your ornaments air dry for a day and then bake them.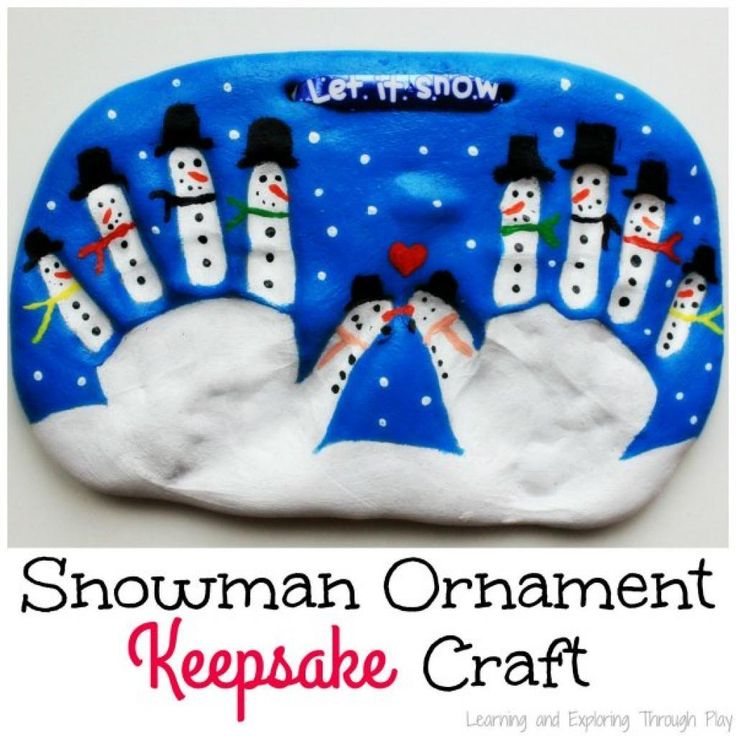 This will prevent the puffing. If you need to bake right away, bake at the lowest temperature (200-250 degrees Fahrenheit).
Note: Make sure to check your oven temperature is Fahrenheit and not Celsius.
You also want to make sure you are using regular, all purpose flour and not self-rising flour.
How Do I Seal Salt Dough Ornaments?
Once you are done, don’t forget to seal with either mod podge or a clear glaze spray. We like this spray for a durable finish. Adults should do the spraying and always follow directions of the product chosen.
Sealing the final ornaments will help stop them from cracking in a few years and prevent moisture from getting in.
What Kind of Paint Should I Use?
I like to use non-toxic acrylic paint for salt dough ornaments. The color will go on much thicker and more vibrant than kids paint. We like this brand of acrylic paint.
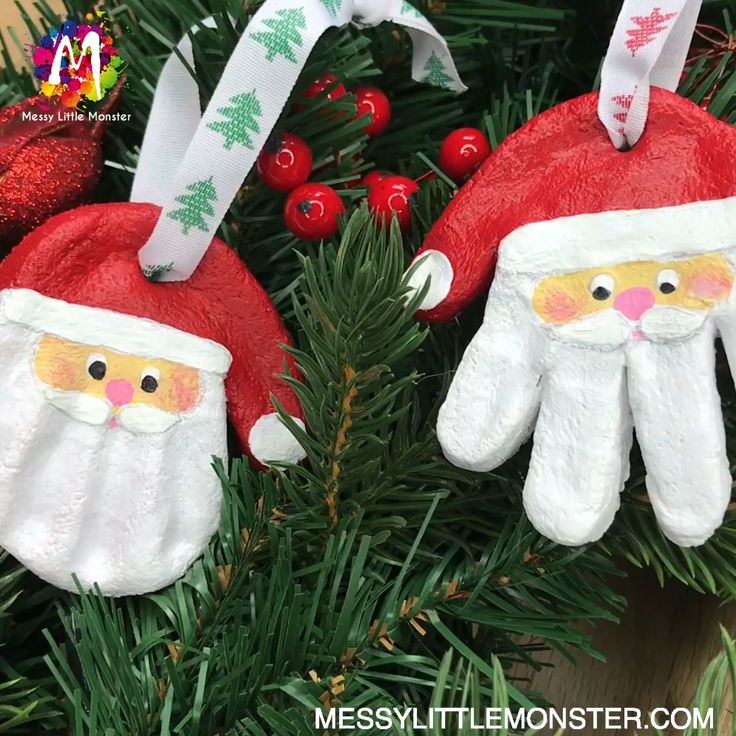
How to Decorate Salt Dough Handprints
You can use a heart for the shape around the handprints or you can use a circle.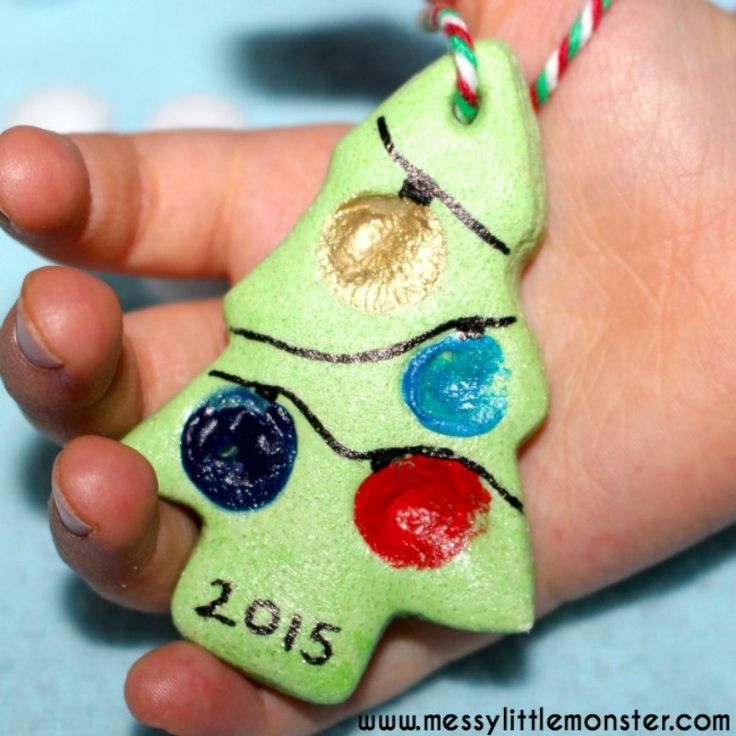
For this one, we used a large heart cookie cutter as the handprints were small (baby handprints):
If you have larger handprints, you can trace around a heart print-out or use a knife (adults only) to draw a heart shape around the handprint.
We painted this one with acrylic red paint but you could choose green or even silver or gold. Then you can leave the handprint portion of the salt dough ornament either natural or use glue and add glitter to it like we did.
How Many Ornaments Does this Make?
Depending on the handprint size and thickness of the salt dough – you can get approximately 8 handprints. If you’re using the dough to make small cookie cutter ornaments you’ll get approximately 15.
If you’re hoping to make this for a classroom or with a larger group of kids, I would recommend bringing an extra batch just in case. The quantity can vary depending on size of cookie cutters, handprints and thickness of the dough.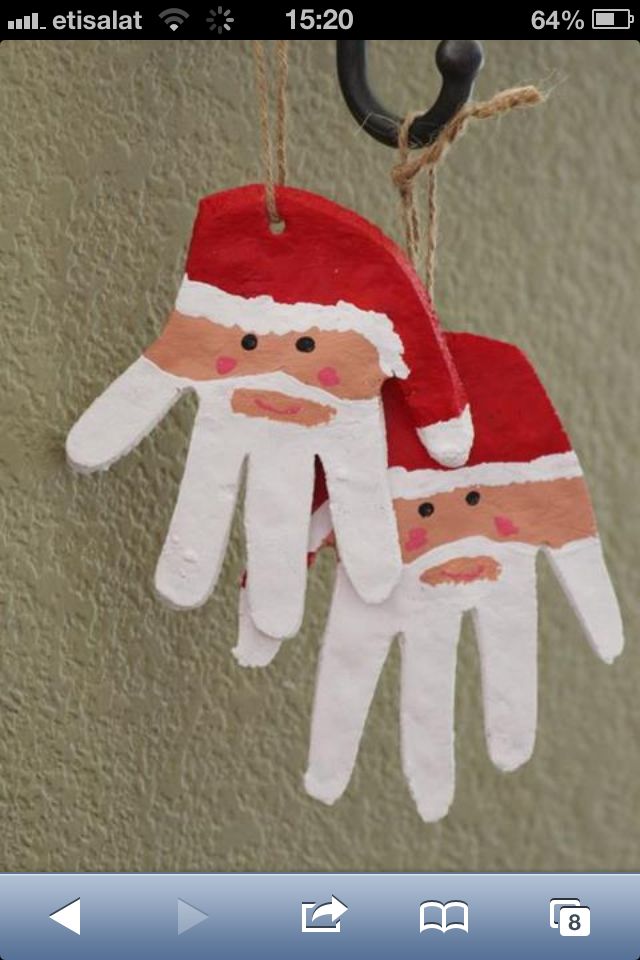 I like to roll out the dough and continue to knead together the scraps to use as much as I can.
Tips for Making Perfect Salt Dough
- Knead well to make the dough smooth – I like to knead at least 10 minutes.
- Let the ornaments air dry for a day first, if possible. This cuts back on the oven baking time and helps to prevent puffing.
- Don’t forget to flip the ornaments when baking or air drying so that the bottoms will be exposed to air.
- Seal with our recommended sealers mentioned above so that the ornaments will last for many years.
- Store the ornaments in a cool, dry place and keep away from moisture. Sealing the ornaments also prevents moisture from getting in.
Prep Time15 mins
Active Time2 hrs
- ▢ 4 cups all purpose flour
- ▢ 1 cup salt
- ▢ 1.5 cups warm water
- ▢ Clear Glaze Finish or Mod Podge
Combine all of your ingredients and knead for 10 minutes.
 If your dough is too dry add a little bit more water in and continue to knead.
Roll out the dough to a thickness that you'd like your salt dough ornament to be. We like between 1/4 to 1/2 inch thickness.
Using a large cookie cutter, cut out different shapes for your salt dough ornaments. If making handprints, place the handprints first and then trace around them.
Have your child place their hand into the salt dough ornament. If the dough is too hard to get an imprint it may be too dry. Continue to knead until smooth. You can also add in a little bit more water.
Using a straw, make a hole in the top for where you want to hang your salt dough ornament.
If possible, let the ornaments air dry for a day.
Preheat your oven to 250 degrees Fahrenheit. Bake for 1-2 hours. If your ornaments are still doughy, put back in for another hour. (It will depend on your thickness how long you need to bake for. The thinner ornaments will take less time but thicker may take more).
If you encounter too much puffing, roll out thinner ornaments and this will help reduce the puffing. If the ornament is still a bit doughy, bake for longer or let sit out a few days to harden before decorating. The thickness of the dough will determine how long you have to bake them for. We prefer to bake them at 250 degrees Fahreneheit for longer and let them air dry for a few days to prevent puffing.
Once cool, you can decorate by painting with non-toxic acrylic paint.
Spray with a clear glaze finish or finish with mod podge. Do this before adding the glitter.
To make the hand glittery, fill the handprint with glue then sprinkle glitter on top of the glue, shake off the excess and let it dry.
Kids will love helping to make this salt dough recipe. They will also have fun decorating the salt dough ornaments by painting them.
Finally, just a friendly reminder to keep these out of reach of pets (they can be toxic to dogs due to the salt content).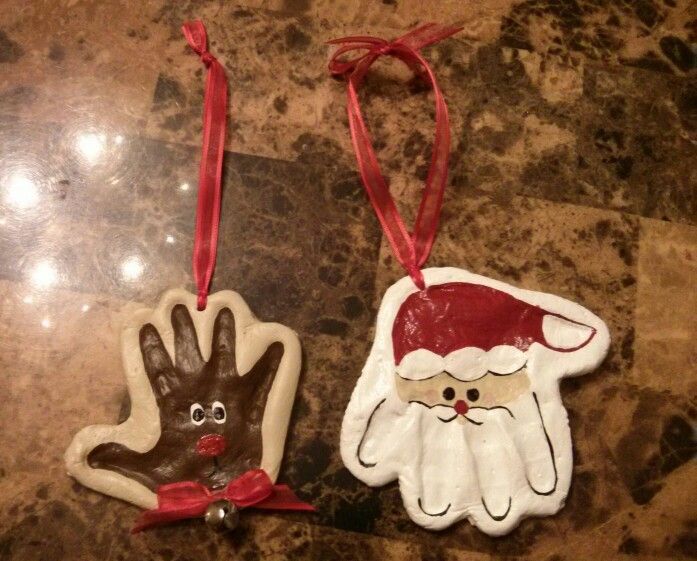
More Salt Dough Ornament Ideas
See over 25+ of the best Salt Dough Ornaments here for more great ideas!
These salt dough glitter ornaments are so fun to make – and you can make these for any season or holiday too!
The Best Salt Dough (for Ornaments and Crafting!) to Make with the Kids
Learn how to make classic salt dough with the kids, with baking, painting, and storage info. This method is straight forward, easy, and thorough—and they a perfect kids holiday gift for grandparents, teachers, and loved ones!
Salt Dough
This salt dough is a staple of childhood and I love doing this Christmas activity with my kids each year—and throughout the rest of the year too! We love to make salt dough handprints, ornaments, and sometimes, just any old shape they want to. It’s an easy project that we can do together—and then share as kid-made holiday gifts, keepsakes, or house decorations.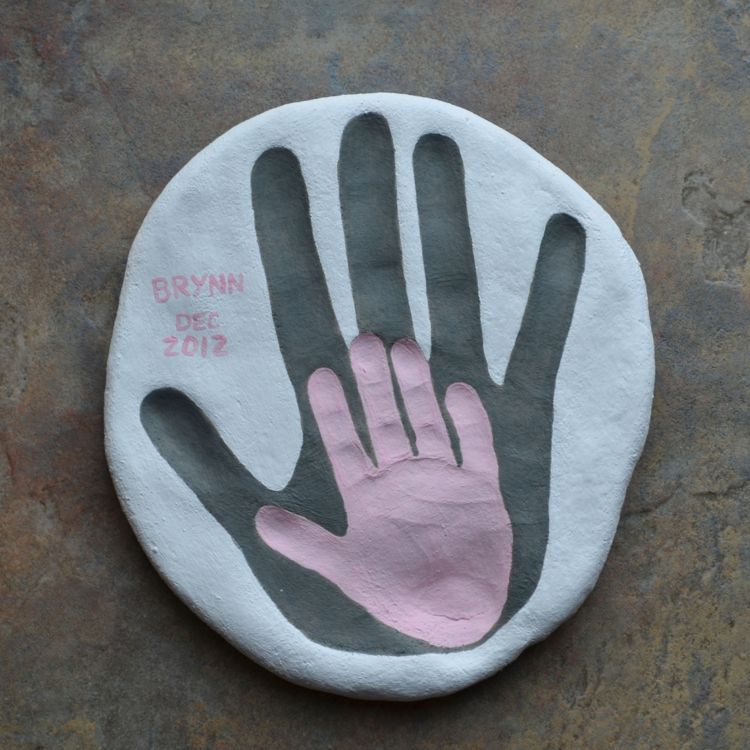
Salt Dough Recipe
Making salt dough at home is as easy as combining three pantry staples together into a dough. It’s fairly fool proof (as long as you follow the measurements!) and is a recipe that even little kids can help make.
Ingredients in Salt Dough
To make this recipe, you’ll need:
- table salt
- all-purpose flour
- water
TIP: That’s it! (I buy store brand, cheap flour for this since project to keep it very budget-friendly.)
How to Make Salt Dough Ornaments Step-by-Step
Here’s a look at how to make the dough for this salt dough. Scroll down to the bottom of the post for the full information.
- Measure out the flour and water. (photo 1)
- Add the water. (photo 2)
- Stir with a wooden spoon. (photo 3)
- Keep stirring until the dough is mostly together and is hard to stir any longer. (photo 4)
- Knead a few times with hands to bring the dough together.
 (photo 5)
 - Place dough between two pieces of parchment paper and roll out. (photo 6)
TIP: You can divide the dough in sections so multiple kids can have their own dough to work with.
How to Cut Out, Bake and Decorate Salt Dough Ornaments
Once you start rolling, here’s a look at what will follow if you want to make these into ornaments. (Skip the hole poking if you want to just make these as shapes for the kids to paint.)
- Roll out, changing directions occasionally, until about 1/4-inch thick. (This may not get precise if you’re working with kids and that’s okay!) (photo 1)
- Stamp cookie cutters. (photo 2)
- Remove the dough around the shapes, then either transfer the whole piece of parchment paper to a cookie sheet OR transfer just the shapes to a parchment-lined cookie sheet. (photo 3)
- Poke holes so you have a place for a string to hang as ornaments. (photo 4)
- Press in a hand to make a handprint, if desired.
 (photo 5)
 - Bake, let cool and decorate! (photo 6)
TIP: Re-roll any remaining dough after Step 3 here to make additional ornaments.
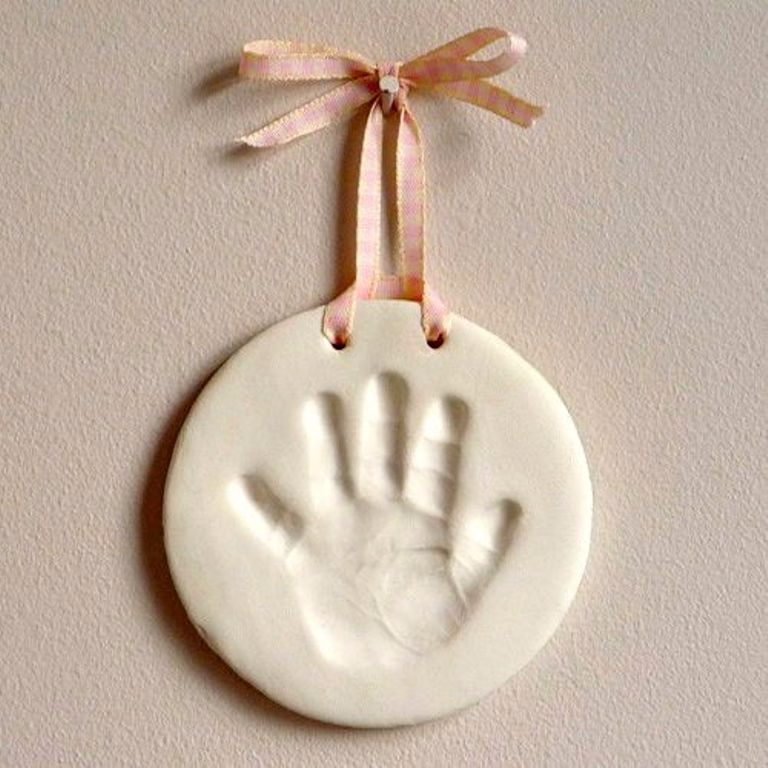
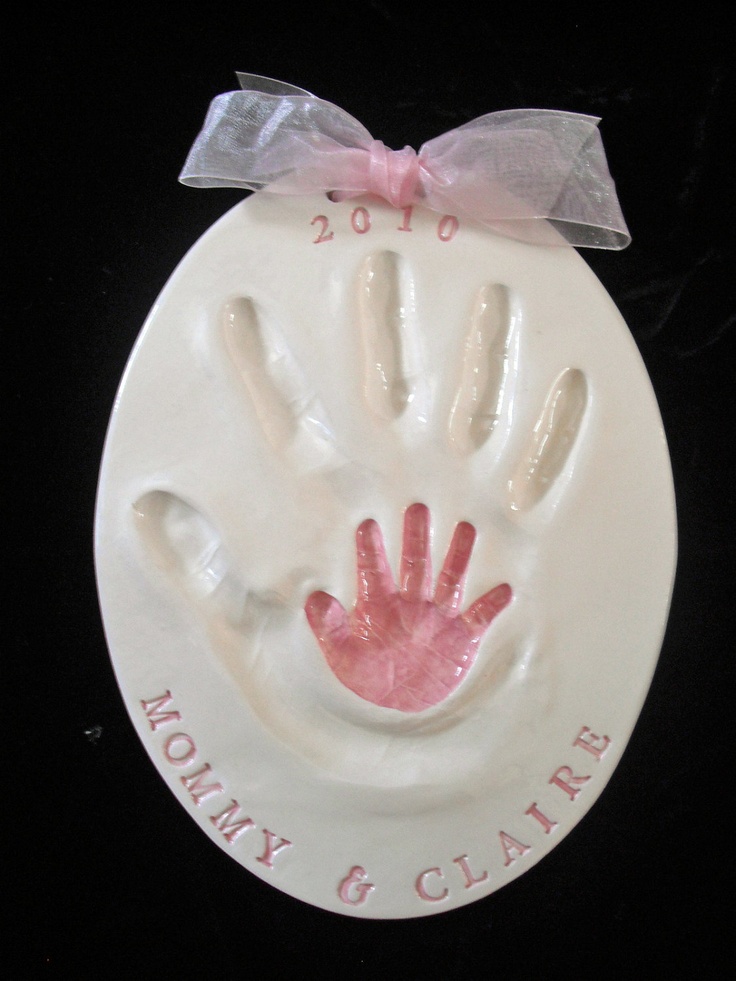
Salt Dough Handprint Ornament
Capturing a handprint in salt dough is a perfect grandparent gift, or a keepsake ornament to make for your own tree. I love pulling out our little collection year after year. Know that getting a good print may take a few tries if doing a baby’s hand!
TIP: Check the size of your round cookie cutter against your child’s hand to make sure that it’s big enough. You may need one that’s 4-5 inches in diameter.
Best Paint for Salt Dough Ornaments
If the kids are wearing smocks, the table is protected, and you are reasonably sure they won’t paint all over their hands and faces, I like using regular acrylic craft paint since it holds up best on crafts. With younger kids who may wind up wearing more of the paint, I’d recommend tempura washable paints.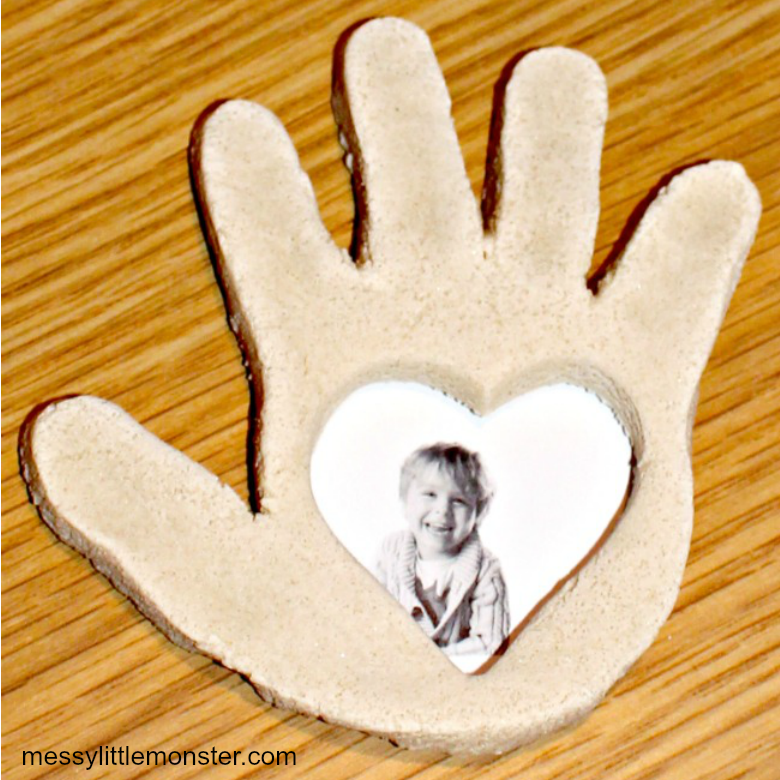
TIP: We put our paint into the base of old egg cartons since we always have those on hand. You can also use paper plates.
How to Preserve Salt Dough Ornaments
To help preserve your finished dried ornaments, you can coat with a layer or two of Mod Podge or spray with a sealer. Either work well. I’d recommend coating or sealing both sides, so do one side and let it dry, and then do the second side. If using the sealer, do it in a well ventilated area without the kids too close by.
TIP: To store these ornaments from year to year, you’ll want to wrap in bubble wrap. Store in a container that won’t be banged around, dropped or exposed to excess moisture.
Why is my salt dough puffing up?
If you mistakenly use self-rising flour, they may puff. And sometimes it happens randomly. Keep the oven temperature low and if it happens consistently, you can try baking at an even lower temperature for a slightly longer amount of time.
Tips for Making the Best Salt Dough Ornaments
- If the dough is too wet and sticky, knead in a little more flour. If it’s too stiff, add a little more water. There is a big range in the way different flours absorb liquid, so there is a normal range of variation in liquid needs. It should be easy to work with—soft and not too stiff and not excessively sticky.
- Use paper lollipop sticks or a skewer to make your holes.
- Use a 4-5 inch round cookie cutter to make handprint ornaments.
- Tie on baker’s twine or thin ribbon to hang as ornaments.
- Try to get the dough to an even thickness before baking so the ornaments bake evenly.
- Bake for the time indicated and then longer if your ornaments still feel soft. They should be firm to the touch without much give.
- Let cool fully before painting.
- If you want to paint the background of a handprint ornament, do that before you paint the inside of the hand.
 Let dry before adding a second color. Some people like to paint the whole thing white or cream to give it a more finished look.
 - Use acrylic craft paint for older kids who can be trusted with paint and tempura washable paints with younger toddlers.since it holds up best on crafts. With younger kids who may wind up wearing more of the paint, I’d recommend.
- To help preserve your finished dried ornaments, you can coat with a layer or two of Mod Podge or spray with a sealer.
I’d love to hear your feedback on this project and what your kids thought of it, so please comment below to share!
Prep Time 30 minutes
Cook Time 2 hours
Total Time 2 hours 30 minutes
Author Amy Palanjian
Cuisine American
Course Holiday
Calories 1kcal
Servings 2 dozen ornaments
- ▢ 4 cups flour
- ▢ 1 cup table salt
- ▢ 1.5 cups water
Mix the ingredients together in a large bowl using a wooden spoon.
 When it becomes too stiff to stir, use clean hands to bring the dough together.
NOTE: If the dough is too wet and sticky, knead in a little more flour, about 1 tablespoon at a time. If it's too stiff, add a little more water, about 1 tablespoon at a time. There is a big range in the way different flours absorb liquid, so there is a normal range of variation here. It should be easy to work with—soft and not too stiff and not excessively sticky.
Knead a few times until the dough is uniform and soft, about 3-5 minutes.
Divide dough into 2 or 4 sections and roll out to about 1/4-½ inch thick between two sheets of parchment paper. This will help prevent sticking.
Cut out with cookie cutters. Transfer shapes to a parchment-lined baking sheet.
Repeat rolling and cutting out shapes to use up the dough.
Preheat oven to 250 degrees F.
Do a 4-5-inch circle and press in a child's handprint if desired.
Use a paper lollipop stick or a skewer to make a hole to hang as an ornament.
If making ornaments, bake for 90 minutes to 2 hours; if baking handprints, bake for 2-3 hours. Continue baking both ornaments and handprints as needed until they are until just firm to the touch, checking every 20 minutes. (It's not a problem if yours take longer than the initial baking time—it varies based on thickness and size...which will likely vary if you are baking these with kids!) They do not need to be rock hard, but should not feel squishy. Handprints will likely take longer than smaller ornaments and may take closer to 4 hours.
Remove from oven, let cool, and paint if desired with acrylic or washable tempera paint.
Once paint is completely dry, seal with Mod Podge if desired.
Mixing Bowl
parchment paper
Mini Cookie Cutters
- Divide the recipe in half to make a smaller portion of dough if desired.
- Use paper lollipop sticks or a skewer to make your holes.
- Use a 4-5 inch round cookie cutter to make handprint ornaments.
- Tie on baker's twine or thin ribbon to hang as ornaments.
- Try to get the dough to an even thickness before baking so the ornaments bake evenly.
- Bake for the time indicated and then longer if your ornaments still feel soft. They should be firm to the touch without much give but do not need to be rock hard. It is not a sign of a problem if yours take longer than mine did to bake—flours and ovens vary!
- Let cool fully before painting.
- If you want to paint the background of a handprint ornament, do that before you paint the inside of the hand. Let dry before adding a second color.
- Use regular acrylic paint for older kids who can be trusted with paint and washable tempera paint with younger toddlers.
- To help preserve your finished dried ornaments, you can coat with a layer or two of Mod Podge or spray with a sealer.
Calories: 1kcal, Fat: 1g, Saturated Fat: 1g, Polyunsaturated Fat: 1g, Monounsaturated Fat: 1g, Fiber: 3g, Sugar: 1g, Calcium: 31mg, Iron: 6mg
Tried this recipe?Rate in the comments and tag @yummytoddlerfood on IG!
90,000 salt printing - photojession- Home
- Instructions
Download instructions in PDF
Buy set
share:
ATTENTION! When working with chemicals, strictly follow the precautions! Be sure to use protective gloves. Avoid contact of chemicals with food and hygiene products. Avoid contact of solutions with eyes! In case of contact with skin, rinse immediately with plenty of water. Keep away from children.
What's in the kit
- Saline #1 - 100 ml
- Sensing Solution #2 - 100ml
- Contrast Enhancer - 30 ml
- Neutral fixer - 200 g
- Volumetric pipettes 3 ml - 3 pcs.
- Instruction
Set contains 50 prints 18x24 cm.
1. Before you start
Eliminate all UV sources. For work, dim light from an incandescent lamp is suitable. Use only plastic or glass tools and utensils.
2. Negative
High contrast negatives with strong highlights and good detail work best for printing. The image is printed with a contact method, so the size of the print will match the size of the negative. Print a digital negative on transparency film or prepare a large format film negative.
3. Paper Coating
Using a pipette, measure out the required amount of saline solution #1 at the rate of 35-40 drops per 18x24 cm sheet. Apply the solution to the paper with a brush. Two coats with an intermediate drying may be required for even coverage. You can prepare the required number of sheets in advance, "salted" paper is stored indefinitely.
Measure the required amount of sensing solution #2 using the same calculation as #1.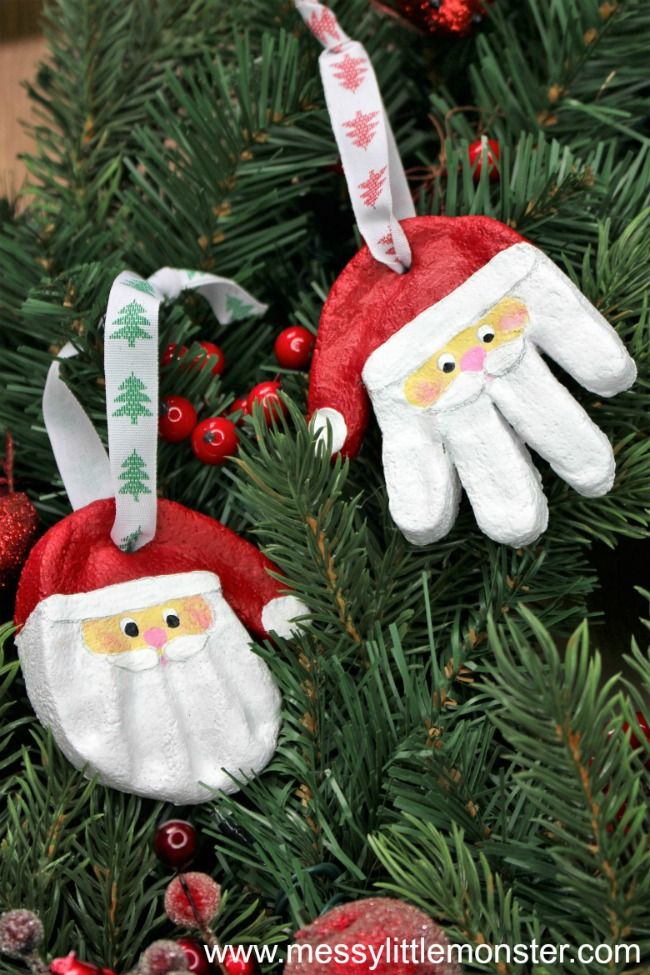 Apply evenly on a sheet of salted paper, leave in a horizontal position for 1-2 minutes. and dry with a cold hair dryer. Use different pipettes, brushes and utensils for different solutions, or rinse instruments thoroughly after each solution distilled water . Sensitized paper can be stored for several days in an opaque bag.
*If the coating is not uniform enough, try adding 1 drop of Emulsifier to the second solution. If the solution becomes too viscous, first dilute the emulsifier with distilled water.
Attention! Solution #2 contains silver nitrate! Strong oxidizer. Leaves difficult to wash off spots on the skin. Dangerous in case of contact with eyes! Be sure to use safety goggles and gloves.
4. Contrast (as required)
To increase image contrast, add a small amount of 2% dichromate to pre-measured saline #1. The exposure time will also increase. The amount is selected experimentally. As a starting point, you can take 1 drop of dichromate per 10 ml of saline.
Attention! The solution contains potassium bichromate! Toxic. Wear gloves. Try to avoid spilling and splashing the solution. In case of contact with skin, wash with plenty of soap and water.
5. Exposure
Place the negative on a sheet of sensitized paper, place contact frame in and place it under an ultraviolet source - sunlight or a UV lamp. The exposure time is selected experimentally. You need to evaluate the exposure after fixing, as the print will brighten in the fixer.
6. Washing
The salt seal belongs to the so-called. "processes with visible printing" (printing out process), that is, the development of the image takes place in ordinary water. Rinse the exposed print in 4-5 changes of room temperature water for 5-7 minutes.
7. Fixing
Prepare a 5% solution of neutral fixer (50 g per liter of water or 1 sachet per 2 liters).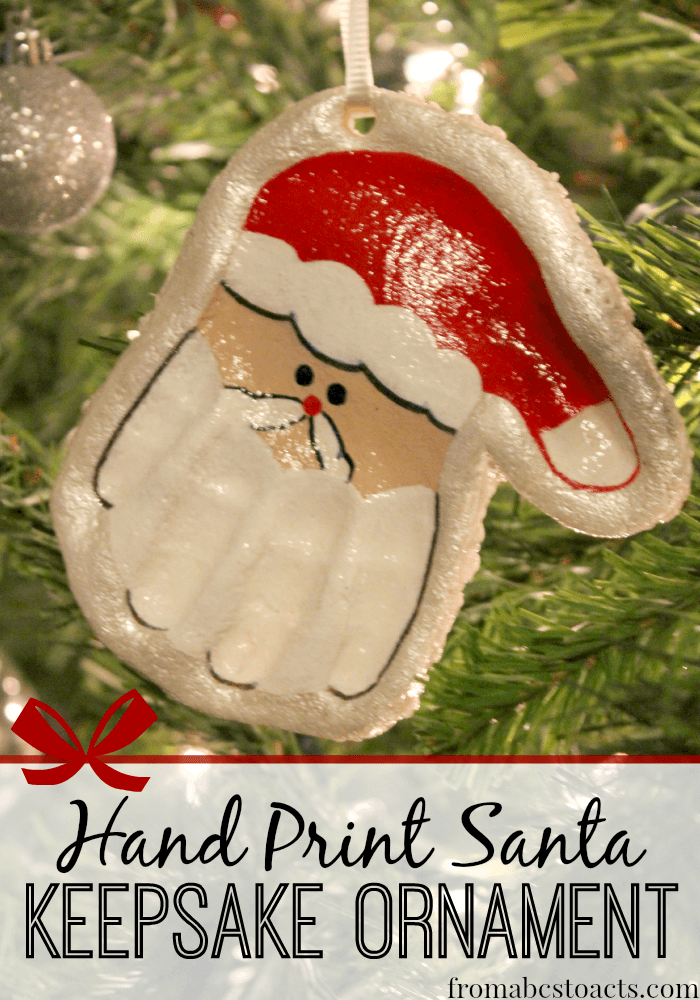 Fixing time: 5-6 min. The print in the fixer will noticeably brighten, but after drying, the density of the image will be partially restored. 1 liter of fixer is enough for 10 prints 18x24 cm. Partially used solution is not stored. If fixing results in loss of detail in the highlights, add regular baking soda to the fixer solution at the rate of 0.5 tsp. per litre.
(optional) Use two cuvettes with fixative to improve the archival quality of the print. In the first cuvette - partially spent fixer (2 min.), in the second - fresh (3 min.)
8. Final rinse
Rinse the print in running water for 30 minutes. and hang to dry.
(optional)
9. Toning
Salt prints are best toned with gold, platinum and palladium. Processing with selenium toner is possible, although this is not the most convenient option for salt printing.
Gold toner
Gold toning gives the image a cold tone (from sepia to black) and improves the archival quality of the print by an order of magnitude.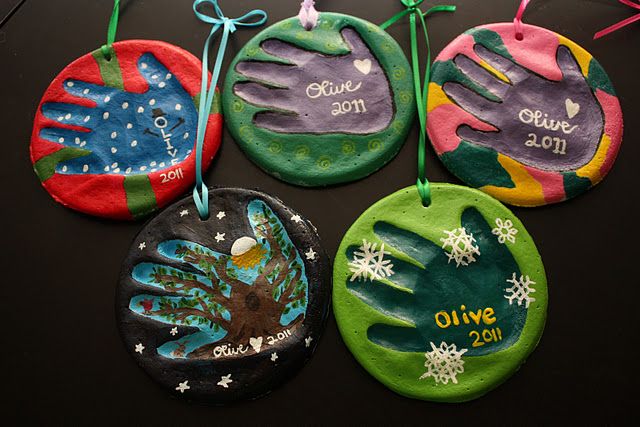 Treatment with gold toner is possible both BEFORE and AFTER fixing. The advantage of the first method is that the pre-tinted print practically does not lose density in the fixer, however, this significantly increases the toner consumption.
See toner instructions.
Selenium Toner
Unlike gold, platinum or palladium, the selenium bath is strictly AFTER fixing, so the selenium toner does not save from weakening in the fixer, moreover, the prints will brighten even more in the toner. However, selenium treatment is an inexpensive way to significantly extend the life of a print. General recommendations are as follows: the print should be overexposed by at least 1.5-2 stops. Selenium toner is diluted 1+19 or even 1+29. After the fixer is washed with water for 10 minutes, then - selenium toner for 3-4 minutes. At the end - final washing 20-30 min.
10. Archival Rinse
To improve archival quality, the print can be treated with Archival Rinse Solution .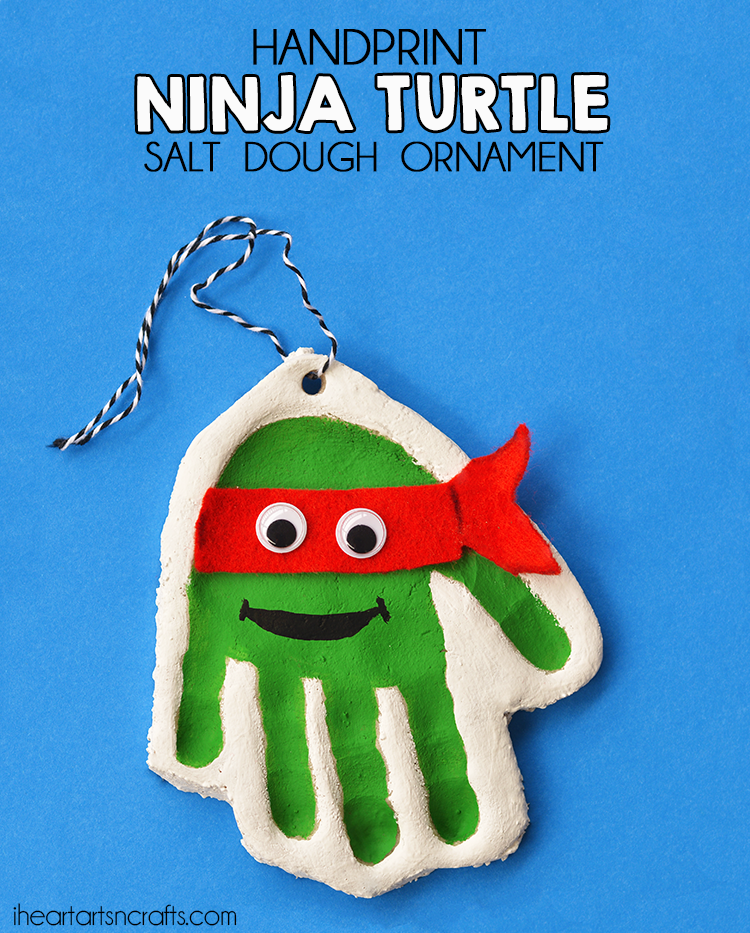 The concentrate is diluted with water 1+19. After fixing, rinse the print in running water for 1 min. and place in an archival rinse bath for 2 min. This is followed by a final rinsing in running water for 15-20 minutes. and drying.
Activities for kids at home
Contents
- Activities for kids at home
- Board games for children
- DIY Games or “Make yourself”
- Designs from blocks
- Game to the theater
- Salt dough and potato stamps
- We prepare with children
- Home Laboratory and Creativity
- Household chores in the form of a game
- Why is it worth spending time with a child?
How to keep a preschool child busy at home? How to spend time creatively and usefully? These questions torment those parents who do not agree that their child is lost watching TV or spending too much time at the computer.
Bad weather, a closed kindergarten, a cough, flu or other illness very often force you to stay at home with your child.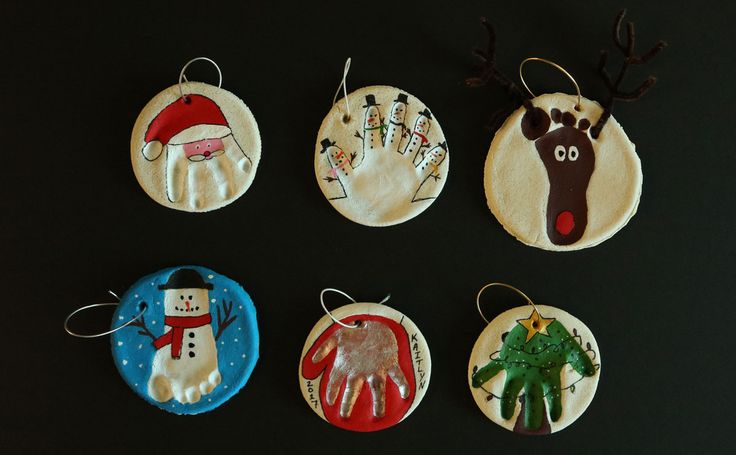 Toddlers get bored quickly and finding new games becomes a real challenge for their caregivers.
Toys that children used to play with when they came home from kindergarten are now quickly boring. Most kids don't like monotony. So parents are coming up with new ways to keep their child productive.
How to keep a child busy at home
The article tells:
- How to take care of your child.
- What games to offer a preschooler while staying at home.
- Why it is worth spending time creatively with your child at home.
- Board games and puzzles for the little ones.
Board games for children
The main way to organize children's leisure and creative development, logical thinking of kids are all kinds of board games, puzzles and puzzles. If there is a need for the baby to calm down and rest from physical exertion for a while, this method will be indispensable.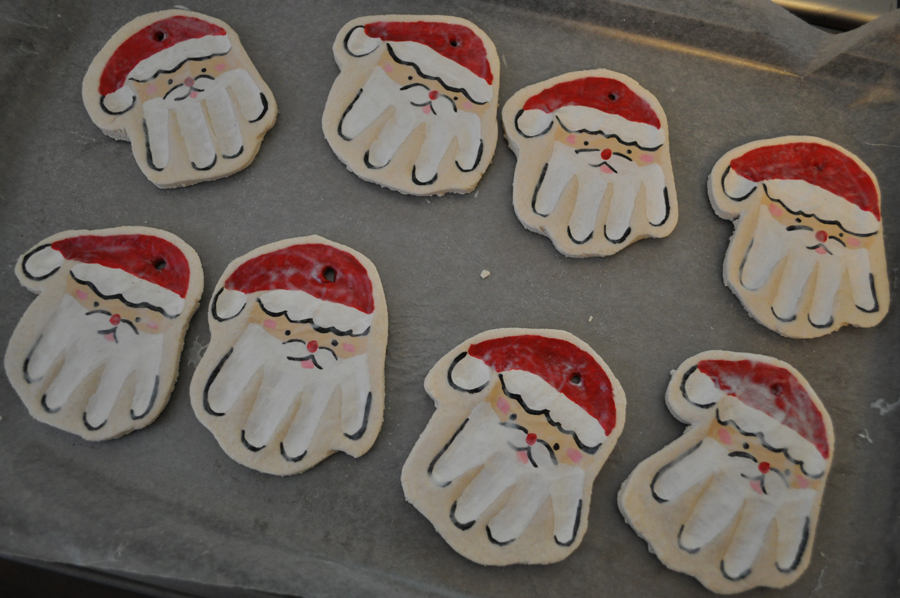
It is worth making sure that the child focuses his attention on one particular activity from time to time. It can be a joint board game or jigsaw puzzles.
It is important that games and puzzles are adapted to the child's age.
When choosing specific names, it is also worth paying attention to the fact that they are of good quality and safe for the child.
Board games are a way to spend time with the whole family. Logic board games allow you to develop the imagination and creativity of even the youngest children. Thanks to them, you can also take a break from the TV or computer.
DIY or DIY games
Recently, DIY games have become very popular. These activities are sure to appeal to active children with an artistic soul. As in the case of puzzles, the level of play should be appropriate for the age of the child.
Some examples of DIY games that may interest a preschooler.
Pasta decorations.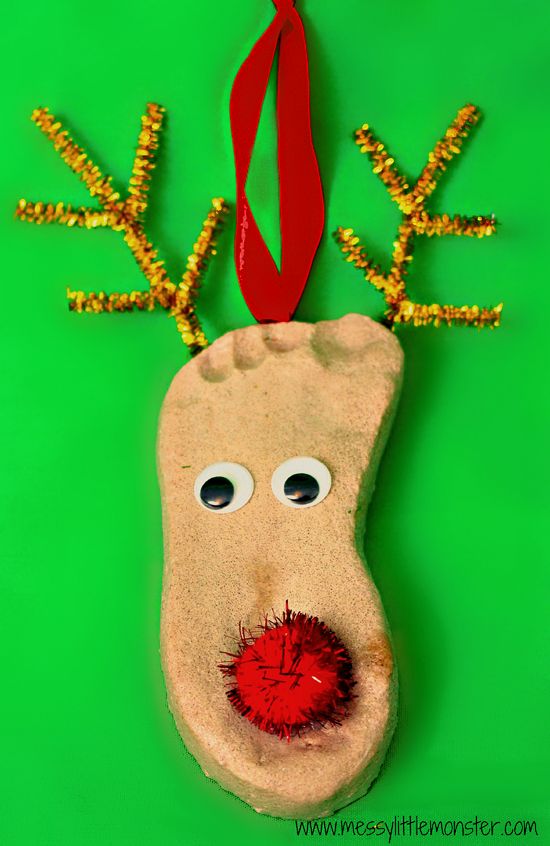 The paste can be pre-colored with paints and then strung with thick threads to create necklaces and bracelets.
Characters from the packaging. Blown eggs are ideal for this, which can be used to create creatures or robots. Cardboard can be colored with crayons, felt-tip pens or paints, creating multi-colored figures.
Colored vases. Glass bottles are an excellent basis for making flower vases. For painting on glass, it is enough to arm yourself with special paints. For example, the bottle should also be lined with waterproof colored paper or plasticine.
Block constructions
Every child has something like a constructor. Blocks are one of those toys that are most often chosen by both boys and girls. It's also a way to spend time that doesn't get boring quickly. From cubes you can create castles, towers, space stations, cars and aircraft. It all depends on the creative abilities of the baby and his guardian.
Blocks are also a treasure trove of inspiration that develops the imagination while promoting the development of logical and spatial thinking, creativity and imagination of the child.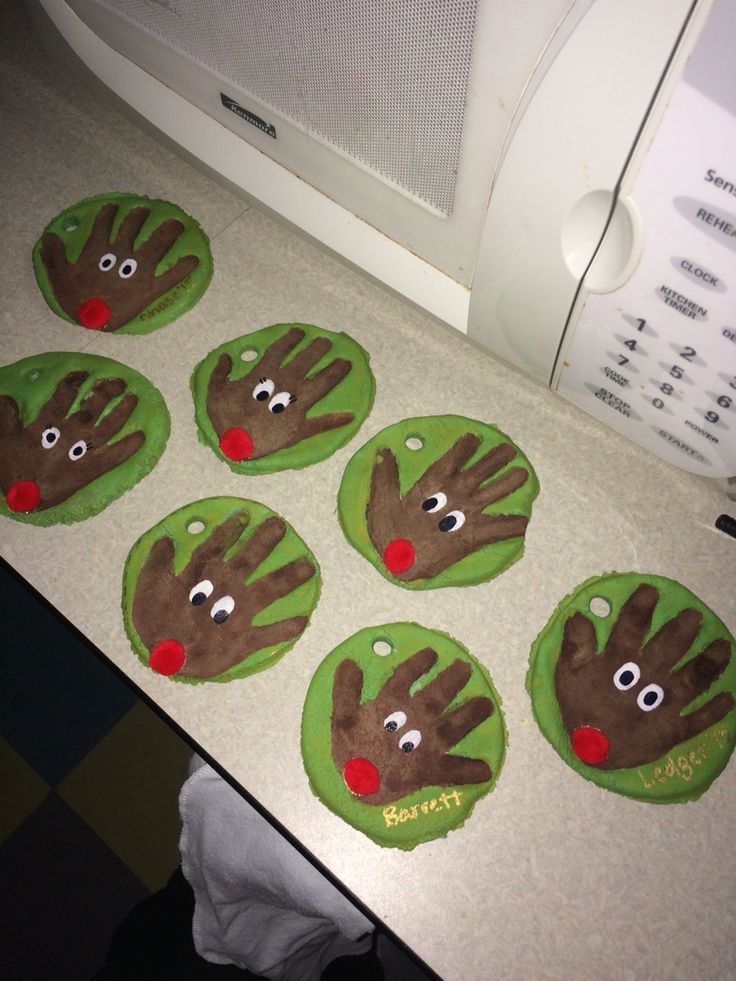
This type of play also trains the baby's attention to one specific task. Connecting the cubes is an opportunity to talk to your child and pass on your knowledge.
Recently, wooden puzzles have become very popular, which are great for both younger and older children.
Playing theater
Another way to spend time creatively with a preschooler is to play theater. An interesting solution is to play your favorite fairy tale with the help of dolls. In stores, you can also buy special dolls that are put on the hand.
Encourage your child to direct the story on his own, which will allow him to develop his creative abilities.
Do not play the game, it is better to rely on the child and his abilities.
Before this, you can make a stage out of cardboard on which the “performance” will be displayed. Such entertainment is best suited when there is more than one child at home. Toddlers can act out scenes, and parents will become spectators.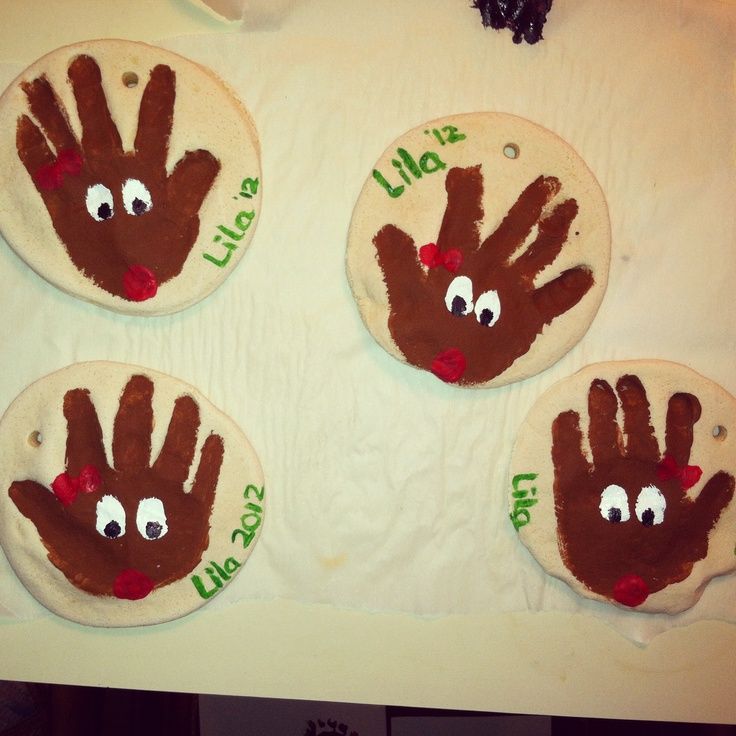
Salt dough and potato stamps
Of course, many parents still remember how they sculpted from salt dough or cut out potato stamps. This is an easy way to creatively entertain your child with the products available in the kitchen.
Various figures, handprints and footprints can be created from the salt mass. They can also be painted with paints after drying, which will enliven the created works and add to their attractiveness. All it takes is water, flour and salt to prepare the base for the fun.
Another interesting occupation is the production of stamps from potatoes. Here, parents will certainly have to help their kids cut out the desired shapes or letters.
However, simply printing forms on paper can be a lot of fun for kids. Potatoes, a notepad and poster paints are enough to make interesting, colorful pictures appear on the pages.
Cooking with the kids
Parents often forget how much fun it is to cook together.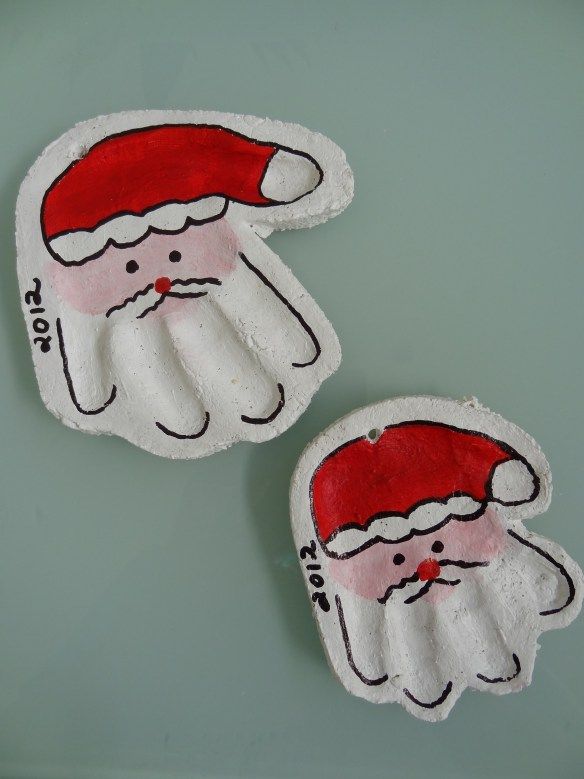 Thanks to this, it is possible not only to prepare a dish, but also to have fun with the children. Together you can bake your favorite cookies, muffins, prepare a fruit or vegetable salad, or dessert.
Your little one can also help prepare lunch or dinner by cutting vegetables or fruit with a plastic knife. Perfectly decorate sandwiches with available ingredients.
Children eat the treats they prepare with taste and pleasure.
Clutter shouldn't scare off parents. After the food is ready, you can also clean the kitchen with your child and thus teach him how to perform basic household chores through play.
Home Lab
Young children love to experiment. Therefore, nothing prevents you from setting up a laboratory at home in your free time. Through some experiments, it is possible to explain to children certain phenomena that they do not understand.
Experience is a great way to learn by playing.
Descriptions of experiments can be found both on the Internet and in special books.
Imagination and creativity
The development of creativity and imagination in the little ones is very important. These features should be developed from an early age. Free time at home can be used to develop the child's manual labor. This is also a great opportunity to discover a dormant talent in a child that is worth developing. For example, enroll your child in extracurricular activities. Perhaps this will be the beginning of an adventure of a lifetime.
A variety of household items can be used for imaginative play in the comfort of your own home. Paints, markers, crayons, paper, and old boxes, newspapers, or toilet paper rolls are great.
Let your child dream up and create their own creation, even if it is awkward.
Housework in the form of a game
Daily activities can also be fun.