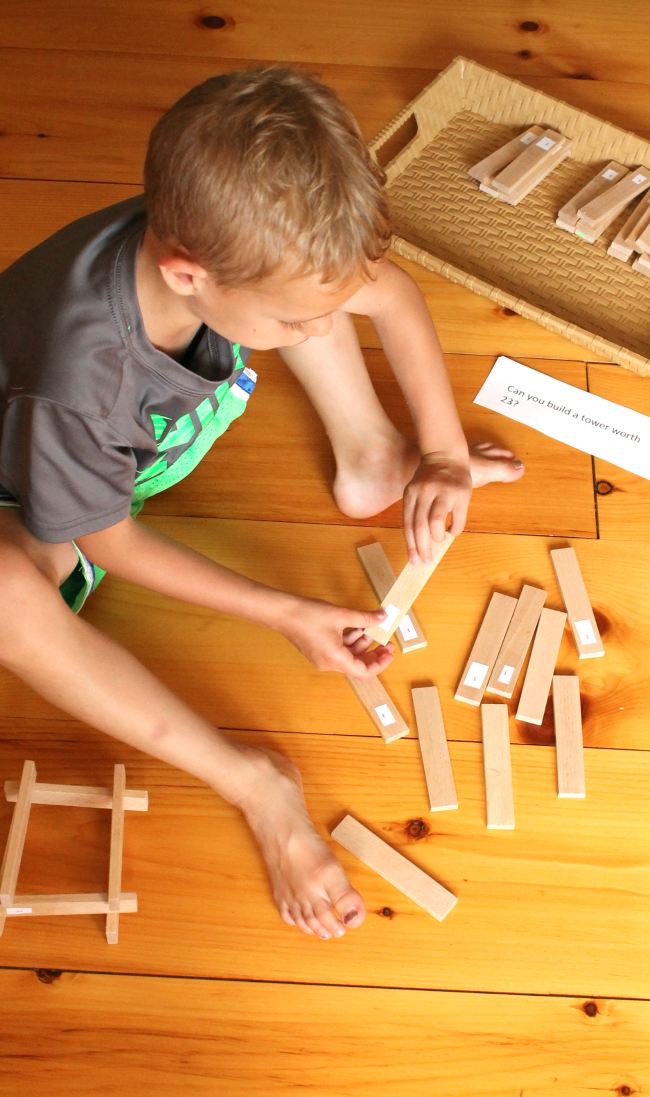
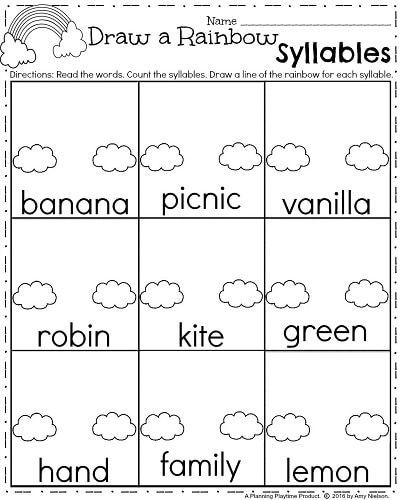
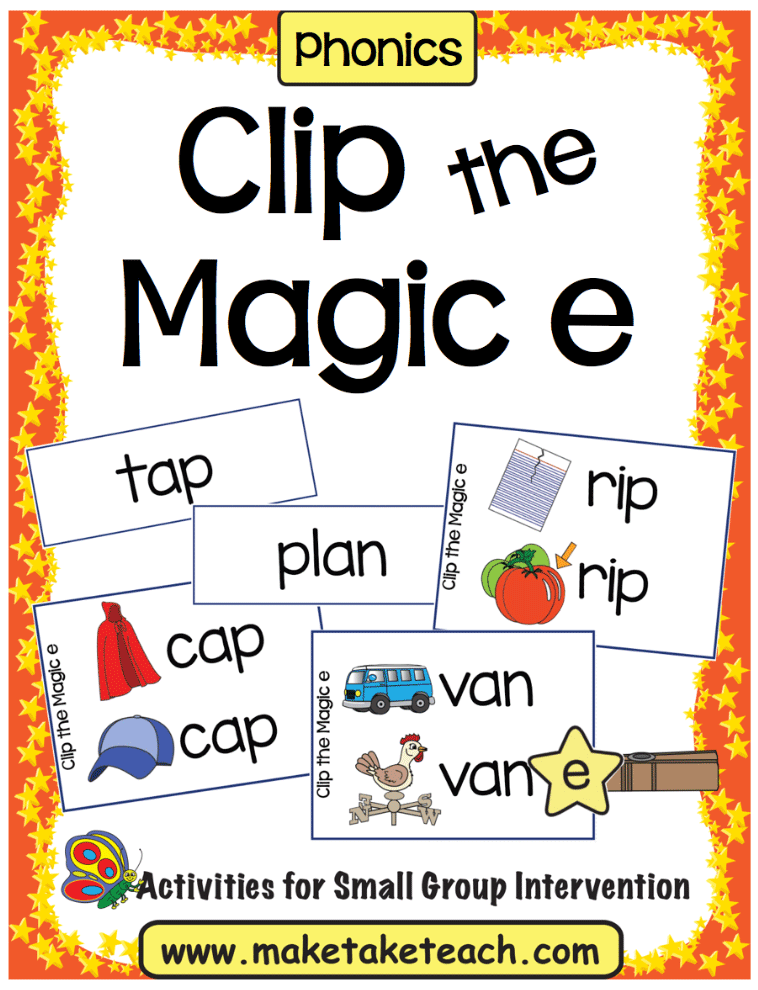
Syllable deletion activities
Phonological and Phonemic Awareness: In Practice
These activities will work effectively for most students, but children will vary in their response to these activities. Some students will need much more practice than others, and what works well for most students will not necessarily be effective for everyone.
Language comprehension activities
In this section
Counting words in a sentence
Counting the words in a sentence may seem simple. But when we speak, we run words together. It’s important for young children to learn that the stream of speech is composed of individual words. For children with low language skills or children learning English, this activity is especially crucial. It is perfectly fine to take sentences from a story. The language should be close to common speech.
Steps:
- Give each child a manipulative or manipulatives with which to count the words in a sentence.
- Dictate a sentence. The sentences should be articulated clearly but not in a halting, artificial manner.
The words should run together as in natural speech.
- Avoid dictating haltingly: “Mom [pause] went [pause] to [pause] the [pause] store.”
- Be careful when dictating phrases such as ‘going to’, ‘would have’, ‘used to’ to pronounce two words. Avoid saying, ‘gonna’, ‘woulda’, ‘useta’, and so on.
- All students repeat the sentence.
- One student uses the manipulatives to count the words.
- All students use the manipulatives to count the words in the same sentence.
Repeat these steps with as many as 10 sentences.
Following these steps, students have individual turns and group practice to ensure the maximum amount of practice in a brief activity.
One manipulative that has been used is a paper bunny cut out and attached to a wooden stick. Students ‘hop the bunny’ for each word in the sentence. Other manipulatives are bingo chips or bottle caps which are counted out for each word.
Sentences should start at two to five words in length, then should get a little longer, but generally should not exceed eight words.
Back to top
Phonological awareness activities
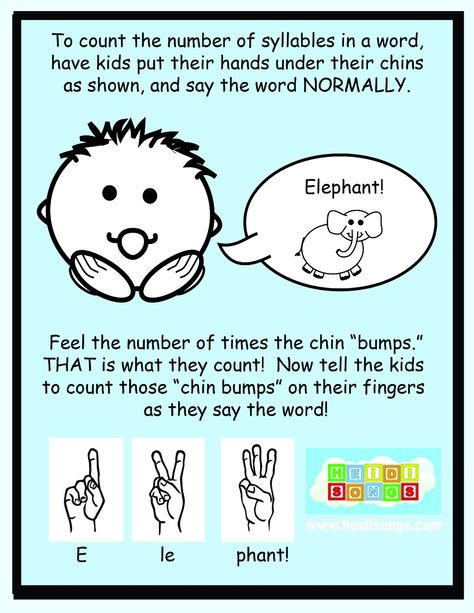
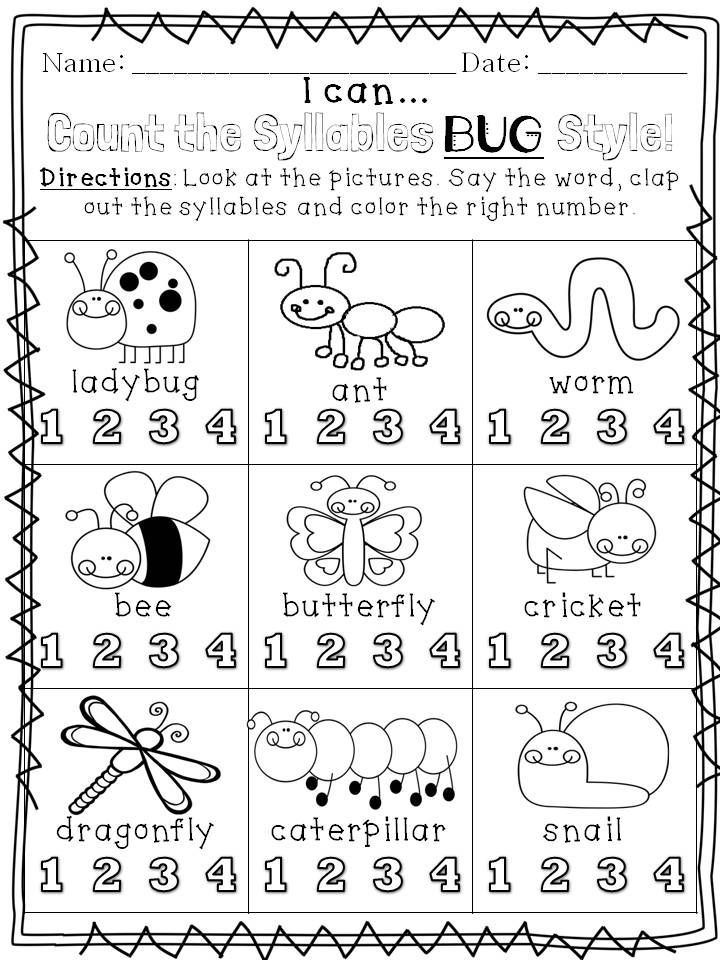
Counting syllables
Counting syllables requires the student to know what a syllable is. Introduce the vocabulary word: syllable. Syllables can be explained to children in this manner:
“Words are made up of syllables. Some words have 1 syllable. Some words have lots of syllables. Our mouth knows where the syllables are. Let’s use our mouth to feel syllables. Watch me. I will use something called clamped lips to feel syllables. I will close my lips tightly and shout the word ‘classroom’.”
Close your lips tightly and shout ‘classroom’. Students will hear two muffled shouts.
“I heard two shouts. I felt two pushes of air. I wanted to open my mouth 2 times. That means ‘classroom’ has two syllables. I hold up two fingers to show how many syllables are in ‘classroom’. Do it with me.” Then lead the group through two examples.
Steps:
- We dictate words in a natural manner.
- Avoid dictating haltingly: “mon [pause] ster”
- Dictate words as they are said, not as they are spelled. For example, say ‘DOC-ter’ not ‘doct-OR’.
- All students repeat the word.
- All students shout the word with clamped lips.
- All students show how many syllables using their fingers.
Repeat these steps with as many as 15 words. Early lessons should include words with one and two syllables. Then include words with three syllables. When students are proficient, introduce some challenge words with four or more syllables. Remember to include one-, two-, and three-syllable words as well.
After some practice, take away the scaffold of using clamped lips:
Steps:
- We dictate words in a natural manner.
- All students repeat the word.
- All students show how many syllables using their fingers.
Back to top
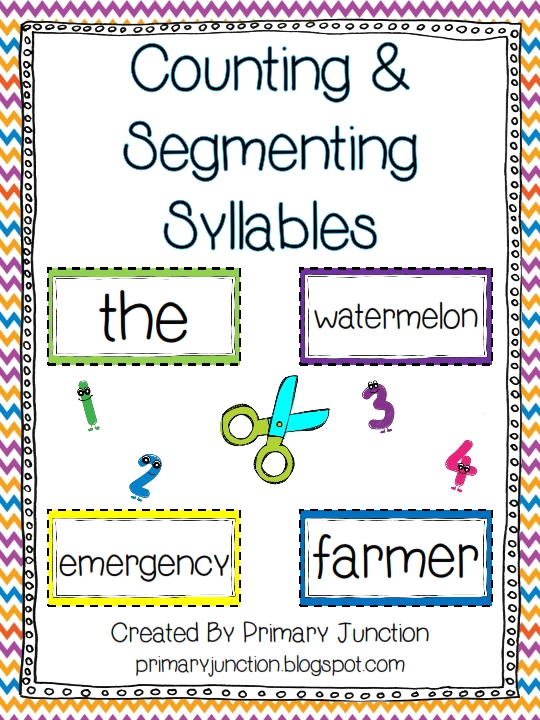
Segmenting syllables
Segmenting syllables is easily taught after students can use clamped lips to count syllables. It is best to restrict this activity to words with three or fewer syllables.
“I can say a word, then say each syllable in the word. As I say each syllable, I will lay down a card. I will lay the cards left to right. Watch me. I say the whole word: ‘Peanut’. I say each syllable and put down a card: ‘pea’ [place a card] ‘nut’ [place a card so it appears left-to-right for students]. Now I sweep my finger below the cards and say the whole word: ‘peanut’ [sweep finger below the cards left-to-right]. Do it with me.” We then lead the group through two examples.
Steps:
- We dictate words in a natural manner.
- All students repeat the word.
- One student uses the manipulatives to segment the syllables.
- All students use the manipulatives to segment the syllables.
Repeat these steps with 10 to 15 words. Early lessons should include words with one and two syllables. Then include words with three syllables.
Following these steps, students have individual turns and group practice to ensure the maximum amount of practice in a brief activity.
Manipulatives can be cards, felts, bingo chips, bottle caps, or other objects.
Back to top
Identifying first, last, middle syllables
Identifying syllables requires the student to segment the word, then say just the target syllable. It is best to restrict this activity to words with three or fewer syllables. First, middle, and last are sufficient for this task. When students move to print, the student can carry this skill into sounding out longer words for spelling and reading.
“I can say each syllable in the word. Then I can say just the first syllable. As I say each syllable, I will lay down a card. Watch me. I say the whole word: ‘sunset’. I say each syllable and put down a card: ‘sun’ [place a card] ‘set’ [place a card so it appears left-to-right for students]. I say the whole word: ‘sunset’ [sweep finger below the cards left-to-right]. I touch and say just the first syllable: ‘sun’ [touch the first card]. Do it with me.” We then lead the group through two examples.
Steps:
- We dictate words in a natural manner.
- All students repeat the word.
- One student uses the manipulatives to segment the syllables.
- Introduce this by saying, “One student will be our voice, everyone else will segment the syllables silently.”
- [Name], segment [word].
- All students (silently) use the manipulatives to segment the syllables.
- A different student identifies just the first syllable.
- Everyone, what is the first syllable?
- All students touch and say the first syllable.
Repeat these steps with as many as 15 words. Start with one and two syllable words. Start with just identifying the first syllable. Introduce identifying the last syllable. Combine identifying the first and last syllable with one, two and three syllable words. Add three syllable words. Introduce identifying the middle syllable.
Following these steps, students have individual turns and group practice to ensure the maximum amount of practice in a brief activity.
Back to top
Blending syllables
Blending syllables should be taught after students can segment. It is best to restrict this activity to words with three or fewer syllables.
“I can say each syllable in a word and then I can blend the syllables to say the word. As I say each syllable, I will lay down a card. I will lay the cards left to right. Watch me. I say each syllable and put down a card: ‘lap’ [place a card] ‘top’ [place a card so it appears left-to-right for students]. Now I sweep my finger below the cards and say the whole word: ‘laptop’ [sweep finger below the cards left-to-right]. Do it with me.” We then lead the group through two examples.
Steps:
- We dictate syllables.
- All students repeat the syllables and place the cards.
- One student blends the syllables.
- All students blend the syllables.
Repeat these steps with as many as 15 words. Early lessons should include words with one and two syllables. Then include words with three syllables.
Following these steps, students have individual turns and group practice to ensure the maximum amount of practice in a brief activity.
Back to top
Manipulating syllables (adding, deleting, substituting)
Adding
Manipulating syllables should generally be taught in this sequence: add, delete, substitute. Adding syllables is very similar to blending syllables. Students already know what to do with the cards. As such, it is the easiest manipulation.
“I can add syllables to make a new word. Watch me. I say the first syllable and put down a card: ‘lap’ [place a card]. I add the last syllable: ‘top’ [place a card so it appears left-to-right for students]. I touch and say the syllables: ‘lap’, ‘top’, ‘laptop’ [sweep finger below the cards left-to-right]. Do it with me.” We then lead the group through two examples.
Steps:
- We dictate the first syllable and places a card.
- All students repeat the syllable and place a card.
- We dictate the second syllable and place a card.
- All students repeat the syllable and place a card.
- All students touch and say, then blend the syllables to say the word.
Repeat these steps with as many as 15 two-syllable words.
Deleting
“Watch me take away a syllable from a word. The word is: ‘pencil’. ‘Pen’ ‘cil’ [place a card for each syllable so it appears left-to-right for students]. ‘Pencil’ [sweep finger below the syllables and say the word]. I take away ‘cil’ [remove the card]. ‘Pen’ is left [touch remaining card]. Do it with me.”; We then lead the group through two examples.
Steps:
- We dictate the word and place the cards.
- All students repeat the word and place the cards.
- All students touch and say, then blend the syllables to say the word.
- We dictate the syllable to remove, alternating between first and last.
- All students touch and say the remaining syllable.
Repeat these steps with as many as 15 two-syllable words.
Substituting
“I can change one syllable in a word to form a new word. Watch me. I will change ‘suntan’ to ‘sunset’. Which syllable is different in ‘suntan’ and ‘sunset’? I will use the cards. The first word is ‘suntan’ [say syllables, lay cards, touch and say syllables, blend word]. I want to change ‘suntan’ to ‘sunset’. [Touch below the cards, say new syllables, blend new word]. The second syllable is different. I’ll change the cards to and say the new syllable: [pick up second card and say ‘tan’, lay down new card and say ‘set’]. I’ll touch and say the new word: [say syllables, lay cards, touch and say syllables, blend word].
Steps:
- We dictate old word to new word.
- All students repeat old word to new word, and lay cards for each syllable.
- All students touch and say, then blend the old word.
- We repeat the new word.
- Below the cards, all students touch and say, then blend the new word.
- We ask: syllable going out?
- All students touch and say the syllable, removing the card.
- We ask: syllable going in?
- All students touch and say the syllable, adding a card.
- All students touch and say, then blend the new word.
Repeat these steps with as many as 15 words.
Back to top
Blending onset and rime
An onset is the initial consonant or consonant cluster of a one-syllable word. A rime is the vowel and any consonants that follow the onset. So in the word “map,” /m/ is the onset and /ap/ is the rime.
Unlike with syllables, we do not need to teach the vocabulary terms of onset-rime. This skill is a scaffold to phonemic awareness skills, and not one with enduring usefulness. Blending onset-rime is more easily taught after students can blend syllables. Use only words with a single onset sound. Blends can be taught in phonics instruction.
We are modeling facing students.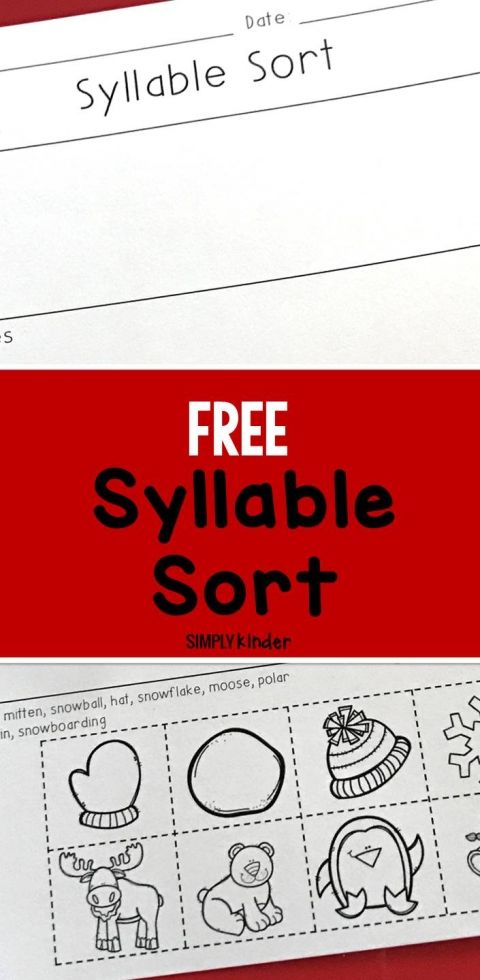 We work right-to-left so it appears left-to-right for students.
“I can blend two parts of a syllable to make a word. Watch me. /M/ [we put right fist on the table], /ap/ [we put left fist on table], ‘map’ [we slide our fists together to touch in front of her]. Do it with me.” We then lead the group through two examples.
Steps:
- We dictate onset [pause] rime, using fists to represent onset and rime.
- All students repeat the sounds and use their fists to represent the sounds.
- One student blends the onset and rime to say the word.
- All students blend the onset and rime to say the word.
Repeat these steps with as many as 10 words. Remember to use words with only one onset sound. For example, use /ch/ /in/ but avoid /sw/ /im/.
Following these steps, students have individual turns and group practice to ensure the maximum amount of practice in a brief activity.
Back to top
Onset-rime completion
As with all onset-rime activities, use only words with a single onset sound.
We are modeling facing students. We work right-to-left so it appears left-to-right for students.
“I will say a word and give you the first part. Then you say the last part. Watch me. The word is ‘tape’. The first part is /t/ [we put right fist on the table]. What’s the rest of the word? /Ape/ [we put left fist on table]. The word is ‘tape’ [we slide our fists together to touch in front of her]. Do it with me.”; We then lead the group through two examples.
Steps:
- We dictate onset, using a fist to represent the onset sound.
- All students repeat the onset sound and put a fist down.
- One student adds the rime and puts the right fist down, then blends the onset and rime to say the word.
- All students blend the onset and rime to say the word.
Repeat these steps with as many as 10 words.
Following these steps, students have individual turns and group practice to ensure the maximum amount of practice in a brief activity.
Back to top
Do these words rhyme?
For students to learn whether words rhyme, and to generate rhyming words, they must understand what rhyming is. Introduce the vocabulary word: rhyme. Rhyming can be explained to children in this manner:
We are modeling facing students. We work right-to-left so it appears left-to-right for students.
“Words rhyme when they end with the same sounds. For example, I can check to see whether ‘make’ and ‘take’ rhyme. Watch me. I blend two parts of each word. /M/ [we put right fist on the table], /ake/ [we put left fist on table], ‘make’ [we slide our fists together to touch in front of her]. /T/ [we put right fist on the table], /ake/ [we put left fist on table], ‘take’ [we slide our fists together to touch in front of us]. The ending sounds for both words were the same: /ake/ [hold up left fist when facing the students to show the ends were the same]. I will do a few and you tell me whether they rhyme.”
We then lead the group through two more examples, one that doesn’t rhyme and one that does. We direct the students to show thumbs up or down to indicate whether the words rhyme.
Steps:
- We dictate two words. Don’t say anything between the words; a brief pause will suffice.
- All students repeat the words.
- All students show the two parts of the first word using their fists.
- All students show the two parts of the second word using their fists.
- All students show thumbs up or down to indicate whether the words rhyme.
After some practice, take away the scaffold of segmenting the onset and rime:
Steps:
- We dictate two words.
- One student shows thumbs up or down to indicate whether the words rhyme.
- All students show thumbs up or down to indicate whether the words rhyme.
This activity can be extended to include three words. We ask students which two words rhyme.
Repeat these steps with as many as 10 sets of words.
Back to top
Generating rhyming words
For students with poor phonological awareness, coming up with words that rhyme is a difficult task.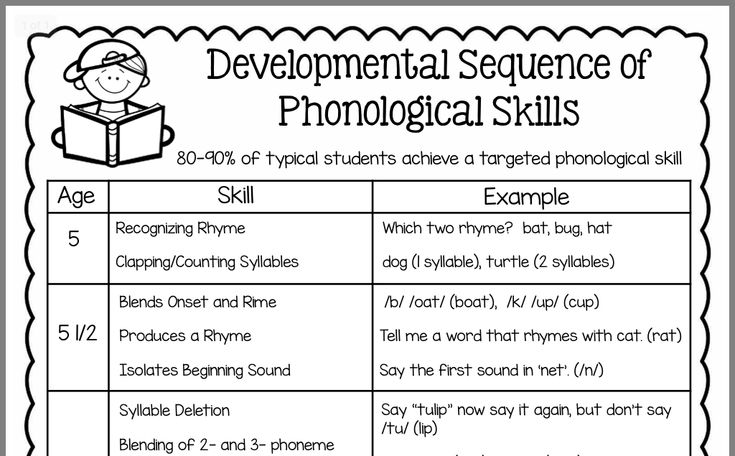 For other students, it will be hard to keep them from blurting out rhyming words. To make the task easier, allow nonsense words as well as real words.
“I can say two words that rhyme. Watch me. ‘Watch’ ‘notch’. They rhyme. I can say a word that rhymes. It doesn’t have to be a real word. ‘Watch’ ‘zotch’. ‘Zotch isn’t a real word, but it rhymes with ‘watch’ because both words end with the same sounds.”
We then lead the group through two more examples. Then we dictate a word and asks individual students to provide words that rhyme. If the student struggles, we can provide a new onset sound and have the student blend to create a rhyme.
Repeat these steps with as many as 10 words.
Back to top
Single phoneme instruction
New consonant sounds
We should ensure they are articulating the consonant sounds correctly before starting instruction. Be sure to say a consonant sound without a trailing /uh/ sound at the end. For example, the first sound in ‘foot’ is /fffff/ not /fuh/. Adding the trailing /uh/sound interferes with blending sounds to sound out words. It is critical that we articulate sounds correctly, so they can learn the sounds correctly. See Ehri (2020): Connected Phonation is More Effective than Segmented Phonation for Teaching Beginning Readers to Decode Unfamiliar Words.
Here is a list of the 44 sounds (phonemes) of the English language. Below, watch a video showing how each of the sounds is pronounced.
Teaching sounds in isolation can start with children as young as age 4, but articulation may interfere with repeating some sounds. Consonant sounds can be introduced in this way:
Steps:
- We say: “You will learn a new consonant sound. The sound is: [sound]. Listen again: [sound].”
- Students repeat the sound 4 or 5 times as we walk through the room listening.
- Ensure all students are saying the sound correctly and not adding the /uh/ to the trailing end of the consonant.
- For correction, describe how the sound is formed (lips, teeth, tongue), use hand mirrors so students can see themselves making the sounds.
- We call on 6 to 10 individual students to say the sound.
- All students say the sound.
Back to top
New vowel sounds
Again, we should ensure they are articulating the vowel sounds correctly before starting instruction.
Vowel sounds can be introduced in this way:
Steps:
New sound
- We say: “You will learn a new vowel sound. The sound is: /ăăăă/. Listen again: /ăăăă/.”
- Students repeat the sound 4 or 5 times as we walk through the room listening. Ensure that all students are saying the sound correctly.
- For correction, describe how the sound is formed (lips, teeth, tongue), use hand mirrors so students can see themselves making the sounds.
- We call on 6 to 10 individual students to say the sound.
- All students say the sound.
Teach the label
- We say: “A label is what we call something. The label for the sound /ăăăă/ is short a.”
- All students repeat the label.
- We call on 6 to 10 individual students and asks 2 questions in a different order: “What’s the short a sound? What’s the label for the sound /ăăăă/?”
- All students say the sound.
- All students say the label.
Back to top
Match the new sound in the initial position
After learning the new (consonant or vowel) sound, teach students to hear the new sound in the initial position. Introduce the activity:
Now you will listen for [sound] at the start of words. You will tell me whether or not the word starts with the sound [sound]. Watch me. I’ll say a word. I’ll show a thumbs up if the word starts with the sound [sound]. I’ll show a thumbs down if the word doesn’t start with the sound [sound]. ”
”
[We say a word that starts with the target sound, pauses, then shows a thumbs up. We say another word that doesn’t start with the target sound, pauses, then shows a thumbs down.]
“Let’s do some together.”
[We lead the group through two examples, one with a word that starts with the target sound and one that does not start with the target sound.]
Steps:
- We tell students to listen for words that start with the sound [sound].
- We dictate a word.
- All students repeat the word.
- All students show a thumbs up or down to indicate whether the word starts with the target sound.
Repeat these steps with as many as 15 words in a lesson. Start with consonants, then move to short vowels, then long vowels. Do not use words with blends at the beginning.
Back to top
Match the new sound in the final position
Immediately after listening for a new sound in the initial position, students can listen for the same target sound in the final position. This cannot be done with short vowels, of course, as English words do not end in short vowel sounds. Introduce the activity:
“Now you will listen for [sound] at the end of words. You will tell me whether or not the word ends with the sound [sound]. Watch me. I’ll say a word. I’ll show a thumbs up if the word ends with the sound [sound]. I’ll show a thumbs down if the word doesn’t end with the sound [sound].”
[We say a word that ends with the target sound, pauses, then shows a thumbs up. We say another word that doesn’t end with the target sound, pauses, then shows a thumbs down.]
“Let’s do some together.”
[We lead the group through two examples, one with a word that end with the target sound and one that does not end with the target sound.]
Steps:
- We tell students to listen for words that end with the sound [sound].
- We dictate a word.
- All students repeat the word.
- All students show a thumbs up or down to indicate whether the word ends with the target sound.
Repeat these steps with as many as 15 words in a lesson
Start with consonants, resume the activity when teaching long vowels. Do not use words with blends at the beginning.
Back to top
Phonemic awareness activities
Even though segmenting sounds is harder than simply identifying the first or last sound, this is a reasonable next step if students have mastered onset-rime. This activity starts with segmenting, and later includes identifying individual sounds.
Segmenting sounds in a syllable
“Words can be broken into individual sounds. We call this segmenting sounds. A segment is a piece of something. We will break words into pieces or segments.”
[Distribute 3 manipulatives per student — in this example, bottle caps.]
When we are modeling, we may have to work right-to-left so it appears left-to-right for students. If we are working on the board, we can work left-to-right.
“First I will show you how to use the caps. I will count 1, 2, 3 and put a cap out for each number. Watch me. 1 [slide a cap forward], 2 [slide a cap working from students’ left-to-right], 3 [slide a cap working from students’ left-to-right]. You do it.”
[Push the caps into a pile to show the start of a new word.]
“Now I will segment sounds in a word, and I will use the caps to show each sound. Watch me. The word is ‘feet’, /f/ [slide a cap], /ee/ [slide a cap], /t/ [slide a cap], feet [sweep finger below the caps blending the sounds]. I’ll do another.”
We model one or two more words, then leads the group through two examples. Do not use words that contain the letter ‘x’ or ‘qu’ because those represent 2 phonemes each (x=ks; qu=kw). Use words with one, two, or three sounds. Do not use words with blends until all students have mastered segmenting three sound words. Do not use words with r-controlled or strong diphthongs (oy and ou) until students have learned those sounds in isolation.
Steps:
- We dictate a word.
- All students repeat the word.
- One student segments the sounds, sliding a cap for each sound and sweeping a finger below to blend the sounds back into the word.
- All students segment the sounds, sliding a cap for each sound and sweeping a finger below to blend the sounds back into the word.
- Another student points and says the first sound.
- [after that skill is mastered add:]
- Another student points and says the last sound.
- [after that skill is mastered add:]
- Another student points and says the vowel sound (i.e., /ă/).
- Another student points and says the vowel label (i.e., short a)
Repeat these steps with as many as 15 words in a lesson.
We can align this activity with vowel sounds being taught in isolation. We may have taught the short a sound and label earlier in the day. Then we select short a words to segment. In this manner, students master the vowel sounds and labels in the context of spoken words. It takes more effort in word selection. It yields powerful results by providing solid basis for spelling and reading.
Watch and learn
Dr. Louisa Moats helps a kindergarten teacher learn a technique for teaching phonemic segmentation using chips — to help students learn to identify the individual sounds within a word. Letters can be introduced later.
Back to top
Blending sounds
[Distribute three manipulatives per student — in this example, bottle caps.]
“We can blend sounds to say a word. Watch me. The sounds are /s/ [slide a cap], /ō/ [slide a cap], /p/ [slide a cap]. I will touch and say, then blend. /s/ [touch first cap], /ō/ [touch middle cap], /p/ [touch last cap], soap [sweeping a finger below the caps]. Do it with me.”
When we are modeling, we may have to work right-to-left so it appears left-to-right for students. If we are working on the board, we can work left-to-right.
[Push the caps into a pile to show the start of a new word.]
We lead the group through two examples. Remember, do not use words that contain the letter ‘x’ or ‘qu’ because those represent 2 phonemes each. Use words with one, two, or three sounds. Do not use words with blends until all students have mastered segmenting three sound words. Do not use words with r-controlled or strong diphthongs (oy and ou) until students have learned those sounds in isolation.
Steps:
- We dictate the sounds, using caps to show the sounds.
- All students repeat the the sounds, using caps to show the sounds.
- One student touches and says the sounds, then sweeps a finger below to blend the sounds into a word.
- All students touch and say the sounds, then sweep a finger below to blend the sounds into a word.
- Another student points and says the first sound.
- [after that skill is mastered add:]
- Another student points and says the last sound.
- [after that skill is mastered add:]
- Another student points and says the vowel sound (i.e., /ō/).
- Another student points and says the vowel label (i.e., long o)
Repeat these steps with as many as 15 words in a lesson. As with segmenting, words can be selected that reinforce sounds being taught in isolation.
Back to top
Manipulating sounds (adding, substituting, deleting)
This phonemic awareness activity is the most difficult of all the phonological awareness activities. It is the pinnacle skill. Keep in mind that poor phonological awareness is the most common area of weakness for struggling readers. Students who master this skill are on a solid footing for reading success.
Adding sounds
It generally makes sense to teach the manipulation of sounds in this sequence: add, substitute, delete, for pragmatic reasons. One needs sounds to delete, so adding and substituting must occur before deleting. Manipulating sounds is similar to manipulating syllables.
Remember, do not use words that contain the letter ‘x’ or ‘qu’ because those represent 2 phonemes each. Use words with one, two, or three sounds. Do not use words with blends until all students have mastered segmenting three sound words. Do not use words with
r-controlled or strong diphthongs (oy and ou) until students have learned those sounds in isolation.
“I can add sounds to make new word. Watch me. I say the first sound and slide a cap: /ī/ [slide a cap]. I add the last sound: /s/ [slide a cap so it appears left-to-right for students]. I touch and say the syllables: /ī/, /s/, ‘ice’ [sweep finger below the caps left-to-right]. The first sound is /ī/ [touch first cap]. The vowel sound is /ī/ [touch first cap]. The vowel label is long i [touch first cap]. The last sound is /s/ [touch last cap]. Do it with me.” We then lead the group through two examples.
Note: We can add sounds in this manner: /m/ /ĭ/, /m/ /ĭ/ /s/, or /ĭ/ /s/, /m/ /i/ /s/. The only change in procedure is to announce whether adding a sound at the start or end of the word.
[Push the caps into a pile to show the start of a new word.]
Steps:
- We say a sound and slides a cap.
- All students repeat the sound and slide a cap.
- We say whether adding a starting or ending sound, then dictates the sound and slides a cap.
- All students repeat.
- All students touch and say, and then blend the sounds into a word.
- All students touch and say, then blend the syllables to say the word.
- One student touches and says the first sound.
- Another student touches and says the last sound.
- Another student touches and says the vowel sound.
- Another student touches and says the vowel label.
Repeat these steps with as many as 15 words
Substituting sounds
“I can change one sound in a word to form a new word. Watch me. I will change ‘make’ to ‘bake’. Which sound is different in ‘make’ and ‘bake’? I will use the caps to find the sound that changes.”
[We use the caps to touch and say, then blend ‘make’. Below the caps, we touch and say, then blends ‘bake’.]
“The first sound in make is /m/. The first sound in bake is /b/. I remove the first cap, and slide a new cap.”
[We remove the first cap, saying /m/. We slide in a new cap, saying /b/.]
“Not I’ll touch and say the new word. /b/ [touch first cap], /ā/ [touch middle cap], /k/ [touch last cap], ‘bake’ [sweep finger below caps].”
We model one more example, then leads the group through two examples.
Steps:
Starting word
- We dictate a starting word.
- All students repeat the word.
- All students slide caps to show each sound, then sweep a finger below to blend the sounds into a word.
Substituting a sound
- We say: “Change [old word] to [new word].
 Repeat.”
 - All students repeat “Change [old word] to [new word].”
- All students touch and say, then blend old word.
- All students touch and say, then blend new word [pointing below caps].
- We instruct students to point at the sound that changes.
- One student removes the cap, saying the sound going out.
- Another student puts a new cap in, saying the sound going in.
- All students touch and say, then blend the new word.
Repeat these steps with 4 to 6 words in a lesson.
Substitute just the first sound for several lessons. Substitute the first and last sounds for several lessons. Finally teach substituting the middle sound. Practice substituting sounds for several lessons. Then reintroduce adding sounds. Practice adding and substituting sounds for several lessons before introducing deleting sounds.
Deleting sounds
“I can delete one sound in a word to form a new word. Watch me. I will change ‘bike’ to ‘by’. Which sound is removed in ‘bike’ to ‘by’? I will use the caps to find the sound that is removed.”
[We use the caps to touch and say, then blend ‘bike’. Below the caps, we touch and say, then blends ‘by’.]
“The last sound in ‘bike’ is /k/. The last sound in ‘by’ is /ī/. I will remove the last cap.”
[We remove the last cap, saying /k/.]
“Now I’ll touch and say the new word. /b/ [touch first cap], /ī/ [touch last cap], ‘by’ [sweep finger below caps].”
We model an example of deleting the first sound and the last sound. We lead the group through two examples, once deleting the first sound and once deleting the last sound.
Steps:
Starting word
- We dictate a starting word.
- All students repeat the word.
- All students slide caps to show each sound, then sweep a finger below to blend the sounds into a word.
Deleting a sound
- We say: “Change [old word] to [new word].
 Repeat.”
 - All students repeat “Change [old word] to [new word].”
- All students touch and say, then blend old word.
- All students touch and say, then blend new word [pointing below caps].
- We instruct students to point at the sound that will be removed.
- One student removes the cap, saying the sound going out.
- All students touch and say, then blend the new word.
Repeat these steps with 6 to 8 words in a lesson. Delete sounds for several lessons. Then reintroduce adding and substituting sounds.
These additions, substitutions and deletions will form sound chains — not spelling chains. For example: ick to sick, to lick, to like, to lime, to dime, to die, to I.
Once you’ve introduced the skills of adding, substituting, and deleting sounds, you can continue to have the students practice these skills.
Back to top
References
Ehri, L. C. (2004). Teaching phonemic awareness and phonics: An explanation of the National Reading Panel meta-analyses. In P. McCardle & V. Chhabra (Eds.), The voice of evidence in reading research (pp. 153-186). Baltimore, MD: Brookes Publishing Co.
O’Connor, R. E. (2011). Phoneme awareness and the alphabetic principle. In R. E. O’Connor & P. F. Vadasy (Eds.), Handbook of reading interventions (pp. 9-26). New York: Guilford.
Top 5 Phonological Patterns in Children treated by SLPs
Language can be divided into several different areas such as semantics, syntax, pragmatics and phonology. Today’s post will focus on phonology which is the language system regarding the rules of sound combinations in a language. More specifically, I will discuss phonological patterns/processes that are used by children to simplify adult speech. As they develop their speech and language skills, children will use certain phonological patterns to try and produce what they hear, then they will eliminate the use of these patterns once they have mastered the rules and can produce speech that sounds like that of adults.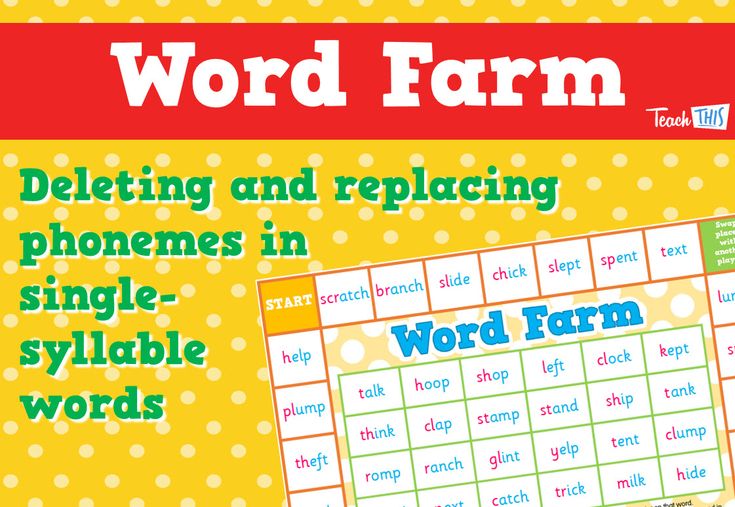
Children using phonological patterns will sound like they are not using adequate speech and some people may think that they make articulation errors. However, articulation is an issue with the speech mechanism whereas using phonological patterns past the appropriate age of elimination is a language issue and not anatomical. Usually, if the child has a phonological process disorder that means that they are using a process/pattern for a group of sounds which is no longer age-appropriate. For example, the phonological pattern called final consonant deletion means that the child does not produce the ending sounds in words such as “ca” for “cat” and “mo” for “mom.”
Treatment of phonological process disorders can be divided into three components: identification/increasing awareness for different sound patterns, discrimination between incorrect and correct sound/syllable patterns in words, and target speech productions of correct sound/syllable pattern.
Auditory Discrimination
A big component in phonological pattern treatment is increasing the child’s awareness of where/how sounds are produced and the ability to discriminate between sounds. For instance, a child who using the pattern of fronting saying “tat” for “cat” and “dame” for “game” may not auditorily hear a difference between phonemes /t, d/ and /k, g/. This is not an issue with their physical hearing but more their perception of sounds. Although, we always recommend a hearing evaluation to eliminate the possibility of a hearing loss for this reason.
Therefore, in the majority of cases, phonology treatment starts with what we call auditory bombardment and minimal pair discrimination. Auditory bombardment is when we stimulate the auditory processing system by listening to words with the target sounds in specific positions. For instance, I would have a child sit doing a mundane task such as a puzzle or coloring while listening to me say words with a lot of /k, g/ sounds to stimulate their auditory processing system for these sounds.
Before using minimal pair discrimination, I like to have the child discriminate between sounds in isolation to increase their awareness. I like to increase awareness by having the child name the different patterns or sounds and adding a visual to it.
Initial Treatment Sessions of Phonological Patterns
These are examples of initial treatment session activities I use for children who are fronting phonemes /k, g/.
First, I discuss the differences between the two sets of sounds. Phonemes /t, d/ are produced with the tip of our tongue whereas phonemes /k, g/ are produced with the back of our tongue and sound like they are coming from way far back in our throat. We can name /t, d/ as the “tippy” category and /k, g/ as the “throaty” category. Then I will have pictures that illustrate tippy and throaty. It is important to have the child collaborate to choose the visuals and names of the patterns to further increase the internalization of their understanding of the patterns.
It is crucial at this stage that children do not practice producing sounds until they can discriminate accurately, because we don’t want them making speech errors and reinforcing the wrong production pattern.
Then, I work on identification and discrimination. I say the sound in isolation such as /t/ or /k/ and then ask the child to point to the picture to identify the sound as a tippy/throaty or they can verbally label it. Once they have done this, I move up to syllables and words depending how fast they catch on. It can take one to two sessions or more. Once you start working on productions, you can have the child try to produce the different sounds and you label them (e.g. tippy or throaty). This will also increase their awareness because if they are trying to say a /k, g/ but produce /t, d/ you will label it as a “tippy.” Be careful! This can lead to frustration when they are unable to produce the sound. Always wait until they can actually get some success with /k, g/ productions before attempting targeted speech productions.
Minimal Pairs
Minimal pairs are words that differentiate in meaning by a single sound. For instance, a minimal pair for the process of consonant deletion would be the words “cow” and “couch.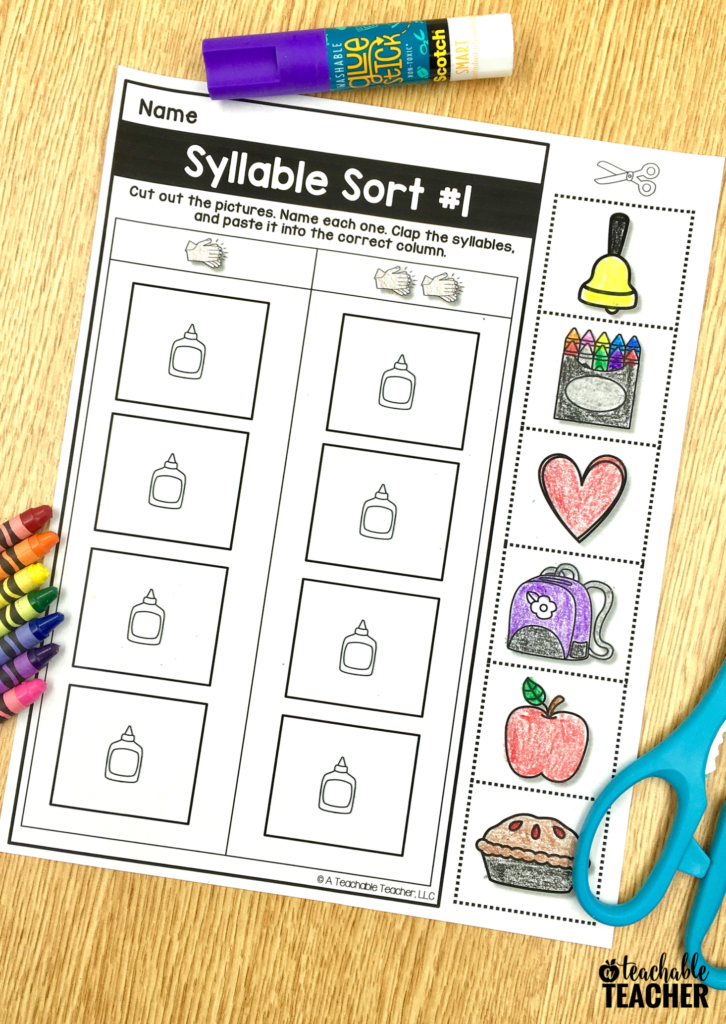 ” This technique helps the child increase their awareness to the final sound and how that sound changes the meaning of the word. Your child will learn that using different sounds or deleting sounds changes the meaning of the word and increase their understanding of the sound rules of their language.
Target Productions
Once your child can fully discriminate and understand the differences between sounds, they can move to practicing productions. This part resembles that of articulation therapy, your child will practice target words, phrases, and sentences to eliminate their use of a phonological pattern. Depending on the phonological pattern, therapy targets and structure will differ.
For example, I had a child who would use the process of stopping. Meaning they would not use fricative sounds such as /f, v, s, z/ instead they would produce oral-plosive stops such as /p, b, t, d/. Once he was able to discriminate between the sounds and label them as a “windy” or “not-windy” sound (chosen by myself and the child along with the visual), I began targeted productions.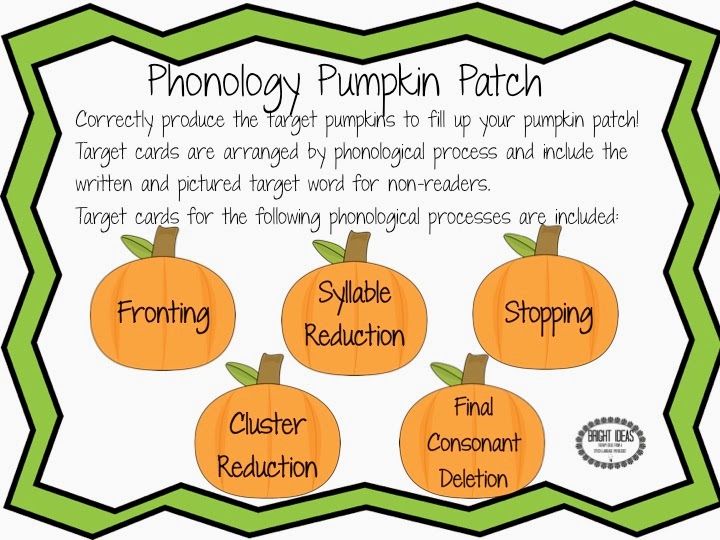 There are many factors that go into the decision of which sounds to practice first or if you should practice all of them at once. For this particular case, I decided to practice speech for sounds /f, v/ first because the child was preschool age, sounds /f, v/ emerge developmentally earlier than /s, z/, and he was stimulable for those sounds (i.e. he could actually produce an /f, v/ given a model).
Using few or several phonological patterns past a certain age will contribute to a child’s intelligibility. Intelligibility is how well a child is understood by others. If a child uses a lot of phonological patterns, chances are that their intelligibility will be lower because peers and adults will have difficulty understanding their speech.
Intelligibility is usually measured as a percentage, which refers to the amount that a listener understands the speaker. For instance, if a child spoke 100 words and was judged to be 25% intelligible, then that means the listener only understood 25 spoken words produced by the child within the entire 100 word conversation.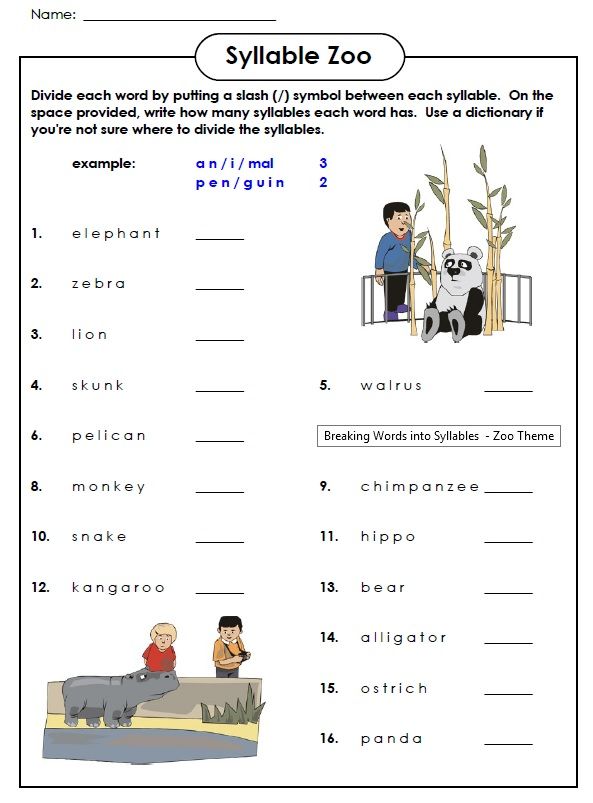
For reference, here is a table guideline for conversational intelligibility according to age to an unfamiliar listener (i.e. someone who does not interact consistently with the child).
Age
- 1 year old
- 2 years old
- 3 years old
- 4 years old
% Intelligible
- 25%
- 50%
- 75%
- 100%
The following are the 5 most common phonological patterns used by children that receive speech and language services. I will provide some information about each pattern, the age by which it should be eliminated in English and Spanish, and ways to help eliminate use of the pattern past the appropriate age.
#1 Final Consonant Deletion
Final consonant deletion is a phonological pattern where children will omit the final consonant in a word. Typically this is seen in words referred to as CVC words by SLPs. CVC words are words such as cat, dog, mom, and dad. Phonology is different from the alphabet, therefore even though a word may have 4/5 letters it can still be considered CVC because it has 3 sounds. For example, “cake, couch, white” are considered CVC words because when we say them we are producing 3 sounds. The child who deletes the final consonant or “sound” will say things such as “cou” for “couch”, “ca” for “cake”, “da” for “dad”, and “whi” for “white.” Similarly in Spanish, they would say “sa” for “sal.”
All children use the phonological pattern of final consonant deletion when acquiring their speech and language skills. Both children speaking Spanish and English stop using the pattern of final consonant deletion by 3 years old. There are differences between English and Spanish in terms of what types of sounds can be produced at the end of a word. For instance, in Spanish only /n, d, s, r, l/ can be found in final position of a word whereas in English all sounds can be produced in final position with the exception of /h/.
Example (Final Consonant Deletion)
If your child is 4 years old and is still using the phonological pattern of final consonant deletion then that is no longer appropriate. You can consult an SLP to help eliminate the use of this process and you can also practice activities at home with your child. As previously mentioned, you can use pictures and words that differ only by one sound. You’d use words that have different meanings if you do not say the last sound such as “bow” and “boat.” You can play matching games with picture cards and have your child find what you say (e.g. find the “bow” or find the “boat”), if they point to the bow but you said “boat” then help them. You could say “No, that’s a bow! Bow. Find the boat. Boat” and emphasize the last sound. Remember do not have your child produce the words unless they can make the sounds you ask of them. A 4-year-old could say final sounds like /b, p, m, n, k, g, t, d/ very easily if they can use those sounds in other positions as well, but there are other sounds that they may not yet have because they develop later and that is okay!
#2 Consonant Cluster Reduction
Consonant cluster reduction is a phonological pattern where children will delete one of two consonants within a cluster in a word. Typically this pattern is seen at the beginning of words such as “spoon, train, plane” but can also occur in the middle or at the end of the word (e.g. hopscotch, boats). The child who reduces consonant clusters will say things such as “poon” for “spoon”, “pane” for “plane”, “hopcotch” for “hopscotch”, “boat” for “boats.” Similarly, in Spanish a child would say “puma” for “pluma.”
Generally, the child will produce the earlier developing sound within the consonant cluster and delete sounds /s, z, l, r/ but each child might vary in their production patterns. The majority of consonant clusters in English are composed primarily of letters /s, r, l/. Given these are sounds that emerge later it may be difficult to differentiate whether your child has a phonological process disorder or an articulation disorder. The SLP would then assess whether your child can produce sounds in other positions and simply omit them when in combination with another sound.
All children use the phonological pattern of consonant cluster reduction when acquiring their speech and language skills. Children speaking Spanish eliminate the use of this pattern later than children speaking English. English speaking children stop using the pattern of consonant cluster reduction by 4 years old whereas Spanish speakers stop by 5 years old. This information is helpful when assessing bilingual children and verifying the use of phonological patterns in each language.
Example (Consonant Cluster Reduction)
If your English speaking child is 5/6 years old and is still using the phonological pattern of consonant cluster reduction then that is no longer appropriate. You can consult an SLP to help eliminate the use of this process and you can also practice activities at home with your child. After having completed the usual auditory discrimination and identification tasks. You can practice producing consonant clusters in words. One way to do so, is by first segmenting (separating) the sounds to emphasize the different sounds and then blending the sounds (saying them together). It is crucial to always say the blended word after having segmented the sounds or else you are giving a very robotic unnatural model.
For example, for the word “spoon”, I would have the child say “s” first and maybe even prolong it a few seconds “ssss” and then say “poon” so it would sound like “sssss-poon”, then I would produce it normally “spoon.” The child can then copy and practice. Make sure every sound is produced. Use a picture for the word and write it out, have your child point to each sound as they say it to help increase their awareness and then say all the sounds together into the blended word (e.g. “t-r-a-p” then “trap”). Be careful when using words with multiple letters that represent a single sound as it could be confusing for your child (e.g. “plane” has the final “e” so segmenting each sound would be odd, instead you could use the word “plan”). Easier and simpler written words are best for this activity.
#3 Fronting
Fronting is a phonological pattern where children will replace a sound made in the back of the mouth (velar position) /k, g/ with a sound made in the front of the mouth (alveloar position) /t, d/. The pattern is typically used in all position of words – initial (e.g. game/key), medial (e.g. kangaroo/baking), and final (leg/book). The child who uses the pattern of fronting will say things such as “tea” for “key”, “bating” for “baking”, and “led” for “leg.” Similarly, in Spanish a child would say “tasa” for “casa.” Children who “front” use the incorrect tongue position – tongue tip up vs. back of the tongue up ( i.e. tip down).
All children use the phonological pattern of fronting when acquiring their speech and language skills. Children speaking Spanish eliminate the use of this pattern earlier than children speaking English. English speaking children stop using the pattern of fronting by 3 1/2 to 4 years old whereas Spanish speakers stop by 3 years old. This information is helpful when assessing bilingual children and verifying the use of phonological patterns in each language.
Example (Fronting)
If your child is 5 years old and is still using the phonological pattern of fronting then that is no longer appropriate.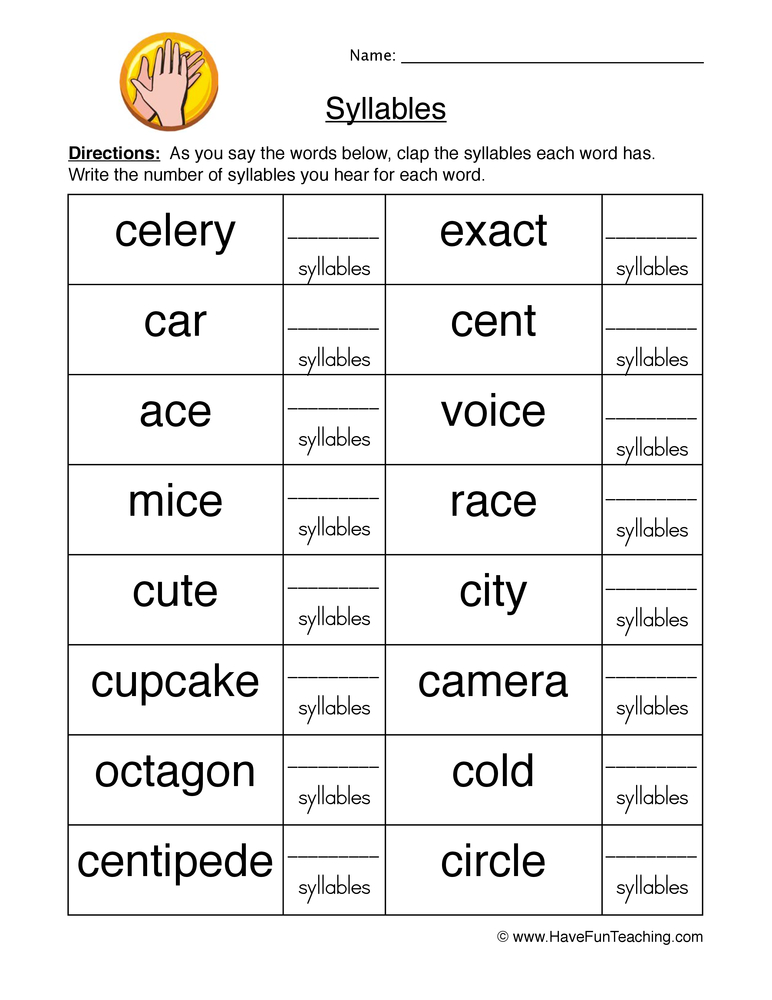 You can consult an SLP to help eliminate the use of this process and you can also practice activities at home with your child. Fronting can be tricky because of the awareness the child requires for tongue positioning. Some children catch on really fast and others need a lot of different feedback (auditory, visual, and tactile) to understand the correct pattern and tongue position. If your child has accurate discrimination between the sounds and is able to produce /k, g/ then a fun game to play is Go Fish with minimal pair cards. This activity is great to help generalize their skills at a higher level. For instance, when playing children have to ask “Do you have a _?” and say “go fish” to help them practice their /k, g/ sounds. If they say “Do you have a dame?” and meant “game” give them the dame and see if they realize their error. You can also say “I don’t have a dame but I do have a game” or if you don’t have the cards and are unsure of what he/she wants then ask “Did you want a dame or a game?” This activity will only be beneficial if children can correct themselves and use their target sounds correctly.
#4 Syllable Deletion
Syllable deletion (weak syllable deletion) is a phonological pattern where children will omit the weak or unstressed syllable in a multisyllabic word. In each language we place stress in different positions of words when producing multisyllabic words and stress changes the sound. For example, in the word “potato”, the first syllable is unstressed/weak so the written syllable “po” sounds like “puh” whereas the written syllable “to” sounds like “toe” and not “tuh” because of the stress. Therefore children that use this phonological pattern would say things like “tato” for “potato”, “nana” for “banana”, and “ephant” for “elephant.” Similarly, in Spanish, a child would say “sana” for “mansana.”
All children use the phonological pattern of weak syllable deletion when acquiring their speech and language skills. Children speaking Spanish eliminate the use of this pattern earlier than children speaking English. English speaking children stop using the pattern of weak syllable deletion by 4 years old whereas Spanish speakers stop by 3 years old. This information is helpful when assessing bilingual children and verifying the use of phonological patterns in each language.
Example (Weak Syllable Deletion)
If your English speaking child is 5 years old and is still using the phonological pattern of weak syllable deletion then that is no longer appropriate. You can consult an SLP to help eliminate the use of this process and you can also practice activities at home with your child. For children who delete syllables, I like to work on segmenting multisyllabic words first. By counting out the syllables in words, your child will also improve their phonological awareness skills.
For example, the word “banana” has three syllables. I would show a picture of a banana to the child and write out the word. Then we would say the word by segmenting the syllables while clapping the syllables out “ba-na-na.” I’d then say that banana has three syllables/parts and repeat the blended word “banana.” Then I’d show the child the picture again and ask “What is this?”, if they say “nana”, I’d say “Oops, I didn’t hear the whole word, there is a part missing, let’s try it again”, then I’d clap it out again and say the blended word “banana. ” After I’d ask “What is it?” again to see if the child could tell me “banana.” Remember! It is crucial to always say the blended word after having segmented the sounds/parts or else you are giving a very robotic unnatural model. You can do this activity for all multisyllabic words (e.g. tomato, computer, television, dinosaur), providing a visual and the written word as well as the tactile feedback from clapping/tapping out the parts of the word will be facilitate your child’s elimination of the pattern.
#5 Gliding
Gliding is a phonological pattern where children will replace sounds known as liquids /r, l/ with sounds known as glides /w, j/. The speech sound /j/ sounds like “y.” The pattern is typically used in all position of words – initial (e.g. red/lake), medial (e.g. boring/yellow), and final (bear/ball). The child who uses the pattern of gliding will say things such as “wed” for “red”, “yeyow” for “yellow”, and “baw” for “ball.” Similarly, in Spanish a child would say “yosa” for “rosa. ”
”
All children use the phonological pattern of gliding when acquiring their speech and language skills. Both children speaking Spanish and English stop using the pattern of gliding by 5 years old. However, in English, children acquire sound /r/ developmentally up until age 6-7 years old. Therefore, it is possible that they continue to produce /w/ for /r/ or omit /r/ entirely. Although, this becomes more of an articulation issue once the phonological pattern is eliminated.
Example (Gliding)
If your child is 6 years old and is still using the phonological pattern of gliding then that is no longer appropriate. You can consult an SLP to help eliminate the use of this process and you can also practice activities at home with your child. As previously mentioned, you can use pictures and words that differ only by one sound (i.e. minimal pairs). You’d use words that have different meanings if you do not say the liquid sound /l, r/ such as “wizard” and “lizard.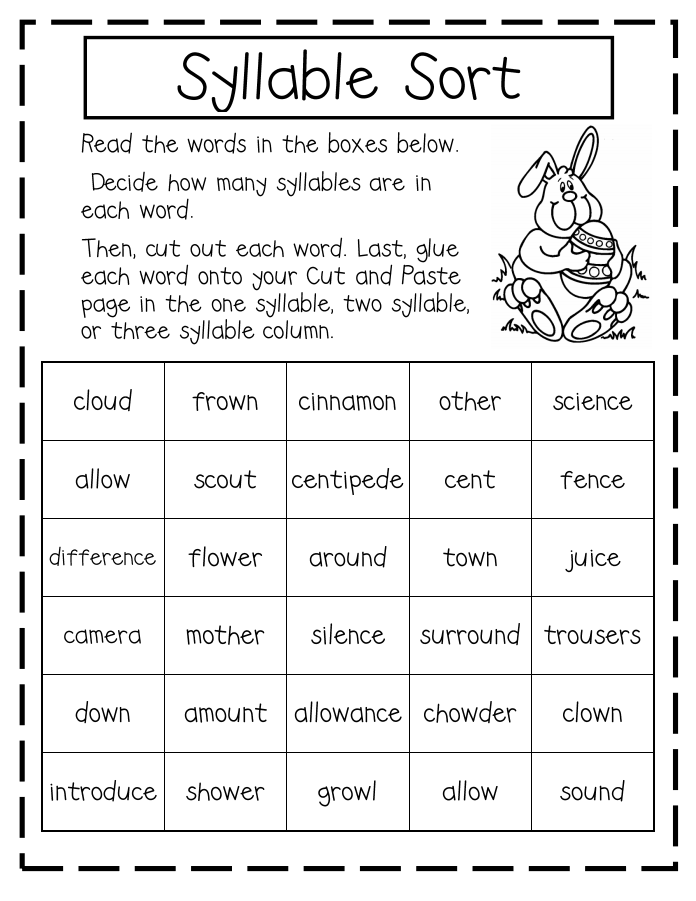 ” Once the child can fully discriminate between the sounds you can use a higher level task such as following directions using minimal pairs. For instance, using the pictures, you could have them do different actions or hide the cards by saying “Put the lizard on top of the sink and the wizard under the couch” and correct them if they picked the wrong cards. Just make sure beforehand that your child understands the direction and is able to follow it.
Treatment of phonological patterns can be time-consuming and must undergo several stages from discrimination to production. Therefore, it is always best to follow the recommendations set by your Speech-Language Pathologist. I hope you enjoyed this post and learned a bit more about phonology and phonological patterns! If you have any questions or want to share information please feel free to drop a comment below!
Reducing the time between reactions when teaching to read open syllables in a child with ASD (comparison of methods for forming a reaction and echo-priming)
January 11, 2021 Articles
Author of the work: Shishmintseva Yulia Vladimirovna — behavioral specialist, speech therapist, GBOU School No. 1367, Moscow
Introduction
Problem: speech dyspraxia is a disorder that affects the child's ability to accurately and consistently reproduce sounds and syllables, and also affects the ability to clearly and distinctly pronounce words and sentences in the correct rhythm in the future speech. It is believed that this condition is based on a deficiency in motor programming or planning. This means that children know what they would like to say, but they lack the ability to program or plan for the precise and rapid articulatory movements necessary for clear speech (Angela T Morgan et al., 2018). This affects the speed of switching from one speech unit to another, the reading speed is unstable, which can further affect the understanding of what is read when moving on to reading words, phrases and simple sentences, etc. The problem can be exacerbated by impaired speech perception - speech auditory agnosia, in particular.
The speaker learns to construct an utterance based on the acoustic image of a minimal speech segment. A syllable is the minimum segment that functions in the flow of speech and is singled out by native speakers when perceiving the speech flow. Simply put, without a training experiment, a person is able to single out exactly the syllable in the word, and not the sound, since the syllable has such a characteristic as fusion. That is why we worked specifically with the consonant-vowel syllable. Bock et al. ., 2007).
Relevance of the study: at the moment there is no data on the use of methods of applied behavior analysis in working with speech dyspraxia in children with ASD.
The purpose of the study: a comparative assessment of the effectiveness of the methods of reaction formation and echo-priming in the work on reading open syllables (consonant-vowel) in a child with ASD.
Participant and environment
Participant: girl C., 12 years old, diagnosed with ASD.
The child has a logopedic conclusion about the presence of speech dyspraxia, violation of articulatory praxis by kinetic type. Important! Since it is this type of praxis that allows you to perform a series of movements, start a motor program, switch, hold and complete, its violation leads to a slowdown in the speed of switching from syllable to syllable. There is also a violation of auditory gnosis, that is, a combination of dyspraxia and speech auditory agnosia.
Wednesday: resource class in a general education school, classes were held 5 times a week, for 30 minutes.
Dependent variable
Target behavior: the child reads a chain of 5 syllables, where the time between reactions (hereinafter BMR) when switching from syllable to syllable "consonant-vowel" will be 2 seconds.
Target criterion: the time between reactions when switching from syllable to syllable in a chain of 5 syllables will be 2 seconds.
Data collection: calculation of the time between reactions when reading a chain of 5 syllables "consonant-vowel" independently.
Measurement method: time between reactions. The time in seconds is recorded in the checklist.
Research methods: 1) reaction formation, 2) echo-priming.
Intervention
The study used an alternating two-phase design. The intervention took place in 2 stages.
Stage 1 - preparatory. Data was collected on motivational incentives (selection of exclusive reward), background data was collected for the study. The child was presented with chains of syllables of the open consonant-vowel type for independent reading, while the presented consonants and vowels were previously studied separately, and the fluency criterion was achieved for them. Chains were allowed, including one consonant - different vowels, for example: “ma-mo-mi-mu-me”, and a combination of different consonants and different vowels, for example: “sa-mo-woo-be-pi”. The vowels in the syllable of the presented chains alternated according to the principle: non-labialized (a, y, u, e) - labialized (o, e). This is an important point, since a change in lifestyle requires effort to switch the child's articulatory apparatus.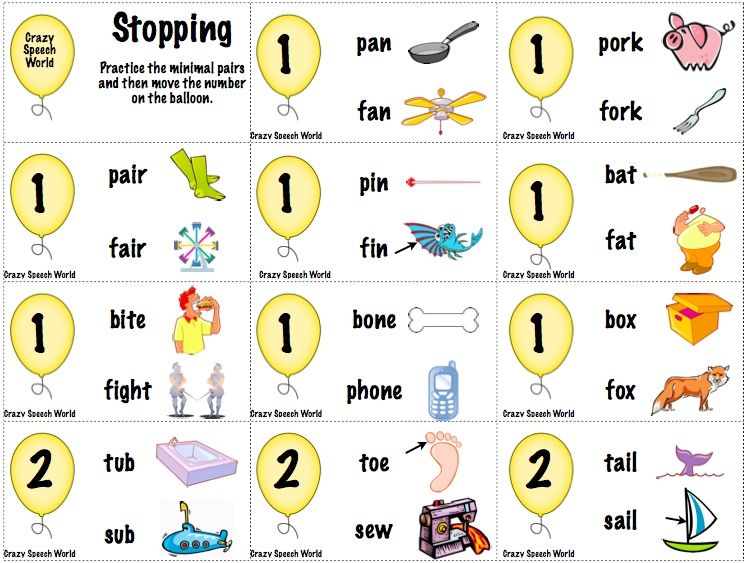 And in our case, speech dyspraxia creates additional difficulties for the child and affects the speed of switching from syllable to syllable.
Mean time between reactions in the background stage is 4.9 seconds.
Stage 2 - alternating phase, where each training day in the format of separate sessions were presented with three different conditions - 1) reaction formation, 2) echo-priming and 3) control (the same procedure as in the background data collection stage , each session lasting 7 minutes). To avoid the influence of one condition on another, all three conditions were presented in random order, before each condition the child was given a brief instruction about what will happen. The interval between sessions was at least 5 minutes.
Condition “reaction formation method”
The training procedure involves 2 stages, each of which includes 3 steps.
1 step: includes 3 steps.
- the instructor reads the syllables - the student shows.
- the instructor shows the syllables and gives a verbal hint, which is removed after 1 independent reaction - the student reads.
- the student is given instructions to read the syllables on his own, while independently tracking the sequence. If this step is completed, then go to step 2.
2nd step: includes 3 steps.
the student is given instructions to read the syllables on his own - the student reads.
the student is given instructions to read syllables quickly, the benchmark for reading speed is the speed at which the instructor provides pointing hints from syllable to syllable. The removal criterion is 3 independent reactions. Afterwards, move on to the next step.
the student is instructed to read the syllables quickly on his own. Data is being collected.
Echo priming condition
The learning procedure includes 2 steps:
- The student reads a chain of syllables with an echo prompt, the reduction criterion is a delay of 1 second, until an independent reaction.
 After completing 3 sessions of at least 6 samples, proceed to the next step.
 - The student reads the syllables independently, increasing the switching speed, approaching the target BMP - 2 seconds. Data is being collected.
"Control" condition
The procedure is the same as in the preparatory phase. The child was presented with chains of syllables of the open consonant-vowel type for independent reading.
Results
Graph 1. Comparative effectiveness of the reaction formation method, echo-priming, for reducing the time between reactions when learning to read a chain of open-type syllables.
Conclusions
The results of the study showed the effectiveness of both methods. But the reaction formation method showed greater efficiency. The time between reactions at the time of the last session reached a value of 0.97 seconds, which is below the target criterion. The average value for the total number of sessions conducted was 2. 4 seconds, which also satisfies the criterion. The echo priming method also gave a result in accordance with the target criterion and was 1.46 seconds at the time of the last session, and 2.6 seconds on average. The control condition data at the intervention stage proved the effectiveness of both methods of applied behavior analysis.
Thus, the use of response shaping and echo-priming can provide important advantages in the development of speech in children with ASD who, in particular, have conclusions about the presence of speech dyspraxia or a combination of speech dyspraxia and speech auditory agnosia.
Literature
- John O. Cooper, Timothy E. Heron, William L. Heward. Applied behavior analysis, M. : Practice, 2016, 864 p.
- Shvachkin, N. Kh. Development of phonemic perception of speech at an early age / N. Kh. Shvachkin. - M. : Enlightenment, 1948. -129 p.
- Amber L. Valentino, M. Alice Shillingsburg, Nathan A. Call. Сomparing the effects of echoic prompts and echoic prompts plus modeled prompts on intraverbal behavior // Journal of Applied Behavior Analysis, 2012, Vol.
 45, Issue 2, P. 431-435.
 - Bock JK, Dell GS, Chang F, Onishi KH. Persistent structural priming from language comprehension to language production, Cognition, 2007, pp. 437–458.
- Kittredge AK, Dell GS. Learning to speak by listening: Transfer of phonotactics from perception to production // Journal of Memory and Language, 2016 Aug, Vol. 89, P. 8-22.
- Morgan AT, Murray E, Liegeois FJ. Interventions for childhood apraxia of speech. Cochrane Database of Systematic Reviews 2018, Issue 5.
- Svein Eikeserth, Rannveig Nesset. Behavioral treatment of children with phonological disorder: the efficacy of vocal imitation and sufficient-response-exemplar training // Journal of Applied Behavior Analysis, 2003, Vol.36, Issue 3, P. 325-337.
Emphasis. Type of accent. Place of impact.
Lesson 4: Emphasis. Type of accent. Place of impact.
Stress is the selection of one syllable from a measure.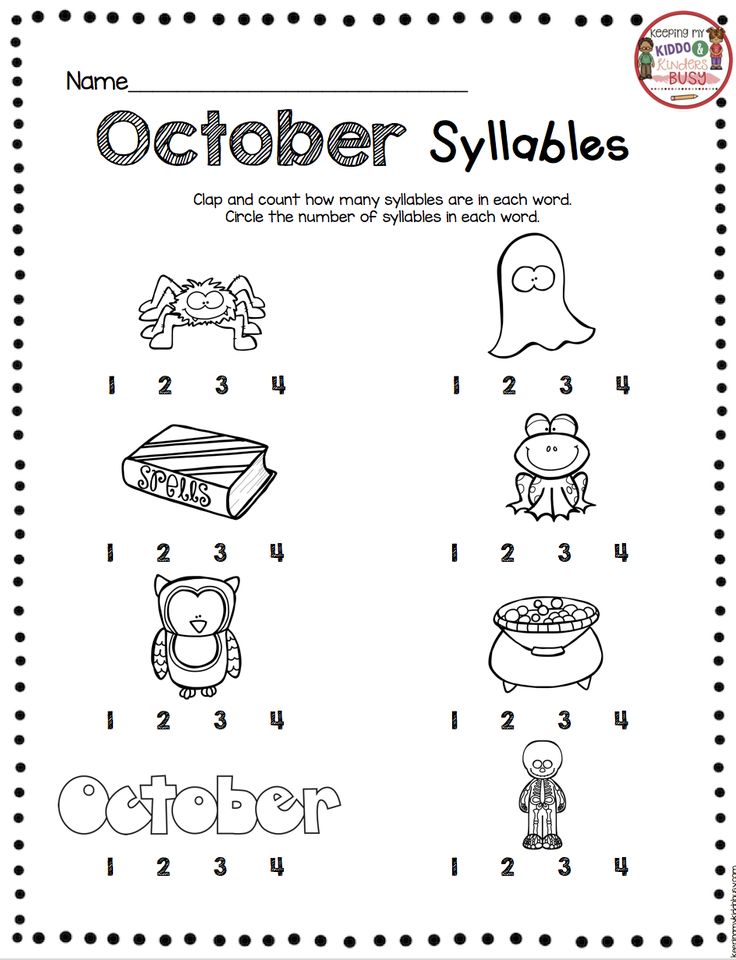 A syllable is distinguished by a relative difference in suprasegmental features between individual syllables tact.
Accent type
According to the method of isolating a syllable from a measure, the stress can be divided into:
-
dynamic (expiratory, power) - the syllable is emphasized by the force of exhalation
-
quantitative (quantitative) - the syllable is distinguished by longitude
-
melodic (musical, tonal) - the syllable is distinguished by the movement of the voice tone.
In fact, there are no pure types of stress, almost always one type is accompanied by another, although one of them prevails.
Dynamic accent available in Russian, English, Czech and other languages. In Russian, dynamic stress is associated with quantitative stress.
The melodic stress occurs, for example, in Serbo-Croatian, Lithuanian, Chinese, etc.
Dynamic stress is either strong (in Russian, English, etc.) or weak (in Czech, Georgian, etc.)
In languages with strong dynamic stress, almost all the force ejected from the lungs by a jet of air is used to pronounce stressed syllable. Unstressed syllables lack strength, they weaken and change.
Changing the sound of unstressed syllables (primarily their sonorous center) is called reduction .
According to the method of separating a syllable from a measure in Russian strong dynamic stress : vowels in unstressed syllables are reduced, which leads to a variety of vowel sounds (allophones), in which a limited the number of phonemes in the Russian language. The strength of Russian stress is accompanied by duration - the substressed syllable of the Russian word is not only the strongest, but also the longest.
In Czech weak dynamic stress : vowels in unstressed syllables hardly change.
For example: Zá -Mek VE -oolThe 0007 vowel sounds of the CHN perform a semantic-distinctive function and are not associated with the dynamics of stress. (i.e. it is a property segment elements) and does not depend on the stressed or unstressed position. Long vowels are twice as long as short ones.
Duration of the vowel sounds of the PR is not an independent property of segmental elements, it accompanies the force of dynamic stress and is its secondary characteristic. Unstressed vowels are 2-3 times longer than unstressed ones.
So, in the PR there is a strong dynamic stress with a significant quantitative component.
In CN a weak dynamic stress without a quantitative component.
For example:
ra-bó-tat
According to the place of the syllable allocated in the word, they differ:
-
fixed stress (it always happens on a certain syllable - in CN on the first, in French on the last)
-
free (non-local), which is not associated with a specific place in the word, it falls on any syllable, for example, in RL, in English. lang.
Free accent has two subtypes:
-
free permanent i.e. in different forms of a given word, the stress always falls on the same syllable (in English, in most words in RL)
-
free movable i.
 e. in different forms of this word, the stress falls on different syllables (for example, in some Russian words - mo-re - mo-r i , pi-shu - p and - shesh).
In RL, the stress is free, mobile and has the function of a semantic-distinctive, phonological means: lock - lock, pi-li - pi-whether. In SN, the stress is fixed and cannot acquire a phonological function.
But the mobility of Russian stress is limited, in most Russian words the stress is constant .
Each independent word in the Russian language has, as a rule, one stress . Functional and in a few cases also some independent words do not have stress on themselves and are adjacent to the neighboring word as proclitic or enclitic .
Enclitics of are some particles, for example: tell me, the teacher said . .., sometimes they can be independent words, for example: didn’t give, didn’t live, take by the hair, etc.
Proclitics of are usually monosyllabic prepositions, conjunctions, particles, etc., e.g. prepositions in combination with definite nouns sometimes shift the stress onto themselves (the next word becomes unstressed, enclitic). For example: on the head, by the hand, by the hand, without a trace ... (in CH this applies to almost all prepositions).
Two-syllable and three-syllable functional words are either unstressed or weakly impacted (with lateral accent), e.g. in an hour or in an hour.
Polysyllabic words formed by adding two or more stems have one more (or more) in addition to the main stress - secondary . The main stress always falls on the stressed syllable of the last stem of a polysyllabic word, side ones are closer to its beginning, e. g., Far Eastern, radio broadcast. Compound words, small in volume, do not have collateral stress: locomotive, gardener.
Exercise
Exercise 4.1
Read, Follow the change in the stress in related words
GOGROD - Gorod - Goroda - City - City - Zathorodnoy
Hold - Kh amnoye - Kholodnov - Cold - Cute 9000 Ghalos - Voice - Golos - Golosa - Golosa - Golosa - Golosa - Golosa - Golosa - Golosa - Golosa - Golosa - Golosa echo
Frost - frost - frost and lo - in s frost - frosty
Collar - gate - gate - collar - collar
Beard - beards - chin - wart
Work - earnings - earned - in s worked
Gold - gold and clear - gold - gold plated
Crow - crow - crow - crow - crow
Exercise 4.2
| Tear off - | apply - | shoot - | |||
| Blind and - | sketch - | break off | |||
| Cut - | underweight - |
Exercise 4.
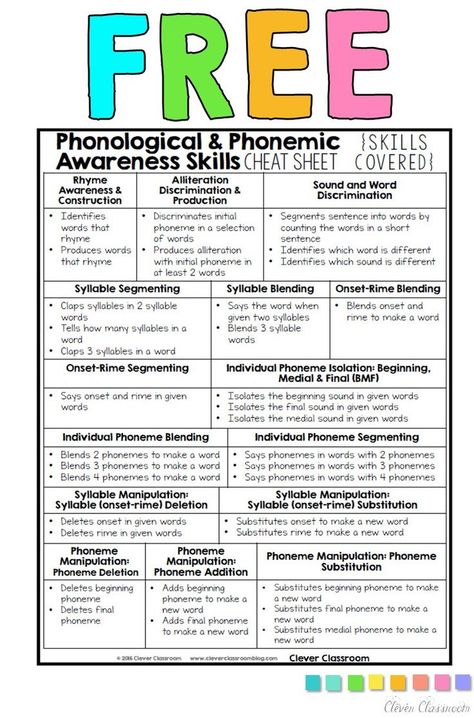 3
3 Form the words of this rhythmic pattern
tá -ta
ta - tá
ta - ta - tá
ta - tá - ta
tá - ta - ta
, steamboat, composer, album, ravine, apparatus, vegetables, room, motor vehicle, dog, road, rock, head, beard, wasp, window, stop, chrysalis, grandmother, father, sister, medicine, patronymic, shore, no place, under the window, in the forest, on the table, under the snow, near the house, near the city, above the door, across the field, across the river.
Exercise 4.5
Read, pay attention to stress and correct pronunciation
Century - centuries, body - body, business - deeds, forest - forests, color - colors took off, pull - chan and .
Literature
The lesson was prepared using the following literature:
Theoretical part
[1]Oliverius, Z. Phonetics of the Russian language.