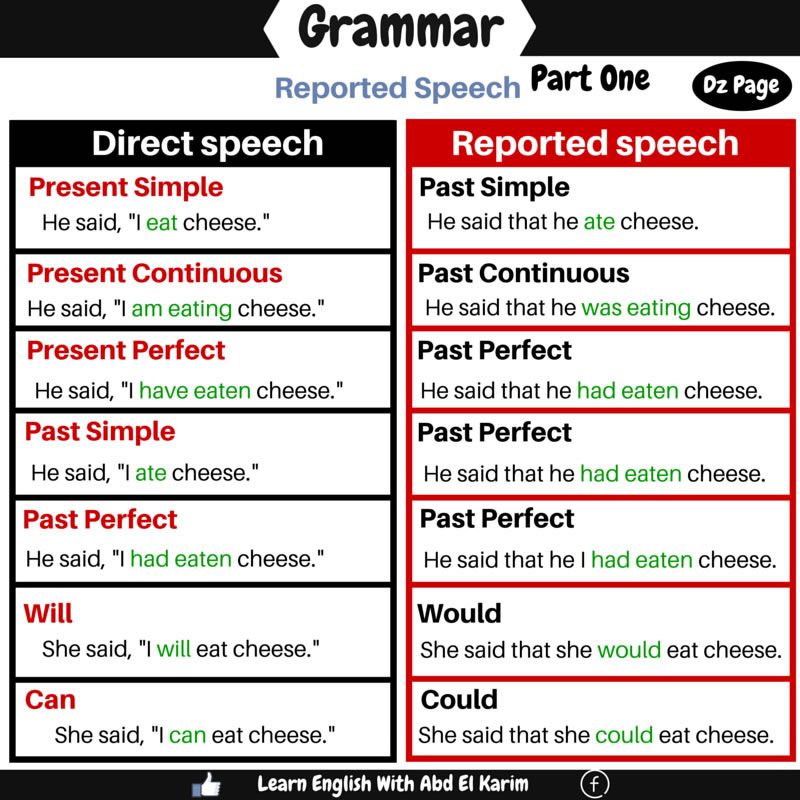
Three step directions
Teaching How To Follow 2- and 3-Step Sequential Directions
This is a guest blog post by Holly, a school-based SLP, all about teaching how to follow 2 and 3-step sequential directions!
Teaching Sequential Directions
Do you have students on your caseload that can follow one-step directions pretty well, but–as soon as the complexity increases–that accuracy goes out the window?
If that’s the case for you and your students, you’re not alone! There are plenty of factors that influence the ability to follow complex directions: hearing/vision, executive function skills, language comprehension, grammar, student level of interest, task complexity, and sequencing, just to name a few. These areas were reviewed in further depth in a previous post on following simple directions — a lot of that info applies here, too!
Complex instructions are relevant for students across the grade-span. Like many domains of communication, the milestones related to following directions are geared towards younger children:
– Between 1-2 years of age, kids generally follow familiar one-step directions with support (Linguisystem, 2014)
– Between 2-3 years, children can follow two-step commands (Linguisystem, 2014)
– Around 4-5 years old, kids typically understand sequential terms (e. g., first, next, last) and respond to three-step directions at home or school (ASHA)
We know, of course, that the importance and complexity of instructions don’t end at age 5. Whether you work at an elementary, middle, or high school, following instructions serves as a major foundation for learning. These skills are also incredibly valuable for students working on vocational skills and transition plans. (Imagine your first day at a new job! There are countless tutorials to follow and procedures that you’re expected to get the hang of!) So how can we support our students no matter what level they’re working at?
In a previous post on following simple directions, we outlined the process of assessing this skill, selecting meaningful targets, using visuals and strategies, plus designing structured and contextualized intervention.
Now we’re taking it a step further by teaching how to follow multi-step, sequential directions! We’ll review different types of complex directions, plus how to teach and strengthen this skill in therapy.
Types of Complex / Multi-Step Directions
Not all directions are equally complex — that’s why it’s important to figure out what strengths and challenges are impacting a student’s ability to follow along with instructions. Here are a couple examples:
Conditional Directions: If you ride the bus after school, line up here.
Spatial Concepts: Take a seat at the nearest table and face your chair towards the front of the room.
Temporal Concepts: Before you sit down, hang up your bag on the wall.
One Action, Multiple Objects: Grab a packet, glue stick, and a pair of scissors from the table.
Multiple Actions, One Object: With your pen, circle the word you don’t know, then underline any clues that will help you figure out what the word means.
Multiple Actions, Multiple Objects: Pick out a book, bring it to the checkout counter, and present your student ID card to the librarian.
The more concepts embedded into a set of instructions, the higher the demands placed on language and working memory will be.
For a deeper dive into assessing these skills, check out the prequel to this blog post and browse through the assessment materials available through the SLP Now membership! There’s a Smart Deck to quickly probe students’ accuracy in following 1, 2, and 3-step directions.
Teaching Multi-Step Directions in Therapy
How do you feel about using anchor charts, visuals, and compensatory strategies in therapy? From kindergarten through high school, I’ve found that these kinds of support make a huge difference for students.
VisualsWhen teaching a new skill, it can be helpful to use visual aids to represent a concept. This is because many of our students are already challenged by auditory or written comprehension (Law et al., 2017), so we can use this teaching phase as an opportunity to play to any strengths! This might involve using pictures, symbols, photos, or other visual supports when teaching a skill.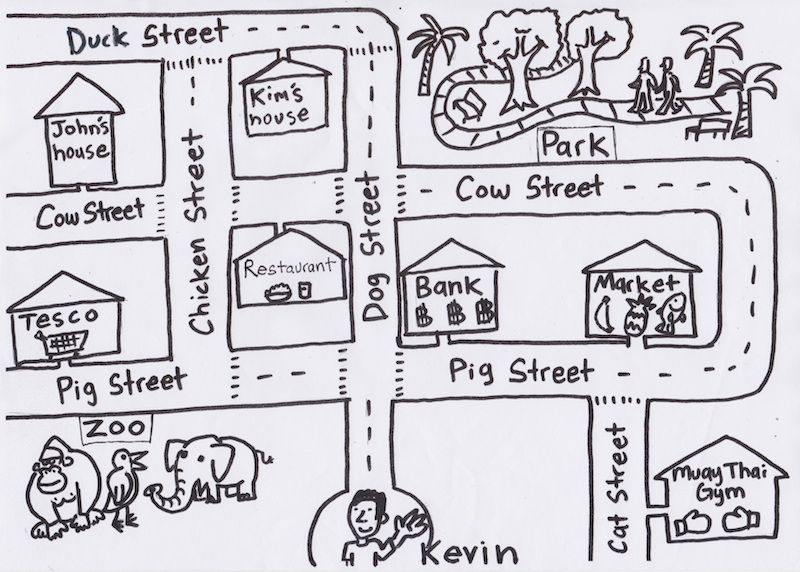 Here are some of my favorite visuals to use with complex instructions:
When helping students strengthen skills in an area, it takes time and practice. Strategies can be taught, practiced, and used the very same day — that kind of success can be really motivating for our students when they’re starting out! Over time, using rehearsal/visualization techniques has also been found to improve students’ abilities to follow directions (Gill et al., 2003).
These handouts (included in the SLP Now membership) are great for partnering with teachers and working on self-advocacy skills for students.
Targeting 2 & 3-Step Sequential Directions (In Therapy & Beyond!)
Once you’ve selected your targets and reviewed the skills and strategies you’ll be working on with your students, now comes the fun part… Practice!
GamesIntroduce a new game or tweak a familiar one, emphasizing the importance of listening to the instructions
RecipesCan you think of a multi-step activity that is more functional than following a recipe? Our speech-language rooms don’t often come equipped with extra space, so your recipe could be as simple as making trail mix.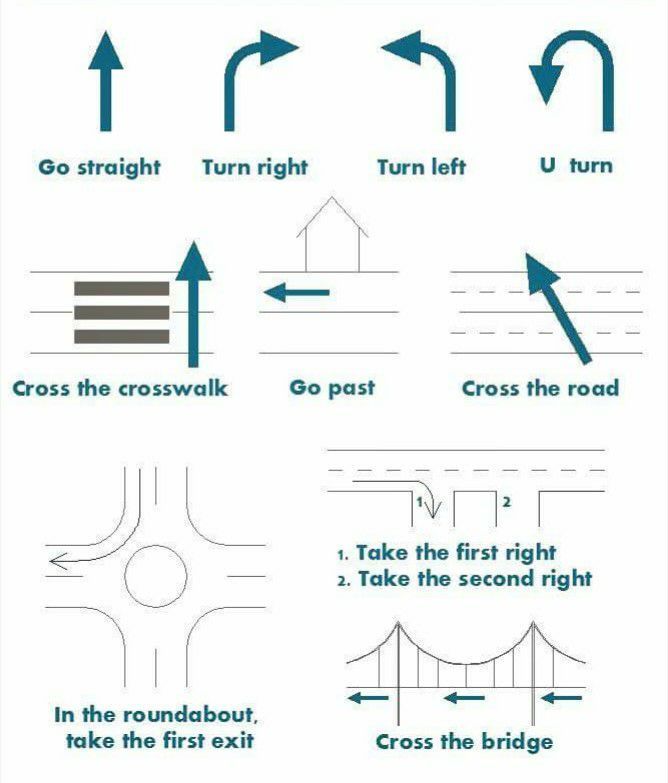 However, if your school has an area dedicated to cooking skills or a kitchen space that you can borrow, try incorporating it into your therapy activities!
Try filling out a planner, agenda, or calendar with students. The working memory demands are high here (e.g., note that your spring break is from April 4th-8th, and your book report is due the following Monday), so it emphasizes the importance of using external strategies, such as writing down details!
Vocational ActivitiesWhen working with older students and developing transition plans, identify what kind of job skills involve complex directions (e.g., bagging groceries involves sorting items based on weight/shape/temperature, organizing them into a bag, and placing the bags into the cart). This is a great opportunity to incorporate your students’ interests!
Other Curriculum-Based ActivitiesTo support carryover throughout a student’s school day, collaborate with other teachers to see what activities involve complex directions.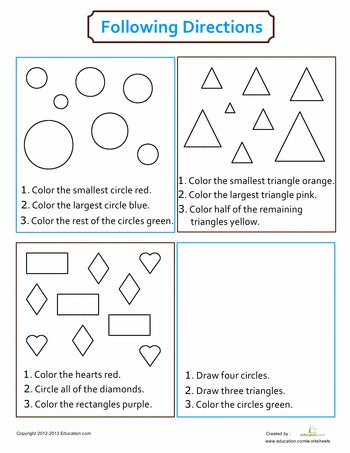 In a framework developed by Wallach (2014) and Kamhi (2014), we see that a contextualized approach to targeting these skills can be the most effective!
I hope this post has been helpful for you! Do you have any other questions or ideas for targeting multi-step directions? Feel free to comment below — thanks for stopping by!
References
American Speech-Language-Hearing Association. (n.d.) What should my child be able to do? Four to Five Years Old. Retrieved from https://www.asha.org/public/speech/development/45/.
Gill, C. B., Klecan-Aker, J., Roberts, T., & Fredenburg, K. A. (2003). Following directions: Rehearsal and visualization strategies for children with specific language impairment. Child Language Teaching and Therapy, 19(1), 85-103.
Kamhi, A. G. (2014). Improving clinical practices for children with language and learning disorders. Language, Speech, and Hearing Services in Schools, 45(2), 92-103.
Law, J., Dennis, J. A., Charlton, J. J. V. (2017). Speech and language therapy interventions for children with primary speech and/or language disorders. Cochrane Database Systematic Review.
Wallach, G. P. (2014). Improving clinical practice: A school-age and school-based perspective. Language, Speech & Hearing Services in Schools, 45, 127–136.
Unrelated 2 Step Directions - Speech Therapy Activities — Toddler Talk
Receptive Language Lessons
Written By Stephanie Keffer
Toddlers typically begin to follow directions with two unrelated steps just before their third birthday.
These directions include 2 different actions that are completely separate from one another. You can think of these directions as following this template: First do action 1 with item 1, Then go do action 2 with item 2.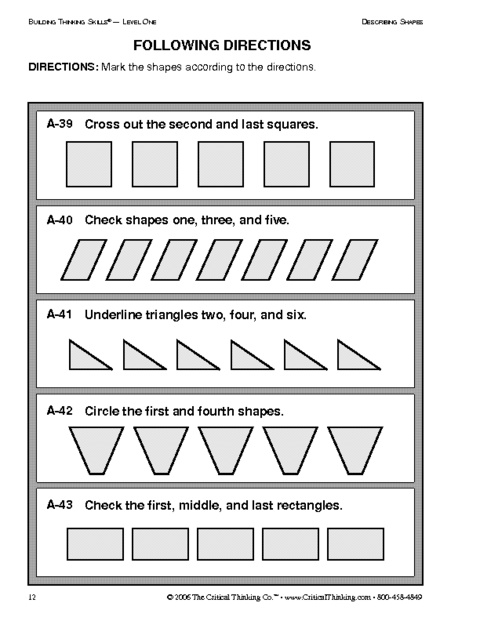 For example, “Push in your chair and go to the sink,” or “Take off your shoes and hang up your coat.”
These types of directions are more complex and therefore more challenging than two-step directions with a single item.
As you practice, keep in mind that your toddler’s success in following directions will vary based on how tired they are, their general mood, and their current level of attention. Day-to-day fluctuations are expected and completely normal.
Speech therapy tips for practicing with 2 step unrelated directions
Tip 1 - Create two-step unrelated directions
In this lesson, we’ll focus on following directions that:
Have two or more steps (two different actions with two different items)
Have not been practiced before and are not part of a daily routine
Are __NOT__ related to an activity your child is doing when you give the direction.

For example, if your child is coloring on the floor, you could tell them, *“Sit at the table and open the Play-Doh.”* If they’re playing with a babydoll, you could say, “Oh no, your shark looks hungry and sleepy! *Feed the shark* and *put him to sleep*.”
Tip 2 - Offer the minimum amount of help your child needs
As you practice following directions with your child, it’s best to practice at a level where your child can successfully complete a direction with minimal help. Follow this step-by-step breakdown to help wean your child off of needing your assistance to complete directions. If your child completes the direction at any point, you do not need to continue with the remaining attempts. Praise your child for completing the two-step direction correctly. (“Yay, you got the cow and gave him a cookie!”).
Here are the steps:
Say your child is playing with a toy turtle. Start by giving the direction, “Get the cow and give him a cookie.
 ” Don’t offer any visual clues about what you want them to do, like motioning with your eyes or hands.
 If your child is unable to complete the direction on their own, repeat the direction and offer one piece of help, such as pointing to what you want your child to do. Say, “Get the cow and give him a cookie,” point to their cow, and then point to the cookie.
For your third attempt, repeat the direction again, but break it into two parts. First, say “Get the cow.” Once they grab the cow, then say “Give the cow a cookie.”
Finally, you can complete the direction together. Repeat the direction, and then actually help your child through the actions. Say “Get the cow and give him a cookie” as you guide your child to get the cow and feed it a cookie.
You’ll know your child has mastered this skill once they can consistently follow your directions in at least four out of five tries.
Tip 3 - Expand your child’s vocabulary to help them follow directions
Following directions is a perfect opportunity to teach your child the meaning of new words. If you discover during practice that your child does not understand the meaning of a particular word, incorporate that word into your daily activities. For example, if you discover that your child doesn’t know what “scrub” means, talk about SCRUBBING your hands in the sink while you wash, and have them help you SCRUB pots and pans after dinner. As always, practice learning just a few words at a time to prevent you AND your child from feeling overwhelmed.
And I will be the first to admit that thinking of these directions on the fly when you’re playing isn’t easy! We created 3 different activities with items and toys most people have. For each activity we’ve listed out directions you can practice with for this lesson!
Download our PDF activities guide for practicing with 2 step directions - speech therapy at home practice ↓
Practicing with 2 step directions - speech therapy at home activity
Washing Hands Before Snack
Materials: Set-up:Gather the items you need for your snack so that your child sees that it is almost snack time.
In this activity, you will be helping your child understand 2-step directions where the parts are unrelated. The second part of the direction is “wash your hands” and the first part is something else in your home.
You will practice this skill before snack time, if your child likes snacks. If they don’t, pick another daily activity that your child looks forward to. You will tell them something simple to do, and then to go wash their hands. You will say, “it is almost time for snack! But first, put your shoes in your room and wash your hands.” Or “throw the wrapper in the trash and then wash your hands”, “put the cars in the box and then wash your hands.” The first part of your direction should be something your child already does, but maybe they don’t always do it routinely before washing.
If they follow the direction correctly, celebrate that your child did it correctly by repeating what they did (“Yay, you put your shoes away and washed your hands!”) If your child does not do it, repeat the direction again.
If they do not follow the direction the second time, break up the direction into two parts. Say, “put your shoes away” and wait for your child to put their shoes away. Then say, “go wash your hands.” Then celebrate by repeating what they did (“Yay, you put your shoes away and washed your hands!”)
What to say:Here are examples of 2 step directions you may use:
“Throw the wrapper away and go wash your hands.”
“Put the book away and go wash your hands.”
“Give me my phone and go wash your hands.”
“Put the banana on the table and go wash your hands.”
Download our PDF activities guide for practicing with 2 step directions - speech therapy at home practice ↓
© 2020-2022. Stephanie Keffer, MS CCC-SLP. All Rights Reserved.
The content offered on ToddlerTalk.com is for informational purposes only. Toddler Talk is not engaged in rendering professional advice, whether medical or otherwise, to individual users or their children or families. No content on this site, regardless of date, should ever be used as a substitute for direct medical advice from your doctor, speech language pathologist, or other health professional. By accessing the content on ToddlerTalk.com, you acknowledge and agree that you are accepting the responsibility for your child’s health and well-being. In return for providing you with information related to home speech and language practice, you waive any claims that you or your child may have as a result of utilizing the content on ToddlerTalk.com
Stephanie Keffer
3 steps to help you find your calling in life
February 2, 2021 Books Motivation
A simple method from the author of the book "Destiny" Alexander Ray.
Alexander Rey
Author of the book "Destiny", psychologist, screenwriter, illustrator. Developed an effective test training that helps people find their calling.
Every person has his calling, there are no exceptions.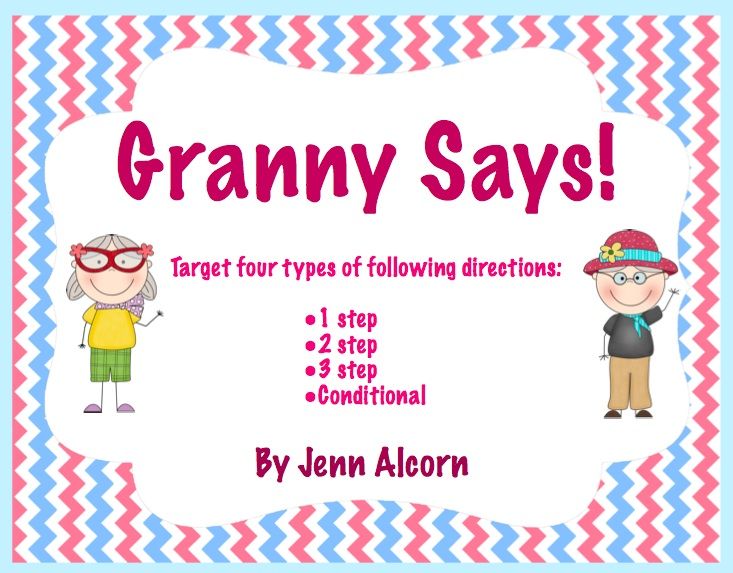 Everyone has the ability to do the job in which he can best show himself. The problem is that it is not so easy to understand what it is. After all, you won't know until you try. nine0003
Psychologist Alexander Rey offers a three-step methodology: awareness, direction and action. Let's briefly talk about it and the exercises that you can do right now.
Everything worthwhile has been brought to life through the three steps method. Without even knowing it, through trial and error, people themselves go through these three steps and improve their lives.
Step 1. Awareness
There will be no changes in your life until one fine day you wake up with the thought that it is time to change something. In order not to wait for this beautiful day, you can do smarter - ask yourself the right questions. nine0003
You need to start with three main questions:
- What is wrong in life and in you?
- What do you not like?
- What and how would you like to change?
And here is the first exercise. Write 3-5 points about each area in your life. If nothing immediately comes to mind, think about each item for as long as it takes.
What do you not like and what do you want to change?
- In a relationship with a partner: __________
- In family relationships: __________
- In relationships with children: __________
- In relationships with parents: __________
- In work: __________
- In your abundance: __________
- In your own character: __________
- In your body: __________
- Healthy: __________
This list is your starting point. Rey advises turning to him from time to time to track progress and remind yourself which areas of your life need change. nine0003
Step 2. Direction
Just realizing that there are things in your life that you don't like is not enough. You need to understand what to do with this fact next. At this point, it is important to find the right direction.
One possibility Rei talks about is finding purpose through action. When you don’t know what you want to do, try everything at random, someday you will be lucky. But it takes too much time and resources.
Another way is to connect your own experience. To do this, do a simple exercise. nine0003
1. What would you do if you were rich?
Imagine that you are obscenely rich. You can write down this amount - the amount of money you need to feel completely secure. You are so rich that you can do whatever you want.
Write down five things you would like to do. But it should be just a matter (and not idle activities like “lying on the ocean”) that requires your participation. Your goal is to come up with a job that will make you happier. nine0003
- __________
- __________
- __________
- __________
- __________
2. What would you do if you were poor?
And now let's go from the opposite. Imagine that you were fired and you had absolutely no means of subsistence left. Think of five things you can do to make a living. Keep in mind that this is your chance to start over with a clean slate, so pick things you love.
- __________
- __________
- __________
- __________
- __________
3. What activities make you happier?
And the last task. Write down five favorite things that you are ready to do for hours on end. List your hobbies and interests, inactivity does not count.
- __________
- __________
- __________
- __________
- __________
The correct course is hidden in these three lists. Read them carefully again and decide where you will move. nine0003
Step 3. Action
The most important step. Without it, the previous two steps will remain just dreams. Choosing a direction will help you set specific goals. Break goals down into specific actions. And act.
All that is required is measured daily work, tiny but real steps.
The Purpose Training Book is a collection of helpful tips with illustrations, exercises, and a diary to track progress. Perhaps it is she who will give you the necessary impetus and inspire you to change. nine0003
Buy the book
Read also 🧐
- A simple question that will start a change in your life
- 3 phrases that harm your happiness and success
- 5 things that kill our self-confidence
Volleyball. Forward blow
MUNICIPAL BUDGETARY EDUCATIONAL INSTITUTION OF IRKUTSK
SECONDARY EDUCATIONAL SCHOOL №28
Research work
“Volleyball. Forward blow "
Completed:
7B grade student Angela Papoyan
Head:
teacher of physical culture Agafonova A.R.
2018
Contents
Introduction
Chapter 1. Theoretical part
1.2 Attack strike technique: run-jump-strike
1.3 Types and characteristics of attack strikes (direct, accelerated, slow)
Chapter 2. Practical part. Experiment
Conclusion
Information sources used
Introduction
Relevance
In modern volleyball, the attacking kick becomes one of the decisive elements of the game of most teams.
The most spectacular moment of any volleyball match is the attack. It is in the process of attacking actions that teams receive 50-70% of scoring points. The whole team strives to create a moment for the successful execution of this spectacular element. The player, having mastered the technique of performing such strikes, can accelerate the ball up to 130 km/h! nine0003
Therefore, understanding and applying the principles of the correct technique of an attacking strike is one of the priorities for a volleyball player.
Hypothesis - special exercises will prepare and correct the technique of performing attacking blows, which will positively affect the entire process of learning this sports game.
The subject of the study is the effectiveness of teaching aids and the level of learning of 7th grade students in physical education lessons.
The object of the study is the educational process of students in physical education lessons in volleyball. nine0003
The goal is to teach students in grade 7 the correct technique for performing offensive strikes
Tasks
- To study the literature on this issue
- Develop a set of exercises for teaching and correcting the technique of attacking blows
- Draw conclusions and practical recommendations
Practical significance - the developed set of exercises can be used in physical education lessons and in independent volleyball lessons
Chapter 1. Theoretical part
Characteristics of volleyball as a means of physical education.
Volleyball (eng. Volleyball from volley - "volley", "hit from the summer", and ball - "ball") - a sport, a team sports game, during which two teams compete on a special platform, divided by a net, trying to direct the ball to the opponent's side so that he landed on the opponent's court (finish to the floor), or the player of the defending team made a mistake. At the same time, to organize an attack, players of one team are given no more than three touches of the ball in a row (in addition to touching on the block). The central body of volleyball as an international sport, which determines the FIVB rulebook (English) is the International Volleyball Federation. Volleyball has been an Olympic sport since 1964 years old. Volleyball is a non-contact, combinational sport, where each player has his own specialization on the court. The most important qualities for volleyball players are jumping ability to rise high above the net, reaction, coordination, physical strength for effective strikes. For fans of volleyball, it is a common entertainment and way of recreation due to the simplicity of the rules and the availability of equipment. There are numerous variants of volleyball that have branched off from the main type - beach volleyball (Olympic type since 1996 years), mini-volleyball. Since 1992, sitting volleyball has been included in the program of the Paralympic Games in Barcelona.
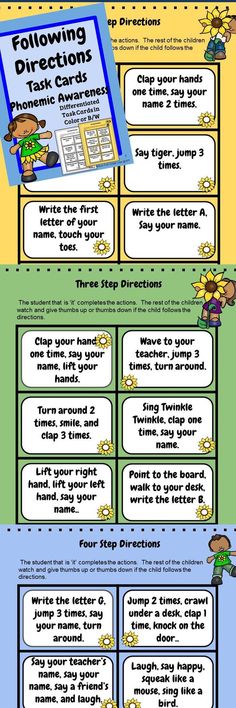
Volleyball can be regarded as the highest form of sports included in the world system of sports competitions. Volleyball is widely represented in the program of the Olympic Games, as well as in professional sports. A large number of competitive technical and tactical actions, their combinations and diverse manifestations in the process of competitive activities of rival teams and individual players is an exciting sight, and also makes volleyball a means of physical education for people in a wide age range. Competitive confrontation between volleyball players takes place within the established rules by means of competitive actions inherent only in volleyball - game techniques (techniques). In this case, the presence of an opponent is mandatory. In volleyball, the goal of each element of the competition is to deliver the object of the competition (the ball) to a certain place on the opponents' playground and prevent this from happening to yourself. This defines the unit of competition - a block of actions of the type "defense -" attack ", which also includes actions for intelligence, disinformation, conspiracy, etc.
Attack hit technique
Attack hit is a technically complex element of volleyball
Attack hit is performed by a player in a jump after a run-up and consists in throwing the ball with one hand above the edge of the net to the side of the opposing team. All actions (efforts) of the volleyball player at this moment are concentrated on achieving the following goals: finding the optimal point for the push, assessing the direction of the ball's flight and making the highest possible jump.
Depending on the development of the attack, on the actions of the team and, in general, the game environment, there are different ways to execute an attacking hit. In practice, the division into such main groups is widespread: attacking strikes "along the way" of the run-up and attacking strikes "with a turn", in which the ball's flight path after the strike is at an angle to the direction of the player's run-up. In addition, there are side and deceptive blows, blows "with translation".
Position of forwards in volleyball:
- Middle blocker - first pace player. Attacks, as a rule, from the 3rd zone with short and high-speed passes. On a team, center forwards are usually the tallest players.
- Finisher - attacker of the second pace. Attacks from the front line from the 2nd or 4th number, from the back - pipe.
- Diagonal. Attacks mainly from the back line from the 1st number. Does not participate in the acceptance of the submission. Usually the most productive players on the team. nine0055
- stop step on toe;
- stop before takeoff;
- lack of forward and upward swinging of the non-strike hand;
- a blow with an arm bent at the elbow; nine0026
- at the moment of impact lowering the elbow down;
- early or late takeoff;
- wrong rhythm or run-up;
- wrong depth of squat before repulsion and setting of feet;
- slow repulsion;
- insufficient impact force and inaccurate brush placement on the ball;
- landing after a strike on straight legs.
Types and characteristics of attacking blows.
Lateral and with transfer
An attacking hit in volleyball in most cases is the end of a ball rally on its own court, the purpose of which is to win a point in one's favor. All previous actions of the players were directed (or should have been) to prepare for its implementation. How accurate and verified the actions of the player were when preparing an attacking strike largely depends on whether its execution will achieve its goal. This is one of the most difficult elements of volleyball. The height of the ball removal, the speed of the pass, the constantly changing conditions of the game, the likelihood of errors at the preparatory stage, the opposition of the enemy require the attacker to be in good physical condition, mastery of technique and the application of moral and volitional qualities. nine0003
Direct offensive strike
In a direct attack strike, the striking movement is performed in the sagittal plane. The starting position is similar to the stance when performing a pass. The preparatory phase includes a run, a jump and a swing. The run-up serves to achieve sufficient horizontal speed of movement and its maximum use for the jump. Take-off run - 2 - 4 meters (usually three steps). The first step is relatively small, the speed of movement is low. It determines the choice of the general direction of the run. The second step corrects the direction of the run. The length of the step is increased, it takes less time to complete it, and the speed of movement increases. In the third step, the horizontal take-off speed is converted into the vertical jump speed. The stride length is short; The BCT of the body is significantly reduced, the speed of movement increases. The last step is usually performed in a jump (jumping): the leg (usually the right one) is extended forward and placed on the heel, the foot is in the breaking position. Only with such a rigid setting of the right foot on the support does a locking effect occur. With the other foot in the latter, the player pushes off the support and after a short period of time substitutes it to the right. Simultaneously with the jumping step, both hands are pulled back. When pushing away, the arms first begin to move - in an arc from behind - down - forward. This swinging movement ends with a sharp stop of the hand at the moment when the hands are extended above the head. The legs are included in the repulsion movement a little later, when the player's BCT is behind the support, while they are unbent in all joints.
 nine0003
Accelerated strike
The structure of the preparatory phase of the strike (run-up, jump, backswing) is similar to the structure of the speed strike. In a shock movement, the arms are carried upwards slightly bent at the elbow. Accordingly, the blow is carried out by straightening the arm at the elbow with a simultaneous whip-like movement of the hand. After hitting the ball, the movement of the hand is sharply inhibited, it stops the accompanying movement minimally. Forward strike with hand translation.
In the stroke movement, when moving to the left of the vertical axis, the arm moves in a small arc forward to the right so that the hand rests on the ball from above and to the right. At the same time, the hand supinates, the thumb rises up. Together with the movement of the hand, the left shoulder is somewhat brought forward. After hitting the ball, the hand is lowered down forward. It is used to circle the opponent's block, as well as to send the ball to an unprotected place on the playing court. nine0003
Chapter 2. Practical part. Experiment
We conducted 10 lessons. The children worked individually, in pairs and in groups. First, they practiced a run-jump-kick without a ball. We worked along the offensive line and near the net. We worked with stuffed, tennis and volleyball balls. They also performed attacking strikes from the 4th, 3rd and 2nd zones. In addition, during the warm-up, much attention was paid to jumping exercises
At the beginning of the experiment, almost none of the guys could perform an attacking kick through the net. Toward the end of the experiment, some guys started to succeed. nine0003
Conclusion
The forward strike is one of the most complex and at the same time the most beautiful technical elements. An attacking hit in volleyball in most cases is the completion of a ball rally on its own court, the purpose of which is to win a point in its favor. All previous actions of the players were aimed at preparing it. How accurate and verified the actions of the player were when preparing an attacking strike largely depends on whether its execution will achieve its goal. Learning this element takes a lot of time. The work that has been started will need to be continued at further physical education lessons. nine0003
Information sources used
https://nsportal.ru/shkola/fizkultura-i-sport/library/2016/05/01/kursovaya-rabota
https://infourok.ru/
https:// multiurok.ru/files/nauchno-issliedovatiel-skaia-rabota-volieibol-ighra-oshibok.html
/issledovatelskij-proekt-vlijanie-volejbola-na-razvitie-dvigatelnoj-1.html
Annex
Exercises for learning the technique of an attacking strike
An attacking strike on the move from zone 4 from a high pass from zone 3 is directed to zones 4,6,5.
Offensive hit from zone 2 with a high pass from zone 3 to zone 2 the ball is directed from zones 2, 6, 1.
Offensive hit from zones 4, 3 and 2 with medium pitch
Striker shot from zones 4, 3, and 2 from high and off-grid passes.
Forward hit with transfer to the right from zone 2 from a high pass from zone 3.
Alternate forward shots from zone 4 with high passes from zone 3; straight along the way, with translation to the right, to accuracy, by hand.
Same from zones 2 and 3, but offensive shots are made from medium and low gears.
Alternating attacking shots in various ways from passes of different heights.
Offensive strike when countered by a block. The meaning of the exercises is that a block closes any direction, and you need to send the ball in a different direction (“open”) with a blow. In this case, all actions are predetermined. For example, a line is blocked by a block - a strike along the way or with a translation to the left. And so in all zones and in all directions. At first, the block is placed in advance, then it “appears” at the last moment. nine0003
Imitation of an attacking blow and deception.
Alternating strikes
Attacking kicks from the back line.
Completion of these tasks provides a necessary condition for successful learning of attacking techniques.
Learning errors:
Exercises for improving the technique of attacking blow:
Offensive hit in zone 4. Transfer from zone 6 to 3, from 3 to 4 and an offensive hit. Next, the attacking player imitates a block in zone 3 - moves to zone 2, performs an offensive hit from the pass of a player in zone 3, then a block in zone 3, an offensive hit in zone 4, etc.
Offensive hit from low, short passes by a setter and behind his back (first pass from the depth of the site).