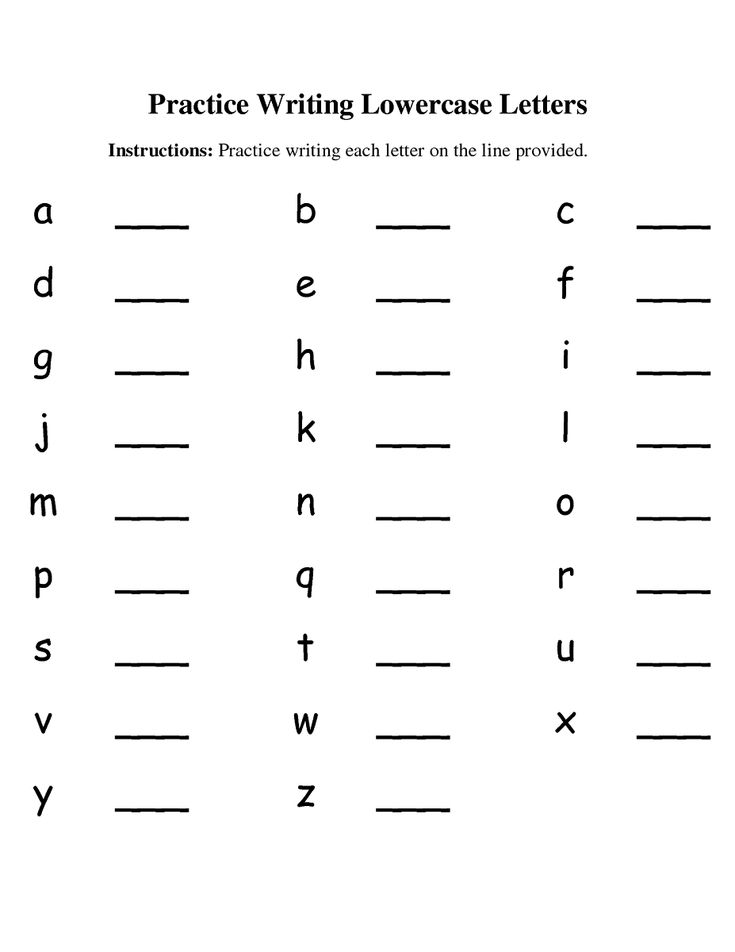
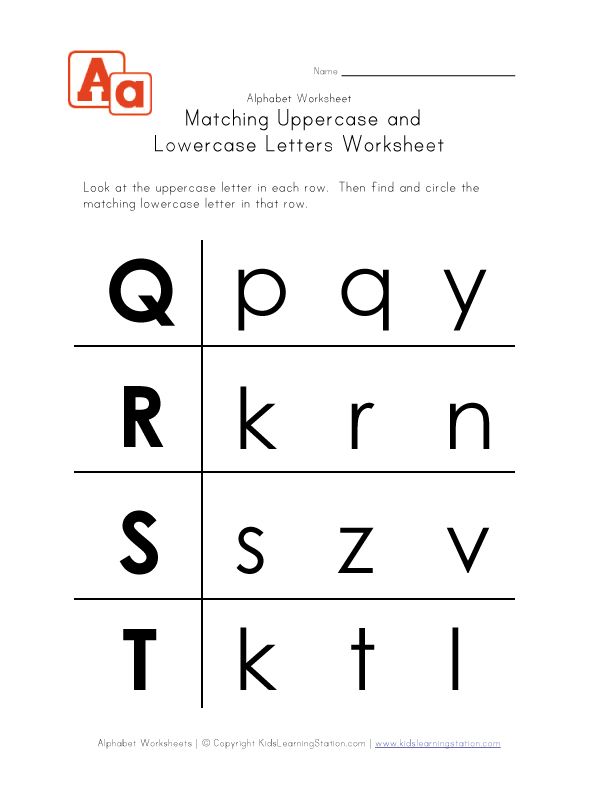
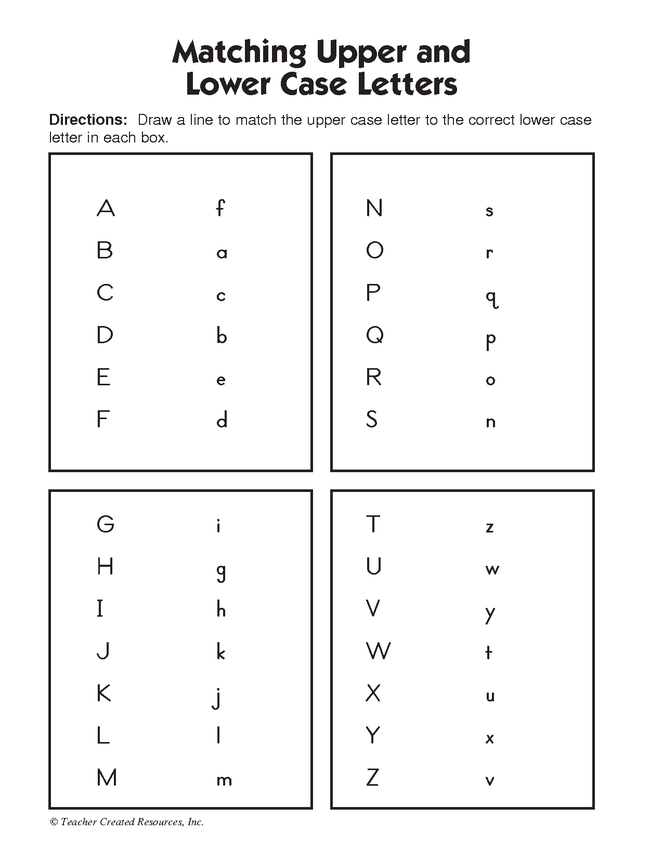
Write upper and lowercase letters
Kids Handwriting: Uppercase & Lowercase Letters
Since less and less instructional time is being spent on handwriting, it is becoming even more important to prioritize the script that students need for functional writing tasks. And, since lowercase letters account for about 95% of all letters in reading and writing, I would like to make the argument for teaching lowercase first!
Lowercase letters are easier to form!Let’s consider four elements:
1. Starting PointsHaving fewer starting points simplifies the decision on where to start. All the capital letters start at the top. Lowercase letters primarily begin at the midline. The exceptions being b, h, k, l, and t which start at the top, and letters e and f. This factor favors uppercase as being easier to learn.
2. Pencil liftsEach pencil lift requires careful visual monitoring and precise motor skills to neatly place the pencil at the start of the next stroke. Seventeen upper letters require two or more lifts compared to seven lowercase letters. Uppercase “E”, for example, has four strokes, requiring one to lift and place the pencil at four different points. Lowercase “e” uses one continuous stroke, which requires less visual attention, and makes it easier and more efficient to form. This suggests that lowercase letters are easier to form.
Children learn to draw the first six pre-writing shapes, in the following developmental order: a vertical line, a horizontal line, a circle, a cross, a square, and finally a diagonal line. Accordingly, letters containing diagonals are the hardest to form. Nine uppercase letters contain diagonal lines in contrast to six lowercase ones. This measure also points to lowercase letters as being easier to write.
4.
Letter GroupsSorting letters by their first stroke and practicing them in their “group” is a highly effective way of learning to write the letters.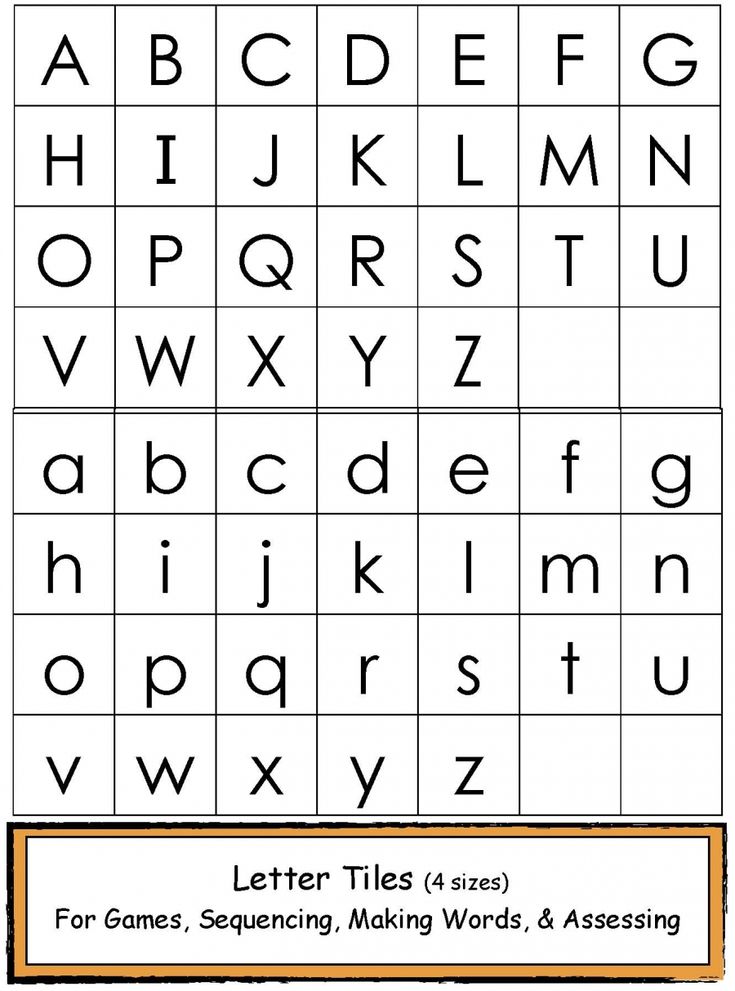 The repetition of the same continuous motion from one letter to the next builds motor memory and promotes rhythmic writing.
Lowercase letters have multiple strokes in common and are easily sorted into four kinesthetic groups:
- l, t, k, I and j all start with a vertical line downward
- c, a, d, o, g and q all start like c
- h, b, r, n, m and p all drop down, up and over
- v, w, x and y all start with a diagonal line down
Letters s, u, f, e and z do share a common stroke with the other letters.
Upper case letters have two kinesthetic groups:
- C, O, Q and G all start like C
- V, W, X and Y start with a diagonal line down
B, D, E, F, H, I, J, K, L M, N, P, R, T, and U all start with a down stroke. However, given that they do not share a similar motion beyond this point to guide correct stroke direction, makes it hard to unify them into kinesthetic group. Letters A, S and Z do not share a common stroke with other letters.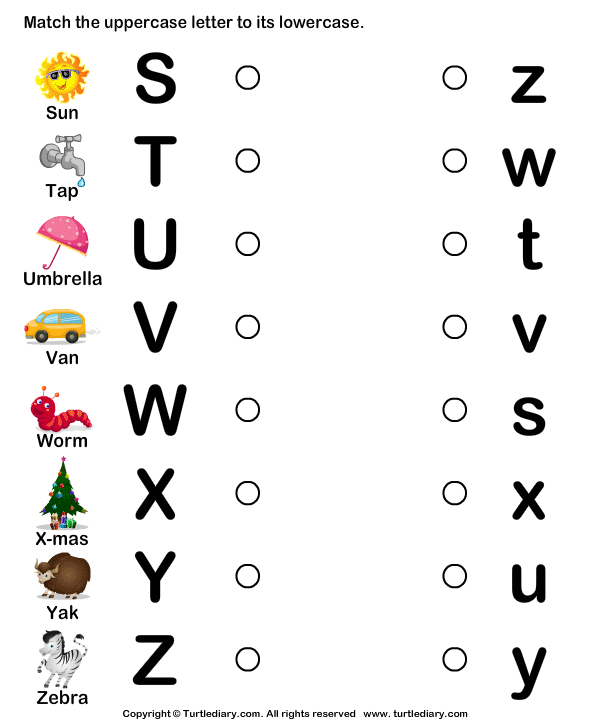
Several lowercase letters are similar in appearance, most notably letters b, d, p, g and q, as well as h and n; making them easier to confuse. Regardless, young students who are learning to read, read in lowercase. And for children who struggle with visually-confusing letters, more practice, not less, would be helpful. Aligning handwriting with reading stands to boost a student’s ability to identify these letters, especially if the child is a kinesthetic learner. Teaching uppercase simply delays the teaching of lowercase or worse, creates more confusion by adding more letters to the mix.
It is also interesting to note that lowercase words are easier to read. Jason Santa Maria’s article, “How We Read”, explains that this is because we see words as shapes. Lowercase has ascenders and descenders that form irregular shapes, and make it easier to identify the words, whereas capitals appear as “big rectangular blocks which take much longer to process”.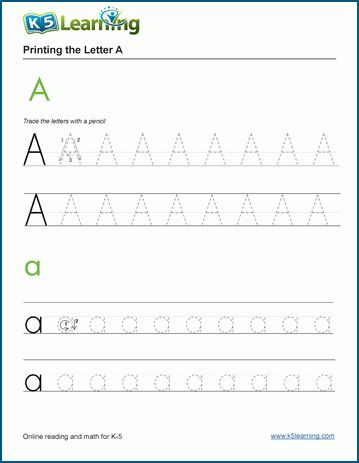
There is a large variance in how well students adapt to lowercase letters after learning uppercase. For students who are predisposed to handwriting difficulties and have been taught uppercase first, I have found that they confuse the two alphabets and tend to be very resistant to switching from upper to lowercase. Apart from affecting overall legibility, mixing upper and lowercase, or using upper case only, is inefficient and results in slow, tedious writing.
What do the experts say?When asked to weigh in on the letter case debate, Dave Thompson, CEO of Educational Fontware, and designer of over 900 fonts said, “Lowercase is definitely easier. Most of the letters are a lot shorter, which involves less movement of the hand for the little ones. There are fewer pen lifts, and much more similarity between smalls (a, c, d, e, g, o, q for example all start with or have a counterclockwise hook) than caps.
 Lowercase uses retrace without pen lift for b, d, h, m, n, p, and r. Caps are usually taught as pen lifts instead of retrace: B, D, M, N, P, and R. Finally, you can make words out of the smalls, but not the caps.”
Virginia Berninger, a UW educational psychology professor, who studied the effect of handwriting on the human brain, says that it is important to teach lowercase letters first because they are used more frequently in writing and are encountered more frequently in written text. Uppercase should only be taught once lowercase letters are legible and automatic. Teachers should also keep written work to a minimum until lowercase writing is functional.
References
Berninger, V. W., & Wolf, B. J. (2009). Teaching
students with dyslexia and dysgraphia: Lessons from teaching and science.
Baltimore, MD: Brookes Publishing Company.
Maria, Jason Santa. “How We Read.” A List Apart, 2014. Web. 15 Dec. 2016. Retrieved from http://alistapart.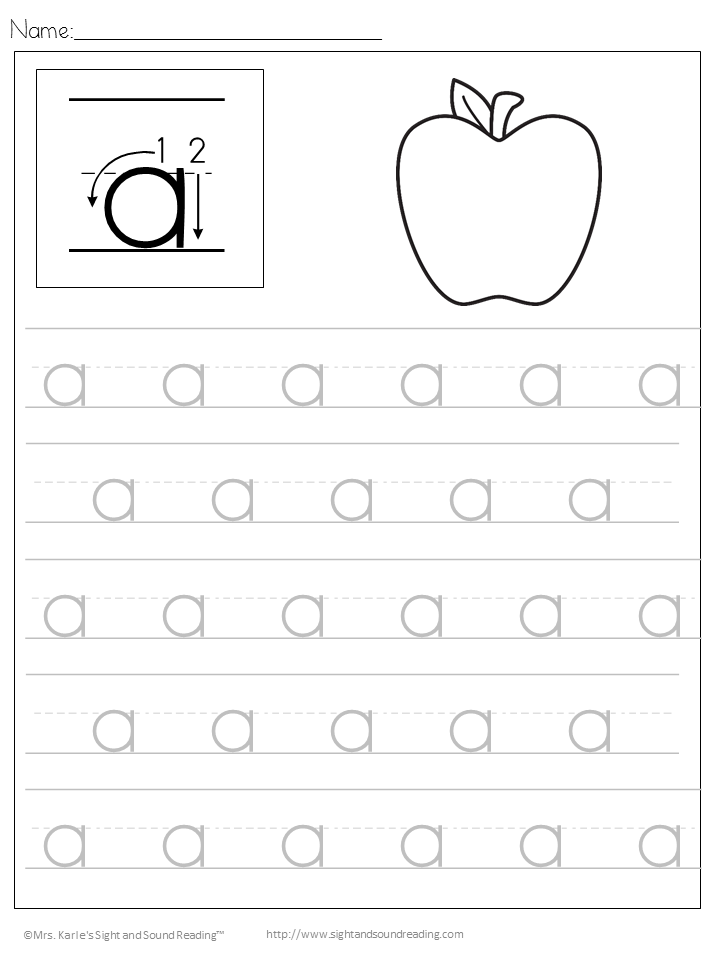 com/article/how-we-readhttp://alistapart.com/article/how-we-read
How To Teach Your Child Uppercase Letters And Lowercase Letters
If your little learner is showing an interest in exploring uppercase letters and lowercase letters, you’ve come to the right place! We’re here to help you and your child have fun while learning.
In this article, you’ll discover the best way to start teaching your child about uppercase and lowercase letters to set them up for success.
Plus, we’ll share 11 of our favorite activities for practicing letter recognition and forming letters so your child can build their skills and confidence while engaging in fun learning games!
Table of Contents
- Tips For Teaching Uppercase Letters and Lowercase Letters
- 11 Fun Ways To Practice Uppercase Letters And Lowercase Letters
- Learning Letters Is Fun With HOMER!
Tips For Teaching Uppercase Letters and Lowercase Letters
When children are beginning to learn the difference between uppercase letters and lowercase letters, many find it easiest to learn uppercase letters first.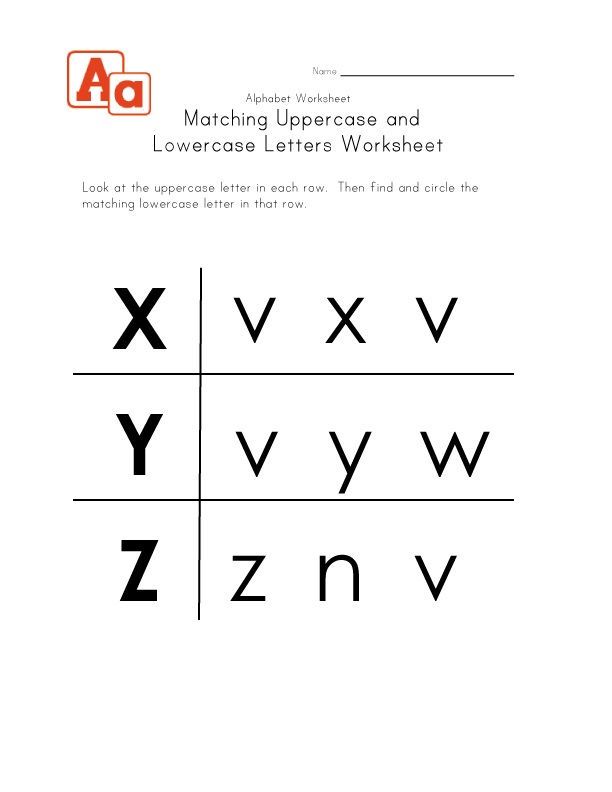 This is because letters are often simpler to draw and differentiate from other letters when they’re capitalized.
However, since lowercase letters are used more often throughout text, it’s important for children to learn that there are two forms of each letter and to understand how they connect to each other.
To accomplish this, start by teaching letters that have similarities between their uppercase and lowercase versions. For example, “T” and “t” are usually easier to link than “G” and “g.”
This process takes time, so don’t be afraid to go slow. Your child likely won’t master all 52 letters at the same time — it’s a huge task for their working memory! This skill will improve the more you practice together.
Additionally, while being able to identify the name of each letter is crucial, it’s more important for children to link the primary sound that each letter represents to both versions of a letter.
This will become a key tool they can use later when they begin to sound out words while reading, so it’s a good idea to practice early in the letter recognition process.
Depending on where your child is on their literacy learning journey, it can also be helpful to explain what the purpose of uppercase letters is. This way, your child can understand where uppercase letters fit into sentences and what they mean.
To do this, you’ll want to explain that uppercase letters are used at the beginning of a sentence and when you’re writing the name of a person or city, for instance. Of course, there are other times uppercase letters might be used (like in acronyms), but that’s a lesson for another day!
Letter Vocabulary To Teach Your Kids
When you’re talking about letters with your child, it’s important to help them understand the words people use when discussing the alphabet. These vocabulary words will ensure your child can communicate effectively and comprehend what others are saying.
Here are a few key words related to these activities your child should know:
- Letter: One of the 26 symbols that make up the English alphabet.
 Each letter has a name, like “A” or “B,” and represents a sound (or sounds).
 - Alphabet: The alphabet is the name for all of the letters.
- Uppercase letters: These letters have specific functions and usually come at the beginning of a sentence or proper noun, among other uses.
- Capital letters: Capital letters are another name for uppercase letters.
- Lowercase letters: These letters are the most common but can vary by font (more so than uppercase letters), which can be confusing for young learners.
You don’t need to quiz your child on these words or make them memorize the definition. Simply use these words when you’re talking about letters so your child can become familiar with the terms.
11 Fun Ways To Practice Uppercase Letters And Lowercase Letters
Learning letters doesn’t have to be boring! Here are some of our favorite games and activities that make learning fun.
1) Everyday Letter I-Spy
I-Spy is a fun, simple way to incorporate uppercase letters and lowercase letters into your child’s everyday life and help them practice letter recognition.
By drawing their attention to different letters throughout the day, you’ll strengthen their skills bit by bit without them even realizing it!
What You’ll Need:
- Signs or other words around you
What To Do
Simply start asking your child to identify letters as you go about your day together. Beginning with letters that matter to them, such as the letters in their own name, is a great way to begin.
Then you can work your way up to letters in other special words as their letter recognition skills improve. For example, try asking your child to identify the letter “L” in the sign for the laundromat, or how many of the letter “T” they can find in the menu at a restaurant.
This activity is a fantastic learning tool, as a game of letter I-Spy can be played practically anywhere, and you don’t need any equipment — all you need is a good eye for spotting letters!
Try adding this fun game into your daily routine to sneak in some letter recognition practice.
2) Create Letters In Nature
As an engaging way to bring learning outdoors, try practicing to form letters by using materials found in nature. Whether you take a walk around the neighborhood or create a scavenger hunt in the backyard, you’ll have fun collecting materials with your child.
What You’ll Need:
- A variety of natural materials, such as rocks, sticks, or leaves
What To Do:
Once you’ve gathered the natural materials you found, it’s time to practice forming uppercase letters and lowercase letters with these supplies.
Start by choosing a letter that your child is familiar with, and have them write it out by forming it with one of their chosen materials.
Note: Rocks and leaves are easiest for forming rounded letters (B, C, D), and sticks are best for letters with straight lines (A, F, T).
When your child has mastered a particular letter in uppercase, ask them to form the same letter in lowercase. Gradually move on to trickier letters that they might be less familiar with to challenge their skills.
With plenty of practice, your child will know all uppercase letters and lowercase letters by heart. (At that point, you could include a time limit to see how many letters they’re able to create within a particular time period as a fun challenge.)
3) Guess The Magnetic Letter
This is another easy letter recognition game that doesn’t require much equipment and can be really fun to play (especially when the kids are able to outsmart the grown-ups!).
What You’ll Need:
- A set of magnetic letters (we recommend the ones in the HOMER Explore Letters Kit)
What To Do:
Grab your magnetic letters. Then, have your child put their hands behind their back before handing them a single letter of your choice.
Ask your child to identify the letter in their hands — without peeking! — only by touch. For children who are still learning, provide choices for them to guess between (“Do you have a ‘T’ or a ‘B’ in your hands?”).
For older kids who are mastering letters, make the activity trickier by increasing the number of letter possibilities, and, eventually, have them guess without any hints at all.
It’s important to take turns so that you also give this letter recognition activity a go as the adult. It’s encouraging (and usually entertaining) for your child if you try and fail a few times by guessing a letter or two incorrectly.
Don’t be afraid to “mess up” in this game!
4) Letter Matching Cards
For this activity, you’re going to need a set of letter-matching cards. While you can purchase a variety of different types, we think it’s fun to make our own personalized set!
What You’ll Need:
- Paper or cardboard to cut into 52 cards
- Scissors
- A marker
What To Do:
Start by cutting out rectangles of paper or cardboard for your cards, one for each uppercase and lowercase letter. Then, write a letter on each of the cards, or have your child practice writing it themselves.
After the letters have been written, your child can decorate to their heart’s content! You might even want to draw (or glue a picture of) an object that corresponds to each letter to make it even more fun (like an apple on each of the “A” cards, a balloon for the “B” cards, and so forth).
This will also make the matching portion of the activity easier for your child if they’re still mastering uppercase letters or lowercase letters.
When your letter cards are complete, mix them all up on the table and have your child select one. Their task is to find the corresponding uppercase or lowercase version of that letter from the selection in the pile.
This game might be difficult at first, so we suggest beginning with just 10 cards at a time: five uppercase letters and five lowercase letters. You can make more cards on different days and add them to the list as your child gets the hang of this activity.
With practice, your child will enjoy becoming a letter matching professional!
5) Get Crafty
This interactive learning activity is all about practicing letter formation using uppercase letters and lowercase letters. No matter which form of arts and crafts your child chooses for this activity, you’re sure to have a blast!
What You’ll Need:
- A variety of art supplies, such as pipe cleaners, Play-Doh, Fingerpaints, glue and glitter, ribbon, and construction paper
- Kid-safe scissors
What To Do:
Grab your art supplies and get ready to start the fun.
Say a letter aloud (or write it down for your child to visualize if that works best) and have your child form the letter using your chosen material. Then have them create the corresponding uppercase or lowercase letter to match.
Engaging in crafts is a great way to encourage your child to practice forming letters — they’ll be so busy having fun that it won’t feel like learning at all!
6) Hidden Letters
Get your child up and moving while they practice their letters with this simple game.
What You’ll Need:
- Your letter cards from activity number four
What To Do:
To make the game more manageable, pick out five to 10 letters your child is practicing. Then, make a deck out of the uppercase and lowercase cards for those letters.
While your child isn’t looking, hide the cards in one room of your home. That way, you’ll limit the area they have to search.
Once the cards are hidden, it’s time to go on a letter scavenger hunt! Your child will love finding all of the letter cards.
Encourage them to set their cards out in a matching set, with an uppercase letter next to a lowercase, so they can see at a glance which part of each set they’re missing.
7) Post-It Note Letter Challenge
Can your child select the matching letters to finish this challenge?
What You’ll Need:
- 52 Post-It Notes
- A pen
- A large area to hang the notes on, such as a blank wall or a whiteboard
What To Do:
Write an uppercase letter on 26 Post-It notes. Then, use the remaining ones for lowercase letters.
Next, alternate placing uppercase and lowercase letters onto your wall or whiteboard. You might have a capital “A” followed by a lowercase “b.”
Once you get to “Z,” set the remaining letters in a row so your child can see them. Point to the uppercase “A” and ask, “Can you find the lowercase letter that matches?” If your child correctly identifies the letter “a,” have them pick it up and stick it below the capital “A.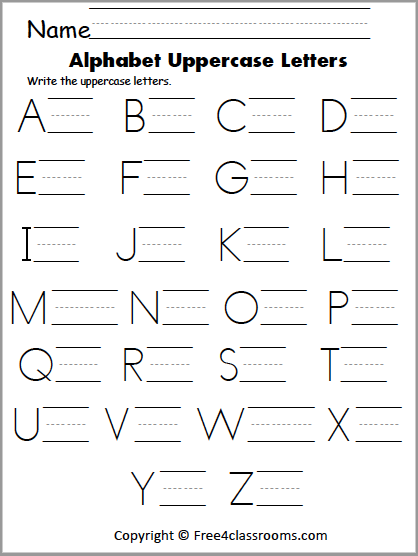 ”
”
If they pick the wrong letter, that’s OK. Gently let them know that they picked a different letter and have them try again.
Once both “A’s” are together, move on to the next letter. When your child has returned all of the missing Post-Its to the wall, sing the ABC song together.
Note: If your child doesn’t yet know all of their letters, don’t start with all 52 Post-Its. Instead, pick a smaller number for them to practice with so they don’t get overwhelmed.
Also, once you finish with the Post-Its, they can save them and use them for this fun Letter Toss game.
8) The Learn & Grow App
If your child enjoys a bit of educational screen time, the HOMER Learn & Grow app is a great way to let them practice their letter identification skills.
What You’ll Need:
- A compatible device
- The HOMER Learn & Grow app
What To Do:
Our kid-friendly design makes it easy for your child to practice their letters on their own, so it’s perfect for those busy days when you just can’t squeeze in another activity.
Once you set up their learning pathway and create your parent account, you can let them play independently. The program takes them on a personalized learning journey that’ll meet them where they are now and help them grow.
Many of the games in the Pre-K section of Learn & Grow, as well as the Early Learners section, work on letter recognition and identification, so it’s a fun way to review what you’re working on together.
9) Letter Sort
Some uppercase letters look just like their matching lowercase friend. Others look nothing alike. This activity helps your child pay attention to the shape of each letter so they can sort them.
What You’ll Need:
- Letter cards (you can reuse the ones you made in activity number four)
- Two large bowls to sort the letters into
What To Do:
Start by mixing up all of the letter cards. Then, invite your child to help you sort them into two groups: those that look the same in upper and lowercase and those that look different.
You may need to model this for your child a few times. For example, hold up the capital “S” card and ask, “Do you see a lowercase letter that looks like this?”
When your child finds it, say, “Both the uppercase ‘S’ and the lowercase ‘s’ look similar. They have the same shape, but one is a little smaller. Let’s put these two letters in this bowl because they look the same.”
Then, pick up another uppercase letter, such as the “E.” Ask your child to find the lowercase “e.” If they have any trouble, give them a hand. Then ask, “Do these two letters look the same?”
Let your child examine both letters and highlight similarities and differences between the uppercase and lowercase versions. Then say, “Since they don’t look the same, we’re going to put them in this bowl.”
Continue sorting, letter by letter.
Once your child sorts all the letters, have them count the cards in each bowl and see if there are more that look alike or more that are different.
10) Identifying Letters In Books
When you’re sharing a book with your child, asking them to identify a few letters is a fun way to sneak in a little extra practice.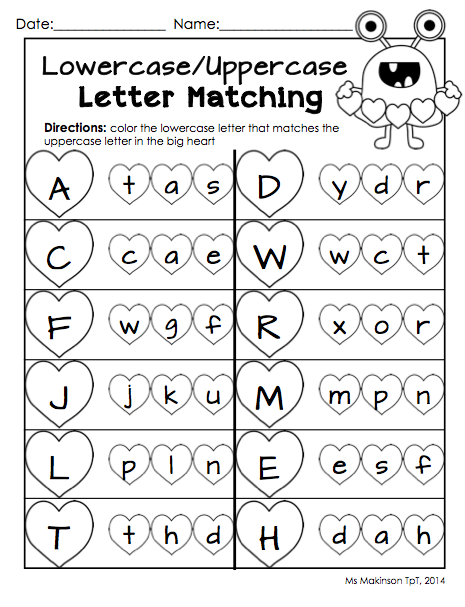 It’s also a great way to get them excited about books and reading.
What You’ll Need:
A picture book your child will enjoy hearing (find some of our book recommendations in this post)
What To Do:
Start by choosing a book that you know your child will enjoy. Then, as you read it aloud, stop occasionally to point out a few letters and ask them to identify them. For example, you might say, “Oh, look, there’s an uppercase letter ‘B’ on this page. Do you see it?”
If your child has trouble finding the letter, point it out. Then, say the sound the letter makes and have them repeat it to you.
Once they’ve found the letter, invite them to look for other letters on the page. See if they can find an uppercase and a lowercase version of the same letter. If not, that’s okay. Just move on to another page and try again.
As you stop, pay attention to your child’s engagement level and enthusiasm. You don’t want them to get tired of finding letters, so try to quit while they’re still having fun and enjoying the activity.
You can always try again later!
11) Make A Letter Book
Your child can use their alphabet knowledge to create a special book from A-Z. It’s great for practice and can also be a neat keepsake to look back on when your child is older.
What You’ll Need:
- Construction paper for the cover
- Printer paper for the inside pages
- Crayons or colored pencils
- A pencil or pen
- A stapler or a hole punch and ribbon
What To Do:
Start by having your child select a title for their book and then decorate the cover. They can use crayons or colored pencils for this task. Just make sure you add their name as the author somewhere!
Once they finish the cover, it’s time to move on to the inside pages. For each letter of the alphabet, have your child write an uppercase and a lowercase letter. Then, have them illustrate the page by drawing things that begin with that letter.
For example, for the “D” page, they might have a picture of a donut, a dog, and a duck.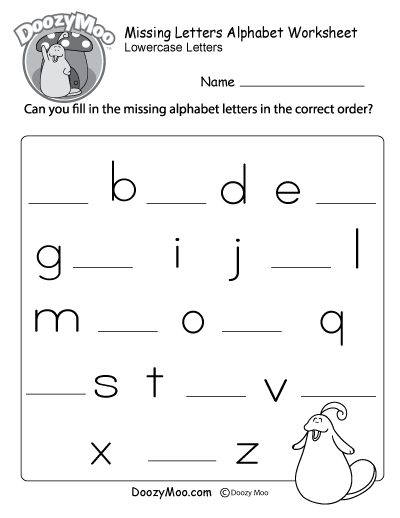
Once every page is ready, it’s time to put the book together.
First, lay the pages out in order from A-Z, and then put the cover on top. Flip through the book to make sure everything lines up.
When everything is together, use the stapler to bind the book. If you don’t have a stapler that’ll staple something that thick you can also use a hole punch and a ribbon to bind it.
Once you’ve finished, have your child read the book to you. They can say the letter on each page and then identify the items they’ve drawn that start with each letter. As they’re reading, have them point to the uppercase or lowercase letters on each page to practice.
Learning Letters Is Fun With HOMER!
With the help of our expert learning tips and fun, engaging activities, your young learner will begin to enjoy practicing uppercase letters and lowercase letters in no time!
From I-Spy and guessing games to enjoying crafts together, watch your child’s skills develop as they master letter recognition and letter formation, feeling more confident each time they practice.
To experience even more “I did it!” moments with your child, try our Explore Letters Kit. Packed with thoughtfully designed activities and expert play tips to build their literacy skills, the possibilities are nearly endless!
Author
CAPITAL AND SMALL LETTER Y, y
CAPITAL AND SMALL LETTER Y, yLETTER CAPITAL AND SMALL LETTER Y , Y
Objectives: teach to write capital and small letters U , at ; reinforce writing skills; develop speech, imaginative thinking, phonemic hearing; enrich children's vocabulary.
Lesson progress
I. Introduction teachers. Updating of basic knowledge.
Game Find a Pair.
What can you say about these letters? What are they?
- What vowels are written after a hard consonant? (Letters a, o .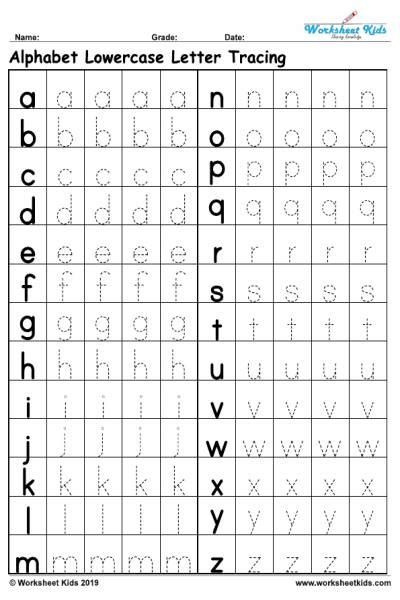 ) What vowels are written after soft consonant? (Letters i, ё .)
- Today we will learn to write the letter Y . What sound does this letter represent?
- You're right, vowel sound. It can be sung low and high, thick and thin voice. Let's try together!
The kettle is on the stove.
The teapot makes a thin voice: woo!
WOLF AND KOMARIK
Wolf caught a mosquito,
Broke his nose with his paw: woo!
Wait, mosquito, I'm asking (ooh),
I'll scratch my forehead (ooh)!
II. Learning new material.
1. Work according to prescription.
The letter Y will remind you of the ears
At the bunny on top.
The snail has horns too
So the letter Y are similar!
Let's draw a bough to the trunk -
And we will see the letter Y .
charcoal drawing,
Stick to stick - corner.
Corner. Coal. U we hear.
At we will write at the beginning of the words.
- About which letter - printed or written - is it said in a poem? Compare printed and written letters . How are they similar?
2. Work with the sample capital letter Y .
– Consider the sample capital letter Y . Describe the direction of movement of the hand when writing the letter Y .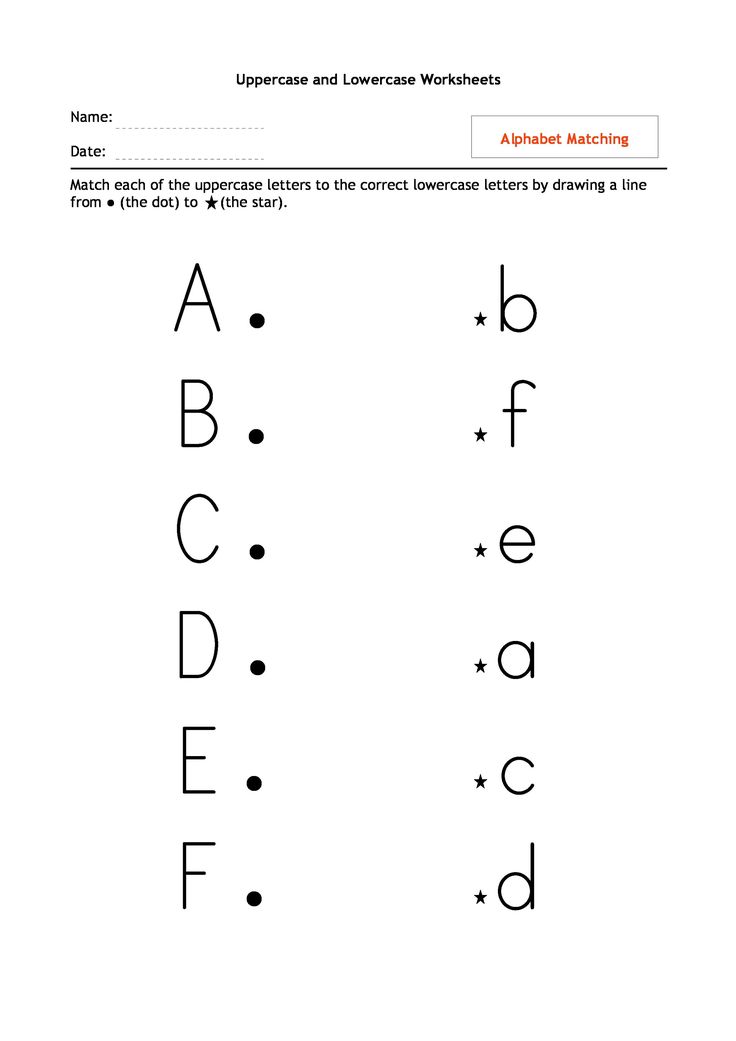 (Letter consists of two elements. We start writing just below the middle of the wide auxiliary line. We lead the hand up to the right, round off, we lead the inclined line down to the bottom line of the working line. Near bringing to the top line of the working line, round to the right, bring to the top lines of the working line, we lead a little to the right up.
The second element must be at the same level as first. We lead down an inclined line. Almost reaching the bottom line of the working lines, round to the right and slightly rise above the bottom line of the working line.)
- Record these items in air; in a notebook.
- Independently circle and add letters on the 1-5th lines. (Teacher provides individual assistance to students.)
3. Reading letters and words.
On the board are written lowercase letters and , y and words y , y .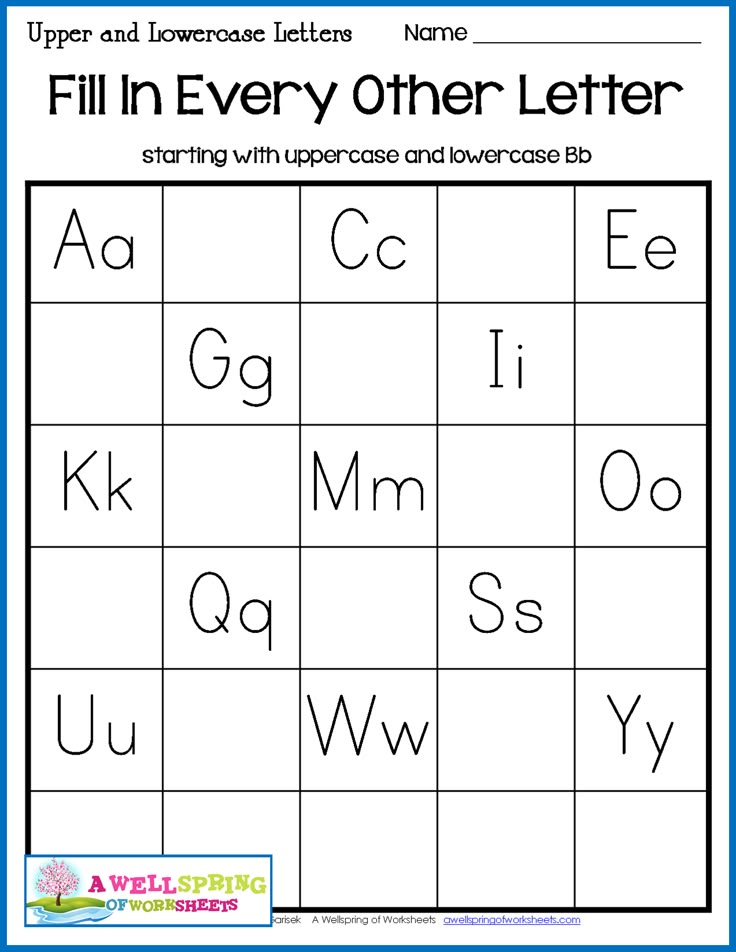 The teacher reads poetry, the children at his command read letters and words in unison.
MASHA GOT LOST
Masha is crying: ... ( a-a-a ),
And the wolf ... ( woo )!
Scary Masha in the forest,
Let's call her - ... ( ау )!
And we have a girl,
Her name is Alyonushka,
Chorus girl,
Round head.
All day ... ("wah-wah") -
That's all her words.
- Read the "words" written on the next line. Pay attention to the connection of letters.
4. Game "Collect the letter".
- Consider the elements of letters.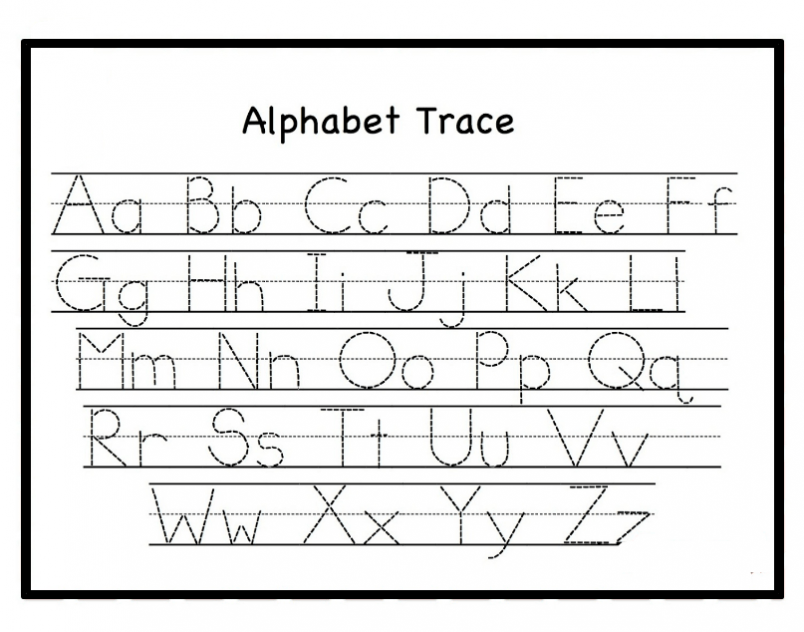 Think what letters "crumbled". On an empty line, write the letters that can be built from these elements.
Independent work of students.
physical minute.
Wind d y et, howling: "Oooo!"
Our mill is spinning: "Vzh-vzh-vzh!"
One, two, three, four -
Twisted, twirled.
(Forward bends, arms to the sides.)
5. Work with sample lower case letter to .
– Consider the lowercase letter pattern y . Compare capital and small letters. Are they the same or different are written? Tell us about the direction of movement of the hand when writing the letter y . (The letter consists of two elements.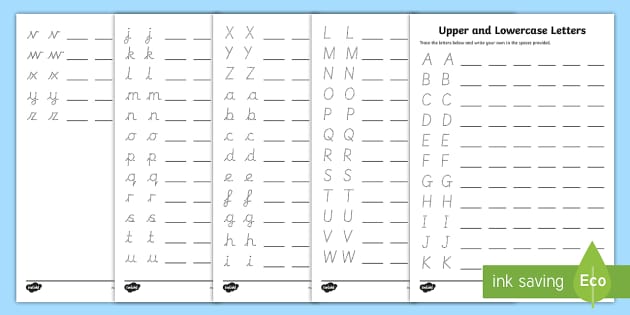 The first element is a short stick with rounded at the bottom. We start writing from the top line of the working line, leading down. Slightly not bringing to the bottom line of the working line, round to the right, bring to the bottom line, draw a line up to the right to the top line of the working line.
The second element is a stick with a loop at the bottom. Second element We start writing from the top line of the working line. We lead down a long stick, then by moving the hand to the left we write a loop, it should be small. The loop intersects with an inclined stick necessarily on the bottom line of the working line. We finish writing in the middle of the working line.)
prescription the second element of the lowercase letter y .
- Independently circle and add letters on the 1-4th lines. (Teacher provides individual assistance to students.)
6. Writing letters in words.
- Look at the pictures.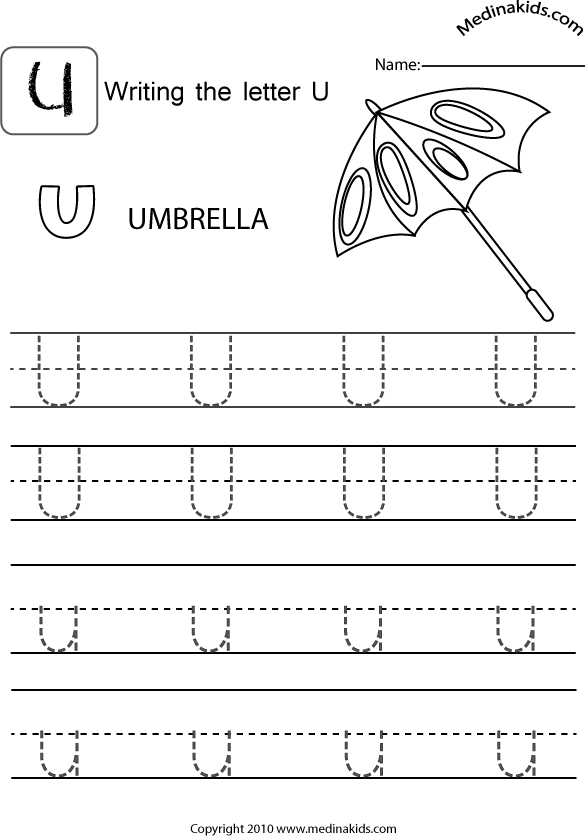 On what basis were they united? to a group? (In the words - the names of objects there is a sound [y] .)
- Say the first word. Determine the place of the sound [y] in word. What letter denotes the sound [y] after solid consonants? Enter missing letters.
III. Summary of the lesson.
What letter have we learned to write? What is needed for capital letter Y ? Lower case y ?
Minute of reflection.
guys answer questions:
- I found out
- I was surprised
- I thought,
- I have learned,
- I remember.
Hosted by uCoz
Uppercase and lowercase letters / Sudo Null IT News
I have collected here some not so obvious facts about uppercase and lowercase letters that a programmer may encounter at work.![]() Many of you have translated strings into “all uppercase” (uppercase), “all lowercase” (lowercase), “first capital, and the rest lowercase” (titlecase). Even more popular is the case-insensitive comparison operation. On a global scale, such operations can be quite non-trivial. The post is structured as a "collection of misconceptions" with counterexamples.
Many of you have translated strings into “all uppercase” (uppercase), “all lowercase” (lowercase), “first capital, and the rest lowercase” (titlecase). Even more popular is the case-insensitive comparison operation. On a global scale, such operations can be quite non-trivial. The post is structured as a "collection of misconceptions" with counterexamples.
1. If I convert the string to uppercase or lowercase, the number of Unicode characters does not change.
No. The text may contain lowercase ligatures, which do not correspond to one character in upper case. For example, when translating to uppercase: fi (U+FB00) -> FI (U+0046, U+0049)
2. Ligatures are a perversion, no one uses them. If they are not taken into account, then I'm right.
No. Some letters with diacritics do not have an exact match in other case, so you have to use a combined character. Let's say the Afrikaans language has the letter ʼn (U+0149). In upper case, it corresponds to a combination of two characters: (U+02BC, U+004E). If you come across a transliteration of Arabic text, you may encounter (U+1E96), which also does not have a single-character match in upper case, so you will have to replace it with (U+0048, U+0331). The Wakhi language has a letter (U+01F0) with a similar problem. You may argue that this is exotic, but there are 23,000 articles in Afrikaans on Wikipedia.
3. All right, but let's consider a combined character (involving modifying or combining code points) as one character. Then the length will still be preserved.
No. There is, for example, the letter "escet" ß (U+00DF) in German. When converted to uppercase, it turns into two SS characters (U+0053, U+0053).
4. Okay, okay, got it. We will assume that the number of Unicode characters can increase, but not more than twice.
No. There are specific Greek letters, for example, (U+0390) that turn into three Unicode characters (U+0399, U+0308, U+0301)
5.
 Let's talk about titlecase. Everything is simple here: I took the first character from the word, translated it into uppercase, took all the subsequent ones, translated it into lowercase.
 No. Let's remember the same ligatures. If a word in lowercase begins with fl (U+FB02), then in uppercase the ligature becomes FL (U+0046, U+004C), but in titlecase it becomes Fl (U+0046, U+006C). The same with ß, but, theoretically, words cannot begin with it.
6. Those ligatures again! Well, we take the first character from the word, translate it into uppercase, if more than one character is obtained, then we leave the first one, and the rest back into lowercase. Then it will definitely work.
Won't work. There is, for example, the digraph dz (U+01F3), which can be used in text in Polish, Slovak, Macedonian or Hungarian. In uppercase it corresponds to the digraph DZ (U+01F1), and in titlecase it corresponds to the digraph Dz (U+01F2).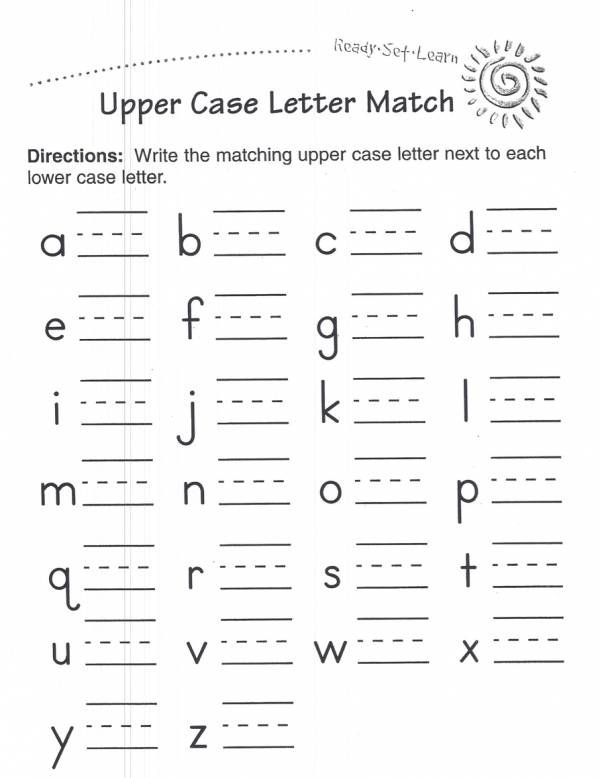 There are other digraphs. The Greek language, on the other hand, will please you with jokes with hypogegrammen and progegrammen (fortunately, this is rarely found in modern texts). In general, the uppercase and titlecase variants for a character can be different, and there are separate entries for them in the Unicode standard.
7. Good, but at least the result of converting a character's case to uppercase or lowercase does not depend on its position in the word.
No. For example, the Greek capital sigma Σ (U+03A3) becomes a lowercase ς (U+03C2) at the end of a word and σ (U+03C3) in the middle.
8. Oh, okay, let's process the Greek sigma separately. But in any case, the same character in the same position in the text is converted in the same way.
No. For example, in most Latin languages, the lower case for I (U+0049) is i (U+0069), but not in Turkish and Azeri. There, the lower case for I is ı (U+0131) and the capital case for i is İ (U+0130).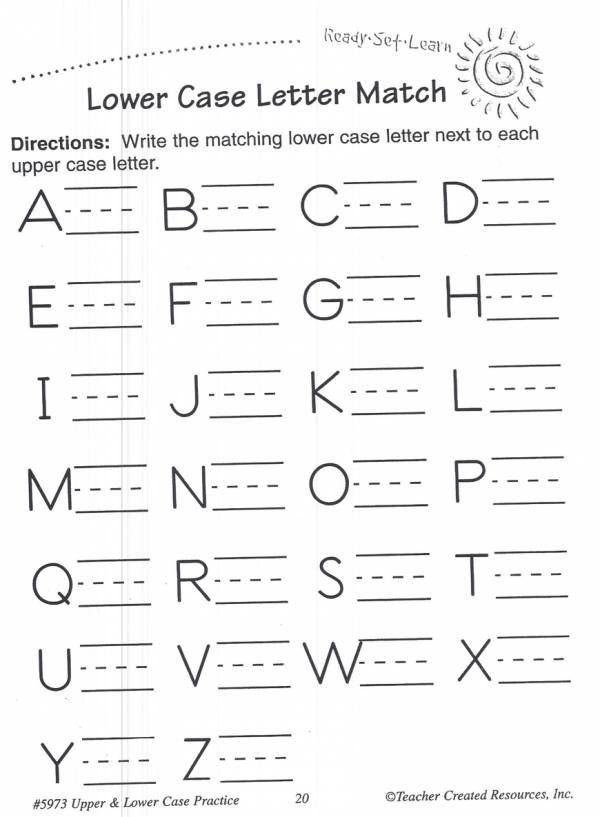 In Turkey, because of this, enchanting bugs are sometimes observed in a variety of software. And if you come across a text in Lithuanian with accents, then, for example, a capital Ì (U + 00CC), which will turn not into ì (U + 00EC), but into (U + 0069, U + 0307, U + 0300) . In general, the result of the conversion also depends on the language. Most of the complex cases are described here.
9. What a horror! Well, let's now correctly convert to uppercase and lowercase. Comparing two words case-insensitively is not a problem: we translate both into lowercase and compare.
There are also many pitfalls that follow from the above. For example, it will not work with German straße and STRASSE (the former will not change, the latter will turn into strasse). There will also be problems with many of the other letters described above.
10. M-yes… Maybe then everything is in uppercase?
And it won't always work (although much more often).