2 step direction worksheets
Following Directions – Worksheets, Activities, Goals, and More
One Possible Hierarchy
Basic Worksheets and Activities
Click on picture to view a small preview of each activity. Click on Doc or PDF to download worksheets in preferred format.
(1) (2) (3) (4)
(5)(6) (7)
(1) “I don’t know” Activity 1 Doc PDF; (2) “I don’t know” Activity 2 Doc PDF; (3) Comprehension Questions – Days of the Week Doc PDF; (4) Comprehension Questions – Months Doc PDF; (5) Comprehension Questions – Numbers Doc PDF; (6) Feedback – Basic Doc PDF ; (7) Feedback #2 Doc PDF;
Additional Worksheets and Activities
Click on picture to view a small preview of each activity. Click on Doc or PDF to download worksheets in preferred format.
(1)(2) (3) (4) (5) (6)(7) (8)
(1)Unless and If Doc PDF; (2) Complex Directions Doc PDF ; (3) “Trick” Directions 1 Doc PDF; (4) “Trick Directions” 2 Doc PDF; (5) And and Or Doc PDF; (6) Checklist Doc PDF ; (7) Category Directions Activity – Basic 1: Doc PDF ; (8) Category Directions Activity – Basic 2 Doc PDF
Expanded Directions Comprehension StripsClick on picture to view a small preview of each activity. Click on Doc or PDF to download worksheets in preferred format.
(1)(2) (3) (4)
(1) Expanded Directions 1 DocPDF; (2) Expanded Directions 2 DocPDF ; (3) Expanded Directions 3 DocPDF; (4) Expanded Directions 4 DocPDF
Background Information
Following directions involves using short term memory to hold known information while manipulating this information using language. Some types of words appear more frequently in directions than others – conjunctions, negatives, adjectives, and prepositions, for example, are often used in directions. Nearly every test item on one of the most commonly used assessments of following directions, the CELF-4’s Concepts and Following Directions subtest, uses some combination of conjunctions, negatives, and prepositions. These concepts are particularly critical in academic directions.
The ability to follow any specific direction depends upon the ability to comprehend the specific words within the direction. Not all one step directions are created equal. For example, a one step direction containing a negative is often more difficult than one with a similarly placed adjective.
Obviously, following directions also requires aspects outside the domain of language, such as motivation, interest, and attention. Increasing proficiency in language should provide a natural boost to these overlapping aspects.
Goal Suggestions
Cleopatra will follow basic one step directions with functional vocabulary with _____ accuracy as measured by SLP criterion referenced assessment and SLP/ teacher/ parent observation.
Marc will follow basic and expanded one step directions with curriculum relevant vocabulary…
Julius will follow basic and expanded two step directions with age appropriate curriculum relevant vocabulary…
Brutus will follow age appropriate complex directions including targeted syntax structures, such as prepositions, conjunctions, and negatives with _______ accuracy…
Functional Activity Ideas
Like this:
Like Loading...
30 Fun 2 Step Directions for Preschoolers
- Share
“Put your slippers on and grab a spoon for your cereal.” Easy to do, right?
For adults and older kids, following directions that have two steps can be quite an effortless task. For toddlers and young preschoolers, following multiple directions is a skill that takes time and maturity.
You can practise this skill in a fun way by using these 2 step directions for preschoolers.
What are Two Step Instructions?
Following directions that include two tasks is an important listening skill for children to learn. This helps them play games, follow instructions and procedures in the classroom and fit in socially with friends.
Being able to follow two-step instructions involves developing different types of skills.
Working memory is about holding onto information in order to use it. We want to be sure that kids can follow one-step directions effectively before moving ahead to giving them two steps to follow.
Auditory processing skills are also very important for enabling kids to follow directions they hear.
For example, auditory memory refers to when kids remember what they have heard, to use that information later.
Auditory closure helps them “fill in the blanks” when they have missed hearing the complete direction and auditory figure-ground aids kids in tuning out background noise to hear instructions. [source]
Speech therapy addresses not only how well children speak in words (expressive language) but also how well they understand what they hear (receptive language).
The receptive aspects of speech therapy are connected to auditory processing, and getting lots of practice in following directions is helpful to build those skills.
Verbal reasoning and vocabulary skills are also essential for children to comprehend your instructions. They must understand the words you are saying to be successful.
When Should a Child Follow 2 Step Directions?
At what age should a child start listening to and following one-to-two step directions?
At 24 months of age, many children can follow two or even three-step directions, especially those that are related, such as picking up two specific toys to put away on a shelf.
Although they can do this, research shows they choose to follow through only about half the time.
At around age three, most kids effectively follow two-step directions.
So then, when should a child follow 3 step directions?
Four-year-old children are usually able to follow through on three-step instructions, especially those that are given in a logical order.
[source]
How do I Teach My Child to Follow Multi-Step Directions?
It’s important to talk to your children often, giving voice to your own thought process as you move through your day. Verbalize what you observe about your child’s movements throughout the day, as well.
Read to your children, pointing to illustrations, and urging them to name objects.
How do you teach following instructions?
Listening skills in early childhood are very important and must be practised. Here are some tips:
- When giving your child instructions, state them clearly, in simple language, and give your child enough time to respond.
- Look at them when giving directions, and make sure they are looking at you.
- Restate or clarify if your child has not followed through on the instructions given.
- Model the correct actions, if necessary.
- Praise your child when they follow through on a single instruction and they will eventually build the ability to follow multiple part instructions.
- Don’t start giving 3 step directions until your child has mastered 2 instructions.
A list of 2 Step Directions for Preschoolers
Some of the following examples include 2 step directions with prepositions or spatial concepts, such as “on,” “under”, and “over.”
These types of words address the relationships between objects or between objects and individuals and can help teach positional language.
Make a game out of requesting that your children complete two actions. You can also make it fun by using these directions in familiar games that require giving directions, such as “Simon Says” or “Follow the Leader.”
You could also play “Broken Telephone,” to see if the last person who hears the directions can follow through successfully.
Another fun game is Listen and Draw. Give multiple directions that your child must follow to draw the picture you describe.
[source]
Here is a list of instructions suitable for preschoolers:
1. Sit down on the floor and close your eyes.
2. Touch your head and turn in a circle.
3. Stand up and pretend to be frozen.
4. Bounce the ball and say your name.
5. Do a jumping jack and then sit on the chair.
6. Hop on one foot and smile.
7. Place the teddy bear under the table and sit on the chair.
8. Walk along the fence and sit on the swing.
9. Reach your hands over your head and clap your hands.
10. Stand next to Grandma/Grandpa and hold onto their hand.
11. Draw a yellow sun above the green grass.
12. Draw blue water next to a brown beach.
13. Touch your toes and then spin around in a circle.
14. Wash your face with this cloth and comb your hair.
15. Spread peanut butter on one slice of bread and place the other slice on top.
16. Pull your blanket up on the bed and arrange your stuffed animals.
17. Take a book out of your bag and set it on the table.
18. Lie down next to Mom/Dad and close your eyes.
19. Take off your mittens and hang them up to dry.
20. Point to your eyes and say your name.
21. Point to your lips and smack them together.
22. Turn off the TV and place the remote on the coffee table.
23. Stomp your feet and say, “I’m a dinosaur!”
24. Choose a book from your shelf and read it to your doll.
25. Cover your eyes and say, “Boo!”
26. Turn around in a circle and then sit down on the grass.
27. Wave goodbye to me and walk to the door.
28. Climb up the steps and then walk back down.
29. Fetch your school bag and put your lunch box inside it.
30. Wash your hands for dinner and come back to sit on a chair at the table.
These are just a jumping-off place to start your mind working! Involve your children and challenge them to make up their own directions and ask you to follow them!
Check out these other listening activities for kids to get even more practice!
Get FREE access to Printable Puzzles, Stories, Activity Packs and more!
Join Empowered Parents + and you’ll receive a downloadable set of printable puzzles, games and short stories, as well as the Learning Through Play Activity Pack which includes an entire year of activities for 3 to 6-year-olds.
Access is free forever.
Signing up for a free Grow account is fast and easy and will allow you to bookmark articles to read later, on this website as well as many websites worldwide that use Grow.
- Share
Autocomplete cells in Excel - statanaliz.info
Autocomplete Excel cells is the automatic entry of a series of data into a certain range. Enter “Monday” into the cell, then hold down the autofill marker (square in the lower right corner) with the left mouse button, drag it down (or in the other direction). The result will be a list of the days of the week. You can use a short form like Mon, Tue, Wed, etc. Excel will understand. Similarly, a list of month names is created.
Automatic filling of cells is also used to extend the sequence of numbers with a given step (arithmetic progression). To make a list of odd numbers, you need to specify 1 and 3 in two cells, then select both cells and drag them down.
Excel can also recognize numbers in text. So, it's easy to create a list of quarters. Enter in the cell "1 quarter" and stretch it down.
This is where most Excel users end their knowledge of autocomplete. But this is not all, and other effective and interesting techniques will be considered further.
Autocomplete in Excel from a list of data
Clearly, other lists other than days of the week and months may be needed. Suppose you often have to enter a list of cities where the company's service centers are located: Minsk, Gomel, Brest, Grodno, Vitebsk, Mogilev, Moscow, St. Petersburg, Voronezh, Rostov-on-Don, Smolensk, Belgorod. First you need to create and save (in the right order) a complete list of titles. Go to File - Options - Advanced - General - Edit Lists .
The next window that opens shows those lists that exist by default.
As you can see, there are not many of them. But it's easy to add your own. You can use the window on the right, where either separated by a comma or a column, list the desired sequence. However, it will be faster to import, especially if there is a lot of data. To do this, first create a list of names somewhere on an Excel sheet, then make a link to it and click Import .
Click OK. The list has been created, you can use it for autocompletion.
In addition to text lists, it is more common to create sequences of numbers and dates. One of the options was considered at the beginning of the article, but it is primitive. There are more interesting tricks. First, you need to select one or several first values of the series, as well as the range (to the right or down), where the sequence of values will be extended. Next, we call the progression dialog box: Home - Fill - Progression .
Consider the settings.
In the left part of the window, use the switch to set the direction of building the sequence: down (by rows) or to the right (by columns).
The desired type is selected in the middle:
- arithmetic progression - each subsequent value is changed by the number specified in the Step field
- geometric progression - each subsequent value is multiplied by the number specified in the Step 9 field0056
- dates - creates a sequence of dates. When this type is selected, the switches to the right are activated, where you can select the type of unit of measure. There are 4 options:
-
-
- day - list of calendar dates (in increments below) fixed as in the first cell)
- year - only years change
-
- autocomplete - this command is equivalent to dragging with the left mouse button. That is, Excel itself determines: whether it should continue the sequence of numbers, or extend the list. If you pre-fill two cells with the values 2 and 4, then 6, 8, and so on will appear in the other selected cells.
 If more cells are prepopulated, then Excel will calculate the approximation using linear regression, i.e. forecast along a straight trend line (an interesting feature - see below for more details).
Lower part of window Progression is used to create a sequence of any length based on end value and step. For example, you need to fill a column with a sequence of even numbers from 2 to 1000. It is not convenient to drag with the mouse. Therefore, you first need to select only the cell with one first value. Next, in the window Progression , specify Location , Step and Limit value .
The result will be a filled column from 2 to 1000. Similarly, you can make a sequence of working days a year ahead (the limit value must be the last date, for example, 12/31/2016). The ability to fill a column (or row) with the last value is a very useful thing, because. eliminates a bunch of unnecessary actions during stretching. This completes the autocomplete settings. We go further.
Autofill numbers using the mouse
Autofill in Excel is more convenient to do with a mouse that has a right and left button. Both will be needed.
Suppose you need to make serial numbers of numbers, starting from 1. Usually, two cells are filled with numbers 1 and 2, and then an arithmetic progression is dragged with the left mouse button. You can do it differently. We fill only one cell with 1. We stretch it and get a column with units. Next, open the box that appears immediately after dragging in the lower right corner and select Fill .
If you select Fill only formats , only cell formats will be extended.
Make a sequence of numbers even faster. While dragging the cell, hold down the button Ctrl .
This trick only works with sequences of numbers. In other situations, holding Ctrl will copy data instead of autocomplete.
If you use the right mouse button while dragging, the context menu opens as soon as you release the button.
This adds several commands. Progression allows you to use additional autocomplete operations (see settings above). True, the range is selected and the length of the sequence will be limited to the last cell.
To autocomplete to the required limit value (number or date), you can do the following trick. We take with the right mouse button by the marker, slightly pull it down, immediately return it back and release the button - the autocomplete context menu opens. Choose a progression. This time only one cell is selected, so we specify the direction, step, limit value and create the desired sequence.
The menu items Linear and Exponential Approximation are very interesting. This is an extrapolation, i.e. forecasting data according to the specified model (linear or exponential). Usually, special Excel functions are used for the forecast or a trend (regression) equation is preliminarily calculated, into which the values of the independent variable for future periods are substituted and thus the forecast value is calculated. It's done like this. Suppose there is a dynamics of the indicator with uniform growth.
A linear trend is suitable for forecasting. Calculation of equation parameters can be done using Excel functions, but often, for clarity, a chart is used with settings for displaying a trend line, an equation, and predictive values.
To get a forecast in numerical terms, you need to calculate based on the resulting regression equation (or directly refer to Excel formulas). Thus, it turns out quite a lot of actions that require a good understanding.
So, the forecast using the linear regression method can be made without formulas and without graphs at all, using only autocomplete cells in Excel. To do this, select the data on which the forecast is based, drag the right mouse button to the required number of cells corresponding to the length of the forecast, and select Linear approximation . We get a forecast. Without noise, dust, formulas and diagrams.
If the data has an accelerating growth (like a deposit account), then an exponential model can be used. Again, in order not to suffer with calculations, you can use autocomplete by selecting Exponential approximation .
There is no faster way to predict.
Autofill dates using mouse
It's quite common to want to extend a list of dates. We take the date and drag it with the left mouse button. Open the box and choose the filling method.
Weekdays is a great option for accountants, HR and other professionals who deal with various plans. And here is another example. Let's say the scheduled payments come on the 15th and the last day of each month. Specify the first two dates, drag down and fill in by month (any mouse button).
Note that the 15th is fixed and the last day of the month is changed to always be the last.
Using the right mouse button , you can use the settings progression . For example, make a list of working days until the end of the year. In the list of commands through the right button there is also Instant filling . This function appeared in Excel 2013. It is used to fill cells according to the sample. But there was already an article about this, I recommend reading it. It will also save you hours of work.
That's about it. This video tutorial shows you how to autofill cells in Excel.
Share on Social Media:
Using Grids and Guides in Photoshop
User Guide Cancel
Search
- Photoshop User Guide
- Introduction to Photoshop
- Dream about it. Do it.
- What's New in Photoshop
- Editing the first photo
- Create documents
- Photoshop | Frequently Asked Questions
- Photoshop System Requirements
- Transfer of presets, operations and settings
- Introduction to Photoshop
- Photoshop and other Adobe products and services
- Working with Illustrator artwork in Photoshop
- Working with Photoshop files in InDesign
- Substance 3D Materials for Photoshop
- Photoshop and Adobe Stock
- Working with the built-in Capture extension in Photoshop
- Creative Cloud Libraries
- Creative Cloud Libraries in Photoshop
- Working in Photoshop using the Touch Bar
- Net and guides
- Create transactions
- Cancellation and transaction history
- Photoshop on iPad
- Photoshop on iPad | General questions
- Introduction to the working environment
- System requirements | Photoshop on iPad
- Creating, opening and exporting documents
- Adding photos
- Working with layers
- Drawing and painting with brushes
- Selecting areas and adding masks
- Retouch compositions
- Working with Adjustment Layers
- Adjusting the key of a composition using the Curves layer
- Applying transform operations
- Trim and rotate compositions
- Rotate, pan, zoom and restore canvas
- Working with text layers
- Working with Photoshop and Lightroom
- Getting missing fonts in Photoshop on iPad
- Japanese text in Photoshop on iPad
- Application parameter management
- Touch shortcuts and gestures
- Key combinations
- Image resizing
- Live stream your creative process in Photoshop on iPad
- Fix imperfections with Healing Brush
- Creating brushes in Capture and using them in Photoshop
- Working with Camera Raw files
- Creating and using smart objects
- Adjusting the exposure of images with the Dodge and Burn tools
- Photoshop Web Application Beta
- Frequently Asked Questions | Photoshop Web App Beta
- Working environment overview
- System requirements | Photoshop 9 Web App Beta0056
- Keyboard shortcuts | Photoshop Web App Beta
- Supported file formats | Photoshop Web Application Beta
- Opening and working with cloud documents
- Collaboration with stakeholders
- Limited cloud document editing capabilities
- Cloud Documents
- Cloud Documents Photoshop | Frequently Asked Questions
- Photoshop Cloud Documents | Workflow Questions
- Work with and manage cloud documents in Photoshop
- Cloud storage update for Photoshop
- Unable to create or save cloud document
- Troubleshooting Photoshop cloud documents
- Collection of cloud document sync logs
- Sharing and editing cloud documents
- File sharing and commenting in the application
- Operating environment
- Basic information about the working environment
- Learn faster with the What's New panel in Photoshop
- Create documents
- Working in Photoshop using the Touch Bar
- Tool Gallery
- Performance settings
- Using tools
- Touch gestures
- Touch gesture capabilities and customizable workspaces
- Technology overview versions
- Metadata and comments
- Default key combinations
- Touch gesture capabilities and customizable workspaces
- Putting Photoshop images in other applications
- Installations
- Default key combinations
- Rulers
- Show or hide non-printing auxiliaries
- Specifying columns for the image
- Cancellation and transaction history
- Panels and menus
- File location
- Positioning of elements with referencing
- Positioning with the ruler tool
- Setting sets
- Customizing keyboard shortcuts
- Net and guides
- Web, screen, and application content development
- Photoshop for design
- Artboards
- View on device
- Copy CSS from layers
- Dividing web pages into fragments
- HTML options for snippets
- Changing the arrangement of fragments
- Working with web graphics
- Create web photo galleries
- Understanding images and working with color
- Resizing images
- Working with raster and vector images
- Image size and resolution
- Importing images from cameras and scanners
- Creating, opening and importing images
- Image viewer
- "Invalid JPEG marker" error | Opening images
- Viewing multiple images
- Customizing color palettes and color swatches
- HDR images
- Image color matching
- Converting between color modes
- Color modes
- Erase sub-images
- Blend Modes
- Choice of colors
- Making changes to indexed color tables
- Image information
- Distortion filters not available
- Color details
- Color and monochrome corrections with channels
- Selecting colors in the Color and Swatches panels
- Sample
- Color mode (or picture mode)
- Shade
- Adding a color mode change to an operation
- Add swatches from HTML CSS and SVG files
- Bit depth and settings
- Layers
- Understanding Layers
- Reversible editing
- Create and manage layers and groups
- Selecting, grouping and linking layers
- Putting images into frames
- Opacity and layering
- Layer masks
- Smart Filter Application
- Layer compositions
- Move, arrange and lock layers
- Mask layers with vector masks
- Managing layers and groups
- Effects and Layer Styles
- Editing layer masks
- Extract resources
- Display layers with clipping masks
- Generation of graphic resources from layers
- Working with Smart Objects
- Blend Modes
- Combining several fragments into one image
- Combining images with Auto Layer
- Alignment and distribution of layers
- Copy CSS from layers
- Load selections based on layer boundaries or layer masks
- See-through to show the contents of other layers
- Layer
- Mixing
- Composite images
- Background
- Selections
- Selection and Mask workspace
- Quick area selection
- Getting Started with Selections
- Selecting with the Marquee Toolbox
- Selecting with the Lasso tools
- Selecting a color range in an image
- Pixel highlight setting
- Convert between contours and selection boundaries
- Channel Basics
- Moving, copying and deleting selected pixels
- Creating a temporary quick mask
- Saving selections and alpha channel masks
- Selecting focus areas in an image
- Duplication, splitting and merging of channels
- Channel calculation
- Extraction
- Bounding box
- Image corrections
- Perspective distortion
- Reducing blur due to camera movement
- Healing Brush Tool Examples
- Export color lookup tables
- Image sharpness and blur correction
- Introduction to color grading
- Applying the Brightness/Contrast setting
- Shadow and Highlight Detail Correction
- Correction "Levels"
- Hue and saturation correction
- Juiciness correction
- Adjusting the color saturation in image areas
- Quick tone correction
- Applying special color effects to images
- Image enhancement with color balance correction
- HDR images
- View histograms and pixel values
- Image color matching
- Crop and straighten photographs
- Converting a color image to black and white
- Adjustment and fill layers
- Curves correction
- Blend Modes
- Target Imaging for Press
- Color and tone correction with Levels and Curves eyedroppers
- HDR Exposure and Toning Compensation
- Filter
- Blur
- Lighten or darken image areas
- Selective Color Correction
- Replacing object colors
- Adobe Camera Raw
- Camera Raw system requirements
- What's New in Camera Raw
- Introduction to Camera Raw
- Creation of panoramas
- Supported lenses
- Vignetting, grain, and haze removal in Camera Raw
- Default key combinations
- Automatic perspective correction in Camera Raw
- Reversible editing in Camera Raw
- Camera Raw Radial Filter Tool
- Manage Camera Raw settings
- Processing, saving and opening images in Camera Raw
- Image enhancements with Camera Raw's improved Spot Remover
- Rotating, cropping and modifying images
- Color correction in Camera Raw
- Function overview | Adobe Camera Raw | Issues for 2018
- Overview of new features
- Processing versions in Camera Raw
- Making local adjustments in Camera Raw
- Fixing and restoring images
- Removing objects from photos using Content-Aware Fill
- Content-aware patching and relocation
- Retouching and fixing photos
- Image Distortion and Noise Correction
- Basic troubleshooting steps to solve most problems
- Image transformation
- Object transformation
- Crop, rotate and canvas adjustment
- Crop and straighten photographs
- Creating and editing panoramic images
- Deforming images, shapes and contours
- Perspective
- Using the Liquify filter
- Content-aware scale
- Transforming images, shapes and paths
- Deformation
- Transformation
- Panorama
- Drawing and painting
- Drawing symmetrical ornaments
- Options for drawing a rectangle and changing the stroke
- Drawing details
- Drawing and editing shapes
- Paint tools
- Creating and modifying brushes
- Blend Modes
- Adding color to outlines
- Edit contours
- Painting with mix brush
- Brush Presets
- Gradients
- Gradient interpolation
- Fill and stroke selections, layers, and paths
- Drawing with the pen tool group
- Pattern making
- Creating a pattern with the Pattern Builder filter
- Loop control
- Managing pattern libraries and presets
- Drawing with pen tablet
- Creating textured brushes
- Adding dynamic elements to brushes
- Gradient
- Draw stylized strokes with the Artistic Archive Brush
- Drawing with pattern
- Synchronizing presets across multiple devices
- Text
- Adding and editing text
- Universal text editor
- Working with OpenType SVG fonts
- Character formatting
- Paragraph formatting
- Creating text effects
- Text editing
- Leading and letter spacing
- Font for Arabic and Hebrew
- Fonts
- Troubleshooting fonts
- Asian text
- Creating text
- Text Engine error when using Photoshop's Type tool | Windows 8
- Adding and editing text
- Video and animation
- Video editing in Photoshop
- Editing video and animation layers
- Introduction to video and animation
- Video and animation preview
- Drawing frames in video layers
- Import video files and image sequences
- Creating frame animations
- Creative Cloud 3D Animation Preview
- Creating timeline animations
- Creating images for videos
- Filters and effects
- Using the Liquify filter
- Using Blur Gallery group effects
- Filter basics
- Filter effects guide
- Adding lighting effects
- Using the Adaptive Wide Angle filter
- Oil Paint Filter
- Effects and Layer Styles
- Application of specific filters
- Image area feathering
- Save and export
- Save files in Photoshop
- Export files to Photoshop
- Supported file formats
- Saving files in other graphic formats
- Move projects between Photoshop and Illustrator
- Saving and exporting video and animation
- Saving PDF files
- Digimarc copyright protection
- Save files in Photoshop
- Printing
- Printing 3D objects
- Printing with Photoshop
- Printing and color management
- Checklists and PDF presentations
- Print photos in a new image layout
- Spot color printing
- Duplexes
- Printing images on a printing press
- Photoshop Color Enhancement
- Printing troubleshooting | Photoshop
- Automation
- Create activities
- Creating data-driven images
- Scenarios
- File batch processing
- Operation playback and management
- Adding conditional operations
- About actions and the Actions panel
- Recording tools in operations
- Adding a color mode change to an operation
- Photoshop UI Development Kit for Plugins and Scripts
- Color Management
- Understanding Color Management
- Accurate color assurance
- Color settings
- Working with color profiles
- Color management of documents for viewing on the web
- Color management for printing documents
- Color management of imported images
- Perform proofing
- Content authenticity
- Learn more about content credentials
- Identity and origin of NFT tokens
- Connecting accounts for creative attribution
- 3D objects and technical images
- 3D in Photoshop | Common questions about deprecated 3D features
- Creative Cloud 3D Animation Preview
- Printing 3D objects
- 3D drawing
- 3D Panel Enhancement | Photoshop
- 3D Concepts and Tools
- Rendering and saving 3D objects
- Creating 3D objects and animations
- Image stacks
- 3D graphics workflow
- Measurements
- DICOM files
- Photoshop and MATLAB
- Counting objects in an image
- Merging and transforming 3D objects
- Editing 3D textures
- HDR Exposure and Toning Compensation
- 3D panel settings
Guides and a grid help you position images or elements precisely.
Guides are non-printing lines that cover the image and can be moved or removed. In addition, they can be secured to prevent accidental movement.
Smart Guides help you align shapes, slices, and selections. They are displayed automatically when drawing a shape, selecting or creating a fragment. You can hide the smart guides if needed.
The grid is useful for arranging elements symmetrically. The grid is non-printing lines by default, but can also be displayed as dots.
Guides and grids work in a similar way.
-
Selections, selection borders, and tools snap to guides and grid when dragged within 8 screen pixels (not image pixels) of them. The guides are also snapped to the grid as they move. This feature can be turned on and off.
-
The spacing between the guides, as well as the visibility of the guides and the grid and the snapping, can be different for different images.
-
The size of the grid cells, as well as the style of the guides, are the same for all images.
 The color of the guides now depends on the specific image.
Show or hide the grid, guides, or smart guides
-
Do one of the following.
-
Select the menu command View > Show > Grid.
-
Select the menu command View > Show > Guides.
-
Choose View > Show > Smart Guides.
-
Select View > Extras. This command can also show or hide layer edges, selection edges, target paths, and slices.
-
Display guide
-
If rulers are not displayed, choose View > Rulers.
View image for best accuracy at 100% scale, or use the Info panel.
-
To create a guide, do one of the following.
-
In the View > Guides > New Guide submenu in the dialog box, select an orientation (Horizontal or Vertical), enter a position and a color, and click OK.
-
Drag away from the horizontal ruler to create a horizontal guide.

-
Hold down Alt (on Windows) or Option (on Mac OS) and drag away from the vertical ruler to create a horizontal guide.
-
Drag away from the vertical ruler to create a vertical guide.
-
Hold down Alt (on Windows) or Option (on Mac OS) and drag away from the horizontal ruler to create a vertical guide.
-
Hold down the Shift key and drag away from the horizontal or vertical ruler to create a guide that snaps to ruler marks. As you drag the guide, the cursor turns into a double arrow.
-
-
If you want to lock all guides, choose View > Guides and choose Lock Guides (optional).
Guide travel
-
Select the Move tool or hold down the Ctrl (Windows) or Command (macOS) key to activate the Move tool and select or move multiple guides.
-
Move the cursor over the guide (cursor changes to double arrow).
-
Move the guide using one of the following methods.
-
Drag the guide to move it.
-
Change a horizontal guideline to a vertical one, or vice versa, by holding Alt (on Windows) or Option (on Mac OS), left-clicking, and dragging the guide.
-
Align the guide to the ruler marks by holding down the Shift key while dragging. The guide snaps to the grid when the grid is visible and View > Snap To > Gridlines is selected.
-
-
You can now select guides (one or more) to modify. To select, click on the guide and a double arrow will appear.
- To select one guide, press it until a double arrow appears. To edit a guide, go to the View > Guides > Edit Selected Guides submenu. You can also right-click on the selected guide to view the context menu.
- To select multiple guides, click on one guide and use the keyboard shortcut Shift + Alt (on Windows) or Shift + Option (on Mac) to select other guides.
 Once multiple guides are selected, other actions can be performed, including move, right-click, double-click, and preview. The keyboard shortcut for quickly selecting multiple guides is Shift+Alt-click.
 - To move one guide, select it and drag it across the canvas to the desired location.
- To move multiple guides, select the guides you want to move and hold down Shift+Alt (on Windows) or Shift+Option (on Mac) until a double arrow appears. Now click on the guides and drag them across the canvas to the right place.
- Release the keys and continue dragging guides across the canvas.
- Hold down the Shift key and move the guide to snap it to the ruler marks. Using shapes or a selection, select multiple guides (vertical and horizontal) and snap them to the edge of the shape. To learn more about binding, please see information on rulers in Photoshop .
- To select one guide, press it until a double arrow appears. To edit a guide, go to the View > Guides > Edit Selected Guides submenu. You can also right-click on the selected guide to view the context menu.
Guide placement
You can also enter a specific location to place your guide.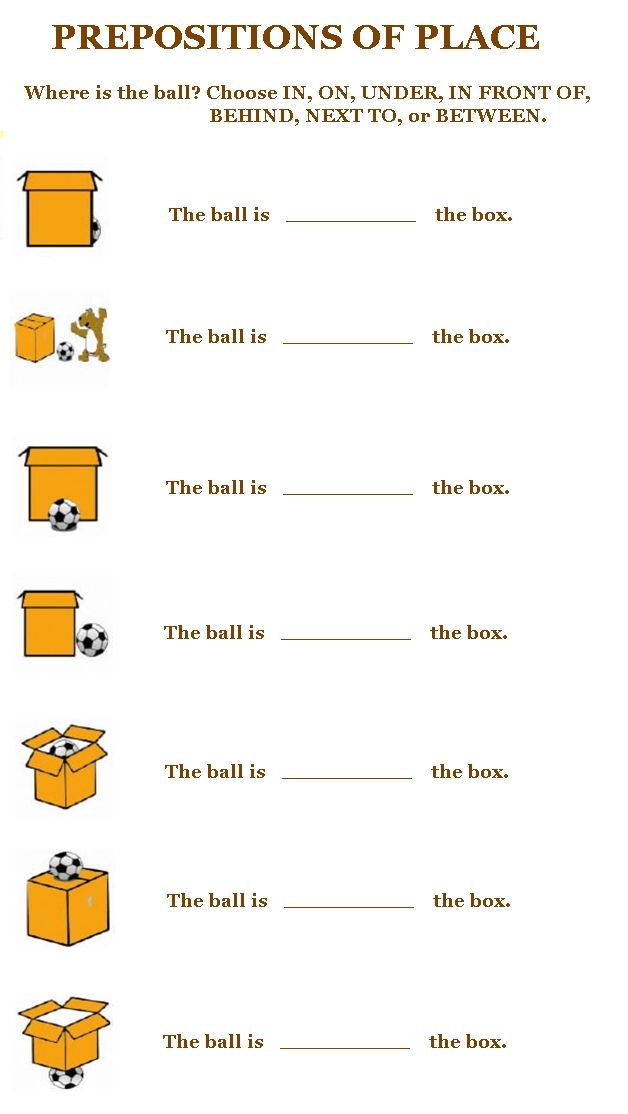 Once placed on the canvas, you can move it or change its color and orientation.
Removing guides from the image
-
Do one of the following.
- To remove a single guide, drag it outside the image window.
- To remove all guides, select View > Guides > Remove Guides .
- To remove selected guides, choose View > Guides > Delete Selected Guides.
Guide and grid setting adjustment
-
Do one of the following.
-
Choose Edit > Preferences > Guides, Grid, and Slices (on Windows).
-
(macOS) Choose Photoshop > Preferences > Guides, Grid, and Slices.
-
-
In the Color boxes, select a color for the guides and grid.
 If Custom is selected, click the color field, select a color, and then click OK.
 -
In the Style boxes, select a color for the guides and grid.
-
In the Line every box, enter a value for the distance between the guides. In the Internal division by field, enter the size of each division in the grid.
Change the units for this parameter if necessary. If you select the % option, a grid will be created dividing the image into equal sections. For example, selecting 25% will create a uniform 4 x 4 grid.
-
Click OK.
Updates in the June 2022 release of Photoshop 23.4
The latest enhancements to the Guides feature allow you to customize the guides functionality at the document level to optimize your creative work.
This includes the ability to color and edit guides with new keyboard shortcuts and a new context menu.
You can also delete guides using the Delete key and select multiple guides to change and move them.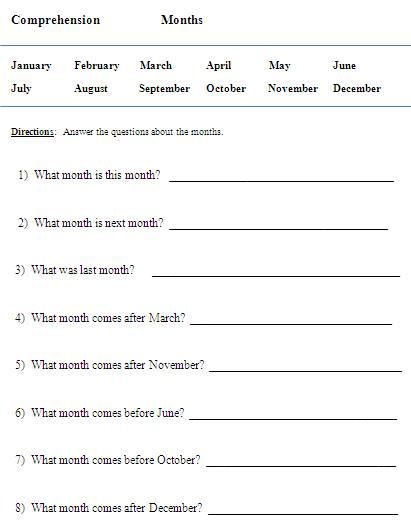
Download the latest version of Photoshop to try out this exciting improvement!
Update Photoshop
Paint Guides
New dialog boxes (shown below) allow you to color one or more selected guides, making it much easier to identify and visualize guides.
-
To choose color options for guides, choose View > Guides > New Guide Layout.
-
Select one of the default color options or create your own colors. You can always go back and change colors after creating the guide layout.
Select a default color in the New Guide Layout dialogCreate your own colors using the Color Picker (guide color)You can also create different guide layout colors for each artboard.
Change guides
-
To change guides, select multiple guides by clicking Option + Shift (Mac) or Alt + Shift (Win).
Photoshop's Edit Selected Guides context menu Right-click and select Edit Selected Guides from the context menu.
 -
Change the Orientation and Color options and click OK.
Photoshop 9's Edit Selected Guides dialog box0056 -
You can also go to the View > Guides submenu to display the Edit Selected Guides dialog box.
Select the Move tool and use the mouse pointer to mark the desired guideline. Then use the keyboard shortcuts option + shift (double-click) on a Mac or Alt + Shift (double-click) on a Windows PC to open the Edit Selected Guides dialog box.
Guide removal
-
Select guides (one or more) as specified in Move guide section .
-
To remove guides, go to the View > Guides submenu and select Clear Selected Guides. You can also select guides and remove them from the right-click context menu.
You can also select multiple guides by pressing option + shift (on Mac) or Alt + Shift (on Win) and the Delete key.

Learn more