3 step directions printable
Following Directions – Worksheets, Activities, Goals, and More
One Possible Hierarchy
Basic Worksheets and Activities
Click on picture to view a small preview of each activity. Click on Doc or PDF to download worksheets in preferred format.
(1) (2) (3) (4)
(5)(6) (7)
(1) “I don’t know” Activity 1 Doc PDF; (2) “I don’t know” Activity 2 Doc PDF; (3) Comprehension Questions – Days of the Week Doc PDF; (4) Comprehension Questions – Months Doc PDF; (5) Comprehension Questions – Numbers Doc PDF; (6) Feedback – Basic Doc PDF ; (7) Feedback #2 Doc PDF;
Additional Worksheets and Activities
Click on picture to view a small preview of each activity. Click on Doc or PDF to download worksheets in preferred format.
(1)(2) (3) (4) (5) (6)(7) (8)
(1)Unless and If Doc PDF; (2) Complex Directions Doc PDF ; (3) “Trick” Directions 1 Doc PDF; (4) “Trick Directions” 2 Doc PDF; (5) And and Or Doc PDF; (6) Checklist Doc PDF ; (7) Category Directions Activity – Basic 1: Doc PDF ; (8) Category Directions Activity – Basic 2 Doc PDF
Expanded Directions Comprehension StripsClick on picture to view a small preview of each activity. Click on Doc or PDF to download worksheets in preferred format.
(1)(2) (3) (4)
(1) Expanded Directions 1 DocPDF; (2) Expanded Directions 2 DocPDF ; (3) Expanded Directions 3 DocPDF; (4) Expanded Directions 4 DocPDF
Background Information
Following directions involves using short term memory to hold known information while manipulating this information using language. Some types of words appear more frequently in directions than others – conjunctions, negatives, adjectives, and prepositions, for example, are often used in directions. Nearly every test item on one of the most commonly used assessments of following directions, the CELF-4’s Concepts and Following Directions subtest, uses some combination of conjunctions, negatives, and prepositions. These concepts are particularly critical in academic directions.
The ability to follow any specific direction depends upon the ability to comprehend the specific words within the direction. Not all one step directions are created equal. For example, a one step direction containing a negative is often more difficult than one with a similarly placed adjective.
Obviously, following directions also requires aspects outside the domain of language, such as motivation, interest, and attention. Increasing proficiency in language should provide a natural boost to these overlapping aspects.
Goal Suggestions
Cleopatra will follow basic one step directions with functional vocabulary with _____ accuracy as measured by SLP criterion referenced assessment and SLP/ teacher/ parent observation.
Marc will follow basic and expanded one step directions with curriculum relevant vocabulary…
Julius will follow basic and expanded two step directions with age appropriate curriculum relevant vocabulary…
Brutus will follow age appropriate complex directions including targeted syntax structures, such as prepositions, conjunctions, and negatives with _______ accuracy…
Functional Activity Ideas
Like this:
Like Loading...
30 Fun 2 Step Directions for Preschoolers
- Share
“Put your slippers on and grab a spoon for your cereal.” Easy to do, right?
For adults and older kids, following directions that have two steps can be quite an effortless task. For toddlers and young preschoolers, following multiple directions is a skill that takes time and maturity.
You can practise this skill in a fun way by using these 2 step directions for preschoolers.
What are Two Step Instructions?
Following directions that include two tasks is an important listening skill for children to learn. This helps them play games, follow instructions and procedures in the classroom and fit in socially with friends.
Being able to follow two-step instructions involves developing different types of skills.
Working memory is about holding onto information in order to use it. We want to be sure that kids can follow one-step directions effectively before moving ahead to giving them two steps to follow.
Auditory processing skills are also very important for enabling kids to follow directions they hear.
For example, auditory memory refers to when kids remember what they have heard, to use that information later.
Auditory closure helps them “fill in the blanks” when they have missed hearing the complete direction and auditory figure-ground aids kids in tuning out background noise to hear instructions. [source]
Speech therapy addresses not only how well children speak in words (expressive language) but also how well they understand what they hear (receptive language).
The receptive aspects of speech therapy are connected to auditory processing, and getting lots of practice in following directions is helpful to build those skills.
Verbal reasoning and vocabulary skills are also essential for children to comprehend your instructions. They must understand the words you are saying to be successful.
When Should a Child Follow 2-Step Directions?
At what age should a child start listening to and following one-to-two-step directions?
At 24 months of age, many children can follow two or even three-step directions, especially those that are related, such as picking up two specific toys to put away on a shelf.
Although they can do this, research shows they choose to follow through only about half the time.
At around age three, most kids effectively follow two-step directions.
So then, when should a child follow 3 step directions?
Four-year-old children are usually able to follow through on three-step instructions, especially those that are given in a logical order.
[source]
How do I Teach My Child to Follow Multi-Step Directions?
It’s important to talk to your children often, giving voice to your own thought process as you move through your day. Verbalize what you observe about your child’s movements throughout the day, as well.
Read to your children, pointing to illustrations, and urging them to name objects.
How do you teach following instructions?
Listening skills in early childhood are very important and must be practised. Here are some tips:
- When giving children instructions, state them clearly, in simple language, and give them enough time to respond.
- Look at them when giving directions, and make sure they are looking at you.
- Restate or clarify if a child has not followed through on the instructions given.
- Model the correct actions, if necessary.
- Praise your children when they follow through on a single instruction; they will eventually build the ability to follow multiple-part instructions.
- Don’t start giving 3 step directions until a child has mastered 2 instructions.
A list of 2-Step Directions for Preschoolers
Some of the following examples include 2 step directions with prepositions or spatial concepts, such as “on,” “under”, and “over.”
These types of words address the relationships between objects or between objects and individuals and can help teach positional language.
Make a game out of requesting that your children complete two actions. You can also make it fun by using these directions in familiar games that require giving directions, such as “Simon Says” or “Follow the Leader.”
You could also play “Broken Telephone,” to see if the last person who hears the directions can follow through successfully.
Another fun game is “Listen and Draw“. Give multiple directions that your child must follow to draw the picture you describe.
[source]
Here is a list of instructions suitable for preschoolers:
1. Sit down on the floor and close your eyes.
2. Touch your head and turn in a circle.
3. Stand up and pretend to be frozen.
4. Bounce the ball and say your name.
5. Do a jumping jack and then sit on the chair.
6. Hop on one foot and smile.
7. Place the teddy bear under the table and sit on the chair.
8. Walk along the fence and sit on the swing.
9. Reach your hands over your head and clap your hands.
10. Stand next to Grandma/Grandpa and hold onto their hand.
11. Draw a yellow sun above the green grass.
12. Draw blue water next to a brown beach.
13. Touch your toes and then spin around in a circle.
14. Wash your face with this cloth and comb your hair.
15. Spread peanut butter on one slice of bread and place the other slice on top.
16. Pull your blanket up on the bed and arrange your stuffed animals.
17. Take a book out of your bag and set it on the table.
18. Lie down next to Mom/Dad and close your eyes.
19. Take off your mittens and hang them up to dry.
20. Point to your eyes and say your name.
21. Point to your lips and smack them together.
22. Turn off the TV and place the remote on the coffee table.
23. Stomp your feet and say, “I’m a dinosaur!”
24. Choose a book from your shelf and read it to your doll.
25. Cover your eyes and say, “Boo!”
26. Turn around in a circle and then sit down on the grass.
27. Wave goodbye to me and walk to the door.
28. Climb up the steps and then walk back down.
29. Fetch your school bag and put your lunch box inside it.
30. Wash your hands for dinner and come back to sit on a chair at the table.
These are just a jumping-off place to start your mind working. Involve your children and challenge them to make up their own directions and ask you to follow them.
Check out these other listening activities for kids to get even more practice.
Get FREE access to Printable Puzzles, Stories, Activity Packs and more!
Join Empowered Parents + and you’ll receive a downloadable set of printable puzzles, games and short stories, as well as the Learning Through Play Activity Pack which includes an entire year of activities for 3 to 6-year-olds.
Access is free forever.
Signing up for a free Grow account is fast and easy and will allow you to bookmark articles to read later, on this website as well as many websites worldwide that use Grow.
- Share
How to Print to PDF in 3 Steps
Elise Williams
2021-05-20 14:32:39 • Posted : How To Articles • Verified Solutions
Unlike other operating systems, Windows does not support printing to PDF. Consequently, for Windows users, who had neither the right tool nor the right know-how, it was quite problematic to print to PDF. It's fair to say that Windows 10 has recently added this feature, so the people most likely to experience this issue are those using Windows 7 and 8. If you haven't upgraded to Windows 10 yet and can't print PDF on Windows 7 or 8, this article will provide you with a complete guide on how how to print to PDF is easy with PDFelement.
FREE DOWNLOAD FREE DOWNLOAD BUY NOW BUY NOW
FREE DOWNLOAD
Microsoft Print to PDF
PDFelement is a PDF Print to PDF software that not only allows you to create, edit and print PDF files, but also includes a whole host of other features that are designed to help you manage your PDF files with ease, as well as the necessary solutions if you find yourself needing to use PDF files frequently.
Step 1. Open Excel
After installing PDFelement, a virtual printer will also be installed on your computer. Then open the Excel file you want to print and click the "File" and "Print" buttons in it.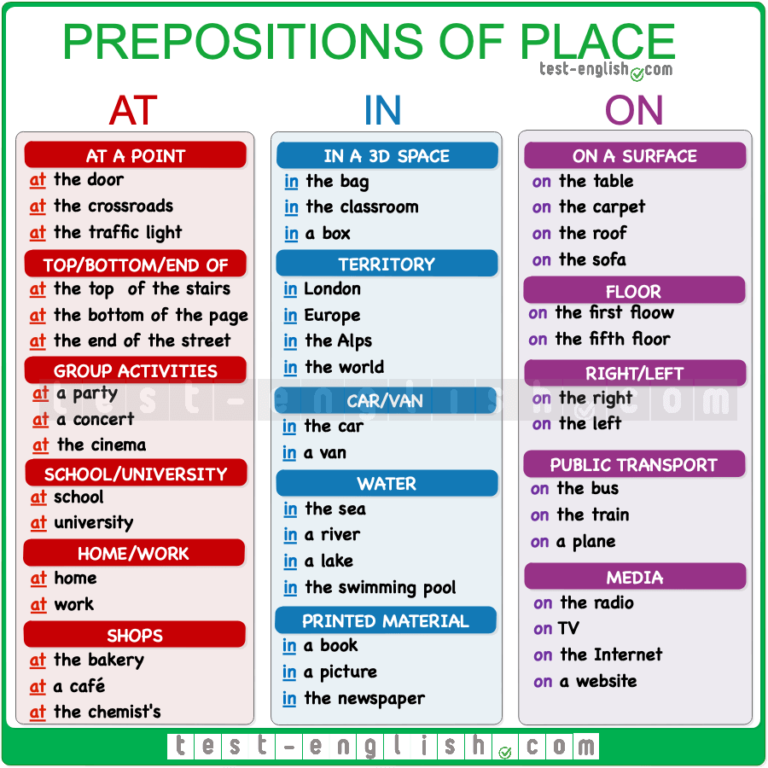
Step 2. Print to PDF
Then select "Wondershare PDFelement" as your printer and click the "Print" button to print.
Step 3. Save the PDF
Then PDFelement will open automatically with the generated PDF in it. You can click "File" and "Save As" button in PDFelement to save the generated PDF file on your computer.
Print Web Page as PDF
If you want to print a web page as PDF, PDFelement can also help you. You just need to follow these steps.
FREE DOWNLOAD FREE DOWNLOAD BUY NOW BUY NOW
FREE DOWNLOAD
Step 1. Open the Web Page of
You can first open the web page in your browser and then click the "Print" button in your browser.
Step 2: Print to PDF
Select "Wondershare PDFelement" in the printer options for printing.
Step 3: Save the PDF
The content of the web page will also open in PDFelement. Save it in your folder.
Video on How to Print to PDF with PDFelement
PDFelement as PDF printing software is also useful if you want to edit PDF in some way. You can easily edit text by deleting some of the text in the document or even adding new text. You can also remove images and graphics in a document, and even add new ones. The program also provides you with many annotation options that allow you to annotate the PDF, highlight and even mark up sections of the document. Its conversion feature is also worth mentioning as it allows users to create PDF files from files in any other format very easily. It also provides many other ways to create a PDF instead of printing to PDF. If you think that a program with so many features is hard to use, you are wrong. As we will see shortly, the program is very easy to use despite its many features.
FREE DOWNLOAD FREE DOWNLOAD BUY NOW BUY NOW
FREE DOWNLOAD
Print to PDF on Windows 7 and Windows 10
Print to PDF on Windows 10:
Print to PDF is already built in. Just select "File" and "Print" and then select the "Microsoft Print to PDF" option as your printer.
Print to PDF in Windows 7:
If you're still using Windows 7, 8, and 8.1, here's what you need to do to print to PDF:
Step 1: Start by downloading a PDF printer that will let you print to PDF on Windows. There are a lot of them to choose from, and most of them are free. You can use one like CutePDF. Just download and install the program.
Step 2: Now in a windows application that allows you to print, such as Word or Excel, select "File" and "Print" or press Ctrl + P on your keyboard. When the "Print" dialog box opens, select "CutePDF Writer" as your printer in the "Select Printer" section. Set your options and click "Print" to complete the process.
Free Download or Buy PDFelement Now!
Free Download or Buy PDFelement Now!
Buy PDFelement now!
Buy PDFelement now!
How to properly prepare shaped labels for printing?
Making custom shaped decals is one of the most difficult things a designer can face. Stickers, unlike other printed products, often have an atypical shape that needs to be cut without errors. Fortunately, the team of the prepress department of the Good Print online printing house daily designs, prepares sticker layouts for printing and knows how to do it right.
What do you need to create stickers?
Here is a list of everything you need to create the perfect personalized stickers:
— Basic knowledge of vector files
- Graphic editor, such as Adobe Illustrator or CorelDraw
— Vector image for your future stickers
— 20 minutes of your free time
Using these tools and following our detailed instructions, you will get stickers that you can send to any printer. Let's start designing.
Step by step instructions.
We have also prepared a step-by-step video instruction on how to prepare curly stickers for printing.
It can be viewed at the link.
More text and pictures:
Step-by-step instructions for creating curly stickers with contour cutting using the CorelDraw editor as an example.
First you need to decide on the size of the future sticker, for example, the desired size of the sticker is 60x50 mm.
Step 1:
Set the page size to the size of the sticker - 60x50 mm
Step 2:
In order for the sticker to be even and beautiful, reduce the image by 4 mm in width and height.
Further, when you press the P (English) button on the keyboard, the sticker will move to the center of the page (a prerequisite is that all objects must be initially grouped, otherwise each element will be located in the center of the page on top of each other).
Step 3:
Right-click on the selected group of objects, select the item - "Ungroup all"
Step 4:
border."
Step 5:
On the right side of the screen, in the "Objects" panel, a bird outline has appeared, but so far it does not meet the technical requirements.
With the left mouse button, on the left side of the screen, click on the arrow in the menu - "Shadows" and from the drop-down list select the item - "Contour".
Step 6-7:
In the upper part of the screen, select the distance from the current contour - to the finished sticker (p. 6), i.e. increase the outline by 2 mm in all four directions (remember Step 2, this is why we initially reduced the size of the bird).
Press the left mouse button on - "Outline outline" (item 7).
Step 8:
In the right part of the screen, on the contour that appears, right-click and select the item "Disconnect Contour" from the drop-down list.
Step 9:
Right click on the original inner path and delete it, it is no longer needed.
Step 10-11:
Select the "form creation tool" in the upper left part of the screen (step 10).
We select unnecessary elements in the new contour that appears and right-click on the item - "Delete" (p. 11).
11).
Step 12:
With the left mouse button, fill the outline with any color from the palette, for example, yellow is selected.
Step 13-17:
Now you need to recolor the resulting outline with a specific color. This is necessary in order for your order to automatically go to print.
Double-click to open the color selection panel (p.13), select the PANTONE solid coated color palette from the list (p.14-16).
Manually enter number 166 in numbers in the "Name:" window (p.17), PANTONE 166 C (0117 )
Confirm the selected color by pressing the "OK" button.
Step 18:
PANTONE 166 C appears at the bottom of the screen, right click on it to set the stroke to that color.
Step 19:
Remove the fill with the left mouse button.
A curly sticker with the correct cut contour is ready, it remains to export it to PDF.
Step 20:
Choose: File - Publish to PDF
Step 21-24:
Choose any path on your computer (p. 21), prescribe any file name (p. 22).
In the menu - "Parameters" (p. 23) select PDF / X compatibility (p. 24)
Step 25:
In the tab - "Prepress" check the box - "Bleed threshold" and write down the value - 2 mm.
Confirm the action with the "OK" button.
Shape sticker 60x50mm ready to print. The outer orange line is the final view.
Voila, your shaped stickers are ready to print! Don't know how to print stickers?
Just follow the link to calculate your curly stickers and make the calculation in seconds.
How to start an order correctly?
How to start the order of curly stickers into work can be found in our detailed instructions - “Launching curly stickers for printing”
You can order the following stickers in Good Print online printing house:
— Plain paper stickers and labels
— Plain film stickers and labels
— Curly stickers and labels
— Paper sticker packs
— Round stickers and labels
If you don't see the option you want to choose, don't hesitate to contact us.