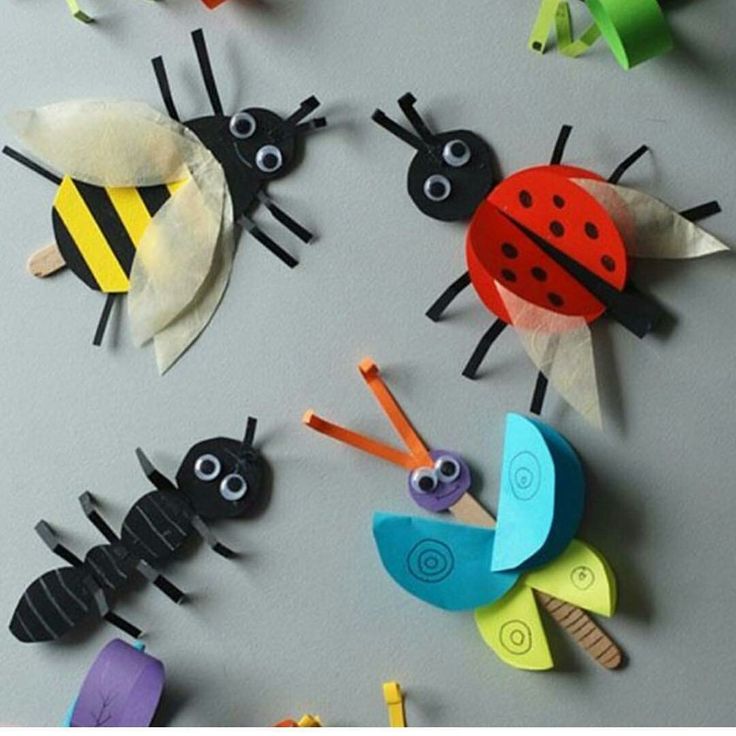
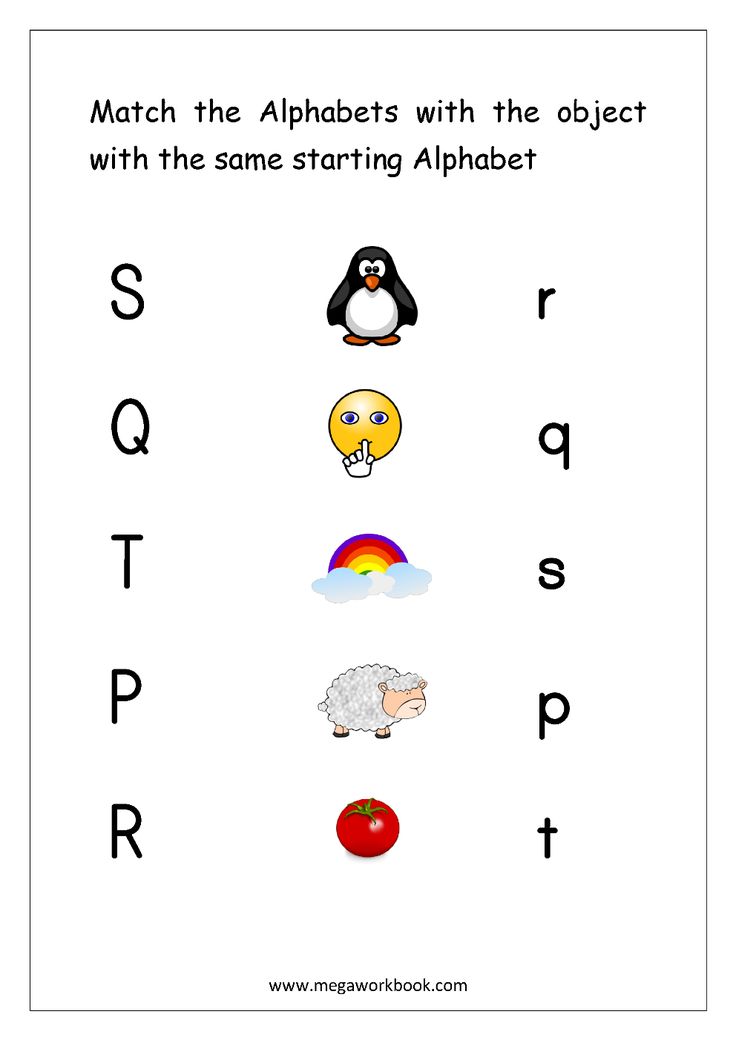
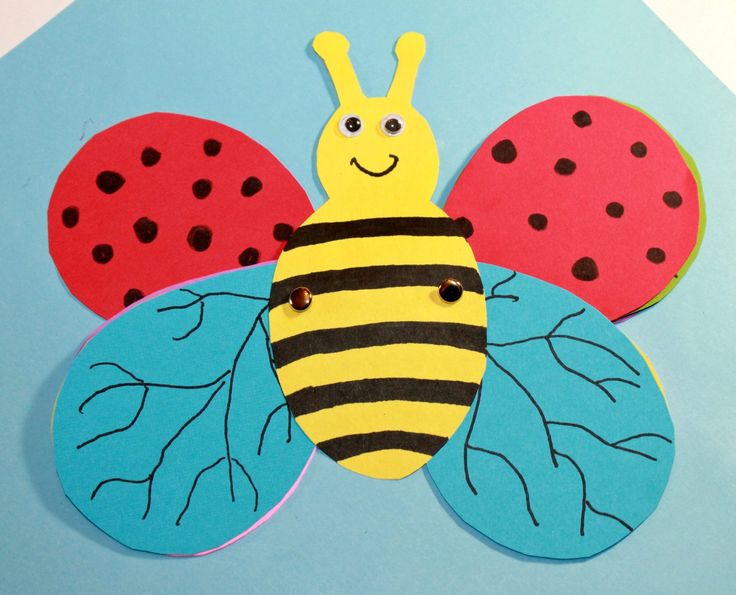
Build a bug craft
Invitation To Create: Build A Bug
One of my favorite activities that we've done recently has been our Cupcake Factory. It was so much fun, and so easy to put together that I thought I should apply the same strategy to other creations! Here is another simple Invitation To Create. I hope you like it!
This post may contain Amazon or other affiliate links. If you use these links, I may earn a commission at no additional cost to you. Click here for my full privacy and disclosure policies.
Using construction paper in a variety of colors, cut your bug pieces. You'll need small holes (I used a hole punch) for eyes, spots, and antennae tops. You'll need circles (I ended up cutting them in 2 different sizes) and semi-circles for bug bodies and heads. And finally, you'll need skinny strips for legs, antennae, stripes, and mouths. It took me around 10 minutes to cut our pieces. If you had a circle punch, it would be even faster!
[
Related Read: DIY Paper Dinosaur Hat]Throw in a glue stick and some half-sheets of construction paper to use as backgrounds. A divided tray helps with presentation, but certainly isn't necessary. I used a plastic plate from Target that is no longer available, but these would do the trick.
Invite your child to the table or workspace and let them get to creating! I gave Lena and Maggie some ideas, and modeled a few different bugs that they could make, but in general they were left to their own creative devices.
[Related Read: Books About Bees]
Once again, this simple and open-ended activity kept my girls busy for nearly an hour. They loved experimenting with different color combinations and types of bugs. We were left with a giant pile of bugs on our table!
[
Related Read: Swat It! 3 Preschool Learning Games]Whew! What kind of bugs will YOUR kiddos make?
If your kids enjoyed this Invitation To Create, be sure check out these other fun variations!
TOP ROW: Cupcake Factory, City Planner, Trim A Tree
BOTTOM ROW: Turkey Time, Make A Monster, Flower Garden
To see ALL of our great crafts, follow the Cutting Tiny Bites Pinterest board below!
You May Also Be Interested In:
Bug Theme- Weekly Home Preschool
Creepy Crawly Bug Painting
Bug Bin
Over 25 Complete Preschool Theme Units
From Other Great Bloggers:
Cute Clay Bugs And Critters from Powerful Mothering
Painting Recycled Cardboard Bugs from Stir The Wonder
Letter Bugs Busy Bag from The Educators' Spin On It
15 Bugs And Butterflies Learning Activities from Mom Inspired Life
Newer Post Older Post Home
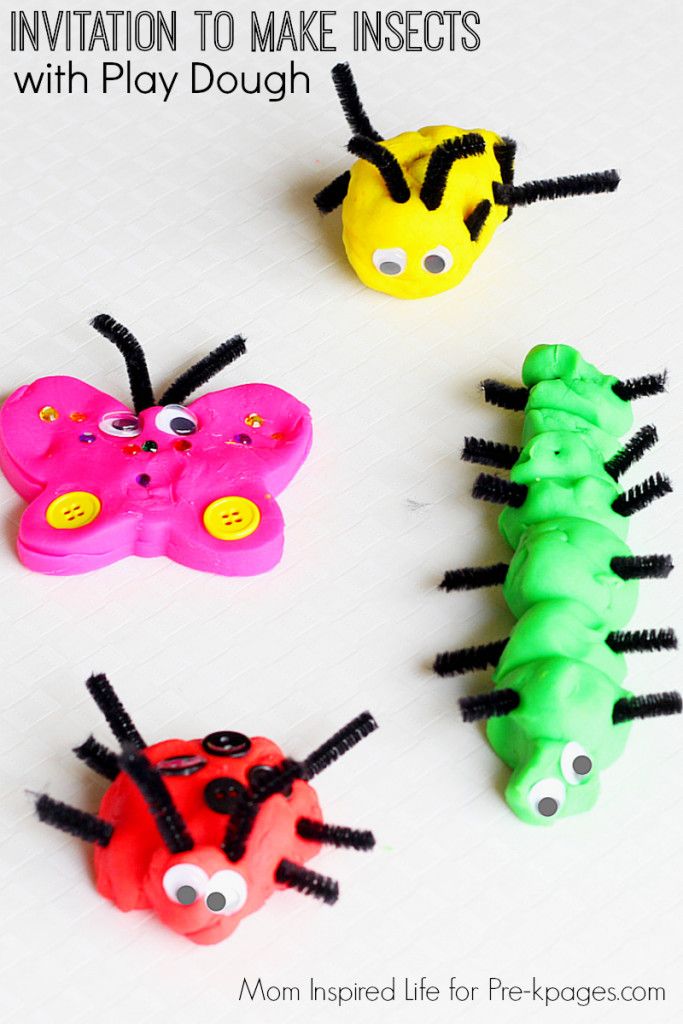
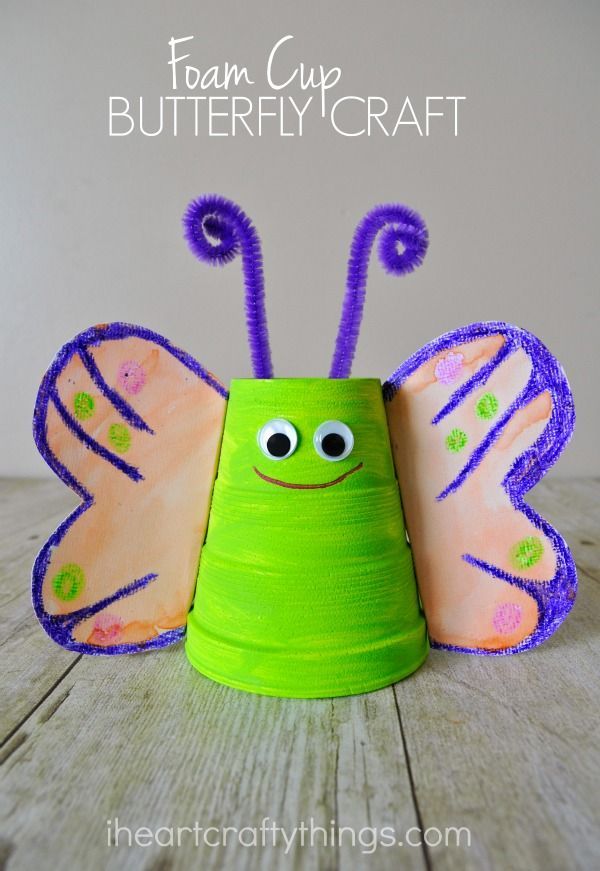
20 Adorable Bug Crafts & Activities for Kids
Let’s do some cute bug crafts with kids! These sweet insect crafts are more adorable than creepy and crawly and a fun way to explore the insect world. Kids of all ages will love making these bug crafts especially preschool. They use simple craft supplies and can work in the classroom or at home easily.
Fun Bug Crafts for Kids
Creepy and crawly? Yes!
We have selected the best 20 adorable preschool bug crafts, activities and food ideas may have you singing a different tune as you explore the outdoors with your children.
Related: Print bug coloring pages
Bugs are fascinating creatures, and kids tend to be intrigued with the unique way they are made.
This article contains affiliate links.
Favorite Preschool Bug Crafts
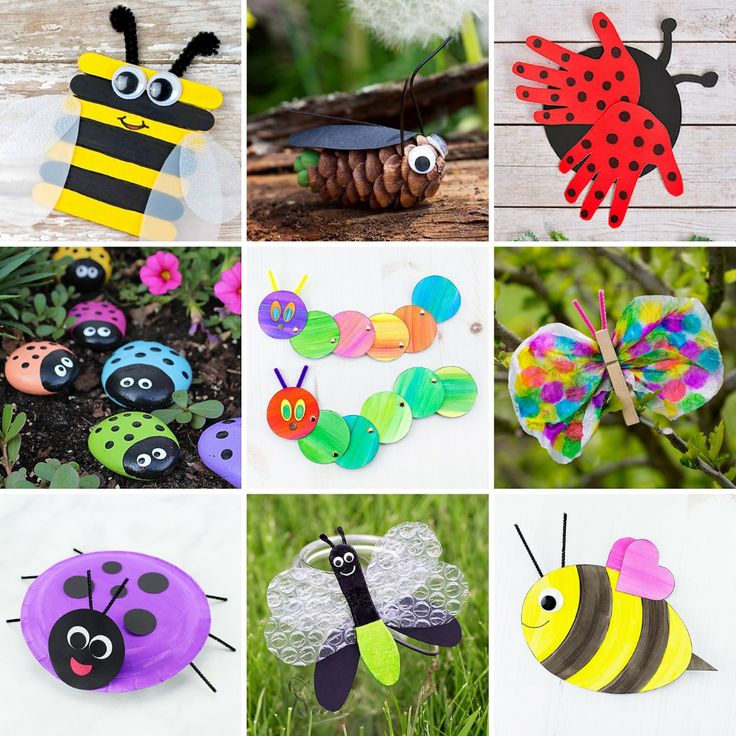
Oh so many fun bug crafts and activities for kids!1. Beaded Dragonfly Craft
These beaded dragonflies and lightning bugs by I Heart Crafty Things can be made by kids of a variety of ages and are not only adorable, but work on fine motor skills during creation. You could turn this into a beaded dragonfly keychain as well!
2.
 Coffee Filter Butterfly Arts & Crafts for Kids
Tie Dye Coffee Filter Butterflies are easy to make and fun to play with. Meaningful Mama shows you how it’s done. Making a coffee filter butterfly is easy and is one of the better bug crafts for little hands.
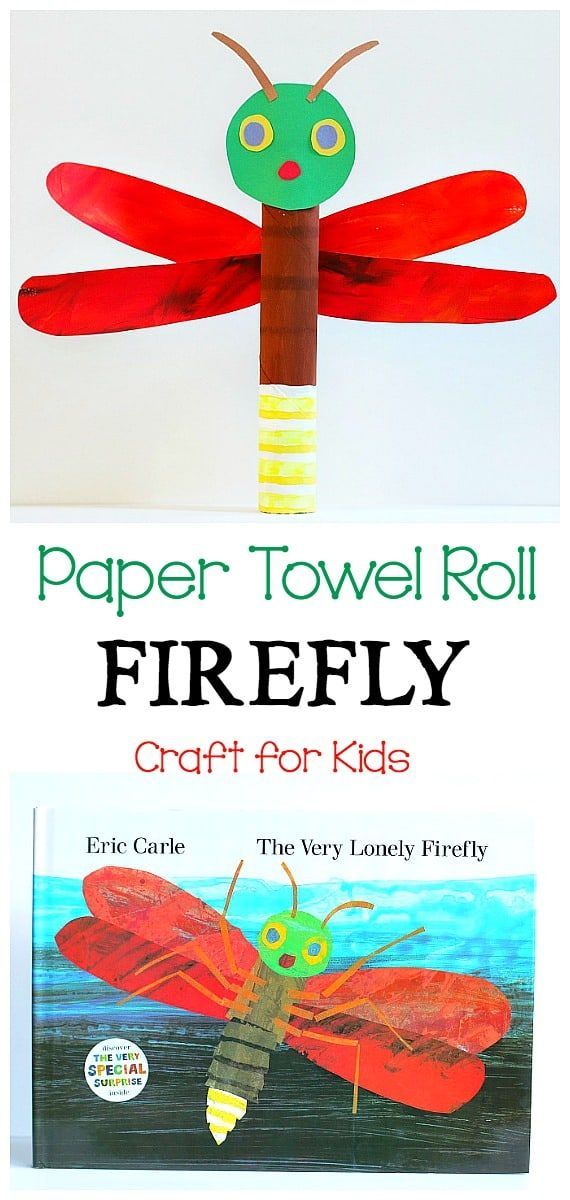
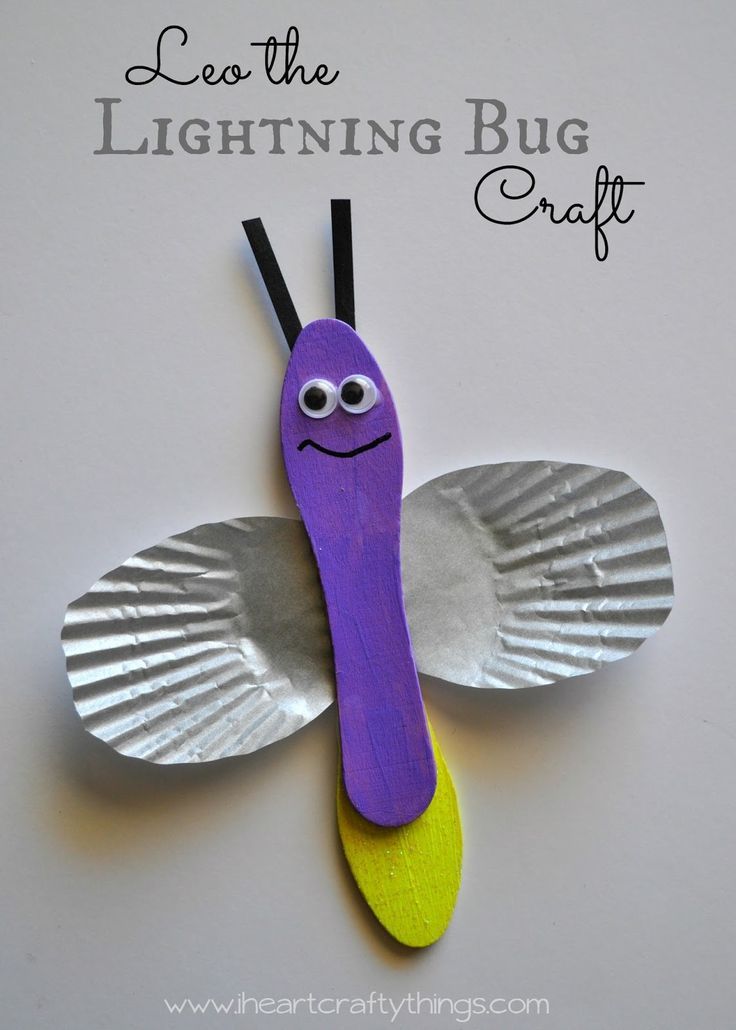
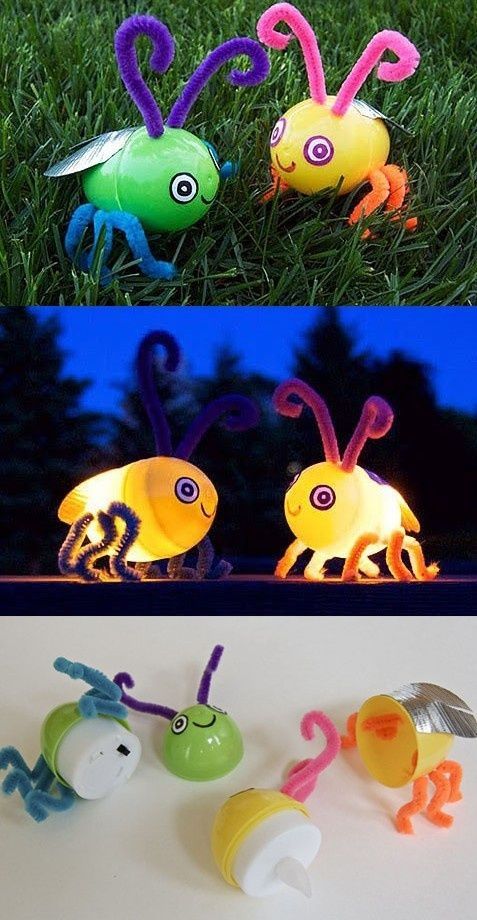
3. Light Up Firefly Craft
Y’all! Your kids are going to love making this firefly craft that really light up. Apartment Therapy nailed it with this idea. I think this would be a great preschool bug craft as it isn’t too hard to do.
4. Make Cute Bugs Using Spoons
Paging Fun Mums made cute bugs using plastic spoons. You’ll have to head over to check out her different variations. Give them googly eyes, antennas and legs using pipe cleaners, and don’t forget to color them some wings!
5. DIY Egg Carton Caterpillar
Egg carton caterpillars couldn’t be cuter! Megan from Balancing Home shows us how to re-create this simple craft.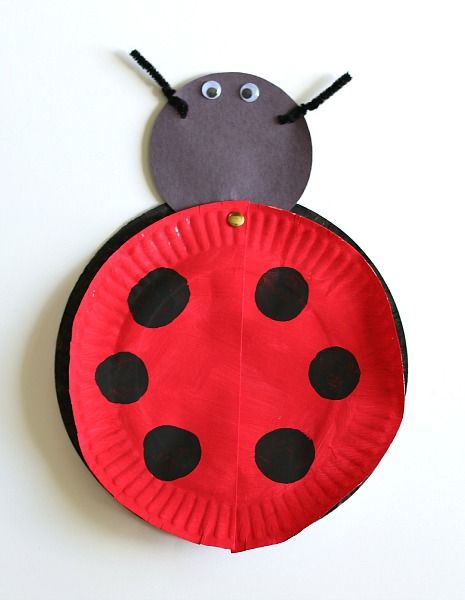 Plus, I love any craft that let’s me recycle. It helps keep the Earth healthy for all the cute bugs and critters.
Cute Easy Bug Crafts for Kids
6. Bug Craft that Turns into a Bug Game
Looking for some bug crafts and activities? Your craft becomes a game after you make this spring time tic-tac-toe game from Chicken Scratch NY. How awesome is that? Painted rocks are super cute, I’ve always loved painted rocks because they’re so versatile.
7. Garden Snail Craft
Okay, technically this one isn’t a cute bug or cute insect, but they’re still outside and in the garden where most bugs are! I’m loving this tissue paper garden snail from Room Mom Extraordinaire.
8. Cute Bug Book Buddies Craft
The book buddy bugs from Meaningful Mama become a bookmark after the craft fun is over. These cute bug book buddies are perfect for your little readers and will help them keep up with where they are in the book without dog earing the poor books.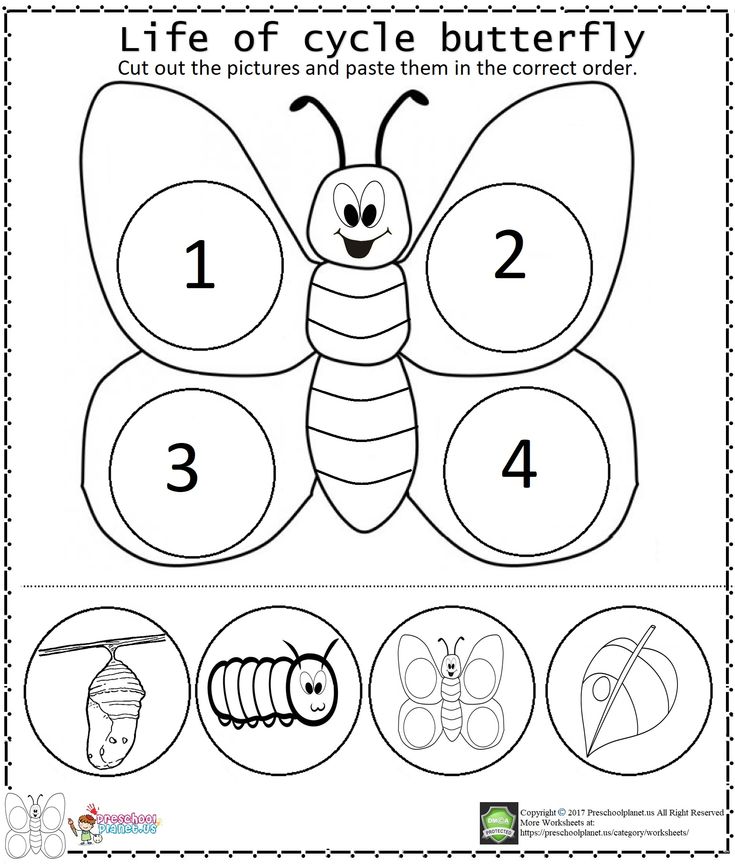
9. Make an Insect Craft
Easy Child Crafts teaches us how to make this cute bee from a recycled toilet paper roll. This insect craft lets up recycle again by using up toilet paper rolls! It is actually really cute with it’s googly eyes and big grin!
10. Ladybug Balloons You Can Make
Ladybug Balloons are fun to make, but they also become a great tactile experience for kids. Squeezing the balloon helps relax children as well. Kids Activities Blog shows us what to put inside these little guys.
Bug Activities for Kids
Oh so many fun bug activities for kids!11. Bug Games For Kids
Kids Activities Blog has a few free bug printables available for you: Color Bugs Memory Game, Bug Activities Sheets, Love Bug Coloring Sheets. How adorable are these bug coloring pages and games?
12. Dig Up Bug Fossils Activity
Your little geologist will love making bug fossils with play-doh. What a clever idea from No Time for Flashcards. What could make this a little more fun, is making some bug fossils, letting them harden, and then hide them in the sand to excavate!
13. Caterpillar Worksheet for Preschool
My Very Hungry Caterpillar number learning activity is a very fun and smart way to get kids working on their numbers. Great idea from Ken and Karen. This worksheet is geared towards teaching kids 3-7 vocabulary.
14. Life Cycle of A Butterfly Printables
Mama Miss has a number of clever ideas to help kids learn about the life cycle of a butterfly – free printables provided. Kids often see butterflies and enjoy their beauty, but I don’t think a lot of smaller kids understand the metamorphosis that takes place for that beauty to appear.
15. Make Edible Dirt
This edible dirt by Kids Activities Blog will have your kids digging for worms in a safe, tactile and hilarious activity. This is a very messy activity, but a delicious one! This sensory activity is a great way for children to play with both mud and worms!
Let’s eat bug themed snacks and fun treats!Bug Snack and Food Ideas for Kids
16.
 How To Make A Ladybug
Want to know how to make a ladybug? These ladybug pretzels are as cute as they are tasty. Meaningful Mama shows you how to recreate this pretzel treat. Who doesn’t love chocolate covered pretzels?
17. Bee Themed Food
Twinkie’s were the solution for Hungry Happenings when she went to create these stunning bumblebee themed food. I actually really like this idea. It’s so simple, and a great little treat.
18. Bug Snacks
Don’t worry we’re not feeding bugs or eating bugs. Just snacks in the shape of bugs! These butterfly snack packs are a fun grab-and-go spring snack for kids, from Meaningful Mama
19. Bee Treats
Meaningful Mama creates these yummy pineapple bumblebees for her daughter’s spring themed birthday. These bee treats have pineapple, chocolate, and chips! It sounds weird, but the sweet and salty combo works very well together.
20. Bug Themed Food Ideas Perfect for a Bug Party
Looking for some bug themed food ideas? Look no further! Your kids will only be grossed out for a second before they take a bite of these tasty dirt and worm cups. You’ll love all the bug birthday ideas featured here at ikatbag. I remember my teacher making this for us when I was in kindergarten many years ago.
Learning About Bugs Through Crafts & Activities
Bugs don’t have to be scary, and even your little ones who may not be the biggest fan of bugs will love these cute insects! Bug crafts are a great way to show your child we really don’t have to be afraid of most bugs and each craft can serve as a science lesson.
Older kids can take on an insect craft project and then learn more about the details while younger kids may be mastering the fine motor skills required to complete the bug craft.
Looking For More Insect Inspired Crafts And Activities?
- You might also find some more ideas in this post about 7 {Non-Icky} Ways To Learn About Bugs.
- You’ll love these nature crafts! Every craft is made from things from nature like rocks, leaves, and grass.
- Grab more nature supplies, you’ll need them for these DIY nature crafts.
- Get moving with this nature scavenger hunt for kids! We even have a free printable to help you out!
- Have left over nature crafting materials? Perfect! Use them to make this beautiful nature collage!
- We have a lot of crafts and activities to learn about Earth!
- Are you trying to keep bugs away naturally? Check out our simple essential oils for bugs that really work!
- Cute bug coloring pages are just plain fun!
- Our zentangle ladybug printable coloring pages are fun for adults and kids.
- Or check out this simple set of ladybug coloring pages that you will have fun…grab red!
Which of these bug crafts was your favorite? Which insect craft will you be trying first? Did we miss any?
Pictures from cones and chestnuts. Crafts from chestnuts (45 ideas for children)
With the presence of imagination, plasticine and twigs, chestnut fruits make very interesting crafts. They can be done together with children, one kids, because there is nothing complicated here.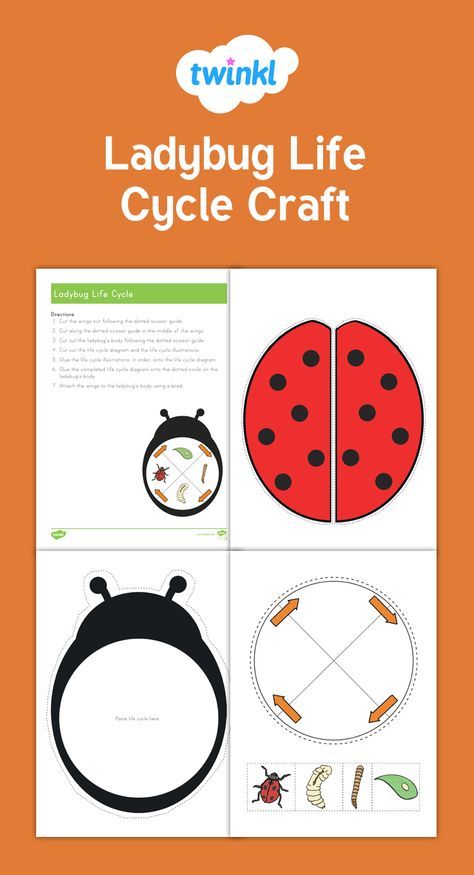 The main thing is to collect them in time in the fall, while they are still soft, to save them for creativity. Picturesque crafts will decorate not only the shelf in the child's closet, but also suitable for exhibitions in kindergarten or class.
Together with the kids, you can try to make such animals as a spider, a hedgehog, a bear. It is easy for children to get a cheburashka or a caterpillar, and together with their mother it is very easy to build a house or arrange a topiary. It is only necessary to prepare scissors, glue, plasticine, the rest will depend on skills and imagination.
Plasticine and chestnut caterpillar
Need to take:
- several chestnuts, for example 7 pieces
- colored plasticine
- matches
Making a funny caterpillar is easy:
- We connect even fruits with plasticine, for reliability you can fasten them with matches
- We make eyes, nose and mouth, you can make them of any color
- We stick into the head plasticine balls at the ends
To make the caterpillar even more interesting, you can place it on the leaves, add tree branches to the composition.
Toothpick spider
All you need are toothpicks and one large fruit of an even shape:
- Take 8 toothpicks, slightly break them in the middle, stick them into the body of the spider
- Eyes can be made from plasticine
Ant made of chestnuts and straws
Need to prepare:
- 2 smaller chestnuts for the body, one larger chestnut for the head
- plasticine
- plastic straws for a cocktail
To make an ant, you need:
- Connect the head and body with plasticine, mold eyes and mouth
- Cut the straws for the paws, it is better to do this from the bending side of the tube
- Insert them into the body 90
The ant becomes even more beautiful if you add small antennae to it and choose elongated fruits for the body.
Cheburashka with big ears
Making cheburashka is easy, you just need to prepare toothpicks and fruits of various shapes
- We connect the stomach, head and ears with toothpick halves, we make arms and legs
- You can draw eyes and a smile on the face with a felt-tip pen
Chestnut Bear
To be prepared:
- 2 chestnuts, a larger one for the belly, a smaller one for the head
- brown plasticine for paws
We fasten the head and stomach with plasticine, paws with ears must be made from plasticine balls.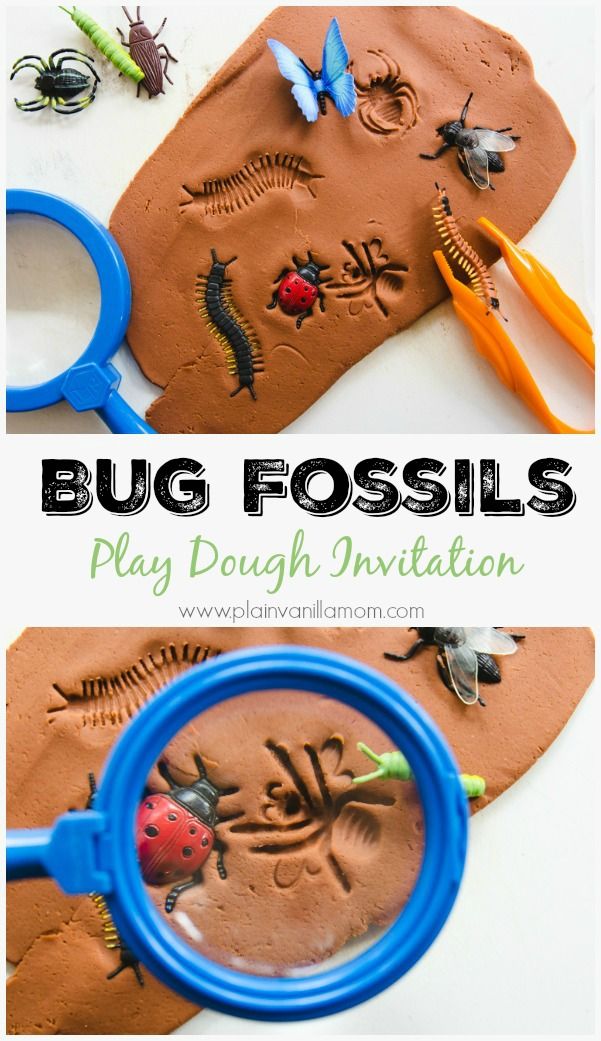 Add a nose and eyes.
Chestnut beads
To make such simple beads that little fashionistas will like:
- Prepare a strong fishing line of the desired length
- Use an awl to make a hole in each small fruit so that you can pass the fishing line through it
- Collect beads, complementing them with colored beads if desired
Decorated vase
This vase should be made with adults.
You will need:
- many small even fruits of the same size
- tall tin of canned fruit
- spray paint of any color, you can take gold or silver
The vase is easy to make:
- The jar is glued along the entire length with fruits, you can make rows even or diagonally inclined
- The resulting volumetric vase dries until the glue hardens
- The finished product must be coated with spray paint
This vase looks good with dried flowers and tree branches.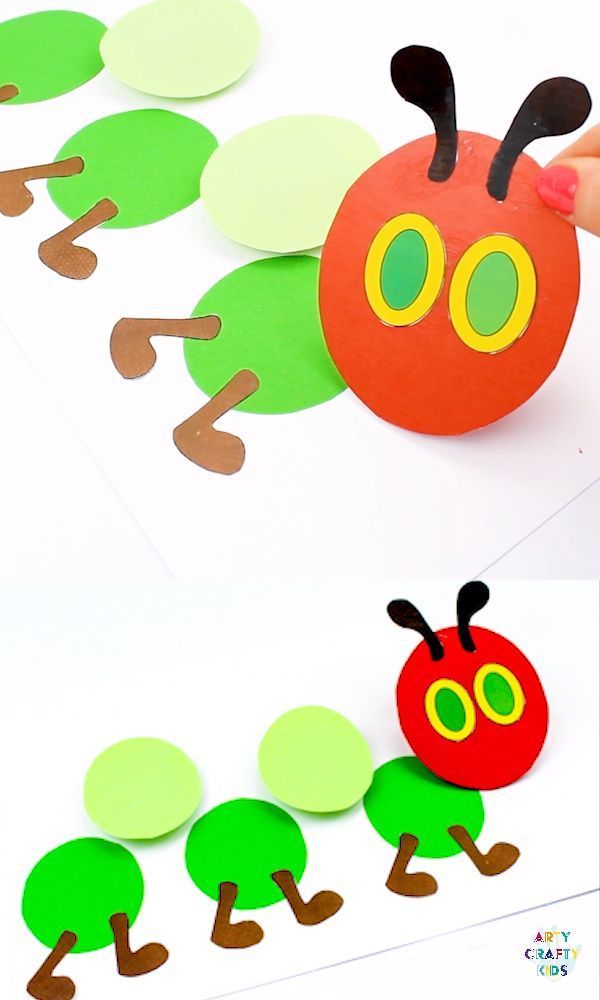
Flowers of their acorns
Need to prepare:
- more acorns for the petals
- chestnuts for the heart of the flower
- long twigs for the stem
Making flowers is easy:
- Glue the acorns to the centers with chamomile glue
- We stick sticks into ready-made flowers
Chestnut tree in the picture
Need to take:
- many fruits
- background card
- spray paint
The panel is made like this:
- Cut out the silhouette of a tree from cardboard
- Glue the fruits onto the cardboard with glue. Larger ones will go to the trunk, smaller ones will go to branches
- We paint the tree with paint, dry it
- Glue the craft to a fabric panel or photo frame
House decorated with chestnut fruit
Everyone can make a house. You will need:
- 2 liter juice boxes for the walls of the house
- cut diagonally box for the roof
- dry leaves, twigs
- scissors, glue
- chestnuts
To make a craft-house, you need:
- glue the boxes, cut windows and doors in them, glue the roof
- cover the roof with leaves, imitating tiles
- decorate doors and windows with twigs
- smear the whole house with glue, attach chestnuts to the walls, imitating masonry
Chestnut hedgehog and plastic bottle
You will need:
- plastic bottle
- plasticine to make a hedgehog face
- a lot of chestnut fruits
- twigs and leaves to decorate crafts
Making a hedgehog quickly:
- Pour dry sand into the bottle for balance and stability
- We coat the cap and the beginning of the bottle with brown plasticine, this will be the muzzle of a hedgehog
- We make a black nose, eyes from white plasticine
- Glue the oblong chestnut fruits with glue, the larger they are, the fluffier the hedgehog will be
- You can paint the tips of the "needles" with white paint
The hedgehog turns out to be very beautiful, for authenticity it is necessary to decorate it with leaves and berries.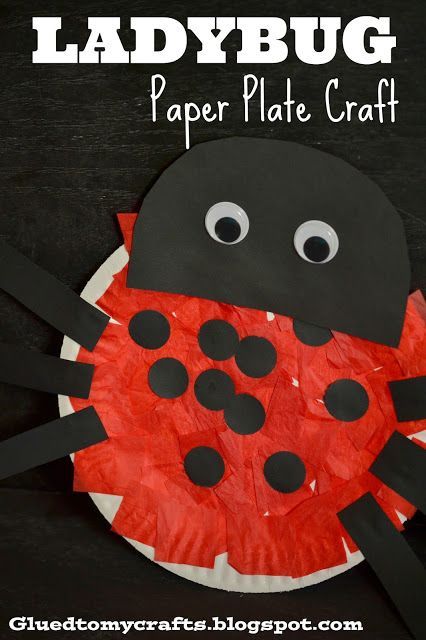
Flat chestnut topiary
Need to cook:
- flat chestnuts - the topiary is more beautiful
- pot
- thick branch for the trunk
- foam ball for the crown of the topiary, if not - you can make a ball of newspapers, tie them with threads
- moss for threads, ribbons, decorations
Topiary is done like this:
- We stick a branch into a ball of foam or newspapers
- We put a branch in a pot without holes, fill it with a mixture of gypsum to fix it
- We glue the ordinary plastic pot with a rope or gray twine for beauty
- Glue the fruits to the ball around the entire circumference with a glue gun, trying to leave only small gaps
Decorate an almost finished topiary:
- Decorate the top of the gypsum with small pebbles, glue with pieces of thread
- It is recommended to make a bow under the ball from a piece of ribbon, you can decorate the topiary with paper flowers or butterflies
All these crafts will delight you for a long time, reminding you of autumn walks.
All last weekend my children and I spent as much as possible in nature. And the reason was chestnuts, which at that time are a dime a dozen underfoot. It was they who became a serious reason to once again go for a walk in the nearest park and breathe fresh air, taking a larger basket with them.
Autumn can't always please you with good weather, and you don't always know what to do with your children and yourself in these long gray days and evenings. This is where needlework comes in. And it’s not at all necessary to buy some materials for this, because everything you need can literally be collected under the trees while walking or returning from work.
And most importantly - such creativity gives you and your children a lot of pleasant and joyful moments. Crafts that the child will create with his parents will help him at various art events at school. For example, my son won the autumn exhibition this Wednesday. .
Autumn crafts from chestnuts
Chestnuts are just a great material for creativity! Handmade crafts from chestnuts will perfectly fit into the interior or become a unique and creative gift.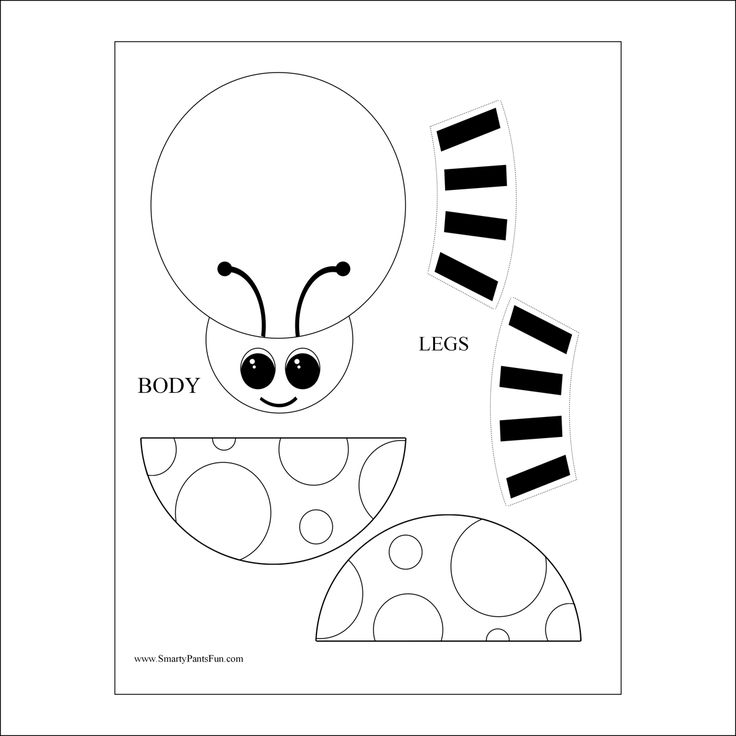
Revision "So Easy!" has prepared 23 bright chestnut craft ideas for you . Ideal for crafting with kids!
- An interesting idea for decorating a Halloween party.
- You can make all kinds of people and animals from chestnuts. In the manufacture of crafts from this natural material, both the chestnuts themselves and their prickly peel are used.
- And for the interior of the house, making a topiary from natural materials is a truly wonderful solution. This will especially appeal to lovers of eco-style in the interior.
-
- Using chestnut crafts you can create a fairy tale world with your own heroes and adventures. Why not the beginning of an exciting and fantasy-developing game for a child?
- And this is an idea for an adult. With the help of a drill, pliers and metal wire, you can create such an interior autumn decor for both your home and various establishments.
 For example, for a cafe or office.
 - I just love this adorable chestnut dragon!
-
- Or you can ask the child to dream up and create his own copy. You will need chestnuts, plasticine and toothpicks.
Such a test will help to understand what emotions a child experiences. You will find out how he perceives close people who are involved in his life - ask him to blind dad and mom. You will get a friendly and wonderful chestnut family.
-
- An excellent solution for a wreath on the door of chestnuts and acorns.
- It is very easy to make legs for a toy animal out of matches. You will need to make four small holes in the chestnut tree and insert matches there.
-
- Just look at these cute owls, no one will definitely refuse such crafts!
-
- You can also create such a stylish candlestick for your home with the help of chestnuts.
Working on crafts, the child gets acquainted with nature, learns to distinguish between fruits and trees, develops imagination. Manufacturing crafts from chestnuts on the theme of autumn to school is an interesting creative joint project that is interesting not only for the child, but also for parents. Support the little inventor, help him bring his fantasies and interesting ideas to life. The kid will understand how interesting it is to play with mom and dad, and crafts for a long time will remind you of the joyful moments spent together.
What crafts can be made from chestnuts to school
From brown chestnut we will make the body of a hedgehog. Plasticine can be glued inside for density, or you can just use a whole chestnut. We take plasticine (brown or orange) and make a muzzle for a hedgehog. Usually, his face is a little elongated, and his nose is snub-nosed, so we bend it a little up.
Making bead eyes. To do this, take white plasticine, and stick black beads on top. Let's not forget about the cheerful, inquisitive nose. Our funny chestnut hedgehog craft is ready and the child can take it to school.
Chestnut caterpillar - an original idea for an autumn craft
You can make any length of craft by gluing any number of chestnuts with plasticine. From matches or toothpicks we will make “horns” for crafting caterpillars. We blind the muzzle from plasticine or draw with felt-tip pens. And let's not forget the ponytail.
Photo of chestnut caterpillar craft
Miracle tree - simple autumn craft
In order to make such a spectacular tree, you will need several round objects, such as tennis balls. We fix chestnuts on them to get a fluffy crown. For greater beauty, we decorate our autumn tree craft with dry leaves, twigs and flowers found in the forest. We put the whole decor on a twig found in the forest or made of wire. Chestnuts can be covered with nail polish for a special effect.
Photo of chestnut topiary
Chestnut man craft
Let the child dream up and blind himself. You will need chestnuts, plasticine and toothpicks. Such a test will help to understand what emotions the child is experiencing. In addition, to find out how he perceives the close people who are involved in his life, you should ask him to blind dad and mom. You get a friendly and wonderful "chestnut" family.
Photo ideas for autumn chestnut crafts
Looking for autumn crafts from chestnut trees on the theme "Autumn" for kindergarten or school? Or maybe you don’t know what to do with your child on the weekends? I propose to make simple, but very interesting autumn compositions using natural materials with your own hands.
Let's create a family of beetles together in a forest clearing. For this you will need:
- chestnuts of various sizes
- colored paper and baseboard
- paints with a brush
- plasticine
- dried leaves.
Craft from chestnuts on the theme "Autumn" for children - do it yourself
So, let's choose the smallest and preferably flat samples from chestnut stocks, glue plasticine eyes and spouts on them.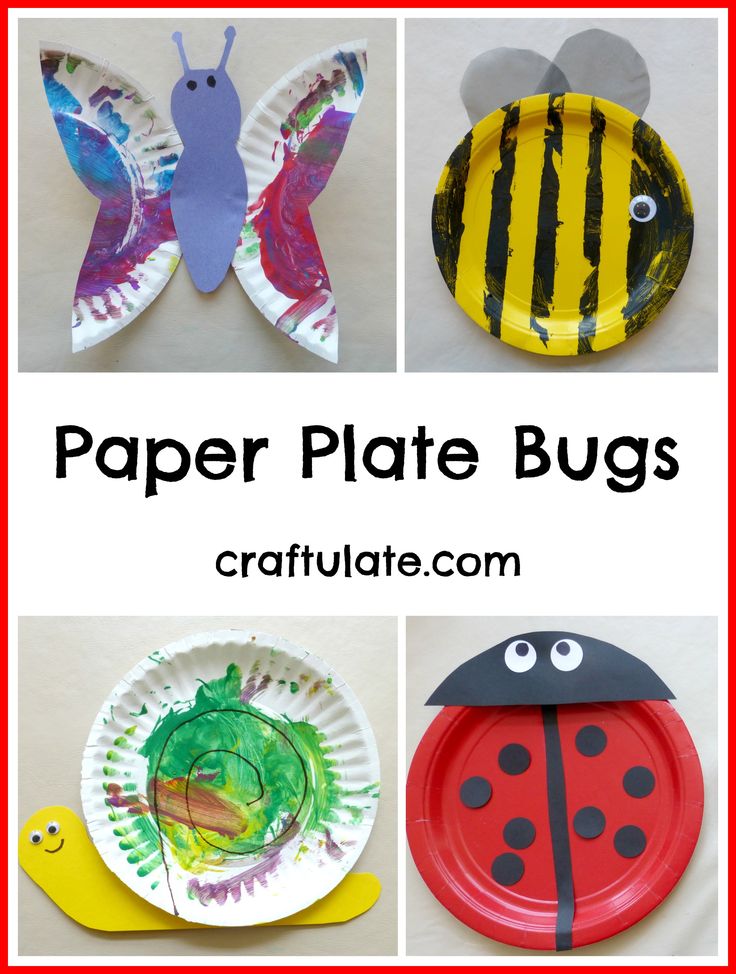 We got funny beetle heads. So far, there is nothing complicated in the work.
Preparing for the event, I found some interesting information about beetles on the Internet. The child enjoyed listening to the entertaining material.
For example, beetles are a fairly numerous group of organisms on Earth, which lives in almost every corner of our planet, with the exception of glaciers. The largest beetles in the world are the titan lumberjack, the hercules beetle and the stag-horned bigtooth. The length of the body of these insects reaches almost 17 cm. The smallest representative of the group is the featherwing, which was not destined to grow more than 4 mm.
It's time to work on the body of our beetles. We select large chestnuts and with the help of pieces of plasticine we attach them to the heads.
Now let's organize a forest clearing for beetles. We will plant a tree on a green sheet of colored paper, and around plasticine or PVA glue we will attach beetles.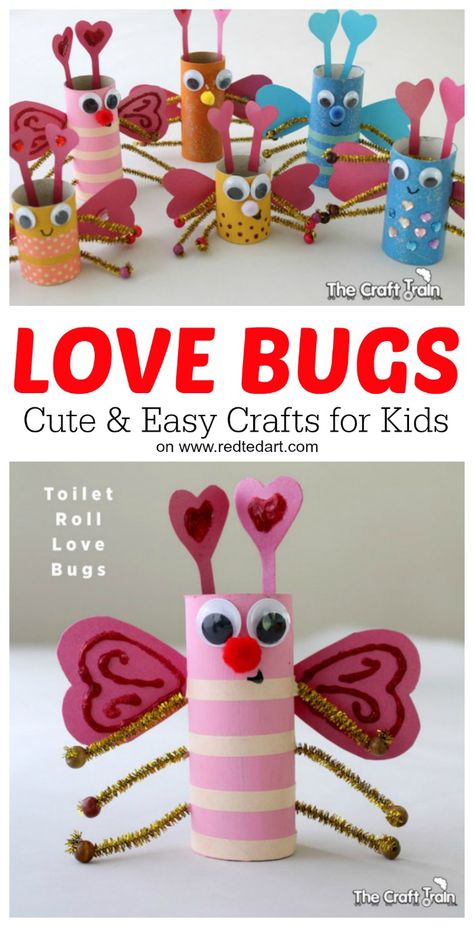 Our tree is real. This is a dried branch.
Let's take a brush, dip it in brown watercolor and paint six legs for each beetle. By the way, the structure of the legs of beetles is different and depends on the way of life. Scientists distinguish running, digging, swimming and other types of legs.
Finishing touches left. We finish drawing two paws and continue the informative story.
Among the beetles there are many predators, but there are also individuals that feed on plants, flowers, roots or sweet pollen. Predators prey on pupae of mosquitoes, ticks and larvae of other insects. Among the sweet tooth, one can separately distinguish a large goldfish, outwardly similar to sunflower seeds.
Our beetles do not belong to any of the species that exist in nature. Let's single them out in a separate group - chestnut insects.
The craft made of chestnuts called "Beetles in the autumn forest" can be considered finished. As decorative elements, we added dried green and yellow leaves to colored paper. In the background, they planted a Christmas tree in the form of a pine cone.
Beautiful autumn composition!
Photo ideas for autumn chestnut crafts
DIY crafts from chestnuts and plasticine
Beautiful, interesting and simple DIY crafts made from natural materials
Published by: admin in Interior, Landscape, Custom 06/12/2022 0 667 Views
Every day, nature presents us with a lot of amazing natural material from which you can make amazing crafts with your own hands. Crafts from natural materials are loved by children in kindergarten or elementary school.
This wonderful process of making handicrafts from natural material brings a lot of joy to both children and adults, helps to cultivate industriousness and perseverance in kids.
Natural materials
Content
- 1 Natural materials
- 2 Crafts with natural material with your own hands
- 3 chestnuts
- 4 stomachs
- 5 cones and needles
- 6 nuts
- 7 plant materials
- 9 Twigs, sticks, wooden saw cuts
- 10 Mineral materials
- 11 Shells
- 12 Leaves and seeds
- 13 Grass, moss, poplar fluff
- 14 Evacious shell
- 15 Natural wood
- 15.
 1 woods
 - 15.2 Wood saws
- 15.3 branches and rods
- 15.
- 16 Decorative stone and pebble 7 19 Sand
- 20 Preparation of natural materials for further use
- 21 Additional tools for crafts made from natural materials
- 22 Rules for storing natural materials
- 23 Beautiful crafts for babies
- 23.1 Crafts made of natural wood
- 23.1.1 Crafts of branches and sticks
- 23.2 Crafts on the Sea
- 23.3 Cornflows of leaves
- 23.3.1 Application from paper and leaves autumn forest
- 23.3.2 Unique pictures from leaves
- 23.3.3 Beautiful photo frames from tree branches
- 23.3.4 Crafts from natural materials: big owl from cones
- 23.3.5 Mountain deer of cones and branches
- 23.3.6 Autumn bouquet of cones with your own hands
- 23.1 Crafts made of natural wood
- 23.4 DIY HOSTER
- 23.5 Crafts of pumpkin seeds
- 23.6 Picture from cereal
- 23.
 23.7 Underwhelm natural material: pea and lentil turtle
There is such a wide variety of natural material these days. It can be collected during an evening walk, because we have a storehouse of material under our feet, a lot of different cones, twigs, pebbles, various bizarre leaves.
Stock up on them in autumn for a long time to pass the winter evenings doing interesting things.
But you also need to collect natural material very carefully, it must be clean and untouched by pests so that it can maintain its quality for a longer time.
After the material has been collected, it must be washed and dried, leaves and twigs must be dried.
All this should be put away in a dark, cool place with good air penetration. After all, you can spend time creating original crafts not only for children, but also for adults, get together with a company at a large table, and start doing work.
Crafts from natural materials with your own hands
The best artist has always been nature, because the natural material created by it turns into real art in skillful hands.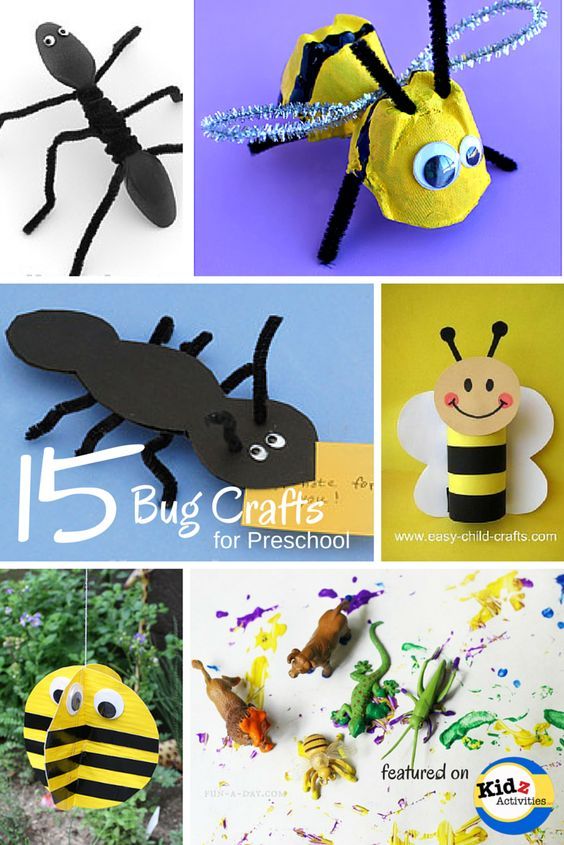
The variety of natural material is simply amazing. It can be collected years in advance.
Chestnuts
Chestnut craft is an original decor that you can create with your own hands. This natural material is always in abundance, in the park and just on the streets of the city.
Joint creativity of an adult together with a child will help to better understand each other.
The chestnut fruit has a shiny surface and a bright brown color.
Fresh chestnut has a thin shell, which is why it can be easily and easily pierced with an awl.
Suitable for crafts made by little children, it can be safely used to make many different creative crafts, such as insects, dolls or animals, voluminous applications or a funny Christmas wreath.
Storage of such crafts should be in spacious boxes with good ventilation.
Acorns
Acorns are an excellent material for many beautiful and original crafts.
Such works can be used at children's exhibitions, or just for beauty at home.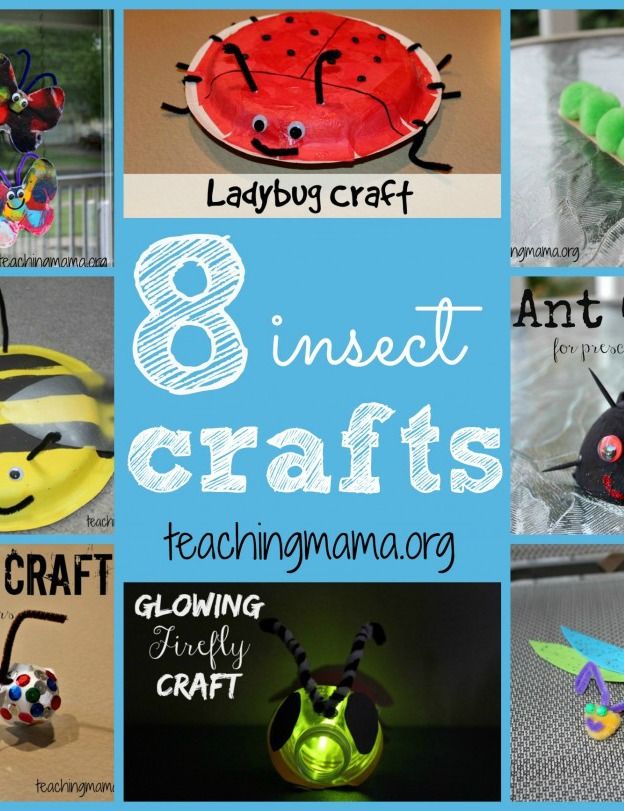
Acorns ripen in autumn, it falls on September-October, the fruits ripen in various bizarre shapes, different widths and lengths, as well as color, some are lighter, while others, on the contrary, are darker.
Plushies are a separate amazing material, from which excellent beautiful crafts are made from natural material. From acorns you can make various beautiful frames for photos, various insects.
Cones and needles
Cones are mainly used to depict the body of an animal or birds, it is best to choose cones that are not too open, because with such cones the production of works will be much easier and simpler.
Cones are the basis of cute crafts.
Do-it-yourself crafts made from cones have an amazing smell of pine needles, which is why it will please not only the eye, but also soothe with its smell.
They need to be collected on moist soil, they will be preserved much better this way, after which they need to be sorted by size, shape.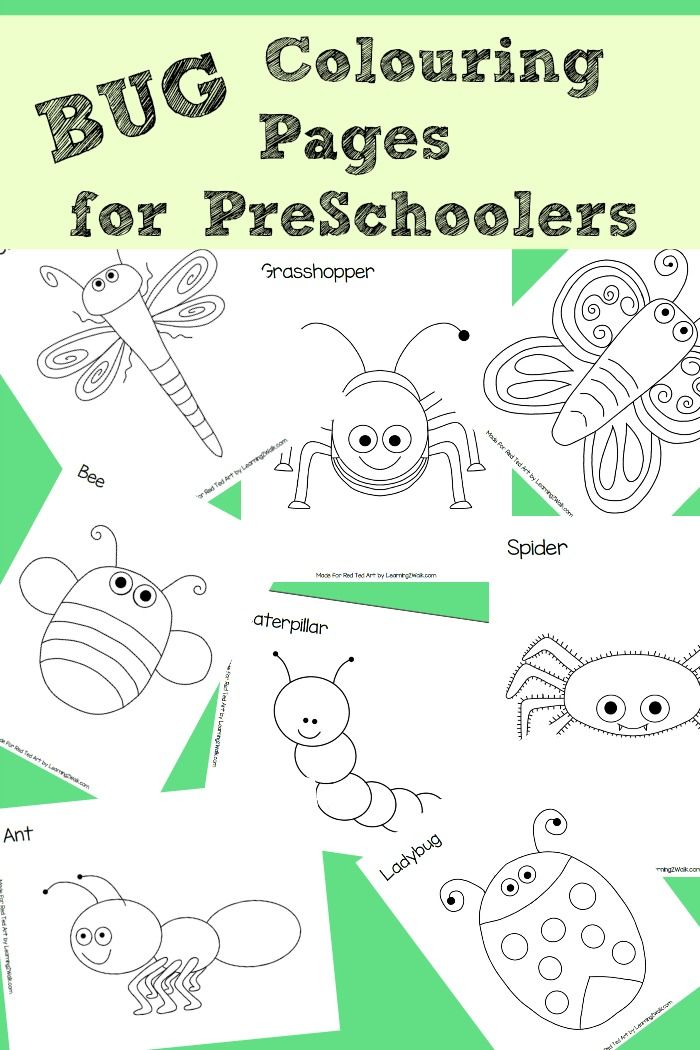 Pine needles can be collected at different times of the year, near cedar, spruce, pine.
It is desirable to use green needles in crafts. With the help of it, various antennae, cilia are made by insects and animals.
Nuts
Various types of walnuts, pine nuts, pistachios, peanuts can be used in the work.
It is better to collect mature nuts together with the cup, first they need to be dried well, and then put into a box for storage.
Hazelnuts have a very hard shell, and if they are too dry, it will be almost impossible to work with them.
But whole walnuts make wonderful beautiful berries, as well as fruits.
Pretty cute bugs, turtles, and no less interesting rodents are obtained from the walnut shell.
Plant materials
Natural materials for crafts are divided into two types: mineral and vegetable.
Minerals are all kinds of pebbles, shells, sand. But the vegetable ones are already more richly expressed, these are twigs, leaves, berries, cones and much more.
In the summer, you can do a lot of work from bunches of greenery, grass stalks, green ears.
Although they deteriorate over time, they become too brittle, but still, many beautiful pictures can be made.
Flowers
Fresh or dry flowers are an excellent choice for crafts. And in order for the product to please the eye for a long time, you need to properly prepare everything properly.
In order to get dried beautiful flowers, they must be placed under a press, then put into a specially designated folder.
But this method is only suitable for flat paintings.
There is another way to dry the flowers so that the flowers do not lose their volume.
To do this, you need a saucer, multi-colored buds are laid out on it, and a small bowl of water, all this is placed in the microwave, set the timer for 2 minutes.
If, after this time, the flowers are not completely dry, you can add one more minute.
You can also collect flowers in a bouquet and hang them upside down for several days.
Many beautiful and creative cards can be made from various dried flowers.
Twigs, sticks, saw cuts
Tree branches have always been considered the most durable material. It is best to collect branches of spruce, lilac, pine.
Original candlestick.
When dried, they do not lose their durable properties. From thin twigs, you can make various parts of the body for little men, benches, gazebos and much more.
It is necessary to collect branches that are not injured, dry, and without pests. But it is also impossible to pluck branches from trees, so that the plant itself does not suffer, you need to collect only fallen branches.
Mineral materials
Mineral materials include sand, shells, various pebbles. Collecting material for work is not only an exciting activity, but also a wonderful pastime.
Shells
While relaxing at sea with the whole family, you can collect a huge number of beautiful shells.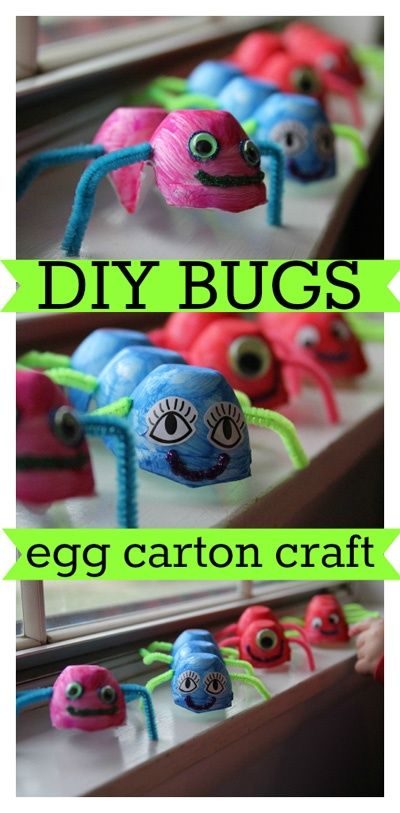 All of them have a different shape, oblong, oval, in-depth, and there are even those that look like scallops.
Various original animals are made from large shells. The little ones make very cute photo frames.
Or take a solution of whiteness and mix with water, the top layer will peel off, and a shell with a beautiful shiny top will remain.
Leaves and seeds
Leaf picking is best done in autumn. In autumn, the leaves are especially beautiful.
In order to keep the leaves for a long time, you need to lay them between the leaves of the paper, and walk with a warm iron. Then the cardboard leaves are shifted and placed under the press.
Oak, chestnut, maple leaves can be used for various beautiful applications.
Grass, moss, poplar fluff
Green moss can be collected in warm weather, it is stored for a very long time. With it, you can make a beautiful background, it is glued very easily to a flat base.
And dried grass is used for gluing small parts, when dried, the grass becomes especially brittle and sharp.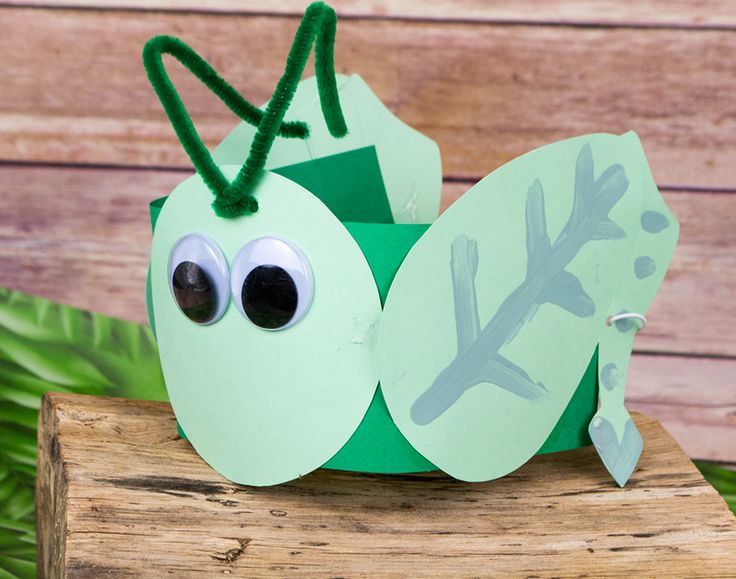
But poplar fluff can be used to make many beautiful paintings.
Strands of down should be laid out on dark velvet paper or fabric to get a dark or light shade, you need to apply different thicknesses of down strands.
Eggshell
Material for handicrafts can be completely different, sometimes we just don't even notice it. This material includes eggshells and the most common domestic eggs.
You can make a very beautiful work out of them, which can surprise everyone.
Place the shell in water for two hours.
In order for the shell not to emit a fetid odor after a while, it must be prepared very well.
It has several layers of film, and after a while it begins to smell unpleasant. Basically there are only 2-4 layers.
After these manipulations, you need to put the shell on a paper towel and dry it properly.
It can be used to make beautiful mosaics and creatively decorate flower pots. And a lot of different crafts for kindergarten kids.
Natural wood
There is a huge amount of crafts made of wood, tree bark, twigs. Since ancient times, wood has been the most sought-after material for crafts.
Wood is the cheapest and most available material.
It is better to start with the simplest items and move on to more complex ones. From such a simple material, you can do very useful things. Various hanging shelves, tables, chairs, bird feeders.
Tree bark
This is a simple and affordable natural material. But you need to collect only the bark that has fallen from the tree, in no case can you cut off the fresh bark, otherwise the tree may suffer.
The bark has many areas where you can use it, you can create an original craft or decoratively decorate your summer cottage.
Wood saw cuts
These thoughtful crafts made from natural materials will be a great addition to your home interior or just a decoration in your summer cottage.
Using various tree cuts, you can easily and easily make beautiful unusual products.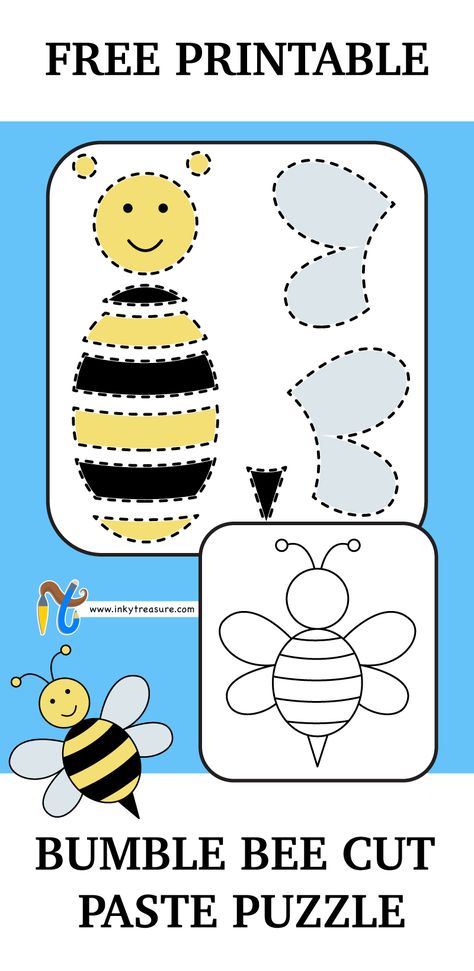
Wood has long been an excellent raw material from which many furniture and other important products are made.
Stumps, branches of various shapes and tree trunks are useful in the work.
Creative products made from saw cut wood are environmentally friendly, look very elegant and will fit into any interior.
Thanks to its pattern, any handicraft from a saw cut becomes unique.
Twigs and twigs
For twigs and twigs, you can go to the nearest park or forest. Various shapes, sizes, and colors of twigs are allowed to be collected for crafts.
Particularly beautiful works are obtained from spruce branches, but it is not recommended for a beginner to immediately start working with them, since there are many nuances with them, the presence of resin makes it difficult to work and the quality of the final craft from natural material.
A variety of tree branches, linden, maple, alder, but from birch, the craft turns out to be very beautiful and original.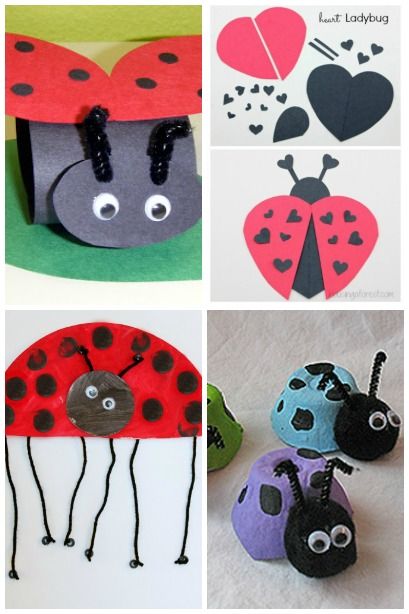
A creative combination of twigs and cones.
Branches can be used to make many beautiful things, such as a star, a gnome, a roof for a house, a raft, and many others.
Decorative stone and pebbles
Making stone and pebble crafts is an exciting and interesting activity.
This activity helps the child not only develop creative skills, but also notice the natural beauty around him.
Various materials can be used to create various figurines.
Various beautiful pictures can be depicted on the stones.
Sea pebble crafts are simple, but at the same time original, they can be easily collected on the beach, various shapes, durable and they do not require almost any care.
This material is highly resistant to moisture and fire, can be used to make candle holders, add to the aquarium as a decoration.
Small pebbles can be used to beautifully decorate a pot or flower vase.
Vegetable fruits for artistic work
For a long time, in almost all countries, various fairs were held after the harvest.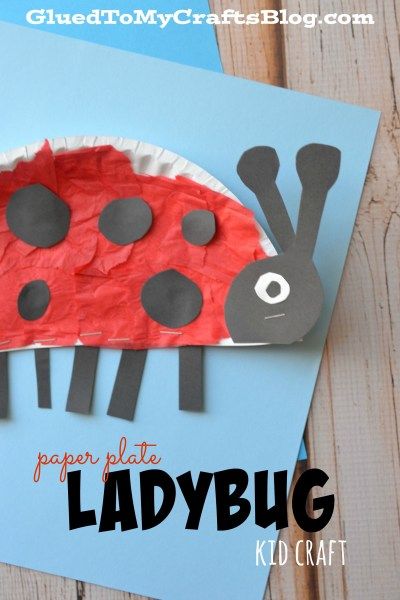 At such events, sellers demonstrated their grown goods.
They created bright compositions, laid out and hung beautifully the gifts of autumn.
Autumn is always famous for its abundance of harvest.
People of all ages like to fantasize and do wonderful things. Every autumn it is already a traditional event in schools and kindergartens to create various crafts from vegetables.
You should not start doing complex work right away, you should start small. From vegetables, you can make many different animals, flowers.
Feathers for needlework
Feathers are the most complex horn formations of birds. Lightweight but strong at the same time. Many birds wear various beautiful outfits.
Due to their color, they form unique patterns, shine and shimmer in the sun in many shades.
Bird feather is used in different directions.
Since ancient times, pillows and duvets have been stuffed with feathers.
Many unique crafts are made from feathers, appliqués.
And when there were no fountain pens before, nibs were sharpened and dipped in ink and written.
They make beautiful colorful fans, decoratively decorate clothes, as well as hats, and most importantly, eco-decor from natural material will never get bored.
Sand
Many people think that natural materials are already more than enough, but no.
In fact, a simple, but not at all ordinary material, gives a chance to make not only various types of crafts from natural materials, but also decorate your interior with it.
One of the latest interesting novelties is sand, and not ordinary, but decorative colored sand.
For decorative sand, the most common is taken, it is cleaned through a sieve, the largest particles are removed, and the rest is painted in various colors.
Decorative colored sand.
Even after a long time, crafts made from such sand remain bright and original.
Use it in painting, souvenirs, candle making and more.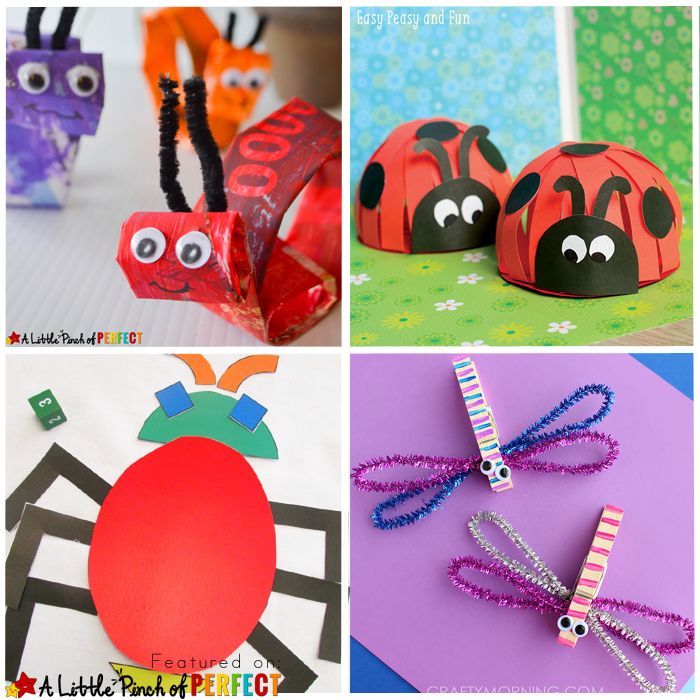
And today everyone already knows what sand animation is.
This is an indescribable spectacle when an animator creates pictures with his own hands from sand to a certain music. The picture is obtained, as if alive, due to the fact that the canvas itself is illuminated.
Preparation of natural materials for their further use
It is necessary to start collecting natural material only on warm sunny days. In order to get the best quality material you need to follow a few rules.
- Flowering plants have a specific time of maximum flowering when they are at their peak.
- Flowers should be cut in the morning and dry weather, when the dew has already disappeared and it has not become very hot.
- Pay attention to brighter and not fully opened buds. It is necessary to cut the flowers, in no case do not pluck, otherwise the plant may be damaged.
- After cutting, the buds must be put in a basket or in paper bags, plastic bags are not recommended in this case, the plant may suffocate from excess moisture and lack of oxygen.
- Dry the flowers with the buds down, or lay them between sheets of paper, and put a press on top.
Things are much easier with branches, snags and roots, you need to take a shovel, an ax and a saw with you, or you can easily collect everything that is on the ground.
- The leaves are collected in dry calm weather, put to dry in a specially designated folder, or it is also possible between the sheets of a book.
- After the leaves are completely dry, they are removed to the herbarium.
- Acorns and chestnuts are dried on a flat surface without much effort.
- But the cones must be dried in the oven.
- Shells do not require special attention during assembly, they only need to be placed in rigid containers or boxes so that they do not break.
- The bark is collected from the ground, or from old dead trees, if there are pests, clean it carefully with a knife, it is recommended to dry it in the microwave.
- I collect feathers only from proven healthy poultry.
Additional tools for crafts made from natural materials
Before you start working with natural materials, you need to properly prepare. You need to think carefully about what you need.
First prepare:
- scissors,
- PVA glue,
- miscellaneous wire,
- threads,
- wire cutters,
- special cloth for wiping excess glue,
- base for crafts.
Rules for the storage of natural materials
In order for natural material to be perfectly preserved, it needs special care.
You need to choose a dry and dark place, a flat box is best, in which you can store cones, acorns, dried flowers, leaves, sticks, twigs, and everything that your soul and fantasy wants.
Beautiful crafts for kids
Absolutely all small children love to be creative, do handicrafts with their own hands, such works develop not only attention and motor skills, but also perseverance and perseverance.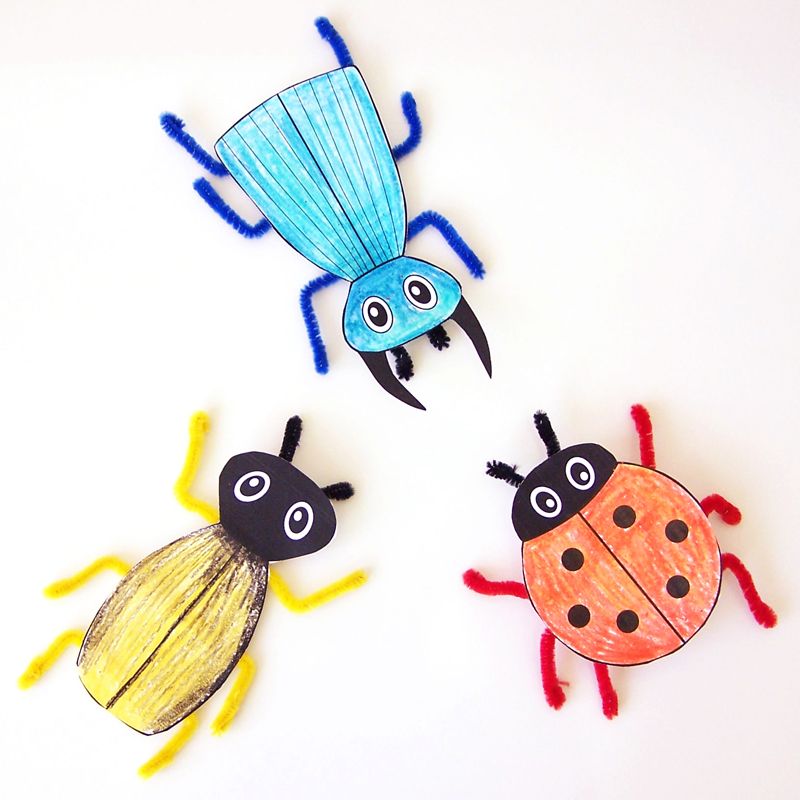 It is not worth taking complex crafts from natural material into work right away, you need to start small, for example, finger painting, light simple paper applications.
Various materials are used for homemade products.
Paper is considered to be the simplest and most accessible material in handicrafts; with it, the child will learn not only to make beautiful works, but also to distinguish colors. For example, from double-sided colored paper, you can make a butterfly.
Baby can just play with it or use it as decoration in the room. And children really like to make crafts from natural materials. The most common are applications with leaves.
Natural wood crafts
Almost all known species are suitable as starting material for beautiful wood crafts.
For the manufacture of various wood products, all kinds of blanks, beautiful roots, cut bars, pallets can be useful.
With the help of various carved timber, you can make an interesting home fireplace.
Thanks to interesting and original crafts made of natural wood, it is possible to embellish the decor of your home.
Make an apron in the kitchen above the work area from hardwoods such as beech, ash or cherry.
Wall clock looks beautiful and stylish from saw cut wood.
Twig and stick crafts
Numerous simple and easy wood crafts are accessories and household items.
On the desk, people make original pencil holders by pasting an empty bottle with branches of various lengths and shapes using a glue gun.
And how many beautiful key chains are made using branches and sticks.
Crafts on the theme of the sea and the underwater world
To create a memory of the sea, many different crafts are made, especially children love such activities.
If you are inspired by the ideas you see, you can create something unique and unusual.
Almost all marine-themed crafts made from natural materials do not require large expenses, pebbles and shells can be collected on the beach, the rest of the material can be bought in an ordinary stationery store.
Shells can be used to decorate photo frames, flower pots or decorative vases. Using paper, you can make an application of the underwater world.
Leaves Crafts
Autumn is a wonderful time, it brings a lot of natural materials to make beautiful outdoor decorations, and also brings autumn comfort to the house in the form of original things.
Children's crafts made from autumn leaves look the cutest.
Children with great imagination make something unusual out of leaves.
At the very beginning, prepare the leaves well, cut off the petioles, and dry thoroughly. It is easy to fantasize with beautiful autumn foliage, you just have to see all this beauty with your own eyes.
Can be done as volumetric work, as well as create unusual interior items.
Paper and Leaves Application Autumn Forest
Creating landscapes using the application technique helps children learn the concept of perspective and horizon.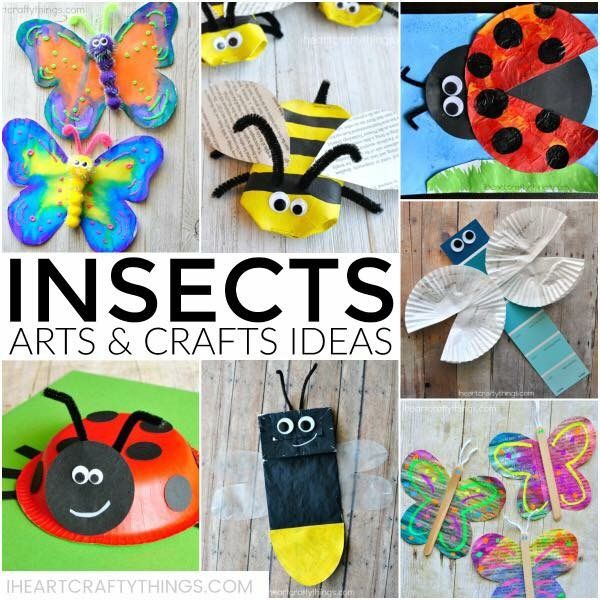 Crafts on this topic can be done even with children of the younger group of kindergarten.
At this age, babies can already distinguish colors, and without the help of adults they can correctly compose a color palette.
Application can be made from paper or tree leaves.
But the work with leaves is more painstaking, since dried leaves tend to break.
With paper, the work will not be so difficult, it is better to make crafts using torn paper technology.
Unique leaf paintings
In the process of making such works, you can lay the leaves in a chaotic order, or come up with a certain pattern.
Making circular symmetrical patterns is not that difficult, the technique of such patterns is called mandalas. Even in ancient times, peoples came up with centric patterns that have the magic of harmony and beauty.
This work is very painstaking, it is required to collect leaves of the same shape and length.
Each circular row differs from the previous one in the size of its repeating element.
These autumn-themed crafts made from natural materials will perfectly fit into your interior.
Beautiful photo frames made of tree branches
Natural materials are often used in art. For example, for a beautiful design of photographs, ordinary tree branches painted with varnish are used. Such natural material is environmentally friendly and affordable.
Branches need to be collected to a certain length, it depends on the size of the finished frame.
Additional material will be scissors, glue, frame base and decorative elements. A frame made of ordinary branches is a wonderful decor made from natural materials.
This photo decoration will be a wonderful gift or an interesting addition to your interior.
Crafts from natural materials: a big owl made of cones
Since ancient times, the owl has been considered a wise bird. For many, the owl is considered the most favorite craft. There are many different options for making such a wonderful craft from natural material.
This work is usually hung on a Christmas tree for decoration.
In such works as Shishka's entertaining little animals, the principle of combination is used, as well as the play of contrasts. It is possible to make such a product from spruce and pine cones.
The bird is based on a bump, nose, eye and paws are made of colored paper.
Mountain deer made of cones and branches
From natural materials that nature gives us, you can make a huge number of original crafts.
Mountain deer made from cones and branches
For example, spruce and pine cones make cute deer figurines that are decorated in various ways.
The buds should be dried either naturally, which will take three to five days, or in the oven. Deer should be made from even and clean cones, and branches should be selected even, without damage.
Mostly such crafts with their own hands from natural materials are made by children for exhibitions at school.
Do-it-yourself autumn bouquet of cones
Among the numerous products made from cones, bouquets of flowers are perhaps the most beautiful.
This craft is popular not only for its beauty and simplicity, but also for its elegance.
A beautiful bouquet made of even and lush cones will bring not only joy from its appearance, but also a certain comfort.
For such work, you can feel like a real florist and designer.
Some girls choose a bridal bouquet from cones, it is unique, and no one else will have this for sure.
In order to create such a beauty, DIY craft from natural material, you need to prepare improvised materials, such as:
- pliers,
- flower ribbon,
- wires 1 mm and 0.5 mm.
It is possible to collect a bouquet in fifteen minutes, first you need to wrap the wire around the cones, you need to leave a little wire to attach flowers to the cones.
In order for the bouquet to keep its fresh look longer, it must be placed in a vase with water.
Place the buds on the flowers and thread the wire down, then wrap the wire around the stems, use twine to hide the wire.
DIY acorn house
Acorn house is another amazing craft that even a child can handle.
As a child, it was amazing to find bright brown beauties, put them in your pocket, and hear how they tap loudly against each other.
Works from acorns are unfortunately short-lived, but if the material is collected intact and without pests, the product will last much longer.
From the cardboard it will be necessary to cut out the base of the cardboard, glue the felt on top, then glue the ice cream sticks on the felt, this will be the floor of the house.
Then you need to collect rows, glue each row of acorns with ice cream sticks, and leave room for doors and windows.
Glue the roof with sticks, decorate the roof with spruce branches from above. Inside the house you need to decorate as you wish.
Crafts from pumpkin seeds
The most popular material is considered to be natural, most often various crafts are made from it, both by adults and children.
Most of all, young craftsmen use pumpkin seeds in their work, as they resemble an even drop, they can be used to create a voluminous work or a colorful autumn picture.
Seeds that are strong, dry and undamaged must be selected for better work.
Various animals can be made from seeds, applications.
There are two ways to paint seeds, the first one requires a lot of time and effort, each seed is painted over individually with a brush.
The second method is much faster, a plastic bag is taken, the dye is poured into it and the seeds are poured, fifteen minutes will be enough for a light stain, forty minutes to an hour for a brighter one.
For this craft you will need scissors, cardboard, a glue gun, paints and pencils.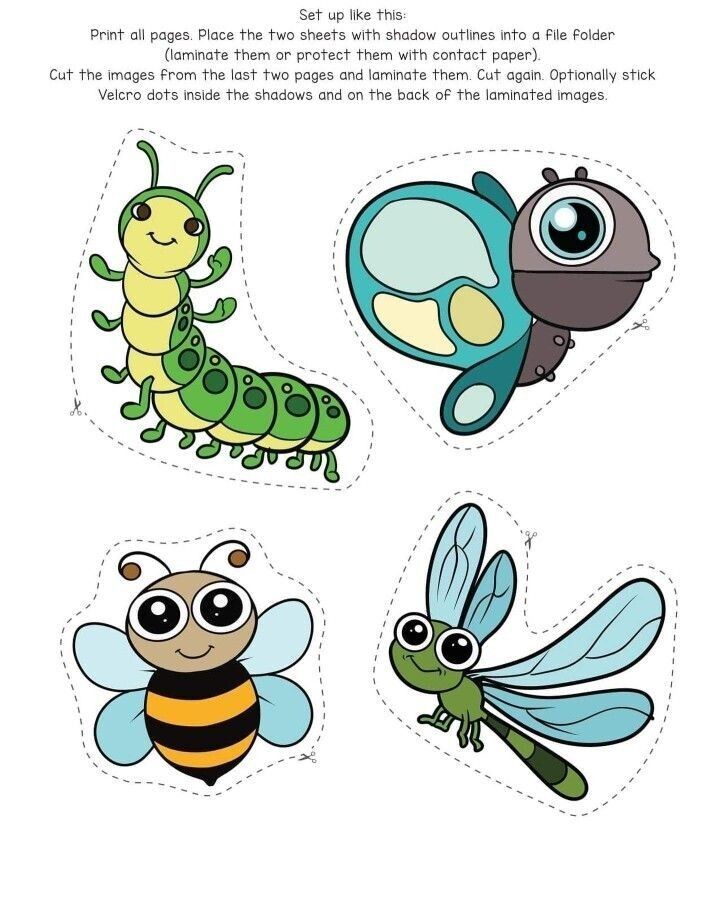 Best of all, of course, applications are obtained, adults help children.
You can make an autumn tree application, the work does not require much effort.
The template of the tree must be glued onto cardboard, the seed must be painted with gouache in various autumn shades and left to dry. After the seeds are ready, you can start gluing. In a chaotic manner, it is necessary to smear glue on the workpiece, and put pumpkin seeds on top.
Picture of cereals
In the process of making a picture, it is possible to use various cereals, peas, buckwheat, semolina, lentils, rice, coffee and many others.
To decorate the picture, it is allowed to use everything that is considered necessary, various beads, sequins, beads, ribbons.
- For the basis of the picture, it is best to use thick cardboard, which will not get wet from the glue during work.
- Groats need to be sorted out so that there are no dirty impurities.
- Next, you need to draw a template with a pencil, you need to do this carefully so that the contour is not visible in the future.