Functions of print
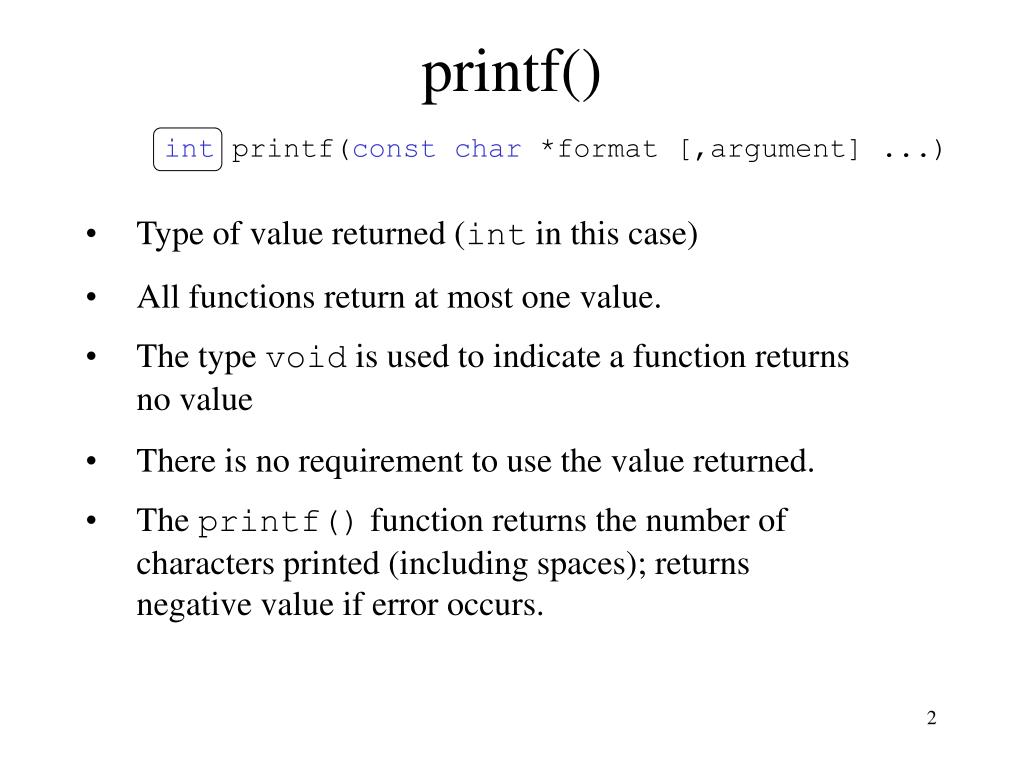
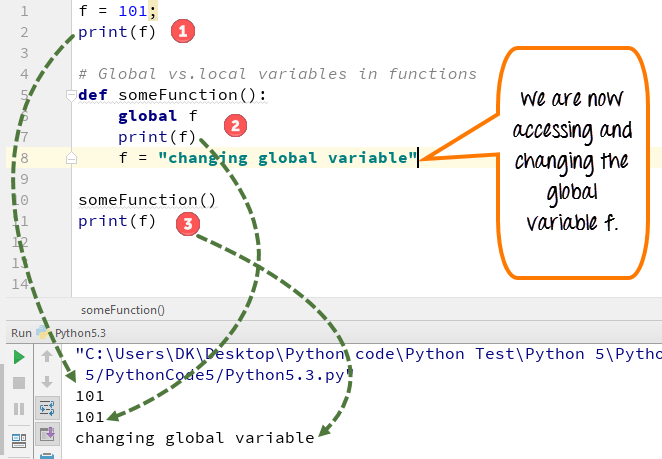
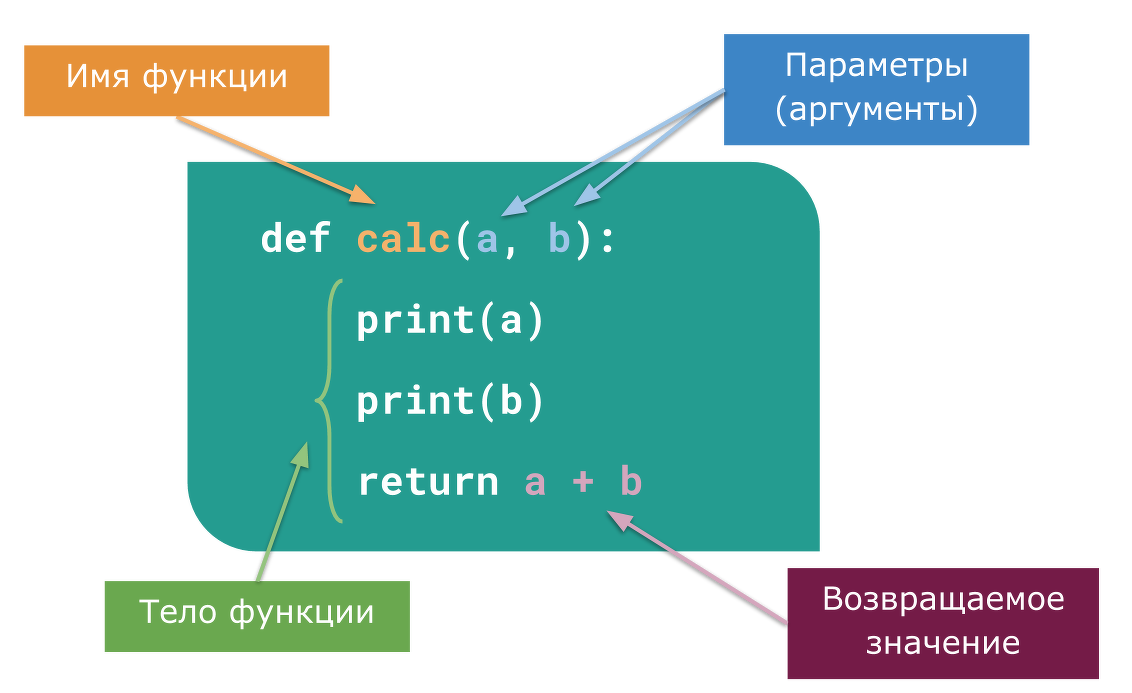
Python print() Function
❮ Built-in Functions
Example
Print a message onto the screen:
print("Hello World")
Try it Yourself »
Definition and Usage
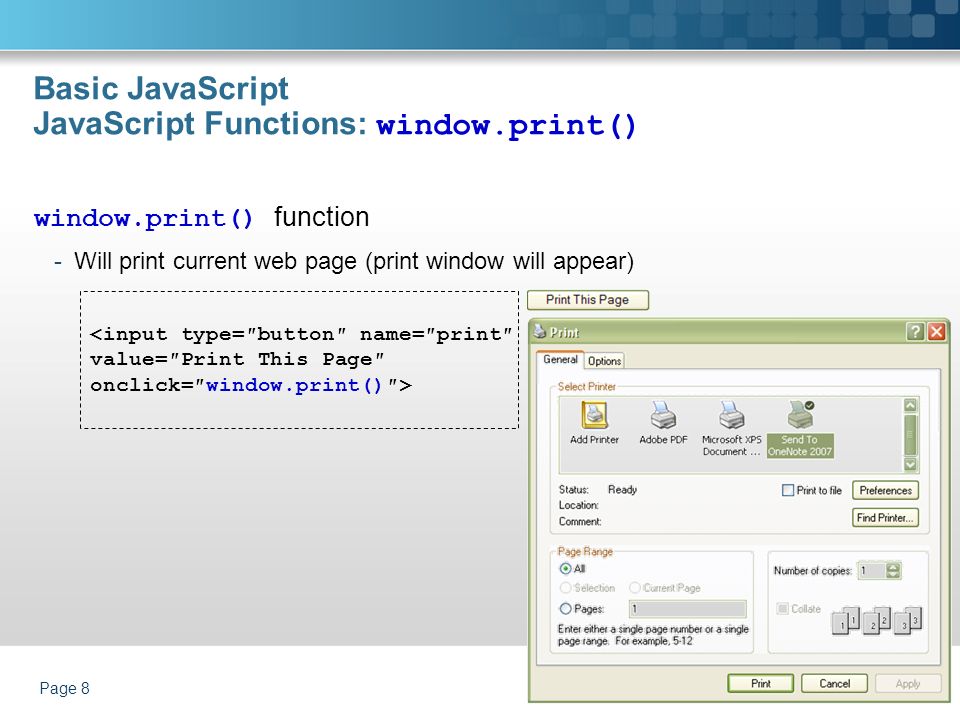
The print() function prints the specified message to the screen, or other standard output device.
The message can be a string, or any other object, the object will be converted into a string before written to the screen.
Syntax
print(object(s), sep=separator, end=end, file=file, flush=flush)
Parameter Values
| Parameter | Description |
|---|---|
| object(s) | Any object, and as many as you like. Will be converted to string before printed |
| sep='separator' | Optional. Specify how to separate the objects, if there is more than one. Default is ' ' |
| end='end' | Optional. |
| file | Optional. An object with a write method. Default is sys.stdout |
| flush | Optional. A Boolean, specifying if the output is flushed (True) or buffered (False). Default is False |
More Examples
Example
Print more than one object:
print("Hello", "how are you?")
Try it Yourself »
Example
Print a tuple:
x = ("apple", "banana", "cherry")
print(x)
Try it Yourself »
Example
Print two messages, and specify the separator:
print("Hello", "how are you?", sep="---")
Try it Yourself »
❮ Built-in Functions
NEW
We just launched
W3Schools videos
Explore now
COLOR PICKER
CODE GAME
Play Game
Top Tutorials
HTML TutorialCSS Tutorial
JavaScript Tutorial
How To Tutorial
SQL Tutorial
Python Tutorial
W3.
 CSS Tutorial
Bootstrap Tutorial
PHP Tutorial
Java Tutorial
C++ Tutorial
jQuery Tutorial
Top References
HTML ReferenceCSS Reference
JavaScript Reference
SQL Reference
Python Reference
W3.CSS Reference
Bootstrap Reference
PHP Reference
HTML Colors
Java Reference
Angular Reference
jQuery Reference
Top Examples
HTML ExamplesCSS Examples
JavaScript Examples
How To Examples
SQL Examples
Python Examples
W3.CSS Examples
Bootstrap Examples
PHP Examples
Java Examples
XML Examples
jQuery Examples
FORUM | ABOUT
W3Schools is optimized for learning and training. Examples might be simplified to improve reading and learning. Tutorials, references, and examples are constantly reviewed to avoid errors, but we cannot warrant full correctness of all content. While using W3Schools, you agree to have read and accepted our terms of use, cookie and privacy policy.
Copyright 1999-2022 by Refsnes Data. All Rights Reserved.
W3Schools is Powered by W3.CSS.
Concepts of Print Assessment | Reading Rockets
By: Reading Rockets
An informal assessment of the concepts of print, including what the assessment measures, when is should be assessed, examples of questions, and the age or grade at which the assessment should be mastered.
All assessments should be given one-on-one.
What it measures
If a student understands:
- That print has meaning
- That print can be used for different purposes
- The relationship between print and speech
- There is a difference between letters and words
- That words are separated by spaces
- There is a difference between words and sentences
- That there are (punctuation) marks that signal the end of a sentence
- That books have parts such as a front and back cover, title page, and spine
- That stories have a beginning, middle, and end
- That text is read from left to right and from top to bottom
When should it be assessed?
Assess concepts of print twice during kindergarten, at the start of school and at mid-year. In addition, as you model story reading techniques to help guide instruction, identify students who need additional support, and determine if the pace of instruction should be increased, decreased, or remain the same.
Examples of assessment questions
Give the student a book and ask the following questions:
- Can you show me:
- a letter?
- a word?
- a sentence?
- the end of a sentence (punctuation mark)?
- the front of the book?
- the back of the book?
- where I should start reading the story?
- a space?
- how I should hold the book?
- the title of the book?
- how many words are in this sentence?
Age or grade typically mastered
Some students enter kindergarten with an understanding of print concepts, but other will master it as the school year goes on.
See also this concepts of print assessment from Michigan's Mission: Literacy.
Reading Rockets (2004)
Reprints
You are welcome to print copies or republish materials for non-commercial use as long as credit is given to Reading Rockets and the author(s). For commercial use, please contact [email protected]
Related Topics
Assessment and Evaluation
Early Literacy Development
Print Awareness
New and Popular
100 Children’s Authors and Illustrators Everyone Should Know
A New Model for Teaching High-Frequency Words
7 Great Ways to Encourage Your Child's Writing
All Kinds of Readers: A Guide to Creating Inclusive Literacy Celebrations for Kids with Learning and Attention Issues
Screening, Diagnosing, and Progress Monitoring for Fluency: The Details
Phonemic Activities for the Preschool or Elementary Classroom
Our Literacy Blogs
Teaching Students to Use Context
Kids and educational media
Meet Ali Kamanda and Jorge Redmond, authors of Black Boy, Black Boy: Celebrating the Power of You
Get Widget |
Subscribe
Print Features
(Mac OS X 10.3.9 to 10.4.x)
Feature Sets: Set 1
| Print Quality Install one of the following permission values:
| |||||||||
| • | Media Type (type of medium) In the device you can use print media of the following types. For optimal print quality, select the type of media you want to use.
| ||||||||
| • | Secure Print The Secure Print feature allows you to secure documents that have been set with a password when they are sent to the machine. Only those who know the password can print secure documents. Since these documents are secured on the machine, you must enter the password using the machine's control panel. For a protected document, you must set a Password and a Job Name. | ||||||||
| • | Password Select the password for the secure document being sent to the machine from the drop-down box. | ||||||||
| • | Job Name Select the job name for the secured document to be sent to the machine from the drop-down list. | ||||||||
| • | Toner Save This function saves toner. If you set Toner Save, printouts will be lighter. Note
|
 1200
1200  Thick
Thick 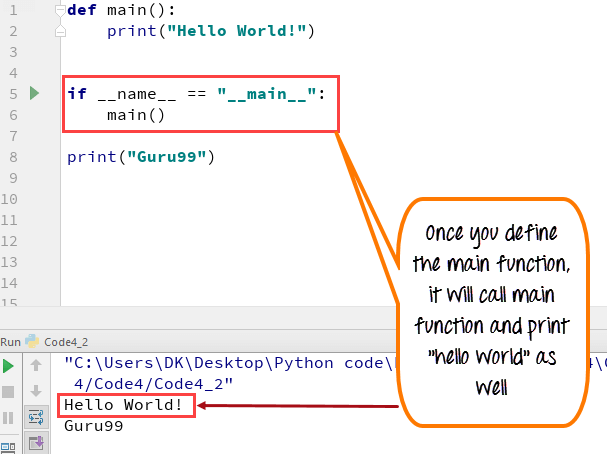 The default setting is Off.
 Feature Sets: Set 2
| • | Halftone Screen Lock The default setting is “On”. | |||||||||||||||||||||||||||||||||||||||||||||||||||||||||||||||||||||||||||||||||||||||
| • | High Quality Image Printing You can increase the print quality of images. Setting High Quality Image Printing to On will slow down printing. | |||||||||||||||||||||||||||||||||||||||||||||||||||||||||||||||||||||||||||||||||||||||
| • | Improve Print Output
| |||||||||||||||||||||||||||||||||||||||||||||||||||||||||||||||||||||||||||||||||||||||
| • | Density Adjustment Increase or decrease the print density. note
Feature Sets: General 2
Top of page [PRINTER]| SPECIAL PURPOSE PRINT FUNCTION|BP-70C65|04-05_005|manual download|MFP/Copier/Printers|Office solution: SharpPRINTING SPECIFIC PAGES ON DIFFERENT PAPER (DIFFERENT PAPER)For Windows Front and back covers and single pages document can be printed on paper other than the one on which the rest of the pages are printed. For macOS Front and back covers can be printed on paper that different from the one on which the rest of the pages are printed. This function can, for example, be used to print the front cover and the last pages on thick paper. Windows
macOS
ADDING INSERTS WHEN PRINTING ON TRANSPARENCY (TRANSPARENCY INSERTION) This function prevents bonding of film sheets to each other during printing due to sheet insertion paper between sheets of film. If necessary, an imprint on a transparent film can be duplicated on the inserted sheet of paper. Windows
 Set for the paper type of the bypass tray [Film] and load transparencies in the bypass tray. macOS
Set the paper type for the bypass tray to [Transparency] and load transparencies in the manual feed tray. INSERTING SEPARATOR PAGES BETWEEN JOBS OR COPIES Between jobs or specified number of copies, you can insert separator pages. This feature is available in the Windows operating environment. Windows
If the bypass tray is selected, set in the Paper Type field. PRINTING A SPECIAL COPY (SPECIAL COPY) This function allows you to print an additional copy of the image on paper of the same size supplied from another tray. This feature is available in the Windows operating environment. Windows
If the bypass tray is selected, set in the Paper Type field. PRINTING TEXT ON TAB PAPER BOOKMARKS (BOOK SHIFT/PRINT TAB PAPER) There are two ways to print on the tabs of tabbed paper: "Offset tab" and "Printing tabbed paper". Tab offset Create in the application the text to be printed on tabular paper. In the [Print Position] section of the [Layout] tab in the printer driver properties window, set the text offset value. Printing tab paper (PCL6 only) Tab sheets will be printed when they are inserted between required pages.
WindowsShift bookmark In the application, prepare the text to be printed bookmarks, then follow the steps below.
Set to paper type of the bypass tray [Tab Paper] and load tab paper in the tray manual feed. Printing tab paper (PCL6 only) Open the data where you want to insert a tab paper, then select settings.
2-SIDED PRINTING WITH CERTAIN PAGES PRINTED ON THE FRONT SIDE (INSERT CHAPTER This function allows you to print certain pages on the front side of the sheet. Example: When pages are selected as page settings 4 and 8.
Windows
FOLDING PRINT PAPER (FOLD) If the folding unit is installed, print paper can be folded. To use the single fold and saddle stitch functions folded (staple), you need to install a saddle stitch finisher. Paper types for folding function
WindowsFolding
Fold (Z-fold)
If "Z-Fold" is selected, select the size check box folding paper into position . macOSFolding
Fold (Z-fold)
INSERTING PRESET DATA BEFORE OR AFTER EACH PAGE (INSETTING PAGES) This function allows you to to insert preset data between every two pages.
First create a page that will be be inserted into the document. Windows
PRINTING MULTIPLE COPIES OF THE SAME IMAGE ON A SHEET (REPEAT PRINT) This feature allows you to print multiple copies of an image on a sheet. This is useful when printing business cards. and stickers.
Windows
HIDDEN FORM PRINT This feature allows you to print below the data, for example, the text "DO NOT COPY".
Windows
Hidden form printing function does not work if Print Mode is set to [1200 dpi].
CHANGING THE HOW TO PROCESS AND PRINT JPEG IMAGES (USE DRIVER FOR JPEG) Document containing images in JPEG format may not print correctly in some cases. To fix the situation, you can change the way images are processed in JPEG format.
Windows
MAXIMUM PRINT AREA USAGE (PRINT AREA) At maximum use printable area, you can print on the entire area of the paper. This feature is available in the Windows operating environment. Even when using the maximum printable area edges may be cut off. Windows
PRINTING WITH INCREASED RESOLUTION (ANTI-SLATHING) Image contours are smoothed using resolution enhancement technologies (RET). 
|

 For optimal print quality, select the type of media you want to use.
  The default setting is Off.

 The text will be printed on the bookmarks.
 The saved file can then open in the "Favorites" section.
 Copies are output sheet by sheet.
 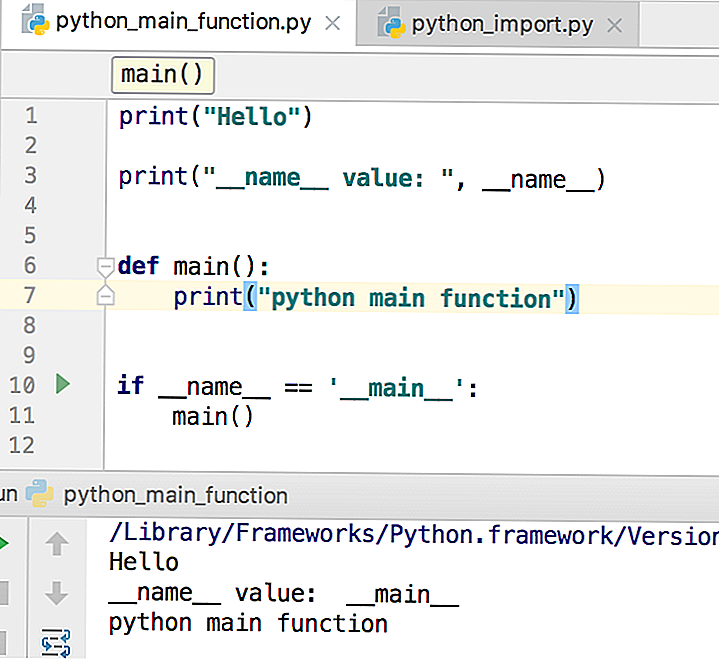 Copies are output sheet by sheet.
  Copies are ejected sheet by sheet.