Handprint crafts with flour
Salt Dough Recipe - The Easiest Way to Make Salt Dough!
Kim146 Comments
All activities should be supervised by an adult. As an Amazon Associate, I earn from qualifying purchases. This post may contain affiliate links.
Learn how to make your own salt dough handprint ornament with this easy Salt Dough Recipe. You only need a few ingredients from your kitchen to make this salt dough! We cover all of our tips and tricks to make sure your salt dough ornaments will last for years!
RELATED: Salt Dough Ornament Recipe
Table of Contents
- Salt Dough Recipe – for Handprints & Ornaments
- Salt Dough Ingredients
- How to Make Salt Dough – an Easy Salt Dough Recipe!
- Why Is My Salt Dough Puffing Up?
- How Do I Seal Salt Dough Ornaments?
- What Kind of Paint Should I Use?
- How to Decorate Salt Dough Handprints
- How Many Ornaments Does this Make?
- Tips for Making Perfect Salt Dough
- Salt Dough Handprint & Ornament Recipe
- Get the Recipe
- More Salt Dough Ornament Ideas
Salt Dough Recipe – for Handprints & Ornaments
One of our favorite things to do with salt dough is to make handprint ornaments. But you can also use this same recipe and use cookie cutters and paint shapes instead!
For the handprint ornaments – you can make a new one every year and have a nice memento for the Christmas tree!
Don’t forget to add the year on the back of the salt dough ornament to keep track of the different years.
Salt Dough Ingredients
- 4 cups all purpose flour (Note: you want regular all purpose flour, not self-rising)
- 1 cup salt
- 1.5 cups warm water
How to Make Salt Dough – an Easy Salt Dough Recipe!
1. Combine all of your ingredients (flour, salt, warm water) and mix well until it starts to form a dough.
2. Take the dough out of the bowl and knead for at least 10 minutes.
If your dough is too dry, add a little bit more water in and continue to knead.
The dough should be smooth and roll out with not too many bumps. It should also be easy to press a handprint into it.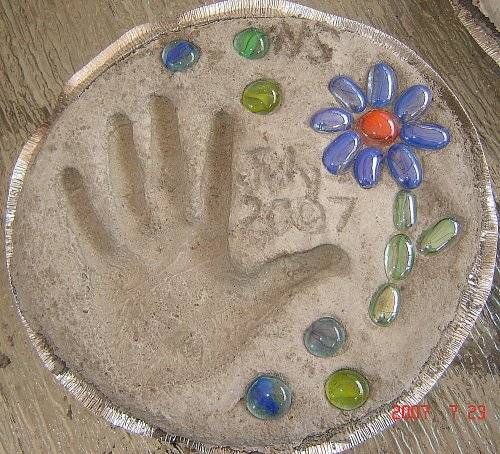 If you’re finding it’s too hard or not smooth enough, continue to knead some more. If it’s still too dry, add a little bit more water (but not too much or it may get too wet).
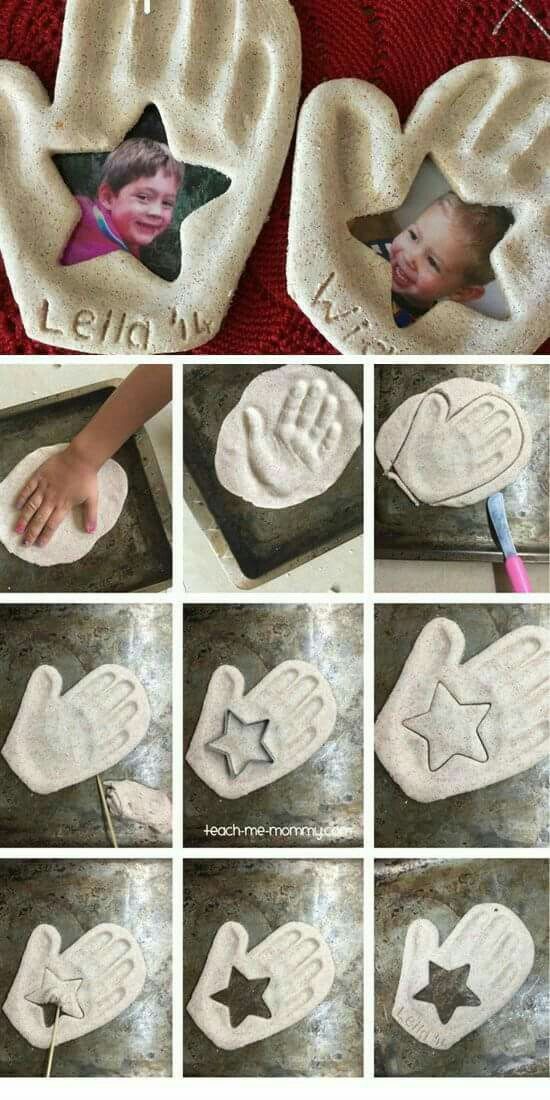
Roll out the dough to between 1/4 to 1/2 inch thickness. If the dough is too thick it will take too long to dry.
Press the hand into the dough.
3. Use a circle shaped bowl to trace around your handprint.
Cut out the handprint with a knife (adults to do this part).
You can also print off a circle shape or heart shape to trace around with a knife (adults to do this part).
If you have a smaller handprint you can use a circle or large heart cookie cutter.
TIP: It’s easier to press the handprint first, and then trace around it. If you have dough left over you can roll it out again and do another handprint.
4. Using a straw, make a hole in the top of the ornament.
5. Let the ornaments air dry for a day.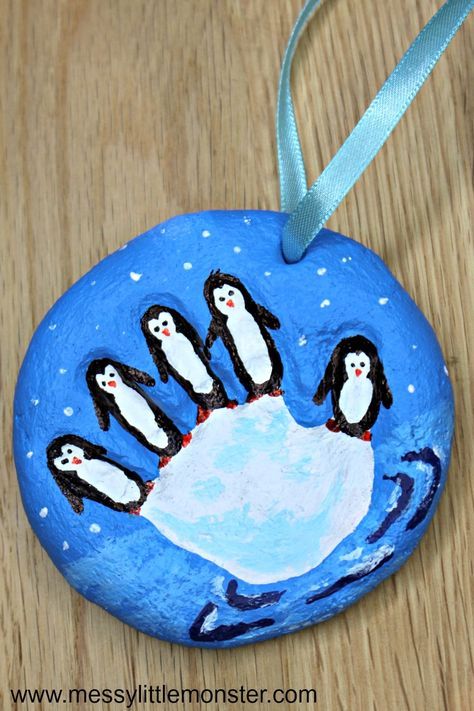
If you have time, let the ornaments air dry for a day. This will cut down on the baking time required and help to prevent puffing. If you do not have time, you can bake right away instead.
Bake at 250 degrees Fahrenheit for 1-2 hours. Once the top of the ornaments look dry and solid, flip over and bake on the other side.
NOTE: It’s important that you check that your oven temperature is set to Fahrenheit. One of the most common reasons the ornaments burn and puff up is that the oven temperature is Celsius. If you have a Celsius setting then you’ll want to use the lowest oven temperature, closer to 120 degrees Celsius.
If your ornaments are still doughy, put them back in for another hour. It will depend on your thickness how long you need to bake for. The thinner ornaments will take less time but thicker may take more. If it’s taking too long in the oven, let them finish drying by air drying them for a few more days. Make sure to flip them over so the bottoms also get exposed to air.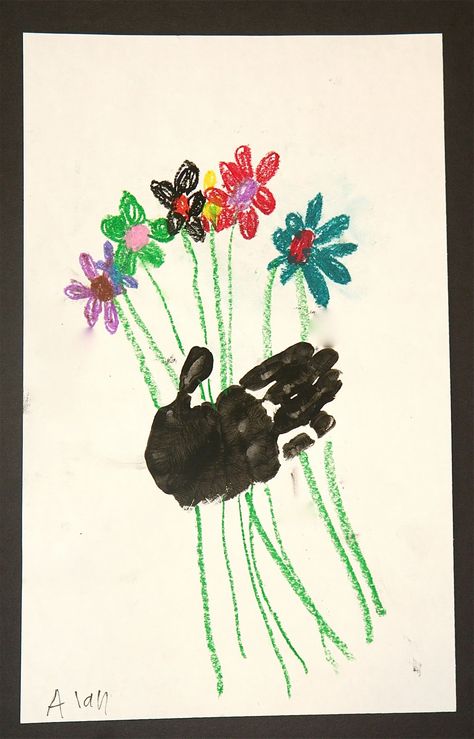
6. Once your ornaments are fully dry you can paint them.
Paint the handprint and leave the remaining ornament plain. Or you can paint the whole ornament white and then paint the center handprint once the base coat has dried.
If you want to add glitter into the handprint, decorate the whole ornament with paint first, then fill the handprint with glue. Shake glitter onto the glue.
After the paint has dried, make sure to seal with with either mod podge or a clear glaze spray. Seal the ornaments after you paint them and the paint has fully dried.
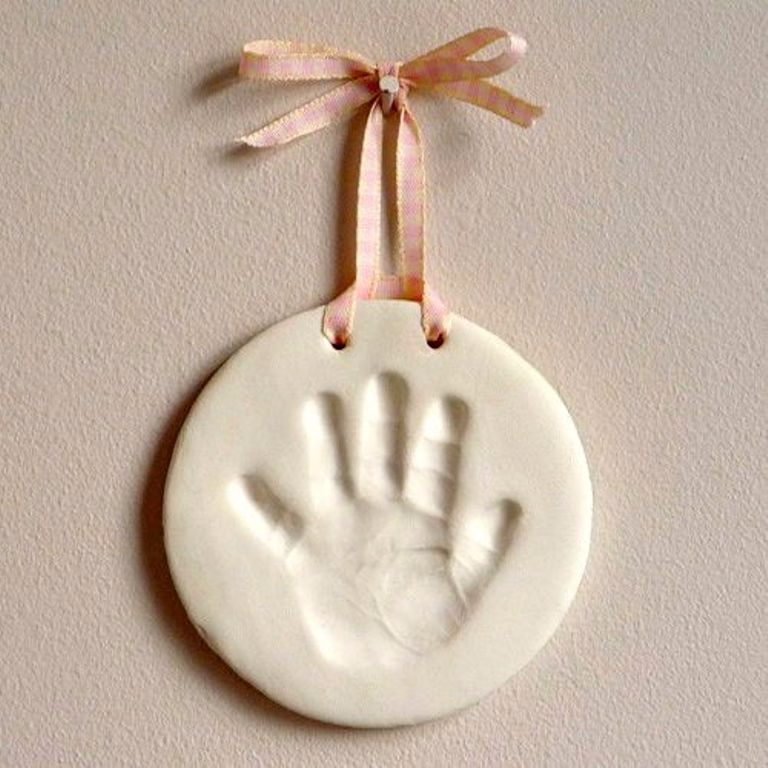
7. Tie ribbon or twine through the hole for hanging on the Christmas tree.
Why Is My Salt Dough Puffing Up?
The number one reason salt dough is puffing is due to the oven temperature. If the temperature is too high the salt dough will puff up. It is better to let your ornaments air dry for a day and then bake them.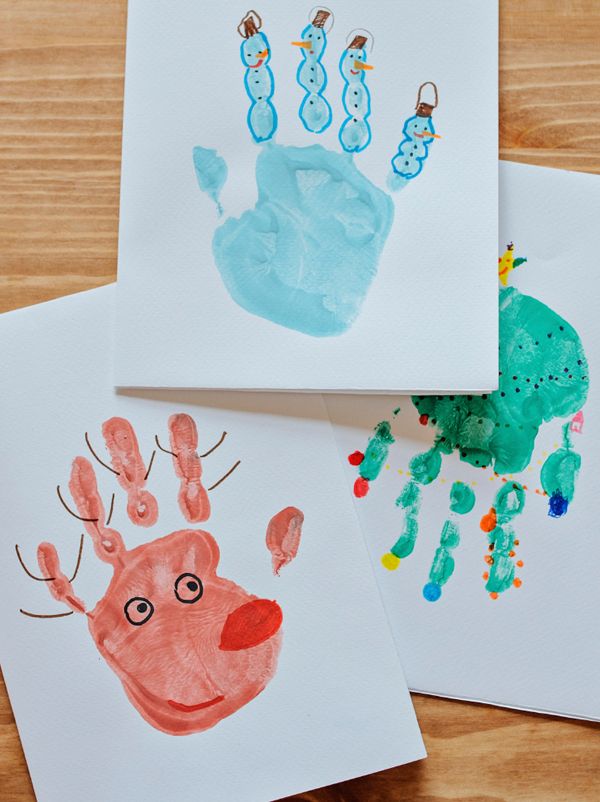 This will prevent the puffing. If you need to bake right away, bake at the lowest temperature (200-250 degrees Fahrenheit).
Note: Make sure to check your oven temperature is Fahrenheit and not Celsius.
You also want to make sure you are using regular, all purpose flour and not self-rising flour.
How Do I Seal Salt Dough Ornaments?
Once you are done, don’t forget to seal with either mod podge or a clear glaze spray. We like this spray for a durable finish. Adults should do the spraying and always follow directions of the product chosen.
Sealing the final ornaments will help stop them from cracking in a few years and prevent moisture from getting in.
What Kind of Paint Should I Use?
I like to use non-toxic acrylic paint for salt dough ornaments. The color will go on much thicker and more vibrant than kids paint. We like this brand of acrylic paint.
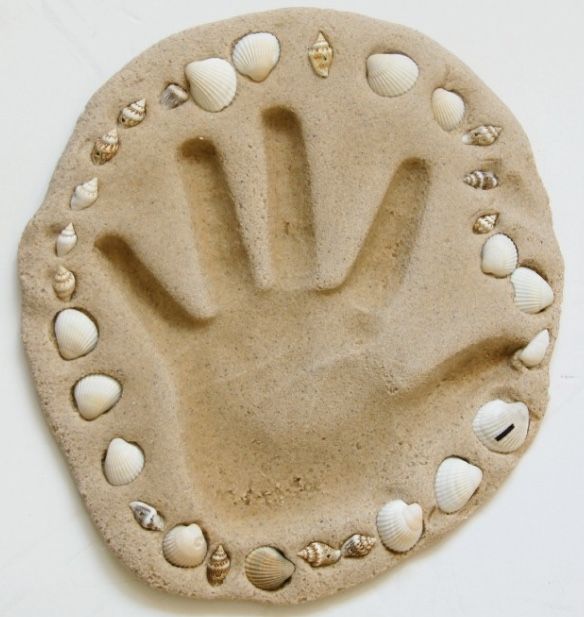
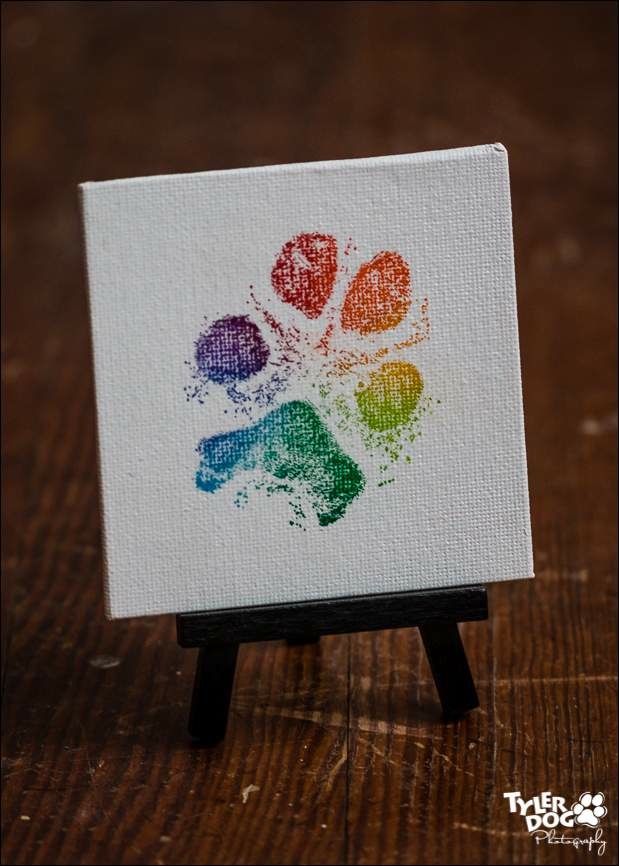
How to Decorate Salt Dough Handprints
You can use a heart for the shape around the handprints or you can use a circle.
For this one, we used a large heart cookie cutter as the handprints were small (baby handprints):
If you have larger handprints, you can trace around a heart print-out or use a knife (adults only) to draw a heart shape around the handprint.
We painted this one with acrylic red paint but you could choose green or even silver or gold. Then you can leave the handprint portion of the salt dough ornament either natural or use glue and add glitter to it like we did.
How Many Ornaments Does this Make?
Depending on the handprint size and thickness of the salt dough – you can get approximately 8 handprints. If you’re using the dough to make small cookie cutter ornaments you’ll get approximately 15.
If you’re hoping to make this for a classroom or with a larger group of kids, I would recommend bringing an extra batch just in case. The quantity can vary depending on size of cookie cutters, handprints and thickness of the dough. I like to roll out the dough and continue to knead together the scraps to use as much as I can.
Tips for Making Perfect Salt Dough
- Knead well to make the dough smooth – I like to knead at least 10 minutes.
- Let the ornaments air dry for a day first, if possible. This cuts back on the oven baking time and helps to prevent puffing.
- Don’t forget to flip the ornaments when baking or air drying so that the bottoms will be exposed to air.
- Seal with our recommended sealers mentioned above so that the ornaments will last for many years.
- Store the ornaments in a cool, dry place and keep away from moisture. Sealing the ornaments also prevents moisture from getting in.
Prep Time15 mins
Active Time2 hrs
- ▢ 4 cups all purpose flour
- ▢ 1 cup salt
- ▢ 1.5 cups warm water
- ▢ Clear Glaze Finish or Mod Podge
Combine all of your ingredients and knead for 10 minutes.
 If your dough is too dry add a little bit more water in and continue to knead.
Roll out the dough to a thickness that you'd like your salt dough ornament to be. We like between 1/4 to 1/2 inch thickness.
Using a large cookie cutter, cut out different shapes for your salt dough ornaments. If making handprints, place the handprints first and then trace around them.
Have your child place their hand into the salt dough ornament. If the dough is too hard to get an imprint it may be too dry. Continue to knead until smooth. You can also add in a little bit more water.
Using a straw, make a hole in the top for where you want to hang your salt dough ornament.
If possible, let the ornaments air dry for a day.
Preheat your oven to 250 degrees Fahrenheit. Bake for 1-2 hours. If your ornaments are still doughy, put back in for another hour. (It will depend on your thickness how long you need to bake for. The thinner ornaments will take less time but thicker may take more).
If you encounter too much puffing, roll out thinner ornaments and this will help reduce the puffing. If the ornament is still a bit doughy, bake for longer or let sit out a few days to harden before decorating. The thickness of the dough will determine how long you have to bake them for. We prefer to bake them at 250 degrees Fahreneheit for longer and let them air dry for a few days to prevent puffing.
Once cool, you can decorate by painting with non-toxic acrylic paint.
Spray with a clear glaze finish or finish with mod podge. Do this before adding the glitter.
To make the hand glittery, fill the handprint with glue then sprinkle glitter on top of the glue, shake off the excess and let it dry.
Kids will love helping to make this salt dough recipe. They will also have fun decorating the salt dough ornaments by painting them.
Finally, just a friendly reminder to keep these out of reach of pets (they can be toxic to dogs due to the salt content).
More Salt Dough Ornament Ideas
See over 25+ of the best Salt Dough Ornaments here for more great ideas!
These salt dough glitter ornaments are so fun to make – and you can make these for any season or holiday too!
DIY SALT DOUGH HANDPRINT ORNAMENT
Making DIY gifts is a lot of fun. Salt Dough Crafts are popular and this salt dough handprint is such a fun project to make and also to give as a gift.
You will find a “how-to” video at the bottom of this post.
DIY SALT DOUGH HANDPRINT ORNAMENTThis page may contain affiliate links for your shopping convenience. The links help support the blog as we may earn a small commission at no extra cost to you, our readers.
If you like salt dough crafts, these adorable thumbprint salt dough magnets are quick and easy to make. This DIY photo lamp using your own family pictures is also a unique gift idea you can make at home.
DIY Salt Dough is something that has been around for ages! I remember making a salt dough handprint ornament when I was little around Christmas time. I thought it would be cute to do all of my boy’s handprints and hang them on the wall.
Salt Dough keepsakes are a very inexpensive craft, made with items from around the house. If you’re wanting to send a handprint kit as a gift, I found an affordable one here: baby’s handprint ornament kit.
I also found this one: marshmallow clay handprint kit. I think marshmallow clay would be super fun to make at home!
SALT DOUGH RECIPEPRINTABLE RECIPE AT END OF POST
- 1 cup flour
- 1 cup salt
- 1/2 cup water
- Bowls (one for mixing, another for cutting out your circle)
- Spoon
INSTRUCTIONS:
- Mix the salt and flour in a large bowl
- Make a well in the salt/flour mixture and add the water
- Knead until smooth and shape into a ball
If you want to color your salt dough, simply mix in a few drops of food coloring while you are kneading it.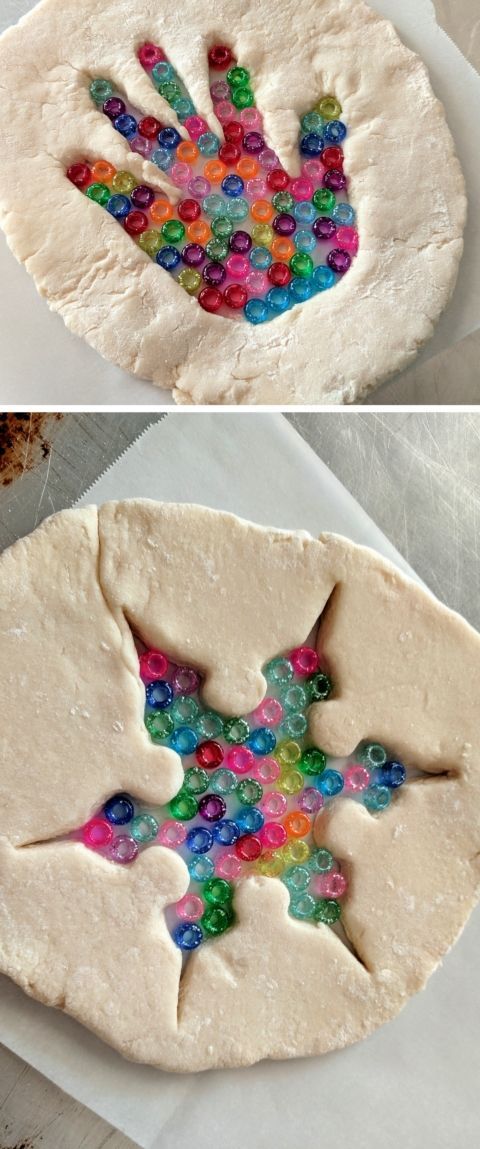
You can let your salt dough handprints air dry, but they can also be dried in the oven. Bake at 200 F until dry. The amount of time on the size and thickness of your masterpiece.
Thin flat ornaments may only take 45-60 minutes, but thicker ones like the ones I did can take 2-3 hours or more.
Make sure you store any leftover dough in an airtight container or it will get all dry and crumbly.
I can’t wait to have the salt dough handprint hanging on the wall, it’s going to be a great addition to our home décor and one that I can treasure as my children grow.
There are many other ornaments you can make with kids, to give as gifts at Christmas or anytime, really. I like buying the DIY ornaments (plastic if you have little ones!) and filling them with glitter. There are tons of things you can do with them, though.
Ingredients
- 1 cup flour
- 1 cup salt
- 1/2 cup water
- Bowls (one for mixing, another for cutting out your circle)
- Spoon
Instructions
Mix the salt and flour in a large bowl.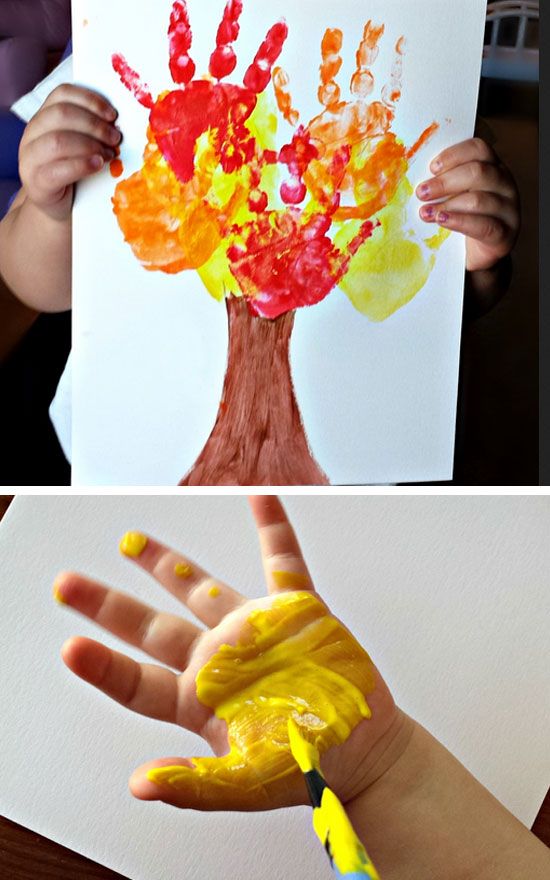
Make a well in the salt/flour mixture and add the water.
Knead until smooth and shape into a ball.
If you want to color your salt dough, simply mix in a few drops of food coloring while you are kneading it.
You can let your salt dough handprints air dry, but they can also be dried in the oven. Bake at 200 F until dry. The amount of time on the size and thickness of your masterpiece.
Thin flat ornaments may only take 45-60 minutes, but thicker ones like the ones I did can take 2-3 hours or more.
Make sure you store any leftover dough in an airtight container or it will get all dry and crumbly.
If you enjoyed this post be sure to check out our boards on Pinterest.
Love salt dough projects? Get more inspiration from these books:
Let’s Get Crafty With Salt Dough
Salt Dough Crafts for Kids (FREE ebook)
You’ll love this FAIRY GARDEN with SALT DOUGH FAIRY GARDEN ACCESSORIES.
You may also like this after school routine clock.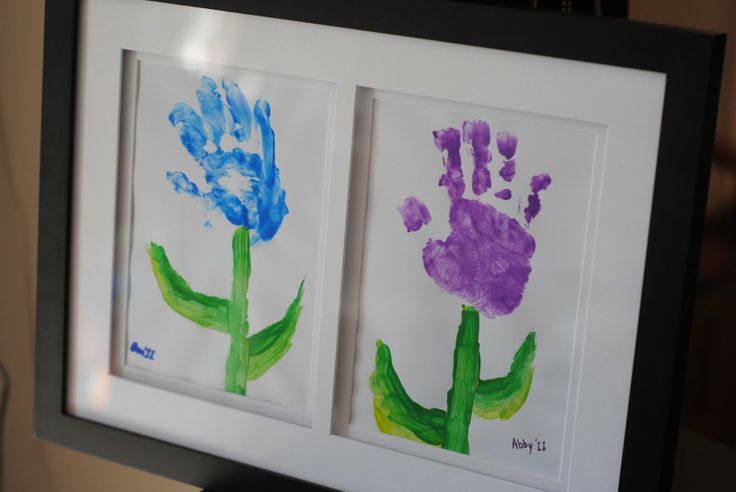
You can sign-up to get an email update each day. You can also connect with us on:
- Google+
- Blog Lovin’
Post submitted to Mommy Moment by Jennifer H.
This post is linked up to I Gotta Create, Tutorials Tips and Tidbits, The Style Sisters, Tidy Mom, Craftberry Bush, Growing Home, Sew Creative
Do-it-yourself crafts from salt dough at home with children - Family Portal of the Omsk Region
From salt dough you can make a huge number of crafts, for example: flowers, animals, various figurines, inscriptions, numbers, toys, pictures and whatever you want! Modeling from salty test is called bioceramics. The advantage of salt dough is that it is convenient to work with it, this material is absolutely harmless and crafts from it will delight you for several years. In this article we will look at how to make crafts from salt dough with your own hands.
As make salt dough?
You will need: a glass of wheat flour, a glass of extra salt, half a glass of cold water, a bowl.
Recipe #1
- Take bowl.
- Pour out a glass of flour.
- Add a glass of extra salt.
- Fill with cold water.
- Knead the dough.
Recipe No. 2
- Flour - 1.5 glass;
- Salt - 1 cup;
- Water - 1 glass;
- Dry wallpaper glue - 1 - 2 tbsp. l.;
- Sunflower oil - 1 tbsp. l.
Pour into capacity flour and salt and gently add water little by little (be sure to first flour, then water, and not vice versa, otherwise lumps may form) and mix. If lumps form in the dough, knead them with your hands. So Knead all the dough until it becomes soft and homogeneous in composition.
Add to this mass of sunflower oil so that the dough does not stick to your hands, and wallpaper paste - so that the dough becomes like plasticine, bending and elastic. All this again mix thoroughly and knead the remaining lumps.
Now we take dough and place it on a cutting board.![]() Rolling out the dough with a rolling pin several times in order to completely eliminate the possibility of the appearance lumps.
Rolling out the dough with a rolling pin several times in order to completely eliminate the possibility of the appearance lumps.
We place the dough in a plastic bag and put in the refrigerator for an hour. An hour later the dough ready to go.
During sculpting, you should not immediately take out all the dough from the bag - in the air it quickly will start to dry up. It is better to pinch off the necessary pieces, and close the rest package.
Important! Mandatory first flour, then water, and not vice versa, otherwise lumps may form.
The finished salt dough must not stick to hands or crumble. It should be cool and comfortable to sculpt.
How to dry salt dough?
There are two most common ways to dry items from salt dough. The first way: the finished craft will dry itself. The main thing that direct sunlight did not fall on it, otherwise it will crack. Under the tree you can put it on a flat surface and wait a few days. Second way: the finished craft dries in the oven from 3 to 6 hours (depending on the size crafts). Drying takes place intermittently. One set is 1-2 hours. For quick drying in one go, set 75-100 degrees in the oven closet, and then, the craft will dry in an hour. At a temperature of 120 degrees craft dries in 30 minutes, but it is better to dry naturally.
How to color salt dough?
There are two most common staining methods salt dough. The first way: after drying, the finished craft is painted acrylic paints or gouache, using a brush. Method two: food coloring diluted in water, then added during the preparation of the dough. When craft completely painted and dried, it must be covered with a transparent manicure or furniture varnish in 2-3 layers. Each layer before application the next one must dry. In this way, the craft will last for a long time.
Salt dough caterpillar
You will need: colored dough, knife, pva glue, toothpick, pendant, clear nail polish.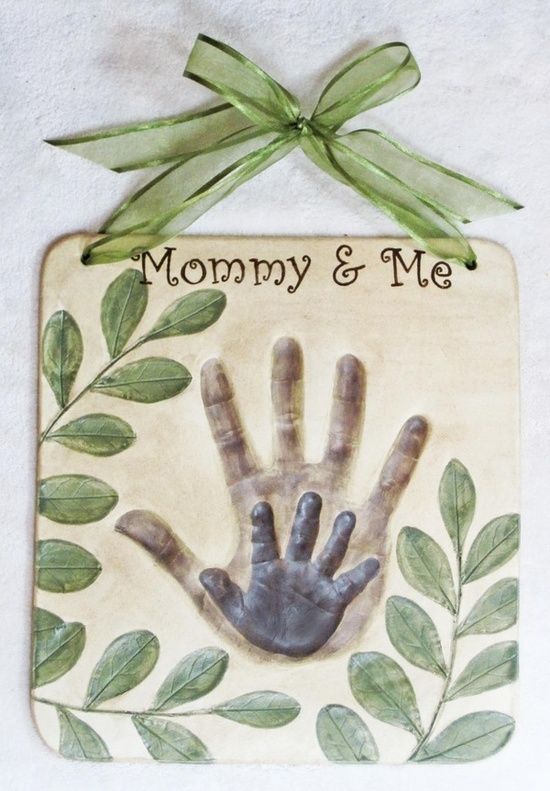
Master class
- Roll out sausage.
- cut it into 6 equal parts.
- Roll up balloons.
- Glue 5 balls in between.
- Glue head.
- Blind nose and eyes, then glue them.
- Pierce toothpick place for hanging.
- Dry under the tree.
- Cover varnish and wait until it dries completely.
- Attach suspension.
Salt dough caterpillar is ready!
Salt dough hedgehog
You will need: salt dough, nail scissors, pva glue, acrylic paints or gouache, brush manicure varnish.
Master class
- Blind the body of the hedgehog is oval.
- Make elongated tip.
- Blind 2 small balls and glue the eyes in place. Roll the ball a little more and glue it as a spout.
- Make needles, cutting the dough. The incisions should be made in rows, the needles should be placed in checkerboard pattern.
- Dry under the tree.
- Color and wait for it to dry completely.
- Cover varnish and wait until it dries completely.
Hedgehog salt dough ready!
Salt dough cat
to you you will need: salt dough, knife, rolling pin, plain pencil, sheet of paper, sandpaper, acrylic paint or gouache, brush, transparent nail polish, glue gun or pva, base for crafts for example: board with a frame, clear nail polish.
Master class
- Draw cat or print the template.
- Roll out the dough thinly.
- Attach the template and cut out the cat.
- Dry the craft.
- Sand the sandpaper craft paper, removing irregularities.
- With a simple pencil, transfer the desired drawing on the body of a cat.
- Color paint and wait until it dries completely.
- Varnish the craft and wait complete drying.
- Glue cat on a base with a frame.
Salt dough cat is ready!
hobby for women and children
Flour can be used not only to bake pies and boil dumplings. Try using this raw material for beautiful salt dough crafts. We invite you to master a new female hobby, the results of which will not be difficult to find practical application.
History does not know who first came up with the idea to create sculptures from flour, water and salt, but there is a version that beautiful crafts made from salt dough were invented by confectioners. Creative cooks got bored of baking quickly stale buns and, having improved the recipe, they invented a material that does not deteriorate over the years and does not lose its attractiveness. Today, testoplasty is a popular women's hobby that you should definitely try too.
- Testoplasty – a fun hobby with a serious approach
- Salt Dough Recipe for Crafts
- Secrets of Sculpting and Shaping Figures
- How to Decorate Dough Crafts
- Beautiful Dough Crafts: Photo Inspiration
- Figure Making Workshops
Fun Hobby with Plastic 9006 approach
Salt dough is a plastic material from which you can mold no less interesting crafts than polymer clay.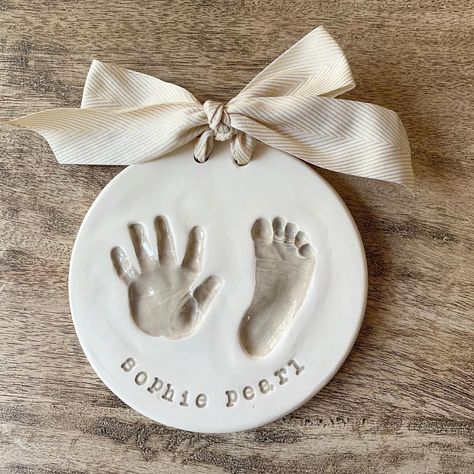 Finished figurines are easy to color and decorate, turning into real works of art, which are easy to find a place not only in the home and office, but also in the museum. The presence of salt in the dough preserves the finished product and protects it from various pests that are not indifferent to flour products.
The main advantage of testoplasty is the availability of materials. The cost of finished crafts is mere pennies, and products for modeling, as well as for choux pastry for dumplings, are always in any home.
Once you master salt dough, you can make small souvenirs to sell and turn your new hobby into an extra income. Figures can be sold via the Internet, social networks or offer your masterpieces in crowded places: at train stations, in parks, on the beach.
Now in many cities open fairs are held, where everyone has the opportunity to sell what they have made with love with their own hands. Amulets, fridge magnets, kitchen decor are in great demand.
DIY Salt Dough Recipe
All-in-one DIY Salt Dough recipe requires only three ingredients: flour, salt and water.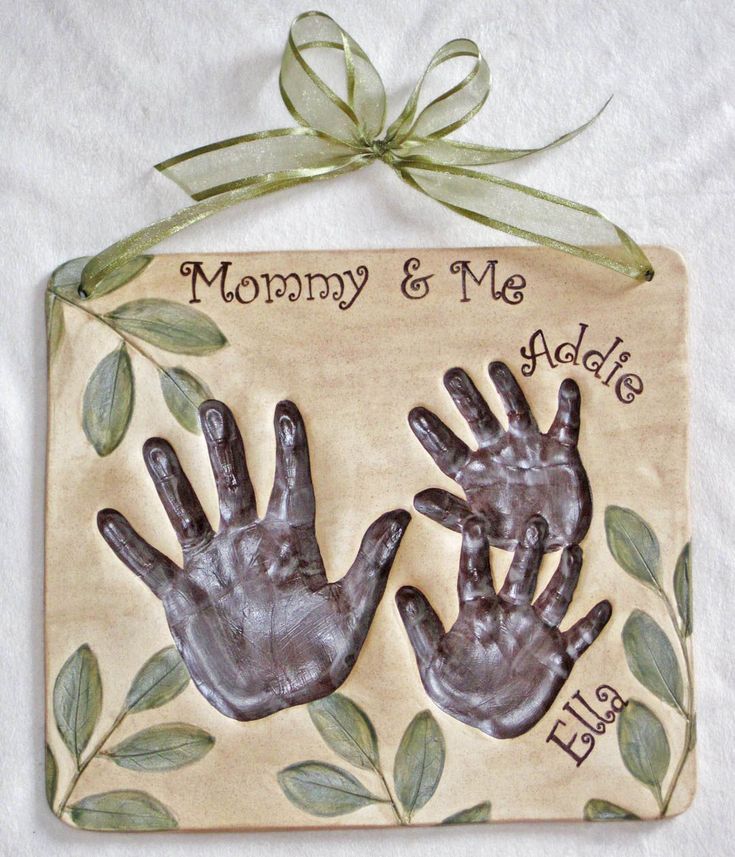
Flour should be used only the highest grade, not containing bran and any improving additives. In no case do not buy pancake, pancake and self-rising flour - during drying, the dough made from it will begin to rise, which will lead to cracks.
Salt should also be taken plain without iodine and other additives, but clean and white. Perfect for Extra. If it was not possible to find finely ground salt, you can take pure coarse salt by dissolving it in water taken in volume according to the main recipe.
Water must be filtered and cooled before mixing. It is recommended to take ice water prepared in the freezer.
Proportions of ingredients:
- Flour - 300 grams;
- Salt - 300 grams;
- Water - 200 ml.
Video recipe from experienced craftsmen
Some crafters use additives to improve plasticity, such as starch, vegetable oil or glue.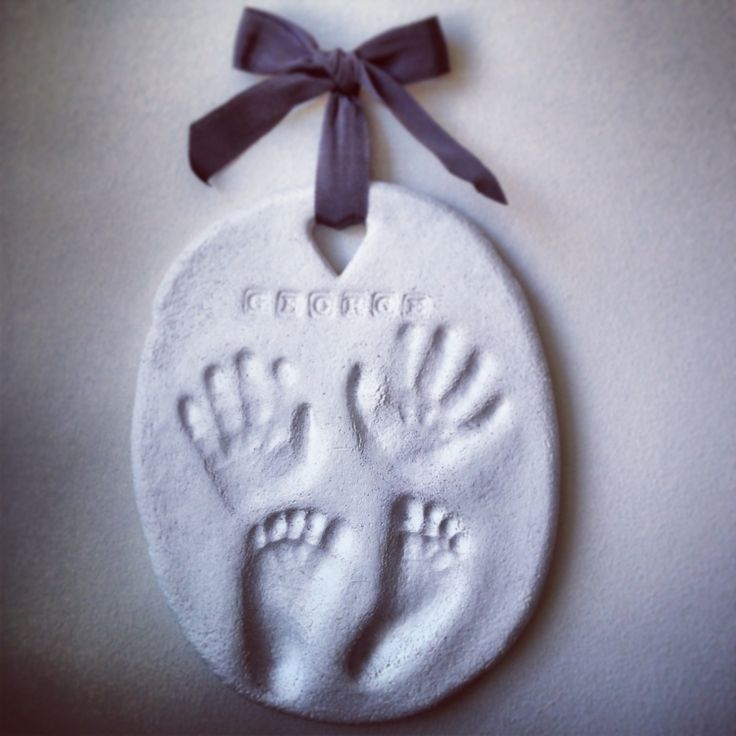 However, for the first masterpiece, it is better to prepare salty dough for crafts according to the main recipe. It is important to consider that flour and salt are taken in the same proportions by weight, but salt is heavier than flour, so it turns out to be half as much in volume! For example, a glass of flour will require half a glass of salt!
Secrets of sculpting and shaping figures
Working with dough does not require special talents, but it is unlikely that you will be able to mold something special the first time. In the air, the mass of flour and salt quickly hardens, so you need to store it in a tightly closed jar, separating, if necessary, the right amount for sculpting a separate element. If the mass was dyed in different colors, then portions of hotel shades of different colors should be stored in separate containers.
There are many techniques for working with dough. It can be rolled into a layer, and then cut out figures and form compositions from them, like flowers from sugar mastic and cold porcelain. At the joints, the parts are moistened and gently pressed against each other. Also, the same dough, diluted to a more liquid consistency, is used as glue.
For large three-dimensional figures, wire frames are used or put inside jars and boxes, which reduces the volume of raw materials and speeds up the drying process. To fasten the elements, you can use toothpicks, fastening the parts to be joined with them.
Finished works are dried in the open air or baked in the oven, which greatly speeds up the process of gaining the desired strength. During drying, the oven is turned on at the lowest temperature, and the door is slightly opened. At high temperatures, the craft may crack.
How to decorate dough products
Any materials at hand can be used to form reliefs and three-dimensional figures: stencils, coins, toothpicks, sushi sticks, combs, penknives, pastry syringe, cookie cutters, vegetable and carving knives .
Figures made from undyed dough have a light beige tint, but the mass can be dyed at the kneading stage, and finished products can be varnished, acrylics, watercolors or gouache.
Natural products such as cocoa or beet juice can be used as dyes. If dyes require dilution with water, reduce the total amount of liquid indicated in the recipe.
Video: delicious strawberries for beginners
Check out a selection of beautiful crafts, maybe you will fall in love with this art and make it your hobby. For starters, try to make a simple figurine - a hedgehog according to the master class on our website or a colorful fish pendant. If you have small children, make casts of their arms and legs, in 20 years this craft will be of high value.
Beautiful crafts from the dough: photo for inspiration
Master classes on creating figures
If you are interested in this simple technique, try to start with simple crafts.