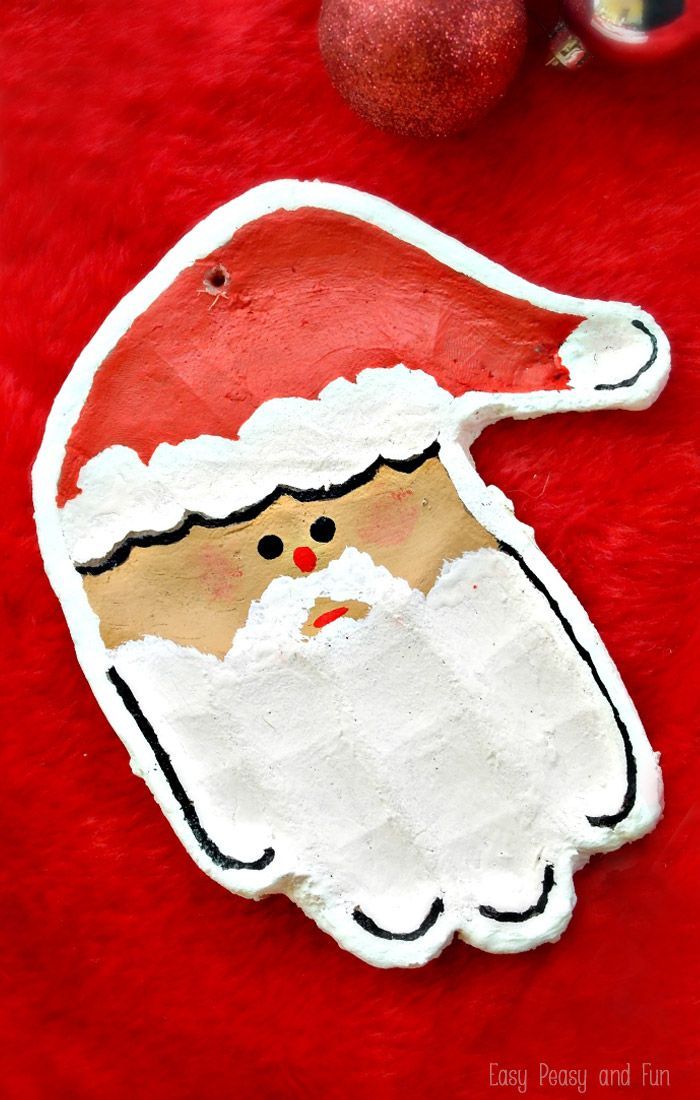
Handprint dough ornament
Salt Dough Recipe - The Easiest Way to Make Salt Dough!
Kim146 Comments
All activities should be supervised by an adult. As an Amazon Associate, I earn from qualifying purchases. This post may contain affiliate links.
Learn how to make your own salt dough handprint ornament with this easy Salt Dough Recipe. You only need a few ingredients from your kitchen to make this salt dough! We cover all of our tips and tricks to make sure your salt dough ornaments will last for years!
RELATED: Salt Dough Ornament Recipe
Table of Contents
- Salt Dough Recipe – for Handprints & Ornaments
- Salt Dough Ingredients
- How to Make Salt Dough – an Easy Salt Dough Recipe!
- Why Is My Salt Dough Puffing Up?
- How Do I Seal Salt Dough Ornaments?
- What Kind of Paint Should I Use?
- How to Decorate Salt Dough Handprints
- How Many Ornaments Does this Make?
- Tips for Making Perfect Salt Dough
- Salt Dough Handprint & Ornament Recipe
- Get the Recipe
- More Salt Dough Ornament Ideas
Salt Dough Recipe – for Handprints & Ornaments
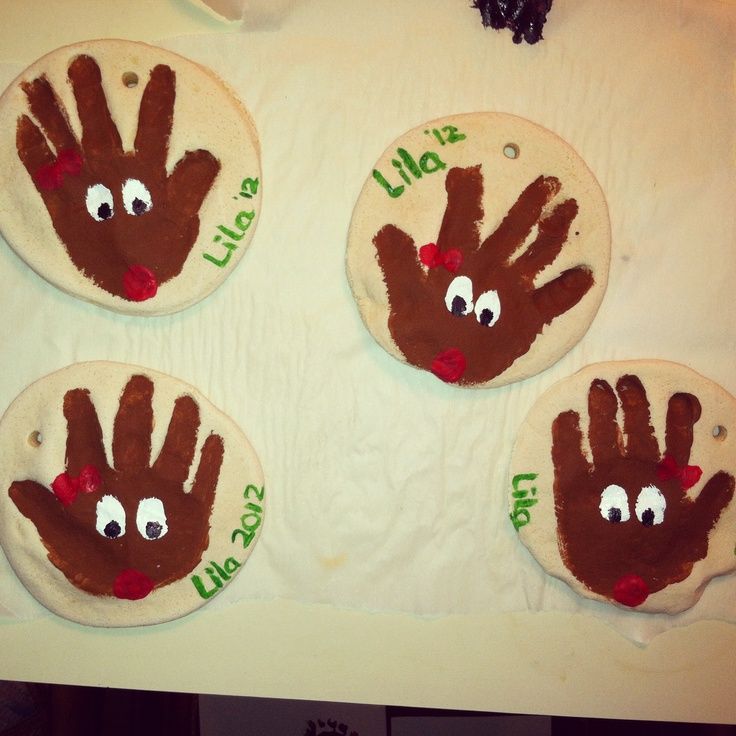
One of our favorite things to do with salt dough is to make handprint ornaments. But you can also use this same recipe and use cookie cutters and paint shapes instead!
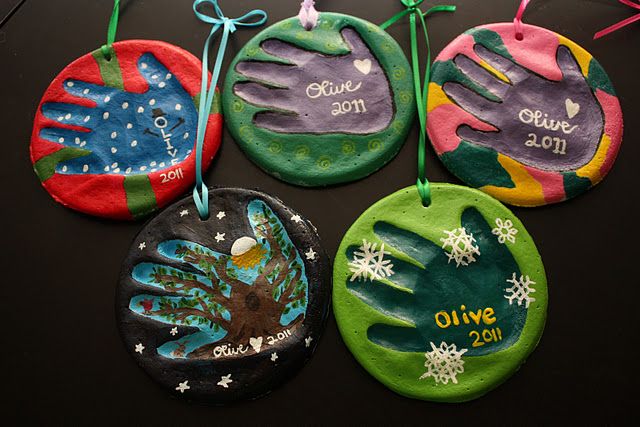
For the handprint ornaments – you can make a new one every year and have a nice memento for the Christmas tree!
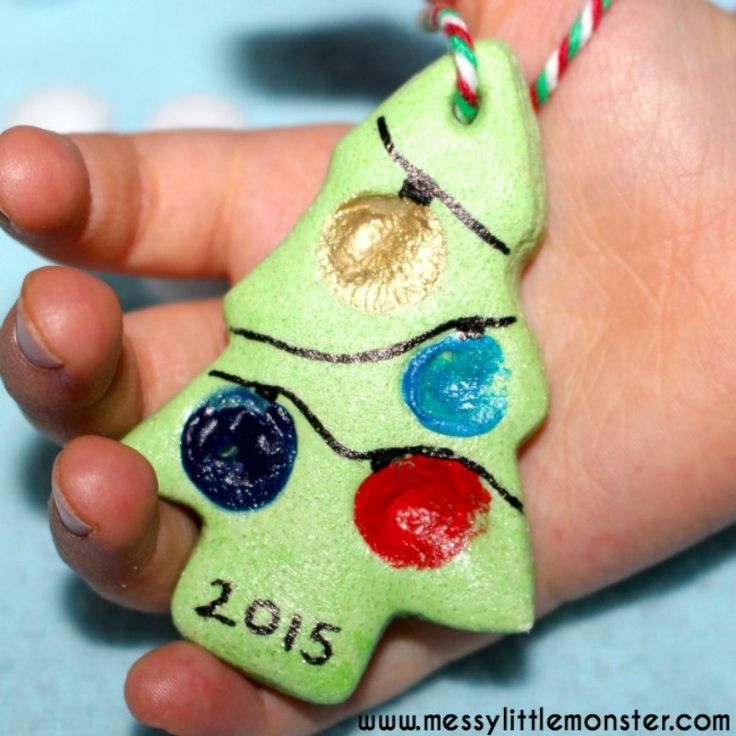
Don’t forget to add the year on the back of the salt dough ornament to keep track of the different years.
Salt Dough Ingredients
- 4 cups all purpose flour (Note: you want regular all purpose flour, not self-rising)
- 1 cup salt
- 1.5 cups warm water
How to Make Salt Dough – an Easy Salt Dough Recipe!
1. Combine all of your ingredients (flour, salt, warm water) and mix well until it starts to form a dough.
2. Take the dough out of the bowl and knead for at least 10 minutes.
If your dough is too dry, add a little bit more water in and continue to knead.
The dough should be smooth and roll out with not too many bumps. It should also be easy to press a handprint into it.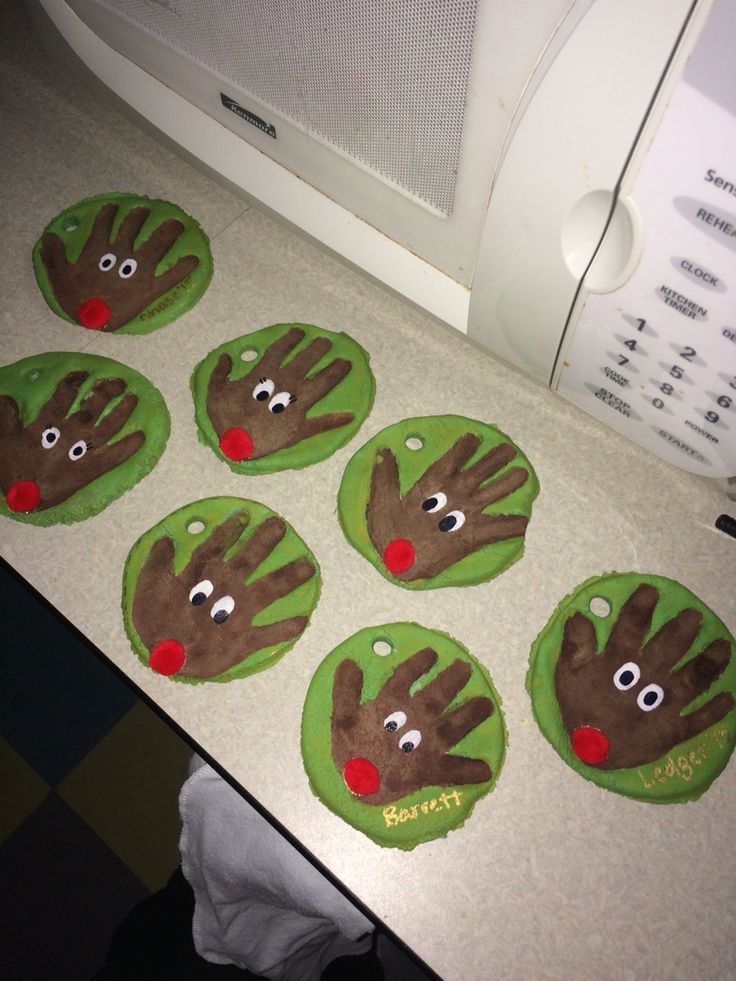 If you’re finding it’s too hard or not smooth enough, continue to knead some more. If it’s still too dry, add a little bit more water (but not too much or it may get too wet).
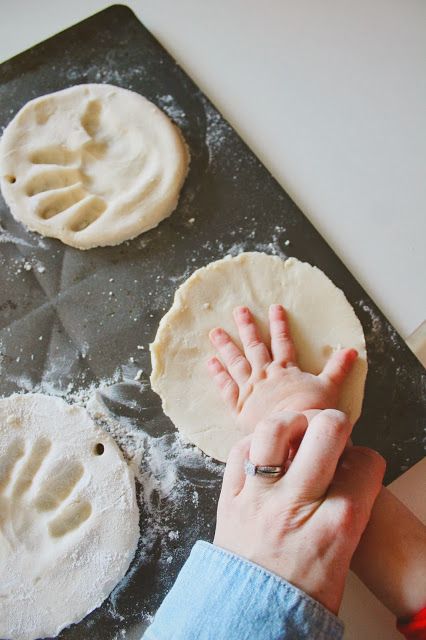
Roll out the dough to between 1/4 to 1/2 inch thickness. If the dough is too thick it will take too long to dry.
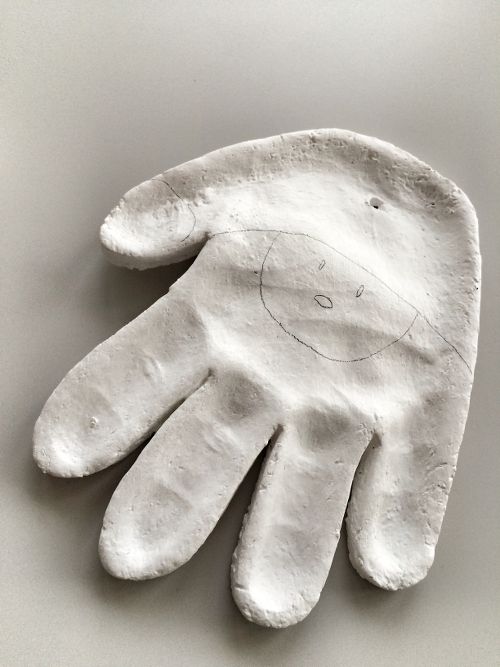
Press the hand into the dough.
3. Use a circle shaped bowl to trace around your handprint.
Cut out the handprint with a knife (adults to do this part).
You can also print off a circle shape or heart shape to trace around with a knife (adults to do this part).
If you have a smaller handprint you can use a circle or large heart cookie cutter.
TIP: It’s easier to press the handprint first, and then trace around it. If you have dough left over you can roll it out again and do another handprint.
4. Using a straw, make a hole in the top of the ornament.
5. Let the ornaments air dry for a day.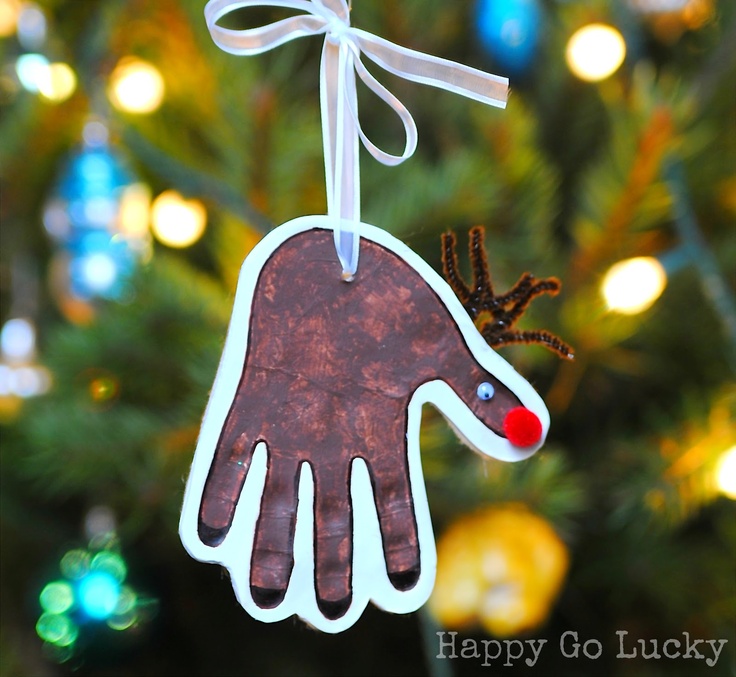
If you have time, let the ornaments air dry for a day. This will cut down on the baking time required and help to prevent puffing. If you do not have time, you can bake right away instead.
Bake at 250 degrees Fahrenheit for 1-2 hours. Once the top of the ornaments look dry and solid, flip over and bake on the other side.
NOTE: It’s important that you check that your oven temperature is set to Fahrenheit. One of the most common reasons the ornaments burn and puff up is that the oven temperature is Celsius. If you have a Celsius setting then you’ll want to use the lowest oven temperature, closer to 120 degrees Celsius.
If your ornaments are still doughy, put them back in for another hour. It will depend on your thickness how long you need to bake for. The thinner ornaments will take less time but thicker may take more. If it’s taking too long in the oven, let them finish drying by air drying them for a few more days. Make sure to flip them over so the bottoms also get exposed to air.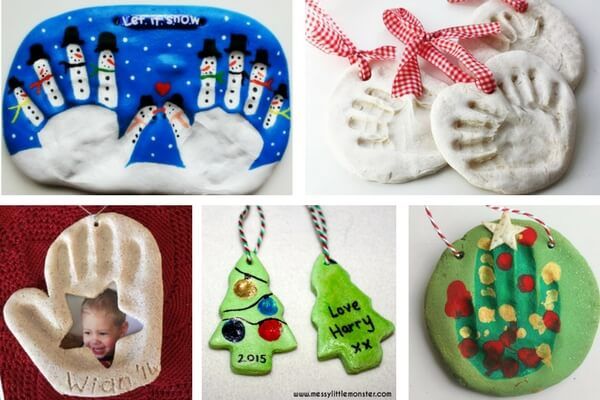
6. Once your ornaments are fully dry you can paint them.
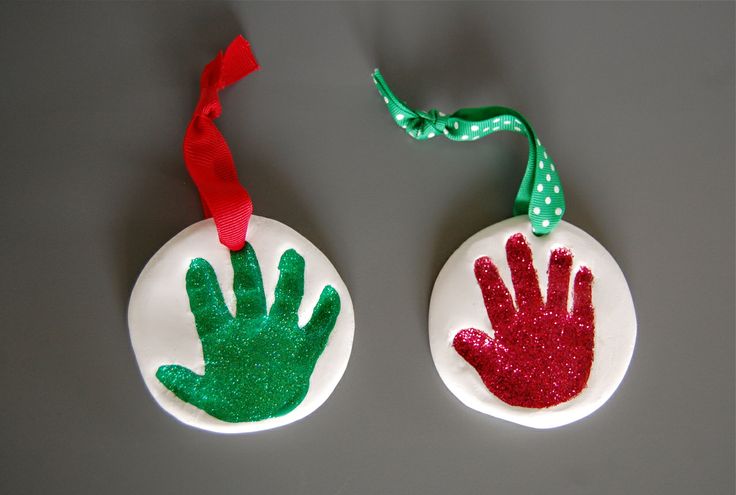
Paint the handprint and leave the remaining ornament plain. Or you can paint the whole ornament white and then paint the center handprint once the base coat has dried.
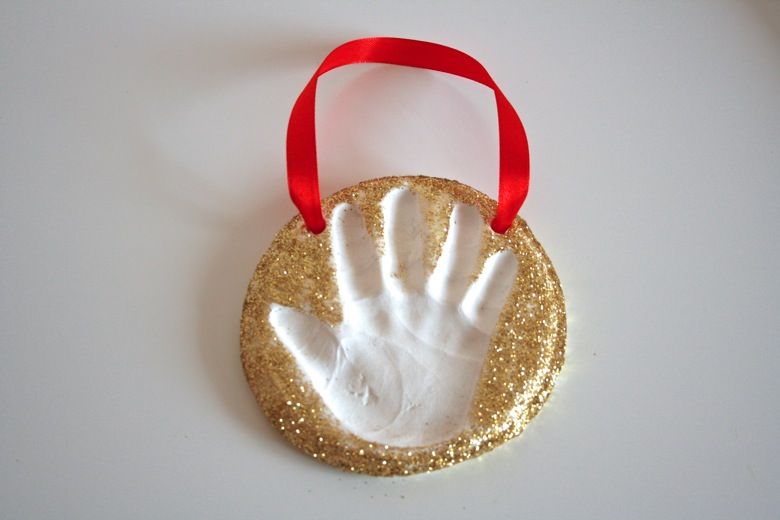
If you want to add glitter into the handprint, decorate the whole ornament with paint first, then fill the handprint with glue. Shake glitter onto the glue.
After the paint has dried, make sure to seal with with either mod podge or a clear glaze spray. Seal the ornaments after you paint them and the paint has fully dried.
7. Tie ribbon or twine through the hole for hanging on the Christmas tree.
Why Is My Salt Dough Puffing Up?
The number one reason salt dough is puffing is due to the oven temperature. If the temperature is too high the salt dough will puff up. It is better to let your ornaments air dry for a day and then bake them.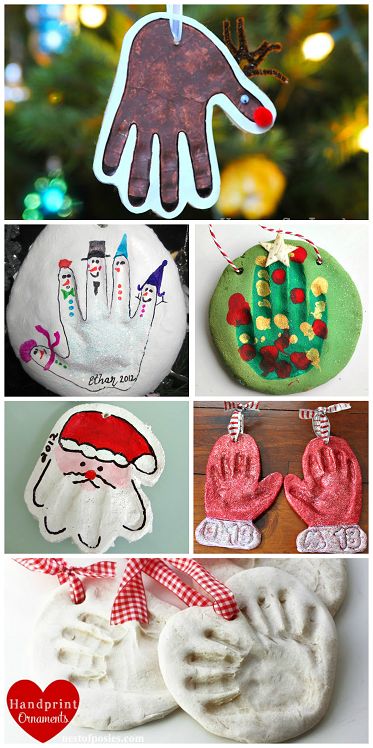 This will prevent the puffing. If you need to bake right away, bake at the lowest temperature (200-250 degrees Fahrenheit).
Note: Make sure to check your oven temperature is Fahrenheit and not Celsius.
You also want to make sure you are using regular, all purpose flour and not self-rising flour.
How Do I Seal Salt Dough Ornaments?
Once you are done, don’t forget to seal with either mod podge or a clear glaze spray. We like this spray for a durable finish. Adults should do the spraying and always follow directions of the product chosen.
Sealing the final ornaments will help stop them from cracking in a few years and prevent moisture from getting in.
What Kind of Paint Should I Use?
I like to use non-toxic acrylic paint for salt dough ornaments. The color will go on much thicker and more vibrant than kids paint. We like this brand of acrylic paint.
How to Decorate Salt Dough Handprints
You can use a heart for the shape around the handprints or you can use a circle.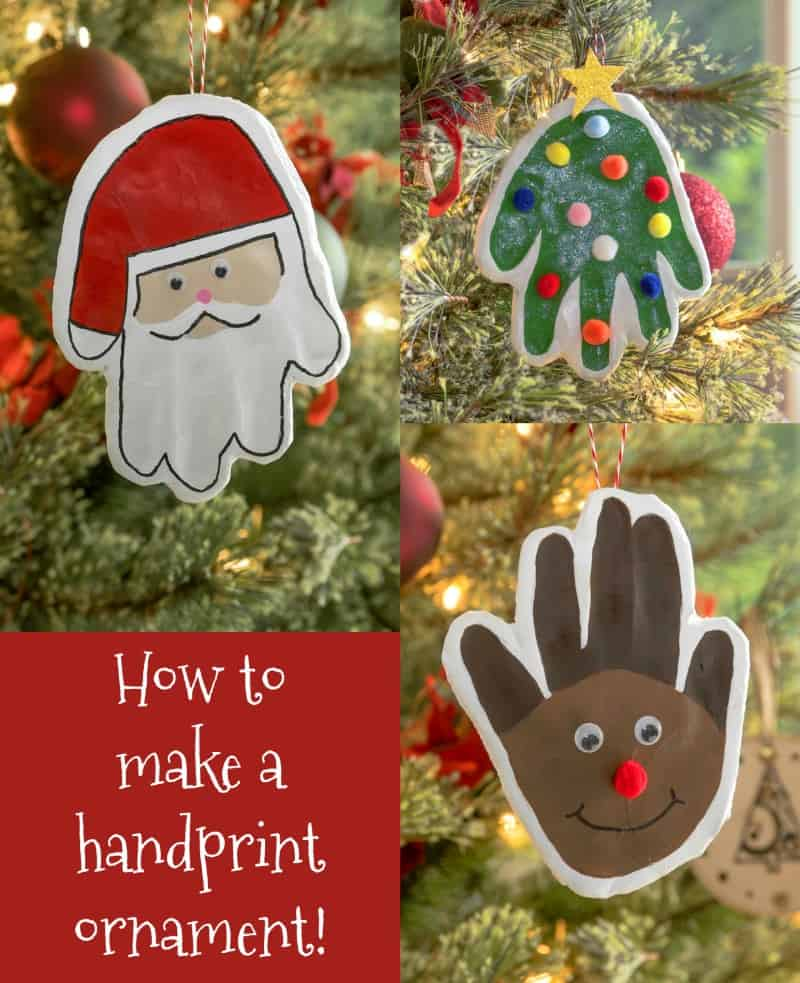
For this one, we used a large heart cookie cutter as the handprints were small (baby handprints):
If you have larger handprints, you can trace around a heart print-out or use a knife (adults only) to draw a heart shape around the handprint.
We painted this one with acrylic red paint but you could choose green or even silver or gold. Then you can leave the handprint portion of the salt dough ornament either natural or use glue and add glitter to it like we did.
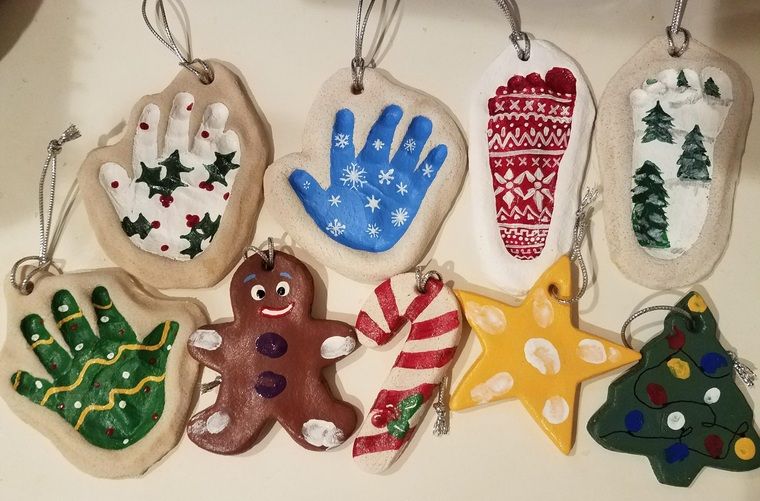
How Many Ornaments Does this Make?
Depending on the handprint size and thickness of the salt dough – you can get approximately 8 handprints. If you’re using the dough to make small cookie cutter ornaments you’ll get approximately 15.
If you’re hoping to make this for a classroom or with a larger group of kids, I would recommend bringing an extra batch just in case. The quantity can vary depending on size of cookie cutters, handprints and thickness of the dough.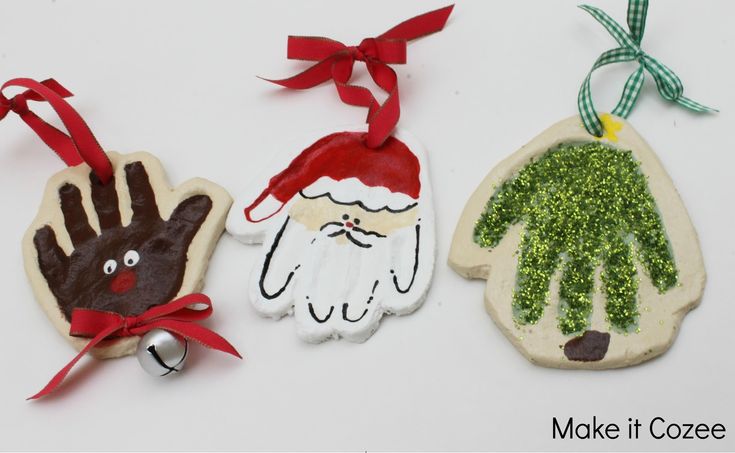 I like to roll out the dough and continue to knead together the scraps to use as much as I can.
Tips for Making Perfect Salt Dough
- Knead well to make the dough smooth – I like to knead at least 10 minutes.
- Let the ornaments air dry for a day first, if possible. This cuts back on the oven baking time and helps to prevent puffing.
- Don’t forget to flip the ornaments when baking or air drying so that the bottoms will be exposed to air.
- Seal with our recommended sealers mentioned above so that the ornaments will last for many years.
- Store the ornaments in a cool, dry place and keep away from moisture. Sealing the ornaments also prevents moisture from getting in.
Prep Time15 mins
Active Time2 hrs
- ▢ 4 cups all purpose flour
- ▢ 1 cup salt
- ▢ 1.5 cups warm water
- ▢ Clear Glaze Finish or Mod Podge
Combine all of your ingredients and knead for 10 minutes.
 If your dough is too dry add a little bit more water in and continue to knead.
Roll out the dough to a thickness that you'd like your salt dough ornament to be. We like between 1/4 to 1/2 inch thickness.
Using a large cookie cutter, cut out different shapes for your salt dough ornaments. If making handprints, place the handprints first and then trace around them.
Have your child place their hand into the salt dough ornament. If the dough is too hard to get an imprint it may be too dry. Continue to knead until smooth. You can also add in a little bit more water.
Using a straw, make a hole in the top for where you want to hang your salt dough ornament.
If possible, let the ornaments air dry for a day.
Preheat your oven to 250 degrees Fahrenheit. Bake for 1-2 hours. If your ornaments are still doughy, put back in for another hour. (It will depend on your thickness how long you need to bake for. The thinner ornaments will take less time but thicker may take more).
If you encounter too much puffing, roll out thinner ornaments and this will help reduce the puffing. If the ornament is still a bit doughy, bake for longer or let sit out a few days to harden before decorating. The thickness of the dough will determine how long you have to bake them for. We prefer to bake them at 250 degrees Fahreneheit for longer and let them air dry for a few days to prevent puffing.
Once cool, you can decorate by painting with non-toxic acrylic paint.
Spray with a clear glaze finish or finish with mod podge. Do this before adding the glitter.
To make the hand glittery, fill the handprint with glue then sprinkle glitter on top of the glue, shake off the excess and let it dry.
Kids will love helping to make this salt dough recipe. They will also have fun decorating the salt dough ornaments by painting them.
Finally, just a friendly reminder to keep these out of reach of pets (they can be toxic to dogs due to the salt content).
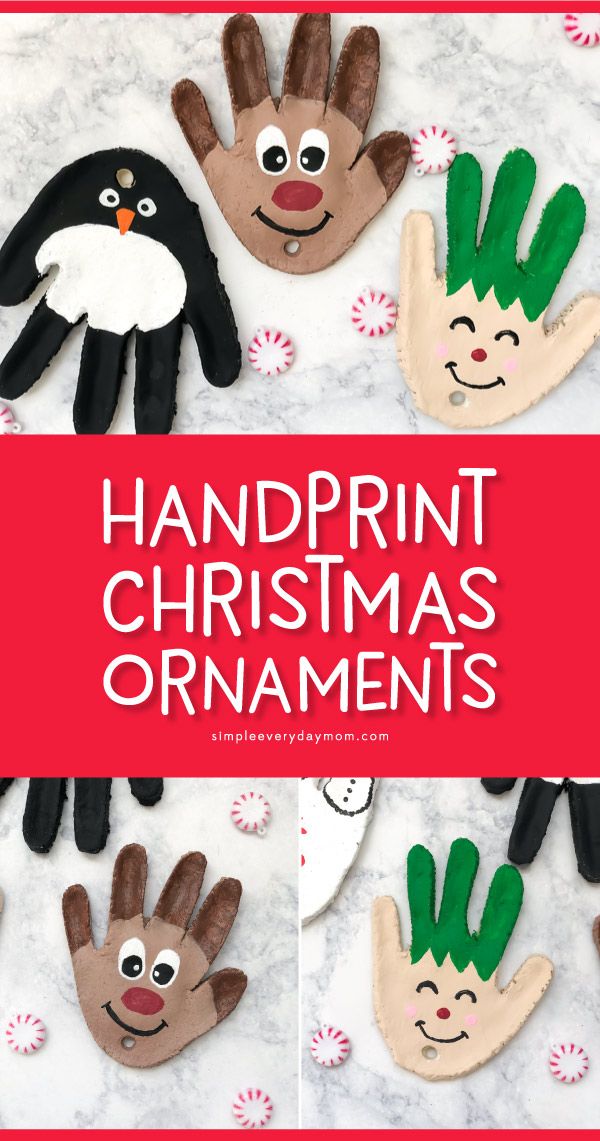
More Salt Dough Ornament Ideas
See over 25+ of the best Salt Dough Ornaments here for more great ideas!
These salt dough glitter ornaments are so fun to make – and you can make these for any season or holiday too!
The Best Salt Dough (for Ornaments and Crafting!) to Make with the Kids
Learn how to make classic salt dough with the kids, with baking, painting, and storage info. This method is straight forward, easy, and thorough—and they a perfect kids holiday gift for grandparents, teachers, and loved ones!
Salt Dough
This salt dough is a staple of childhood and I love doing this Christmas activity with my kids each year—and throughout the rest of the year too! We love to make salt dough handprints, ornaments, and sometimes, just any old shape they want to. It’s an easy project that we can do together—and then share as kid-made holiday gifts, keepsakes, or house decorations.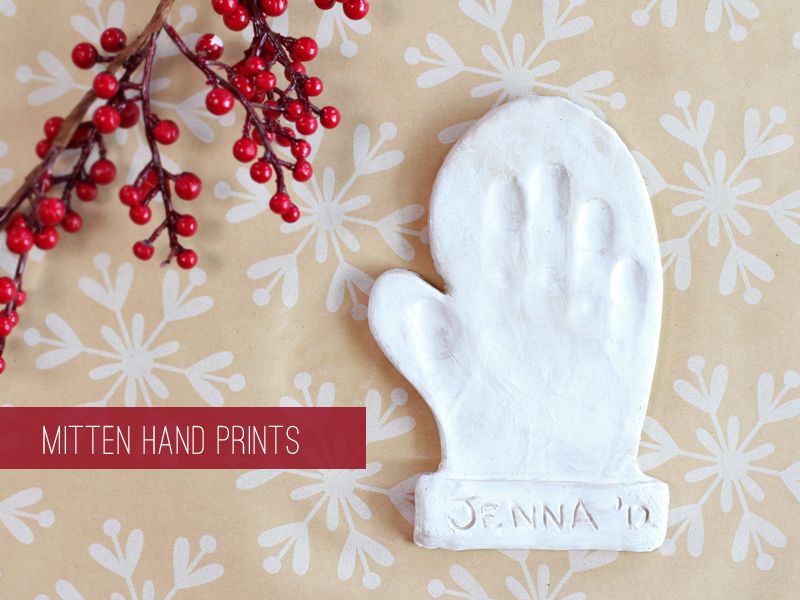
Salt Dough Recipe
Making salt dough at home is as easy as combining three pantry staples together into a dough. It’s fairly fool proof (as long as you follow the measurements!) and is a recipe that even little kids can help make.
Ingredients in Salt Dough
To make this recipe, you’ll need:
- table salt
- all-purpose flour
- water
TIP: That’s it! (I buy store brand, cheap flour for this since project to keep it very budget-friendly.)
How to Make Salt Dough Ornaments Step-by-Step
Here’s a look at how to make the dough for this salt dough. Scroll down to the bottom of the post for the full information.
- Measure out the flour and water. (photo 1)
- Add the water. (photo 2)
- Stir with a wooden spoon. (photo 3)
- Keep stirring until the dough is mostly together and is hard to stir any longer. (photo 4)
- Knead a few times with hands to bring the dough together.
 (photo 5)
 - Place dough between two pieces of parchment paper and roll out. (photo 6)
TIP: You can divide the dough in sections so multiple kids can have their own dough to work with.
How to Cut Out, Bake and Decorate Salt Dough Ornaments
Once you start rolling, here’s a look at what will follow if you want to make these into ornaments. (Skip the hole poking if you want to just make these as shapes for the kids to paint.)
- Roll out, changing directions occasionally, until about 1/4-inch thick. (This may not get precise if you’re working with kids and that’s okay!) (photo 1)
- Stamp cookie cutters. (photo 2)
- Remove the dough around the shapes, then either transfer the whole piece of parchment paper to a cookie sheet OR transfer just the shapes to a parchment-lined cookie sheet. (photo 3)
- Poke holes so you have a place for a string to hang as ornaments. (photo 4)
- Press in a hand to make a handprint, if desired.
 (photo 5)
 - Bake, let cool and decorate! (photo 6)
TIP: Re-roll any remaining dough after Step 3 here to make additional ornaments.
Salt Dough Handprint Ornament
Capturing a handprint in salt dough is a perfect grandparent gift, or a keepsake ornament to make for your own tree. I love pulling out our little collection year after year. Know that getting a good print may take a few tries if doing a baby’s hand!
TIP: Check the size of your round cookie cutter against your child’s hand to make sure that it’s big enough. You may need one that’s 4-5 inches in diameter.
Best Paint for Salt Dough Ornaments
If the kids are wearing smocks, the table is protected, and you are reasonably sure they won’t paint all over their hands and faces, I like using regular acrylic craft paint since it holds up best on crafts. With younger kids who may wind up wearing more of the paint, I’d recommend tempura washable paints.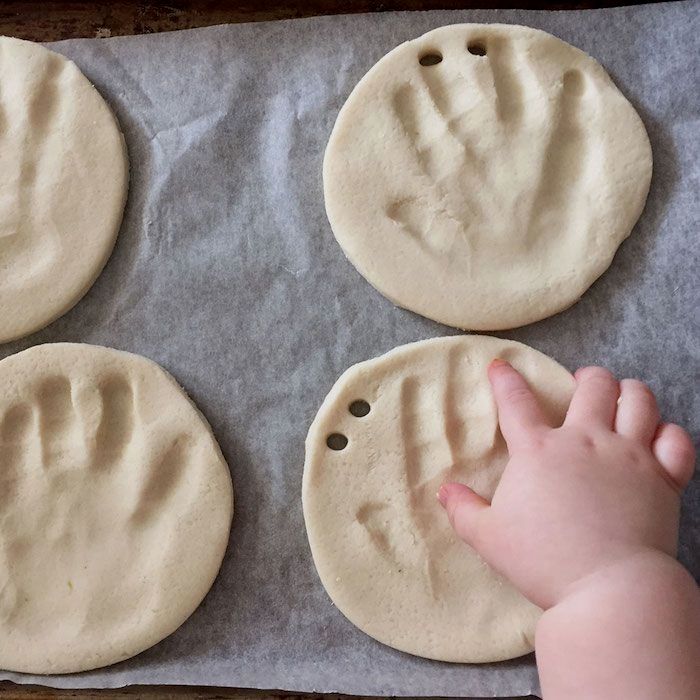
TIP: We put our paint into the base of old egg cartons since we always have those on hand. You can also use paper plates.
How to Preserve Salt Dough Ornaments
To help preserve your finished dried ornaments, you can coat with a layer or two of Mod Podge or spray with a sealer. Either work well. I’d recommend coating or sealing both sides, so do one side and let it dry, and then do the second side. If using the sealer, do it in a well ventilated area without the kids too close by.
TIP: To store these ornaments from year to year, you’ll want to wrap in bubble wrap. Store in a container that won’t be banged around, dropped or exposed to excess moisture.
Why is my salt dough puffing up?
If you mistakenly use self-rising flour, they may puff. And sometimes it happens randomly. Keep the oven temperature low and if it happens consistently, you can try baking at an even lower temperature for a slightly longer amount of time.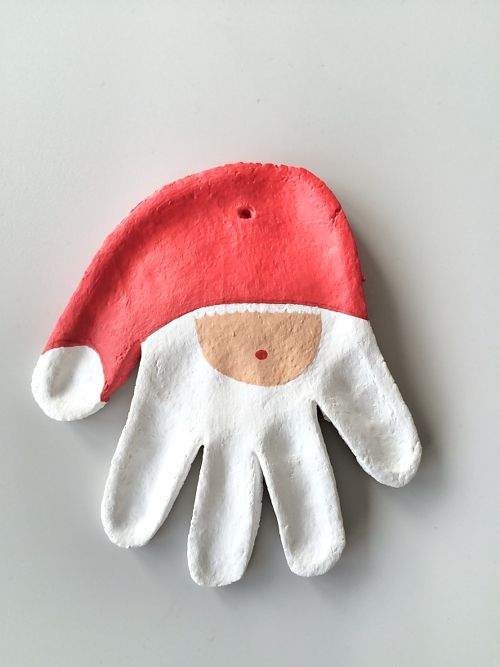
Tips for Making the Best Salt Dough Ornaments
- If the dough is too wet and sticky, knead in a little more flour. If it’s too stiff, add a little more water. There is a big range in the way different flours absorb liquid, so there is a normal range of variation in liquid needs. It should be easy to work with—soft and not too stiff and not excessively sticky.
- Use paper lollipop sticks or a skewer to make your holes.
- Use a 4-5 inch round cookie cutter to make handprint ornaments.
- Tie on baker’s twine or thin ribbon to hang as ornaments.
- Try to get the dough to an even thickness before baking so the ornaments bake evenly.
- Bake for the time indicated and then longer if your ornaments still feel soft. They should be firm to the touch without much give.
- Let cool fully before painting.
- If you want to paint the background of a handprint ornament, do that before you paint the inside of the hand.
 Let dry before adding a second color. Some people like to paint the whole thing white or cream to give it a more finished look.
 - Use acrylic craft paint for older kids who can be trusted with paint and tempura washable paints with younger toddlers.since it holds up best on crafts. With younger kids who may wind up wearing more of the paint, I’d recommend.
- To help preserve your finished dried ornaments, you can coat with a layer or two of Mod Podge or spray with a sealer.
I’d love to hear your feedback on this project and what your kids thought of it, so please comment below to share!
Prep Time 30 minutes
Cook Time 2 hours
Total Time 2 hours 30 minutes
Author Amy Palanjian
Cuisine American
Course Holiday
Calories 1kcal
Servings 2 dozen ornaments
- ▢ 4 cups flour
- ▢ 1 cup table salt
- ▢ 1.5 cups water
Mix the ingredients together in a large bowl using a wooden spoon.
 When it becomes too stiff to stir, use clean hands to bring the dough together.
NOTE: If the dough is too wet and sticky, knead in a little more flour, about 1 tablespoon at a time. If it's too stiff, add a little more water, about 1 tablespoon at a time. There is a big range in the way different flours absorb liquid, so there is a normal range of variation here. It should be easy to work with—soft and not too stiff and not excessively sticky.
Knead a few times until the dough is uniform and soft, about 3-5 minutes.
Divide dough into 2 or 4 sections and roll out to about 1/4-½ inch thick between two sheets of parchment paper. This will help prevent sticking.
Cut out with cookie cutters. Transfer shapes to a parchment-lined baking sheet.
Repeat rolling and cutting out shapes to use up the dough.
Preheat oven to 250 degrees F.
Do a 4-5-inch circle and press in a child's handprint if desired.
Use a paper lollipop stick or a skewer to make a hole to hang as an ornament.
If making ornaments, bake for 90 minutes to 2 hours; if baking handprints, bake for 2-3 hours. Continue baking both ornaments and handprints as needed until they are until just firm to the touch, checking every 20 minutes. (It's not a problem if yours take longer than the initial baking time—it varies based on thickness and size...which will likely vary if you are baking these with kids!) They do not need to be rock hard, but should not feel squishy. Handprints will likely take longer than smaller ornaments and may take closer to 4 hours.
Remove from oven, let cool, and paint if desired with acrylic or washable tempera paint.
Once paint is completely dry, seal with Mod Podge if desired.
Mixing Bowl
parchment paper
Mini Cookie Cutters
- Divide the recipe in half to make a smaller portion of dough if desired.
- Use paper lollipop sticks or a skewer to make your holes.
- Use a 4-5 inch round cookie cutter to make handprint ornaments.
- Tie on baker's twine or thin ribbon to hang as ornaments.
- Try to get the dough to an even thickness before baking so the ornaments bake evenly.
- Bake for the time indicated and then longer if your ornaments still feel soft. They should be firm to the touch without much give but do not need to be rock hard. It is not a sign of a problem if yours take longer than mine did to bake—flours and ovens vary!
- Let cool fully before painting.
- If you want to paint the background of a handprint ornament, do that before you paint the inside of the hand. Let dry before adding a second color.
- Use regular acrylic paint for older kids who can be trusted with paint and washable tempera paint with younger toddlers.
- To help preserve your finished dried ornaments, you can coat with a layer or two of Mod Podge or spray with a sealer.
Calories: 1kcal, Fat: 1g, Saturated Fat: 1g, Polyunsaturated Fat: 1g, Monounsaturated Fat: 1g, Fiber: 3g, Sugar: 1g, Calcium: 31mg, Iron: 6mg
Tried this recipe?Rate in the comments and tag @yummytoddlerfood on IG!
HANDPRINT SALT DOUGH CHRISTMAS DECORATIONS | INSTRUCTIONS | DIY
There is no need to buy an expensive set of handprint ornaments from the store. Make your own adorable souvenirs from scratch using this traditional salt dough recipe.
Expenses
$
Skill level
Start to finish
Day
Tools
- knife or cookie cutter
- The main kitchen materials
Show all
materials
- 1 cup flour
- 3/4 cup salt
- 1/2 cup of water (double the amount for two handles)
- Permanent marker
- Body
- gloss
- acrylic paint
- transparent polyurethane
Show all
How is it? Here's more:
CraftsBy: Jess Abbott
Intro
A lasting impression
They grow so fast.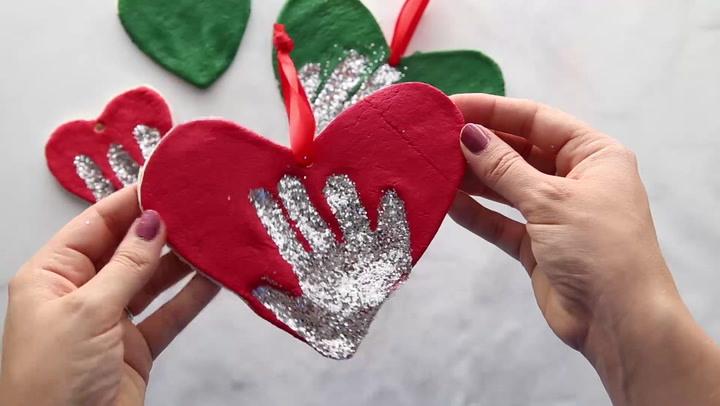 Make unforgettable memories by capturing your little one's handprint. Display it all year round or use it as a Christmas decoration like us.
Step 1
Gather Your Materials
Step 2
Mix Dry Ingredients
In a large bowl, combine flour and salt.
Step 3
Add water
Slowly add water while stirring.
Step 4
Knead
Knead the dough with your hands until the salt dough is firm, smooth and ball-shaped.
Step 5
Cut out shape
On a lightly floured surface, roll out the dough smoothly and evenly. You want the dough to be at least 1/4 thick. Use a knife or cookie cutter to cut the dough into the desired shape. Make sure your figure is bigger than your child's hand.
STEP 6
Imprint
Use a spatula to carefully move the pan onto the non-stick cookie sheet. Place the child's hand so that the print is nice and evenly pressed.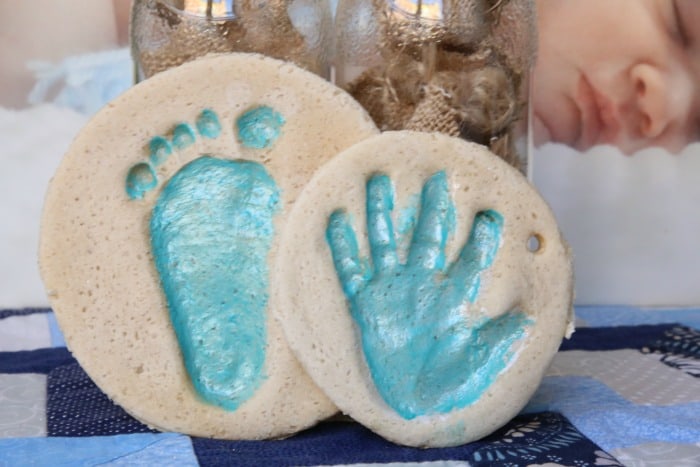
Step 7.
Poke Holes
If you plan to hang a handprint, use a straw or pencil to make a hole(s) on the top. Bake at 200 degrees for two hours or air dry for at least two to three days.
Step 8
Paints and Glitter
You can stop there, but if you want to give your handprints a snow print, you will need some white glitter, acrylic paint and polyurethane spray. Color the handprint white and then sprinkle glitter on top. Let it dry completely.
Step 9
Seal it
When the handprint is dry, apply polyurethane to set the gloss.
Step 10.
Label it
Use permanent marker to write your child's name, age or year.
Step 11
Add Ribbon
Cut a piece of ribbon to make a hanging loop, thread it through the holes at the top and tie both ends in a knot.
Step 12
Leftover Doughboys
If you have extra salt dough, have the kids make snowmen.
Next
How to make a pom-pom Christmas stocking
This is a simple and adorable holiday craft to make with your kids.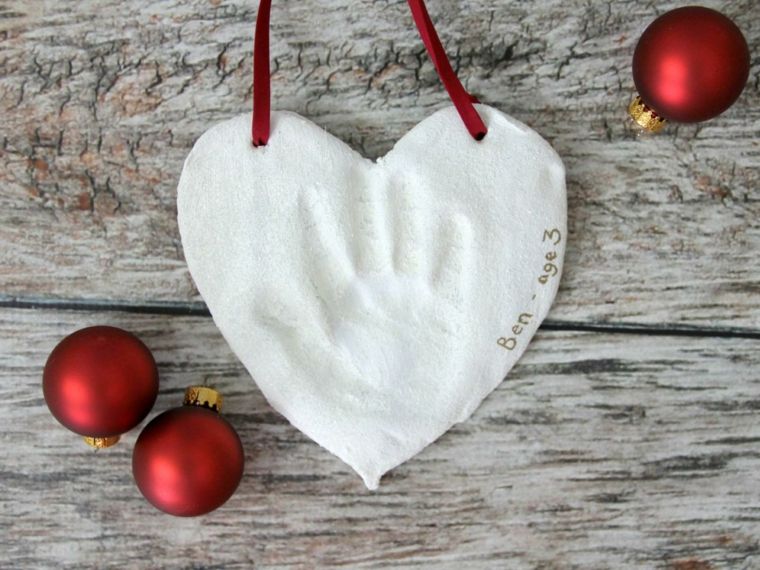 Use a store-bought stocking or sew from our easy pattern, then let the kids play with the colorful pompoms.
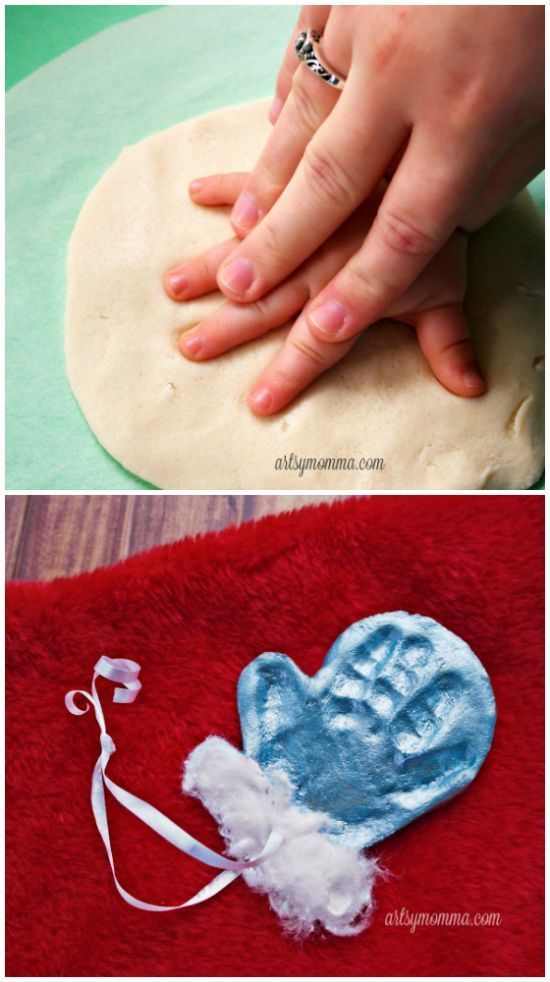
How to Make Baby Handprint Snowman Ornaments
Create sentimental decorations for your Christmas tree that you will cherish for years to come. This is a fun craft that kids make and makes great gifts for relatives.
3 ways for kids to dress up store-bought Christmas stockings
Looking for a simple no-sew Christmas stocking to make with your kids? With a little creativity, you can decorate standard stockings and turn them into memories and jewelry that will last a lifetime.
How to Turn a Sweater into a Christmas Stocking
Turn a sweater you love but never wear again into adorable holiday stockings. It's simple and very inexpensive.
How to make embroidered burlap napkins
Make embroidered burlap napkins for an inexpensive holiday accent on your dinner table.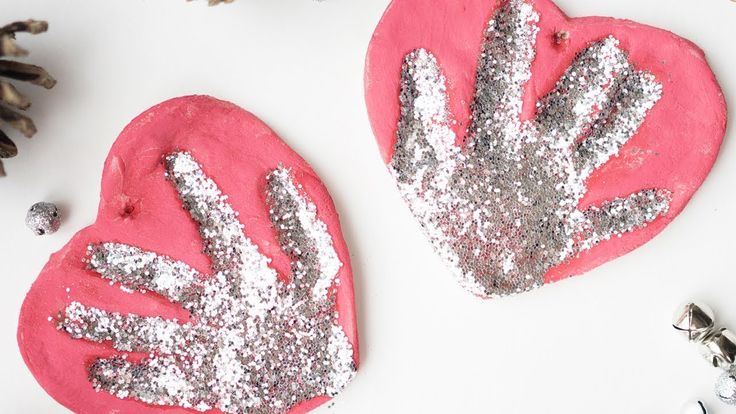 We made ours for a Mexican themed Christmas party, but they can be made for any occasion in any color.
How to Make a Christmas Pine Cone Garland
Instead of using a regular garland, opt for a more natural look (and save money) by creating a strand of pine cones.
How to make a checkered Christmas reindeer
Do you need more patterns in your holiday decor? Create custom and inexpensive pieces of art to hang a fireplace or decorate foyers anywhere in your home.
How to make a burlap Christmas stocking
Check out how we made a bohemian-style Christmas stocking with frayed burlap and colorful tassels.
How to sew a Christmas fleece stocking
This lightweight fleece stocking is great for those who want to celebrate the season in DIY style without spending hours in front of the sewing machine.
How to Make Peace Sign Christmas Ornaments
Add some retro flair to your Christmas decoration with these handmade peace sign pompoms.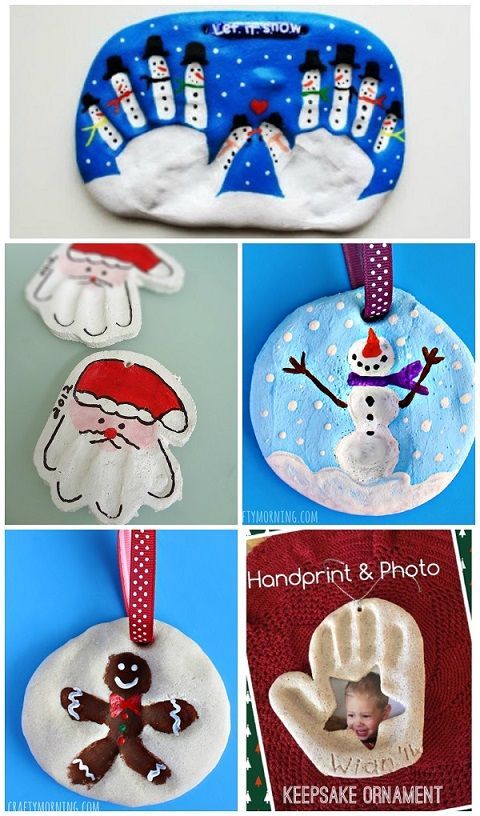
How to make pen prints out of salt dough. How to make impressions of a child's legs and arms
Hello! In Oh My Baby Book you will find special pages for hand and foot prints.
We know that perhaps you have never done this before and therefore here you will find some tips on how to make a nice and neat handprint and footprint.
The footprint and handprint of a newborn are very touching memories. Believe me, the legs and arms grow very quickly and the main thing is not to miss this moment and leave an imprint in the book.
Let's start with the simplest way to make a print - trace the handle or foot with a pen or pencil. Everything is extremely simple here and success is guaranteed!
Get cute, beautiful and fast!
But, we are not looking for easy ways. So, if you decide to make a real print, then below we offer some instructions and tips. First you need to get ready! What you will need:
A piece of paper, preferably heavy or matte, high quality card stock, but not too heavy.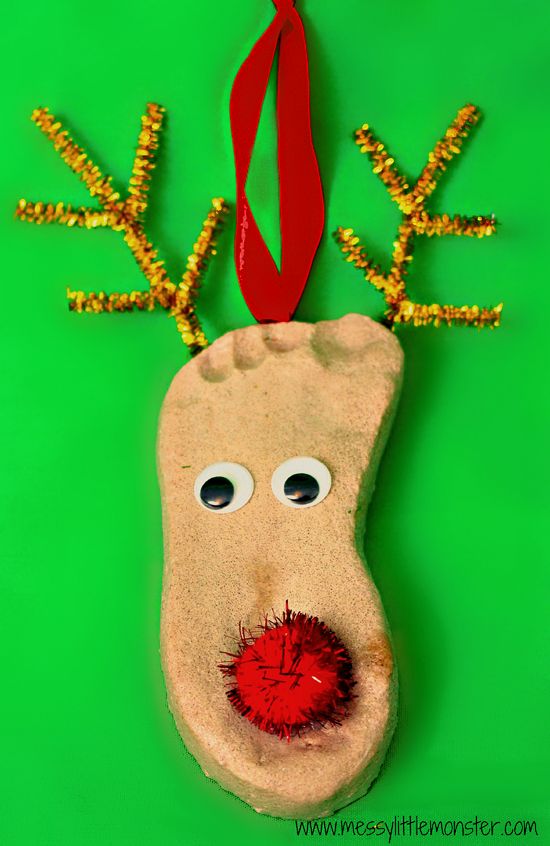 You can use designer paper, which you can buy at any scrapbooking store.
Paper is needed only if you want to make a print on a separate sheet, then cut it out and paste it into a book. You can skip this step and make a print directly in the book on specially designated pages for the print of the handle and leg.
Tip: If you want to make a print directly on a page in a book, then it is advisable to practice at least 1 time. If suddenly you missed or something went wrong, do not be discouraged. Make a print on a separate sheet of paper, cut it out and paste it over the bad print! 🙂
Paint or ink:
Option 1 - ink. Stamp pad with one color ink, also available at the scrapbooking store. The ink must be non-toxic and not contain acids in its composition - this is important! Be sure to check this point with the seller. Ink allows you to create clearer and more durable prints.
Option 2 - finger paints. You can buy at any children's store. They are absolutely safe for children.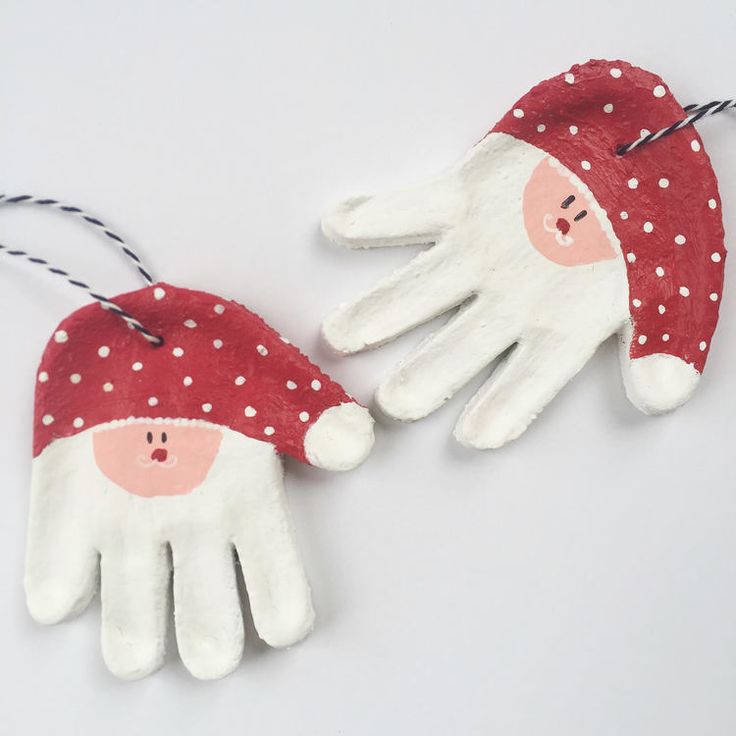
Wipes: Wet baby wipes and cotton towel.
Well, let's get started!
- Of course, you can make an imprint yourself, but it is better if you have an assistant.
- Think about the time - the best time is when the child is in a good mood and does not want to eat.
- Wash the hand/foot thoroughly with normal baby soap that you always use for bathing, and then dry it with a dry towel to keep it perfectly dry.
- Open the book to the desired page or prepare a separate sheet of paper/cardboard.
- Pass the child to dad or another assistant (position: back to dad, one hand under the handles, the other hand under the ass holds the leg).
- Smear your foot or palm with paint or ink (evenly).
- Making an imprint: for the foot, start from the heel and smoothly move to the fingers, and place the palm completely immediately on the sheet.
- We wipe the handle and leg with wet wipes or go straight to the bathroom and wash everything under the tap.
- That's it - the print is ready! Now I need to let it dry!
You will succeed, it's easy!
Babies in their first year of life grow so fast that their parents don't even have time to look back. But you really want to capture in your memory the moments when the baby is very small. The way out of the situation is casts of arms and legs. Buying a ready-made kit for their manufacture is now not difficult. However, the price of such kits is often surprising, and the creative components included in the composition seriously limit the imagination. How realistic is it to make casts of arms and legs with your own hands, using improvised means? It turns out that the procedure is quite simple, and the materials will require quite a bit!
Plaster casts
How to make casts of arms and legs with your own hands using plaster? You need to take plasticine, you can even use an old one, heat it in a microwave oven and form a cake so that a foot or palm print fits on it. Then we make an imprint on the cake. If the first time does not work out, then you just need to re-heat the mass. To make the print clearer and deeper, when pressing, fix the edges of the cake so that they do not diverge to the sides.
It is convenient to use a mold with sides for this. After obtaining an acceptable result, the cast is placed in a freezer to harden. We breed gypsum for sculptural works (can be purchased at an art store) in accordance with the instructions and additionally add a little PVA glue, pour the resulting mass into cakes with prints, leave for a while to harden. When the gypsum hardens, the resulting casts are carefully cleaned of plasticine and left for about a day for final drying. Then you should lightly walk on them with sandpaper, removing roughness and irregularities. This should be done very carefully so as not to crumble the finished product. From above it is necessary to apply paint in several layers. The most popular options are bronze or metallic silver, but the choice of color is up to you.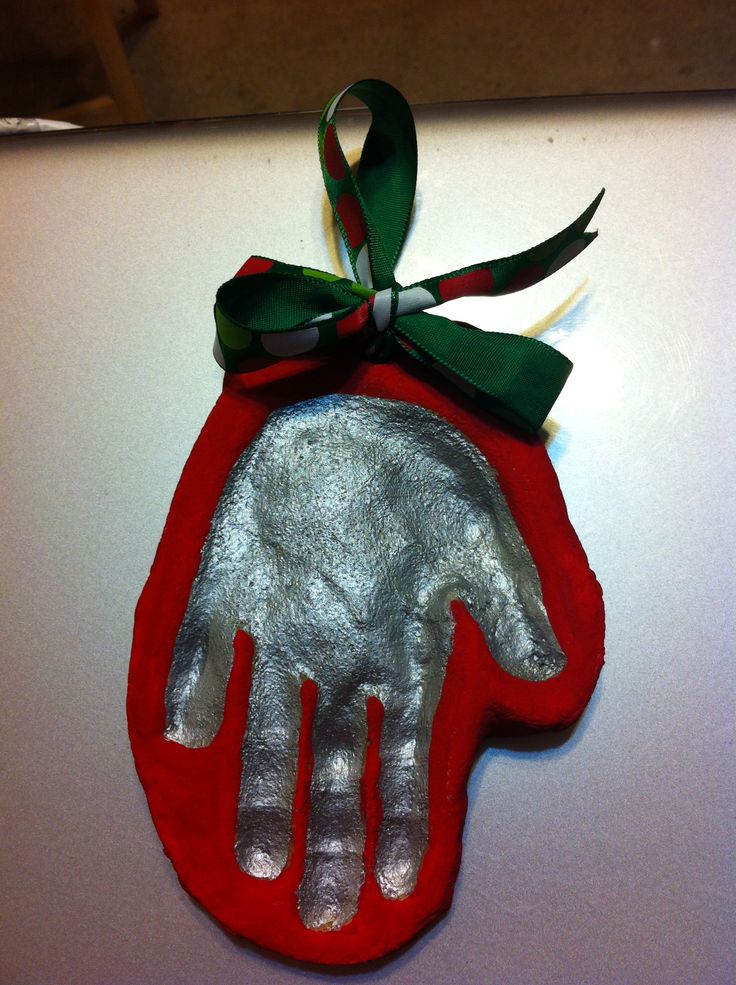 After drying, the casts of the arms and legs (by the way, made with your own hands) are ready! They can be placed in a deep frame, mounted on a stand or otherwise fit into the interior.
Casts of alabaster
The second, no less budgetary way with which you can make casts of arms and legs with your own hands is to use alabaster as a base. It is necessary to mix five glasses of flour, two and a half glasses of fine salt, a tube of baby cream, mix. Gradually add water, achieving the consistency of plasticine. We make cakes of the required shape and make prints of the feet and hands. The casts are placed in the oven and dried at a low temperature until hardened. Lubricate the prints with petroleum jelly and fill with diluted alabaster, leave to dry. After complete drying, carefully remove the casts from the mold using a nail file, file, other improvised means, give them a neat shape. After that, we cover the casts with paint of the desired color and let it dry.
We looked at two of the easiest ways to make casts of arms and legs with your own hands.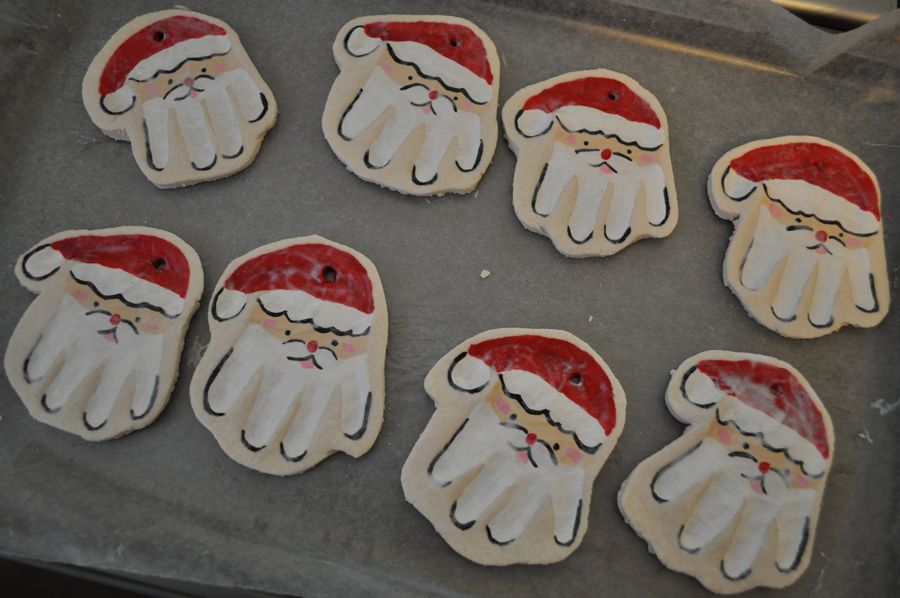 As you can see, it is quite simple and accessible to parents. And the possibilities of further decoration are limited only by the range of products of the art store! It can be a beautiful frame in a marine style for a boy, decorated with pebbles and shells, a flower arrangement for a girl. Or you can even make a cast of the pen every month and by the end of the year draw up an unusual panel, which will clearly show how quickly the baby grew during this period.
To make the footprint of your little one, i.e. the first baby footprint, please read this manual.
All materials intended for making impressions do not cause any harm and cannot cause .
For their manufacture, a small amount is required, this will not disturb the child, because the technology by which the casts are made is innovative, and the composition from which the cast will be made is hypoallergenic.
Specialists have specially developed kits so that parents can create children's casts on their own.
Parents of children often bought kits in stores, but there was not enough molding mass for a sufficient number of casts.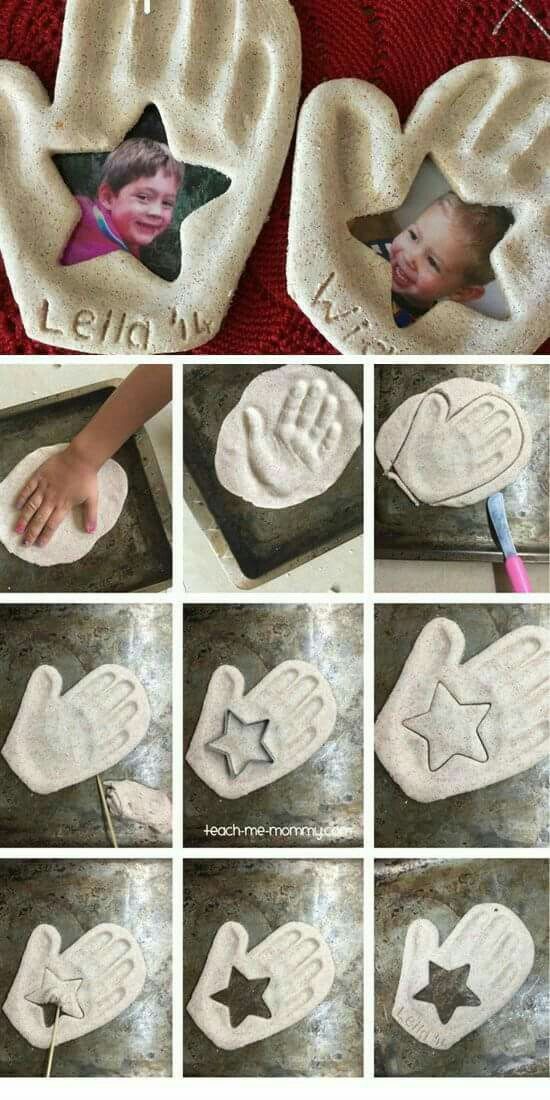 But there are kits with which parents have several attempts before the real start. They train and begin to sculpt something really beautiful and neat. It turns out a quality cast. They can create it not only for themselves, but also as a gift to grandparents, godparents of their little one, make casts of children of close friends as a gift to them.
In addition to the casts of the tiny limbs of your little one, you can create a cast of the hands of two lovers or newlyweds, a cast of your own hand.
Today there is a great abundance of such things on sale, with the help of which it is easy to create your own design of casts.
And on the Internet there are many samples for making impressions.
If you want to put the resulting cast on a table or shelf, you need to fill a plastic mold, for example, from under sweets, with plaster, paint it with any paint, then glue the resulting cast of a leg or handle with a good glue.
Kits for creating 3d impressions
Watch the video on how to create a cast correctly:
Now let's take a closer look at this video: mix the dry gel in the required proportion, beat with a mixer until a homogeneous mass is formed, convenient for use.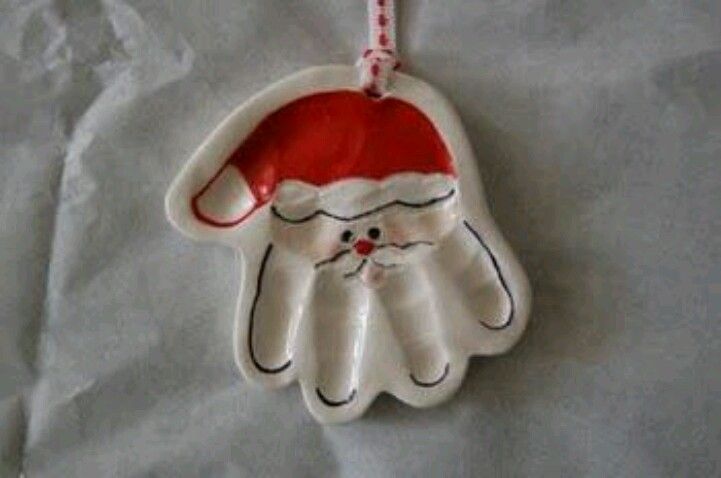 After that, we lower the child's leg into the mass, take it out. We fill the form with special plaster, after a while we take out the resulting sculpture.
Pretty easy, isn't it?
And now let's take a closer look at the proportions by which you need to mix water with the impression gel.
Take 100 grams of dry gel, also 400 milliliters of water. Well, to create the hand of an adult, instead of a mayonnaise bucket, they take a two-liter bottle of plastic, cut off her throat. Take 250 grams of gel per liter of water.
For children whose age ranges from and above, you need to calculate the proportions yourself. To do this, measure the amount of water required to completely immerse the child's arm or leg in the container.
In order to pour the mold, take a special plaster. To pour one cast, take ten to five tablespoons of gypsum and 0.05 liters of water.
In order to pour one cast of an adult's hand, you will need 20 tablespoons of plaster and 0.18 liters of water.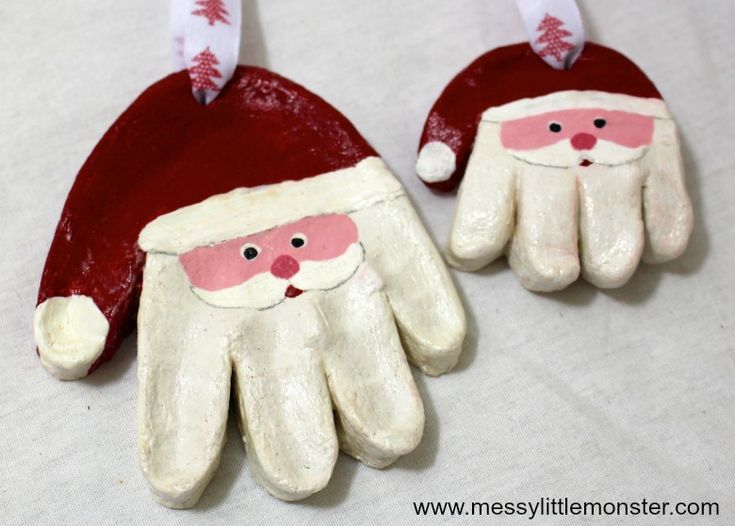
2d Impression Kits
Create a convex impression of some part of your little one's tiny limbs.
This technology assumes a plastic material for reusable use.
It is quite plastic and soft, able to convey every fold and line of the skin, keeps its shape perfectly.
But this material can be used almost unlimitedly.
The main condition for storage is the obligatory presence of the material in a jar, the absence of contact with water, talc and oil.
This kit will help you make casts of baby feet and hands every month. You will compare how the baby has grown.
And now the video instruction for making impressions 2 d:
When analyzing this video, we want to clarify again that the convex layer of the handle is made using the finished impression mass manually, filled with special plaster. Then everything dries up, the cast is pulled out, the mass is again kneaded. A new cast is created from it.
After this procedure, the impression mass is kneaded again, it is placed in a bag into which air will not enter, in order to take out the mass next time and create a sculpture again.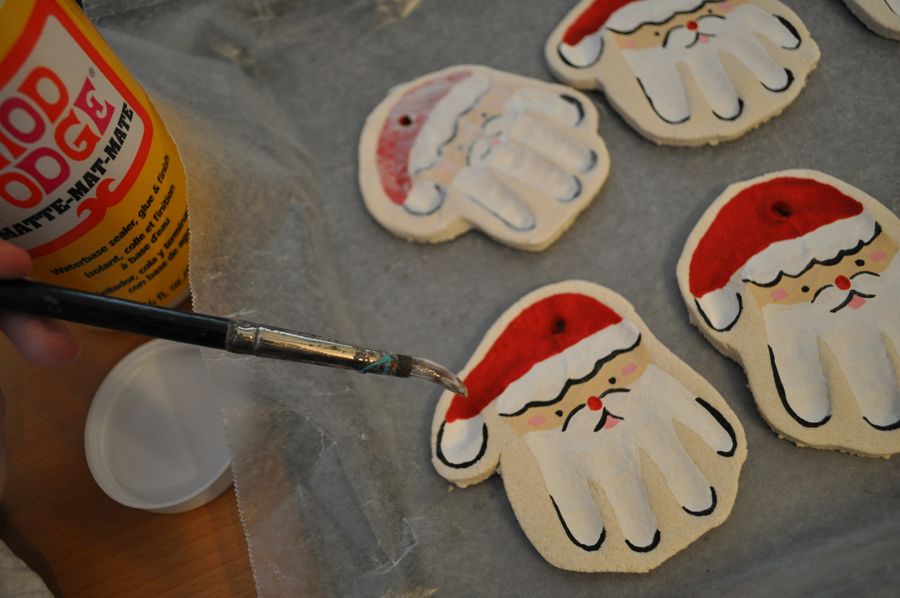
Casts can be stained in any color you like. This can be done using watercolor, gouache, acrylic. Glue what you got to the photo frame. At the same time, use any decor that you like, some collages, booties, a tag, a dummy, an ultrasound scan, a bodysuit, a vest, a hat. The main thing is to use your imagination.
If you have small children in your family, then this idea is just for you! Stop the moment by leaving impressions-imprints of small hands or feet. By placing them in a frame, it will be possible for many years to remember the happy moments and joy associated with this precious time.
Well, you can make a few casts, while your baby will grow up and create a whole collage, which in the future will be of interest to the child himself, on it he will see how his arms and legs grew, but if you add photographs to the collage - then you will definitely have a corner in the house that will cause smiles and joy every time you pass by it.
We will tell you about two ways to make your own impressions - prints.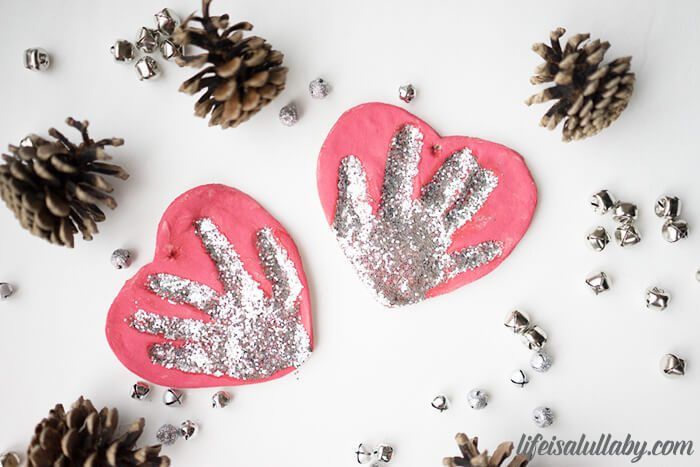
The first way - we need: fine sand, alabaster, a container of a suitable size, a brush, decorative elements (buttons, shells, pebbles, small toys, etc.).
Pour wet sand into the container, it is important not to compact it too much.
Now we carefully make prints of handles or legs in the center of the container, along the edges of which we also print our decorative objects.
After that we breed alabaster, its consistency should be similar to sour cream. Remember, alabaster hardens very quickly, so immediately start pouring carefully - carefully pour 2-3 cm thick alabaster onto the sand in a small stream so as not to damage the prints. We leave it to dry for 15-20 minutes, and then carefully take out the frozen alabaster plate, brush off the sand with a brush - and admire our prints, which can be painted with paints or decorated with decorative elements, inscriptions.
The second way is to make foot or hand prints using salt dough.
First, of course, prepare the dough - to do this, mix 1 cup of wheat flour with 1 cup of fine salt, add water (about 0. 5-1 tbsp). Knead a tight elastic elastic dough.
Now let's give the dough the desired shape, but do not roll it out thinly - otherwise the mold will not be made. Level the surface of the dough with a flat object or a rolling pin, after which you can make an imprint of a leg or handle. If the print does not work the first time, you can roll out the dough again.
After you have a beautiful cast, you can draw patterns around the edges with a stick, then put the product in the oven for 2 hours, the oven temperature should be about 100 ° C. If you have a rather thick cast, then it may take more time to dry . After you take the product out of the oven, it is advisable to let it lie down for another 5 hours at room temperature, and only then you can start decorating and decorating the cast with decorative elements.
You can put the mold in a frame or drill a hole (and if you are making a dough mold, you can pre-drill a hole) and hang it on the wall. Casts - prints will also be a great gift for dad or grandparents.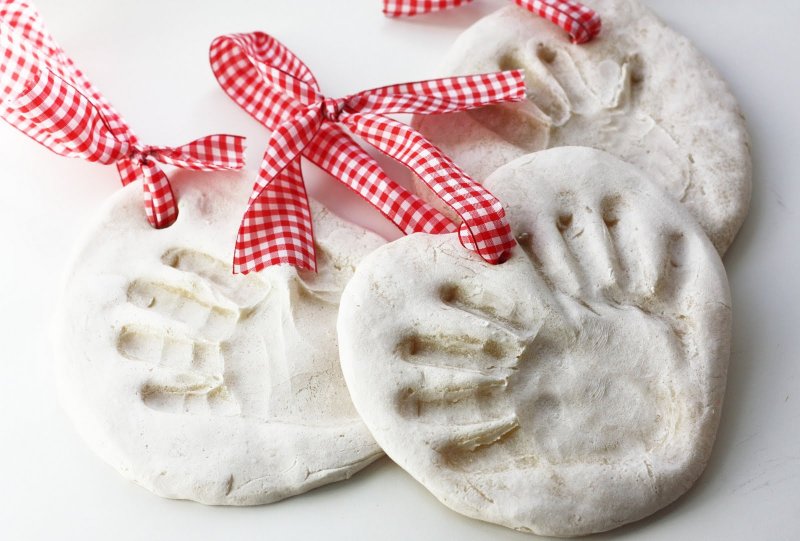 Well, if you are already making a cast with an older baby, then this activity can turn into an exciting joint pastime!
Of course, we forgot to mention the most fun and easy way to make fun prints - just give your child paints and paper. Colored palms in paint - and you have a lot of ready-made prints as gifts for all relatives and friends! Just make sure in advance that the paints are non-allergic on delicate baby skin!
Children grow up very quickly, so catch and stop the moments that will delight you all your life!
Now my sun is already three and a half months old, and she is getting older and bigger every day, although I do not notice it at all. That is why I wanted to have at least something to remember her the way she is now.
Somehow I came across an ad about making compositions with clay casts of children's hands and feet. Of course, I really liked the idea - after all, having a cast of your favorite feet and hands is much more pleasant than just a print or a contour drawn with a pencil around thin, sweet fingers.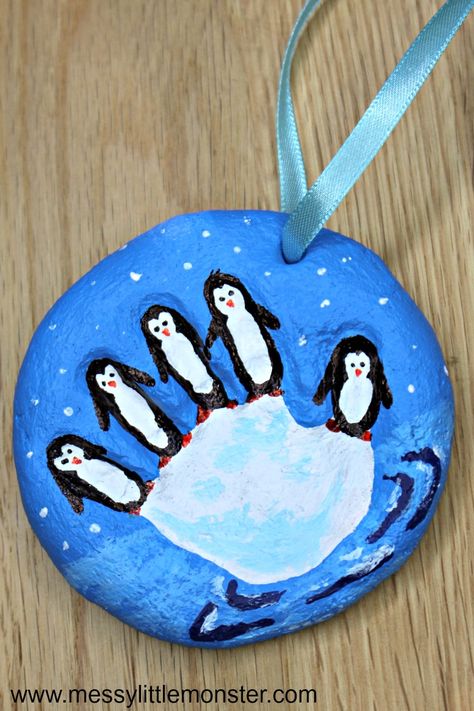 But I decided not to resort to the help of strangers, but to do everything myself - it's much more pleasant, and the baby can be scared of strangers.
I did it like this:
1. I kneaded the salty dough.
It is best to make elastic salt dough according to the following recipe:
2 cups flour
1 cup salt (preferably fine)
1 tbsp. starch / hand cream / vegetable oil
0.5 - 1 tbsp. water
Mix all ingredients thoroughly. The mass should be quite thick. The dough should not crumble. If it turned out to be too thick - add a little water, too thin - salt with flour (it is always necessary to observe the ratio of flour and salt 2: 1).
2. When the dough becomes like this:
We tear off small pieces from it, on which we will make prints of children's legs and arms, something like this:
3. Now, bring a piece of dough to the child's foot, and firmly take root. We need to get as deep an imprint as possible. Ideally, all the lines on the baby's foot should be printed on the test, but I will say right away: it is quite difficult to achieve this, in any case, when making prints in this way.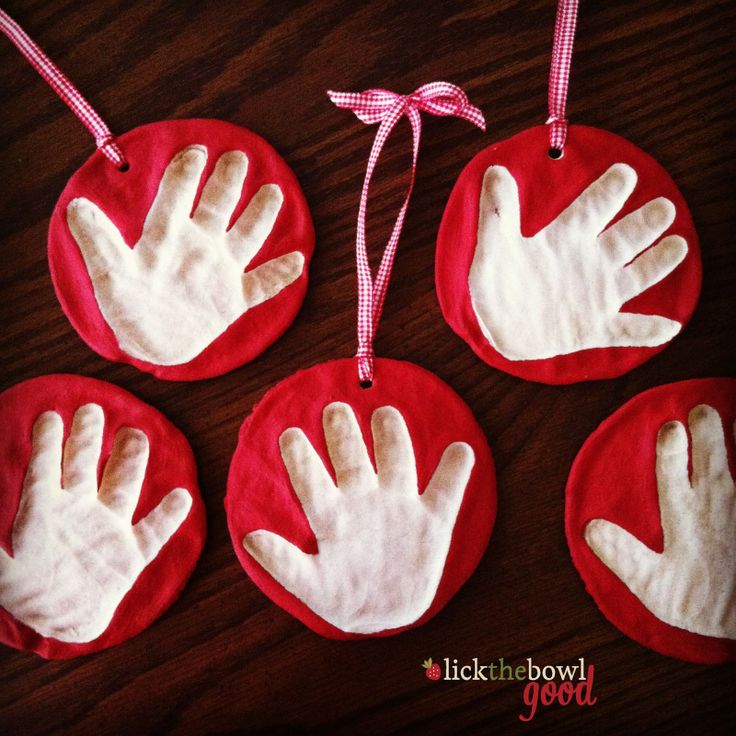
Making a pen print is more difficult, especially if the child is not yet six months old - my baby always took pieces of dough with her)))
5. The last two procedures can be repeated ad infinitum. I made about five to seven prints of each foot and each hand in order to be able to choose the most successful ones.
6. Then there are two ways. You can first bake the resulting prints of children's hands and feet in the oven (about 30 minutes at a temperature of 130 degrees), or you can work with raw dough. In the first case, you will be able to use each print several times. In addition, if you bake the dough longer, you can save the trace itself - it also looks very good. You can make a memorable composition with him)). However, making molds from raw dough is easier and faster.
I've tried both methods, and I liked the second one better.
7. So, we take a baked or raw imprint of a child's foot or pen, and pour plaster into it. This must be done quickly before the plaster has hardened.