How to do letter
How to Write a Letter in Hassle-Free Steps (With Sample)
DESCRIPTION
letter in printer
SOURCE
Cunaplus_M.Faba / iStock / Getty Images Plus
PERMISSION
Used under Getty Images license
Knowing how to write a letter, whether business or personal, is a skill that everyone needs. Sometimes, these letters will be short, informal emails. Other times, they'll be highly polished for corporate correspondence. Learn how to write a letter step-by-step, and review a printable sample letter. Then, explore best practices for writing both formal and informal letters.
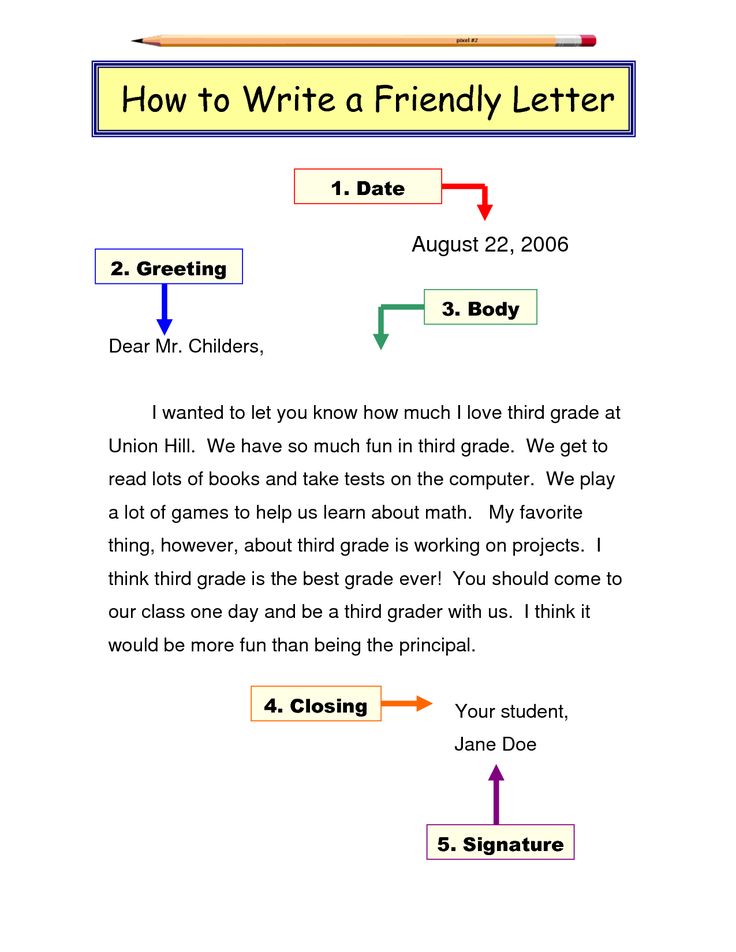
Writing a Letter: Step-by-Step
Let's tackle how to write a letter in proper order, from top to bottom. These steps are directed toward a formal letter, though recommended adjustments for informal letters are also included.
- Sender's address - To start, place your full address — including your full name, street address, city, state, and zip code — in the upper left-hand corner.
If you're not confident in writing addresses, learn how to write an address properly.
- Date line - Skip a line and specify the date. Use the date the letter is being written.
- Recipient's address - Skip a line and place the recipient's full address. For a formal letter, you'll need to include the company name, the recipient's name and title, and mailing address. For an informal, personal letter, there's no reason to include the company name or job title.
- Greeting/salutation - Skip one more line to insert the greeting. This is called the salutation. In a formal letter, you use "Dear Mr./Ms./Mrs. Last Name:" Formal letters require a colon after the greeting, while informal letters take a comma. For an informal letter, it's fine to use the recipient's first name followed by a comma.
- Body of letter - Skip a line and begin the letter. In the body of your letter, separate your thoughts into paragraphs.
 You never want to draft one big block of text. For each new set of thoughts or ideas, begin a new paragraph. Leave a blank line between paragraphs.
 - Complimentary close - Skip one of your final lines to include a complimentary close. The closing can be as simple as, "Sincerely," "Yours truly," "Regards," or similar. There should always be a comma after the word or phrase you use to close a letter, whether it is formal or informal.
- Signature text - Skip three lines (where you'll insert your handwritten signature), and type your full name. For a formal letter, you should also include your job title on the next line.
- Attachments - If you're including any attachments with your letter, skip one more line and type "Enclosure." If there's more than one attachment, indicate how many there are in parentheses, as in "Enclosures (4)."
For a few more pointers, check out tips on business communication letter writing.
Advertisement
Sample Letter to a Company
Keeping the above formula in mind, the sample letter below illustrates each section of a letter written to a company. Below the sample text, you will find a fully editable PDF that you can use as a template for drafting your own letter.
Abigail LeJeune
Branding Ambassadors, Inc.
4568 Highway One
Makeup, CA 12709September 14, 2019
Mr. David Henry
Chief Marketing Officer
Consulate of Branding
328 Plainway Road
San Samon, CA 12808Dear Mr. Henry:
This past weekend, I met one of your staff members, Cody Abercorn. He was manning your company's booth at the Cincinnati Trade Show. Since our booths were adjacent to one another, we had the opportunity to get to know each other rather well.
I must say, his professionalism and welcoming attitude toward your visitors was highly encouraging. Visitors were welcomed into your company's booth as if they were entering his home for a Friday evening dinner party.
Every guest became a fast friend. Beyond that, they left the booth highly informed on your product line.
How often do we receive congratulatory letters, in a sea full of complaint letters? I wanted to make sure you began your week with a highly complimentary letter. I would say you spend a lot of time training your staff and Cody has certainly reaped those rewards.
As President and CEO of my own marketing firm, Branding Ambassadors, I wonder if you might consider teaming Cody up with us for a social media marketing campaign? Perhaps we can partner up on a short campaign where we sponsor one another in two to three posts.
With over 1.5 million followers, I believe we can join together and support each other's endeavors very effectively. What do you say? Will we take over the Internet and create a marketing movement that is mutually beneficial to our growing companies?
Thank you for your time!
Sincerely,
[Signature here]
Abigail LeJeune
President and CEO
www.brandingambassadorsinc.com
Advertisement
Printable Sample Letter Template
The template below is provided as a resource to help you format your own letter. You can save or print it for future reference. You can even edit the document once you open it, so you can customize it for your needs.
Example how write letter
Click to View & DownloadFormat Considerations for Different Types of Letters
Letters can be either informal or formal. Both types are similar in terms of format, but there are some differences. Informal or personal letters may come in the form of email, but the basic premise remains the same.
Informal/Personal Letter Best Practices
It is important to know how to write a letter of a personal nature. Personal letters are not as formal as business letters and can be handwritten or typed. The tone can be conversational, even using a bit of slang or colloquial terminology.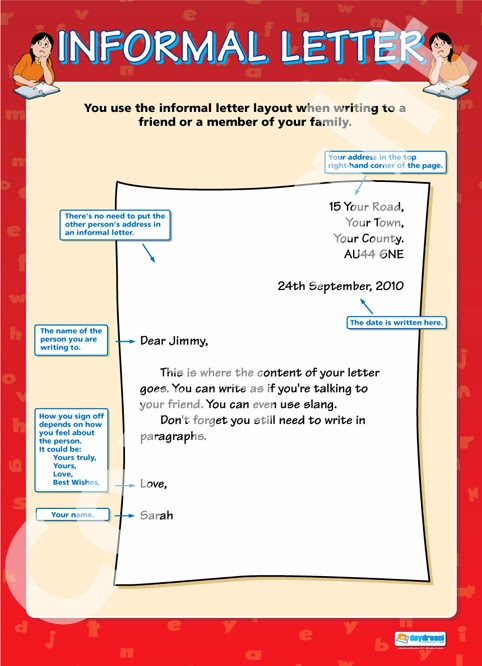
- For the greeting, use an informal salutation (first name only) ending with a comma in lieu of a colon.
- In the body, the first paragraph is usually an introduction setting out the reason you are writing.
- The next paragraphs go into more detail. The closing paragraph summarizes what you've had to say. You may want to thank the recipient or ask questions.
- The closing comes after two skipped lines and can also be informal.
- If you want to add a P.S. or P.P.S. to your personal letter, skip another line and start the P.S. on the left-hand side of the paper.
If you are sending a hand-written letter or an email, the mailing addresses don't have to be included.
Advertisement
Informal letter format
Click to View & DownloadFormal Letter Best Practices
Formal letters follow a set pattern, as you can see in the example above. One type of formal letter that will be an important part of most people's lives is the cover letter.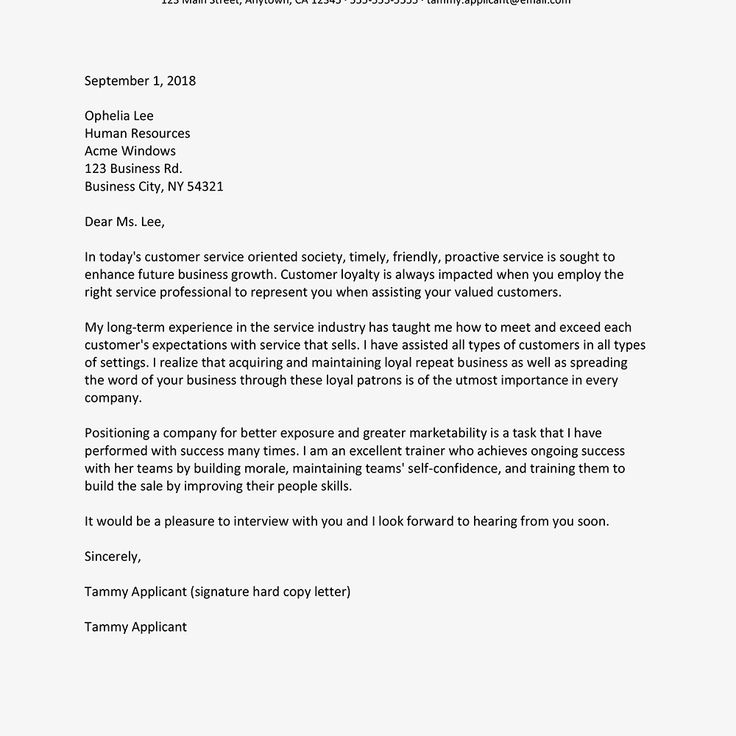 In a cover letter, as with all business letters, you'll need to use a standard formal letter format.
- A cover letter should generally include three body paragraphs. The first paragraph explains why you are writing, what position you want, and why you want it. The second outlines why you are the best person for the job and summarizes your skills and experience.
- The closing paragraph mentions your resume and asks for an interview. You need to be strong and upbeat in this paragraph so the reader will want to interview you.
- Thank the person for his time and include contact information.
Follow a similar structure with all business letters and other formal letters, adapting as needed based on the purpose for which you are writing. If you're sending a formal letter in the body of an email, the addresses aren't necessary.
Advertisement
Formal letter format
Click to View & DownloadGeneral Writing Tips
Now that you know the steps involved in writing a letter and have had an opportunity to review best practices for both formal and informal letters, you're just about ready to write a letter of your own.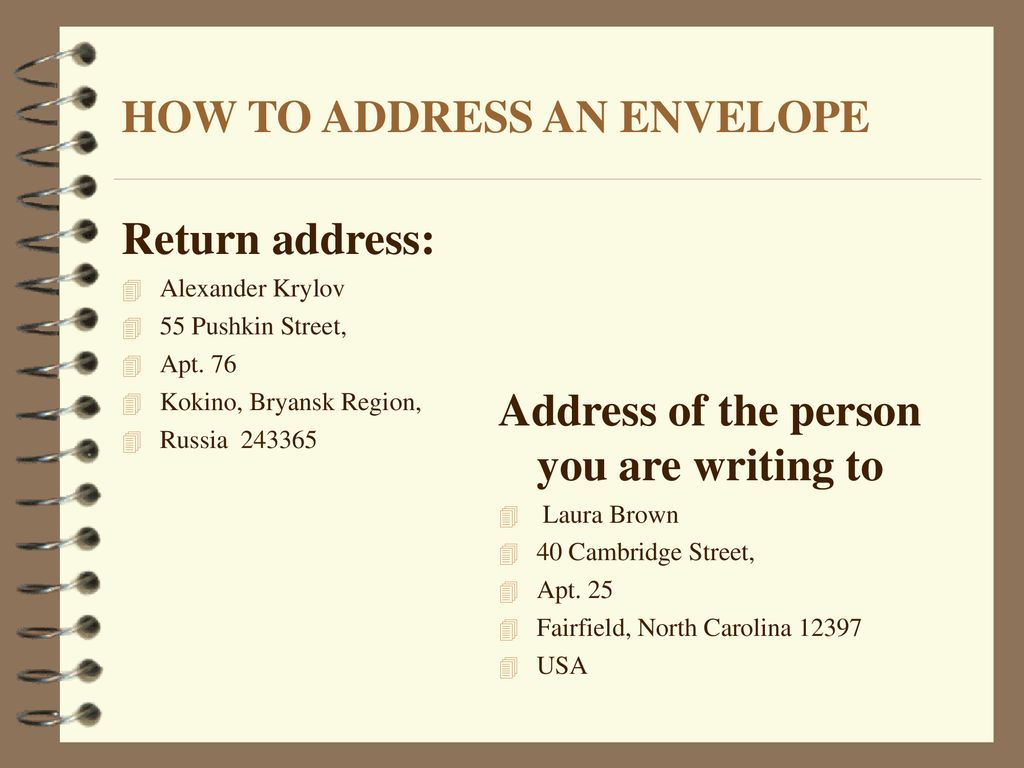 With the general steps listed above in mind, consider a few key tips:
- Know your audience. Only use technical terms or industry jargon if you are sure the reader will understand.
- Avoid contractions in formal letters, as with all business writing. It is fine to use contractions in informal letters.
- Keep letters relatively short if at all possible. Do not write two (or more) pages if one will do.
- Be clear and to the point with your message. Use specific language that leaves no room for misunderstanding.
- Leave out unnecessary details. As you re-read your letter for accuracy, ask yourself if anything in there is unnecessary information.
- Remain professional. Do not include any inappropriate language or use an unpleasant tone, even if you are writing a complaint letter or a letter of resignation.
Advertisement
Written Communication Skills
Now that you know the basics of letter writing, explore examples of letters and what to include in them for more advice and samples of different styles of letters.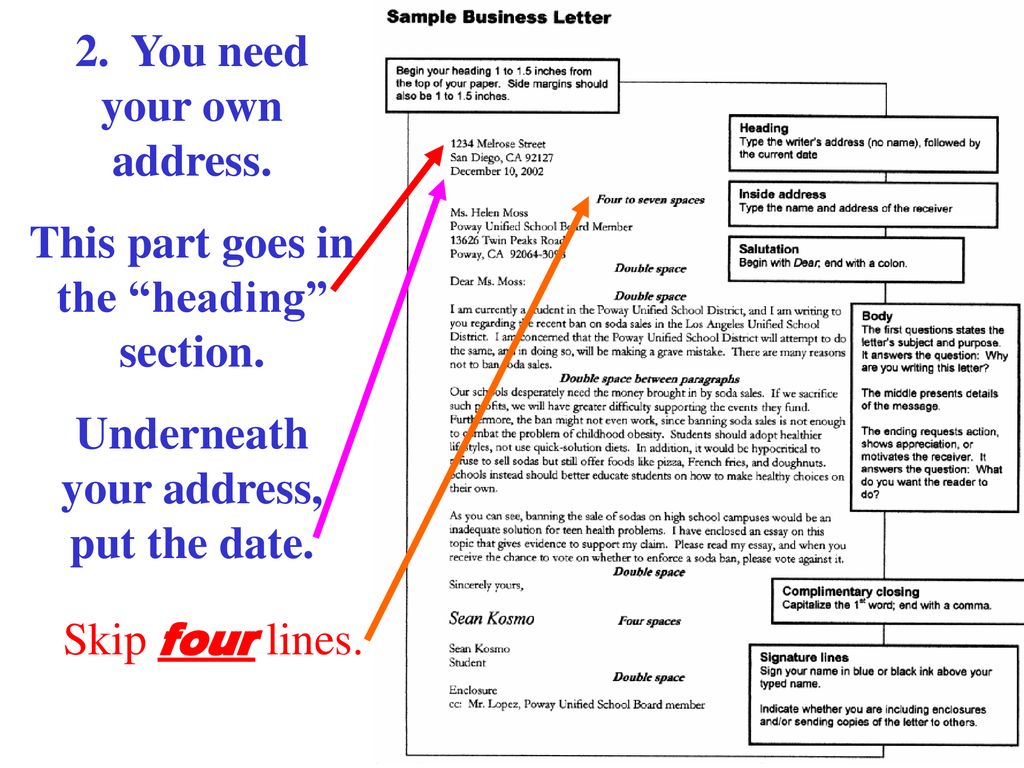 Then, discover what P.S. stands for at the end of a letter and how to use it.
Written communication is an important skill to list on a resume. More than that, knowing how to write a letter is an important skill that you will use throughout your life, for both personal and professional reasons. Learn more about what's involved in effective written communication.
How to Write a Letter - The Ultimate Guide
How to write letters to loved ones
It’s official. Letter writing is having a revival. In these digital days, when most of our messages are seen on screen and sent in an instant, the notion of receiving a thoughtful, handwritten note through the post feels more special than ever.
It’s a chance to press pause on the fast pace of life. The sender gets to stop, slow down and enjoy the pleasure of putting pen to paper; the receiver winds down as they carefully unfurl a meaningful message from someone who cares.
Knowing what to write can be a little tricky, especially when you’re faced with very lovely writing paper. But, whether you’re scribing a love letter, an apology letter or a thank you letter, our how-to guide should deliver some helpful reminders and tips.
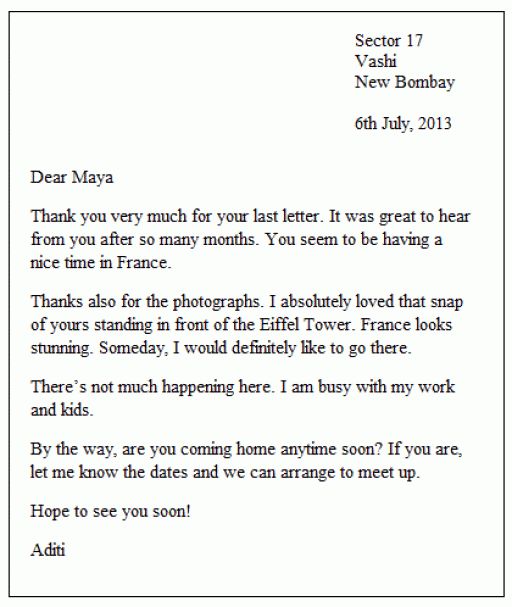
Letter template – structure of a personal letter
Sender address
(optional if you know the person very well)
14 Paper Lane,
London,
EH5 3UT
Date goes here 27th August, 2020
Greeting Dear Jasmine,
Body Hope you're doing well and had the best time in Deià? Just a note to say thank you so much for the lovely apron - it's perfect. I've been wearing it to all my pottery classes and getting lots of compliments. Let's arrange a catch up this month, please? It's been too long! I know Suzy is in London next month, so perhaps we could all meet for a long lunch. Let me know.
Sign off
With love,
Delilah
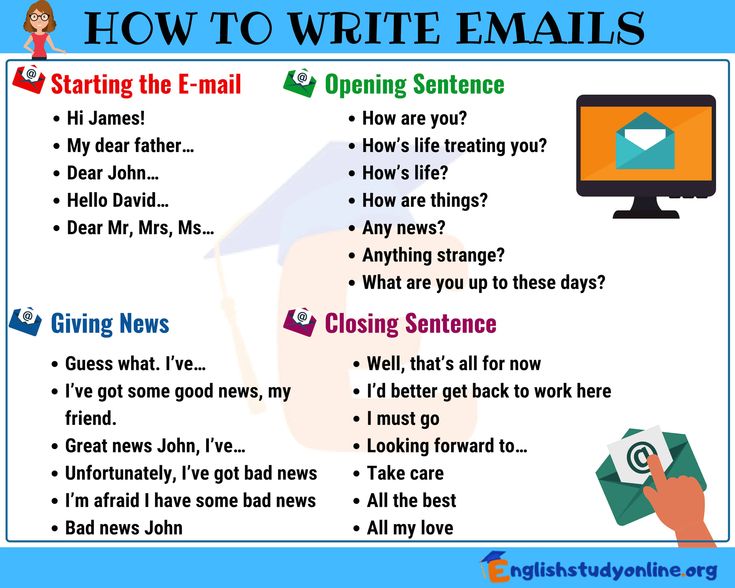
How to start a letter
The beginning of your letter depends on who you’re writing to and why.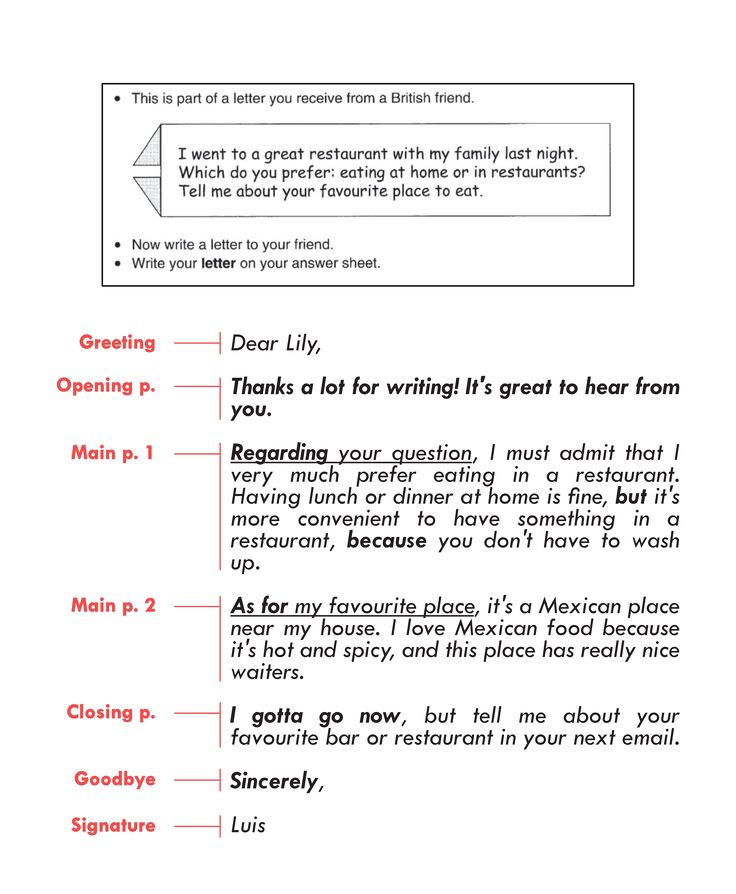 Think about how well you know the person and whether your letter is formal, informal or somewhere in between to decide on your tone. Here’s a few examples:
To whom it may concern,
Tone: Very formal/traditional
For addressing: People you don’t know
Dear Sir or Madam,
Tone: Formal/traditional
For addressing: People whose gender you know but name you don’t
Dear [Ms. Hardy],
Tone: Formal/modern
For addressing: General letters to people you don’t know well
Dear [Samuel],
Tone: Semi-formal/traditional
For addressing: People you know well or someone you know on a first-name basis
To [Anya],
Tone: Semi-formal/modern
For addressing: People you have a good, friendly relationship with
Hi/Hey [Nico]
Tone: Informal/modern
For addressing: Friends and family
To my [amazing big sister],
Tone: Very informal/modern
For addressing: Close friends, family, partners or anyone you want to show affection to
How to end a letter
Signing off your letter is just as important as the start.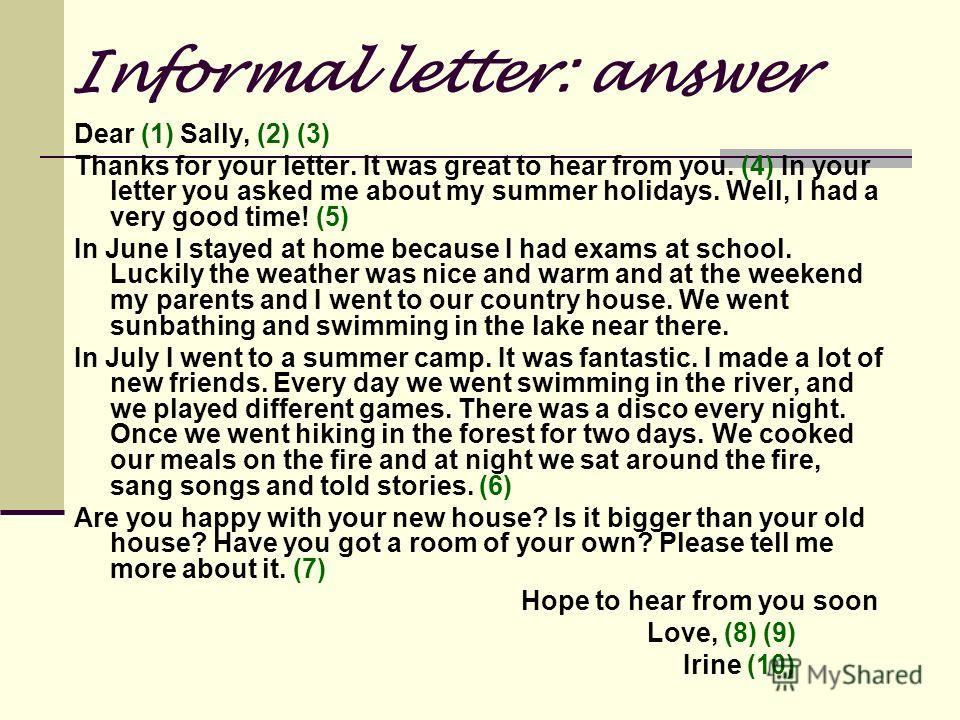 Once again, think about who you are speaking to and the content. Notes to loved ones call for a conversational round-off, whilst formal letters should be finished with a traditional closing. Remember to capitalize only the first letter of your sign-off and to write your signature underneath your full name for business and legal letters.
Yours sincerely,
Tone: Formal/traditional
For signing off: Letters that are addressed with someone’s name
Yours faithfully,
Tone: Formal/traditional
For signing off: Letters to someone you don’t know, usually correspondence beginning with ‘Dear Sir/Madam’
With sympathy,
Tone: Formal/traditional
For signing off: Letters of condolences
Best wishes,
Tone: Semi-formal
For signing off: Letters to people you have a good relationship with, from relatives to work associates
Best,
Tone: Semi-formal/contemporary
For signing off: Letters to people you’ve written to a few times
Many thanks,
Tone: Semi-formal/contemporary
For signing off: Letters to show your appreciation for the time or efforts of someone you know
Love from,
Tone: Informal/contemporary
For signing off: Letters to friends and family or anyone you love!
How to address a letter
How to set out your letter depends on the kind you’re writing. Business letters should include both the sender and recipient address, while personal letters can omit the recipient address and sometimes the sender’s too. We suggest all letter include the date – it’s essential for formal letters and a nice touch for social ones.
Sender’s address
The letter author’s address should include full address and postcode and be placed on the top right-hand side of the page. If you already have your address printed in a letterhead, then there’s no need to write it out.
Recipient’s address
The recipient address should include their name and title (e.g. Dr Warwick) along with their full address and postcode. Include their company name for business letters too.
Date
The date usually sits on the right-side of a letter, 1-2 lines beneath your address. For the UK, the format is day-month-year, e.g. 24th September 2021. And in the US, it’s month-day-year, e.g July 17, 2023.
Extra tips to note
Pick a good pen & writing surface
- Choose a pen with a nice nib to ensure your best handwriting.
- Double check that the surface you’re writing on is flat and stain-free.
Choose writing paper that reflects the vibe of your letter
- Fun prints, like unicorns, flamingos and bumblebees, are perfect for sharing good news or a note of thanks.
- Simple borders or smart monograms work well for more serious letters.
Draft your letter on a rough piece of paper
- Mark Twain once wisely said: “I didn't have time to write a short letter, so I wrote a long one instead.” Penning your words on a scrap paper will help you think about exactly what you want to say and how to space it evenly across your page(s).
Be concise for formal letters
- Get to the point in formal letters, stating the purpose in the opening paragraph, and don't stray from the subject.
Be yourself in personal letters
- Don’t feel the need to be serious or alter your usual tone of voice when putting pen to paper. Write as you speak to bring your personality to the page.
- Remember doodles are always welcome when writing to best friends or true loves. Take a leaf out of the letters of Charles and Ray Eames.
Proofread!
- Read your letter over to check for mistakes once you’re done.
- You can scribble out small errors on personal letters (hey, it adds character), but start over if you’re writing a formal correspondence.
Shop writing paper
20 ways to make a beautiful paper envelope
November 19, 2019 Likbez Do it yourself
Classic and unusual packaging for letters, cards and cash gifts.
How to make a classic envelope
VENTUNO ART YouTube channelWhat you need
- Sheet of A4 paper;
- scissors;
- adhesive.
How to
Cut a square out of paper. Attach one corner to the opposite. Press the paper in the middle with your finger without bending it all the way.
YouTube channel VENTUNO ART Unfold the paper and connect the other two opposite corners in the same way.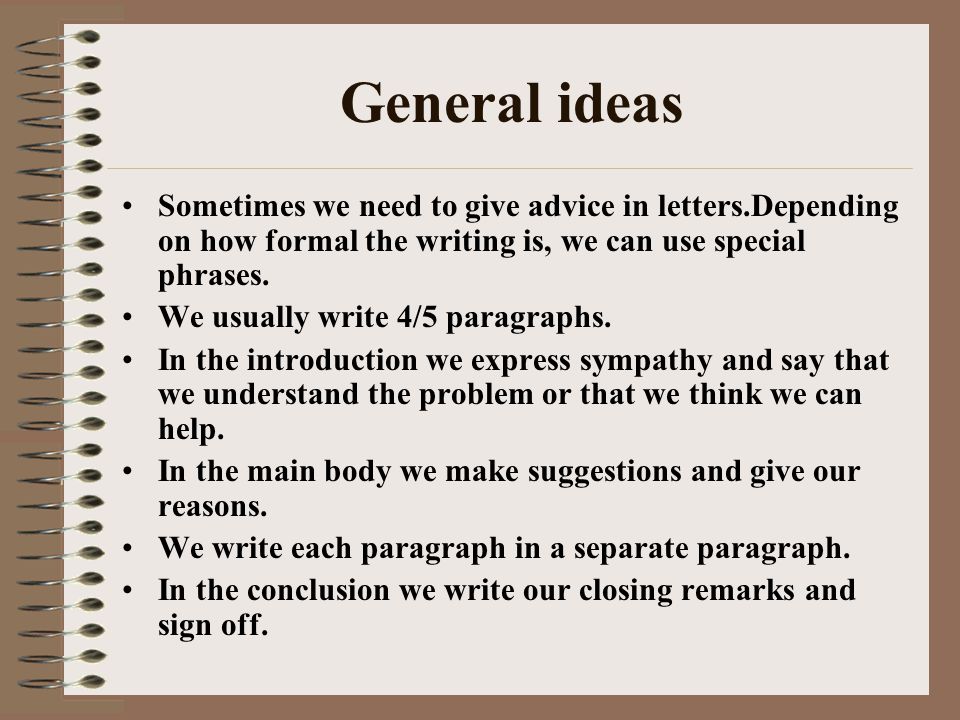
Unfold the figure and position it with an upward angle.
YouTube channel VENTUNO ARTBend the left corner of the figure to the middle.
YouTube channel VENTUNO ARTThen bend the right one.
VENTUNO ART YouTube channelFold the top of the figure so that it touches the sides of the side triangles.
VENTUNO ART YouTube ChannelUnfold the top flap. Bend up the bottom part so that the corner touches the fold.
VENTUNO ART YouTube channelFold down a small corner. Its sides should be in line with the sides of the side triangles.
VENTUNO ART YouTube channelUnfold the bottom of the envelope completely. Lubricate the undersides of the side triangles and the whole small one with glue. Details are in the video.
VENTUNO ART YouTube ChannelFold the small triangle back up and glue it to the paper.
VENTUNO ART YouTube channelFold up and glue the entire bottom of the envelope.
Other options
This video shows how to make an elongated envelope from a whole sheet of paper:
How to make a classic origami envelope without glue
Colors Paper YouTube channelWhat you need
How to
Cut a square out of paper. Fold it in half to make a triangle. Unfold and fold in half again, connecting the other opposite corners.
Colors Paper YouTube ChannelPosition the triangle with the fold down. Bend the top front corner to the fold.
Colors Paper YouTube ChannelPlace the top back corner over the front corner as shown in the photo.
Colors Paper YouTube channel Fold the right side corner to the left. The widest side of the resulting triangle should touch the side of the shape from the previous step.
Fold the left side corner of the shape in the same way.
Colors Paper YouTube ChannelNest one corner of the side triangle inside the other.
Colors Paper YouTube channelThe whole process is shown in this video:
Other options
A similar envelope, made a little differently:
This envelope looks like the first one, but is made without glue:
A more difficult version with a triangular flap:
And here's how to make an envelope with a rectangular flap:
How to make a simple heart envelope
Step to Health YouTube channelWhat you need
- A4 sheet of paper;
- pencil;
- scissors;
- adhesive.
How to
Fold the sheet in half across. Draw a half of the heart so that its center is on the fold of the paper. Cut out the shape.
Step to Health YouTube channelExpand the heart. Fold the sides to the middle of the figure, as shown in the photo.
YouTube channel Step to HealthFold up the top of the heart.
Step to Health YouTube ChannelFold down the flap of the resulting envelope.
Step to Health YouTube ChannelGlue the sides to the bottom so it doesn't fall apart.
How to make an origami envelope with a flap and a rectangular fastener without glue
VENTUNO ART YouTube channelWhat you need
- Sheet of A4 paper.

How to
Fold the sheet in half across. Bend the front part down to the resulting fold. Fold the same part up to the new fold.
VENTUNO ART YouTube channelUnfold the front and fold the bottom edge of the paper towards the fold. To avoid confusion, watch the video tutorial below.
YouTube channel VENTUNO ARTBend the resulting strip up.
YouTube channel VENTUNO ARTNow cover it with the top of the sheet.
VENTUNO ART YouTube channelPut the top part back in place and fold the bottom corners of the figure to the strip.
VENTUNO ART YouTube channelFold the right side of the figure to the left along one side of the small triangle.
YouTube channel VENTUNO ART Fold the left side in the same way and fold it back. A small rectangle outline will appear above the center fold. Fold the top of the paper so that the fold connects the bottom right and top left corners of the shape. Do not fold the sheet completely. Do the same with the right side of the future envelope.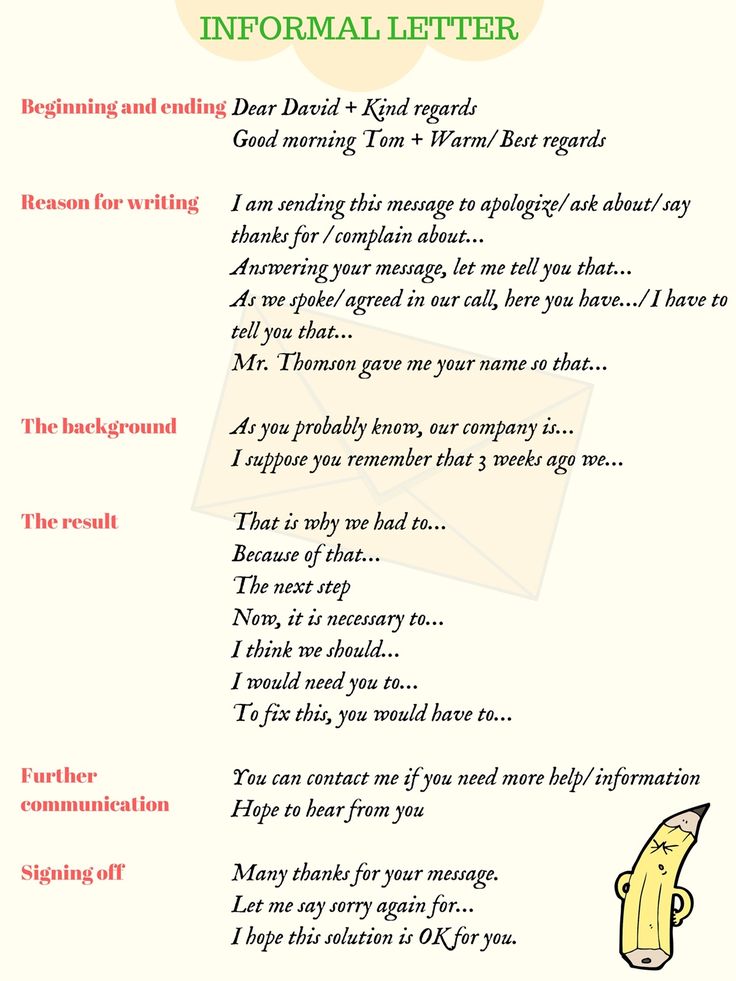
Unfold the bottom corners of the figure and the folded front.
YouTube channel VENTUNO ARTBend the sides of the front part of the paper towards the middle, unrolling small triangles from below. The detailed process is in the video.
VENTUNO ART YouTube channelBend the part in the middle down the fold. Fold the sides of the paper towards the center.
VENTUNO ART YouTube channelFold the bottom triangles under the paper along the folds. Fold the top corners as shown in the photo.
VENTUNO ART YouTube ChannelUnfold the top corners and place them under the center piece.
VENTUNO ART YouTube channelClose the envelope by sliding the flap under the front of the strip.
Other options
Here is a square envelope with a different clasp:
How to make a folding envelope with clasps
VENTUNO ART YouTube channelWhat you need
- Sheet of A4 paper.
How to
Fold the paper in half across. Unfold her. Fold the top left corner to the center fold.
VENTUNO ART YouTube channelFold the bottom right corner in the same way.
YouTube channel VENTUNO ARTBend the upper right part of the sheet to the left to form a triangle. She must interact with him.
VENTUNO ART YouTube channelFold the lower left side of the paper in the same way.
VENTUNO ART YouTube channelFold the bottom of the paper towards the middle.
YouTube channel VENTUNO ARTAnd right.
VENTUNO ART YouTube channelInsert the top flap into the end corner.
YouTube channel VENTUNO ARTPlace the lower flap in another corner.
What other options are there
A very unusual envelope with a figured flap:
Another original hexagon envelope:
How to make an envelope with origami figures
ZIZ origami YouTube channelWhat you need
- Sheet of A4 paper;
- pencil;
- adhesive.
How to
Place one corner of the paper on the opposite side diagonally. Mark with a pencil the places along the edges where the narrow side of the sheet is. It is not necessary to fold the paper completely.
YouTube channel ZIZ origami Bend the narrow side to the pencil marks.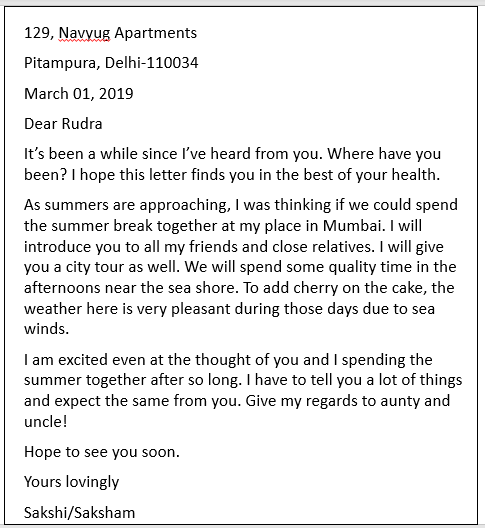
Unfold and then fold the same edge to the resulting fold.
YouTube channel ZIZ origamiFold the paper in half lengthwise right side out.
YouTube channel ZIZ origamiUnfold and fold the corners to the resulting line on the front side.
YouTube channel ZIZ origamiTurn the paper over and fold the corner to the impromptu line where the pencil marks are.
YouTube channel ZIZ origamiTurn the paper right side out again. Unfold the strips and make triangles, as shown in the photo.
YouTube channel ZIZ origamiBend the top squares diagonally. Fold the resulting small corners down to the fold.
YouTube channel ZIZ origamiFlip the paper. On top you will get a heart. Fold the sides of the paper over to it.
YouTube channel ZIZ origamiFold the flap with the figure up and fold the bottom of the paper to the fold.
YouTube channel ZIZ origamiGlue the inside of the envelope along the sides.
What other options
are a very beautiful envelope with a curly sheet:
A narrow opening envelope with a sheet located in an angle:
An unusual option with a filler -hearth:
is shown here how to make an interesting bow fastener:
Try making an envelope with a paper rabbit:
Or a butterfly:
See also 👍
- How to make a paper airplane: 10 original ways
- 10 paper colors that are indistinguishable from real ones
- 20 DIY cute snowmen
- 20 ways to make a cool birthday card
- 10 ways to make beautiful DIY gift boxes
*Activities of Meta Platforms Inc. and its social networks Facebook and Instagram are prohibited in the territory of the Russian Federation.
4 ways with step-by-step instructions and photos
If you need to send a letter or a greeting card and don't have an envelope handy, you can make it yourself. In this article, we offer you several different ways to make an envelope from plain white or pretty wrapping paper.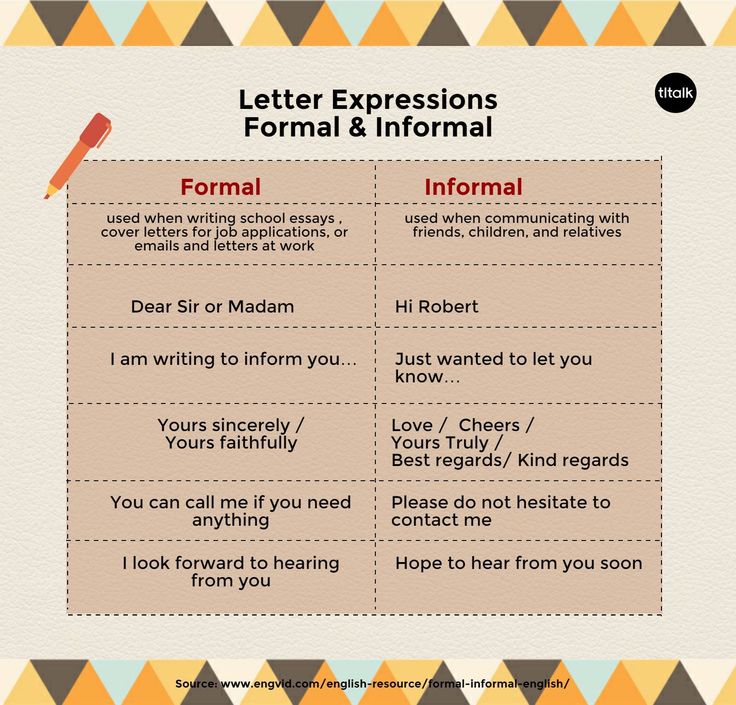
Standard Envelope
Take a piece of A4 paper and fold it in half lengthwise. Then unfold again - this way you outline the crease.
Lay the sheet vertically in front of you, fold the top right corner towards the middle. Fold the top left corner in the same way.
Measure 3.8 cm from the right edge of the sheet and fold towards the middle. Do the same on the left side of the sheet.
Bend the lower part of the sheet so that the lower edge coincides with the intersection point of the upper triangles with the folded sides (see picture), straighten again.
Insert a letter or postcard between the folded edges of the envelope.
Close the envelope. To do this, first bend the lower part, and then the upper (so that the triangle-lapel is located on top).
Use adhesive tape to stick the flap of the envelope, also tape the sides.
Method #2
1: Take a piece of A4 paper and cut it so that it is a square.
2: Fold a square piece of paper in half diagonally first to one side and then to the other side. Smooth out the sheet again.
3: Rotate the sheet 45°. Bend the bottom corner towards the center of the sheet, then bend the bottom edge of the resulting figure along the central crease.
4: Now fold the left corner of the sheet towards the center so that the top of the triangle protrudes slightly beyond the middle of the sheet. Repeat the same on the right side.
5: Bend the tip of the right triangle so that the crease is exactly in the middle of the part. Do not bend the corner completely - it should stick out vertically.
6: Spread the triangle with your finger to create a diamond shape with a “pocket” at the top.
7: Fold over the flap of the envelope and tuck the top of the triangle into the “pocket” of the diamond. Ready!
Workshop #3
1: Take a sheet of A4 paper, write a letter or a short message on it and fold it in half crosswise.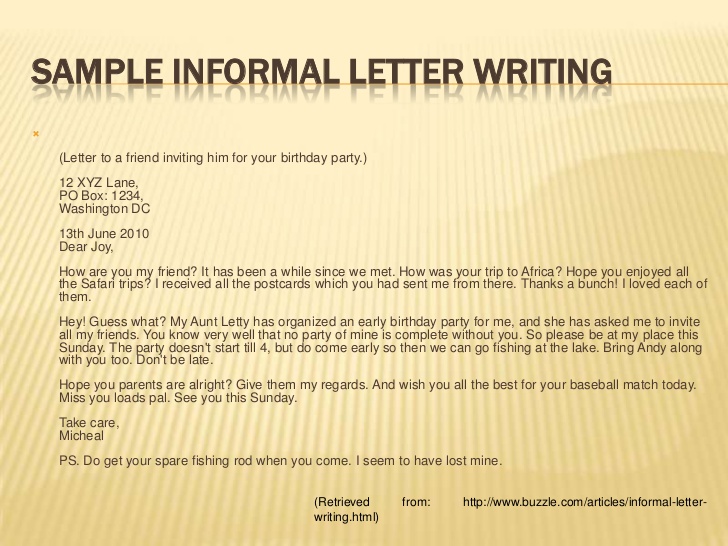 Smooth out the crease and unfold the sheet again.
2: Fold the upper right corner towards the crease in the middle of the sheet. Do the same for the bottom left corner.
3: Bend the right edge of the sheet so that the cut coincides with the edge of the triangle folded in the second step. Then fold the left edge of the sheet in the same way (see picture).
4: Rotate the piece 90 degrees counterclockwise and fold the top right corner along the dotted line as shown. Its top edge should match the bottom edge of the shape. At the same time, bend the lower fold and fill the bent corner under it.
5: Repeat the same on the left side.
The letter-envelope is ready!
Method No. 4
Another option for a gift envelope. It can be made from multi-colored gift paper.
1. Fold the paper in half crosswise.
2. Bend the top edge of the folded half of the sheet down so that the cut coincides with the bottom edge of the part.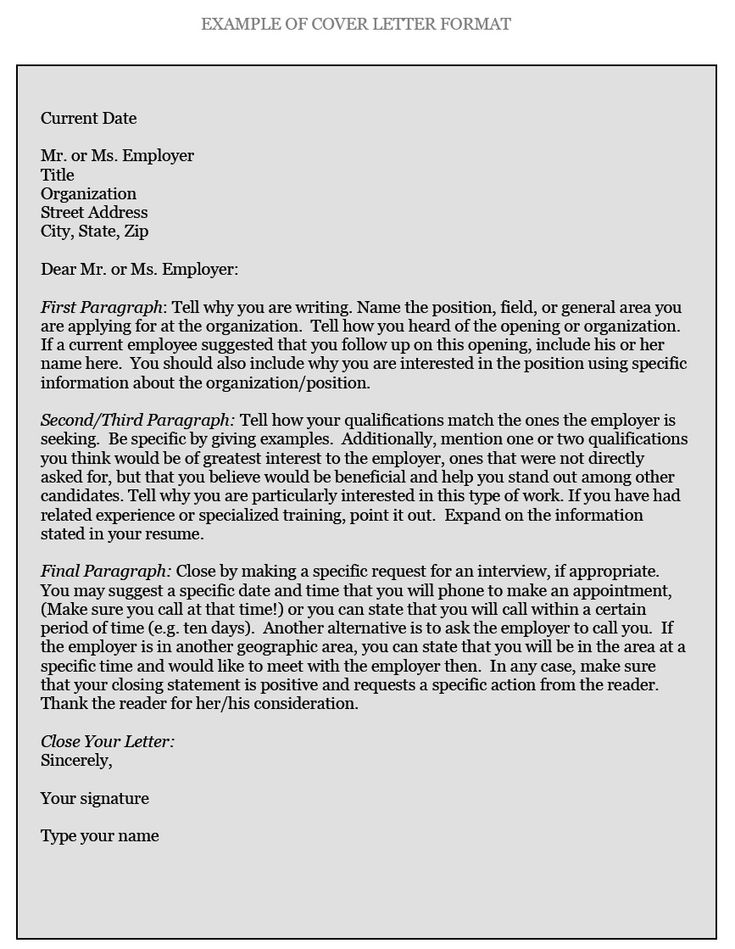
3. Then fold the flap in half again as shown. Bend again, just marking the crease.
4. Now fold the bottom edge up to the crease once, then again.
5. Fold the top edge of the sheet down towards the point marked in the illustration.
6. Fold in the bottom right and left corners.
7. Turn the right and left edges of the part to a width equal to the width of the folded triangles.
8. Mark the pleats along the dotted lines as shown.
9. Unfold the folds so that you have a sheet of paper folded as shown.
10. Using the folds outlined earlier, fold the right and left sides of the lapel so that two triangles form along the bottom edge of the figure.
11. Fold the top edge of the lapel along the existing crease.
12. Fold in the right and left edges, while folding the bottom triangles as shown.
13. Then tuck the bottom corners inward.
14.