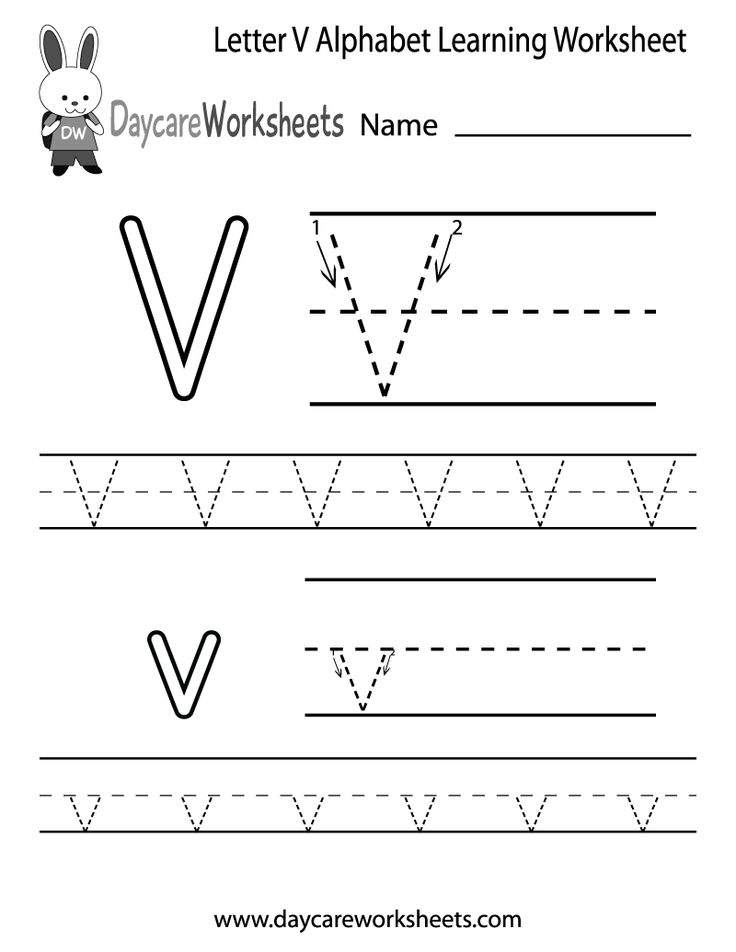
Learning the letters ofthe alphabet
5 Easy ways to teach the alphabet to preschoolers | Daycare Blog
Teaching children the alphabet is foundational to learning how to read. Before children can put together sounds or draw together lines that make words, they need to know what they are. If you’ve never taught the alphabet before, the concept may sound abstract: how do you teach something that comes so naturally to you? Teaching letters can be really fun and simple. In this article, we’ll give you easy ways to teach the alphabet to preschoolers.
1) Sing alphabet songs
Obviously, we all know the English-language, “A-B-C-D, E-F-G,” song. That’s a great place to start. However, there are more alphabet songs, which can add variety to your tunes, and help kids learn the alphabet in different ways.
This article lists a whole bunch of alphabet songs to try. And, if you saw our article on YouTube channels for toddlers and preschoolers, you can find letter-related songs there too. The visuals in videos can show objects that start with each letter, and sometimes the songs also pronounce sounds too.
One important note brought up by this early childhood educator, is that kids should go from singing the song, to being able to say and point out the letters without a tune. So don’t stop at singing!
2) Play letter matching games
Letter matching games are easy to set up. You can have a poster board with the alphabet printed on it in large letters. Have separate letter magnets or paper letters cut out at the same size as the print letters. Ask the preschoolers to match their cut outs to the letters on the chart. Where does “A” go? Place the letter “A” cut out on top of the printed “A” on the poster board. Get them to practice doing this with all the other letters.
As the early childhood educator mentioned above noted, you can also have an alphabet ‘arc,’ where one end of a half-circle shows the letter “A”, and the other end the letter “Z”. In between you can have other letters in the alphabet shown, but not all of them. Ask the preschoolers to put down their block letters in the right sequence, using the pre-filled in letters as clues.
3) Open a new ‘alphabet box’ each week
You may have seen us post on Facebook that a certain week is brought to you by a letter we’re covering. It may be “C,” and you’ll see photos of us painting the letter C at daycare, or learning about animals that start with the letter “C.” Weekly letter themes are common in preschools.
You can take your weekly letter curriculum a step further by creating a box that children can open to discover objects that relate to that letter.
For example, on the week covering the letter “A,” your preschoolers can open (or even unlock) a box that contains an apple, a toy airplane, a toy alligator, an acorn, an arrow (a safe one!), and so on. In fact, don’t tell the children right away what letter the box of ‘treasures’ represents. Ask them if they can guess the letter they’ll cover that week by observing the objects in the box alone. This can be a fun and whimsical way to have your children get excited about the week ahead, and work together to come up with an answer.
3) Use interdisciplinary learning with each letter, to strengthen letter associations
Since repeating a letter over and over again can get boring, you can mix it up a little by bringing in related lessons. You can start with a week’s letter as your core subject. Then, throughout the day, teach interdisciplinary subjects that still relate.
For example, if you are on the letter “R,” you can learn about the colour “red” too, since it starts with “R.” Ask the children, ‘what things are red?’ If you are on the letter “A,” you can learn about apples. We’ve done this before, where we teach children about the types of apples there are, as well as explain that seeds are inside an apple, and so on.
This blogger lists a whole bunch of crafts you can you incorporate into your letter learning. For example, you can make holes with a hole punch for the letter “H.” This can then lead into learning about the circle shape. You get the idea…
4) If you use flashcards to teach the alphabet, use logical ones
Flashcards are a great memorization tool, and the alphabet is all about memorizing. However, this teacher warns that sometimes, pre-made flashcards can get really confusing. If you are teaching the letter “D” and there is an image of something that simply uses the sound of “D” somewhere in the word, but doesn’t start with “D”… well you can quickly see how even adults would be confused by that.
Remember, at this stage, you’re not teaching phonetics or complex vocabulary and pronunciation. First, children need to recognize and know the alphabet. Use the simplest flash cards, with the simplest pictures of the objects and animals that preschoolers can recognize.
That said, sometimes you want to use lowercase and uppercase letters in your flashcards…and yes, that can be confusing for the very young learners, especially when the upper and lowercase look so different, but are called the same thing. But if you’re using a set of magnets, for example, you can just use their uppercase versions, that’s ok (they may only come in that form). For very early learners, you can start really basic.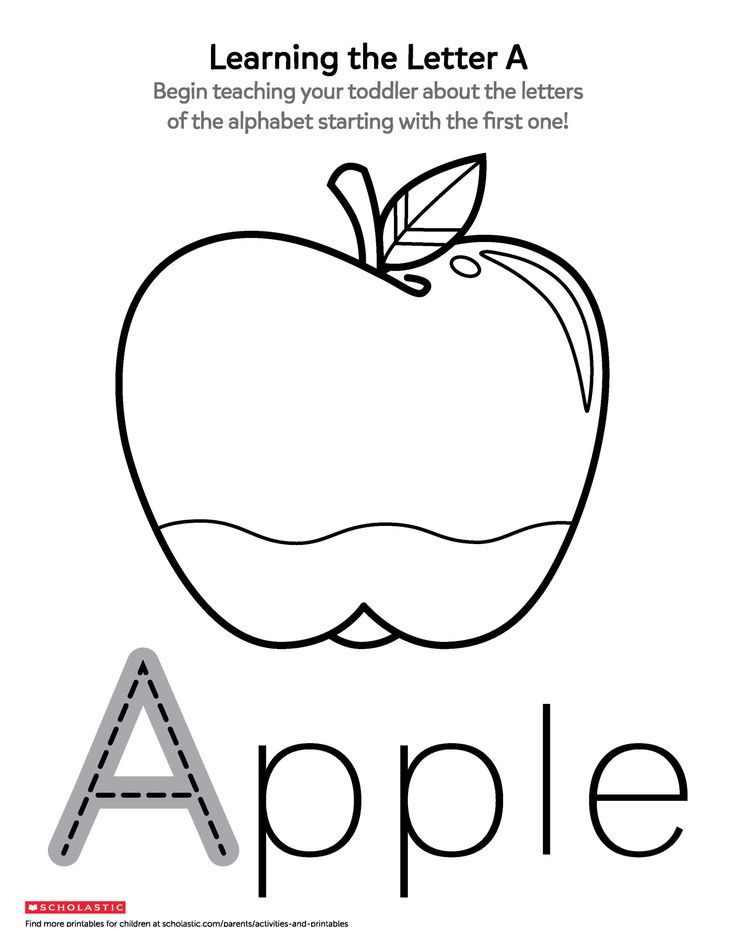 Just don’t forget to start showing them the lowercase and uppercase letters together at some point in their alphabet learning journey.
5) Eat foods shaped like letters to help preschoolers learn their alphabet
Speaking of interdisciplinary alphabet learning, why not do a baking session with the kids at preschool? They can use letter-shaped cookie cutters to make a fun and yummy snack. Meanwhile, there is a host of lessons you can teach with the baking activity. Chemistry, cooking, nutrition…the list goes on.
If you want the easy route, try commercially-sold letter-shaped biscuits. IKEA has a version of these. Ask your toddler or preschooler to name the alphabet letter they’re about to eat. Eating it can be the reward for getting it right!
And of course, there is alphabet soup, or noodles shaped like letters. You can make mealtime fun, and educational, with these edible alphabet manipulatives.
So there you have it, 5 easy ways to teach the alphabet to preschoolers.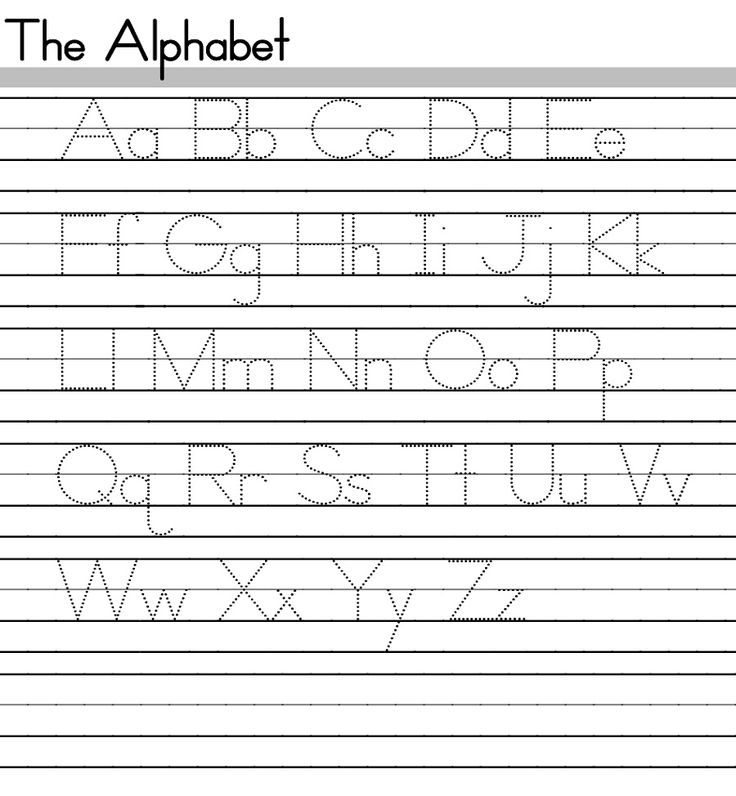 They may even be fun for you, too! It is super cute to hear little ones pronounce letters, and guess what object goes with each letter. When your preschoolers are learning the alphabet, be sure to take every teachable opportunity you can to encourage them to recognize letters in the world around them. If you’re on a field trip, ask the children if they can spot their letter-of-the-week on a street or building sign. If you’re reading a book, see if they can spot the letters you’re reading to them. Keep pushing letter recognition throughout the day, so the lessons can really sink into their memory.
See more on our blog:
- How to teach digraphs to preschool children (6 ways)
- What is the best way to teach word recognition to early childhood readers?
- Why is literacy crucial in the early years? How can parents and preschools help with reading skills?
- How to teach toddlers and preschoolers to count, and learn their numbers
- Ideas for teaching shapes in preschool and daycare
Learning the Alphabet: Printable ABC Packs
I’m so excited to share an alphabet series that my two year old has been using behind the scenes for the last few weeks!
It’s called Learning the Alphabet and is designed to help kids learn letters (upper and lowercase) and their sounds.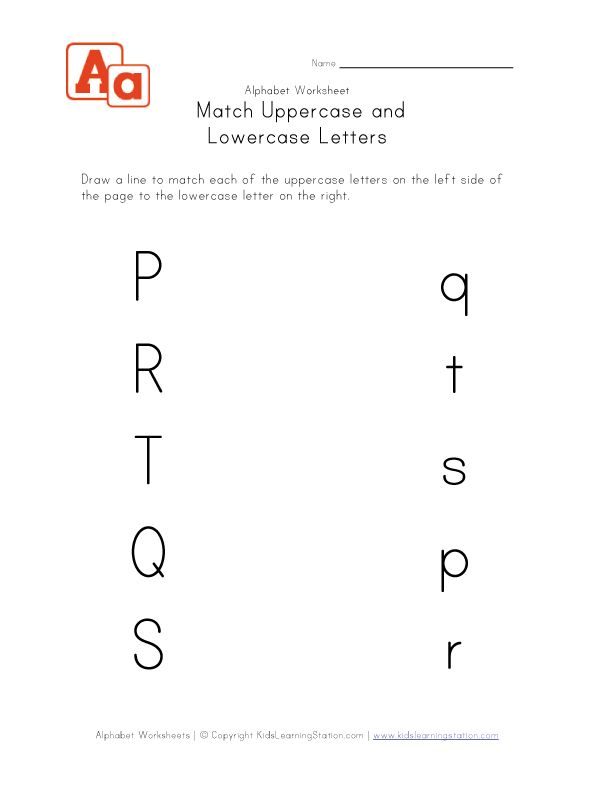 It’s a “prequel” to Reading the Alphabet and contains the same kinds of hands-on activities.
*This post contains affiliate links.
Teaching Young Children the ABC’s
Before I share the specifics, I want to remind all of us that every child is different. The activities included each week were designed to make learning the alphabet hands-on, playful and interactive. Very few of the alphabet activities are “print and go” like you’d find in a workbook.
With that being said, please feel free to adapt the pages as you see fit for your child/students. Follow the lead and interests of your child. This is KEY, especially when teaching young children.
Although the packs are shared for free in ABC order, I actually recommend NOT teaching the alphabet in ABC order. For one, I like to start with the letters in this child’s name to make it more meaningful. This is especially important for reluctant learners.
You can read more of our tips for teaching letters and sounds here.
Learning the Alphabet Activities & Printables
**Please note that the activities share in this post are the activities in the FREE ABC packs. The Bundle Pack has been updated and expanded since this post, so it is more comprehensive. You can read about about the updated activities HERE.**
Today, I’m going to walk you through all the activities included in each of the free printable ABC packs There’s a lot of information here, but I’m hopeful it will be a helpful resource as you use these printables with your child/students.
Read about these supplies for Learning the Alphabet HERE.
1. Simple Alphabet Books
Each pack contains a little book that has a simple image and word below it. Six images are included for each letter. The books can be printed in color or in black and white. NSis really loves coloring, so the black and white is what she prefers.
The books can be read over and over and are a fantastic way to build vocabulary with young children.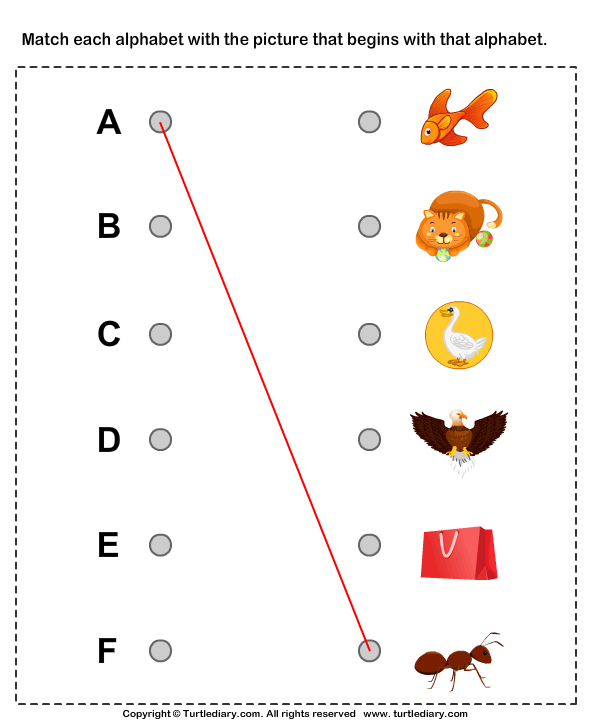 By the 3rd or 4th time through, kids can even “read” it with you!
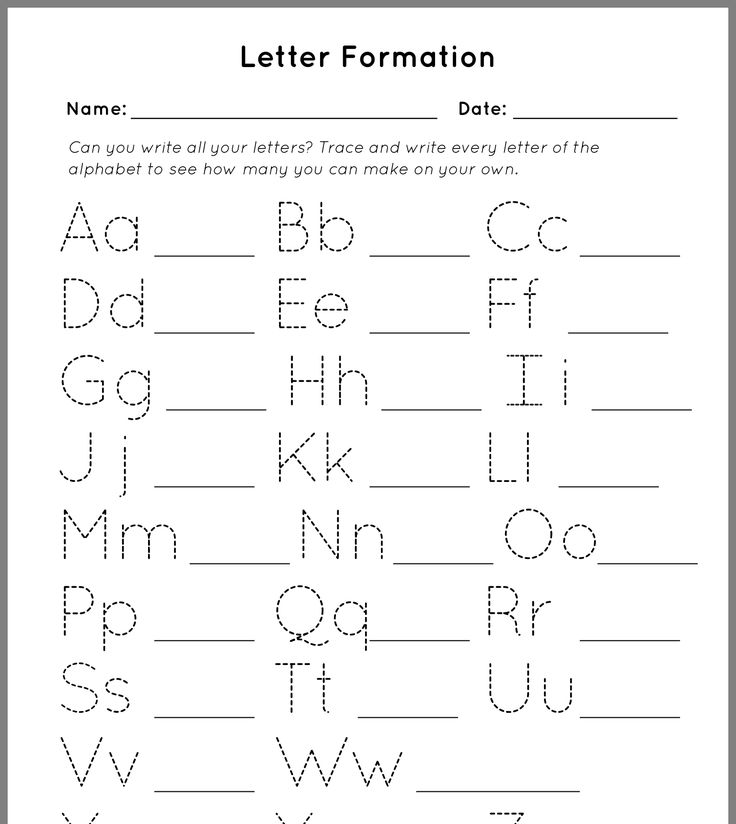
2. Alphabet Tracing Page
These are exactly like the ones you’ll find in our Handwriting Practice Pack, except they match with the clip art from Learning the Alphabet. NSis enjoys these, but we don’t spend a ton of time doing them. I placed all of them in plastic sleeve protectors and created a Handwriting Notebook for her. I let her pull out her notebook when she’d like to “play” with writing.
3. Alphabet Lacing Cards
In both upper and lower case letters, these cards include the six images from the Alphabet Books. I recommend printing these onto cardstock, laminating and hole punching along the edges to make alphabet lacing cards.
These cards are great for letter recognition, letter sounds, and hand-eye coordination and fine motor skills. If your child is very young, be prepared to help her thread the lacing card.
4. Cut & Paste a Letter Sound
This activity features several different skills at the same time, namely cutting, gluing, letter recognition and letter sounds. The large block upper and lowercase letters can be adapted many other ways as well.
If you follow the directions on the printable, first the child cuts the picture strips for the letter. This is similar to the Cut & Pattern activities with Reading the Alphabet, our Pre-K/K Packs, and our Cut it Out! Packs {level 1} except the strips are a bit smaller for smaller hands. Our absolute FAVORITE pair of scissors for young learners is the Maped Koopy Spring Scissors. Seriously amazing because they eliminate a lot of the frustration for young learners.
NSis is still perfecting her scissors skills, but she loves to try. {Notice my fingers are also in the photograph above. She still needs quite a bit of help.} I helps tremendously to print these strips onto cardstock so that the paper isn’t so flimsy.
Once cut out, the images are glued down around the letter. As you glue them down, name each picture together.
You can also take these blank letter pages and adapt them for what your child likes to do. NSis loves our alphabet stamps, so we stamped n‘s in the capital N.
5. Roll and Race!
Instead of your basic upper and lowercase sort, do a little rolling and racing as you climb the letter ladder. Such a simple yet fun game for teaching letter recognition.
Instead of using the letter cards pictured above, you could also use letter stamps, letter stickers or have your child write the upper and lowercase letters in the rungs of each ladder {for those who are ready}.
6. Letter Puzzles
These are simple letter puzzles containing the alphabet pictures with words. The cards can be cut by the child or cut ahead of time.
Mix up all the pieces {12 pieces total} and let your child rematch them. They can also be reworked and glued down the next day. And if you want to make it a little more challenging, also cut the cards vertically to make it four pieces.
7. Roll and Match a Letter Sound
Rolling letter sounds has been a favorite of NSis.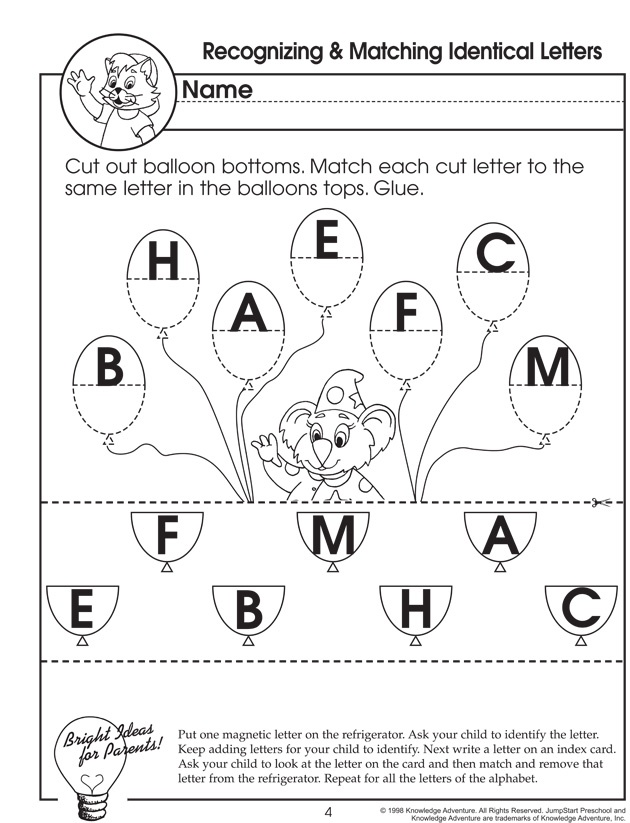 She LOVES our Photo Stacking Blocks and asks to play with the all.the.time. I knew these packs wouldn’t be complete without rolling activities. This one is also very simple, yet is a great way to teach vocabulary.
For her, I print off the letter picture inserts twice. We take turns rolling {really, she throws and/or kicks them} and trying to match the pictures, like alligator/alligator.
To use the blocks for more letters, print off the images you need and insert the same number of images from each letter in each block. For example, if you wanted to compare three letter sounds, insert 2 letter images for each letter each of the blocks.
In the bonus material from the Bundle Pack, you’ll find letter inserts, so you can roll and match letters and pictures. More bonus material is shared at the end of this post.
8. Alphabet Coloring Pages
Yes, I did include an upper and lowercase coloring page for each letter simply because NSis loves to color.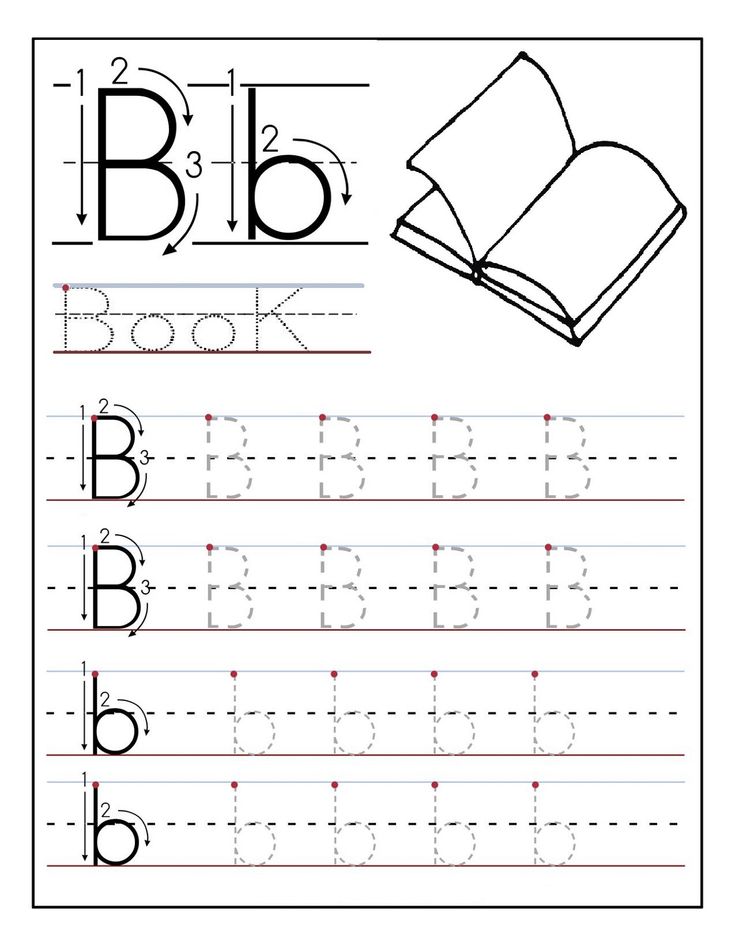
Feel free to use it any way you’d like, such as letting your child paint the pages.
9. Alphabet Do-a-Dot Pages
My advice is to wait to use the Do-a-Dot paint markers with these because you can get multiple uses out of these pages if you
use counters or pom-poms with them
or Power Magnets {she worked this one 5 times in one sitting using the different colors of magnets, all of her own accord}.
You can also use circle stickers.
And, of course, Do-a-Dot Paint Markers. In this pack, you’ll find four different versions of these Alphabet Do-a-Dot pages. Simple ones like those seen above and harder ones featuring both upper and lower case letters.
10. Letter 10-Grid
We love grid games. They cover so many literacy and math objectives. You can read more about with our Alphabet Grid Games.
These are for younger children and feature numbers 1-10. You can re-label a smaller die or print off the 1-3 die template {seen in the image above} found in the bonus material of the Bundle Pack.
11. Alphabet Playdough Mats
These playdough mats are interactive, similar to our Alphabet Playdough Mats Pack, but also get kids to work on recognizing numbers 1-10 and one-to-one correspondence.
I always slip these into plastic sleeve protectors first. Draw a number card and add that many objects to the page with playdough, based on the directions. In the example above, the child is to add bubbles to the fish page.
12. Numbers Pages for 1-10
These number pages are also great for Do-a-Dot Paint Markers, Power Magnets, counters, stickers, or pom-poms. These are similar to the ones in Reading the Alphabet or our Pre-K/K packs, except they are for numbers 1-10.
Place all the number cards in a pile. These are the same number cards used for the playdough mat. I HIGHLY recommend laminating them, as you’ll use them in every pack A to Z.
13. Number Cards 1-10
Included with each letter are number cards 1-10, which can be played with in many ways.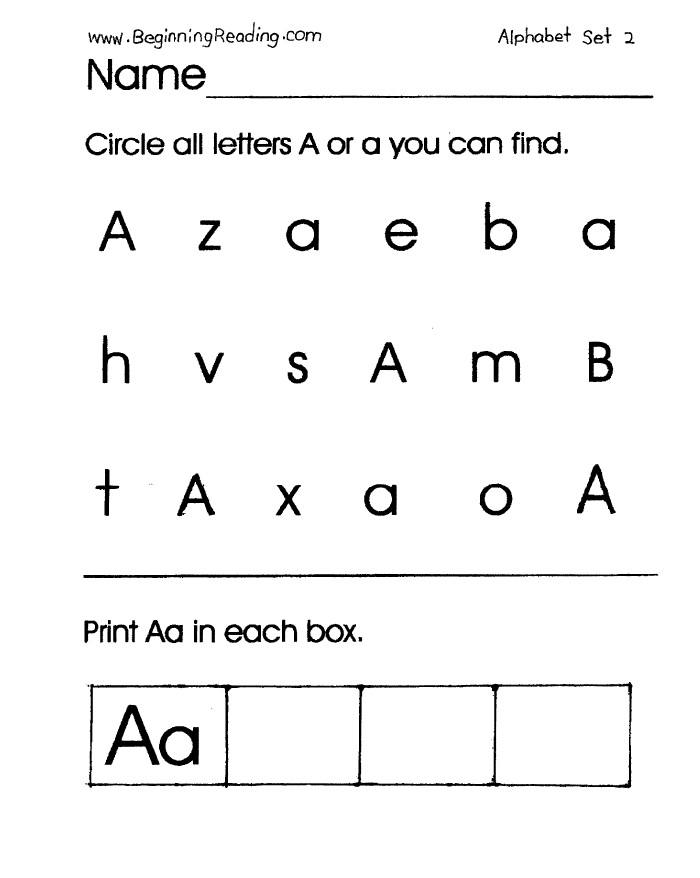
Read the number and practice one-to-one correspondence by adding that many objects to the card. Lay them on the floor and jump to the numbers.
Place them in order 1 through 10. More ideas are included on the Number Card pages.
So there you have it! Whew. I hope that helps to explain what exactly you’ll find in every free letter pack of Learning the Alphabet. Remember you can grab the UPDATED BUNDLE PACK!
There’s an App for Learning Alphabet Sounds!
Alphabet Sounds Learning App has FOUR levels of interactive play designed to extend your child’s understanding of letters and their sounds. It will definitely grow with your little one!
Enjoy teaching!
~Becky
Want MORE Free Teaching Resources?
Join thousands of other subscribers to get hands-on activities and printables delivered right to your inbox!
Learning the alphabet: methods, exercises and games for children
The alphabet is the foundation of reading.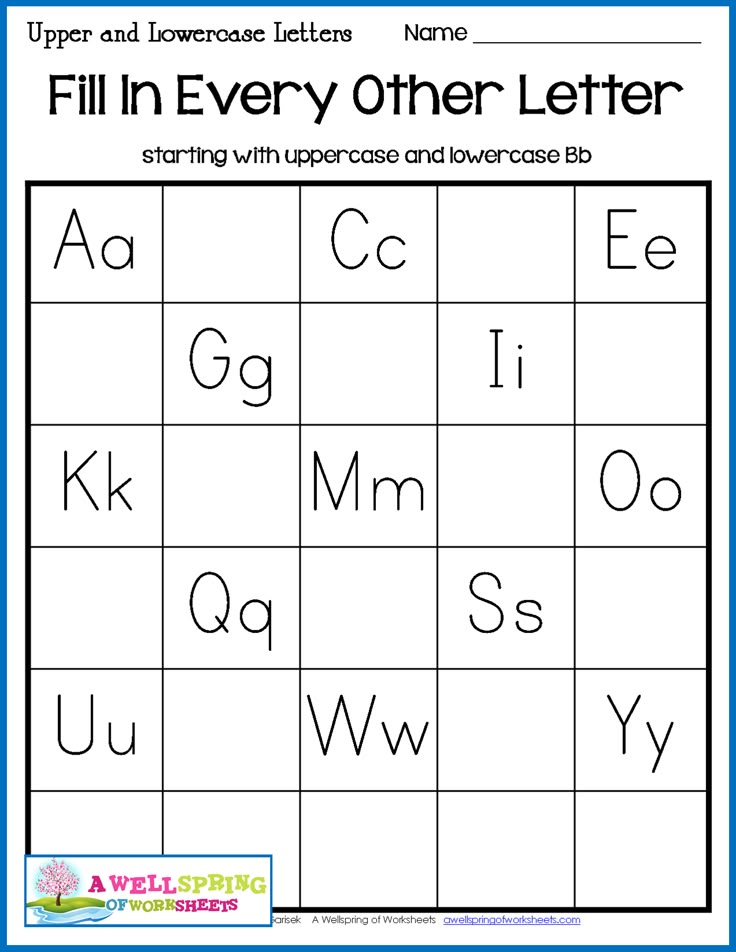 Therefore, before you start reading and writing, teach your children the letters.
Children can start learning to read as early as preschool age. Parents and teachers need to teach their child how to pronounce sounds correctly in their native language. These are important prerequisites for learning letters and learning to read successfully. The educational process of preschool children is based on visual, acoustic and tactile exercises. The use of various channels of perception in the educational process increases its effectiveness and stimulates long-term memorization of letters.
Learning the alphabet: introducing the child to the alphabet.
To master reading, a child must learn and recognize not only the graphic form of letters, but also be able to compare them with their corresponding sounds. This means that the child must be able to write letters and pronounce them. When the child learns to correctly pronounce all the sounds in his native language and distinguish letters by visual form, go directly to reading.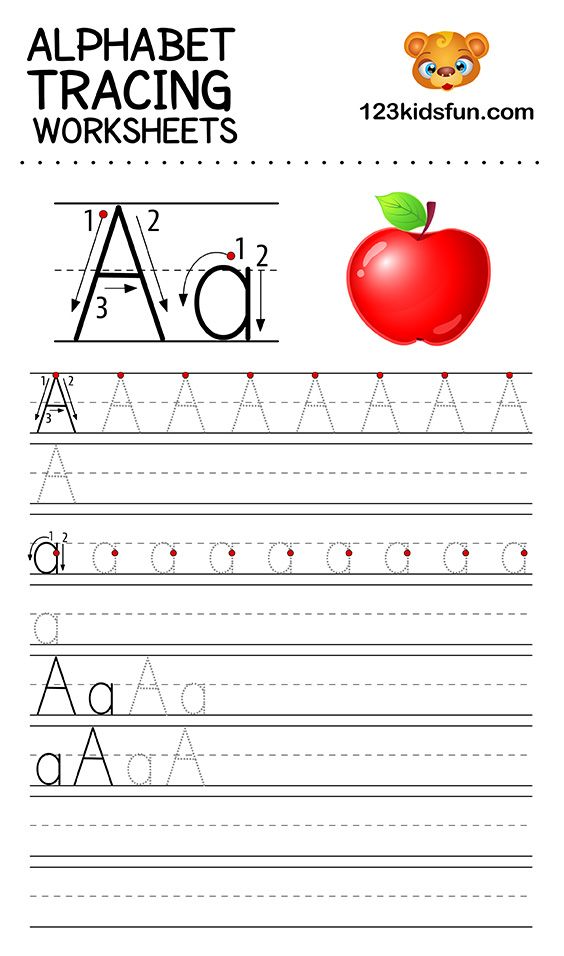 As a rule, at the age of 5-6 years, most children no longer experience difficulties in this.
See also: Reading and bilingualism. Bilingualism in children
From the age of 5 to 6, children begin to understand that there is a lot of information encoded in language using letters. Thus, they are interested in learning to read by then, as they are naturally curious.
Of course, babies can learn and memorize individual letters quite early. However, their interest, mostly spontaneous, is directed to individual words and letters. Here it is important to gently motivate the child by encouraging him to learn through games and a comfortable environment. However, too much pressure can lead to stress, causing little ones to lose any motivation to learn letters.
Alphabet learning games
The first rule of learning the alphabet: learn the letters one by one!
Don't forget, each letter is made up of visually similar elements. If you try to teach a child several letters at a time, he may become confused. Learn the letters one by one. One lesson - one letter.
Second rule of learning the alphabet: take your time!
Give your child enough time for each letter. Plan 1-2 lessons for each new letter. Organize the lesson in a form that is interesting for the child with the help of games.
Tactile method: from studying letters to reading
The child sees something abstract in a letter. Chains of associations will help in learning letters. Associating each letter with something specific or familiar helps the child fix it in his memory.
1. Make a letter out of plasticine
Let's memorize what a letter looks like and develop fine motor skills.
We will need: plasticine (should be elastic), modeling board and a disposable plastic knife.
Together with your child, roll out 8 approximately identical sausages from plasticine.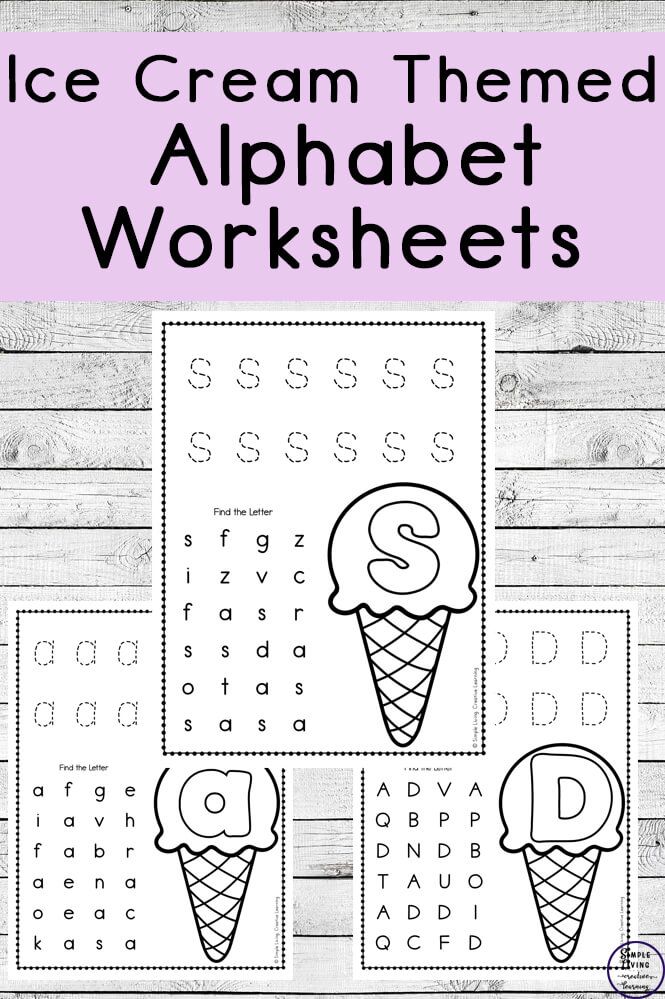 2 - divide in half, 2 - divide into 3 parts. From the remaining 4, make rings by blinding their edges and cut 2 of them in half, creating semicircles. Thus, you should get a set of elements to compose any letters of the alphabet. Show the child a couple of examples and ask them to repeat, collecting previously passed letters.
2. Magic wands
Let's memorize letters, learn how to make letters from sticks, learn how to transform letters.
We need: a set of counting sticks. If not, you can replace with matches or toothpicks.
The easiest way is to lay out letters from sticks according to a pattern or without a pattern (according to the idea). When the child learns to lay out all the letters, you can complicate the task by laying out objects familiar to the child from them, and then ask them to change them, for example, make a figure resembling a door out of sticks, and then ask the child to remove 2 sticks to make the letter P.
3.
 Tactile letters
 Memorize letters and develop fine motor skills
We will need: sandpaper, velvet paper, scissors.
Cut out letters from sandpaper or velvet paper. The child will have to close his eyes to identify the letter by touch.
4. Draw a letter on the semolina
Memorize letters, develop fine motor skills
We will need: bright dish tray, semolina
Pour sand or semolina in a thin layer on the tray. Set an example for your child, show how to write letters on the croup with a finger or a stick. Ask him to write next to the letter, the same as you wrote, to write a letter more or less than yours, to add an unfinished letter, or to erase the extra detail of the "wrong" letter. Children will like this game, just shake the tray a little, and the mistake or inaccuracy made disappears!
5. Mirror letter
Memorize letters and train attention
We will need: cardboard, pencil and scissors
Prepare identical cards cards, 2 pieces for each letter.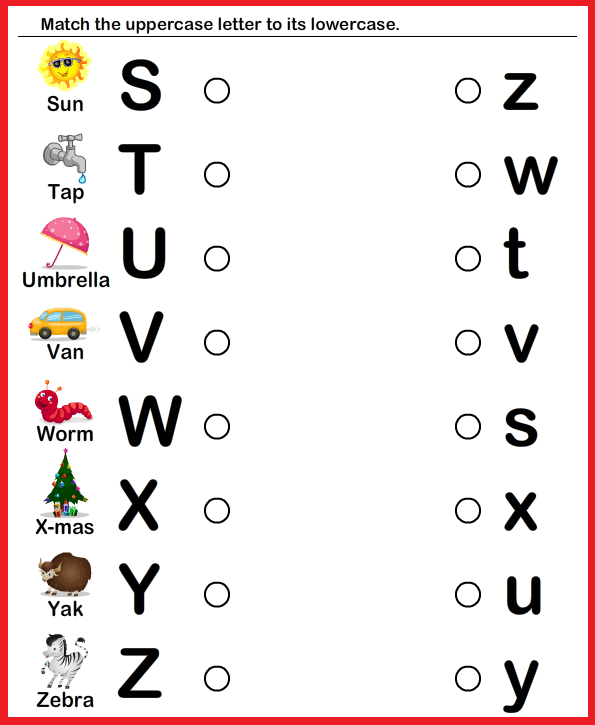 Write 1 letter on each card. Write the letters in mirror image and correctly. Lay out cards with the same letter in front of the child and offer to choose the correct one.
6. Memory test game
Train memory
We will need: scissors, cardboard and a pencil
The game "Memory Test" will challenge even older children. Write each capital letter on one card and lowercase letter on the other card. Turn over all the cards and place them on the table. Ask your child to match uppercase and lowercase letters. You can complicate and add a dictionary element. Have the children match the letter of the alphabet with the picture that starts with that letter.
7. Bean bag
Memory training
We will need: a bag of beans or other bulk material, a tablecloth or a large piece of paper.
If you want to warm up a bit while you study the letters, play a game of Beanbag. Write the alphabet randomly on a large piece of paper.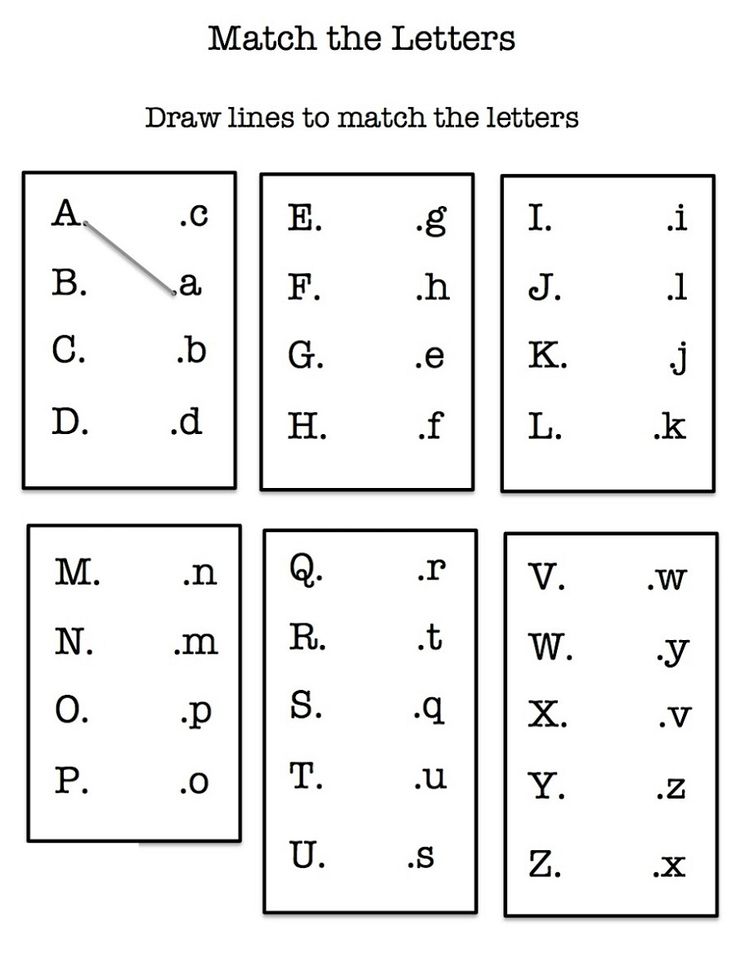 Give the children a bean bag and ask them to put it on paper. The child must name a word that begins with the letter on which the bag fell. If a student is stuck, help him.
Ask the child to check the chosen letter with letters from the alphabet. Be sure to ask the name of the letter. The exercise will help children learn to distinguish visually similar letters and avoid mistakes when writing them in the future.
Drawing, coloring, cutting letters out of paper and gluing them together develop fine motor skills in children. Self-made flash cards with letters facilitate memory and associative thinking, creating the basis for tactile games. You can make postcards alone or with your child. Letters can be cut out of paper of various textures and pasted onto cards made of cardboard or paper. Then you can ask the child to pick up letters from 2-3 cards with their eyes closed.
Literacy begins with learning the letters of the alphabet. Combine different perceptual styles. The alphabet learning games described above help children to learn letters at different levels. Moreover, fine motor skills play a crucial role in the formation of systematic connections in the mind of the child and create the basis for the development of reading and writing.
5 ways to learn the alphabet quickly and easily with a child aged 3-6 — Somersault
Before you learn the alphabet with your child, it is important to understand what you are not going to do. Namely, learning to read. This is a more complex skill, so it is worth putting it off until the time when the child gets acquainted with all the letters and will confidently recognize them and write on their own. Until then, put off the alphabet and reading by syllables.
In this article, we have put together the basic principles to quickly learn the Russian alphabet with a 3-6 year old child in a playful way. For all games with letters, you can use plasticine, paints and any improvised means or magnetic letters - they will easily attract the attention of the child.
Contents:
- Learn the Alphabet Easily: Basic Principles
- 5 ways to learn the alphabet with your child
- From alphabet to reading
How to Learn the Alphabet Easily: Basic Principles
Each child can find an easy way to learn the alphabet that suits them best, but there are basic principles that are important for all children. If you do not follow them, study will turn into drill and the child is unlikely to ever love to read. Here are a few such principles on how to properly learn the alphabet for a child.
- Learn sounds first, not letters . At the first stage of learning, it does not matter how the letters in the alphabet are called correctly. Now only sounds are important for the child - "d", and not the letter "De". The names of the letters will only confuse the child, who first needs to learn to recognize the shape of the letters and their sound.
- Not learning the alphabet in the correct sequence . Until a child goes to school, it is of no use to him to know how the letters are arranged in the alphabet. This information will only distract him from what is really important: how the letters look and sound. The sequence of the alphabet can be learned later or even at school, where this knowledge will be tested by the teacher.
- Do not turn learning into a lesson . Learning from call to call is difficult even for children at school, let alone a baby. Therefore, all learning should take place in a playful way and not for long: 5-7 minutes a day to get acquainted with the letters will be enough. Gradually, this time can be increased, especially if the child likes the proposed games with letters.
- Use material objects . At the age of 3-6 years, the child learns the world by touch and taste. It is difficult for him to work with abstract letters spoken aloud.
 Therefore, it is better to stock up on plasticine and paints and create letters that are more understandable to the child and can be touched. Such a game for children will allow the child to learn the letters of the alphabet and he will recognize them in different forms regardless of what they are made of.
 - First vowels, then consonants . Vowel sounds are easier to pronounce, so it's worth starting with them.
The main thing is not to force anyone. If you see that the child is inquisitive, enjoys exploring the world and is ready to learn, you can move on to learning letters and the alphabet. So the child will be happy to learn the alphabet in a playful way and gradually learn to read. So that the game is not abstract, you can use the magnetic letters TUMBLING.
5 ways to learn the alphabet with your child
1. Use an interesting topic to study
Use the child's interest to spur his motivation to learn. For example, if your kid is crazy about cars, let them be the topic in which you learn the alphabet. Use any words related to cars:
"A" - bus
"B" - trunk
"C" - driver, etc.
You can show cars and their parts, draw or sculpt from plasticine. It is important that the child's focus shifts from learning to doing what they love. Additionally, the method will help expand vocabulary and knowledge about the world.
2. Cross out a letter of the alphabet in the list
Fill in a small square with arbitrary letters. The task is to cross out only the letter that you are studying. This will help the child focus on one letter and not get distracted by the ones he doesn't remember or don't know.
3. Pulling the letters of the alphabet out of the pouch
Magnetic letters , which are soft to the touch, are perfect for this method. Put the letters in a bag and give the child the task, without looking, to pull out only the letter that you thought of. Let there not be too many letters in the bag, otherwise the child will get confused. 6-7 pieces will be enough. To start, use letters that are very different in shape, such as "O" and "M". Gradually, the complexity can be increased and searched among similar letters, for example, "K" and "X". Don't forget to praise and encourage your child. You can alternate the learning process with desktops.
4. Recognize letters of the alphabet by ear
You pronounce a word, and if it contains a hidden letter, the child claps his hands.
With this game for kids, you can learn individual letters or the entire alphabet. For example, you name a word, and the child inserts its first letter into the insert frame. To stimulate your child's interest, you can use only words from his favorite topic, for example, the names of animals.
5. Guess words starting with the first letter
You choose one letter and think of a word that starts with that letter. For example, the letter "Z":
- What is this animal with big ears and loves carrots?
- Hare!
This game form is again suitable for learning individual letters or the entire alphabet.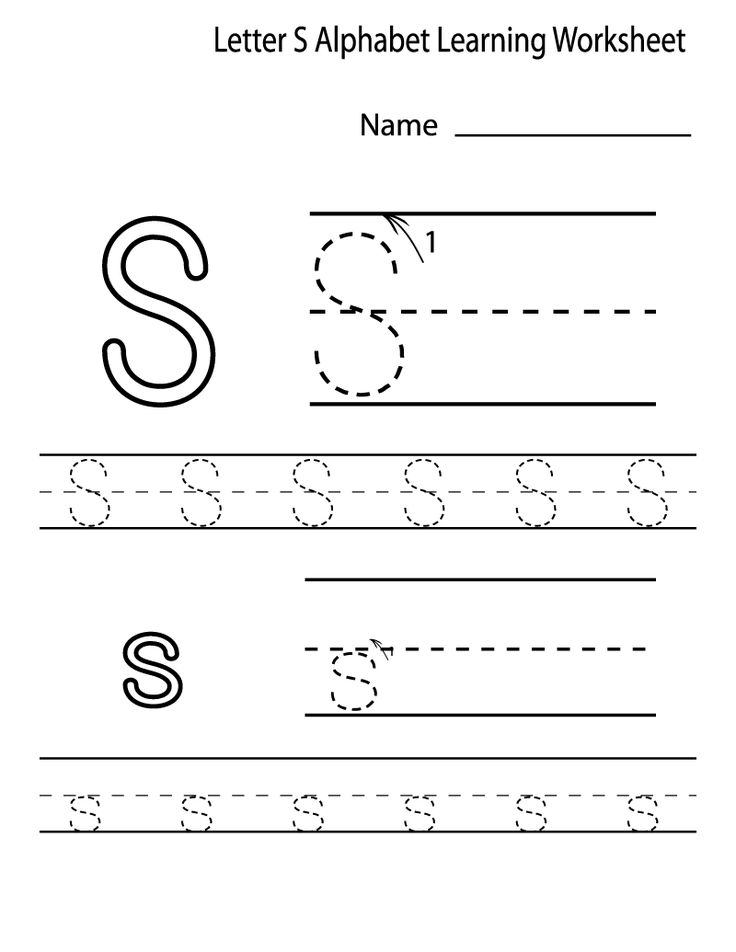 If you learn only one letter, the child gets used to quickly recognizing it in different words. And if you give words with different letters, the child as a whole learns to understand with which letter they begin. With the study of the account and the English language will also help TUMBLING.
From the alphabet to reading
When a child learns the Russian alphabet, confidently recognizes all the letters in different words and can draw or mold them on his own, it is worth moving on to reading. Because you need to learn the alphabet just so that the child can read. If knowledge is not used, it will hang as an extra burden, and by the time school will be forgotten. Therefore, you should not learn the alphabet too early: at 3-4 years old, a child is simply not interested in reading books in order to learn something new. He is more interested when his mother reads. Conversely, by the age of six, the child will be glad to have his own books to read them himself.