On hands learning
What are the Benefits of Hands on Learning?
hands on training and learningWhile educational approaches used to subscribe to a “one-size-fits-all” philosophy, observation, testing, and psychology have revealed, by degrees, a different picture over the last few decades. Different students learn different ways, and forcing all to adhere to a singular style of learning has the potential of limiting two-thirds – or more – of any given class.
At NewSchool, we incorporate hands-on learning and training techniques as an integral part of our teaching strategy in our academic programs. We know that not all students are the same, which is why we incorporate these progressive teaching methods in all of our classrooms. In this article, we’ll explore the benefits of hands-on learning for students, including a variety of learning styles and training techniques that are effective both in and out of the classroom – and how they can serve you in your future career.
What Is The Best Way For A Student to Learn?
‘Best’ is a subjective term, but certain learning styles offer clear advantages over others, depending on the subject(s) of study. Below are several core learning styles commonly practiced in the classroom from grade school to college:
- Visual learning, often called “book” learning, has long been the prevailing method, compelling students to read, remember, and recite the information on a page in reports, tests, and quizzes. This method is most frequently used by teachers during early childhood for school-aged children, where information is traditionally taught using picture books, flashcards, and later, textbooks.
- Auditory learning, most easily observed in the lecture formats of certain college courses, relies upon the student to take in an instructor’s information through listening to them live, or via a pre-recorded session, requiring students to take notes accordingly throughout the process. This form of learning may or may not encourage discussion, depending on the preferences of a given professor.
- Kinesthetic learning is the third and most intriguing of the learning styles, mingling elements of both visual and auditory learning and compelling full participation from the student.
 Named after kinesiology, the study of human movement, it’s most commonly referred to as “hands-on” learning. This blended learning technique is one of the key drivers in trade school learning, as it allows students to become comfortable and familiar with the hands-on processes and skills of what will hopefully become their careers, rather than simply watching or reading about them.
Does Hands-On Learning Work For Everyone?
Barring severe shyness or anxiety, hands-on learning is uniquely positioned to support or elevate any type of learner. Everyone has their own specific needs when it comes to their personal learning style. Students that prefer to listen to their lesson can hear the instructor as they follow along, and those that do well with visuals can watch the instructor, duplicating his or her steps after they’re finished. Rather than a learning style alone, hands-on learning should be a functional part of every lesson plan, if only to familiarize students especially in the design degree and science studies with the models and materials they’ll use later in either professional, post-graduate employment or research positions.
Why Is Hands-On Learning So Powerful?
Hands-on learning (also known as experiential learning) is the biology lab that teaches a future scientist to be comfortable with dissection; the vehicle shop experience that helps a future mechanic understand the nuances of an engine with not just their eyes and ears but also with actual hands-on training. It gives students the opportunity to self-correct any educational missteps in the moment – with professional guidance at arm’s reach. While notes can be copied down incorrectly and the thread of learning can get buried under a teacher that talks too quickly or a poorly-written textbook, live examples of core concepts are registered in the brain as holistic experiences, giving the student’s mind more “anchors” to tie the memory to.
The sound two materials make when they’re joined together, the scent of a certain solvent, the vivid color of a particular plant leaf – these all become easy-access sensory “bookmarks” for bringing the memory to the surface when it needs to be reviewed. This works for every field of study as well, not just the sciences – that’s why so many condensed “how-to” courses use the format. People simply learn better when they’re allowed to roll up their sleeves and experience the subject matter in a simulation, rather than being distanced from it by a third-hand narrative experience or a dry passage of text.
How Does Hands-On Learning Help A Career?
While learning should ideally translate perfectly into practice, the reality is that it seldom does. Just as someone who may have only read a particular word in books might mispronounce it the first time they speak it aloud, self-focused learning methods may not reveal mistakes until the stakes are high. Particularly in fields where physical precision is important – manufacturing, architecture, medical studies, and so on – these innocent mistakes can become big problems if they aren’t identified and addressed beforehand. Hands-on learning helps instructors recognize and correct these mistakes while still in the learning process, dramatically reducing the chances of the same mistake cropping up after the training course is finished.
Hands-on learning also provides a student with the opportunity to safely make mistakes and learn organically through trial and error. Rather than experimenting when a job is on the line, they can experiment with new ideas and satisfy curiosity at their own natural pace without worrying about damaging an important project. This allows them to practice their critical thinking skills and utilize the knowledge they’ve accumulated during their training program. Humans naturally learn by making mistakes and determining how to either fix or avoid them, and the more times the cycle is repeated, the better a student becomes at meeting those challenges without hesitation. To put it another way, practice makes perfect!
Transferring Hands-On Learning From Classroom To Workplace
As most recent college graduates learn “the hard way,” life in the real world has very few things in common with life in the classroom. Real-world situations aren’t usually clear-cut or easily solved, a variety of different factors need to be considered and weighed, and sometimes real-world solutions – while they do work – aren’t very tidy. Hands-on learning can help lessen the imbalance between academia and employment by familiarizing students with the environments they’ll be confronted with.
An employer isn’t, for example, likely to hand a worker a document and give them a multiple-choice quiz on it a week later. Far more plausible is a sudden emergency situation that needs to be addressed, with little time to consider options and actions – therein lies the value of the hands-on experience. Such learning exercises can enable a virtual walk-through of actions and reactions, as hypothetical circumstances can be emulated and practiced by imposing time limits. Instructors may also wish to “surprise” students in the form of hands-on exercises, presenting them with unexpected problems and unique materials to work with.
Depending on the length of time spent in a hands-on environment and the complexities of the lessons, students may also be able to list certain experiences on their resume. For example, bullet points such as these could pique the interest of employers that might otherwise pass over a candidate without time “on the job”:
- Worked with (X) program/machine/tool/material several times a week.
- Built (X) in conjunction with a team of 5 students.
- Developed (X) from raw materials in accordance with the (X) method.
- Solved (X) problem using only (X) materials.
How Does Hands-On Learning Help Students?
Properly structured, hands-on learning encourages students to think outside of the proverbial box, coaxing them to experiment with and explore the problems, tools, and substances they’ll work with regularly in their chosen careers.
From an educator’s perspective, this learning style also offers a welcome respite from the rote repetition of “book learning” or lecturing. No teacher likes to think about it, lest their teaching confidence slip, but the fact of the matter is that adults do have a limited attention span, even when they’re earnestly trying to pay attention. The sound of an instructor’s voice may become a drone after an hour of class, or the words in a passage of text may blur together as eyes become tired or the thought of lunchtime intrudes. Legs and backs may get restless from sitting in place, and thoughts drift as students become a passive – rather than an active – participant in their classroom experience. Gossip and private conversations can become a distraction as students away from the front row seek alternate stimulation during class hours.
Hands-on learning uproots this tired, traditional classroom instruction, allowing students to move, discuss, interact with, and truly engage with in the lesson. Rather than bored teammates simply waiting for their proverbial turn at bat, they are instead immersed in the actual functional points of the task, figuratively getting their hands dirty with the materials, techniques, and concepts being taught. Rather than a chore – listen, take notes, remember – it becomes that magical organic experience and students retain it the same way they would visiting a museum, or trying a new type of food. It’s interesting, and thus the subject matter becomes easier to recall and more enticing to explore.
No restless legs, no wandering thoughts, no dozing off during class – instead, they get to tackle challenges alongside classmates, delving into a “gamification” structure that encourages – or even directly endorses, depending on the instructor’s techniques – competition as each student attempts to be the first to create a result, or otherwise answer a challenge using their materials.
How Should Students Prepare For Hands-On Learning?To receive the most benefits out of this valuable teaching method, students should arrive to each lesson ready to explore the projects and components in front of them. That means:
- Familiarizing themselves with any safety procedures beforehand
- Ensuring they have any necessary personal protective equipment (PPE) ready to use
- Arriving on time, so as not to miss preliminary show-and-tell steps
- Using hands-free recording devices so they can focus on doing rather than note-taking
- Never missing a class (barring emergencies) so that they always feel comfortable with the current expertise level being demonstrated
- Getting enough sleep and eating/drinking before class to keep the mind sharp
- Setting aside extra time before or after a class to work with an instructor on any problem areas
Hands-on learning is an incredibly powerful tool, but it won’t replace traditional learning entirely. While it’s beneficial to get excited about hands-on sessions in your field of study, don’t neglect reviewing your notes, or collaborating with peers to ensure you understand important concepts. If you feel like you understand your hands-on session well but struggle with test and quiz concepts, be sure to confer with your instructor to bring your learning experience back into balance. Just as all students learn in different core methods, their ideal mix of the three learning methods will vary as well.
How Does Hands-On Learning Work In Groups?
Just as employees are directed to work in teams on important job projects, hands-on learning typically incorporates group work as well. To ensure the best experience for all students involved, each participant should be aware of his or her contributions and time spent with materials, stepping back to give others ample experience as well. While it’s normal and understandable to get into a groove while problem-solving a hands-on challenge, if you’re placed in a group, remember that your teammates are counting on you to support them as well.
Hands-on learning is a decidedly personal experience, but it should also be a communal one whenever possible – you’ll need to work well with others in an employment position, after all. Instead of allowing impatience or a competitive streak to spoil the experience, consciously spend time watching how others interact with the same problems you may already know how to solve.
- Did they use the materials in unexpected or unfamiliar ways while still solving the issue?
- Did they use more or less of a material than you would have done yourself?
- Did they tackle a certain step with more expertise than you’ve been able to? How?
- What did they struggle with while trying to solve the project or scenario?
Remember: if you allow your eagerness to get to the hands-on portion of learning eclipse your desire to learn, you could be missing important additional lessons from your classmates’ experiences with hands-on materials. You could even learn a new skill from them. Treat your classmates as part of the hands-on lesson – though not literally, of course. Ask them about their experiences with your mutual materials and tools, and don’t be afraid to ask them to demonstrate techniques they’re particularly skilled with to learn from them.
Hands-on learning is a rewarding way for students to explore, retain, and experiment with all aspects of their chosen field of study, particularly at the collegiate/trade school level of career development and education. The potentials are essentially limitless, and the amount of preparation and confidence this method offers can’t be overstated. Even if a student struggles to pay attention to a spoken lecture or a lengthy text, they could find true academic breakthrough on the other side of a hands-on lesson. The most challenging career fields demand expertise, and one of the best ways to acquire it is to reach out and grab it – quite literally – with hands-on learning.
For more information on NewSchool’s hands-on learning philosophy, and opportunities for design scholarships contact our Enrollment Team!
In this article:benefits of hands on learning for students benefits of hands on learning in the classroom hands on learning style what are the benefits of hands on learning?The Latest News-chool
Find your place at NewSchool in 2023. APPLY NOW
The Importance of Hands-On Learning in Child Education
Hands-on learning has long been touted by parents and educators as a key factor in raising children who develop a lifelong love of learning and who perform better academically. But what exactly do we mean when we say “hands-on learning,” and why is it so beneficial to students? Here, we explore both the concept and the benefits.
What is hands-on learning?
Hands-on learning is a form of education in which children learn by doing. Instead of listening to a teacher or instructor lecture about a given subject, the student engages with the subject matter to create something or solve a problem.
Free Downloadable Guide: Take a Closer Look at Friends' Central School
Though certain subjects come to mind more readily than others when talking about hands-on learning (for example, shop class), the truth is, a hands-on educational philosophy can be incorporated into nearly any subject matter. This philosophy provides students with engaging hands-on experiences that will further develop the learning process. A few examples might include:
- Solving problems as a part of math class
- Completing a lab experiment as a part of a science class
- Building circuits or working machines as a part of a tech class
- Recreating a historical document or artifact as a part of history class
- Writing a creative story, poem, or essay as a part of English class
The benefits of hands-on learning
Hands-on is by no means a “new” movement in the classroom. That being said, even today, many schools find it difficult to incorporate hands-on projects and principles into student work. This can be a particular challenge for public schools, which often have tight budgets and less freedom in developing curriculum.
And that’s a real shame, because hands-on learning brings so many benefits to students, including:
- It is a more engaging way to learn
- Leads to increased retention
- Offers practice in problem solving and critical thinking
- Often results in a physical creation
1.
 Hands-on is another way to learn.
Hands-on learning allows for equal visibility of common learning styles in the classroom. Some children learn best by looking at visuals, some by listening to a parent or teacher speak, and some by reading and writing about a given topic. These are called visual, auditory, and reading/writing learning styles, respectively. But there is a fourth learning style that is easy to overlook: Kinesthetic learning, which is a fancy way of saying “learning by doing.”
There are a lot of theories about why hands-on learning is so effective. The reality is, there is no single reason why. But one hard-to-argue fact about hands-on learning is this: It is incredibly engaging.
When students are forced to do something, they are engaged in active learning. They’re practicing their critical thinking skills and they’re putting their knowledge to the test. Most importantly, this form of learning gives opportunities for students to actively create knowledge, instead of passively consuming it.
In order to create, in order to do, students must be engaged in their education. And engagement has for years been linked to greater academic success like increased test scores and greater academic achievements.
2. Hands-on gives students practice.
Beyond simply leading to better engagement, hands-on learning allows students to practice the skills that they've already learned. As anyone who has ever learned a skill or learned information can attest to, the more practice you get, the better you will be at that skill, and the better you will be able to retain the information.
We can see this in action in many science classes around the country, which pair traditional study (lecture, discussion, reading) with active learning concepts in lab sessions. While students may learn about a concept in the classroom, it is by walking through an experiment in the laboratory that they are able to put that concept into action and gain practice in actually applying it. This process has been shown to lead to higher retention and a better understanding in the subject.
3. Hands-on gives students something “real.”
When it comes to education, one of the most difficult things for young children to understand is how what they are learning is important. They want to know: When will I use this in my life? Why does it matter?
Incorporating hands-on learning into the classroom or into the home is an easy way for parents and teachers to show their children exactly how what they are learning can be used in the real world.
Through hands-on learning, students will often actively create something, whether an essay, story, piece of art, construction project, or something else. This is something real. It is something that a student can look at and think: I was able to create this because of what I've learned and because of the skills that I've practiced.
Project-based learning can make this realization incredibly empowering because it shows students that they can have an impact on the world around them. It shows them that they can use their education to achieve something. And it’s a physical embodiment of what they’ve learned.
4. Hands-on lets students be creative.
Creativity is a muscle. Just like other muscles, it needs to be regularly exercised or else it will become harder and harder to be creative. Hands-on learning gives your child one more opportunity to exercise their creative skills so that they don’t lose them.
It’s important to note that when people hear the word “creativity,” their minds often go immediately to subjects like art and music. While these are of course important classes for children, and should play a role in your child’s education, they’re not the only way that your child can be creative. Given enough practice, it’s possible for your child to put their creativity to use in classes as diverse as history, science, and even math.
You might be wondering how that could be. To answer simply: Creativity encourages children to develop a new way of thinking about something. This new way of exploring a concept or idea can lead to insights that may otherwise have been hidden. For example, your child may have learned to complete a math problem in a certain way. But that doesn't mean it’s the only way that the problem can be solved. A creative student may look at a problem and find a brand new way of completing it.
What can parents do to encourage hands-on learning in their children?
When children are young and at home, parents have more control over how their children learn. At this stage of a child’s life, it’s important for parents to encourage hands-on activities that will challenge their child to learn through doing.
As a parent, there are various steps you can take to facilitate these yourself. You might, for example, encourage your child to create a diorama illustrating a critical scene from their summer reading assignments. If your child is an aspiring coder, there are many resources you can turn to online (or purchase from a store) to let them practice their skills. The possibilities really are endless.
But when a child moves beyond the home—entering a nursery program, preschool, kindergarten, or grade school—parents who prioritize hands-on education will need to find a school that shares this priority. In addition to evaluating the school’s curriculum and asking questions during the admissions process, parents should also keep an eye out for schools that embrace Maker Education, which encourages learning through doing and offers many other benefits similar to hands-on education.
Handstand training - broscience — LiveJournal
Translation: republicommando
Checking: You
What is the thought that comes to mind when someone easily gets on their hands in front of you? Most likely, you will think:
"This is skill!"
"What strength and coordination."
"Wow, how cool." nine0018
Unfortunately, most people's mind immediately goes, "I can't learn this even in a thousand years!"
"I'm afraid I'm going to crash. "
"
"I'm not strong enough."
"I weigh too much, my age is not the same."
So, what if I say that not only you can, but it will take much less time? Will you argue with me that you will never stand on your hands?
Luke: I don't believe it! nine0003 Yoda: That's why you can't.
Once you believe you can, you will start to succeed. And quite quickly - I usually put newbies on my hands in just two months.
Just two months to reach a goal they once thought impossible.
Muscle strength is not the issue
Most Padawans believe that strong muscles are necessary for the handstand.
And again we turn to the wisdom of the Master. He already knew what he was talking about, as he coped with the larger and more powerful Sith. nine0008
“Size doesn't matter. Look at me. Do you judge me by size? - Yoda
In fact, to stand on your hands, you do not need to be super strong and muscular. Of course, a certain level of fitness is necessary: one must be able to hold the body upside down, relying only on the palms. But don't be sad! You will quickly gain this strength by exercising regularly.
Even if you are given a seat on a vehicle due to your advanced age/weight, it will only take a couple of months to reach the required level. nine0005 (AUTHOR'S NOTE: But if you are more than 20 kilograms, I recommend that you first start losing weight.)
After that, the handstand submits to you, and then you need to train not for strength development, but for skill. Here's what you MUST do - practice the stance by improving technique, which can only be achieved with high-quality repetition.
. (As opposed to developing muscle strength, where you have to work hard and rest a lot in order for the body to recover). nine0008
The process of mastering the handstand is more like learning to play the piano than training with iron: the more practice, the better you get.
So getting up on your hands only once a week is a bad idea. Even three classes - not very much. Since you need to develop a skill, it is best to practice a little bit daily (at least 5 minutes a day).
Habit must be developed
Luke could drop everything and fly off to the Dagoba system to fully focus on his studies… but you probably won't have that much free time. Therefore, you need to develop a regular habit that will become an indispensable part of your daily life.
The first and most important step is to decide what you really want. Take a sheet of paper and write large: "I WILL stand on my hands without any wall." Hang it on the fridge so you can see more often. And just do it.
"Do. Or don't. Don't try" - Yoda
Now that you have officially declared your goal to yourself, you need to make a plan and strictly follow it. This is your Jedi challenge to work on handstand for 5 minutes daily for four weeks of .
Just 5 minutes. And only. You can do more if you want, but that's enough. Anyone can free 5 minutes for such an important matter. Some people admire the mirror for longer…
Fear, which one must overcome
“Fear is the path to the dark side of the Force. Fear leads to anger. Anger leads to hatred. Hatred leads to suffering” - Yoda
Usually, when handstand is taught, almost none of the instructors tell you how to deal with fear. Which is strange, since over 90% of my students initially leaned towards the Dark Side ... People don't stand on their hands simply because they are afraid to fall.
Victory over fear is an essential element of handstand training. nine0006
Like every decent Jedi, you need to recognize your fears and get rid of them.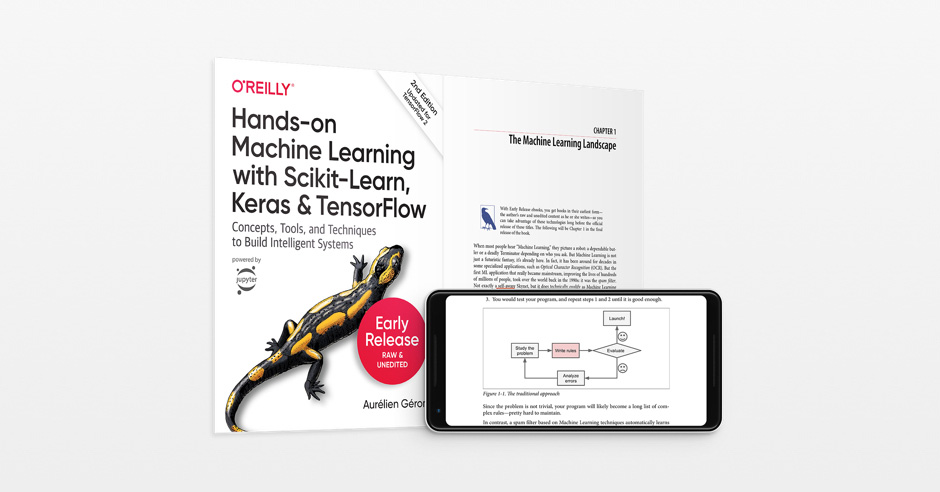
Fear cannot be ignored. Here, Luke did not finish his training and flew away from Yoda too early, without learning everything he needed to. What is the result? He lost his arm and almost died!
Don't be reckless Luke!
Fear is the reason that Luke nearly died in Cloud City.
Fear is the reason that you have never tried standing on your hands before.
Fear is the reason that you may not move from reading these words to action.
To master the handstand, you have to conquer your fears.
There is no other way.
Rack Fears
Now for the good news: overcoming hand resistance is a lot easier than you might think. nine0006 Pictured above is my client, who used to get dizzy with disorientation; but in two months I put him in my arms.
The key to success lies in a systematic and smooth transition to the inverted position.
First, let's separate two fears: the fear of falling and the fear of being upside down.
Fear of turning over
Is it so scary that your arms buckle? Are you afraid to hit your face on the floor? Or just go crazy when it turns upside down? nine0008
This is quite common - but there is hope. You can deal with this fear absolutely painlessly, without exposing yourself to any risk.
We'll go through a simple progression starting with a regular plank. What's so terrible about her? Feet on the floor, palms on the floor. The floor doesn't jump out from under you. There is nothing to fear.
Now move back to the wall. Take a step with one foot on the wall, then the other. Move your hands a little closer. A little more. More. Gradually you will find yourself standing on your hands with your feet against the wall. And you don't fall. nine0008
Take your time: Gradually transfer as much weight as you can onto your arms and shoulders. Strength will grow, and fear will disappear!
Fear of falling
Is it scary that, having pushed off with your feet properly, you will roll over and fall on your back? Do you have such strong legs? Or are you afraid that, quite normally, getting up on your hands, you will lose control and even then you will fall and hit something painfully? And if you fall not on a hard floor, but on a soft feather bed? Will the fear disappear? nine0008
Eliminate the possibility of such a fall.
You need to learn how to properly rise on your hands and properly lower yourself [further in the article - approx. transl.], if something went wrong. Sounds too simple, but trust me, is really that simple. When you learn, this fear will disappear without a trace.
How to learn to stand on your hands
So, when you have accepted both fears and decided to overcome them, you can start learning! nine0006
If you have ever been taught to stand on your hands, you probably remember different instructions. How to position the palms, how to hold the body, where to put the head and a million other details.
"You must unlearn what you have learned" - Yoda
The path to the handstand is surprisingly simple, and it begins with FORGETTING all previous instructions. And then you move on to this proven four-step progression.
Step 1 - 60 Second Wall Plank
Start with a regular plank against a wall, feet flat on the floor, palms directly under shoulders. If you can stand like this for a minute (5-8 long breaths), then rearrange your hands a little back, raising your legs alternately on the wall. Watch the sensations in the carpal, elbow and shoulder joints - you need to stand confidently.
Gradually increase the duration to 60 seconds.
Regularly repeating this exercise, come closer to the wall with your hands (raising your legs higher), at least one centimeter. nine0008
With such small steps you will control your position all the time and smoothly move on, getting rid of fear .
At the same time, you will see how you gain strength and better control your body, which is also very useful to feel.
Step 2 - 60 Second Handstand with Support
As your hands get closer to the wall, your plank becomes a handstand. Remember that you must control your position at all times without any risk of falling. (If you start to stagger, move your arms a little further away from the wall to regain your position with confidence. ) nine0003 You need to approach the wall at a distance of about 30 cm.
This position must also be held for 60 seconds before moving on to the next phase.
This will take more training, but one day you yourself will be amazed to find that you can stand a minute in a rack against a wall without any difficulties and fears.
It's practically a handstand... but you're not afraid of anything anymore. Why be afraid? You gradually come into this position, there is nowhere to fall. nine0003 And this step prepares you for the next - the most important.
Step 3 - Pirouette Landing
"Control. Control. You must learn control" - Yoda .
In order not to be afraid to fall, you need to learn how to lower yourself correctly - pirouette landing.
Landing, like getting into a handstand, is also a skill. You can practice it just as often against the wall without any risk.
Standing on your hands against the wall, transfer the weight to the left hand (support) and move the right hand away from the wall. With your left foot, continue to lean against the wall for now, and take your right foot away, turning around. Gravity will pull it down - and here you are standing with your right foot on the floor. Where is it easier?
Once you have mastered this way of getting out of the stance, the fear of falling on your back will leave you. The higher the control, the less negative emotions will remain in your body. And you don't even have to use the Force like that Skywalker cheater. nine0008
Stage 4 - Kick Off and Unsupported Stand
After mastering the pirouette skill, you are ready to master the full handstand. The easiest way to get into it is to take a stance against the wall and lightly push off with your feet, balancing on only your hands.
Once you've completely conquered the stance next to the wall, it's time to learn to get upside down with the push off. Instead of stepping gradually (as in Step 2), approach the wall facing the wall and, bending down and placing your hands in front of it, push off with one foot. No need to jump on the wall, just push off with one foot properly. At the same time, the arms should be straightened and tense so as not to tuck their nose into the floor. Practice this to determine how much force to push off with. Ideally, you should get up on your hands without touching the wall with your feet (but while you are learning, the wall is in place to support you!)
Over time, you will get better and better at push-off against the wall, and eventually feel confident enough to try handstand in the middle of the room.
After conquering this stage, you will be able to fearlessly stand on your hands anywhere.
It's all just a matter of time... 5 minutes every day.
But what to do if, when trying to stand on your hands not against the wall, you push off too hard? Pirouette landing - you have already worked it out. Having reached this stage, you will no longer be afraid of anything, because you know how to do everything. Too easy? The way it is. nine0008
Start learning now
Make the decision to learn handstand right now while you are inspired. In any house you can find a free wall (or at least clear a place for a while). Start with planks and see how far you can walk up the wall without fear.
Only 5 minutes. Do it. Instead of looking at yourself in the mirror.
Even if you can "only" start with a regular plank floor, this is a GREAT first step. nine0003 You have a long journey ahead of you and excellent achievements.
Tags: training
Learn how to stand on your hands. Manual - CMT Scientific approach
“Do it. Or don't. There is no "I'll try" - said Yoda. Using the Jedi techniques described below, you can easily learn to stand on your hands. For starters, the most important thing is to believe.
What thought comes to mind when someone stands up easily in front of you? Most likely, you will think: “This is skill!” nine0008
Unfortunately, for most people, the mind immediately continues: “I can’t learn this even in a thousand years!” / “I’m afraid I’ll crash” / “I don’t have enough strength” / “I weigh too much, age is no longer that".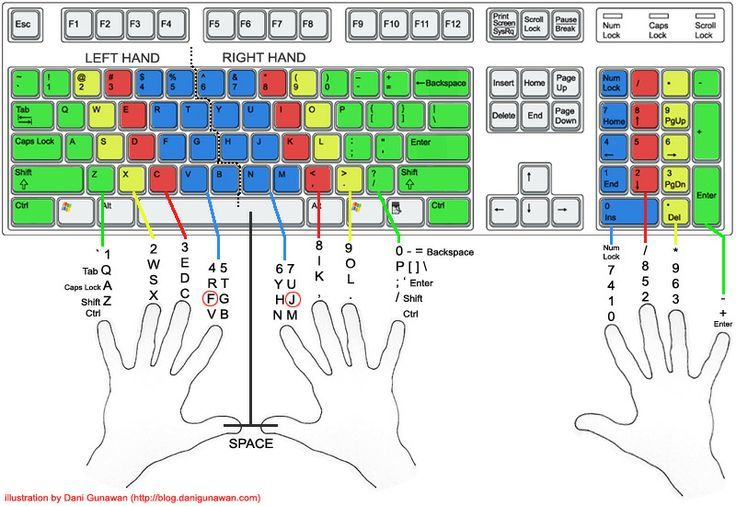
So, what if I say that not only will you be able to, but it will also take much less time? Will you argue, convincing me that you will never stand on your hands?
Luke: I don't believe it!
Yoda: That's why you can't.
Once you believe that you can, you will start to succeed. Moreover, quite quickly - I usually put newbies on my hands in just 2 months. Just 2 months to reach a goal they once thought was unattainable.
Muscle strength is not the issue
Most Padawans believe that strong muscles are necessary for the handstand.
And again we turn to the Master's wisdom:
“Size doesn't matter. Look at me. Do you judge me by size? - Yoda. nine0008
In fact, you don't have to be super strong and muscular to stand on your hands. Of course, a certain level of fitness is necessary: one must be able to hold the body upside down, relying only on the palms. But don't be sad! You will quickly gain this strength by exercising regularly.
Even if you are given a seat on public transport because of your advanced age/weight, it will only take a couple of months to reach the required level. (Author's note: But if you're 20 pounds overweight, I recommend losing weight first.) nine0008
Fortunately, skill development is not that tiring and progress is directly related to training frequency. (As opposed to developing muscle strength, where you have to work hard and rest a lot in order for the body to recover).
The process of mastering the handstand is more like learning to play the piano than training with iron: the more practice, the better you get .
So getting up on your hands only once a week is a bad idea. Even 3 lessons is not very good. Since you need to develop a skill, it is best to do a little bit daily (at least 5 minutes a day) .
It's a habit to develop
Luke could drop everything and fly off to the Dagoba system to focus entirely on his studies. .. But you probably won't have that much free time. Therefore, you need to develop a regular habit that will become an indispensable part of your daily life.
The first and most important step is to decide what you really want. Take a piece of paper and write large: "I WILL STAND ON HANDS WITHOUT A WALL." Hang it on the fridge so you can see more often. And just do it. nine0008
“Do it. Or don't. No need to "try" - Yoda.
Now that you have officially declared your goal to yourself, you need to make a plan and strictly follow it. This is your Jedi challenge - work on the handstand for 5 minutes daily for 4 weeks.
Just 5 minutes. Only. You can do more if you want, but that's enough.
Fear, which must be overcome
“Fear is the path to the dark side of the Force. Fear leads to anger. Anger leads to hatred. Hatred leads to suffering.” - Yoda nine0008
Usually when handstand is taught, almost none of the instructors teach how to deal with fear. Which is strange, since over 90% of my students initially leaned towards the Dark Side ... People don't stand on their hands simply because they are afraid to fall.
Conquering fear is an essential element of handstand training.
Even if you have already decided everything for yourself and doomedly began to train, fears can manifest themselves and hinder progress. Like every decent Jedi, you need to recognize your fears and get rid of them. nine0008
Fear cannot be ignored. Here, Luke did not finish his training and flew away from Yoda too early, without learning everything he needed to. What is the result? He lost his arm and almost died!
Fear is the reason Luke nearly died in Cloud City.
Fear is the reason why you have never tried standing on your hands before.
Fear is the reason why you may not move from reading these words to taking action.
To master the handstand, you have to conquer your fears. nine0322 There is no other way.
Rack Fears
Now for the good news: overcoming hand-to-hand phobia is a lot easier than you might think. Pictured above is my client, who used to get sick with disorientation; but in two months I put him in my arms.
The key to success lies in a systematic and smooth transition to the inverted position.
Let's first separate two fears: the fear of falling and the fear of being upside down.
Fear of turning over
Is it so scary that your arms buckle? Are you afraid to hit your face on the floor? Or just go crazy when it turns upside down?
This is quite common. But you can deal with this fear absolutely painlessly, without exposing yourself to any risk.
We'll go through a simple progression starting with a regular plank. What's so terrible about her? Feet on the floor, palms on the floor. The floor doesn't jump out from under you. There is nothing to fear. nine0008
Now move back to the wall. Take a step with one foot on the wall, then the other. Move your hands a little closer. A little more. More. Gradually you will find yourself standing on your hands with your feet against the wall. And you don't fall.
Take your time: gradually transfer as much weight as you can onto your arms and shoulders. Strength will grow, and fear will disappear!
Fear of falling
Is it scary that, having pushed off with your feet properly, you will roll over and fall on your back? Do you have such strong legs? Or are you afraid that, quite normally, getting up on your hands, you will lose control and even then you will fall and hit something painfully? And if you fall not on a hard floor, but on a soft feather bed? Will the fear disappear? nine0008
Eliminate the possibility of such a fall.
You need to learn how to get up on your hands properly and how to get down if something goes wrong. Sounds too easy, but trust me, it's really that simple. When you learn, this fear will disappear without a trace.
How to learn to stand on your hands: 4 stages of learning
So, when you have accepted both fears and decided to overcome them, you can start learning!
If you have ever been taught to stand on your hands, you probably remember different instructions.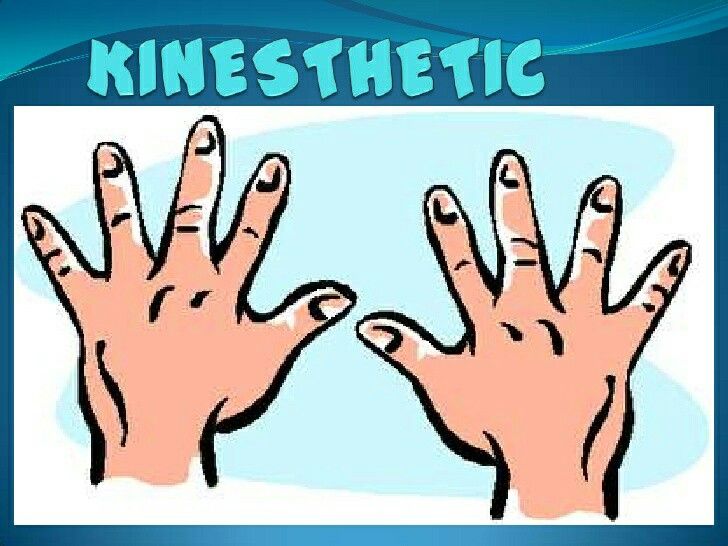 How to position the palms, how to hold the body, where to put the head and a million other details. nine0008
"You must unlearn what you have learned" - Yoda.
The path to the handstand is remarkably simple, and begins with FORGETTING all previous instructions. And then you start this proven progression of 4 steps .
Step 1. 60 Second Wall Plank
Start with a regular plank against a wall, feet on the floor, palms directly under your shoulders. If you can stand like this for a minute (5-8 long breaths), then rearrange your hands a little back, raising your legs alternately on the wall. Watch the sensations in the carpal, elbow and shoulder joints - you need to stand confidently. nine0008
Gradually increase the duration to 60 seconds.
Regularly repeating this exercise, come closer and closer to the wall with your hands (raising your legs higher), at least one centimeter each.
With such small steps, you will control your position all the time and smoothly move on, getting rid of fear.
At the same time, you will see how you gain strength and control your body better, which is also very useful to feel.
Step 2. 60 second handstand with support
As your hands get closer to the wall, your plank turns into a handstand. Remember that you must control your position at all times without any risk of falling. (If you start to stagger, move your arms a little further away from the wall to regain your position with confidence.)
You need to approach the wall at a distance of about 30 cm.
This position must also be learned to hold for 60 seconds before moving on to the next phase. nine0008
This will take more practice, but one day you will be amazed to discover that you can stand for a minute against a wall without any difficulty or fear.
It's almost like a handstand, but you're not afraid of anything anymore. Why be afraid? You gradually come into this position, there is nowhere to fall.
And this step prepares you for the next - the most important one.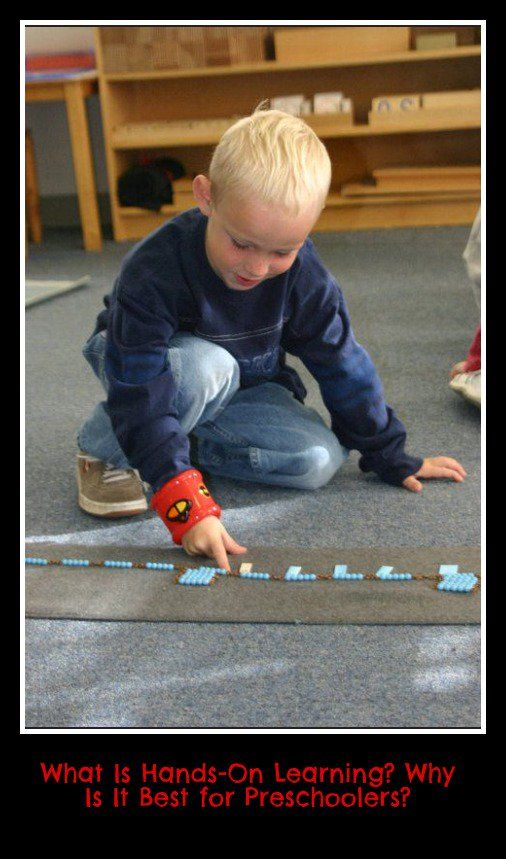
Stage 3. Pirouette landing
“Control. Control. You have to learn control.” – Yoda nine0008
Since we do not have the Force that will help us stay in the air, we will have to follow the master's advice again and learn to control ourselves.
In order not to be afraid to fall, you need to learn how to lower yourself correctly - pirouette landing.
Landing, like getting into a handstand, is also a skill. You can practice it just as often against the wall without any risk.
Standing on your hands against the wall, transfer the weight to the left hand (support) and move the right hand away from the wall. With your left foot, continue to lean against the wall for now, and take your right foot away, turning around. Gravity will pull it down - and here you are standing with your right foot on the floor. Where is it easier? nine0008
Once you have mastered this way of getting out of the stance, the fear of falling on your back will leave you. The higher the control, the less negative emotions will remain in your body.
Step 4: Kick Off and Unsupported Stand
After mastering the pirouette skill, you are ready to master the full handstand. The easiest way to get into it is to take a stance against the wall and lightly push off with your feet, balancing on only your hands.
Once you've completely conquered the stance next to the wall, it's time to learn to get upside down with the push off. Instead of gradually stepping away (as in Step 2), approach the wall facing the wall and, bending down and placing your hands in front of it, push off with one foot. No need to jump on the wall, just push off with one foot properly. At the same time, the arms should be straightened and tense so as not to fall with their nose to the floor. nine0008
Practice this to determine how much force to push off with. Ideally, you should get up on your hands without touching the wall with your feet (but in the meantime, the wall is in place to support you!) confidently to try to stand on your hands in the middle of the room.