Scholastic leveled reading chart
Leveling Chart | Scholastic Guided Reading Program for the Classroom
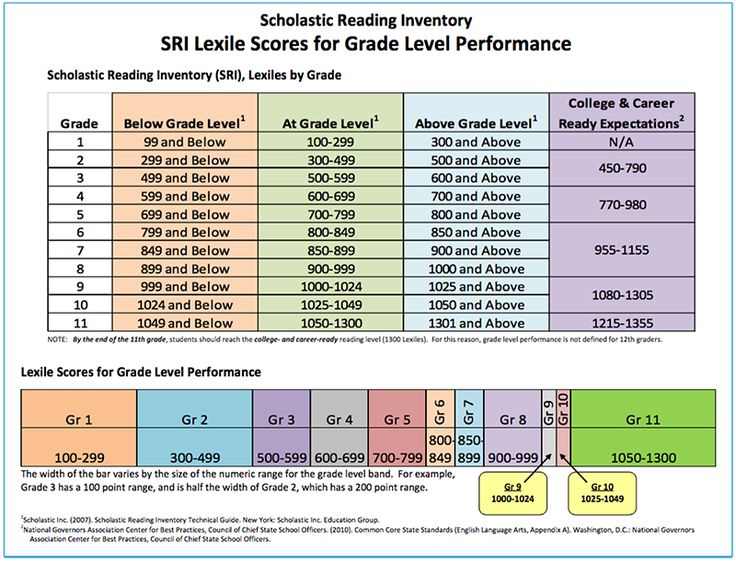
Use the grid below to shop by Guided Reading, Developmental Reading Assessment (DRA), and Lexile® Levels. This chart includes Lexile level recommendations and may also be used as a general leveling guide.
Click on links to shop the Teacher Store!
| Grade | Scholastic Guided Reading Level | DRA Level | Lexile® Levels |
|---|
| Grade | Scholastic Guided Reading Level | DRA Level | Lexile® Levels | ||||||||||||||||||
|---|---|---|---|---|---|---|---|---|---|---|---|---|---|---|---|---|---|---|---|---|---|
| Kindergarten |
| Beginning Reader | |||||||||||||||||||
| 1 |
|
| 190L-530L | ||||||||||||||||||
| 2 |
|
| 420L-650L | ||||||||||||||||||
| 3 |
|
| 520L-820L | ||||||||||||||||||
| 4 |
|
| 740L-940L | ||||||||||||||||||
| 5 |
|
| 830L-1010L | ||||||||||||||||||
| 6 |
|
| 925L–1070L |
Back to Top
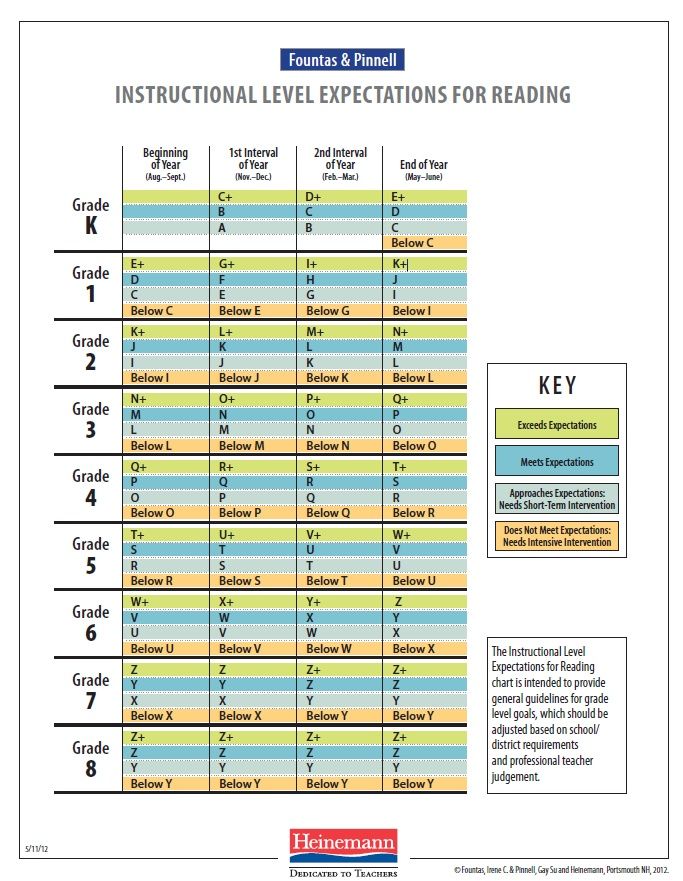
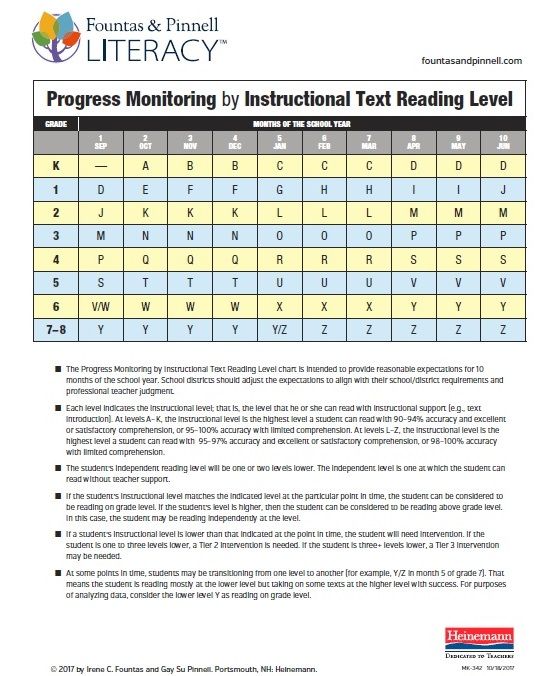
Guided Reading Leveling Charts (and How to Use Them)
Guided reading is one of the most effective ways to help your students develop core reading skills, boosting comprehension and helping young readers analyze plot, characters, complex themes, and more. Of course, to create a thriving guided reading program, you’ll need a diverse collection of high-interest books—and guided reading leveling charts are the perfect tool to help you find exactly what you need. Here’s everything you need to know about guided reading leveling charts and how to use them.
Add even more high-interest reads to your classroom library with these guided reading booklists for every level.
For your guided reading program to succeed, you’ll have to introduce books to your young readers that are both challenging and interesting to them. This Guided Reading Leveling Resource Chart from Scholastic helps you do this by making it easy to find and organize books by Guided Reading, Development Reading Assessment (DRA), and Lexile® levels.
Each book found through our leveling chart is assigned a guided reading level based on the increasing complexity of 10 common book characteristics your students will encounter as they progress as readers:
· Genre
· Text Structure
· Content
· Theme and Ideas
· Language and Literary Features
· Sentence Complexity
· Vocabulary
· Words
· Illustrations
· Book and Print Features
By keeping each of these characteristics in mind, you can find books that will challenge your students in specific areas and help them grow as readers.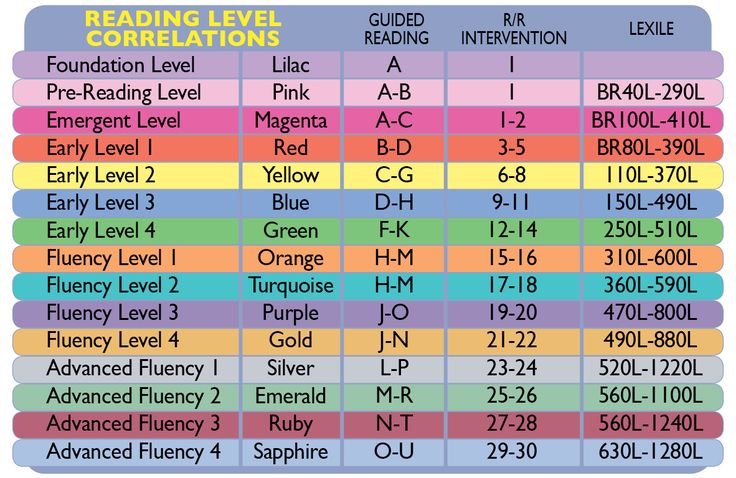
How to create leveled book lists
Guided reading leveling charts aren’t only for finding and organizing books, they’re a useful tool for creating leveled books lists specifically tailored for your students. Our leveling chart lets you create dynamic books lists with selections leveled using different systems like DRA and guided reading.
These book lists are also a great way to inspire students to read beyond their current level, since you can tailor the list based on high-interest topics your students love. If you have a reluctant reader who lives and breathes outer space, create a reading list of books on the solar system with titles at their current reading level and selections that are a level or two above. This way, even if the books are challenging, their passion for the topic will keep them engaged.
By implementing a well-planned guided reading program, you’ll cultivate a classroom full of strong, independent readers and thinkers with a passion for books.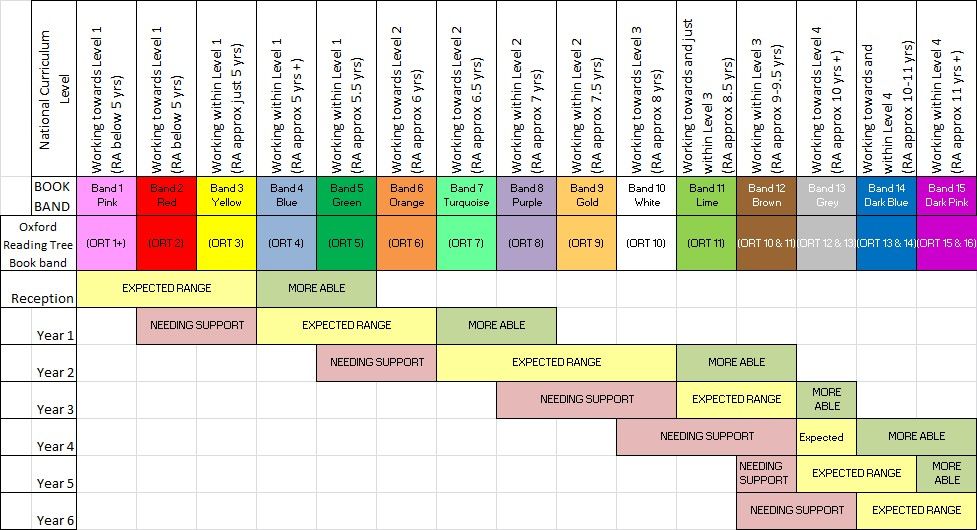 And leveling charts are one of the most important tools you’ll use, helping you find the perfect books to meet your young readers needs and keeping your classroom library organized and accessible at the same time.
If you’re looking for one more must-have resource to add to your guided reading toolbox, be sure to check out our Book Wizard. With this tool, you can easily search books by guided reading level system, genre, and grade.
Want more great content? Click here to subscribe to our Teacher Newsletter and get teaching ideas delivered right to your inbox.
Use a screen reader to create tables in Access desktop databases
This article is for visually or cognitively impaired people who use screen readers such as Microsoft Narrator, JAWS, or NVDA with Microsoft 365 products. This article This article is part of the Microsoft 365 Screen Reader Support Content Set to learn more about accessibility in our apps. General help information is available on the Microsoft Support Home page.
Add Access tables to a database on your computer using the keyboard and Access screen. We've tested it with Narrator and NVDA, but it may work with other screen readers as long as they follow accessibility standards and practices. You will also learn how to save, rename, and delete tables.
Notes:
-
New Microsoft 365 features become available to Microsoft 365 subscribers as they become available, so your app might not have these features yet. To learn how you can get new features as quickly as possible, become an Office Insider.
-
For more information about screen readers, see How screen readers work in Microsoft 365.
In this section
-
Tables in Access
-
Adding a table
-
Rename header field
-
Insert a field
-
Adding a field
-
-
Saving a table
-
Renaming a table
-
Deleting a table
Tables in Access
Tables are an integral part of any database, as they contain all the information and data. For example, a business database might have a Contacts table that contains vendor names, email addresses, and phone numbers. Before creating tables, analyze your requirements and determine which tables you might need. For background information about planning and designing a database, see Database Design Basics.
A relational database, Access, typically contains several logically related tables. In a well-designed database, each table stores information about a particular entity, such as employees or products. The table contains records (rows), fields (columns), and field values (cells) for each record.
-
A record (string) contains specific data, such as information about a particular worker or product.
-
A field (column) contains data about one aspect of a table item, such as a name, email address, or price.
-
The field value (cell) for a record contains data of various types, such as text, numbers, dates, and hyperlinks.
While each table stores data on a specific topic, tables in a relational database such as Access store data on related topics. For example, a database might contain the following data:
-
"Customers" table, which lists the company's customers and their addresses
-
Products table listing the products you sell, including prices and images for each product
-
Orders table that tracks customer orders
Links are used for this. A relationship is a logical relationship between two tables based on their common fields. For information about creating relationships between tables in an Access desktop database, see Create, edit, or delete a relationship.
Add table
-
Open a new or existing database.
-
To create a table, press ALT+C, T, N to select table on the tab Create on the ribbon. A new table is added and you hear "Table N." The focus will be on the second field value of the first record. (By default, the first field is named Code .)
-
Enter data in the table. You can also use it as a source in an Excel workbook. More information can be found in this link: Copy and Office Clipboard.
When you enter a field value in a new field and move to the next field value using the Access arrow keys, the field name is The field name is .
Rename header field
You can rename a field (column) in a table.
-
To select a field, in any record, put focus on the field and press CTRL+SPACEBAR. The column will be selected.
-
Press SHIFT+F10 to open the context menu.
-
To select rename the field, press N. The focus moves to the header field, and you hear: "Exit menu, table, row N", the name of the field, and the message "Enter and text." Enter a new field name.
Tip: Meaningful names, such as Product Name or Price, help you know what each field contains without looking at the contents of each field.
Insert field
You can insert a field (column) to the left of any existing field in the table.
-
To select the field to be inserted to the left of any row, place focus on the field and press CTRL+SPACE. The column will be selected.
-
Press SHIFT+F10 to open the context menu.
-
To select Insert field, press F four times and then press enter. The focus moves to the first record of the new field.
Add field
You can create a field (column) on the right side of the table.
-
Go to the entry around which you want to add a new field.
-
To jump to the first entry in the table, press CTRL+HOME.
-
To jump to the last record of the last field in the table, press CTRL+END.
-
-
To create a field on the right side of the table, press the RIGHT ARROW key until you hear the row number followed by "Column, click to add."
-
Enter the field value for the current entry. When you move to another cell, a new field is added with the name FieldN at by default.
-
To jump to the first record of a new field, press CTRL+UP ARROW.
Save table
After creating a new table or modifying an existing table, save your work.
-
Press CTRL+S or ALT+F, S to save the table.
The first time you save a table, the Save As dialog opens and you hear "Save As" followed by the default table name.
Notes:
-
If you try to close the table without saving changes, a confirmation dialog box appears. To save the table before closing, press ALT+Y. To undo your changes, press ALT+N.
-
When you save changes to an existing table, it has the name you previously provided. To change the table name on save, press F12. The Save As dialog box opens and you can enter a new name.
-
-
Enter a table name and press enter.
The first time you save the table as a name, describe the data it contains, such as "Customers", "Parts List", or "Products".
Tip: Agree on how you will name the objects in the database, and follow these rules.
Rename table
Note: An open table cannot be renamed. To close the active table, press CTRL+W. The focus moves to the next open table. If open tables are not open, focus moves to area navigation.
-
In the navigation area , press the Tab key until you hear "Tables," and then press the DOWN ARROW key until you hear the value you want.
-
Press shift+F10 to open the context menu for a table.
-
To select in context menu item Rename, press M twice, and then press ENTER.
 You hear: "Rename."
 -
Enter a new name and press ENTER.
Delete table
-
In the table view, close all tables. The focus moves to navigation area .
-
Press the DOWN ARROW key until you hear the value you want.
-
Press the DELETE key. A window will open asking you to confirm the deletion. The focus is placed on the button Yes .
-
To delete a table, press ENTER.
Note: To jump to table from the constructor, press ALT+H, W, then H. To jump to the constructor from the table, press ALT+H, W, then D.
See also
Start Access with a screen reader
Add or remove columns in Access desktop databases with a screen reader
Get Excel data in desktop Access databases with a screen reader
Export an Access table to a text file with a screen reader
Export an Access table to an Excel workbook using a screen reader
Keyboard shortcuts in Access
Get to know Access and navigate with a screen reader
Technical support for users with special needs
Microsoft is committed to ensuring that all of our customers receive the best possible product and service.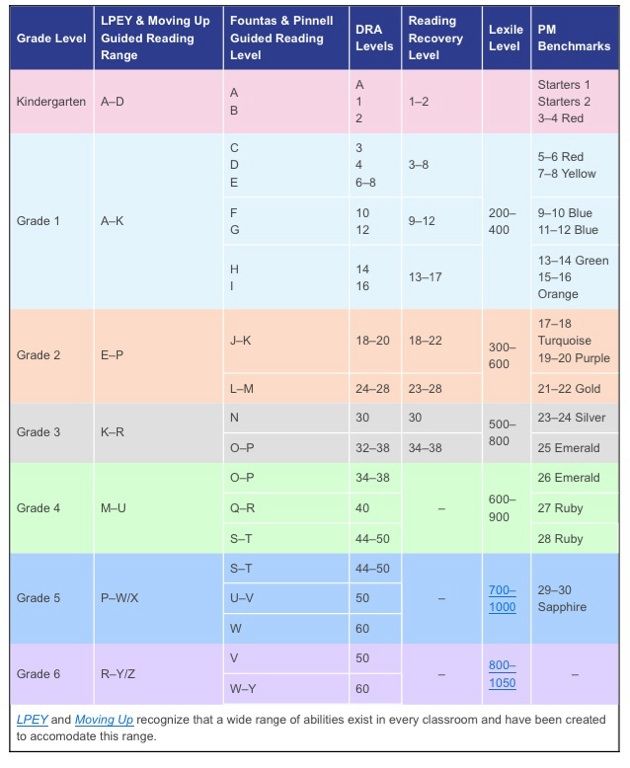 If you have a disability or have accessibility questions, contact the Microsoft Disability Answer Desk for technical support. Microsoft Disability Answer Desk experts are familiar with many popular accessibility features and can provide support in English, Spanish, French, and American Sign Language. Go to the Microsoft Disability Answer Desk site for contact information for your region.
If you are a government or commercial organization, contact the Disability Answer Desk for Enterprises.
Create good tables / Sudo Null IT News
Poor tables. Well, what's wrong with them?
At the beginning of the history of the web, tables were the basis for displaying information. Over time, developers have found new, more fashionable ways of presenting data, and tables have faded into the background. Today, tables are used much less often, but they still collect and organize the large amounts of information that we encounter on a daily basis.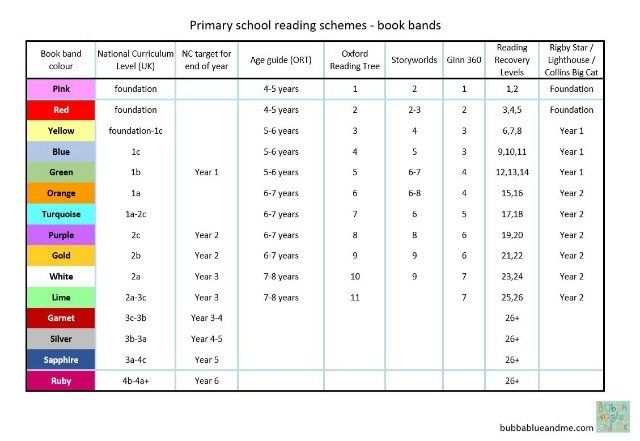
Here is an example that I call a table of all tables: US Harmonized Tariff , over 3550 pages long. It contains a description of every item that can be imported into the United States, including such exciting items as "Men's and children's coats, short coats, capes, jackets, anoraks (including ski suits), windbreakers and similar products (including padded vests)."
So what is a short coat?
An illiterately designed table looks ugly. Design is the backbone of a spreadsheet: when done right, complex data is easy to view and compare. If the design is incorrect, the information is no longer understandable.
Let's see how to do it right.
Watch the numbers
Not all numbers are the same. I do not mean π (Pi) and ∞ (although I mention them at parties), but I am talking about the display of numbers, divided into minuscule or majuscule, and proportional or tabular.
Minuscular and majuscule
Minuscular numerals look great in sentences where they are related to the size and indentation of lowercase characters.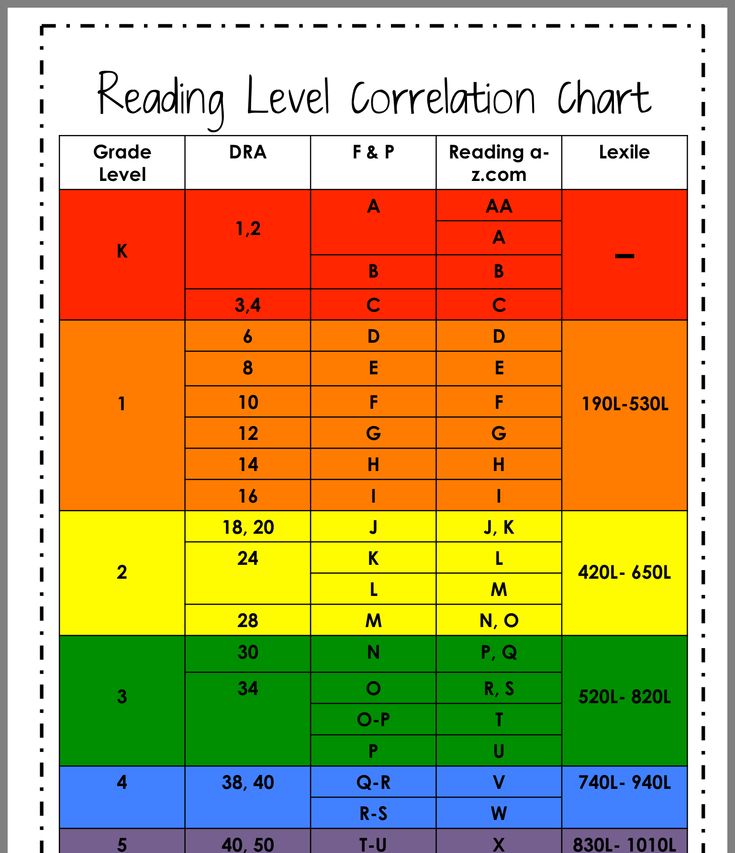 Majuscular figures are more uniform, which corresponds to the even structure of the table.
The difference between proportional and tabular numerals is not so obvious:
Proportional and tabular numerals
Proportional numerals are designed to convey the hue - to match the overall dimensions and indents - of the typeface. Tabular figures are proportionate to each other, which allows you to align columns with numbers. Although the difference is not so obvious in the example of one or two lines, the use of tabular numbers makes it easier to scan large tables and reduces the likelihood of reading errors.
Tabular majuscule digits tech note
At the design stage, it's worth making sure the numbers you use are right for you (tabular and majuscule alignment is usually off by default). Adobe products include an "opentype" panel that sets the numbers to the correct setting. To include the corresponding property in CSS, you need to understand the slightly confusing syntax.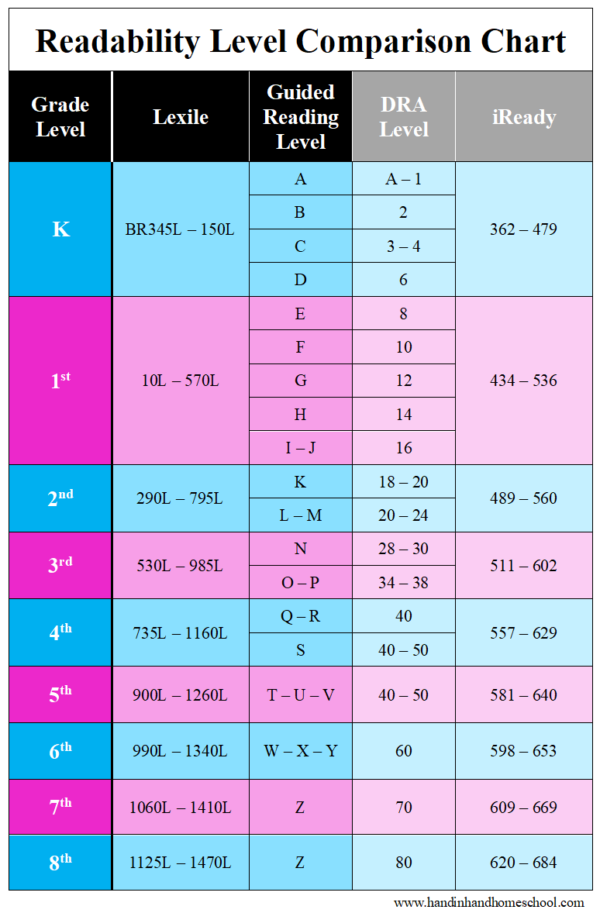 Be that as it may, a few queries to Google will set you on the right path.
Now for the bad news: tabular majuscule numerals are not available for all typefaces. Headsets that include them are usually expensive. There are a few exceptions: for example, the beautiful Work Sans is a free font with tabular majuscule numbers.
If finding a suitable typeface is difficult, use fixed-space fonts as a fallback. They look more like code, but are always good for displaying numbers in a table. It's worth adding that San Francisco, Apple's new system default font, contains tabular majuscule numerals that display well at small sizes.
Remember to align
Follow the 3½ rules:
1. Numeric data is right-justified.
2. Text data is left justified.
3. Headers are aligned the same as their data.
3½. Do not use center alignment.
List of US states by historical population - Wikipedia
Numbers are read from right to left - when comparing numbers, we first look at units, then tens, hundreds, etc.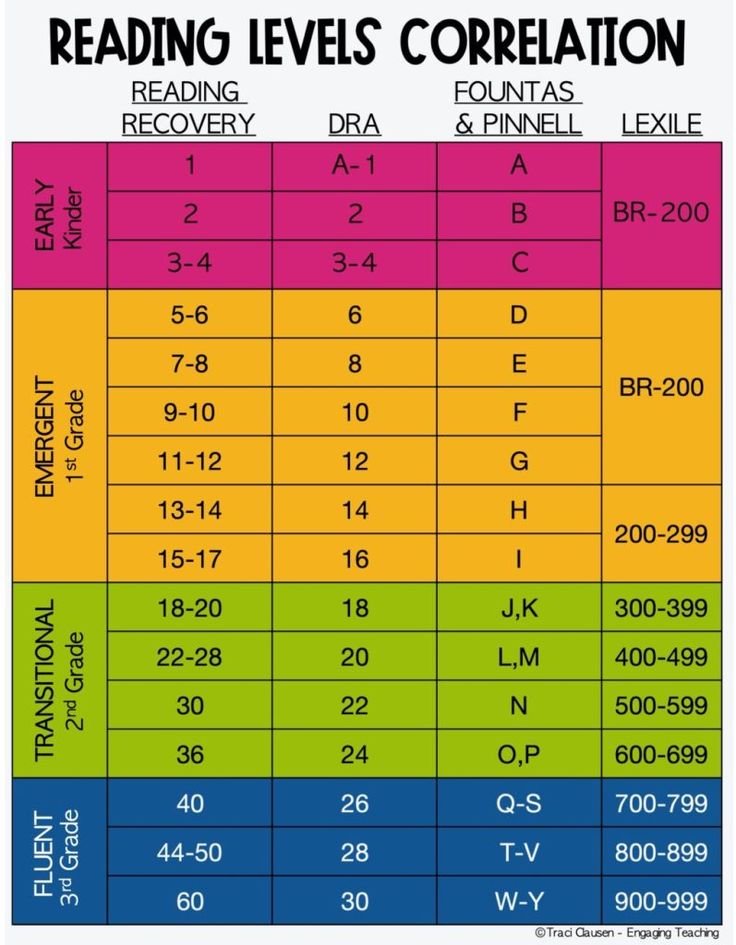 This is the same way people learn arithmetic - start on the right and move to the left, collecting and grouping numbers as you read [1] . Therefore, tables should right-align numeric data.
Texts (in Russian) are read from left to right. Texts are usually compared in alphabetical order: if two lines start with the same letter, the next one is compared, and so on. Trying to quickly run through text that is not left-aligned is extremely difficult.
Headers must retain the alignment of their respective data. The vertical lines of the table in this case will look neat, and the data will look solid and consistent.
Table lines appear jagged when centered, making it difficult to see the contents. This often forces additional separators and graphic elements to be added to the table.
Consistent significant digits = good alignment
An easy way to keep your table aligned is to maintain consistency in writing significant digits. This usually means that within each column, the numbers must have the same number of decimal places.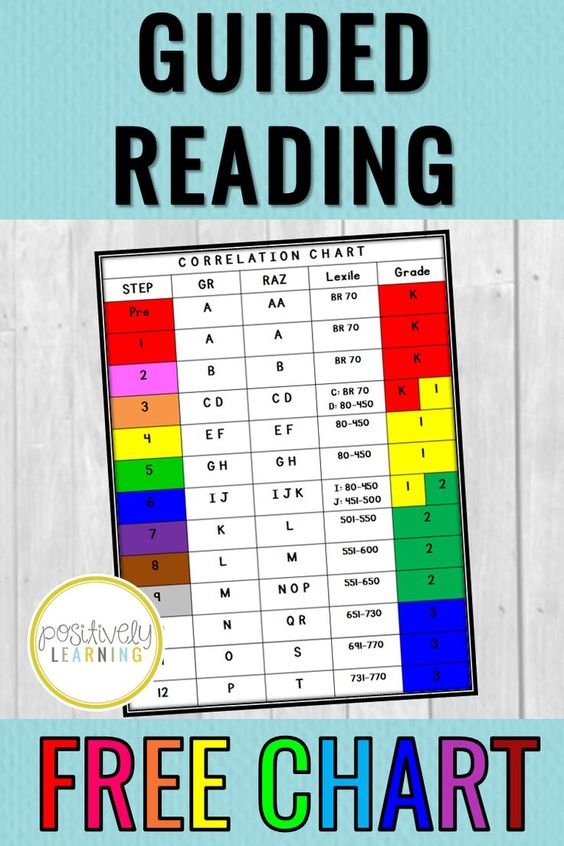 Significant figures are a topic for a separate article, so I will leave here only a brief advice: the fewer significant figures you can get by with, the better.
Concise, clear labels
Labels accompanying data are especially important. These elements of supporting context allow the table to be read by a wider audience, and under more different circumstances.
Mississippi Flood Forecast - NOAA
Title
It sounds like a no-brainer, but a short and clear title is just as important to a table as the rest of the design. With a good title, tables become mobile - they can be transferred to many different contexts, they can be easily referenced from external sources.
Units
The most common label used in tables is data units. Usually it is repeated in each individual cell of the table. To avoid repetition, it is enough to include a caption in the first line of each column.
Headings
Keep headings as short as possible. The table design should focus on the data. Long captions in the titles will interfere with this, taking up a huge part of the visual space.
As little ink as possible
When deciding how to style graphics in a table, you should always try to reduce the color saturation of the table without losing structure. Try to use as little "ink" as possible - i.e. do not style elements when possible.
National League 2016 Batting Statistics - BaseballReference
Rulers
If you aligned the data in the table correctly, there is no point in using rulers. The main advantage of rulers is the ability to reduce the distance between elements, while at the same time separating them from each other. Even if you use rulers, try to make them nondescript so that they don't get in the way when you skim them.
Horizontal rulers are most useful. They allow you to significantly reduce the height of long tables, speeding up the comparison of large amounts of data or noticing trends in their change.
I also have a personal opinion about rulers: do not use zebra stripes. This is bad practice. However, whether you agree with me or not is up to you.
Backgrounds
Backgrounds are best for highlighting different areas of data, such as transitions from numbers to sums or averages.
Many elements can be distinguished without the use of backgrounds: highlighting values, additional context to data, changes in values compared to previous periods. Use graphic elements like ✻, † (one of my favorites), or ▵.
In addition, tables must be monochrome. The use of colors for organizational purposes or to add additional meaning increases the likelihood of misinterpretation or error and causes problems for people with visual impairments.
Conclusion
Tables may be boring, but they are one of the main elements in information-rich documents, so designers should not take them lightly. Efficient, transparent, readable tables will greatly facilitate the difficult process of perceiving a large amount of data.