Shapes and shape names
Different Shape Names (with Useful List, Types) • 7ESL
Pin
Are you looking for different shape names in English? Here you will find a list of shapes with different types and useful example sentences. If you work in a business that requires the use of mathematics, for example then it would be very important that you are aware of the English names for shapes.
However, this may not be the only reason that you need to learn this information. When taking part in day-to-day conversations, you will need to learn the shape names in order to describe something or be able to understand what someone is talking about, for example, if a person tells you about ‘the square plate.’ Here, you can learn shape names and further expand your vocabulary.
Table of Contents
Shapes
What Are Shapes?
Shapes are geometric figures, or the pattern an outline falls into. Shapes are often drawn (whether by ink, pencil, or digitally), but they occur in life, also. Frequently, people picture 2D (two-dimensional, or flat) images when they hear the word “shapes,” so most of the objects listed in this lesson will be 2D shapes, but some will be 3D as well.
Different Types of Shapes
There are many, many different types of shapes, and there are names for basically all of them. The following list focuses on more common shapes that you’re more likely to encounter or to need or want to know the name of.
Shape names with pictures
Pin
Two-Dimensional (Flat) Shapes
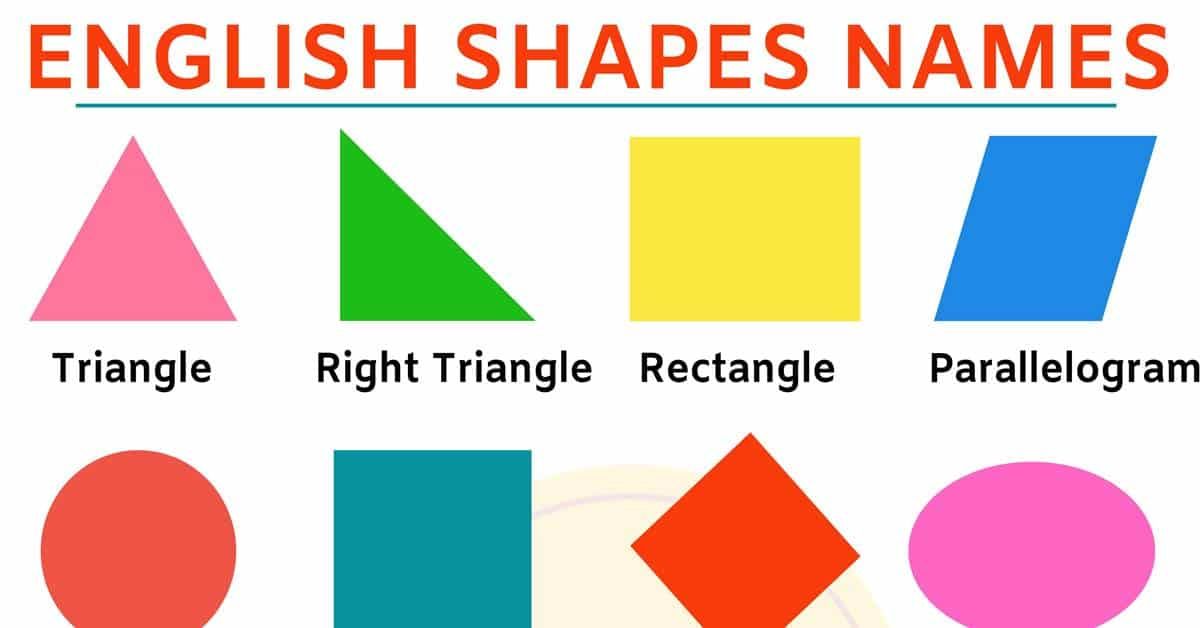
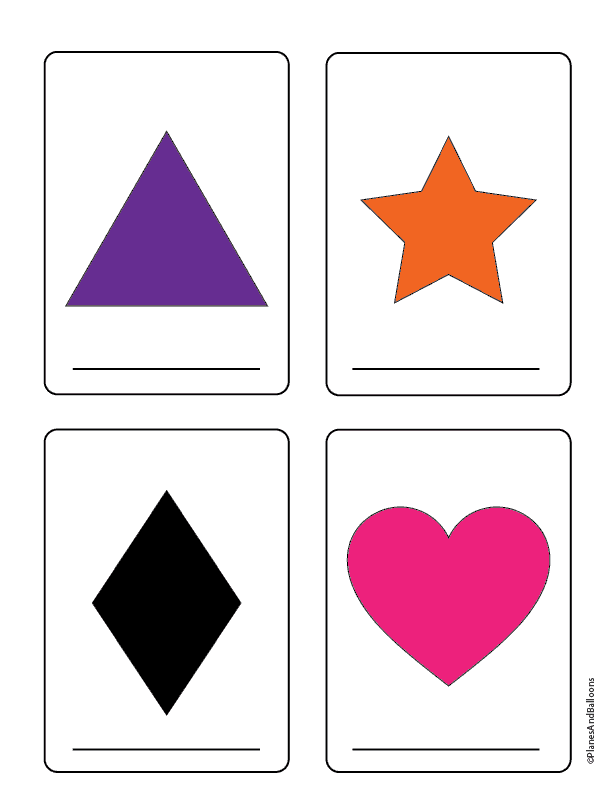
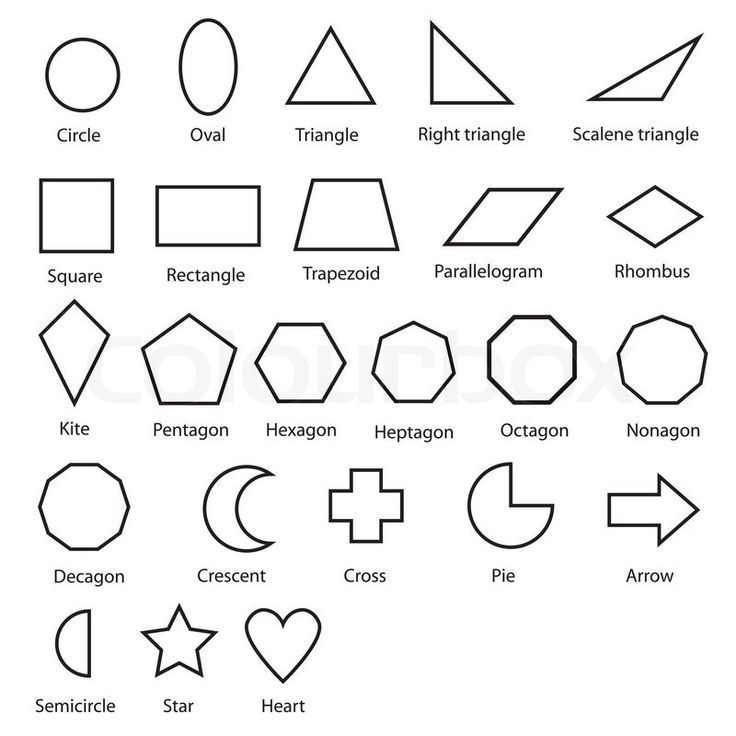
- Circle: A circle is an equally round shape. Picture the lid of a jar, flat, from above. That is a circle. The wheels on a car are circular, as well. So are the holes in most lined paper and notebooks.
- Oval: An oval is basically a circle that’s been a little squished. The cups of over-the-ear headphones are generally referred to as oval. So is the profile of an egg.
 Some make a distinction between circles that have been squished in the middle versus circles that have been squished at the top, the former being called an ellipse, but common usage treats both as ovals.
 - Rectangle: A rectangle is a shape with four sides, made up of two sets of parallel lines, with four right angles (90 degree angles; picture a capital L). It doesn’t matter whether the sets of sides are the same length. Picture a plain piece of printing paper. This is a rectangle, with one set of sides (generally the top and bottom) shorter than the other set of sides (generally the left and right).
- Square: A square is a very specific type of rectangle, one with four equal sides. Some boxes have a square footprint. Origami paper is square.
- Triangle: A triangle is a shape with three straight sides. These sides can be any length, with any degree of angle, as long as the three sides are joined at their ends. Many warning signs are triangular.
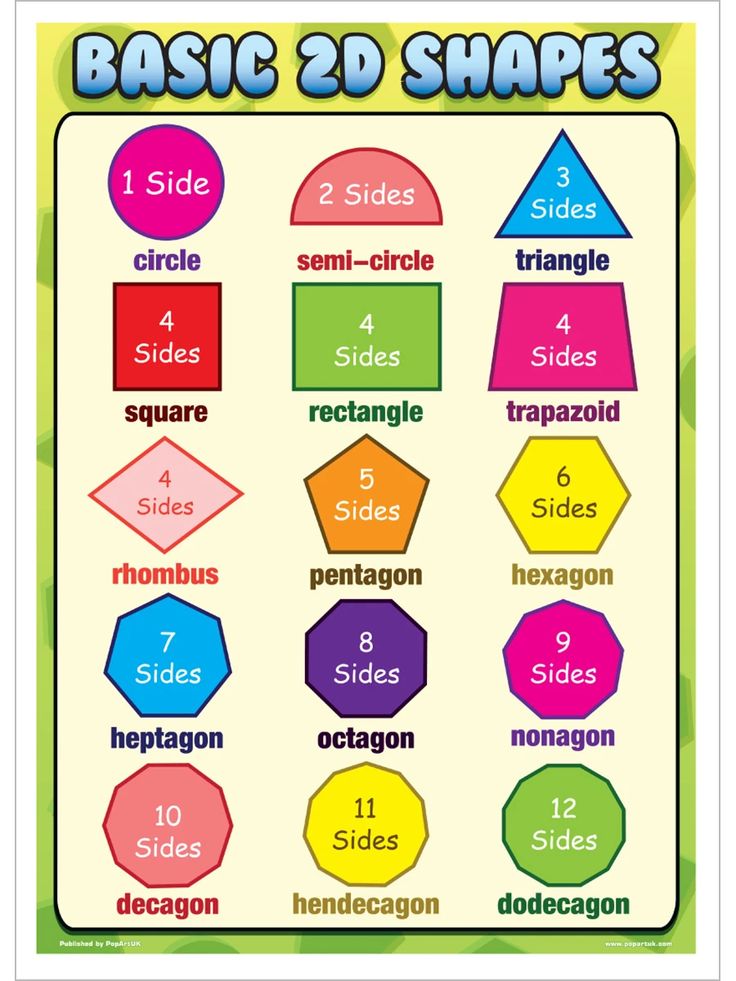 A slice of a round pizza is mostly triangular (the crust is a little too rounded to be perfect).
 - Pentagon: A pentagon is a shape with five sides. A basic drawing of a house, with two lines for the roof, a line for each side, and a line for the bottom is generally a pentagon.
Shapes with more sides are generally named based on how many sides they have. A hexagon has six sides, heptagon has seven, and an octagon has eight.
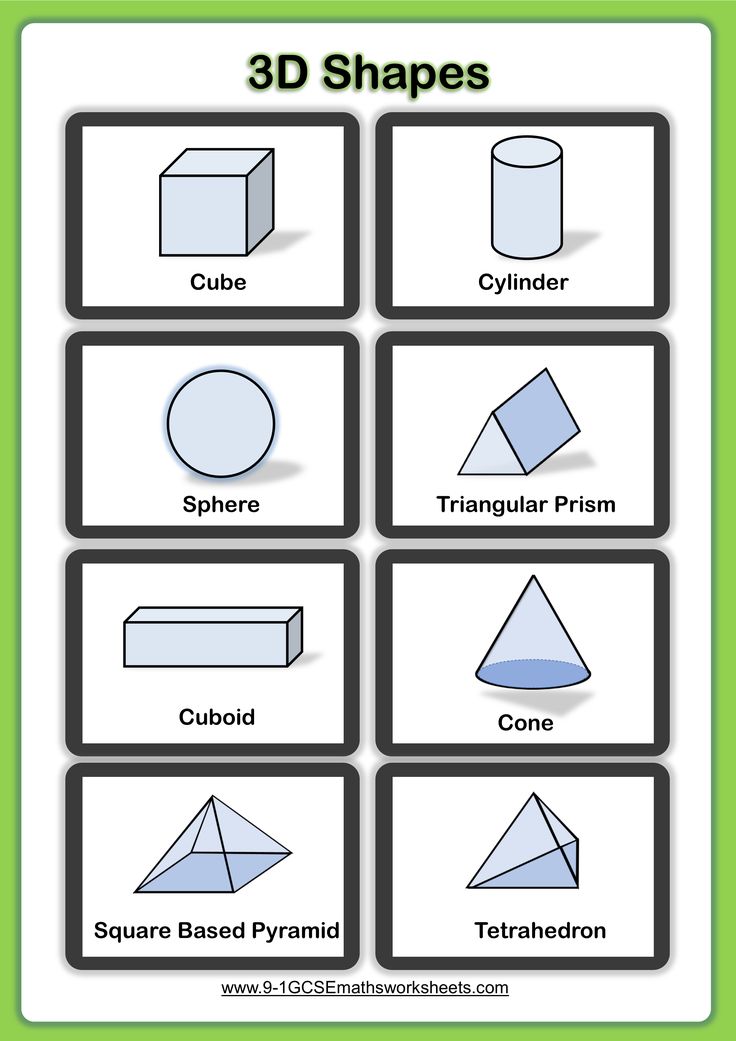
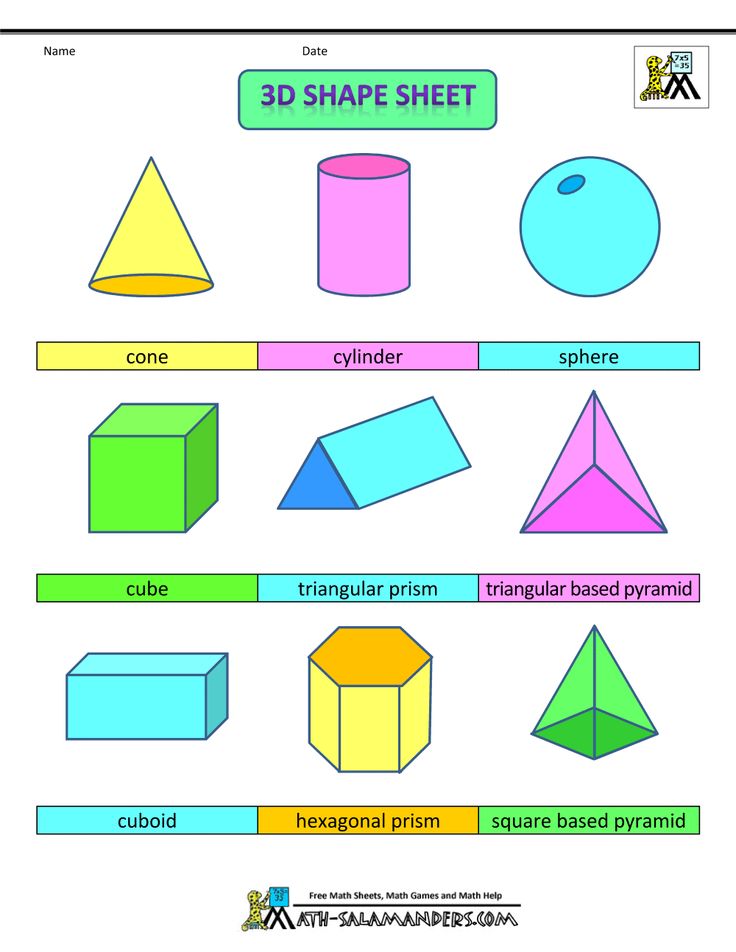
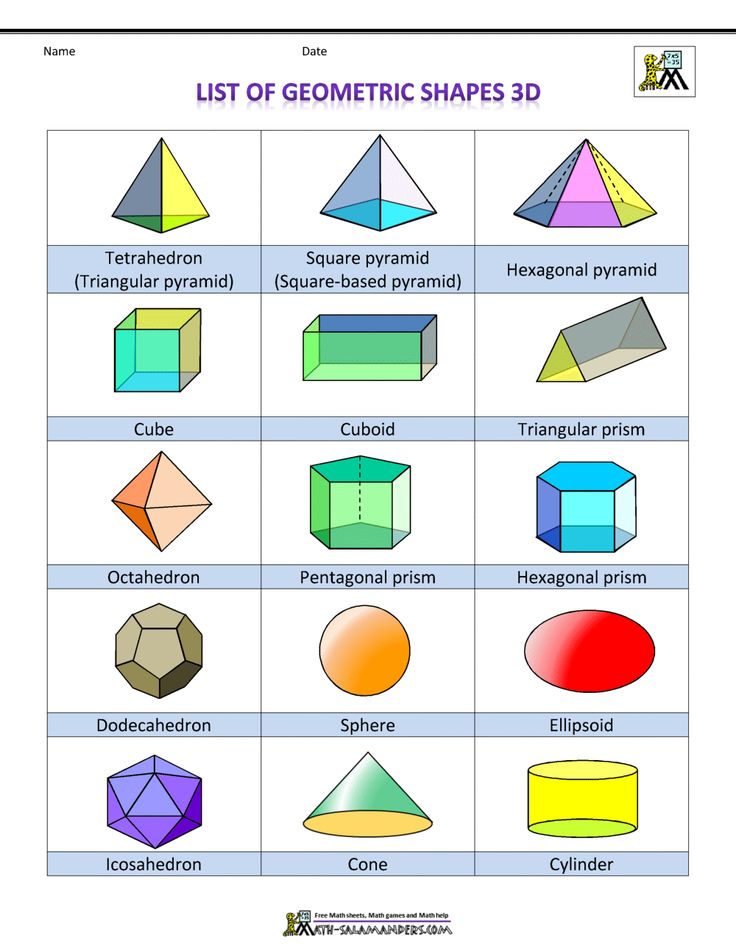
Three-Dimensional Shapes
Three-dimensional shapes are ones that aren’t just flat on paper, but also take up room vertically. Only a few are really commonly named.
- Sphere: A sphere is a 3D circle, like a ball.
- Cube: A cube is a 3D square, like a box.
- Pyramid: A pyramid is a 3D triangle. The giant structures in Egypt are pyramids, as is the Luxor in Las Vegas.
Shape Names
It’s important to build a good vocabulary, in any language.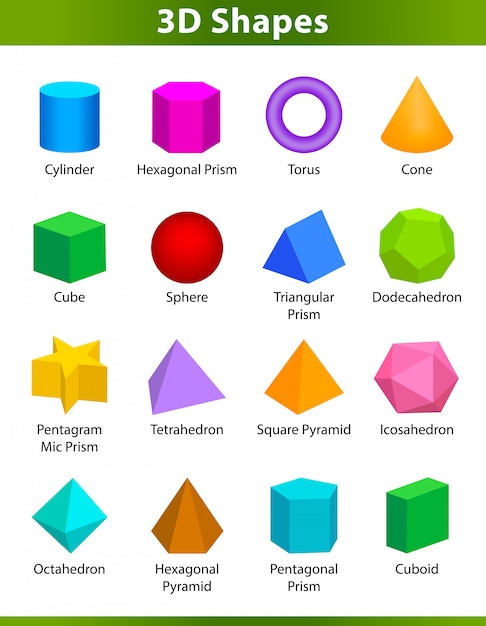 The more words you know and understand, the better you can communicate. Even if you don’t use the words often, understanding them allows you to follow along with a conversation, even if it ventures a little outside of your comfort zone. This lesson is specifically focused on different types of shapes.
- Nonagon
- Octagon
- Heptagon
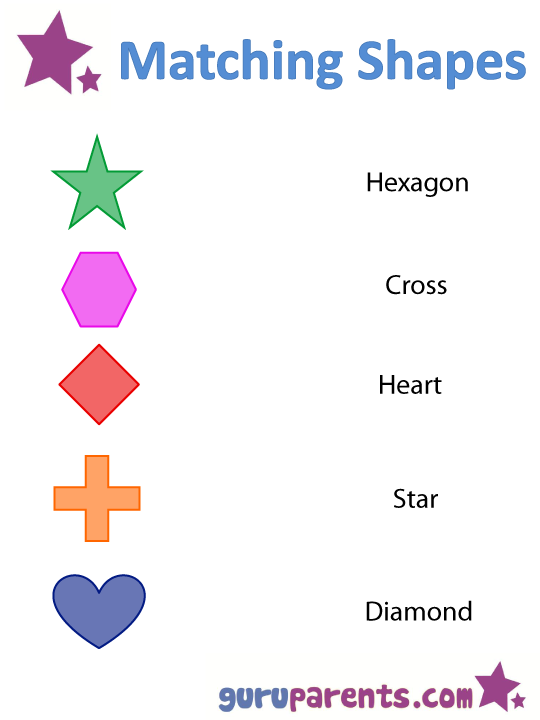
- Hexagon
- Triangle
- Scalene triangle
- Right triangle
- Parallelogram
- Rhombus
- Square
- Pentagon
- Circle
- Oval
- Heart
- Cross
- Arrow
- Cube
- Cylinder
- Star
- Crescent
The math student measured each side of the nonagon until he had measurements for all nine edges.
Pin
OctagonThe sectional shape is a quarter of an octagon.
Pin
HeptagonThe pagoda has a base of heptagon.
Pin
HexagonA hexagon is a six – sided figure.
Pin
TriangleThe sum of all the angles of a triangle is 180 degrees.
Pin
Scalene triangleA scalene triangle is a triangle that has three unequal sides.
Pin
Right triangleThe hypotenuse is the longest side of a right triangle.
Pin
ParallelogramThese are the opposite sides of the parallelogram.
Pin
RhombusA rhombus is a simple quadrilateral whose four sides all have the same length.
Pin
SquareThe interior angles of a square are right angles or angles of 90 degrees.
Pin
PentagonDraw a pentagon, a regular five-sided figure.
Pin
CircleThe students sit in a circle on the floor.
Pin
OvalThe shape of the earth is an oval.
Pin
HeartThe pool was in the shape of a heart.
Pin
CrossThe cross is the symbol of Christianity.
Pin
ArrowIt flew straight as an arrow.
Pin
CubeThe box was cube-shaped.
Pin
CylinderThe cylinder is rotated 180 degrees.
Pin
StarShe cuts these paper into star-shaped.
Pin
CrescentHe has a crescent–shaped knife.
Pin
Shapes | PictureLearn different shapes with images to improve and expand your vocabulary, especially shapes and colors vocabulary words in English.
PinShapes: Different Shape Names (with Useful List, Types)Shapes Names VideoThere are shapes everywhere, and so references to them happen frequently.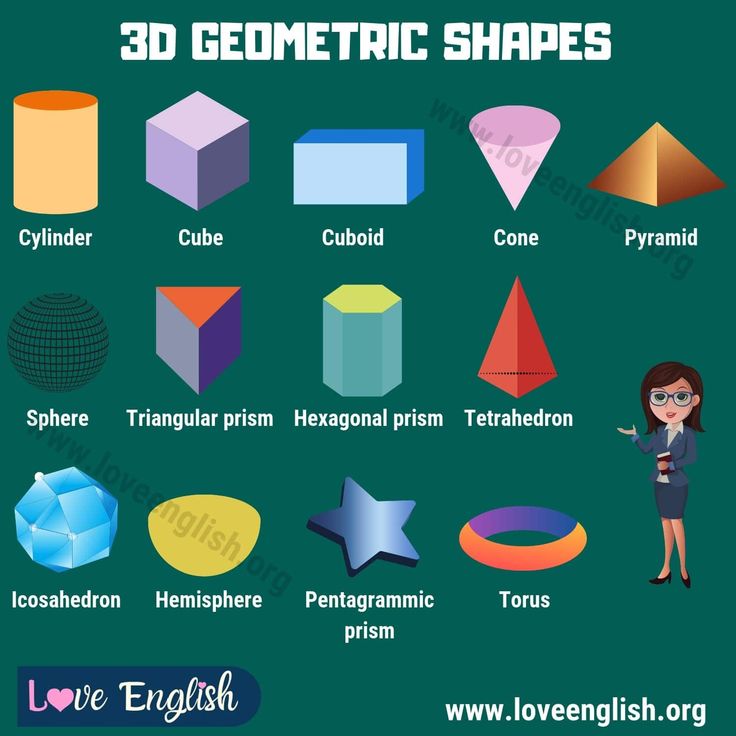 Hopefully, after this lesson, you’re feeling prepared to deal with shapes!
Shapes Names: 30 Popular Names of Shapes with ESL Image
by Issabella
Names of Shapes in English! Lean 30 different 2D shapes and their names with ESL printable infographic to enlarge your vocabulary words in English.
Table of Contents
Names of Shapes in English
Basic Shape Names
Here is the list of 30 names of shapes (geometric shapes) in English:
- Nonagon
- Octagon
- Heptagon
- Hexagon
- Triangle
- Scalene triangle
- Right triangle
- Parallelogram
- Rhombus
- Square
- Pentagon
- Circle
- Oval
- Heart
- Cross
- Arrow
- Cube
- Cylinder
- Star
- Crescent
- Trapezoid
- Diamond
- Decagon
- Multiplication
- Minus
- Plus
- Ellipse
- Semi-circle
- Trefoil
- Ring
Learn more about different types of house in English.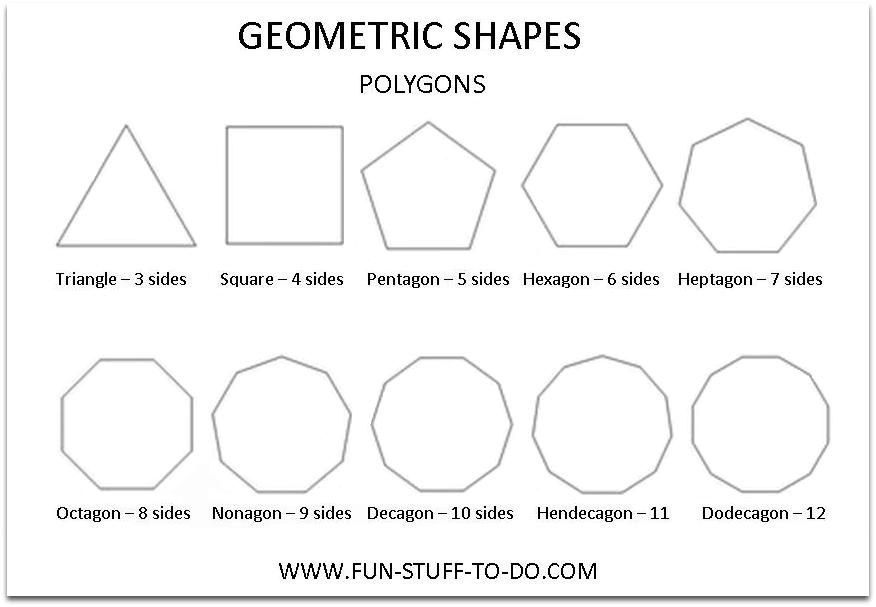
Types of Shapes with Examples
Octagon
- This main octagon is the central chamber or nave.
Heptagon
- The pagoda has a base of heptagon.
Hexagon
- The church tower likes a huge hexagon.
Triangle
- He is having a sandwich triangle.
Scalene triangle
- The cells of the scaffold grew normally in accordance with close-packed rule in the form of antenna or scalene triangle.
Right triangle
- The hypotenuse is the longest side of a right triangle.
Parallelogram
- It is the envelope of a series of parallelograms of equal area and sharing two sides.
Rhombus
- They are situated at the four points of a rhombus.
Square
- A carpet six metres square has an area of 36 square metres.
Pentagon
- Draw a pentagon, a regular five-sided figure.
Circle
- The students sit in a circle on the floor.
Oval
- The playing field is a large oval.
Cross
- The cross is the symbol of Christianity.
Arrow
- The arrow embedded itself in the wall.
Cube
- The box was cube – shaped.
Cylinder
- The cylinder is rotated 180 degrees.
Star
- Remember to match it with your glistening star-shaped necklace.
Crescent
- The moon was a brightly shining crescent.
Trapezoid
- A trapezoid is a quadrilateral with two parallel sides.
Diamond
- They selected a diamond engagement ring.
Decagon
- A polygon with ten sides is a decagon.
Multiplication
- Multiplication and addition are associative operations.
Minus
- The temperature is now minus 5 degrees.
Plus
- Membership is 350 dollars per year plus tax.
Ellipse
- The Earth orbits in an ellipse.
Semi-circle
- They stood in a semi-circle round the teacher’s chair and answered questions.
Trefoil
- The main themes were decorated pillars, trefoils and roundels.
Ring
- The men were standing in a ring.
Shapes Names | Infographic
Categories Topic VocabularyForms
A form in Access is a database object that you can use to create a user interface for a database application.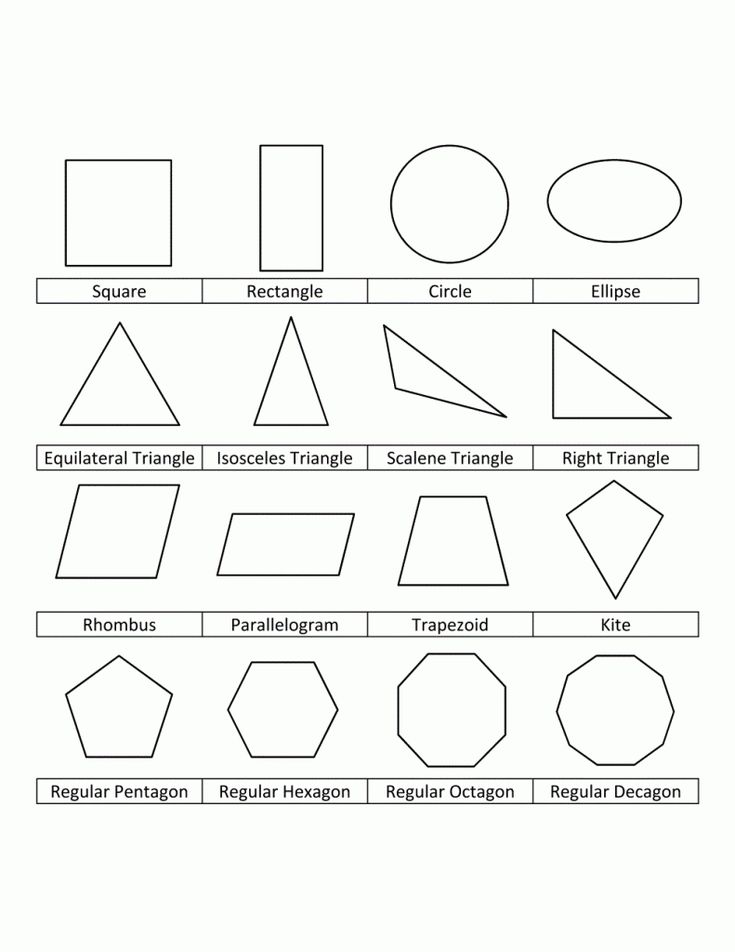 A "linked" form is directly linked to a data source, such as a table or query, and can be used to enter, edit, or display data from that source. It is also possible to create an "unbound" form. It doesn't bind directly to a data source, but it also contains command buttons, labels, or other controls that are required to work with the application.
This article focuses on linked forms. They can be used to control access to data (for example, to determine which fields or rows of data should be displayed). For example, some users may only need a few fields from a table with many fields. A form containing only these fields will make it easier for such users to work with the database. You can also add buttons and other functions to your form to automate common actions.
Forms can be compared to windows through which users see and access a database. An effective form speeds up work with the database, as it eliminates the need to search for the necessary information. A visually appealing form makes working with the database more pleasant and efficient, and helps prevent incorrect data entry.
Note: This article assumes that you have already created a table (or a query based on one or more tables) and want to create a form to view or work with data.
In this article
-
Create a shape with the Shape tool
-
Create a split shape with the Split Shape tool
-
Create a form that displays multiple records using the Multiple Items tool
-
Create a Form Using the Form Wizard
-
Create a shape with the Blank Shape tool
-
Layout view and design view
-
Setting up a form in Layout view
-
Modifying a Form in Design View
Creating a shape with the Shape tool
The Shape tool allows you to create a shape with a single click. When used, all fields of the underlying data source are added to the form. You can start using the new form right away, or modify it in Layout view or Design view to better suit your needs.
Creating a shape with the Shape tool
-
In the Navigation Pane, click the table or query that contains the data that you want to display in the form.
-
On the Create tab, in the Form group, click the Form button.
The new form will be displayed in layout mode. In this mode, you can make changes to the structure of the form while viewing the data. For example, if necessary, you can adjust the size of the text fields according to the data.
If Access detects a table that has a one-to-many relationship with the table or query that was used to create the form, then the data table is added to the form that is based on the associated table or query. For example, if you create a simple form based on the Employees table and a one-to-many relationship is defined between the Employees and Orders tables, then the data table will display all records in the Orders table that are related to the current employee records. If the data table on the form is not needed, it can be deleted. If there are multiple tables that have a one-to-many relationship with the table that was used to create the form, then Access does not add the data tables to the form.
Creating a split shape with the Split Shape tool
A split form allows you to display data in two views at the same time - Datasheet View and Form View.
A split form differs from a combination of forms and subforms in that both split form views are linked to the same data source and are always in sync with each other. When you select a field in one part of the form, the same field in another part is selected. Data can be added, modified, or deleted in each part of the form (provided that the record source allows updating and the form settings do not prohibit such actions).
Working with a split form allows you to take advantage of both views in one form. For example, you can use the tabular part of a form to quickly find a record and then view or edit it in form view.
To create a split shape using the Split Shape tool:
-
In the Navigation Pane, click the table or query that contains the data that you want to display in the form. You can also open a table or query in Datasheet view.
-
On the Create tab, in the Forms group, click the Other Forms button and select the Split Form command.
The new form will be displayed in Layout view. In this mode, you can make changes to the structure of the form while viewing the data. For example, if necessary, you can adjust the size of the text fields according to the data. For more information about form views, see About Layout View and Design View.
Creating a form that displays multiple records using the Multiple Items tool
If the form was created using the Simple Shape tool, it can only display one record at a time. If you want to create a form that displays multiple records but is more customizable than a table, use the Multiple Items tool.
-
In the Navigation Pane, click the table or query that contains the data that you want to display on the form.
-
On the Create tab, in the Forms group, click the button Other forms and select the command Multiple elements .
A new form will be created and displayed in Layout view. In this mode, you can make changes to the structure of the form while viewing the data.
When using the Multiple Items tool, the form generated by Access looks like a table. The data is arranged in rows and columns, and you see multiple entries at the same time. However, the Multiple Items form provides more customization options than a grid, such as the ability to add graphics, buttons, and other controls. For more information about customizing a form, see Customizing a Form in Layout View and Customizing a Form in Design View.
Creating a form using the form wizard
Instead of the various tools described above, you can use the form wizard to precisely select the fields that should be displayed on the form. You can also set up grouping and sorting of data and use fields from several tables or queries, if the relationships between such tables and queries have been previously configured.
-
On the Create tab, in the Forms group, click the Form Wizard button.
-
Follow the instructions on the Form Wizard pages.
Note: To add fields from multiple tables or queries to a form, do not click Next or Finish after selecting fields from the first table or query on the first page of the Form Wizard.
 Instead, repeat these steps to select a different table or query, and click any additional fields that you want to include in the form. Press button 9 to continue0009 Next or Done .
 -
On the last page of the wizard, click Finish .
Creating a shape with the Blank Shape tool
If the form wizard or tools do not suit you, you can start with an empty form. This can be a very quick way to create a form, especially if you only plan to add a few fields to it.
-
On the Create tab, in the Forms group, click the Empty Form button.
An empty form will open in Layout view and the area Field List will be displayed.
-
In the Field List area , click the plus sign ( + ) next to one or more tables that contain the fields you want to include in the form.
-
To add a field to a form, double-click it or drag it onto the form.
-
After adding the first field, you can add several fields at once. To do this, select them by holding down the CTRL key and then drag them onto the shape.
-
Order of tables in area List of fields may vary depending on the selected part of the form.
 If the field you want to add is not visible, select another part of the form and try again.
-
-
Using the tools in the group Header on the tab Designer , you can add a company logo, name or date and time to the form.
-
To add other types of controls to the form, select the ones you need in the group Controls in tab Designer .
To expand the selection of controls, switch to Design view. To do this, right-click the form and select Designer .
Understanding Layout and Design Views
Layout View is an intuitive view that you can use to make almost any change to an Access form.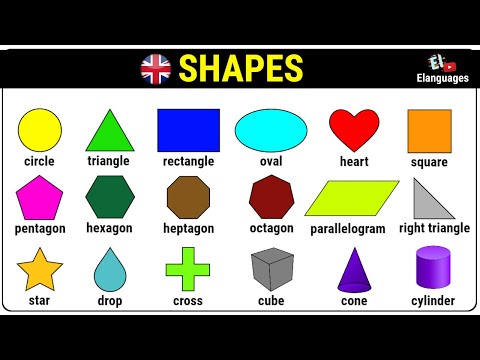
The form is being executed in Layout view. Therefore, you can view your data in the same way as when using a form. However, in this mode you also change the structure of the form. Because you can see the form data when you change it, this view is useful for adjusting the size of controls and performing almost any other task that affects the look and feel of the form.
If you encounter a task that cannot be completed in Layout view, you can switch to Design view. In some situations, a message appears in the application telling you that you need to enter design mode before making any changes.
Constructor The constructor represents the structure of the form in more detail. It displays the title, details, and footer of the form. The form is not executed when it is displayed in design mode. Therefore, you cannot view the underlying data when you make changes to the structure. However, certain tasks are easier to perform in Design view.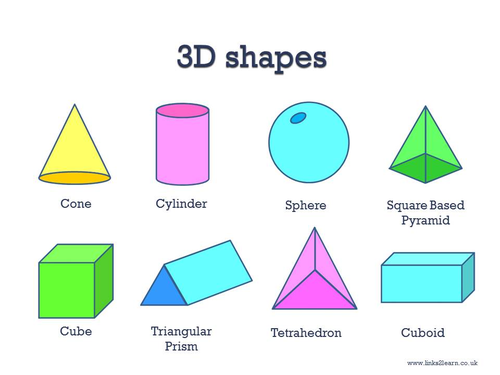 The options available are listed below.
-
add other kinds of form controls, such as bound object frames, page breaks, and charts;
-
change sources for text fields in the fields themselves without opening their property page;
-
resize sections of a form, such as its title or details section;
-
change some form properties that cannot be changed in layout mode.
Form setup in layout mode
After creating a form, you can easily customize its structure using Layout view. You can move controls around and resize them based on the data itself. You can add new controls to the form, and you can also set properties for the form and its controls.
To switch to Layout View, right-click the form name in the Navigation Pane and select Layout Mode .
The form will be opened in layout mode.
You can use the property page to change the properties of a form, controls, and sections. To open it, press the F4 key.
To add fields from a base table or query to the form structure, use area List of fields . To display area Field List :
You can drag fields directly from area Field list to the form.
-
To add a single field, double-click it and drag it from the Field List area to the desired section of the form.
-
To add multiple fields at once, CTRL-click them. Then drag the selected fields onto the form.
Form completion in design mode
You can also customize the form structure in Design view. You can add new controls and fields to it by placing them on the form. On the property page, you can set properties to customize the form.
To switch to design mode, right-click the form name in the Navigation Pane and select Design View .
The form will open in design mode.
You can use the property page to change the properties of a form, controls, and sections. To open it, press the F4 key.
Use area Field list to add fields from a base table or query to the form structure. To display area Field List :
You can drag fields directly from area List of fields in the form.
-
To add a single field, double-click it and drag it from the Field List area to the desired section of the form.
-
To add multiple fields at once, CTRL-click them. Then drag the selected fields onto the form.
Forms of nails and their names with photo
Today, nail shapes can be very diverse and there are simply no strict restrictions when choosing. Fashion dictates its own laws, which can very often surprise, and sometimes even amaze.
Any type is selected based on your own wishes and preferences. However, it often happens that at first glance, the priority option may not look profitable enough, since an important factor in this or that preference is the structure of the brush and cuticle. Whichever option you choose, remember that the manicure must be perfect and always neat. Well, as you probably guessed, the topic of our today's research in the field of beauty is the shape of nails and their names.
[adzense]
In order to make it easier to decide on the option that suits you and find out what types exist, we suggest that you consider the main forms that are often used by manicure masters.
Below are the most popular shapes:
- Oval
- Round shape
- Square
- Soft square
- Square oval
- Almond shaped
- Bevelled
- Cat's claws
- Pointe shoes
Next, we invite you to take a look at the graphic drawing, which clearly shows all the currently existing forms:
[yandex3bloka]
graphic examples of decoration.
Oval
This is one of the most popular shapes. It is suitable for almost everyone and is famous for being applicable to any structure of the cuticle, bringing together the advantages of all other types.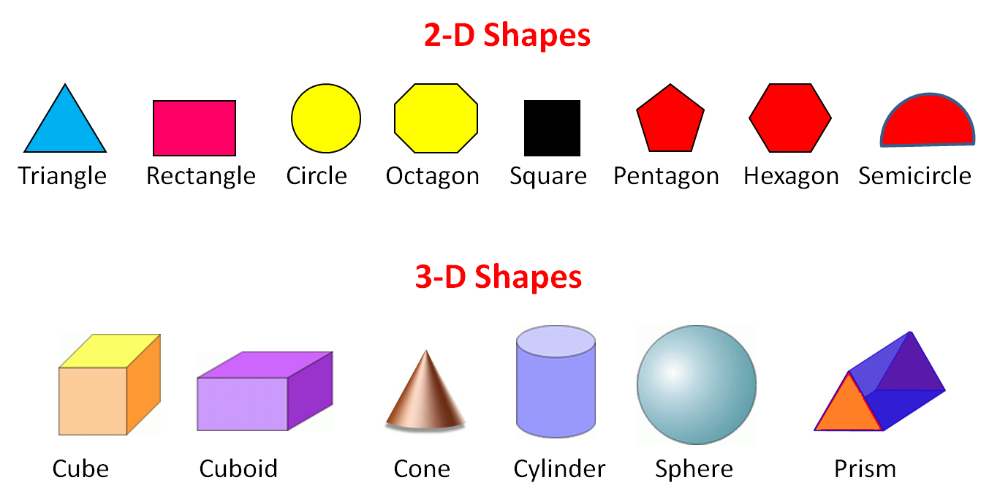 It has received wide application due to the fact that it acts as a kind of retoucher - it visually lengthens the nail plate, and also corrects the nail bed.
If you want to give your nails a well-groomed look, then the oval is the best, it looks neat, restrained and sophisticated, despite the simplicity. The complete absence of corners gives tenderness to this option, and the classic jacket will only emphasize the chic of this form.
Round shape
[adsense]
This option will be ideal for owners of fragile and short nails, as round nails are optimal for a shortened manicure. On long nails, this form looks less extravagant. The preference for the circle is given by supporters of an active lifestyle, for example, young mothers.
In order to give the nail this shape, you need to cut off the sharp corners along the edges and round the nail plate.
Square
Square-shaped nails are also quite popular now, this version of manicure looks great on girls with long graceful fingers, giving them a well-groomed look and sophistication.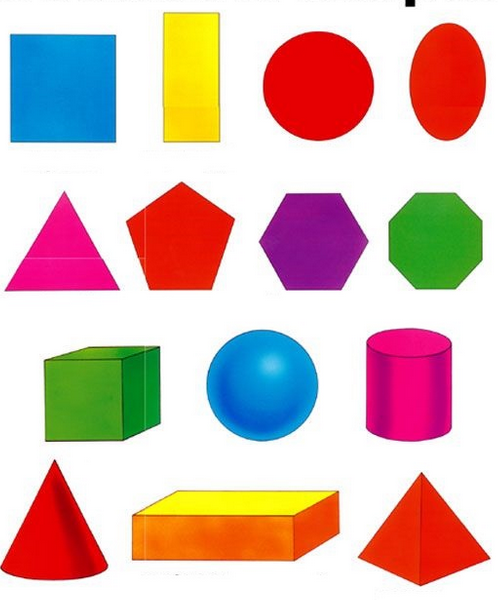 For this option, the optimal average length of the nail, as in the photo below.
[adzense2]
A distinctive feature of this variant is the strictly parallel lateral lines of the claw with the upper cut at a right angle. The only drawback of the square is its fragility on natural nails. Sharp corners can be easily damaged by impacts or snags. Also, if this manicure is not corrected in time, then the square begins to deform and wrap inward.
Soft square
[yandex2]
This form is very similar to the previous one, but is more practical. A soft square looks good on nails of any length. It is more durable, and the corners are less likely to break due to their roundness.
In order to create this option, you first need to make the nails square, and then file a little and round off the sharp corners.
Square oval
If for some reason you cannot enjoy the square, then you can choose such an option as a square oval - this is a combination of an oval and a square.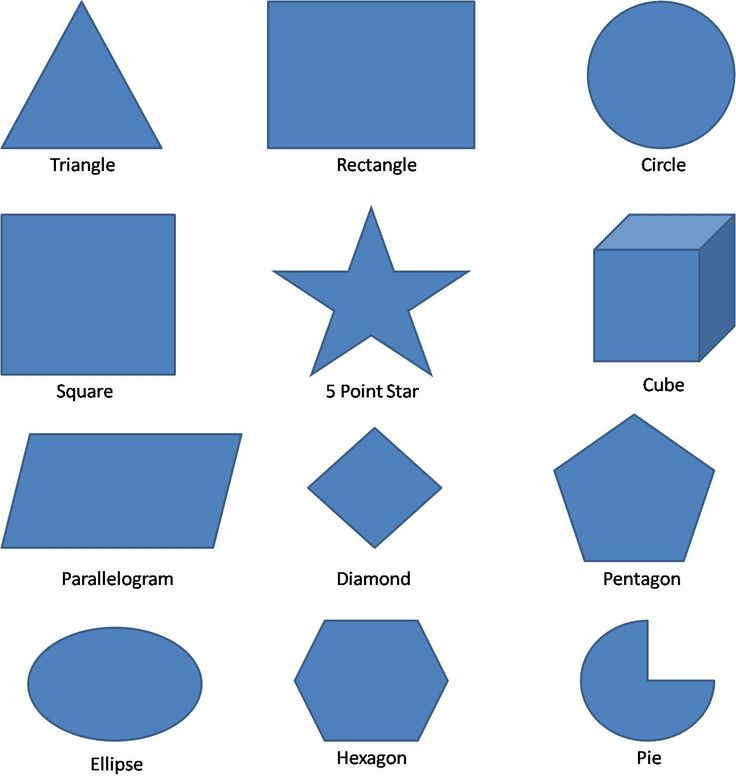 For owners of a wide nail plate, the similarity of an oval tip visually stretches the nail and brightens up the width.
To achieve this shape, you first need to make a square out of the nail, then cut off the sharp tips and finish by grinding to an oval.
Almond shape
This version does not have any corners or sharp shapes. All lines are smoothly reduced to the center and there they acquire an oval rounding. All this looks beautiful on long and graceful fingers. To achieve the ideal performance of this option, the length of the nail should be medium.
To create an almond-shaped shape correctly and beautifully, you need to start a soft filing from the middle of the nail and smoothly bring it to the tip, forming a rounding.
Beveled shape
It is quite bold and suitable for extravagant and original girls. It resembles a square in execution, but nuances are introduced when making the tip: an oblique cut is made, while one corner is made sharp and the other blunt. The most important condition when choosing this option is a strong nail plate, since sharp tips can peel off or break. This option is suitable for long nails.
Cat's claws
This option is chosen by owners of narrow nails. If the nail plate is massive and wide, then this interpretation looks somewhat rough. In general, this form is very similar to the almond-shaped one with one obvious difference - if in the almond-shaped tip is rounded, then here it is pointed, and the smooth sawing of the nail also begins from the middle of the plate.
It should be noted that in the process of wearing this form is not very practical, because due to the presence of a point, the nail plate is subject to frequent breaking off.
Pointe shoes
The universal option is gaining more and more popularity today. This is due to the fact that pointe shoes are suitable for owners of any structure of the brush with any length of the nail plate. However, if the plate is wide enough, then the tip of medium length looks more aesthetically pleasing.