Wearable cardboard box car
DIY Cardboard Box Cars - Just Add Confetti
This post contains affiliate links. For more information, see my disclosures, here.
Hi Friends! I wanted to share a full tutorial on how to make the DIY cardboard box cars that we created for Easton’s Retro Drive-In Movie Party. Below are all of the step-by-step instructions of the car assembly line!
DIY Cardboard Box Cars: The Assembly LineStep 1: To assemble the DIY cardboard box cars you will need cardboard boxes, duct tape, hot glue, an xacto blade, scissors, and a ruler. I wanted all of the boxes to be the same size so I used these 18×24 cardboard boxes and they worked really well. They were a good size for the older kids too.
Step 2: Fold and tape the box into the standard box shape.
Step 3: Using a bowl or round object of your choice, draw two semi-circles on the front of the box (on the fold line, where the flaps will fold down).
Step 4: With an xacto blade, carefully cut along the semi-circle line that you just drew.
Step 5: Fold the flap downward. The two semi-circles of the headlights should remain up.
Step 6: Measure 8.5 inches on the sides of the box (on the left and right of the headlights). Next, with the xacto blade, cut the vertical line you just created/measured. Repeat for both left and right sides.
Step 7: Fold both the left and right 8.5 inch panels down and tape together with duct tape.
Step 8: Hot glue the front flap and newly taped together side flaps to one another. This will create your dashboard.
Step 9: Place hot glue on the inside back flap of your car and then fold over to attach to back of box. This will act as reinforcement as well as create a more sturdy back of your car.
Step 10: Now it’s time for windows! Draw a curved window shape with pencil on the remaining left or right side panel.
Step 11: Using your xacto blade, carefully cut out the curved window that you just drew.
Step 12: Tip: Use the portion of the window that you just cut off to create the “stencil” for your other window. Just flip it over and trace on the other side panel. This will make the curve of both windows uniform.
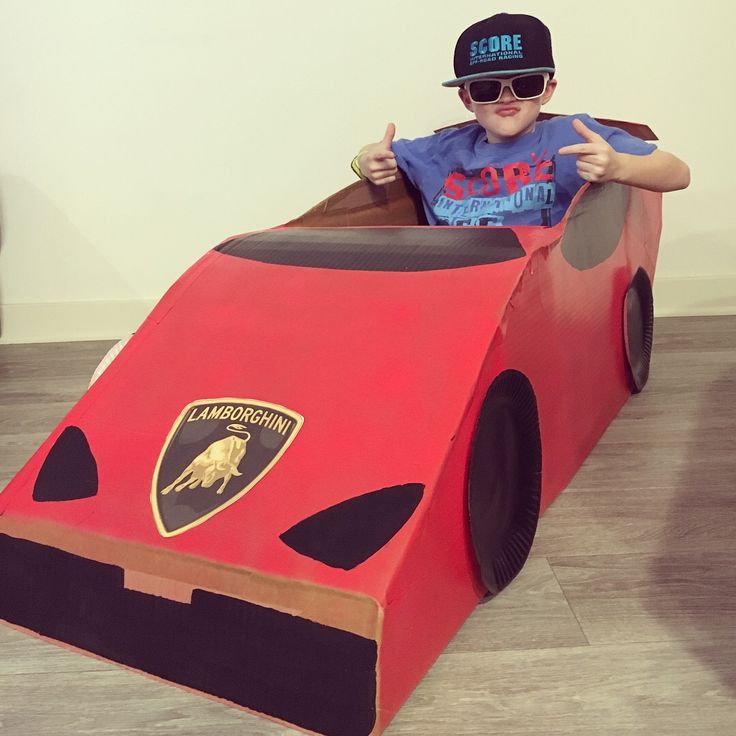
Step 13: Now your DIY cardboard box car is completely assembled!
Step 14: Time for a paint job! I used this Rust-oleum spray paint in apple red, golden sunset, and seaside. Each car took about one can each. The links above have some 6-pack prices that would be a very good value if you are doing multiple cars.
Step 15: Spray paint the cars in the color of your choice.
Step 16: Now it’s time for some bumpers! You will need pool noodles, silver ribbon, hot glue, scissors, and decorative metallic trim.
Step 17: Cut each pool noodle in half lengthwise and widthwise.
Step 18: Cut strips of the decorative metallic trim that will be able to wrap around the pool noodle. I found this trim at Hobby Lobby in the classroom section.
Step 19: Cover the end of the pool noodle with sliver ribbon by applying a small amount of hot glue and then wrapping the ribbon around.
Step 20: Apply hot glue to the silver metallic trim and place all along the sides of the noodle. Repeat until you have completed all of your bumpers. Then, hot glue entire bumper onto the front and back of your DIY cardboard box car.
Step 21: Time for some detail work! I created grills for the cars using the remaining metallic trim that I had left over from the bumpers. With an xacto blade, I cut strips in the trim to create the look of a grill. Once completed, I glued the grill to the front of the car.
Step 22:
I used black paper plates for the tires on the cars. To create the look of chrome rims, I cut silver paper into strips and glued them to the plate. Then, in the center of the plate, I glued a silver circle.
After you finish assembling the initial shape and form of the DIY cardboard box car you can paint and decorate it any way you would like. I just wanted to share what worked well for me. I hope it is helpful to you! After I created paper plate tires I also added glittery blue paper for the window panes, gold shimmery paper for the headlights and red shimmery paper for the taillights. I’m also sharing free printables for the license plates. It’s an editable PDF so you can personalize it with any name, month and year you would like. Be sure to grab yours at the bottom of this post. Happy crafting!
PIN FOR LATER:
Cardboard Car Craft Project — The Multitasking Mom
Emily Bendler
Crafty Mom
Emily Bendler
Crafty Mom
Disclaimer: The Multitasking Mom is a participant in the Amazon Services LLC Associates Program, an affiliate advertising program designed to provide a means for us to earn fees by linking to Amazon.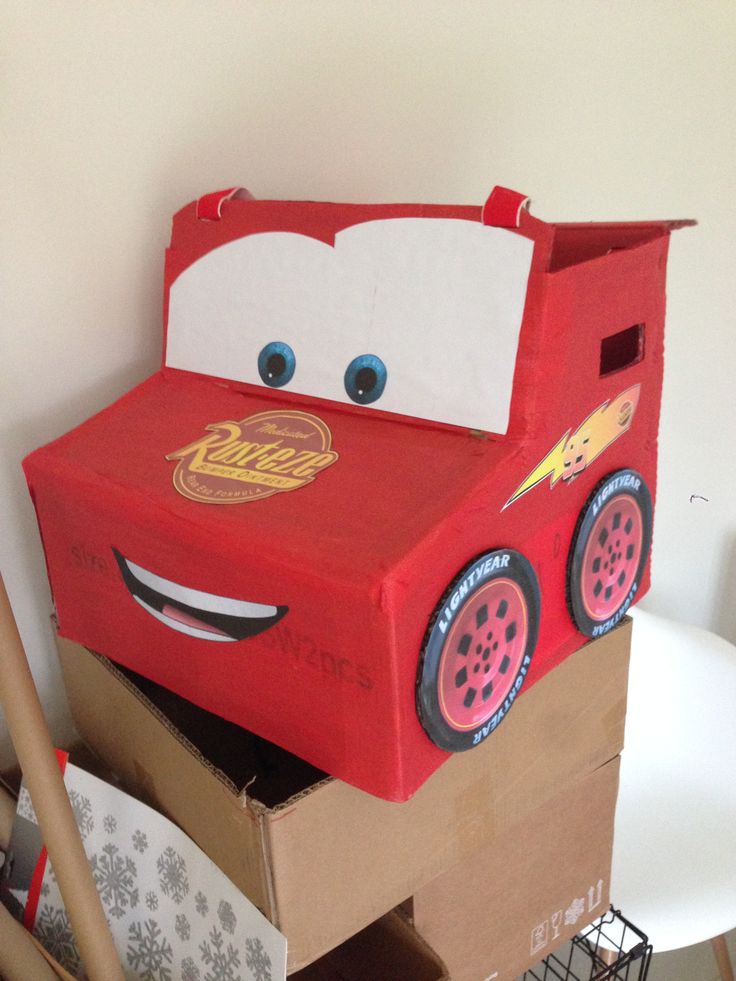 com and affiliated sites. Anything linked within this post are items that the author, herself, would purchase and all other content continues to be the author's own opinion.
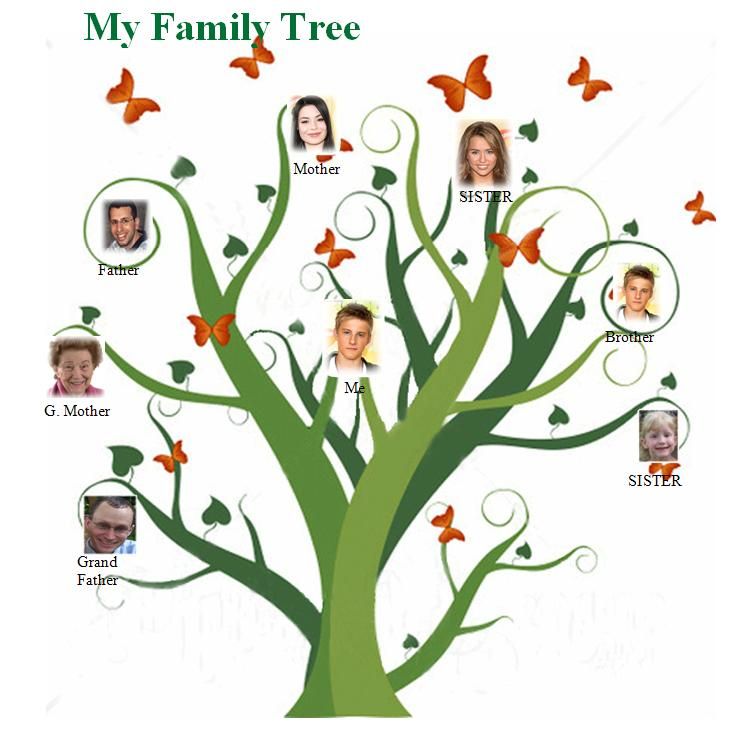
Recently, Tyler’s class was discussing transportation at school. They talked about the various forms of transportation and as a homework assignment, they had to make a form of transportation using household items.
The intention was to use things like cardboard and buttons and egg cartons to make a bus or a train or a plane that they could take to school. My son wanted to make a car; one that he could fit in.
So, that’s what we did! Check out how we made Tyler’s little blue jalopy.
What You Need
Large box (we used a box from Amazon.com)
Dessert sized paper plates
Washable paint
Markers
Pipe cleaners
Paint brush
Paper (white or construction)
Paper towel rolls
Duct tape
Paper fasteners
Straps (you can use old ties, elastic, suspenders, scarves etc. )
)
What to Do
1. First we found an old amazon box from a prior delivery. The short ends of the box were the perfect size, but the long ends made it more of a mini van size. So we cut down the long ends of the box to make it the perfect width for Tyler. Then we re-attached the other short end using duct tape form a smaller rectangle. You can refer to the diagram below where the purple represents the box, the dotted lines represent the cuts, and the silver dots are where we taped it back together.
2. We folded the flaps of the box in towards center to make each side of the car thicker and more study. We used duct tape to secure them in place.
3. While we parents performed steps 1 and 2, Tyler took 5 dessert sized paper plates. He used markers to color 4 of them to be the wheels of the car and the 5th one to be the steering wheel.
4. We used long paper fasteners to secure the wheels to the box.
5. Next we took blue washable paint and Tyler painted the two sides of the car. He decided to leave the front and back as is. You can paint all 4 sides or glue on construction paper to color your car.
6. Next we used a plastic cup to trace 4 circles onto white paper. Tyler colored these with a yellow marker and then cut them out. We glued two on the front and two on the back of the car to be headlights and taillights. You could also use yellow construction paper for this part.
7. We took a paper towel roll, cut it the long way, and slipped it onto the bottom edge of the front of the car. We covered it in silver duct tape which also secured it to the car. this served as the front bumper. The same process is used for the rear bumper.
8. We used a cut down wrapping paper roll as the stem of the steering wheel. You could also use another paper towel roll. We taped one end of the tube to the inside of the front of the car. I then took the steering wheel paper plate and looped a pipe cleaner through the center. I made a small hole on either side of the stem and put the ends of the pipe cleaner through the holes and then tied the ends together. This allowed us to secure the steering wheel but also allow it to be able to turn.
9. We used elastic straps to make the car wearable. We secured one end of each strap on the inside front of the car. We then crossed the straps and secured the other ends of the straps to the inside back of the car.
Below is the finished product!
Other additions you can make is to add racing stripes to the side of the car or a grill on the front of the car. You could also use a toilet paper roll, a small box, and aluminum foil to make a side view mirror. Maybe create your own license plate! There are tons of ways to make this project your own.
This project was a lot of fun. I loved letting Tyler come up with ideas on how we could create the parts of the car. Plus, he was so excited to show his creation to his friends at school. This is definitely a fun project that can lead great imaginative play time as well.
Cheers,
Emily
Tagged: cardboard car, preschool craft, little blue jalopy, wearable car
Unusual interior items from a cardboard box
Explore
Stories
Photo
Lifehacks
Health
Entertainment
Food and Home
Interior with your character
nine0002 BrandGalaxy
collaborationsEvents
Stories
Photo
Lifehacks
Health
Entertainment
Food and Home
Interior with your character
nine0002 BrandGalaxy
collaborationsEvents
HACKS
Bring new life to Samsung Indoor TV carton packaging.
06/20/2022 | ~5 min.
Unpacking new devices, in particular interior TV, is not a reason to throw away the boxes. It is much better (and more environmentally friendly) to make a table, an art object or a cozy home for a pet out of them. It's easy: just follow the instructions. Shall we try? nine0003
Cat House
Device: 43 / 50 / 55 / 65 / 75 inch TV
Assembly Time: 50 minutes
Difficulty Level: 2/5
1. Prepare the box. Lay it flat, open the top flaps, glue one side seam and unfold the cardboard on the floor to form a sheet.
2. Mark the box as shown. nine0060 The number in the diagram indicates the distance in points: for example, to measure the segment with the number 5, you need to connect 6 points in series with each other.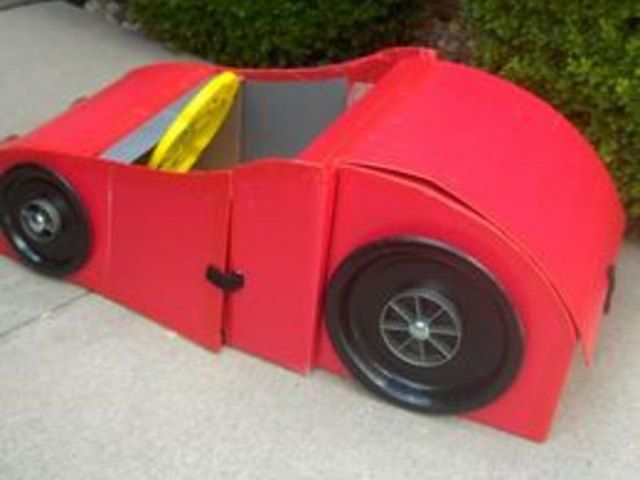 The size of your package and the image on it may be different - that's okay. The main thing is to fit the entire sketch on the box.
#OurPlanetFirst
Samsung's eco-projects that help care for the environment
To learn more
3. Cut out the parts according to the markup. Details 1 and 2 - both on the outer contour and on the inside. We cut out the third only along the outer contour, plus we make four cuts along the edges. We advise you to use a clerical knife: in our case, it is more convenient than scissors.
4. Assemble the house. Place part 3 on the floor and fold the edges towards the center according to the marking. Pre-squeeze the places of the folds on the corner of the table - you get a parallelepiped. Put parts 1 and 2 on its edges with sharp edges up. Now lift the edges of part number 3 so that parts 1 and 2 fit into the slots and fix the structure. You can celebrate housewarming! nine0003
Animal figurine - say a bear
Device: 43 / 50 / 55 / 65 / 75 inch TV
Assembly time: 1 hour 20 minutes
Difficulty level:
1. Repeat steps 1 and 2 from the previous instructions. The figurine has 5 parts: use the packaging sparingly to make sure there is enough cardboard for everything. We remind you that the number in the diagram is the distance between the points. To measure the segment indicated by the number 3, it is necessary to connect 4 points in series with each other. nine0003
Why dispose of old equipment and how to do it right?
To learn more
2. Cut out all the pieces along the outer contour. And make slots-mounts: in part 1 there are 4 of them, in 3-a and 3-b - two each, and in 4 - one.
3. Assemble the bear.
— Attach part 2 inside part 1 by inserting the projecting parts into the slots. Get a rigid frame structure. nine0061 - Align the slots on parts 3-a and 3-b with the same slots on the "legs" of part 1 - the stand is ready.
- Put part 4 on the larger side ledge of the structure (the small one will become a tail). Here is the bear!
Kinko coffee table
Device: 43 / 50 / 55 / 65 / 75 inch TV
Assembly time: 1 hour 30 minutes
Additional inventory: 90 90 60 adhesive tape5 : nine0060 3.5/5
1. Repeat steps 1 and 2 from the first instruction. We need 8 elements, item number 3 - in duplicate. Recall again: the number in the diagram indicates the distance between the points. To measure the segment indicated by the number 5, it is necessary to connect 6 points in series with each other.
2. Cut out the elements along the outer contour. And make cuts - they are on every part. Bend parts of the structure 2 and 7 along the lines in advance - for this it is convenient to use the corner of the tabletop. nine0003
3. Assemble the table. You will need tape or glue.
— Insert the edge of the base of part 2 into the slot of part 1, wrap around, insert the second edge into the same slot. Glue the edges of element 2 along the entire height.
- Connect parts 3 and 4 perpendicular to each other using slots.
— Put item 5 on top of the structure. Bottom — 6.
— Lubricate the edges of element 7 with glue. Glue one of them vertically to part 3.
- Wrap element 7 around the resulting “washer” and glue its other end to part 3 from the inside. nine0061 - Place the structure of parts 3, 4, 5, 6 and 7 horizontally on the cylinder of elements 1 and 2. Done!
Give your TV box a new life.
Enjoy great picture quality with QLED technology.
- HACKS
- TV nine0174
- Interior TV
- Tips
See also
Types of product packaging: transport and consumer :: Shopolog.
 ru
ru Packaging allows goods to retain consumer properties, protects them from mechanical damage and other harmful effects on the way from production to the marketplace client. In addition, it can serve as additional marketing tools. Obviously, the value of packaging is difficult to overestimate. nine0003
Packaging is usually divided into transport and consumer packaging, its features depend mainly on consumer properties that need to be protected in transit and during storage. We understand the types of packaging together with the experts of the fulfillment operator FulEx.
Clothing and accessories
Clothing and textile accessories
The main task of packaging during transportation of clothing is to prevent accidental damage that could spoil the presentation of products, as well as to keep the goods dry. For this purpose, ordinary or perforated PVC bags are used. Perforation can be used so that the moisture absorbed, in a certain amount, into the hygroscopic fabric at the production stage, does not condense on the walls of the bag and can evaporate.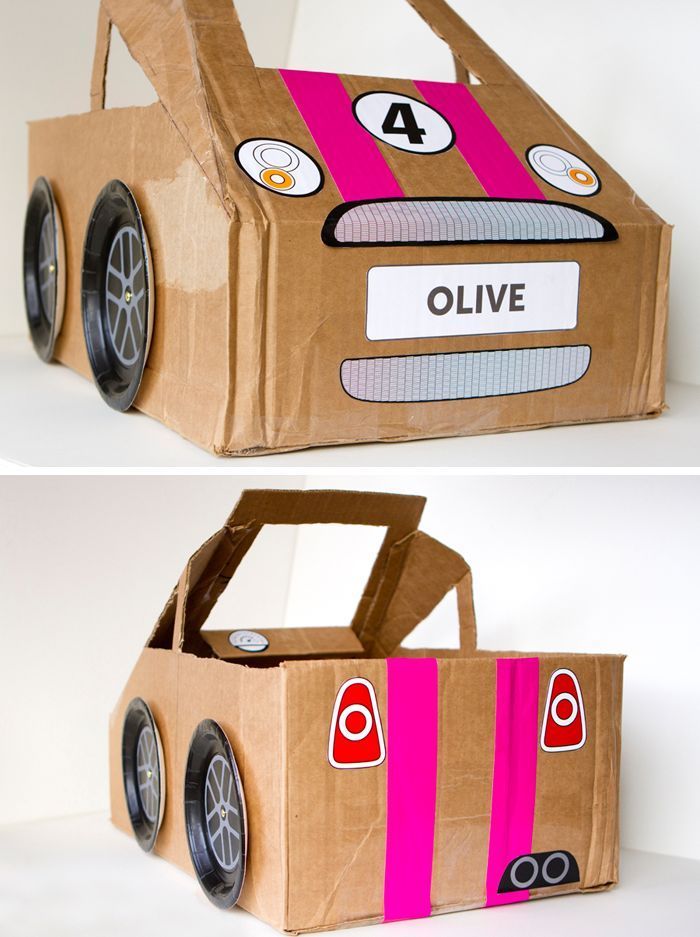 Textile products in PVC bags are usually stacked in batches of several dozen pieces in corrugated cardboard boxes. nine0003
Upon delivery to the consumer, in addition to consumer packaging, decorative and protective packaging, such as kraft gift bags or an additional corrugated cardboard box, can be used.
A special feature is the transport packaging of garments and accessories where even minimal deformation is unacceptable, such as hats. Each item of this type is packed in a rigid box made of corrugated cardboard, plastic, and, in the case of the luxury segment, made of more durable materials, such as wood. nine0003
Shoes and accessories
Footwear requirements are different from clothing requirements. The need to maintain shape and prevent deformation requires a different approach. Shoes are packed in hard corrugated cardboard boxes, sometimes with ventilation perforations. To prevent the influence of high humidity, for example, in transit or in a warehouse, hygroscopic filler is placed in boxes in moisture-proof paper bags.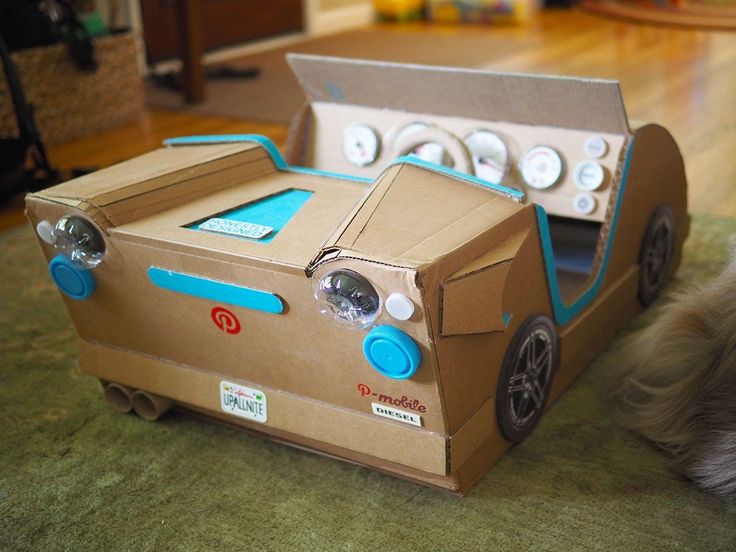 The internal cavities of the shoe are filled with an elastic filler, since the cargo in the package should not have voids. To prevent aesthetic defects from mutual friction inside the package, a pair of shoes is often isolated from each other with paper or separate textile covers are used. nine0003
Cosmetics
Transport packaging of cosmetics mainly involves protection against mechanical damage and compliance with storage and transportation conditions. Cosmetics, household chemicals, and books must be packed in shrink wrap. This eliminates damage to consumer packaging when rubbing against each other in a bulk box. At the supplier-marketplace stage, standard corrugated cardboard boxes are used, which contain several cardboard boxes of cosmetics. At the stage of the marketplace - the client, for additional protection (especially when it comes to glass bottles), air-bubble PVC film can be used. nine0003
Household chemicals
Features of the transport packaging of household chemicals are determined by the factory consumer packaging and transportation requirements. It is important that such packaging comply with the Uniform Sanitary and Epidemiological and Hygienic Requirements for products (goods) subject to sanitary and epidemiological supervision (control). In addition to the requirements, it is recommended to additionally pack household chemicals in breakable containers, in bubble wrap, and seal them. nine0003
Wearable electronics and small household appliances
The purpose of packaging for wearable electronics and household appliances is to prevent mechanical damage, eliminate the effects of vibration, increase humidity inside the package above the values specified by the manufacturer. Factory consumer packaging is additionally reinforced with bubble wrap. Additionally, if there is an open (non-hermetic) factory packaging, you can use a hygroscopic filler in moisture-proof bags. Factory packaging, depending on the device and manufacturer, can be soft or hard. In the case of soft (PFC-bag) packaging, it makes sense to additionally pack the device in a corrugated cardboard box. nine0003
Books
The main enemy of a book is moisture. Also, some people do not want to share with others what they read, for example, when it comes to political literature or erotic works. Both of these issues are easily solved by kraft paper or an opaque PVC bag. Valuable publications from the luxury segment sometimes require more serious protection against mechanical damage, which can be solved with the help of corrugated cardboard packaging.
Products for adults
A characteristic feature of the packaging of products for adults is anonymity. For them, as a rule, special opaque PVC bags are used, which do not allow determining the shape of an object due to dense pneumatic frame inserts. In order to mask the shape of the object, soft filler can also be used.
Interior goods, decor, dishes
The packaging of interior and decor goods is extremely diverse and depends on the materials from which they are made.