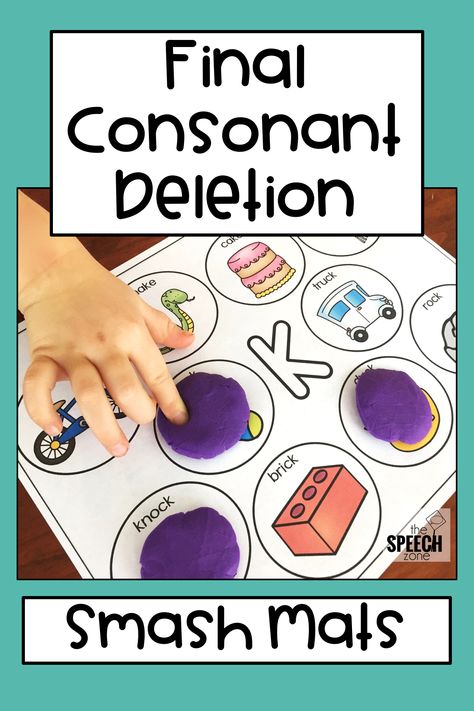
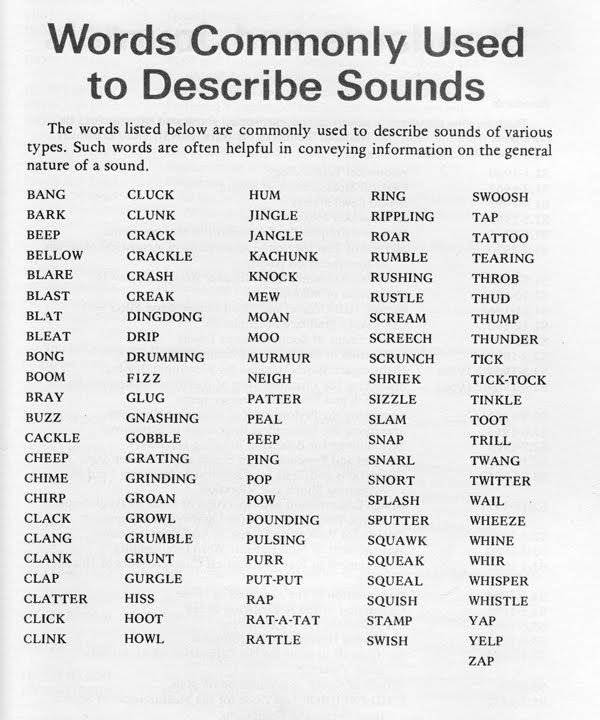
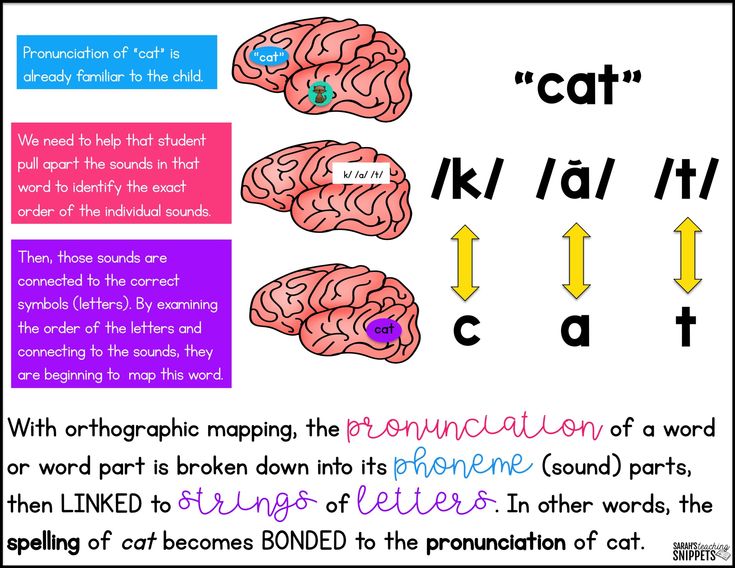
Break words into sounds
Tuning In to the Sounds in Words
Thinking about the sounds in words is an unnatural act. From our earliest experiences we learn to "see through" the sounds of language to think about meaning. For instance, we learn to focus not on the sounds /mä/mē/, but on that warm, cuddly person, Mommy. But to learn to read, children must refocus on the sounds of words, a "metalinguistic shift."
Onset-rime blending
To help children think about words as sound, we can help them break words into smaller parts. One way to break down the syllable is into onset (everything before the vowel) and rime (the vowel and everything after it). For example, sleep could be broken into /sl/ and /eep/.
Rhyming means blending a new onset to an old rime. Before children can produce rhymes, they need a great deal of experience recognizing rhymes. Listening to rhyming stories, reciting rhyming poetry, and singing rhyming songs should be daily activities in the early childhood classroom.
Children can first try making rhymes by blending a single onset to a variety of words. For example, they could play Silly Sally, where they blend /s/ to the rime of each word. The teacher names an object (e.g., cup), and the children change the onset to /s/ (e.g., sup). This might make sense (me, see; bite, sight) or nonsense (mouse, souse; bike, sike). Any phoneme could become the onset in such a game. You can play Silly Billy, Silly Curly, Silly Dolly, etc.
Body-coda blending
The vowel is the loudest part of the syllable (the peak). You can always stretch the vowel and say it out loud. Children find it fairly easy to break a syllable on either side of the loud vowel. For instance, they might break the word flight into fl-ight or into fligh-t.
When we talk about the body of a syllable, we are referring to all of the phonemes through the vowel. Any consonants that come after the vowel is called the coda. For example, in the word dream, /drE/ is the body of the syllable and /m/ is the coda.
Here are two ways to break up the word blast:
- Onset (bl) – Rime (ast)
- Body (bla) – Coda (st)
There is an important payoff for this new terminology: Body-coda blending is easier than onset-rime blending. This is because onsets are often highly distorted during blending.
For example, if we ask a child to blend d-ice, it is very difficult to pronounce /d/ without considerable distortion. Because /d/ involves the vocal cords, it takes some vowel to pronounce /d/ (we usually add a schwa /u/), and this artificial voicing interferes with blending in the actual vowel. However, there is no distortion of consonants in the coda. Thus, di-ce is a very easy blend.
In general, the easiest way to blend in decoding is body-coda, e.g., swee-t. Onset-rime blending (sw-eet) is usually harder, but at least there are only two parts to blend. Phoneme blending is harder still, because there may be three, four, five, or six phonemes to blend in a single syllable. Thus, a natural progression is to begin with body-coda blending, progress to onset-rime blending, and finish with phoneme blending.
Ways to practice blending
One way to practice blending is to play a guessing game called Secret Code. The teacher could turn an illustrated word face down and say its body and coda, e.g., ha-t. When a student blends the phonemes and guesses the word, the teacher shows the picture.
This game also works well with riddles, which don't require pictures. For example, the teacher could say, "I'm thinking of the animal Bo Peep lost. It's a shee-p." Note that these examples are especially easy because they feature body-coda blending, the easiest kind. Later the teacher could give onset and rime (sh- eep), and for the final challenge, all the phonemes (sh-ee-p).
Phonological and Phonemic Awareness: In Practice
These activities will work effectively for most students, but children will vary in their response to these activities. Some students will need much more practice than others, and what works well for most students will not necessarily be effective for everyone.
Language comprehension activities
In this section
Counting words in a sentence
Counting the words in a sentence may seem simple. But when we speak, we run words together. It’s important for young children to learn that the stream of speech is composed of individual words. For children with low language skills or children learning English, this activity is especially crucial. It is perfectly fine to take sentences from a story. The language should be close to common speech.
Steps:
- Give each child a manipulative or manipulatives with which to count the words in a sentence.
- Dictate a sentence. The sentences should be articulated clearly but not in a halting, artificial manner. The words should run together as in natural speech.
- Avoid dictating haltingly: “Mom [pause] went [pause] to [pause] the [pause] store.”
- Be careful when dictating phrases such as ‘going to’, ‘would have’, ‘used to’ to pronounce two words.
 Avoid saying, ‘gonna’, ‘woulda’, ‘useta’, and so on.
- All students repeat the sentence.
- One student uses the manipulatives to count the words.
- All students use the manipulatives to count the words in the same sentence.
Repeat these steps with as many as 10 sentences.
Following these steps, students have individual turns and group practice to ensure the maximum amount of practice in a brief activity.
One manipulative that has been used is a paper bunny cut out and attached to a wooden stick. Students ‘hop the bunny’ for each word in the sentence. Other manipulatives are bingo chips or bottle caps which are counted out for each word.
Sentences should start at two to five words in length, then should get a little longer, but generally should not exceed eight words.
Back to top
Phonological awareness activities
Counting syllables
Counting syllables requires the student to know what a syllable is. Introduce the vocabulary word: syllable. Syllables can be explained to children in this manner:
“Words are made up of syllables. Some words have 1 syllable. Some words have lots of syllables. Our mouth knows where the syllables are. Let’s use our mouth to feel syllables. Watch me. I will use something called clamped lips to feel syllables. I will close my lips tightly and shout the word ‘classroom’.”
Close your lips tightly and shout ‘classroom’. Students will hear two muffled shouts.
“I heard two shouts. I felt two pushes of air. I wanted to open my mouth 2 times. That means ‘classroom’ has two syllables. I hold up two fingers to show how many syllables are in ‘classroom’. Do it with me.” Then lead the group through two examples.
Steps:
- We dictate words in a natural manner.
- Avoid dictating haltingly: “mon [pause] ster”
- Dictate words as they are said, not as they are spelled. For example, say ‘DOC-ter’ not ‘doct-OR’.
- All students repeat the word.
- All students shout the word with clamped lips.
- All students show how many syllables using their fingers.
Repeat these steps with as many as 15 words. Early lessons should include words with one and two syllables. Then include words with three syllables. When students are proficient, introduce some challenge words with four or more syllables. Remember to include one-, two-, and three-syllable words as well.
After some practice, take away the scaffold of using clamped lips:
Steps:
- We dictate words in a natural manner.
- All students repeat the word.
- All students show how many syllables using their fingers.
Back to top
Segmenting syllables
Segmenting syllables is easily taught after students can use clamped lips to count syllables. It is best to restrict this activity to words with three or fewer syllables.
“I can say a word, then say each syllable in the word. As I say each syllable, I will lay down a card. I will lay the cards left to right. Watch me. I say the whole word: ‘Peanut’. I say each syllable and put down a card: ‘pea’ [place a card] ‘nut’ [place a card so it appears left-to-right for students]. Now I sweep my finger below the cards and say the whole word: ‘peanut’ [sweep finger below the cards left-to-right]. Do it with me.” We then lead the group through two examples.
Steps:
- We dictate words in a natural manner.
- All students repeat the word.
- One student uses the manipulatives to segment the syllables.
- All students use the manipulatives to segment the syllables.
Repeat these steps with 10 to 15 words. Early lessons should include words with one and two syllables. Then include words with three syllables.
Following these steps, students have individual turns and group practice to ensure the maximum amount of practice in a brief activity.
Manipulatives can be cards, felts, bingo chips, bottle caps, or other objects.
Back to top
Identifying first, last, middle syllables
Identifying syllables requires the student to segment the word, then say just the target syllable. It is best to restrict this activity to words with three or fewer syllables. First, middle, and last are sufficient for this task. When students move to print, the student can carry this skill into sounding out longer words for spelling and reading.
“I can say each syllable in the word. Then I can say just the first syllable. As I say each syllable, I will lay down a card. Watch me. I say the whole word: ‘sunset’. I say each syllable and put down a card: ‘sun’ [place a card] ‘set’ [place a card so it appears left-to-right for students]. I say the whole word: ‘sunset’ [sweep finger below the cards left-to-right]. I touch and say just the first syllable: ‘sun’ [touch the first card]. Do it with me.” We then lead the group through two examples.
Steps:
- We dictate words in a natural manner.
- All students repeat the word.
- One student uses the manipulatives to segment the syllables.
- Introduce this by saying, “One student will be our voice, everyone else will segment the syllables silently.”
- [Name], segment [word].
- All students (silently) use the manipulatives to segment the syllables.
- A different student identifies just the first syllable.
- Everyone, what is the first syllable?
- All students touch and say the first syllable.
Repeat these steps with as many as 15 words. Start with one and two syllable words. Start with just identifying the first syllable. Introduce identifying the last syllable. Combine identifying the first and last syllable with one, two and three syllable words. Add three syllable words. Introduce identifying the middle syllable.
Following these steps, students have individual turns and group practice to ensure the maximum amount of practice in a brief activity.
Back to top
Blending syllables
Blending syllables should be taught after students can segment. It is best to restrict this activity to words with three or fewer syllables.
“I can say each syllable in a word and then I can blend the syllables to say the word. As I say each syllable, I will lay down a card. I will lay the cards left to right. Watch me. I say each syllable and put down a card: ‘lap’ [place a card] ‘top’ [place a card so it appears left-to-right for students]. Now I sweep my finger below the cards and say the whole word: ‘laptop’ [sweep finger below the cards left-to-right]. Do it with me.” We then lead the group through two examples.
Steps:
- We dictate syllables.
- All students repeat the syllables and place the cards.
- One student blends the syllables.
- All students blend the syllables.
Repeat these steps with as many as 15 words. Early lessons should include words with one and two syllables. Then include words with three syllables.
Following these steps, students have individual turns and group practice to ensure the maximum amount of practice in a brief activity.
Back to top
Manipulating syllables (adding, deleting, substituting)
Adding
Manipulating syllables should generally be taught in this sequence: add, delete, substitute. Adding syllables is very similar to blending syllables. Students already know what to do with the cards. As such, it is the easiest manipulation.
“I can add syllables to make a new word. Watch me. I say the first syllable and put down a card: ‘lap’ [place a card]. I add the last syllable: ‘top’ [place a card so it appears left-to-right for students]. I touch and say the syllables: ‘lap’, ‘top’, ‘laptop’ [sweep finger below the cards left-to-right]. Do it with me.” We then lead the group through two examples.
Steps:
- We dictate the first syllable and places a card.
- All students repeat the syllable and place a card.
- We dictate the second syllable and place a card.
- All students repeat the syllable and place a card.
- All students touch and say, then blend the syllables to say the word.
Repeat these steps with as many as 15 two-syllable words.
Deleting
“Watch me take away a syllable from a word. The word is: ‘pencil’. ‘Pen’ ‘cil’ [place a card for each syllable so it appears left-to-right for students]. ‘Pencil’ [sweep finger below the syllables and say the word]. I take away ‘cil’ [remove the card]. ‘Pen’ is left [touch remaining card]. Do it with me.”; We then lead the group through two examples.
Steps:
- We dictate the word and place the cards.
- All students repeat the word and place the cards.
- All students touch and say, then blend the syllables to say the word.
- We dictate the syllable to remove, alternating between first and last.
- All students touch and say the remaining syllable.

Repeat these steps with as many as 15 two-syllable words.
Substituting
“I can change one syllable in a word to form a new word. Watch me. I will change ‘suntan’ to ‘sunset’. Which syllable is different in ‘suntan’ and ‘sunset’? I will use the cards. The first word is ‘suntan’ [say syllables, lay cards, touch and say syllables, blend word]. I want to change ‘suntan’ to ‘sunset’. [Touch below the cards, say new syllables, blend new word]. The second syllable is different. I’ll change the cards to and say the new syllable: [pick up second card and say ‘tan’, lay down new card and say ‘set’]. I’ll touch and say the new word: [say syllables, lay cards, touch and say syllables, blend word].
Steps:
- We dictate old word to new word.
- All students repeat old word to new word, and lay cards for each syllable.
- All students touch and say, then blend the old word.
- We repeat the new word.
- Below the cards, all students touch and say, then blend the new word.
- We ask: syllable going out?
- All students touch and say the syllable, removing the card.
- We ask: syllable going in?
- All students touch and say the syllable, adding a card.
- All students touch and say, then blend the new word.
Repeat these steps with as many as 15 words.
Back to top
Blending onset and rime
An onset is the initial consonant or consonant cluster of a one-syllable word. A rime is the vowel and any consonants that follow the onset. So in the word “map,” /m/ is the onset and /ap/ is the rime.
Unlike with syllables, we do not need to teach the vocabulary terms of onset-rime. This skill is a scaffold to phonemic awareness skills, and not one with enduring usefulness. Blending onset-rime is more easily taught after students can blend syllables. Use only words with a single onset sound. Blends can be taught in phonics instruction.
We are modeling facing students. We work right-to-left so it appears left-to-right for students.
“I can blend two parts of a syllable to make a word. Watch me. /M/ [we put right fist on the table], /ap/ [we put left fist on table], ‘map’ [we slide our fists together to touch in front of her]. Do it with me.” We then lead the group through two examples.
Steps:
- We dictate onset [pause] rime, using fists to represent onset and rime.
- All students repeat the sounds and use their fists to represent the sounds.
- One student blends the onset and rime to say the word.
- All students blend the onset and rime to say the word.
Repeat these steps with as many as 10 words. Remember to use words with only one onset sound. For example, use /ch/ /in/ but avoid /sw/ /im/.
Following these steps, students have individual turns and group practice to ensure the maximum amount of practice in a brief activity.
Back to top
Onset-rime completion
As with all onset-rime activities, use only words with a single onset sound.
We are modeling facing students. We work right-to-left so it appears left-to-right for students.
“I will say a word and give you the first part. Then you say the last part. Watch me. The word is ‘tape’. The first part is /t/ [we put right fist on the table]. What’s the rest of the word? /Ape/ [we put left fist on table]. The word is ‘tape’ [we slide our fists together to touch in front of her]. Do it with me.”; We then lead the group through two examples.
Steps:
- We dictate onset, using a fist to represent the onset sound.
- All students repeat the onset sound and put a fist down.
- One student adds the rime and puts the right fist down, then blends the onset and rime to say the word.
- All students blend the onset and rime to say the word.
Repeat these steps with as many as 10 words.
Following these steps, students have individual turns and group practice to ensure the maximum amount of practice in a brief activity.
Back to top
Do these words rhyme?
For students to learn whether words rhyme, and to generate rhyming words, they must understand what rhyming is. Introduce the vocabulary word: rhyme. Rhyming can be explained to children in this manner:
We are modeling facing students. We work right-to-left so it appears left-to-right for students.
“Words rhyme when they end with the same sounds. For example, I can check to see whether ‘make’ and ‘take’ rhyme. Watch me. I blend two parts of each word. /M/ [we put right fist on the table], /ake/ [we put left fist on table], ‘make’ [we slide our fists together to touch in front of her]. /T/ [we put right fist on the table], /ake/ [we put left fist on table], ‘take’ [we slide our fists together to touch in front of us]. The ending sounds for both words were the same: /ake/ [hold up left fist when facing the students to show the ends were the same]. I will do a few and you tell me whether they rhyme.”
We then lead the group through two more examples, one that doesn’t rhyme and one that does. We direct the students to show thumbs up or down to indicate whether the words rhyme.
Steps:
- We dictate two words. Don’t say anything between the words; a brief pause will suffice.
- All students repeat the words.
- All students show the two parts of the first word using their fists.
- All students show the two parts of the second word using their fists.
- All students show thumbs up or down to indicate whether the words rhyme.
After some practice, take away the scaffold of segmenting the onset and rime:
Steps:
- We dictate two words.
- One student shows thumbs up or down to indicate whether the words rhyme.
- All students show thumbs up or down to indicate whether the words rhyme.
This activity can be extended to include three words. We ask students which two words rhyme.
Repeat these steps with as many as 10 sets of words.
Back to top
Generating rhyming words
For students with poor phonological awareness, coming up with words that rhyme is a difficult task. For other students, it will be hard to keep them from blurting out rhyming words. To make the task easier, allow nonsense words as well as real words.
“I can say two words that rhyme. Watch me. ‘Watch’ ‘notch’. They rhyme. I can say a word that rhymes. It doesn’t have to be a real word. ‘Watch’ ‘zotch’. ‘Zotch isn’t a real word, but it rhymes with ‘watch’ because both words end with the same sounds.”
We then lead the group through two more examples. Then we dictate a word and asks individual students to provide words that rhyme. If the student struggles, we can provide a new onset sound and have the student blend to create a rhyme.
Repeat these steps with as many as 10 words.
Back to top
Single phoneme instruction
New consonant sounds
We should ensure they are articulating the consonant sounds correctly before starting instruction. Be sure to say a consonant sound without a trailing /uh/ sound at the end. For example, the first sound in ‘foot’ is /fffff/ not /fuh/. Adding the trailing /uh/sound interferes with blending sounds to sound out words. It is critical that we articulate sounds correctly, so they can learn the sounds correctly. See Ehri (2020): Connected Phonation is More Effective than Segmented Phonation for Teaching Beginning Readers to Decode Unfamiliar Words.
Here is a list of the 44 sounds (phonemes) of the English language. Below, watch a video showing how each of the sounds is pronounced.
Teaching sounds in isolation can start with children as young as age 4, but articulation may interfere with repeating some sounds. Consonant sounds can be introduced in this way:
Steps:
- We say: “You will learn a new consonant sound. The sound is: [sound]. Listen again: [sound].”
- Students repeat the sound 4 or 5 times as we walk through the room listening.
- Ensure all students are saying the sound correctly and not adding the /uh/ to the trailing end of the consonant.
- For correction, describe how the sound is formed (lips, teeth, tongue), use hand mirrors so students can see themselves making the sounds.
- We call on 6 to 10 individual students to say the sound.
- All students say the sound.
Back to top
New vowel sounds
Again, we should ensure they are articulating the vowel sounds correctly before starting instruction.
Vowel sounds can be introduced in this way:
Steps:
New sound
- We say: “You will learn a new vowel sound. The sound is: /ăăăă/. Listen again: /ăăăă/.”
- Students repeat the sound 4 or 5 times as we walk through the room listening. Ensure that all students are saying the sound correctly.
- For correction, describe how the sound is formed (lips, teeth, tongue), use hand mirrors so students can see themselves making the sounds.
- We call on 6 to 10 individual students to say the sound.
- All students say the sound.
Teach the label
- We say: “A label is what we call something. The label for the sound /ăăăă/ is short a.”
- All students repeat the label.
- We call on 6 to 10 individual students and asks 2 questions in a different order: “What’s the short a sound? What’s the label for the sound /ăăăă/?”
- All students say the sound.
- All students say the label.
Back to top
Match the new sound in the initial position
After learning the new (consonant or vowel) sound, teach students to hear the new sound in the initial position. Introduce the activity:
Now you will listen for [sound] at the start of words. You will tell me whether or not the word starts with the sound [sound]. Watch me. I’ll say a word. I’ll show a thumbs up if the word starts with the sound [sound]. I’ll show a thumbs down if the word doesn’t start with the sound [sound]. ”
”
[We say a word that starts with the target sound, pauses, then shows a thumbs up. We say another word that doesn’t start with the target sound, pauses, then shows a thumbs down.]
“Let’s do some together.”
[We lead the group through two examples, one with a word that starts with the target sound and one that does not start with the target sound.]
Steps:
- We tell students to listen for words that start with the sound [sound].
- We dictate a word.
- All students repeat the word.
- All students show a thumbs up or down to indicate whether the word starts with the target sound.
Repeat these steps with as many as 15 words in a lesson. Start with consonants, then move to short vowels, then long vowels. Do not use words with blends at the beginning.
Back to top
Match the new sound in the final position
Immediately after listening for a new sound in the initial position, students can listen for the same target sound in the final position. This cannot be done with short vowels, of course, as English words do not end in short vowel sounds. Introduce the activity:
“Now you will listen for [sound] at the end of words. You will tell me whether or not the word ends with the sound [sound]. Watch me. I’ll say a word. I’ll show a thumbs up if the word ends with the sound [sound]. I’ll show a thumbs down if the word doesn’t end with the sound [sound].”
[We say a word that ends with the target sound, pauses, then shows a thumbs up. We say another word that doesn’t end with the target sound, pauses, then shows a thumbs down.]
“Let’s do some together.”
[We lead the group through two examples, one with a word that end with the target sound and one that does not end with the target sound.]
Steps:
- We tell students to listen for words that end with the sound [sound].
- We dictate a word.
- All students repeat the word.
- All students show a thumbs up or down to indicate whether the word ends with the target sound.
Repeat these steps with as many as 15 words in a lesson
Start with consonants, resume the activity when teaching long vowels. Do not use words with blends at the beginning.
Back to top
Phonemic awareness activities
Even though segmenting sounds is harder than simply identifying the first or last sound, this is a reasonable next step if students have mastered onset-rime. This activity starts with segmenting, and later includes identifying individual sounds.
Segmenting sounds in a syllable
“Words can be broken into individual sounds. We call this segmenting sounds. A segment is a piece of something. We will break words into pieces or segments.”
[Distribute 3 manipulatives per student — in this example, bottle caps.]
When we are modeling, we may have to work right-to-left so it appears left-to-right for students. If we are working on the board, we can work left-to-right.
“First I will show you how to use the caps. I will count 1, 2, 3 and put a cap out for each number. Watch me. 1 [slide a cap forward], 2 [slide a cap working from students’ left-to-right], 3 [slide a cap working from students’ left-to-right]. You do it.”
[Push the caps into a pile to show the start of a new word.]
“Now I will segment sounds in a word, and I will use the caps to show each sound. Watch me. The word is ‘feet’, /f/ [slide a cap], /ee/ [slide a cap], /t/ [slide a cap], feet [sweep finger below the caps blending the sounds]. I’ll do another.”
We model one or two more words, then leads the group through two examples. Do not use words that contain the letter ‘x’ or ‘qu’ because those represent 2 phonemes each (x=ks; qu=kw). Use words with one, two, or three sounds. Do not use words with blends until all students have mastered segmenting three sound words. Do not use words with r-controlled or strong diphthongs (oy and ou) until students have learned those sounds in isolation.
Steps:
- We dictate a word.
- All students repeat the word.
- One student segments the sounds, sliding a cap for each sound and sweeping a finger below to blend the sounds back into the word.
- All students segment the sounds, sliding a cap for each sound and sweeping a finger below to blend the sounds back into the word.
- Another student points and says the first sound.
- [after that skill is mastered add:]
- Another student points and says the last sound.
- [after that skill is mastered add:]
- Another student points and says the vowel sound (i.e., /ă/).
- Another student points and says the vowel label (i.e., short a)
Repeat these steps with as many as 15 words in a lesson.
We can align this activity with vowel sounds being taught in isolation. We may have taught the short a sound and label earlier in the day. Then we select short a words to segment. In this manner, students master the vowel sounds and labels in the context of spoken words. It takes more effort in word selection. It yields powerful results by providing solid basis for spelling and reading.
Watch and learn
Dr. Louisa Moats helps a kindergarten teacher learn a technique for teaching phonemic segmentation using chips — to help students learn to identify the individual sounds within a word. Letters can be introduced later.
Back to top
Blending sounds
[Distribute three manipulatives per student — in this example, bottle caps.]
“We can blend sounds to say a word. Watch me. The sounds are /s/ [slide a cap], /ō/ [slide a cap], /p/ [slide a cap]. I will touch and say, then blend. /s/ [touch first cap], /ō/ [touch middle cap], /p/ [touch last cap], soap [sweeping a finger below the caps]. Do it with me.”
When we are modeling, we may have to work right-to-left so it appears left-to-right for students. If we are working on the board, we can work left-to-right.
[Push the caps into a pile to show the start of a new word.]
We lead the group through two examples. Remember, do not use words that contain the letter ‘x’ or ‘qu’ because those represent 2 phonemes each. Use words with one, two, or three sounds. Do not use words with blends until all students have mastered segmenting three sound words. Do not use words with r-controlled or strong diphthongs (oy and ou) until students have learned those sounds in isolation.
Steps:
- We dictate the sounds, using caps to show the sounds.
- All students repeat the the sounds, using caps to show the sounds.
- One student touches and says the sounds, then sweeps a finger below to blend the sounds into a word.
- All students touch and say the sounds, then sweep a finger below to blend the sounds into a word.
- Another student points and says the first sound.
- [after that skill is mastered add:]
- Another student points and says the last sound.
- [after that skill is mastered add:]
- Another student points and says the vowel sound (i.e., /ō/).
- Another student points and says the vowel label (i.e., long o)
Repeat these steps with as many as 15 words in a lesson. As with segmenting, words can be selected that reinforce sounds being taught in isolation.
Back to top
Manipulating sounds (adding, substituting, deleting)
This phonemic awareness activity is the most difficult of all the phonological awareness activities. It is the pinnacle skill. Keep in mind that poor phonological awareness is the most common area of weakness for struggling readers. Students who master this skill are on a solid footing for reading success.
Adding sounds
It generally makes sense to teach the manipulation of sounds in this sequence: add, substitute, delete, for pragmatic reasons. One needs sounds to delete, so adding and substituting must occur before deleting. Manipulating sounds is similar to manipulating syllables.
Remember, do not use words that contain the letter ‘x’ or ‘qu’ because those represent 2 phonemes each. Use words with one, two, or three sounds. Do not use words with blends until all students have mastered segmenting three sound words. Do not use words with
r-controlled or strong diphthongs (oy and ou) until students have learned those sounds in isolation.
“I can add sounds to make new word. Watch me. I say the first sound and slide a cap: /ī/ [slide a cap]. I add the last sound: /s/ [slide a cap so it appears left-to-right for students]. I touch and say the syllables: /ī/, /s/, ‘ice’ [sweep finger below the caps left-to-right]. The first sound is /ī/ [touch first cap]. The vowel sound is /ī/ [touch first cap]. The vowel label is long i [touch first cap]. The last sound is /s/ [touch last cap]. Do it with me.” We then lead the group through two examples.
Note: We can add sounds in this manner: /m/ /ĭ/, /m/ /ĭ/ /s/, or /ĭ/ /s/, /m/ /i/ /s/. The only change in procedure is to announce whether adding a sound at the start or end of the word.
[Push the caps into a pile to show the start of a new word.]
Steps:
- We say a sound and slides a cap.
- All students repeat the sound and slide a cap.
- We say whether adding a starting or ending sound, then dictates the sound and slides a cap.
- All students repeat.
- All students touch and say, and then blend the sounds into a word.
- All students touch and say, then blend the syllables to say the word.
- One student touches and says the first sound.
- Another student touches and says the last sound.
- Another student touches and says the vowel sound.
- Another student touches and says the vowel label.
Repeat these steps with as many as 15 words
Substituting sounds
“I can change one sound in a word to form a new word. Watch me.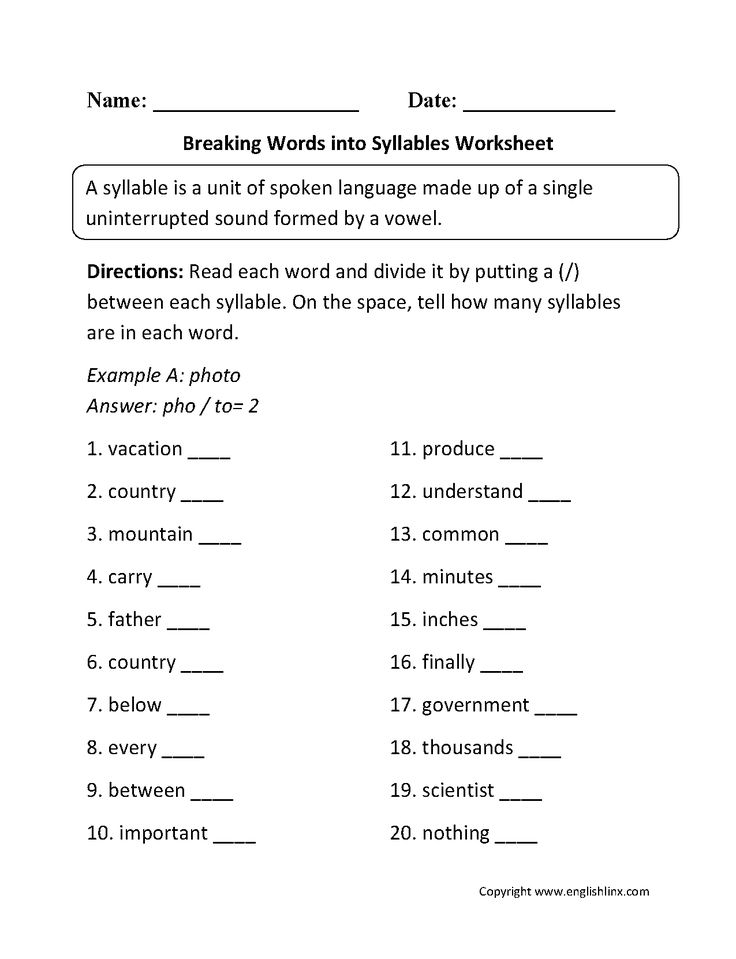 I will change ‘make’ to ‘bake’. Which sound is different in ‘make’ and ‘bake’? I will use the caps to find the sound that changes.”
[We use the caps to touch and say, then blend ‘make’. Below the caps, we touch and say, then blends ‘bake’.]
“The first sound in make is /m/. The first sound in bake is /b/. I remove the first cap, and slide a new cap.”
[We remove the first cap, saying /m/. We slide in a new cap, saying /b/.]
“Not I’ll touch and say the new word. /b/ [touch first cap], /ā/ [touch middle cap], /k/ [touch last cap], ‘bake’ [sweep finger below caps].”
We model one more example, then leads the group through two examples.
Steps:
Starting word
- We dictate a starting word.
- All students repeat the word.
- All students slide caps to show each sound, then sweep a finger below to blend the sounds into a word.
Substituting a sound
- We say: “Change [old word] to [new word].
 Repeat.”
 - All students repeat “Change [old word] to [new word].”
- All students touch and say, then blend old word.
- All students touch and say, then blend new word [pointing below caps].
- We instruct students to point at the sound that changes.
- One student removes the cap, saying the sound going out.
- Another student puts a new cap in, saying the sound going in.
- All students touch and say, then blend the new word.
Repeat these steps with 4 to 6 words in a lesson.
Substitute just the first sound for several lessons. Substitute the first and last sounds for several lessons. Finally teach substituting the middle sound. Practice substituting sounds for several lessons. Then reintroduce adding sounds. Practice adding and substituting sounds for several lessons before introducing deleting sounds.
Deleting sounds
“I can delete one sound in a word to form a new word. Watch me. I will change ‘bike’ to ‘by’. Which sound is removed in ‘bike’ to ‘by’? I will use the caps to find the sound that is removed.”
[We use the caps to touch and say, then blend ‘bike’. Below the caps, we touch and say, then blends ‘by’.]
“The last sound in ‘bike’ is /k/. The last sound in ‘by’ is /ī/. I will remove the last cap.”
[We remove the last cap, saying /k/.]
“Now I’ll touch and say the new word. /b/ [touch first cap], /ī/ [touch last cap], ‘by’ [sweep finger below caps].”
We model an example of deleting the first sound and the last sound. We lead the group through two examples, once deleting the first sound and once deleting the last sound.
Steps:
Starting word
- We dictate a starting word.
- All students repeat the word.
- All students slide caps to show each sound, then sweep a finger below to blend the sounds into a word.
Deleting a sound
- We say: “Change [old word] to [new word].
 Repeat.”
 - All students repeat “Change [old word] to [new word].”
- All students touch and say, then blend old word.
- All students touch and say, then blend new word [pointing below caps].
- We instruct students to point at the sound that will be removed.
- One student removes the cap, saying the sound going out.
- All students touch and say, then blend the new word.
Repeat these steps with 6 to 8 words in a lesson. Delete sounds for several lessons. Then reintroduce adding and substituting sounds.
These additions, substitutions and deletions will form sound chains — not spelling chains. For example: ick to sick, to lick, to like, to lime, to dime, to die, to I.
Once you’ve introduced the skills of adding, substituting, and deleting sounds, you can continue to have the students practice these skills.
Back to top
References
Ehri, L. C. (2004). Teaching phonemic awareness and phonics: An explanation of the National Reading Panel meta-analyses. In P. McCardle & V. Chhabra (Eds.), The voice of evidence in reading research (pp. 153-186). Baltimore, MD: Brookes Publishing Co.
O’Connor, R. E. (2011). Phoneme awareness and the alphabetic principle. In R. E. O’Connor & P. F. Vadasy (Eds.), Handbook of reading interventions (pp. 9-26). New York: Guilford.
Vowels and vowel sounds of the Russian language - scheme, table
Contents:
• Vowels and sounds
• Stressed and unstressed
• Iotated
In Russian there are 10 vowels, 6 vowels. Vowels: a, and, e, e, o, u, s, e, u, i. Vowel sounds: [a], [o], [y], [e], [i], [s]. In the school curriculum, vowel sounds are indicated in the diagrams in red. In elementary grades, they explain: vowels are called so because they “voice”, they are pronounced “voiced”, while consonants got such a name because they “agree” with vowels. nine0006 Scheme 1. Vowels and vowel sounds of the Russian language.
Stressed and unstressed vowels
Vowel sounds are:
- stressed: juice [o] - ice ['o], forest ['e] - mayor [e], drill [u] - hatch ['u],
- unstressed: in o yes [a], from y dak [y], l e juice [i].
It is correct to say "stressed syllable" and "unstressed syllable". Instead of "stress falls on a vowel" say "stress falls on a syllable with a vowel." However, in the literature there are formulations "stressed vowel" and "unstressed vowel". nine0006
Stressed vowels are in a strong position, they are pronounced with more force and intonation. Unstressed vowels are in a weak position, they are pronounced with less force and may be subject to change.
The designation of the letter e in a weak position differs in different school programs. Above we showed the sound [and], in other school programs the designation [e] is found, in the institute program - [e and ] (e with an overtone and).
Scheme 2. Division of vowels into stressed and unstressed. nine0002 In Russian there are compound words with primary and secondary stress. In them, with a strong intonation, we highlight the main stress, with a weak intonation - a secondary one. For example, in the word foam blocks, the main stress falls on the syllable with the letter o, the secondary stress on the syllable with the letter e. In phonetic analysis, the vowel with the main stress is stressed, the vowel with the secondary stress is unstressed. For example: tricuspid, three-year-old.
 Iotated vowels
The letters i, u, e, ё are called iotated and mean two sounds in the following positions of the word:
- at the beginning of the word: tree [y'olka], Yana [y'ana], raccoon [y'inot];
- after a vowel: hare [zay'its], button accordion [bay'an];
- after ь or ъ: streams [ruch'y'i], rise [fall'om].
For ё and stressed vowels i, yu, e, a replacement is made: i → [y’a], yu → [y’u], e → [y’e], yo → [y’o]. For unstressed vowels, a replacement is used: i → [y'i], e → [y'i]. In some school programs, when compiling a transcription of a word and during phonetic analysis, they write Latin j instead of th. nine0006 Scheme 3. Rules for iotated vowels.
In other cases, i, u, e, ё mean the softness of the consonant sound in front of them, and create one sound: i → [a], yu → [y], e → [e] or [i], ё → [ about].
To be able to do phonetic analysis, in addition to vowels, you need to know consonants and the rules of phonetics.
Words with the letter ё must be written through ё. Phonetic parsing of the words "everything" and "everything" will be different!
Consonant letters and consonant sounds of the Russian language - scheme, table
Contents:
• Consonants and sounds
• Hard and soft
• Voiced and deaf
• Sonorous, noisy and hissing
• Paired and unpaired
There are 21 consonants and 36 consonants in Russian. Consonants and their corresponding consonant sounds:
b - [b], c - [c], d - [g], d - [d], f - [g], d - [d], s - [h] , k - [k], l - [l], m - [m], n - [n], n - [n], p - [r], s - [s], t - [t], f - [f], x - [x], c - [c], h - [h], w - [w], u - [u].
Consonants are divided into voiced and voiceless, hard and soft. They are paired and unpaired. There are 36 different combinations of consonants in terms of pairing-unpairing of hard and soft, deaf and voiced: deaf - 16 (8 soft and 8 hard), voiced - 20 (10 soft and 10 hard).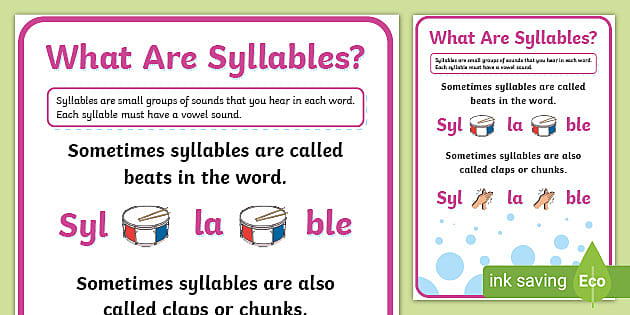 nine0006 Scheme 1. Consonant letters and consonant sounds of the Russian language.
Hard and soft consonants
There are hard and soft consonants. They are divided into paired and unpaired. Paired hard and paired soft consonants help us distinguish between words. Compare: horse [kon '] - con [kon], bow [bow] - hatch [l'uk].
For understanding, let's explain "on the fingers". If a consonant letter in different words means either a soft or a hard sound, then the sound is paired. For example, in the word cat, the letter k denotes a hard sound [k], in the word whale, the letter k denotes a soft sound [k ']. We get: [k] - [k '] form a pair of hardness-softness. Sounds for different consonants cannot be attributed to a pair, for example [v] and [k '] do not make a pair in hardness-softness, but make a pair [v] - [v ']. If a consonant is always hard or always soft, then it belongs to unpaired consonants. For example, the sound [g] is always solid. There are no words in Russian where it would be soft [zh']. Since there is no pair [w] - [w ’], then it belongs to unpaired ones. nine0006 6
| Parny | unpaired | ||
|---|---|---|---|
| Fruded | Soft | Always hard | Always soft |
| [b], [B], [B], [G], [G], [G], [G], [G], [GAW], [G], [GAW],. , [k], [l], [m], [n], [p], [r], [s], [t], [f], [x] | [b'], [c' ], [g'], [d'], [h'], [k'], [l'], [m'], [n'], [p'], [p'], [s' ], [t'], [f'], [x'] | [w], [w], [c] | [h'], [w'], [d'] |
Voiced and voiceless consonants
There are voiced and voiceless consonants. Thanks to voiced and deaf consonants, we distinguish words. Compare: ball - heat, stake - goal, house - volume. Deaf consonants are pronounced with the mouth almost covered; when they are pronounced, the vocal cords do not work. For voiced consonants, more air is needed, the vocal cords work.
Some consonants have a similar sound in terms of pronunciation, but are pronounced with different tonality - dull or voiced. Such sounds are combined in pairs and form a group of paired consonants. Accordingly, paired consonants are a pair of voiceless and voiced consonants. nine0006
- paired consonants: b-p, v-f, g-k, d-t, s-s, w-w.
- unpaired consonants: l, m, n, p, d, c, x, h, u.
| Parny | unpaired | ||
|---|---|---|---|
| LOVING | Deaf | Always dull | |
| [b], [B '], [B], [B], [B], [B] [B], [B] [B] [IUAM], [B] [B] [B] SUID [g], [g'], [d], [d'], [g], [h], [h'] | [p], [p'], [f], [f'], [k], [k'], [t], [t'], [w], [s], [s'] | [d'], [l], [l'], [m], [m'], [n], [n'], [p], [p'] | [x], [x’], [c], [h’], [u’] |
Sonorant, noisy and hissing consonants
Sonorant — voiced unpaired consonants. There are 9 sonorous sounds: [th '], [l], [l '], [m], [m '], [n], [n '], [p], [p '].
Noisy consonants are voiced and deaf:
- Noisy voiceless consonants (16): [k], [k'], [p], [p'], [s], [s'], [t] , [t'], [f], [f'], [x], [x'], [c], [h'], [w], [w'];
- Noisy voiced consonants (11): [b], [b'], [c], [c'], [g], [g'], [d], [e'], [g], [h], [h'].
Learn more