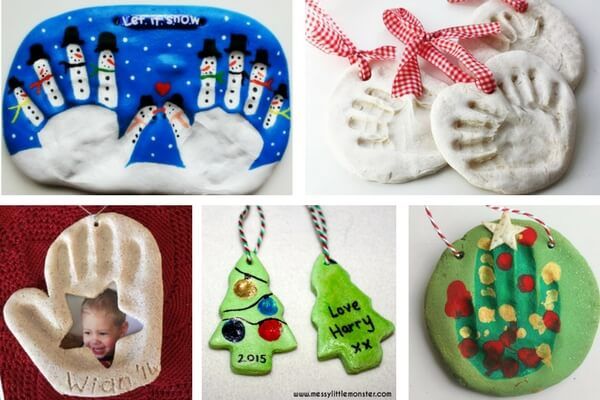
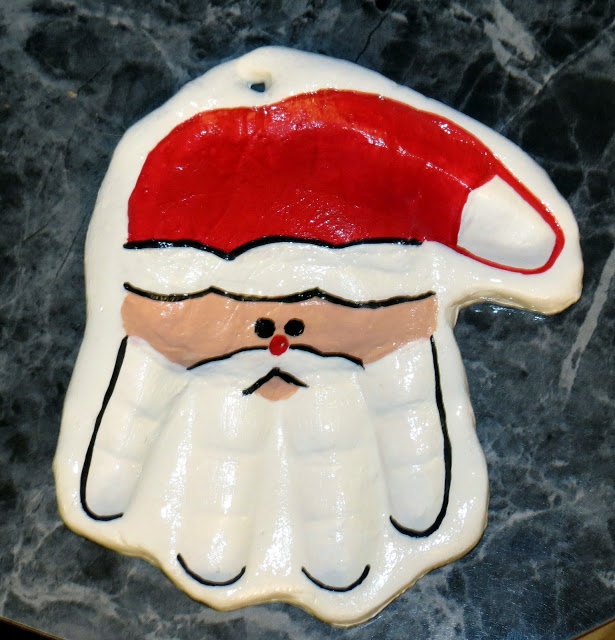
Christmas ornament dough handprint
Salt Dough Recipe - The Easiest Way to Make Salt Dough!
Kim146 Comments
All activities should be supervised by an adult. As an Amazon Associate, I earn from qualifying purchases. This post may contain affiliate links.
Learn how to make your own salt dough handprint ornament with this easy Salt Dough Recipe. You only need a few ingredients from your kitchen to make this salt dough! We cover all of our tips and tricks to make sure your salt dough ornaments will last for years!
RELATED: Salt Dough Ornament Recipe
Table of Contents
- Salt Dough Recipe – for Handprints & Ornaments
- Salt Dough Ingredients
- How to Make Salt Dough – an Easy Salt Dough Recipe!
- Why Is My Salt Dough Puffing Up?
- How Do I Seal Salt Dough Ornaments?
- What Kind of Paint Should I Use?
- How to Decorate Salt Dough Handprints
- How Many Ornaments Does this Make?
- Tips for Making Perfect Salt Dough
- Salt Dough Handprint & Ornament Recipe
- Get the Recipe
- More Salt Dough Ornament Ideas
Salt Dough Recipe – for Handprints & Ornaments
One of our favorite things to do with salt dough is to make handprint ornaments. But you can also use this same recipe and use cookie cutters and paint shapes instead!
For the handprint ornaments – you can make a new one every year and have a nice memento for the Christmas tree!
Don’t forget to add the year on the back of the salt dough ornament to keep track of the different years.
Salt Dough Ingredients
- 4 cups all purpose flour (Note: you want regular all purpose flour, not self-rising)
- 1 cup salt
- 1.5 cups warm water
How to Make Salt Dough – an Easy Salt Dough Recipe!
1. Combine all of your ingredients (flour, salt, warm water) and mix well until it starts to form a dough.
2. Take the dough out of the bowl and knead for at least 10 minutes.
If your dough is too dry, add a little bit more water in and continue to knead.
The dough should be smooth and roll out with not too many bumps. It should also be easy to press a handprint into it. If you’re finding it’s too hard or not smooth enough, continue to knead some more. If it’s still too dry, add a little bit more water (but not too much or it may get too wet).
Roll out the dough to between 1/4 to 1/2 inch thickness. If the dough is too thick it will take too long to dry.
Press the hand into the dough.
3. Use a circle shaped bowl to trace around your handprint.
Cut out the handprint with a knife (adults to do this part).
You can also print off a circle shape or heart shape to trace around with a knife (adults to do this part).
If you have a smaller handprint you can use a circle or large heart cookie cutter.
TIP: It’s easier to press the handprint first, and then trace around it. If you have dough left over you can roll it out again and do another handprint.
4. Using a straw, make a hole in the top of the ornament.
5. Let the ornaments air dry for a day.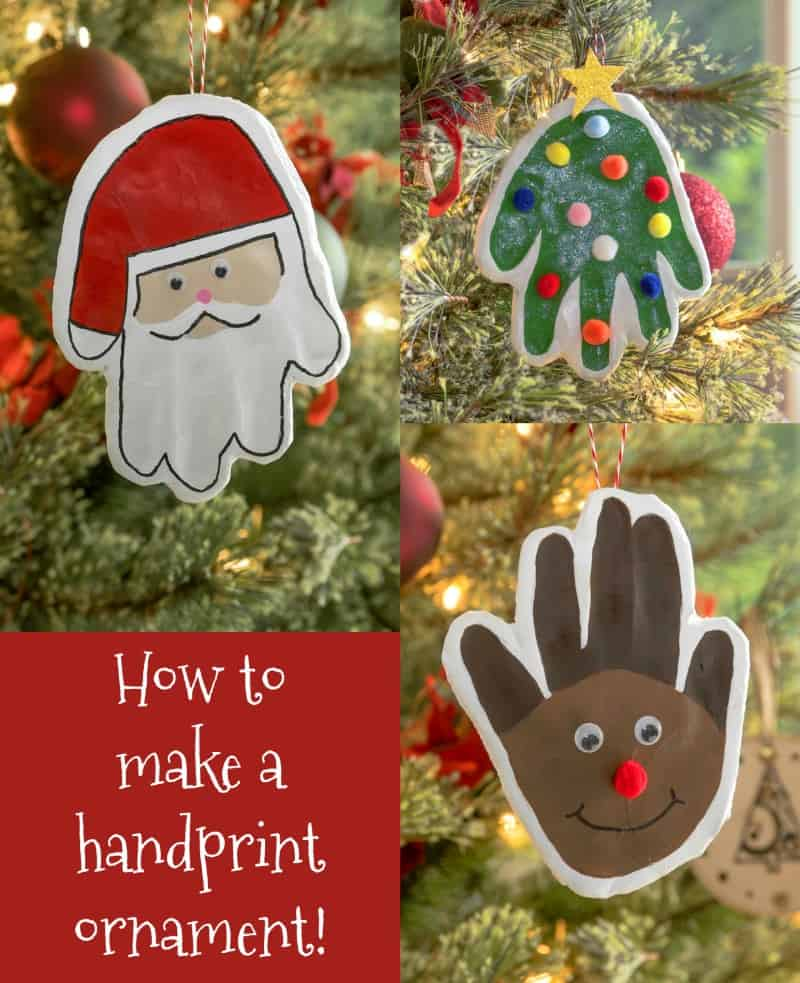
If you have time, let the ornaments air dry for a day. This will cut down on the baking time required and help to prevent puffing. If you do not have time, you can bake right away instead.
Bake at 250 degrees Fahrenheit for 1-2 hours. Once the top of the ornaments look dry and solid, flip over and bake on the other side.
NOTE: It’s important that you check that your oven temperature is set to Fahrenheit. One of the most common reasons the ornaments burn and puff up is that the oven temperature is Celsius. If you have a Celsius setting then you’ll want to use the lowest oven temperature, closer to 120 degrees Celsius.
If your ornaments are still doughy, put them back in for another hour. It will depend on your thickness how long you need to bake for. The thinner ornaments will take less time but thicker may take more. If it’s taking too long in the oven, let them finish drying by air drying them for a few more days. Make sure to flip them over so the bottoms also get exposed to air.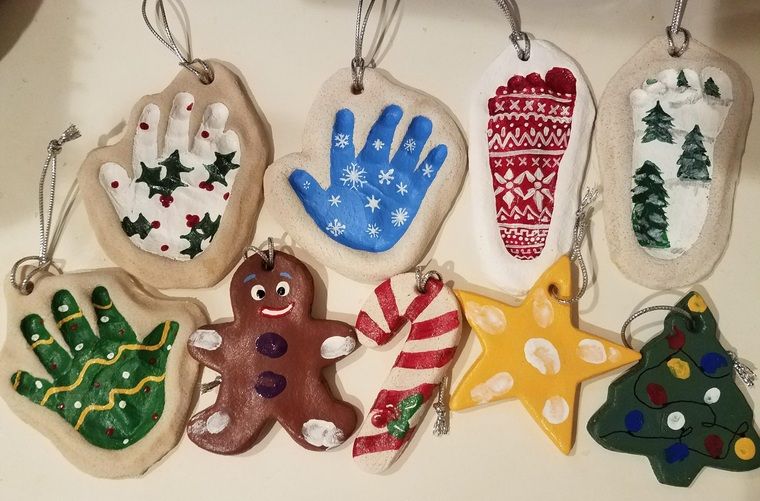
6. Once your ornaments are fully dry you can paint them.
Paint the handprint and leave the remaining ornament plain. Or you can paint the whole ornament white and then paint the center handprint once the base coat has dried.
If you want to add glitter into the handprint, decorate the whole ornament with paint first, then fill the handprint with glue. Shake glitter onto the glue.
After the paint has dried, make sure to seal with with either mod podge or a clear glaze spray. Seal the ornaments after you paint them and the paint has fully dried.
7. Tie ribbon or twine through the hole for hanging on the Christmas tree.
Why Is My Salt Dough Puffing Up?
The number one reason salt dough is puffing is due to the oven temperature. If the temperature is too high the salt dough will puff up. It is better to let your ornaments air dry for a day and then bake them.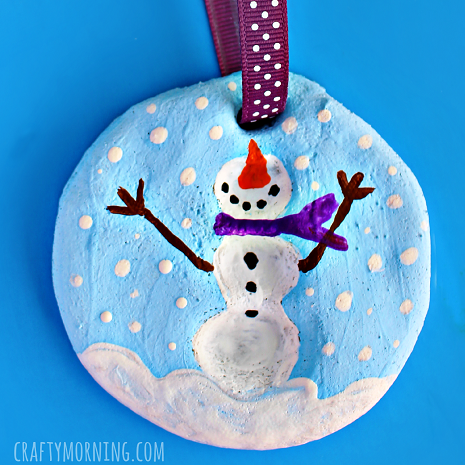 This will prevent the puffing. If you need to bake right away, bake at the lowest temperature (200-250 degrees Fahrenheit).
Note: Make sure to check your oven temperature is Fahrenheit and not Celsius.
You also want to make sure you are using regular, all purpose flour and not self-rising flour.
How Do I Seal Salt Dough Ornaments?
Once you are done, don’t forget to seal with either mod podge or a clear glaze spray. We like this spray for a durable finish. Adults should do the spraying and always follow directions of the product chosen.
Sealing the final ornaments will help stop them from cracking in a few years and prevent moisture from getting in.
What Kind of Paint Should I Use?
I like to use non-toxic acrylic paint for salt dough ornaments. The color will go on much thicker and more vibrant than kids paint. We like this brand of acrylic paint.
How to Decorate Salt Dough Handprints
You can use a heart for the shape around the handprints or you can use a circle.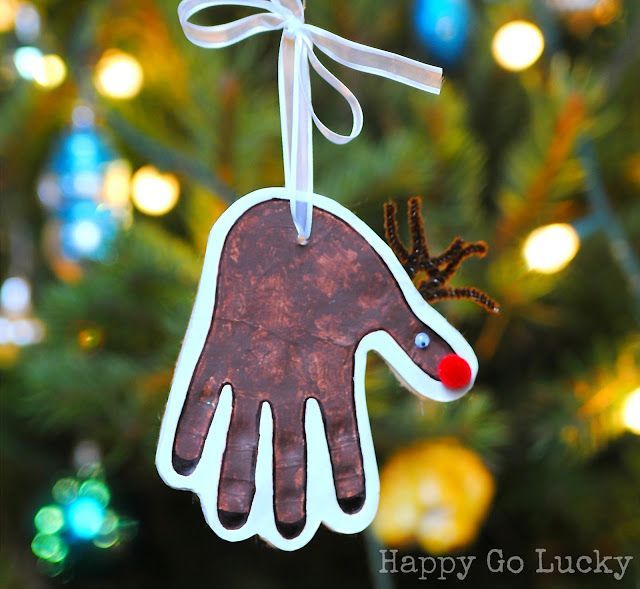
For this one, we used a large heart cookie cutter as the handprints were small (baby handprints):
If you have larger handprints, you can trace around a heart print-out or use a knife (adults only) to draw a heart shape around the handprint.
We painted this one with acrylic red paint but you could choose green or even silver or gold. Then you can leave the handprint portion of the salt dough ornament either natural or use glue and add glitter to it like we did.
How Many Ornaments Does this Make?
Depending on the handprint size and thickness of the salt dough – you can get approximately 8 handprints. If you’re using the dough to make small cookie cutter ornaments you’ll get approximately 15.
If you’re hoping to make this for a classroom or with a larger group of kids, I would recommend bringing an extra batch just in case. The quantity can vary depending on size of cookie cutters, handprints and thickness of the dough.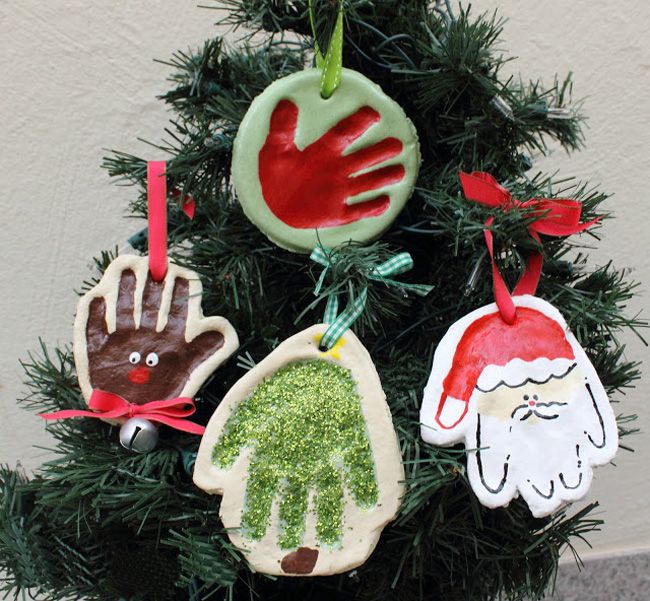 I like to roll out the dough and continue to knead together the scraps to use as much as I can.
Tips for Making Perfect Salt Dough
- Knead well to make the dough smooth – I like to knead at least 10 minutes.
- Let the ornaments air dry for a day first, if possible. This cuts back on the oven baking time and helps to prevent puffing.
- Don’t forget to flip the ornaments when baking or air drying so that the bottoms will be exposed to air.
- Seal with our recommended sealers mentioned above so that the ornaments will last for many years.
- Store the ornaments in a cool, dry place and keep away from moisture. Sealing the ornaments also prevents moisture from getting in.
Prep Time15 mins
Active Time2 hrs
- ▢ 4 cups all purpose flour
- ▢ 1 cup salt
- ▢ 1.5 cups warm water
- ▢ Clear Glaze Finish or Mod Podge
Combine all of your ingredients and knead for 10 minutes.
 If your dough is too dry add a little bit more water in and continue to knead.
Roll out the dough to a thickness that you'd like your salt dough ornament to be. We like between 1/4 to 1/2 inch thickness.
Using a large cookie cutter, cut out different shapes for your salt dough ornaments. If making handprints, place the handprints first and then trace around them.
Have your child place their hand into the salt dough ornament. If the dough is too hard to get an imprint it may be too dry. Continue to knead until smooth. You can also add in a little bit more water.
Using a straw, make a hole in the top for where you want to hang your salt dough ornament.
If possible, let the ornaments air dry for a day.
Preheat your oven to 250 degrees Fahrenheit. Bake for 1-2 hours. If your ornaments are still doughy, put back in for another hour. (It will depend on your thickness how long you need to bake for. The thinner ornaments will take less time but thicker may take more).
If you encounter too much puffing, roll out thinner ornaments and this will help reduce the puffing. If the ornament is still a bit doughy, bake for longer or let sit out a few days to harden before decorating. The thickness of the dough will determine how long you have to bake them for. We prefer to bake them at 250 degrees Fahreneheit for longer and let them air dry for a few days to prevent puffing.
Once cool, you can decorate by painting with non-toxic acrylic paint.
Spray with a clear glaze finish or finish with mod podge. Do this before adding the glitter.
To make the hand glittery, fill the handprint with glue then sprinkle glitter on top of the glue, shake off the excess and let it dry.
Kids will love helping to make this salt dough recipe. They will also have fun decorating the salt dough ornaments by painting them.
Finally, just a friendly reminder to keep these out of reach of pets (they can be toxic to dogs due to the salt content).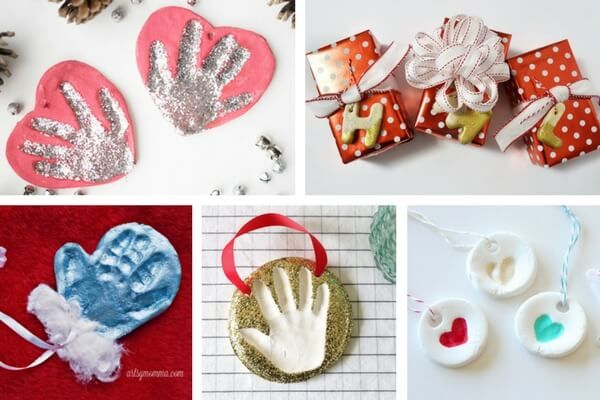
More Salt Dough Ornament Ideas
See over 25+ of the best Salt Dough Ornaments here for more great ideas!
These salt dough glitter ornaments are so fun to make – and you can make these for any season or holiday too!
DIY SALT DOUGH HANDPRINT ORNAMENT
Making DIY gifts is a lot of fun. Salt Dough Crafts are popular and this salt dough handprint is such a fun project to make and also to give as a gift.
You will find a “how-to” video at the bottom of this post.
DIY SALT DOUGH HANDPRINT ORNAMENTThis page may contain affiliate links for your shopping convenience. The links help support the blog as we may earn a small commission at no extra cost to you, our readers.
If you like salt dough crafts, these adorable thumbprint salt dough magnets are quick and easy to make. This DIY photo lamp using your own family pictures is also a unique gift idea you can make at home.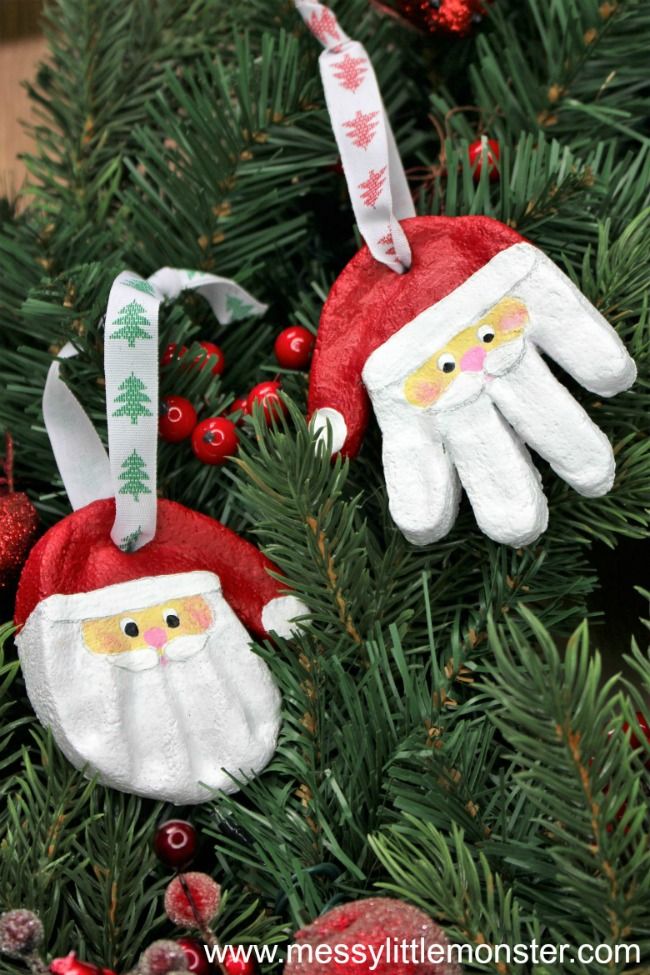
DIY Salt Dough is something that has been around for ages! I remember making a salt dough handprint ornament when I was little around Christmas time. I thought it would be cute to do all of my boy’s handprints and hang them on the wall.
Salt Dough keepsakes are a very inexpensive craft, made with items from around the house. If you’re wanting to send a handprint kit as a gift, I found an affordable one here: baby’s handprint ornament kit.
I also found this one: marshmallow clay handprint kit. I think marshmallow clay would be super fun to make at home!
SALT DOUGH RECIPEPRINTABLE RECIPE AT END OF POST
- 1 cup flour
- 1 cup salt
- 1/2 cup water
- Bowls (one for mixing, another for cutting out your circle)
- Spoon
INSTRUCTIONS:
- Mix the salt and flour in a large bowl
- Make a well in the salt/flour mixture and add the water
- Knead until smooth and shape into a ball
If you want to color your salt dough, simply mix in a few drops of food coloring while you are kneading it.
You can let your salt dough handprints air dry, but they can also be dried in the oven. Bake at 200 F until dry. The amount of time on the size and thickness of your masterpiece.
Thin flat ornaments may only take 45-60 minutes, but thicker ones like the ones I did can take 2-3 hours or more.
Make sure you store any leftover dough in an airtight container or it will get all dry and crumbly.
I can’t wait to have the salt dough handprint hanging on the wall, it’s going to be a great addition to our home décor and one that I can treasure as my children grow.
There are many other ornaments you can make with kids, to give as gifts at Christmas or anytime, really. I like buying the DIY ornaments (plastic if you have little ones!) and filling them with glitter. There are tons of things you can do with them, though.
Ingredients
- 1 cup flour
- 1 cup salt
- 1/2 cup water
- Bowls (one for mixing, another for cutting out your circle)
- Spoon
Instructions
Mix the salt and flour in a large bowl.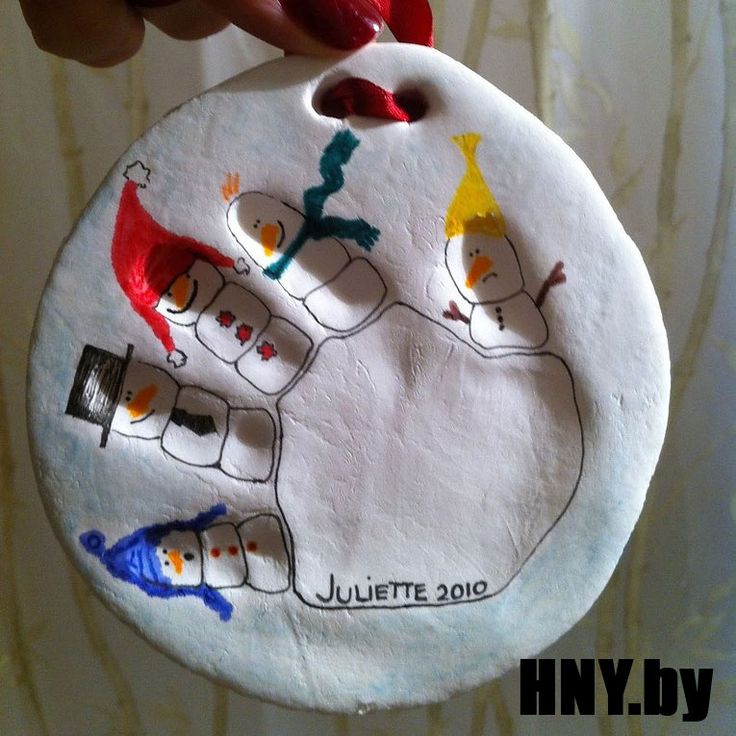
Make a well in the salt/flour mixture and add the water.
Knead until smooth and shape into a ball.
If you want to color your salt dough, simply mix in a few drops of food coloring while you are kneading it.
You can let your salt dough handprints air dry, but they can also be dried in the oven. Bake at 200 F until dry. The amount of time on the size and thickness of your masterpiece.
Thin flat ornaments may only take 45-60 minutes, but thicker ones like the ones I did can take 2-3 hours or more.
Make sure you store any leftover dough in an airtight container or it will get all dry and crumbly.
If you enjoyed this post be sure to check out our boards on Pinterest.
Love salt dough projects? Get more inspiration from these books:
Let’s Get Crafty With Salt Dough
Salt Dough Crafts for Kids (FREE ebook)
You’ll love this FAIRY GARDEN with SALT DOUGH FAIRY GARDEN ACCESSORIES.
You may also like this after school routine clock.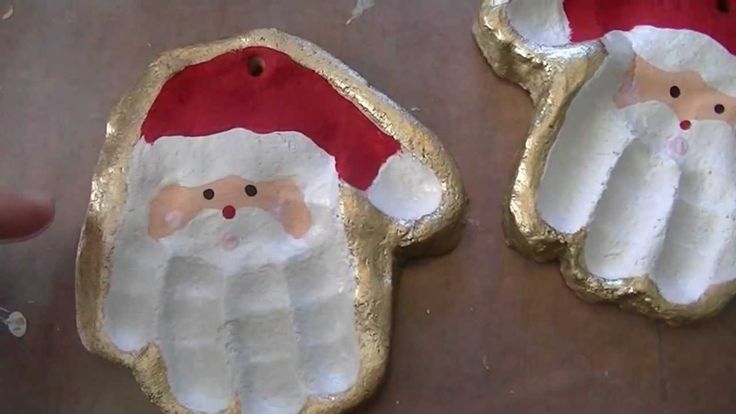
You can sign-up to get an email update each day. You can also connect with us on:
- Google+
- Blog Lovin’
Post submitted to Mommy Moment by Jennifer H.
This post is linked up to I Gotta Create, Tutorials Tips and Tidbits, The Style Sisters, Tidy Mom, Craftberry Bush, Growing Home, Sew Creative
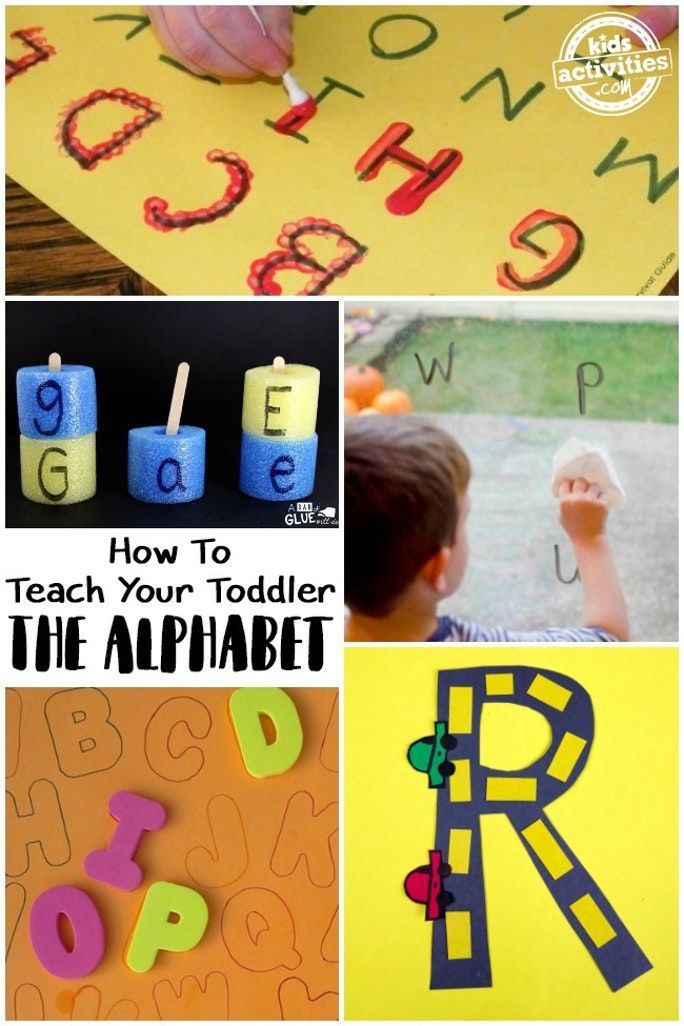
40 fun Christmas crafts for kids perfect for winter holidays
Christmas is the best time of the year to get creative with your kids. This list of fun Christmas kids crafts is great for your little ones during this year's holiday break. Whether you're a homeschooler and need some DIY, or just want to get them involved in creating new decorating ideas, this list has a lot to create and have fun with. I love adding unique ideas that kids of all ages can come up with, and this list has something for preschoolers through high school!
Children's Christmas crafts
Admittedly, Christmas is my favorite time of the year.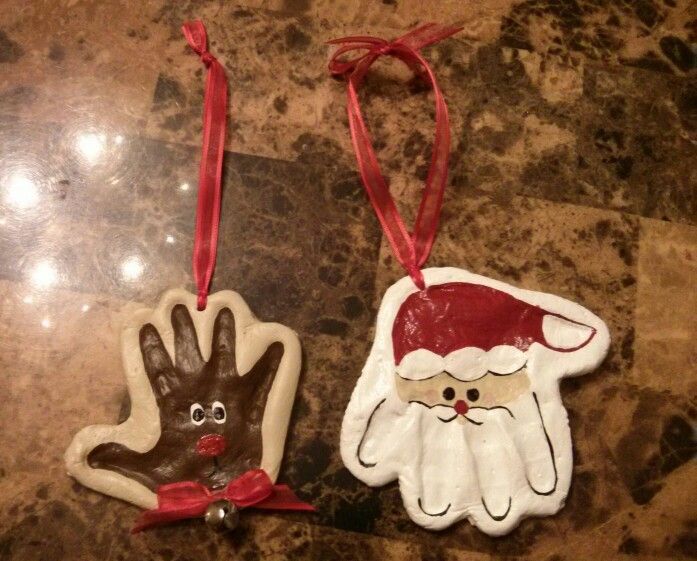 I just look and smell the holidays. Whether it's Santa Claus, Christmas trees, holly, peppermint or cinnamon sticks, this is the best time of the year for me to get creative. If you're looking for more decorating or crafting ideas, look no further than the list below!
- 30+ Easy-to-Make Holiday Christmas Wreaths
- 20 ingenious Christmas crafts made from recycled and repurposed DIY
- 40+ Festive Miniature Christmas Tree Ornaments and Ornaments
- 35+ Creative DIY Disney Christmas Decorations Anyone Can Make
- 25 Gorgeous Farmhouse Inspired Christmas Decorations
Shiny Rudolph - Red Nosed Reindeer Christmas Ornament
Turn a golden Christmas light bulb into a cute little reindeer decoration. It is very easy to make and always fun to make for kids and adults alike! Add it to your tree for a great decoration!
Source: DIY n Crafts
Adorable Christmas Decoration Pom Pom Tree
Sticks and pompoms are all you need to make this cute tree.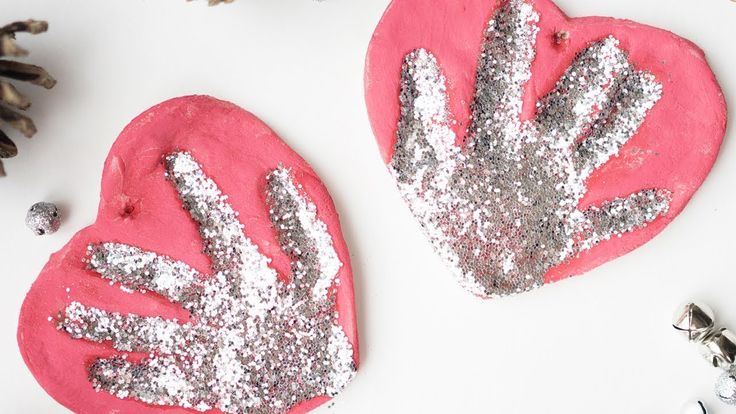 Hang it on a tree or use it as a pretty magnet to hang on your fridge. This is a cute craft that kids are sure to love making.
Source: DIY n Crafts
Rustic Branch Tree Ornaments
Connect a few simple branches from the trees in your yard with ribbon or twine to create charming little rustic ornaments. This is perfect for making by kids. Send them out on a nature hike to find twigs and get creative with making them.
Source: DIY n Crafts
Cardboard Christmas Star Decorations
I love upcycling and this is the perfect craft for it! Plus, it's perfect for the hand-eye coordination you want kids to practice. Turn old cardboard boxes into cute stars to add to your tree, mantle, or use as a gift tag!
Source: DIY n Crafts
Charming DIY Christmas Bell Decoration
The kids will love helping you make it. Color an old flower pot and add some winter and holiday themed stickers to the outside, making it a cute addition to any tree or decoration.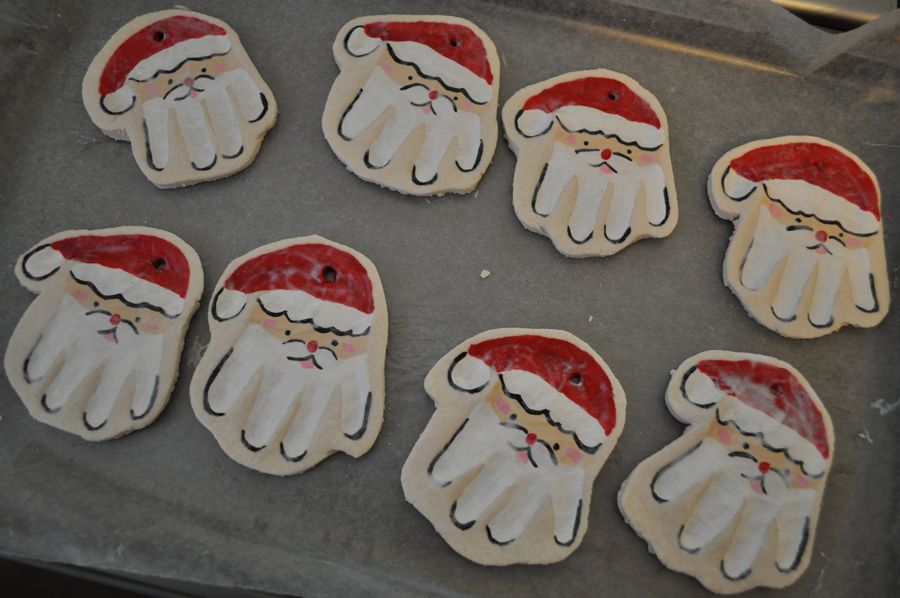 You can easily do this for kids using spray paint!
Source: DIY n Crafts
Cute Checkered Fabric Christmas Ornaments
Nothing could be easier than this little ball! Use scraps of whatever color you have on hand to create your own easy take on this idea that can be hung from a tree for a gorgeous rustic holiday decoration.
Source: DIY n Crafts
Cute Christmas Tree Pasta Ornaments
Glue and paint assorted pasta onto cardboard or foam paper to create a cute little Christmas tree decoration. Painting and crafts from pasta are ideal for making with children. Do it and you will have happy children!
Source: DIY n Crafts
Adorable Gnome Pom Pom Ornament
All you need to do to add this cute addition to your tree is use some pompoms, some craft paper and some glue! Kids can make this in minutes and it's the perfect addition to the rustic chic or rustic look you want on your tree.
Source: DIY n Crafts
Mini Pine Cone Christmas Tree Craft
A painted pine cone on an old wine bottle cork is a great addition to your holiday decor.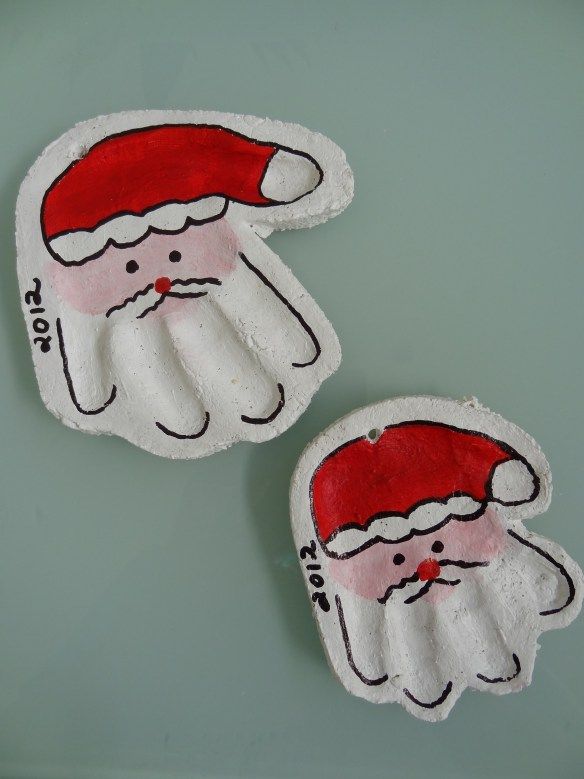 It's super easy for kids to make and easy for you if you want to create a fun pine cone village!
Source: DIY n Crafts
Twine and Lace Christmas Ornament
For older kids who can use hot glue or good craft glue, this easy decoration is a great idea to add to the Christmas tree. Use any color of twine and lace and let your kids create their own unique ornament.
Source: DIY n Crafts
Mini Christmas Tree Pasta Ornaments
Colored paste, a few miniature bells and ornaments are all you and the kids need to make this cute miniature tree. It's perfect to complement a mantle, or if it's a little smaller, to hang from your tree.
Source: DIY n Crafts
Reindeer Christmas Decorations in Clay Pots
This is one of the easiest ideas to make a cute deer decoration! Use them on holiday tables or simply create a fun set of deer on a mantle or tree. Cute ideas kids can come up with and handprints to immortalize their age for years to come!
Source: DIY n Crafts
Colorful Pine Cone Pom Pom Ornaments
A little glue and a few colorful pompoms will transform an ordinary pine cone into a charming addition to your holiday tree.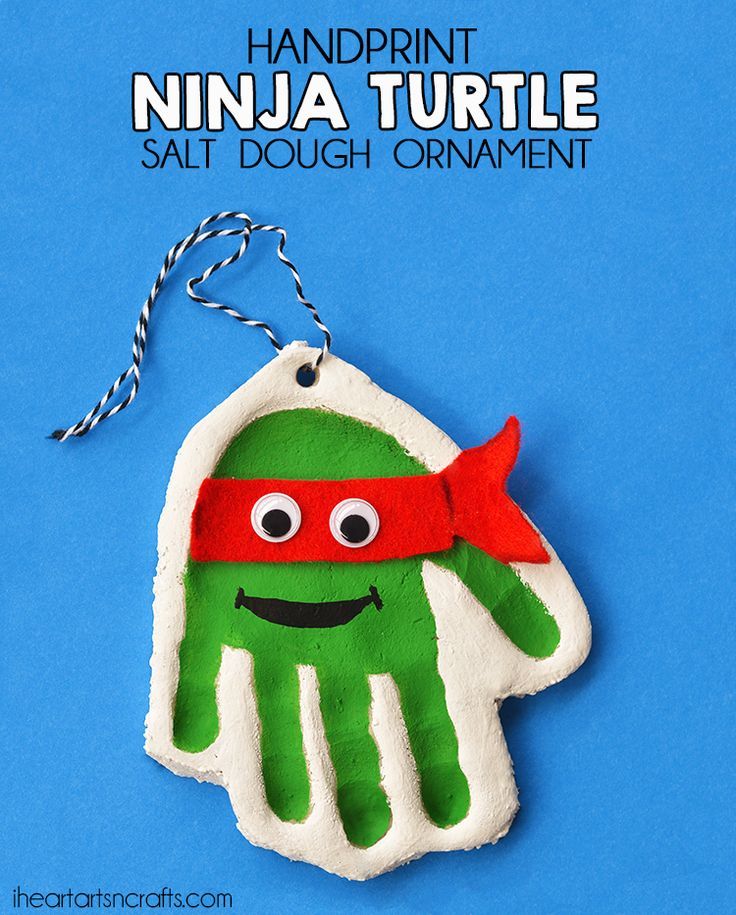 Kids love making them and they are great fun to add to their trees or decorate yours.
Source: DIY n Crafts
Mini Paper Straw Christmas Ornaments
Who knew paper straws could be so cute! In this tutorial, they are turned into very cute little decorations that you can add to your holiday tree. Use straws in unique colors for a fun different look!
Source: DIY n Crafts
Sheet Music Mini Paper Christmas Tree
Old music notation, a piece of wood and a simple dowel turn into a cute miniature Christmas tree. I love this idea and it's easy to get the kids to help!
Source: DIY n Crafts
Make Christmas stick characters (Santa, Tree, Snowman)
Painted craft sticks are easy to turn into cute little holiday characters. I love how fun it is! They are perfect for kids to make and perfect for hanging on a holiday tree.
Source: DIY n Crafts
Paper Ribbon Mini Christmas Tree Party Decoration
Older kids can help make this cute paper Christmas tree.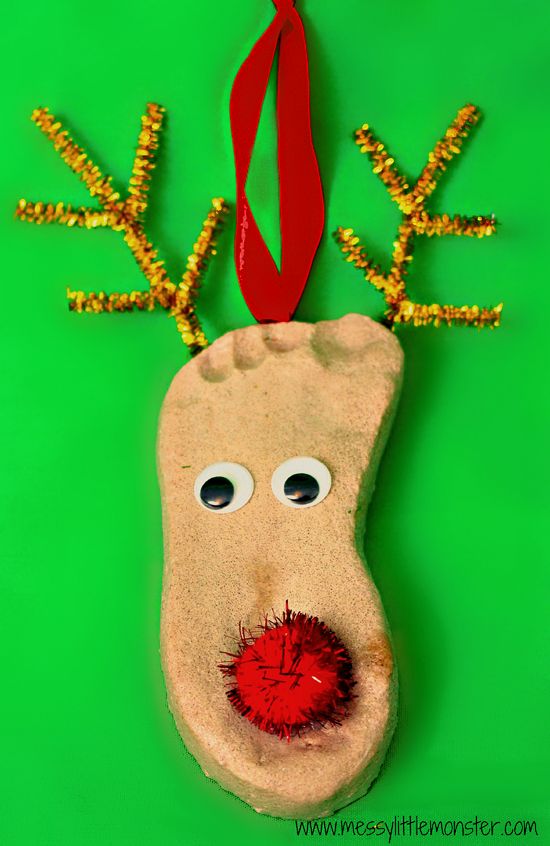 Using holiday paper, scrapbook paper, or even hand-colored paper, it turns into a cute decoration in seconds.
Source: DIY n Crafts
Wood Slice Deer Ornament
A simple wood strip with a few extras will make a cute deer ornament to add to your holiday tree! This is a great project for you to prepare and let your little ones finish with their own facial twist and ribbon.
Source: DIY n Crafts
Christmas Decoration DIY Craft Stick
A few paint sticks and some glue and you suddenly have a cute message to add to your holiday tree. This idea is perfect for creating with kids and adding a unique message.
Source: Craft Create Cook
Yarn Ball Ornaments
Scrap yarn is easy to turn into a cute little ornament that can be decorated with a Christmas tree. The kids will especially love it! Add them to your holiday tree or gift as a tag on any package.
Source: Craft Create Cook
Colored Dough Ornaments
This little dough ornament idea is so cute! With simple steps, turn it into colorful ornaments. Your children will be delighted with these decorations, and you will forever be satisfied with memorable gifts!
Source: Craft Create Cook
Christmas Garland Mittens
I love how easy it is, even kids can help make it! You just need a few dollar store supplies and safety pins to hook it up, and voila, you have the perfect holiday garland for your home.
Source: Craft Create Cook
Rudolf Paper Plate Kids Craft
Color a paper plate and make a cute deer out of it! This fun Rudolph craft is perfect to create with the kids and add a cute decoration to your robe!
Source: Craft Create Cook
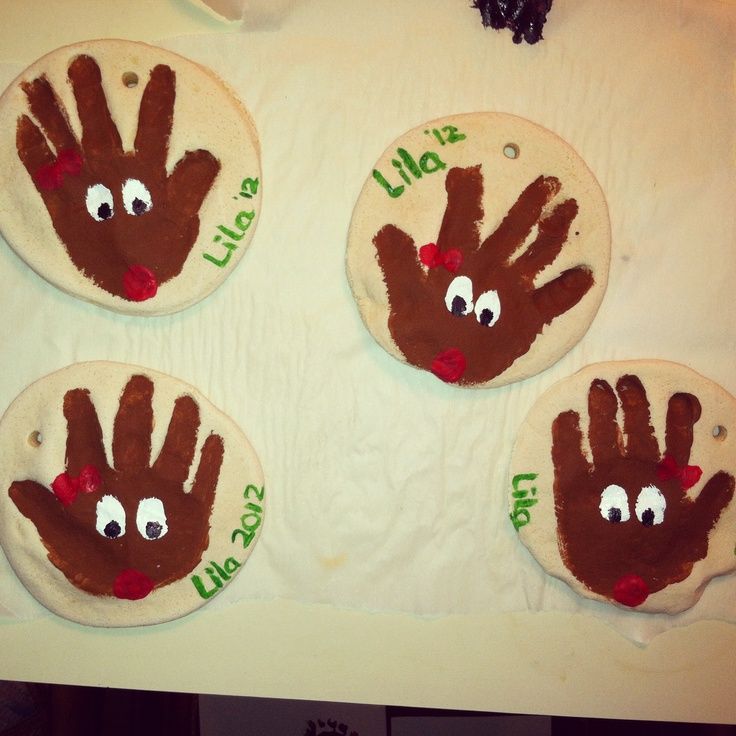
Snowman Craft Ornament
Hang these cute snowmen on your tree this year! Add the year and the name of the child who created it to create an even more special look that hangs on your tree year after year!
Source: Craft Create Cook
Paper craft for kids with reindeer
The cut paper makes it very easy for kids to assemble this little deer.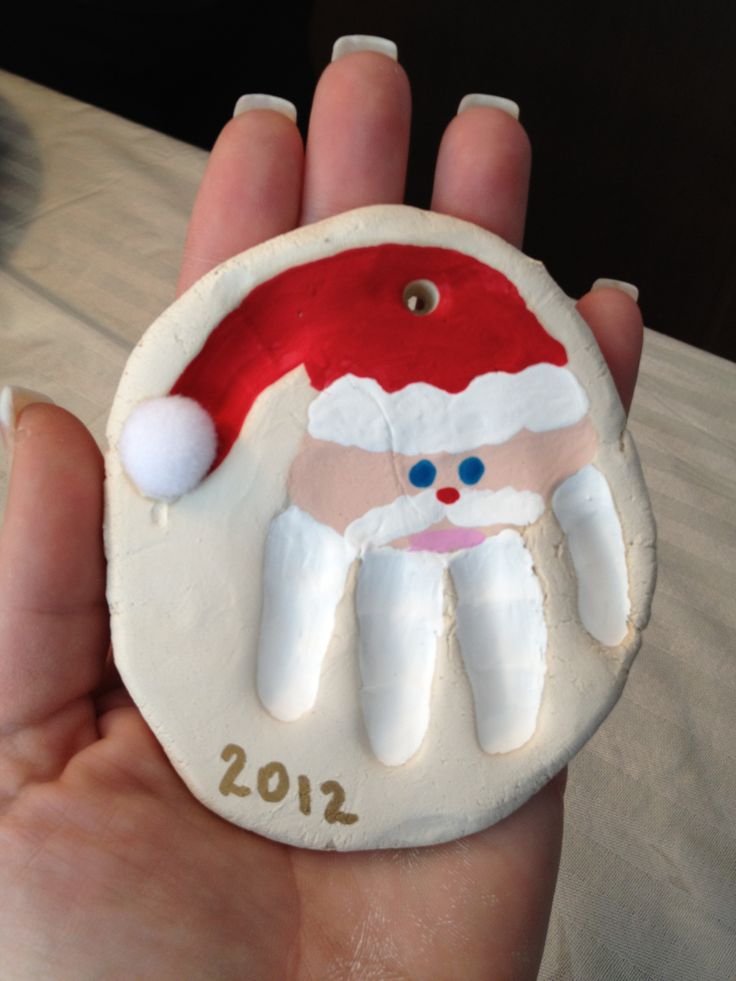 This is the perfect project for a large group as you already have everything you need. All they do is glue!
Source: Etsy
Easy Christmas Tree Craft
Make this easy Christmas tree craft - a fun craft that is suitable for all ages. It is not difficult to make this Christmas tree craft from basic materials. I love that it's a budget option to add to the kids' holiday creations this year.
Source: Our Life Wabi-Sabi
Pipe Cleaner Ornaments
This is such a cute little idea that kids can come up with so easily. I love that the pipe cleaners are so economical and they are super easy to roll up and turn into cute ideas to hang on the Christmas tree!
Children's Reindeer Crafts
This classic Christmas craft makes a great addition to your Christmas tree and makes a great gift for grandparents. Old-fashioned clothespins are a great base for reindeer holiday decorations!
Source: That Fit Fam
Children's Art Embroidered Ornament
Let your kids get creative by turning their sketches into hand-embroidered keepsakes! This is a beginner's guide to hand embroidery that anyone can do.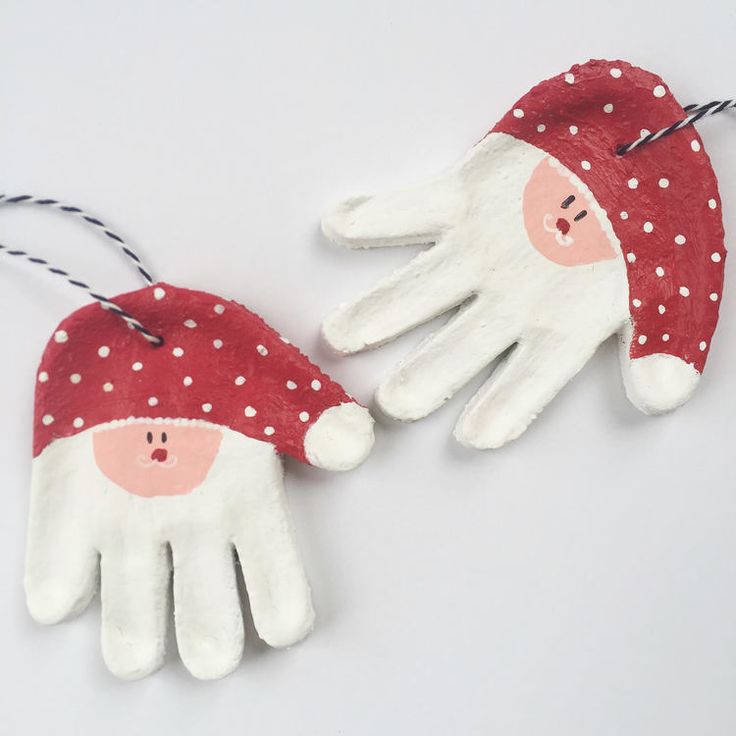
Source: Swoodson Says
Light Felt Tree Children's Christmas Ornament
I love how felt circles are used here to glue them together to create a cute little decorative tree. It's perfect for young hands to learn coordination!
Source: Etsy
Fingerprint Christmas Tree Craft
Get creative with a Christmas tree that will brighten up the whole season! This Christmas tree is easy and fun to make! Kids will love painting their hands and folding the pom poms to make a fun little tree!
Source: Foster to Adopt
Baby Jesus yarn in the manger
I have to admit, it's just amazing! Perfect for Sunday school crafting or teaching kids about the birth of Jesus and the scenes in the manger.
Source: Catholic glaze.
Painted Snowman Block Craft
I love how easy this project is to make! Children have fun coloring the blocks and then building them into a cute snowman or other holiday character. Super cute and definitely easy to make!
Source: Learning Ideas
Snowglobe Sun Catcher Craft for Kids
This fun little idea is perfect for kids! Snow globes are a traditional dish for the holidays and this gives them the opportunity to really customize it!
Source: Etsy
DIY reindeer craft
This is a classic that kids always have fun making! I love that you can do them year after year and track the changes in your kids! Just mark the year and their name on the back!
The Grinch's Charming Christmas Games
It's time for the Grinch's crafts! Learn how to make these super fun crafts for kids! I love the face of the Grinch on the porch! Such a cute idea to add this to your holiday routine with the kids!
Source: Get Your Holiday On
Homemade Gingerbread House Recipe
You make gingerbread and your kids put it together and it will be a delicious addition to your holiday routine! A homemade gingerbread house recipe is more than just a recipe; this is a tradition. Supplied with a template. Even a budget one with a recipe that only costs $6.95 to make 2 big houses!
Source: Easy budget recipes
Styrofoam crafts for kids
Styrofoam decorations are always popular with children.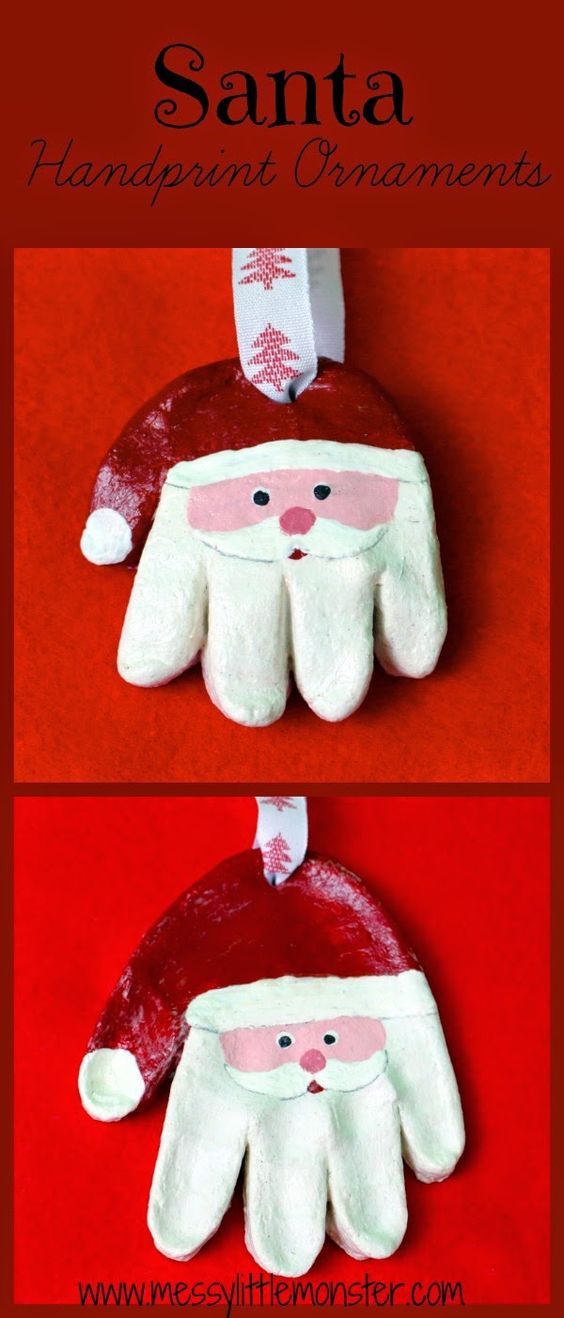 This allows them to create their own unique spin on the ornament with fun additions to the traditional round ornament.
Source: Etsy
Fingerprint Deer Ornament
We've all done this before, but it's a great reminder of how cute they are for kids! Another great way to track your child's growth year after year! I love it, and so do the grandparents who send them in the mail at Christmas!
Baby Reindeer Ice Cream Stick
Make this cute little reindeer using the simple template included in this tutorial. Kids love reindeer and now they can add this to their holiday crafting routine!
Source: Simple Everyday Mom
Santa Elf Christmas Bookmarks
Here's a fun snowman and elf Christmas bookmark you can make with your kids this holiday season! Includes a free printable template to download. This is a fun and easy craft for kids to help them spend time reading!
Source: Brooklyn Active Mama
"The gingerbread should have an aromatic ornament" - Weekend Ukraine - Kommersant
In Germany, it is customary to bake sweet bread stollen for Christmas, in Italy - panettone, and in France, a pandepis decorates the Christmas table.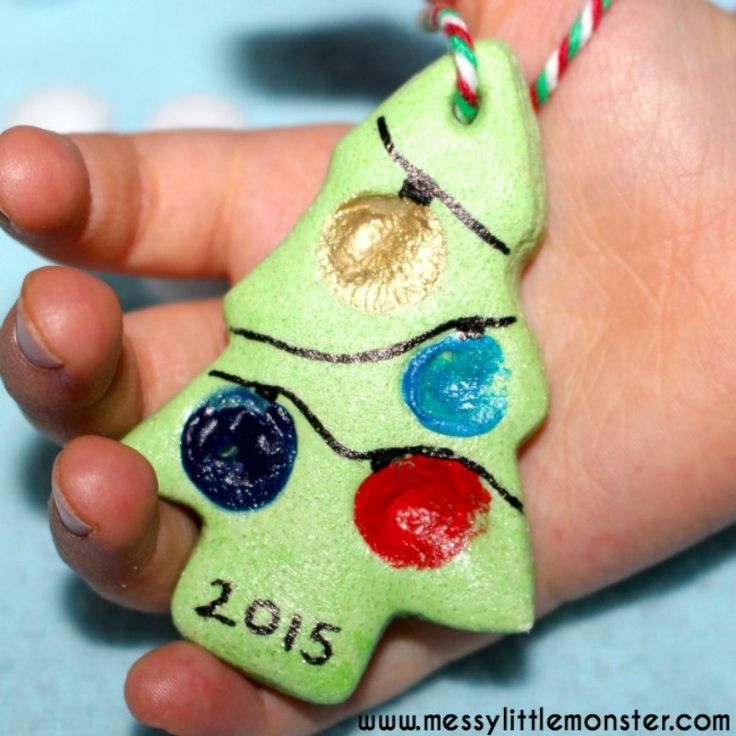 The culinary blogger Belonika, the founder of the Russian culinary school in Provence, the author of "Recipes", "Diets" and the book "About Food. About Wine. Provence" told Marina Gladkaya Nika Belotserkovskaya .
Does the Christmas cake have a story?
— Pandepis always participates in the Christmas gingerbread fair, for Europe this is a long tradition, inseparable from Christmas. Christmas markets are beautiful, where you can buy festive decorations and incredibly beautiful gingerbread, delicious gingerbread, roasted almonds, chestnuts, chocolate figurines. The fair closes on the night before Christmas. If we talk specifically about the history of the gingerbread itself, then it is probably connected with the history of German stollen baking, they are even close in shape to each other. But the French pandepis did not go down in history as loudly as the stollen. Stollen was baked on Christmas Day. It was unprofitable to cook yeast dough in vegetable oil, which was expensive in the Middle Ages, and some daredevils wrote a letter to the Pope asking for permission to use cheaper butter.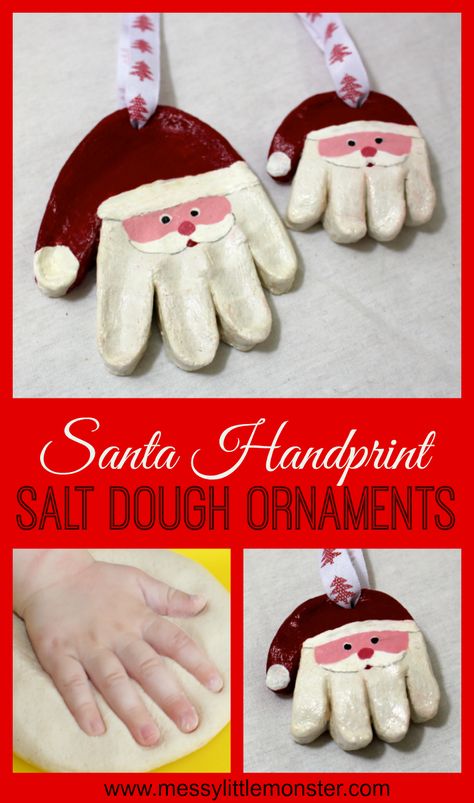 A whole story unfolded with refusals, requests, and finally, in the 15th century, Pope Innocent VIII agreed to change the recipe.
— What do German stollen and French pandepis have in common?
- First of all, the shelf life: both Christmas products can safely lie in the refrigerator for two months. Given that the pace of life picks up towards the end of the year, pandepis baked in advance can really help, especially when you expect a lot of guests. Eat it cold or reheat in the oven. If it gets stale, make croutons, and it will turn out delicious again. The French call it "panperdu", "lost bread". The slices are soaked in milk and fried in an egg.
— Is Italian panettone very different from French Christmas cake?
- There are differences, although the name of both the first and the second begins with the word "bread". This is confusing for many translators, and you can hear such translations as "sweet Christmas bread" and even "cupcake".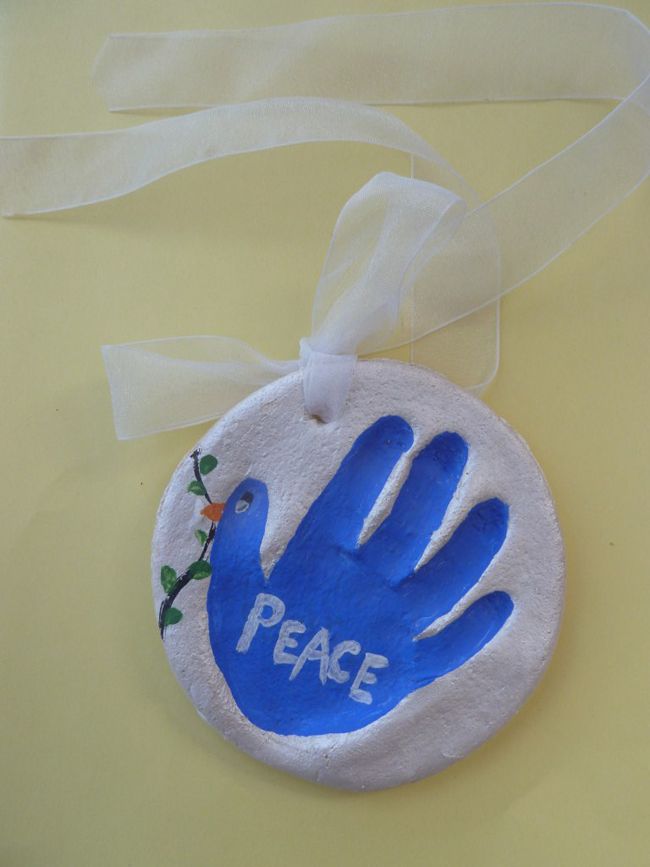 If you add both parts together, then the Italians, according to one of the dialect variants, will get "bread of luxury" ( pan del ton ), the French - "bread with spices" (rain d`epices). Both are baked for Christmas, but the panettone is always domed, it looks like a Russian Easter cake. Pandepis looks different, it is baked in a long rectangular shape - you can take the usual form for cupcakes. A lot of candied fruits and raisins are added to the panettone, it is variegated in the cut, all in colored squares.
— And what kind of candied fruits can be added to pandepis?
— I don't add candied fruit or raisins to my Christmas cake at all, I like its rich flavor. Panettone and stollen are studded with raisins and candied fruit, cut off a chunk and you see a colorful mosaic. But as for me, the gingerbread should have an aromatic ornament. She is fragrant, fills the room with an incredible smell of spices, her beauty is precisely in this palette of taste.
- How to get this "palette"?
– Very simple – we prepare a mixture of spices, it is better to do it in advance and more. Feel free to take spices, all at once, and grind into powder, then sift through a sieve. If you want a more powerful fragrance, add a flavor enhancer - pepper. Do not be afraid, he will not spoil the pandepis. In general, if you look closely at the Christmas gingerbread, there is something oriental in it, apparently, the love for spices in the Middle Ages left its mark. In general, the French are incredibly strong in nuances and feel subtle moments where, say, the most sophisticated Russian gourmet will pass by and not notice. No wonder they have exceptional desserts.
- Can't you just repeat the recipe?
- The French feel much finer, they have some kind of their own special palette of taste, it is much wider and deeper than that of a Russian person. I remake all French recipes for myself. The first thing I start with is to reduce the amount of sugar, almost by half. They have incredibly sweet desserts, but unlike us, the French in a continuous stream of sweets feel and catch some subtleties that are incomprehensible to us, which they hear, understand and enjoy.