Dra levels for 1st grade
Quick Guide to Understanding Reading Levels
Home » Blog » Literacy » Quick Guide to Understanding Reading Levels
Written by: Angie Olson
- Share
- Tweet
With so many different types of reading assessments and leveling systems, it can be hard to keep track of which books are just right for your growing readers. Let’s take a look at some of the reading level systems to get a better understanding of each, and how they can be useful in your literacy block and small group instruction planning.
Guided Reading Level
The Guided Reading Level was developed by reading experts Fountas & Pinnell. The levels are matched to grade level specific reading goals. In order to progress to the next level, students must display proficient use of strategic actions. Decoding, word acquisition, vocabulary growth, making predictions, connecting to text, recognizing text features, summarizing, inferring, and bringing personal experiences to comprehension passages are just a few of the components measured on the Guided Reading Level.
For a more in-depth look at Guided Reading Levels, check out this link.
- 1st Grade: E – J
- 2nd Grade: K – N
Lexile Bands
Lexile Measure is a valuable evaluation tool. A Lexile measure evaluates the complexity of text, as well as students’ ability to read and comprehend the text. To find the Lexile Grade Level Charts for 1st and 2nd grade, click here.
1st Grade Lexile Bands
| BOY – Fall | MOY – Winter | EOY – Spring |
| 10L-435L | 85L-505L | 165L – 570L |
2nd Grade Lexile Bands
| BOY – Fall | MOY – Winter | EOY – Spring |
| 290L-675L | 355L-735L | 425L-795L |
DRA
The Diagnostic Reading Assessment is an assessment that is ideally administered twice a year. To determine a student’s DRA reading level, students are administered an individual assessment that measures skills of phonemic awareness, phonics, and fluency. There are also measurements for vocabulary, comprehension, and engagement. The better a student scores, the higher the number of their DRA level.
Expected DRA levels:
- 1st Grade: 4 – 16
- 2nd Grade: 16 – 24
AR
The Accelerated Reader, or AR Level, is designed to match students with an appropriate level of text for independent reading. to Measure an AR text, three things are considered: average sentence length, average word length, and word difficulty level.
Expected AR Levels:
- 1st Grade: 1.0-1.9
- 2nd Grade: 2.0-2.9
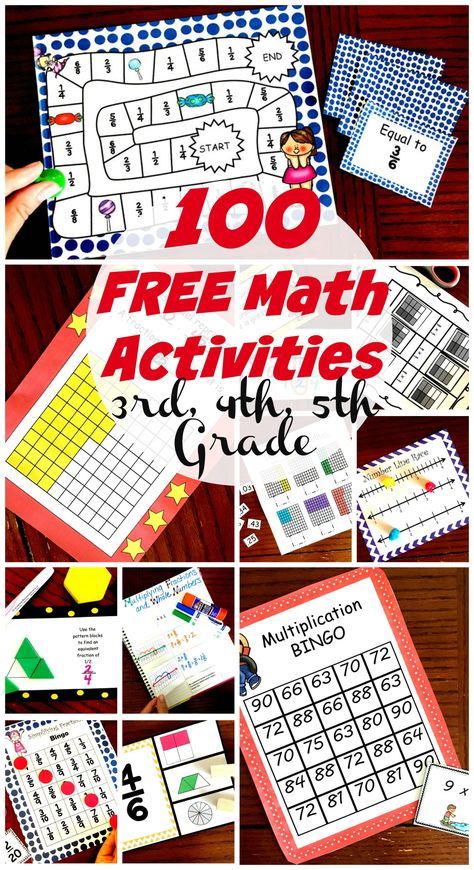
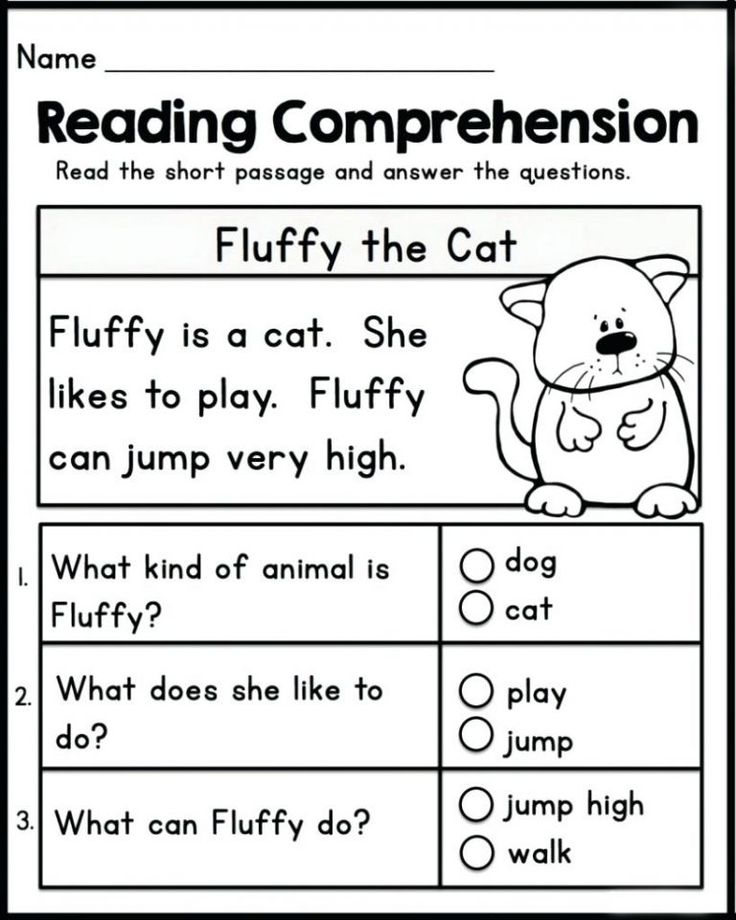
Let’s take a closer look at a Lucky Little Learners 2nd Grade reading passage.
Download Reading Passages HEREThe reading comprehension passages are leveled using a Lexile band, but due to Lexile copyright, we cannot provide the exact level for each passage. The coding we use for each reading passage level is:
- ⭐️Below Level/Star Passages: within the 300-500 band
- ❤️On level/Heart Passages: within the 400-700 band
- 🍏Above level/Apple passages: within the 600-800 band
When we design new products for 2nd grade that are leveled, we make sure they are within the CCSS recommended Lexile band for second grade (300-800).
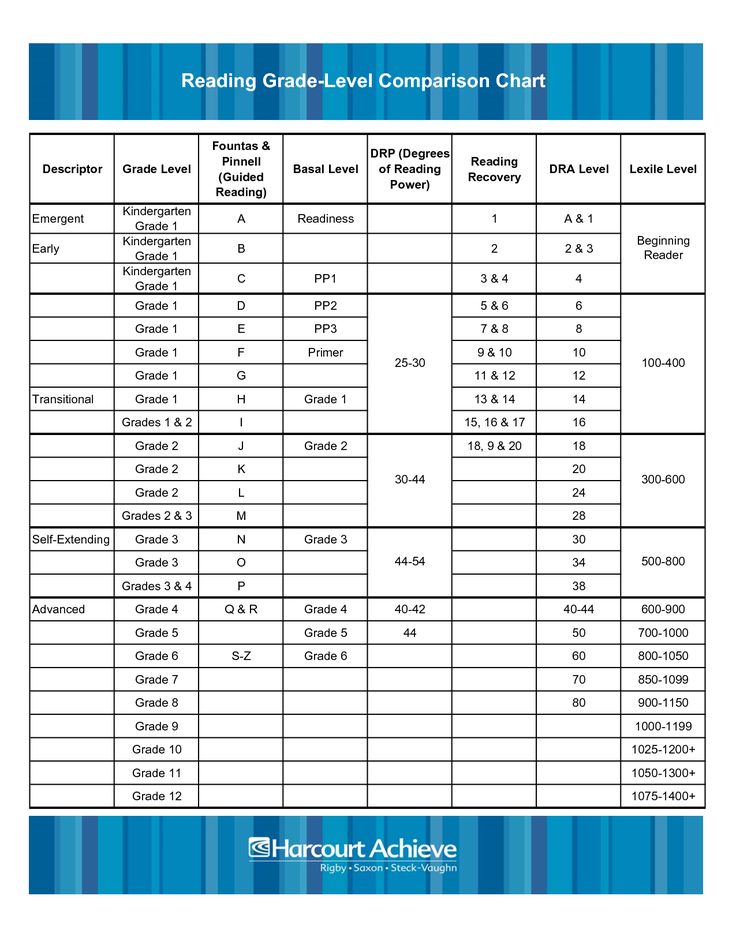
Looking to compare the different reading level assessments? Take a look at this leveling chart.
Tools for Leveling Books
Are you searching for a “just right” book for a student? Check out Scholastic’s Book Wizard, where you can find the level of any book by simply typing the name or ISBN number. Voila! The Book Wizard generates the Grade Level, Guided Reading Level, Lexile Level, DRA Level, and ACR Level, all with the click of a button. If only organizing your classroom library was that easy! For tips on leveling and organizing a classroom library, check out this classroom library blog post.
More Digital Resources for Leveling Books:
Lexile Find a Book – from the Lexile
Level It Books App and QuickScan Book Leveler– these apps allow you to scan ISBN numbers with your phone’s camera, making library leveling a breeze!
Be sure to check out our reading comprehension passages in All Access.
2 Ways to Get Reading Passages
- Share
- Tweet
Leveling Chart | Scholastic Guided Reading Program for the Classroom
Use the grid below to shop by Guided Reading, Developmental Reading Assessment (DRA), and Lexile® Levels. This chart includes Lexile level recommendations and may also be used as a general leveling guide.
Click on links to shop the Teacher Store!
| Grade | Scholastic Guided Reading Level | DRA Level | Lexile® Levels |
|---|
| Grade | Scholastic Guided Reading Level | DRA Level | Lexile® Levels | ||||||||||||||||||
|---|---|---|---|---|---|---|---|---|---|---|---|---|---|---|---|---|---|---|---|---|---|
| Kindergarten |
| Beginning Reader | |||||||||||||||||||
| 1 |
|
| 190L-530L | ||||||||||||||||||
| 2 |
|
| 420L-650L | ||||||||||||||||||
| 3 |
|
| 520L-820L | ||||||||||||||||||
| 4 |
|
| 740L-940L | ||||||||||||||||||
| 5 |
|
| 830L-1010L | ||||||||||||||||||
| 6 |
|
| 925L–1070L |
Back to Top
Guide to all classes of creatures on the “Battlegrounds” HS
Hearthstone mode “Battlefields” was included in the list of disciplines of the new season of Red Bull M. E.O. - this auto-butler has long been in the top games of its genre and is distinguished by a special variety of creatures and strategies. You can find a separate material on Battlegrounds with tips from SilverName here, but if your knowledge is limited to the completed tutorial and the two top 8 games, then it's time to talk about the most important.
We won't explain the basics of the gameplay to you - Bob will do just fine after starting the mode for the first time. We are ready to dig deeper and talk about the holy of holies of all Hearthstone, namely about creatures and their features.
Don't forget that Battlegrounds is an incredibly versatile auto-battler, and you can win with any cards and through any strategy. At the same time, knowing and understanding the basics of each type of creature is vital, because it is from understanding core cards and their features that absolutely all your gameplay is built.
In this article we will only talk about the features of each class, and also describe the main and proven connections between the creatures of a particular archetype. How to mix them, replace them and what cards to use in other strategies - this will only come with experience.
1. Dragons
Kalecgos is not a guarantee of victory!
© Blizzard
-
Cores: Kalecgos 6*, Nadina the Red 6*, Razordeath the Indomitable 5*
-
Strong Links: Tarecgosa 3* + Exhibition Dragon 4*
One of the most obvious classes in the game based on high stats on creatures and divine shields. Kalecgos, the main dragon card from Tavern 6, has always been a core minion for scaly strategy, yet it can easily give you a false sense of advantage. This card needs time to ramp up and usually additional sources of buffs. So if you've invested a bunch of resources into excavating Kalecgos, and you've got an empty table and low HP, then there's a good chance you'll fly off in the next game before your dragons start biting really hard.
However, this card is very strong and has always been a major power-up for dragon strategies. To help Kalecgos, you can take the Whelp Trader, especially if it is collected in a triplet. The second stage is finding Nadina Krasnaya. This card gives divine shields to all dragons on the table and is an incredibly powerful buff to your table. But do not forget that a skilled player is able to counter it with the purchase of an Unstable Ghoul (“ghouls”). Beginners and intermediate players almost never use this life hack, because they are not well versed in the mechanics of the game.
Another strong dragon card that can also be played in hodgepodges is Tarecgosa. An incredibly powerful creature in the hands of a skilled player. Tarecgosa permanently retains temporary effects, so in combination with the Exhibition Dragon, she can gain insane numbers of stats.
2. Quilboar
-
Core cards: Charlga 6*, Captain Bluntfang 6*.
-
Strong Links: Throttusk + Flag Bearer + Dynamic Duo
Pure stats and nothing more. The whole quilboar archetype involves the skillful manipulation of blood gems in order to hit the enemy in the face as painfully as possible. Quilboar have almost no useless cards, they all find their way in one way or another. Your main task is to find a good source of blood gems and form a link between the power-ups of the pigs.
This class only has one divine shield, and that is Thrugtusk from the second tavern. Since Divine Shields is one of the strongest mechanics in the game, this card should not be ignored. Quilboar builds usually start after receiving some kind of Blood Gems generation. If you decide to sell an already buffed pig - do not forget about the presence of Necrolyte, which pumps fragments into the desired creature. This allows, for example, to use the Earthshaker for early victories, in order to get rid of it painlessly later.
In fact, the section of core cards in the case of quilboar is rather a convention, because it is possible to make strong pigs without Charlga or the Captain. By the way, Aggem Curse of Thorns is one of the best maps for hodgepodges, in the presence of constant generation of gems, and Captain Blunt Fang is very often used for advanced strategies through the Pirates Crusher and Peggy.
3. Elementals
Your creatures did their best!
© Blizzard
Core cards: Nomi 5*, Blinding Spawn of Light 4*, Ragnaros 6*
-
Strong combos: Molten Boulder 2* + Celebration 2* + purchase of any elements (at the start of the game)
Elementals have always been favorites players in Hearthstone, and at medium ranks you can meet 4-5 elem players in one lobby. Nomi, the key creature of the archetype, is one of the core cards of a kind of “golden list”. When players make a triplet to the fifth tavern, they almost always hope to find it there.
Early Nomi allows you to quickly accelerate and guarantees an almost unlimited increase in stats with the right approach to buying cards. They almost always try to find a Renewable Spirit to him in order to provide themselves with free rerolls. Nomi has a mini analogy - Blinding Spawn of Light. It works similarly, but for this map you definitely need to have a couple of good provocateurs. All buffs always try to give to Crackling Cyclone (because of the divine shield) and Rampant Fire Elemental. Also in the fourth tavern there is a Majordomo Executus - a good card to strengthen the elementals, but one Majordomo is not enough to make a competitive table.
Ragnaros is also one of the core cards of the elems. One Ragnarosh - this one is like Kalecgos in terms of strength (that is, it is not a fact that it will ensure victory in solo), but at high levels of the tavern it gives strong buffs. Usually, after buying Ragnaroshi, Nomi is sold, because these cards do not work well in conjunction.
4. Murlocs
-
Core Cards: Brann Bronzebeard 5*, Murloc Spy 5*
-
Strong Links: Selfless Heroine 3* + Baron Rivendare 5*
The most clumsy and one-sided class in the game. He threw poisons, gained health - he won. This is a joke, of course, but in most cases, murlocs are really only played according to one plan.
Anyone who wants to do "rrrr" is looking for the two main murloc cards - Brann and Murloc Spy. The first provides creatures with attack and health, and the second poisons. Without at least one of these cards, murlocs generally don't have the ability to rack up enough stats to compete with other strategies. Therefore, if you have been hit with murlocs, then your goal is to download the fourth tavern and make triplets in the fifth to find one of these cards. Or, of course, look for them already on the fifth.
If you're lucky enough to get a Murloc Spy, it's a good idea to grab Argus' Defender in time to make two cards provocateurs and ensure a reliable supply of poisons.
Highly advanced players at some point replace Brann and the weakest murloc with a strong combination: golden Selfless Heroine + Baron Rivendare to provide their cards with divine shields
5. Pirates
-
Reaver 5*, Peggy Brittlebone 5*, Dread Admiral Eliza 6*, Naval Marauder 3*
If you think fast and can do a thousand actions in a minute, then you might be able to handle the pirates. Most pirate strategies are played through the main card: Captain Dr-r-tugger. This hyena provides the player with a large amount of gold, which allows you to make an unrealistic promotion with proper skill and the presence of cards in the tavern. Newbies trying to collect pirates get their first Naval Marauder - and this is a really good start, but it is the Crusher that is the basis of all the most popular builds.
At the same time, you won't go far with one Crusher: it is desirable to make it gold, and it is important to have an additional source of stats - Peggy Brittle Bone and a marauder. Since the hyena, especially the gold hyena, gives a lot of gold, you are required to buy and sell pirates very quickly, while keeping an eye on the gold limit. In this way, you can score wild numbers of attack and health. The Crusher is also often used in hodgepodges and builds through Captain Bluntfang (quilboar), but these are already more advanced strategies.
Secret build for true professionals.
© Blizzard
But there is something else that you might not immediately guess. Build through the so-called “shushpins” (hello from SilverName). We will show its final version, and how to get into it - think for yourself.
So. Shalopayka (without buffs, preferably 2 pieces and in a taunt) + Eliza + Baron Rivenderr + Khadgar. There should be no other cards on the table. There can be two or even three Khadgars.
6. Demons
-
Core Cards: Wrathcaster 1*, Ravenous Ur'zhul 5*, Starving Felbat 6*
-
Strong Links: Megafernal 4*\Soul Juggler 3* + demons with deathrattles
3 Interesting enough
3 a set of creatures, with taunts, death rattles and devours. The demon player generally follows two main strategies. The first is the purchase of demons from the start, if the Wrath Caster came to you (“red”, as he is also called). Reno players often make it gold right away.
 This unit spends the player's HP every time any demon is placed on the board, while gaining buffs itself. Beginners are afraid of this strategy, and for good reason: you need to be able to manipulate health and stop in time. However, defeating the player on the red at the start is almost impossible, because this card accelerates too much. The third tavern has Katra'natir, which gives the player's hero immunity to these hits, so purchasing it is a priority.
 Next, players usually buy taunt demons in combination with Soul Juggler. And it's a really strong pick for the mid game, but don't make the mistake of getting rid of him in time - he won't take out the end game. Here the Ravenous Ur'zul and the core-card from the sixth tavern - Starving Felbat (gargoyle) come to the rescue. These cards are the basis of the second strategy and they are self-sufficient, so if you draw an early gargoyle, then you can go into demons and win.
7. Mechanisms
-
Cor-cards: Omega-wheeler 6*, student Kangora 5*, Baron Riveder 5*
-
Strong ligaments: lubricant 4*\ Robolesvet 5* + Divine shields
-
One of the most complex archetypes in the game, which requires a good understanding of the game and the correct placement of units. The whole essence of cars is divine shields and death rattles. Strategies through mechanisms do not imply huge permanent stats of units, because their power is revealed already on the battlefield. There are a lot of options for playing through mechanisms, and they are all equally complex.
Ultimate core card - Omega Crusher in combination with Baron Rivendare, and it is important to get Kangor's Apprentice with them. The Crusher must be one of the first (or all the Crushers, if there are several of them), and after them - an apprentice who will immediately resurrect them.
Mechanisms have a lot of useful auxiliary cards. One of the most useful creatures in the mid-game is Blockobot, a card that boosts its attack and gains a divine shield when a mechanism is summoned during combat. Therefore, various collapsing units are bought to it - the Replicator, the Mechano-Egg and others.
In general, apart from the Omega Crusher, there are no exact strategies for mechanisms. We need to act according to the situation.
8. Beasts
-
Core Cards: Goldrinn 6*, Mama Bear 5*, Hopper 2*
-
Not as complex as mechanisms, but still quite a variable archetype. As a rule, it is based on death rattles and the interaction of various creatures. The most popular strategy is Scary Macaw 3* + Goldrinn + a bunch of animals (preferably Cave Hydra and Mexna) + Baron Rivendare. But this is ideal. In fact, such ideal builds are extremely rare, so animals are collected from what is.
The starting strategy is usually based on Jumpers, which are supplemented with sewage rats and other animals. With proper assembly, this can easily be brought to the end-game. Mother Bear is one of the core cards, but it shouldn't be considered the most important card on the board: it buffs creatures well, interacts with deathrattles, but requires understanding of the game. If you got an early bear, then you can put animals on the table and they will immediately receive buffs, which is also nice.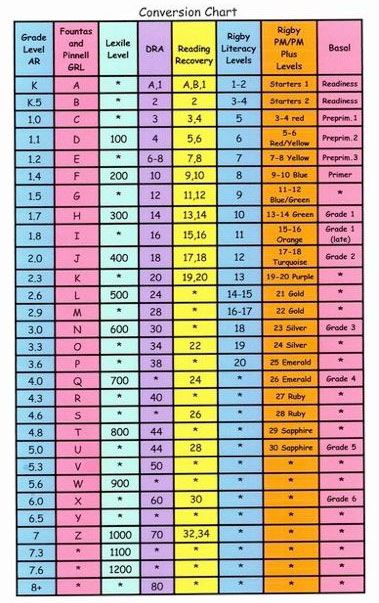
In general, this strategy still requires understanding of the mechanics and good placement.
Respirator protection classes
June 29, 2018
One of the main characteristics of a respirator is the filtering activity class or protection class. This indicator characterizes the ability of the protective device to retain harmful substances in the filter.
According to the European standard EN-149:2001, respirators are divided into three classes.
For the correct choice of personal respiratory protection equipment, it is necessary to know the indications of the maximum permissible concentration of harmful substances in the room and the characteristics of the SIDOS itself.
Class 1 respirators (FFP1)
1. Degree of filtering activity
They are used in well-ventilated rooms with medium dustiness with a maximum allowable concentration of impurities in the air from 2 mg/m3. times, detaining up to 80% of dust, liquid and solid aerosol particles.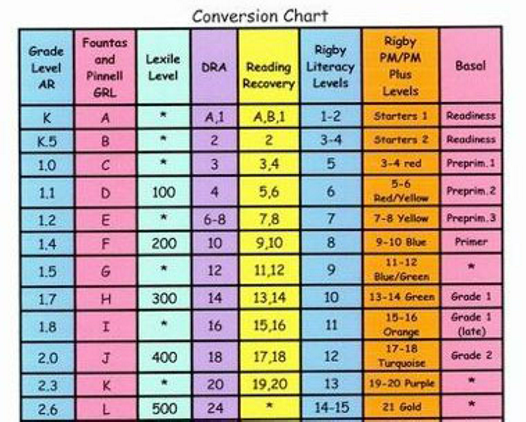
2. Protection
Used in industrial premises with non-toxic dust, agriculture, food industry. Indispensable in mines and quarries, when working in limestone quarries, as well as in woodworking. Good protection against dust particles of calcium carbonate, natural and synthetic graphite, gypsum, chalk, cement, plaster, marble, zinc oxide, plant pollen, cellulose, sulfur, cotton, coal and metal filings. Suitable for work in smoky rooms (with non-toxic smoke), in foggy conditions.
3. Models
- 3M 8101. One of the most popular respirators in its class. Ergonomic design and soft inner padding make it comfortable to use, and the technical characteristics allow you to reliably protect the respiratory system.
- "Alina" 100. Equipped with 3D FLEX-TO-FIT tapes, which allows you to adjust the size of the headband. Fits snugly to the face, securely fixed, but does not impede breathing due to the wide filter surface.
- U-2K. It has two valves - for inhalation and exhalation.
 Equipped with a nose clip for maximum tightness. It is used in the temperature range from -10 to 35°С at humidity up to 98%.
Neva 100, 110, 119 and others are also popular.
Respirators 2 protection class (FFP2)
1. Degree of filtration activity
Suitable for closed, poorly ventilated areas with MPC greater than 0.05 but less than 2 mg/m3. Reliably protect the respiratory system in conditions of up to 10 times the maximum allowable concentration of irritating substances in the air. At the same time, up to 84% of impurities are retained.
2. Protection
They are used in enterprises where work is connected with solid particles of medium toxicity, asbestos, copper, barium, titanium, vanadium, chromium, manganese dust. They are mandatory when working with hardwood and coal, when welding, at mining, chemical, metallurgical industries, in shipbuilding. Suitable for areas with harmful carcinogenic dust, smoke and oil- and water-based aerosols in the air.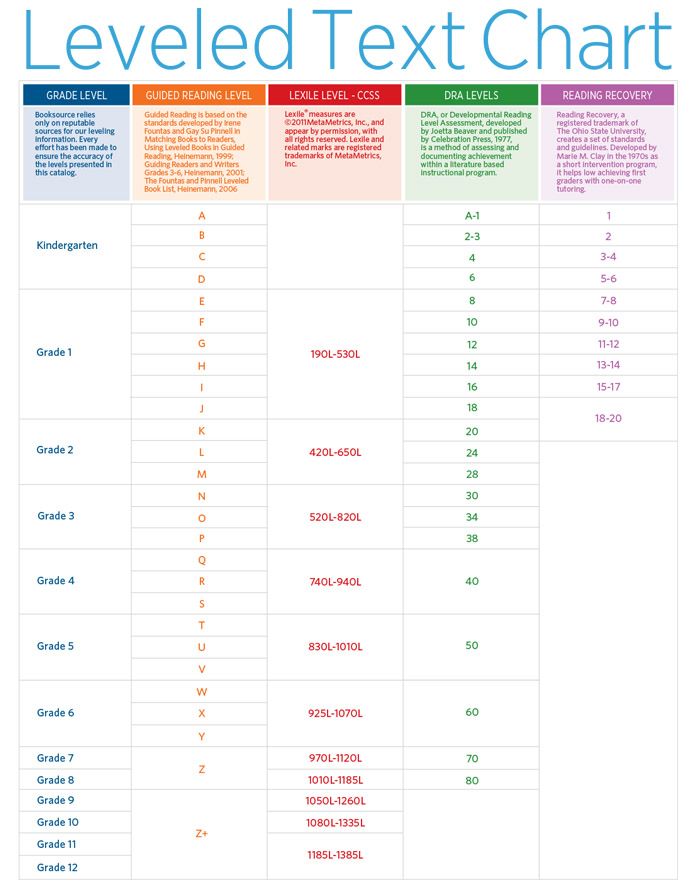
3. Models
- 3M 8122. One of the best protection in its category. Provides safe operation when the concentration of hazardous particles in the air exceeds the maximum allowable standards by 12 times. Equipped with stiffening ribs that allow the respirator to restore its shape even after long-term storage. Anti-allergic soft interior lining enhances comfort of use.
- Particulate control 9322. Equipped with advanced electret filter and parabolic exhalation valve. Easy to use, does not impede breathing and speech. Soft inner lining helps avoid irritation. Can be used at temperatures from -30 to 70°C.
No less effective respiratory protection is provided when using models "Alina" B and 200, "Julia" 209, 215, 219 and others.
Respirators of the 3rd protection class (FFP3)
1. The degree of filtering activity
Indispensable in industries with a high concentration of toxic substances in the air, the MPC of which is from 0.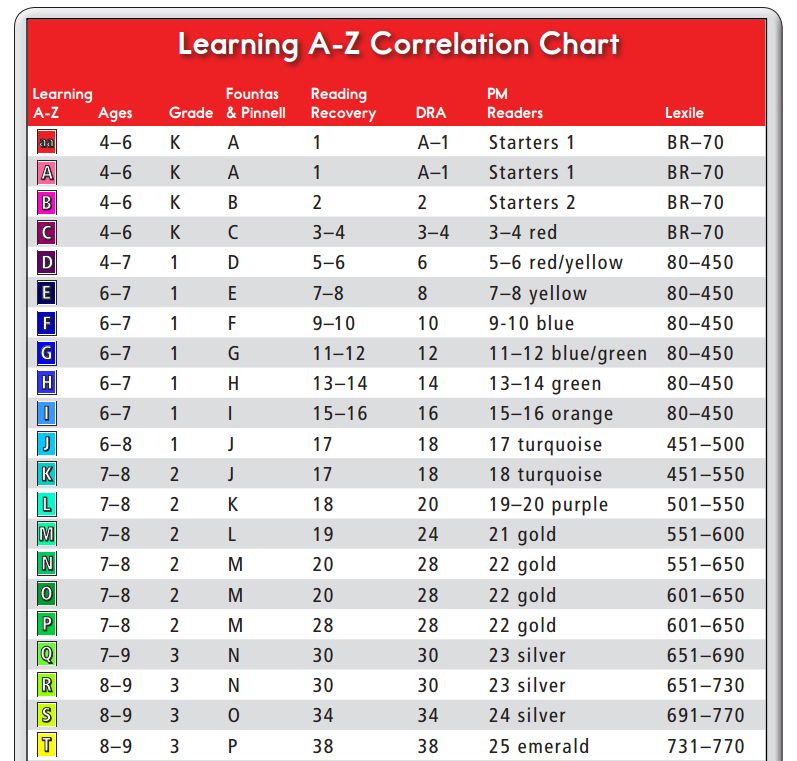 05 mg/m3. They are effective in conditions of exceeding the maximum permissible concentration by 30 times, retaining 99% of impurities dangerous to humans.
2. Protection
Used for welding and soldering. Suitable for enterprises where work is related to the use of beryl, antimony, arsenic, cadmium, cobalt, nickel, radium, strychnine, radioactive substances.
3. Models
- With valve 9332. Compact protection equipped with an exhalation valve and a sweat-wicking layer on the nose clip. Fits tightly and tightly, does not impede speech.
- "Alina" 310. Able to protect when the maximum permissible concentration of hazardous substances is exceeded by 50 times. It can be used at various temperatures, while maintaining the most comfortable humidity and temperature conditions.
- "Julia" 319. One of the best representatives of the class with a seal made of foamed polymer, which allows to ensure optimal humidity and temperature inside the respirator.
Learn more