Dra reading assessment free
FREE Reading Assessment Tools for Teachers for Easier Testing
When it comes to completing reading assessments, there is always so much to do! Teachers have to gather their materials, prepare both students and parents, find testing checklists, and keep track of important data. I know you are already doing so much to serve your students, so I wanted to help make reading assessments easier for you!
I decided to put together The Reading Assessment Teacher Toolkit – a free downloadable pdf that has tons of resources and tools for you! This toolkit is packed with checklists, parent notes, and testing signs to make testing a little lot more efficient! Let’s jump right into what all is included!
Phonemic Awareness Checklist
Building phonemic awareness is the foundation of reading, and young readers need strong phonemic awareness for success in reading. I included a checklist of the skills students should be working on mastering to help you get a picture of where each child is.
Phonics Skills Assessment
Next in the reading assessments toolkit you’ll find a phonics skills assessment. This list will help you understand and get a solid picture of how your readers decode words. You’ll be able to see if there is a certain skill (digraphs, vowel teams, etc.) that they struggle with.
Dictation Assessment
The dictation assessment will help you see how your students take the knowledge and skills they have and write what they know. Reading is input, and writing is output.
Running Record Cheat Sheet
A huge piece of guided reading assessments is running records. Instead of having to flip around in different books to find coding symbols and percentages, I put everything you’ll need in one handy cheat sheet. Just print it off and stick it in your guided reading binder!
Comprehension Questions for Reading Assessments
Part of gathering a picture of the whole reader is to ask comprehension questions after reading a text. Some books may include specific questions to ask, but most do not. I compiled a list of comprehension questions to ask for both fiction and nonfiction texts that will work with any book!
Reading Strategies and Skills Checklist
Next, to help you keep track of skills and strategies students use for your reading assessments, there is a checklist that you can use throughout the year. This makes data tracking easy. Plus, you can use it to help write effective lesson plans to address areas of need.
Dolch and Fry Sight Word Lists
Help students get warmed up for assessments and find out how many sight words students know. In the reading assessments toolkit, you’ll see both the Dolch and Fry sight word lists for kindergarten, first, and second grade.
3 Parent Conference Forms for Reading Assessments
Another big piece of reading assessments is keeping parents informed of what their child can do, what their child is working on now, and where you want them to go next.
For each grade in kinder through second grade, there is a parent conference form you can fill out. This will help guide you through the conference and give parents a great picture of their student as a reader. You can also use these with progress reports, too!
Table Top Testing Tents
To help minimize distractions during testing, use the table tents to remind students not to interrupt unless it is important. I teach my students about the 3 Bs – blood, barf, bathroom. I recently adding bullying to my list, too! Just set up the tent on your table and assess away!
Testing Door Signs
Remind students (and staff) that you’re doing reading assessments with your students by hanging one of the cute door signs out on your door. If we can minimize distractions, we can provide a great testing environment for students.
The Reading Assessment Teacher Toolkit was carefully designed with kindergarten, first, and second grade teachers in mind. Be sure to download it today for your beginning, middle, or end of year reading assessments.
If you want to dive deeper into reading assessments for guided reading, sign up for the waiting list for Rethinking Guided Reading. This online course is self-paced and has tons of resources for you like printables, teaching videos, and helpful forms.
I’ll coach you through everything you need to know about guided reading – assessments, writing and implementing effective lessons, meeting with groups while distance learning, and how to complete and read running records. The doors will open this summer for a short time. You won’t want to miss out!
Click HERE to get on the waitlist.
Want to use the latest research to boost your readers during small groups? This FREE guide is packed with engaging ideas to help them grow!
How To Determine Your Child’s Reading Level And Choose The Best Books
When you sit down to read a book, you want to enjoy the story in front of you. The same is true for your child. That’s why uncovering your child’s reading level is an important step in fostering their love of words from a young age!
Consider the different factors that allow kids to enjoy the books they read. For example, does it tie into their interests, and is it slated as an appropriate option for their level? By answering these questions, you can make sure they’re reading books that are just right for them!
If your child is in school, you’re probably no stranger to jargon like “reading level.” But what exactly does Lexile Framework, Guided Reading Levels (GRL), or Developmental Reading Assessment (DRA) actually mean?
Additionally, if your child is just starting to read on their own (or already reading independently) and is learning from home, how can you figure out what reading level is right for them? If any of these thoughts have crossed your mind, you’ve come to the right place.
We’re here to answer your questions so you and your child can sit down and enjoy a good book together!
What Is A Reading Level?
A reading level is simply a measure of your child’s ability to read text. It reflects how well your little one can read independently. Importantly, reading levels help you choose books that are a good match for your child while still presenting a challenge.
Keep in mind these levels are meant to be helpful, not stressful. They don’t limit your child, but, rather, help them blossom into a fluent, excited reader.
When your child reads books that are appropriate for their current reading level, it boosts their confidence so they can truly enjoy reading! Also, knowing what level your child is at allows you to work with them to improve their skills.
That being said, it’s important to remember that children are unique and develop differently. Comparing your child to their peers isn’t necessarily the best approach when trying to assess their reading ability.
Why Is Determining Reading Level Important?
It’s helpful to determine your child’s reading level so you can find books that are appropriate for them to read on their own: not too difficult but challenging enough to encourage growth.
Reading level classification is a convenient tool you can use when searching online or at the library. And when you provide books that are on your child’s level, you create excitement and build their confidence, which can lead to a lifetime love of learning and reading!
If you’re looking for ways to help your little one read at the best level for them, Our new app HOMER Learn & Grow has a Stories section that gives age-appropriate story recommendations!
This is a great resource that takes your child’s specific interests and recommends stories just for them. What’s more, your child can choose to read along or read on their own.
How Is Your Child’s Reading Level Measured?
Your child’s reading level is usually measured at their school in first or second grade, and we’ll show you how that’s done. Here’s a tip: since your child’s teacher knows their reading level, consider asking the teacher (or the school librarian) for books your child can read at home.
Don’t worry if your child isn’t in school yet or if they’re homeschooled. We’ll show you how you can measure their reading level at home, too!
Before we dive in, it’s important to note that we think of books for kids at three levels: independent reading, instructional reading, and frustrating to read.
As the names indicate, independent reading books are ones a child can read with ease and without support from an adult.
Instructional ones are the books just above independent that teachers might use to stretch a child’s reading as they offer support while the child makes that next step. Finally, frustrating books are too hard for a child to read even with adult guidance.
Now that you have an idea of how to think of the different books your child might encounter, let’s talk about the tools used for determining or describing reading levels.
Lexile Framework For Reading
Lexile Framework For Reading is an educational tool that ranks books by order of their difficulty using a scale called a Lexile.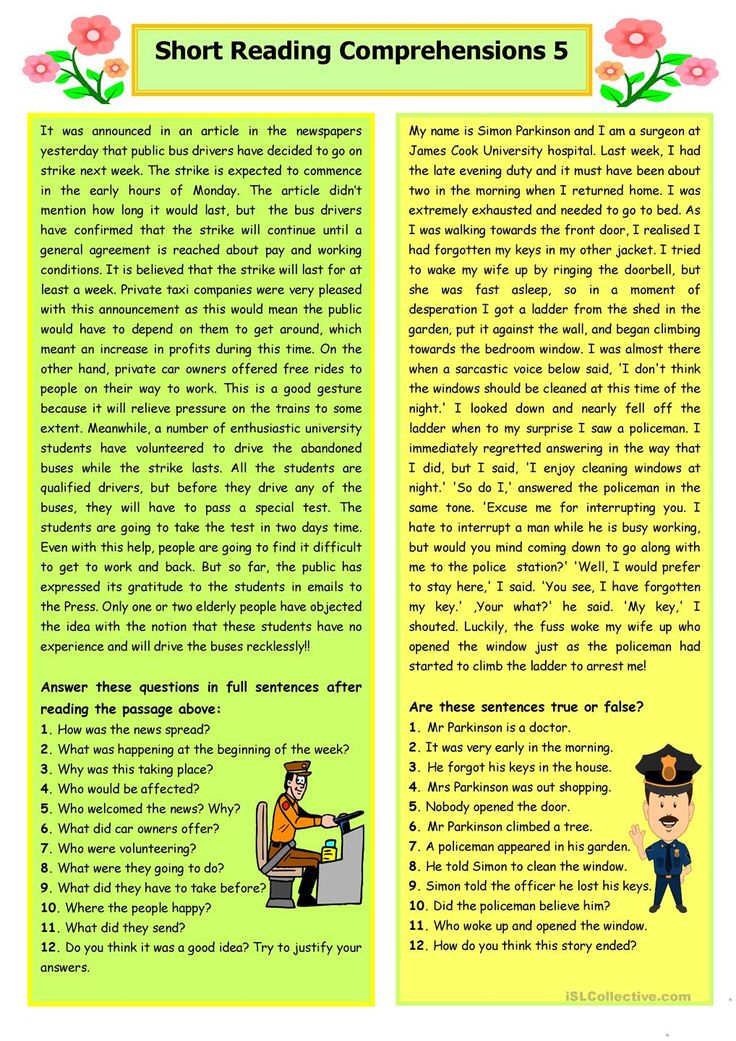 Usually, your child’s teacher will determine their Lexile reading level and then choose books that have a matching score.
The Lexile score, or measure, describes your child’s reading ability and matches them with books and other reading materials. This measure ranges anywhere from 0L to 2000L.
Kids are encouraged to read within their Lexile “range” — 50L above to 100L below their actual level. For instance, if your little one is reading with a Lexile measure of 500L, they would read books ranging anywhere from 400L to 550L.
Using standardized assessments, schools will often measure a child’s reading level several times a year to help them select books that are appropriate for independent reading.
Guided Reading Levels (GRL)
GRL is a guided reading system used in some schools.
To determine reading levels using GRL, children sit one-on-one with their teacher and read from a book that’s considered standard for their grade level — a “benchmark” book. GRL books range from A to Z with A being the easiest.
While reading these books, the teacher will take notes on any missed words and ask comprehension questions, such as, “When did the story take place?” or, “What was the problem in the story?”.
Through guided instruction, the teacher will gradually move children into more difficult books.
Developmental Reading Assessment (DRA)
DRA is a standardized reading test given by teachers or reading specialists. As with GRL, children sit individually with the test administrator and read a book.
Several factors are taken into consideration to determine reading level, including:
- Reading comprehension
- Phonemic awareness
- Fluency
DRA books are labeled with an A for the easiest books and then move into a numerical grading system. The levels range from 1 to 80 with 1-3 representing a kindergarten reading level and 80 representing an eighth-grade reading level.
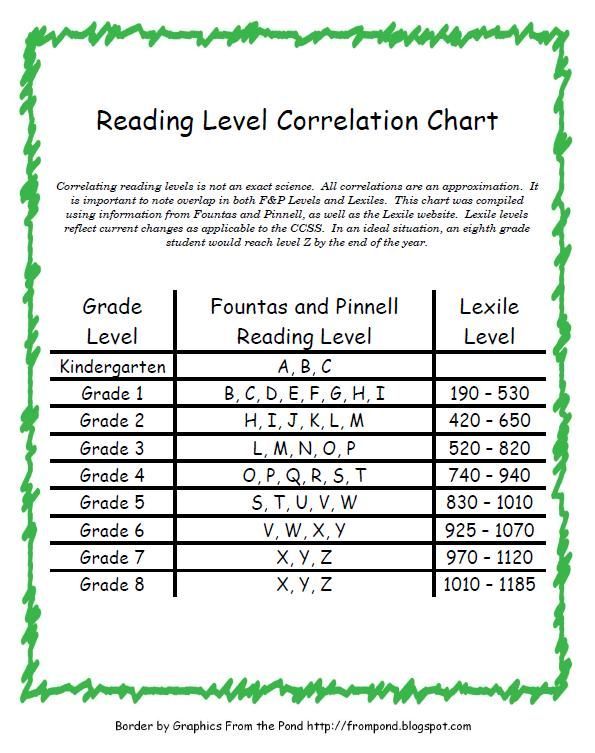
Once a child has a DRA or a GRL level, a teacher or parent can search for the reading level of any particular book and can usually discover either the Lexile, DRA, or GRL of that particular text. Here’s a chart for your reference.
At-Home Reading Levels
If you’re looking for a way to find out your child’s reading level without using any of the methods listed above, you might try the five-finger rule.
For the five-finger rule, choose a book and flip to any page. If your child seems to have trouble reading more than five words on the page, it’s a good indicator that the book is too advanced for them.
To be sure, though, you can have your child try another page, especially if they seem eager to read a particular book.
This can be a helpful strategy, but it’s OK to let your child try a book and see how the reading goes. If a book is too hard, most kids will figure that out — and there is nothing wrong with reading books that are too easy!
Sometimes a child may be interested in a book that’s a little too hard for them. If this happens, we encourage you to read aloud to your child. You can also read together by alternating pages, paragraphs, or sentences.
It’s important not to completely avoid books that may be a little above your child’s reading level.
Even if your child struggles a bit to read them without assistance, these books can still be beneficial in helping build their vocabulary, improve comprehension, and increase general knowledge — not to mention, encourage their love of reading!
When your emerging reader seems overwhelmed by one book, you can always give the five-finger rule a try with other books until you find the right match. And if your child is particularly interested in a topic, you can always read the book to them and stop on words you know they can read.
Also remember that when a child is really enjoying a book and highly motivated to read it, they will read at a higher level than if the material is not as interesting to them.
Tip: Most libraries and bookstores have books arranged by reading level so you can easily choose the best one for your emerging reader!
Feel free to ask librarians and knowledgeable staff at bookstores to offer suggestions. You could even say something like, “My child happily read a Clifford book; can you suggest others at the same level?”
How To Help Your Child Become A Stronger Reader
As we mentioned earlier, you can easily determine your child’s reading level at home so that you can help them choose books that are just right! We suggest incorporating some of the tips below to help your child become a stronger reader.
Start With Clues
- Is your child using “sounding out” techniques to figure out unknown words?
- When your child reads, are they getting tripped up by sight words — common words that are hard to sound out?
- Is your child using pictures to help them understand what is written on the page?
- Is your child using context clues to figure out what word makes sense to come next as they read sentences?
Check Vocabulary
- Play games with your child to see what words they know. For example, say a sentence and point out one word in the sentence.
 Then ask them if they can come up with a different word (synonym).
 - Play synonym games to see what words your child knows. For example, challenge yourselves to think of 10 or more ways to describe speaking (shout, whisper, mumble).
While you’re talking with your child, describe something specific from your day. Make sure to use interesting adjectives, and don’t hold back from using sophisticated vocabulary when talking with your child.
You can help your child’s vocabulary grow through day-to-day conversations and activities!
Ask Comprehension Questions
Understanding what they read is an important part of your child’s reading journey.
- To check for reading comprehension, we suggest pausing every other page to talk about what you’ve just read. Make this a natural reaction to the story, like you’re thinking aloud about the story or characters, so that it doesn’t feel like a test.
- Consider encouraging your child to act out and retell the story (for younger children).

- Try discussing themes/lessons with your child (for older children). Remember: this isn’t a test, but a conversation between book lovers!
Talk To Your Child
When most people implement strategies to help their children improve their reading skills, they often forget about the importance of verbal communication. It’s essential to talk to your child frequently in short and simple sentences.
This includes singing songs, telling them wonderful stories, reciting fun nursery rhymes, and describing the world around them. All of this exposes children to lots of different words. It also helps them learn that language is a powerful tool for communication.
Discover Your Child’s Favorite Books
- Children often choose books that are a little below their actual reading level. At home, this is a good thing. It keeps reading fun and exciting!
- We recommend choosing books that interest your child — with a certain character or activity they like — so they’re curious and excited about reading.
Reading books your child enjoys together can encourage their love of reading. And letting them read those same books to you can boost their confidence over time.
Together, these two activities increase your child’s fluency and reading enjoyment!
Create A Reading Corner
Establishing a reading corner in your house can benefit your child. The setup doesn’t need to be elaborate. This can be a simple, quiet, private area where your child can confidently read independently or with you.
It’s also great for the spot to be well-lit and filled with lots of books your child enjoys reading.
Is Reading The Same Book Over And Over OK?
Just like you might pick up an old favorite book to read, your child may do the same, and that’s OK! At least you know they’re enjoying a good book and the process of reading!
Rereading books can have many benefits for a child, including:
It allows children to get more from the text. Have you ever developed a deeper understanding of a story after rereading it? That’s because the more you engage with a story, the more you can take away from it.
You can pick up on new information, establish connections between yourself and some of the characters, and even improve your understanding of the overall story.
Similarly, allowing your child to read their favorite books for the second, third, fourth (or more) time will enable them to get more from the story.
It also allows for bonding. Did you know that rereading books can help bring your family closer together?
Many of us remember a couple of books that our family read together regularly. This can be a holiday book or a favorite story. Rereading is a great way to get the whole family involved, as everyone can take turns reading and connecting on the same story.
What’s more, reading familiar books can actually help develop a young reader’s fluency. It allows them to learn the words and helps them become familiar with narrative structure or storylines (i.e. beginning, middle, and end), which builds reading comprehension later on.
So feel free to let your child choose the same book over and over!
FAQs About Reading Levels
What Reading Level Should My Child Be In Each Grade?
It’s challenging to answer this question because each child is different and will naturally develop at their own pace.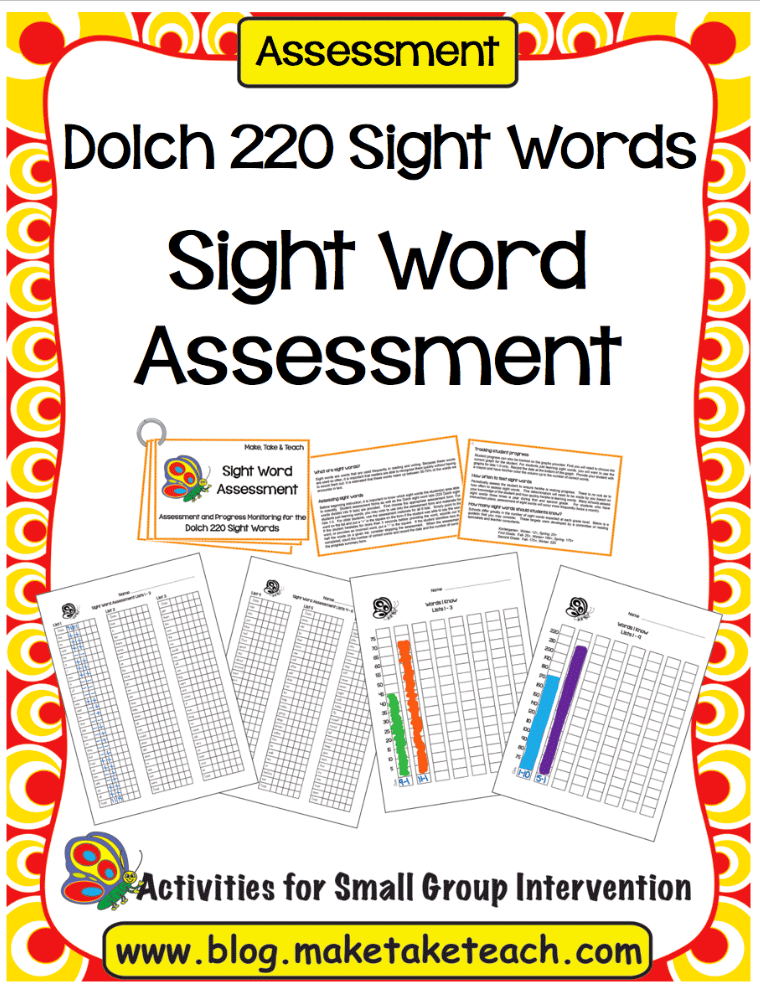 For example, just because your child’s friend has started reading fluently doesn’t mean your child will be able to do that yet.
While no parent wants their own child to be a little behind compared to their peers, putting too much pressure on them to “catch up” might actually have an adverse effect. In fact, they might feel overwhelmed by the pressure and develop a negative attitude toward reading.
It’s also important to note that there’s no direct link between a certain Lexile measure and a specific grade level. When using any of the reading level measures we mentioned, remember that they are an estimate of a child’s performance and shouldn’t be interpreted literally.
Also, if you’re really concerned about your young learner’s development, you can always address those concerns with their teacher or another professional. They can offer tips and advice on how to best work with your child.
Finally, remember to be patient and positive no matter what. With lots of time and effort, your child will develop a lifetime love of reading!
Who Can Help Me Choose Books That Match My Child’s Reading Level?
The best place to start is to consult your child’s teacher. They will have the expertise to guide you in buying the right books for your child.
It’s also possible for you to look up most books online and find their reading levels. Furthermore, for beginner readers, there are publishers who label books in stages with age and/or grade suggestions attached.
If you’re homeschooling, you can also reach out to your local librarian or bookstores. As people who spend each day surrounded by books, they often have knowledge on this topic and may be able to recommend a few relevant books in your child’s reading level.
What If My Child Is Reading At A Lower Level?
The last thing a parent wants to hear is that their child’s reading level isn’t on par with their peers. But what can you do if, from the assessment used at your child’s school, you find out that your young learner is reading below the average grade level?
Firstly, it’s important not to panic. As mentioned earlier, kids develop reading skills at different stages of their development. Some children might be early readers, while others may take time to get there.
The most effective way to help your child improve their reading level is by continuing to encourage reading at home. While reading, remember to discuss the content to ensure comprehension.
Reading For Fun
From assessments to the five-finger rule, determining reading levels varies across the board. No matter which method you choose, remember these measurements are meant to be helpful and encouraging, not stressful and limiting.
Keep this in mind when assessing your young learner. You don’t want your child to sense any stress about their abilities, as this might overwhelm them and have an adverse effect on how they view reading.
While reading is an essential early learning (and lifelong) skill, you want your child to LOVE reading and not only view it as a test of their intelligence.
At the end of the day, the way reading makes your child feel is more important than their reading level. Each child learns in a way that’s special and unique to them.
The HOMER Road To Reading
The road to discovering how to read can be a fun ride, but sometimes it’s bumpy. This is why we’re more than a learning program. We’re your learning partner.
If you’re looking for a resource to help develop your child’s love of reading and learning, consider taking a look at the HOMER Learn & Grow app. It’s full of stories curated based on your child’s interests!
When your child develops a love for reading, they’ll move up to the next level before you can say “Developmental Reading Assessment”!
Author
Evaluation of the state of the HDD according to reading graphs: a review of utilities - Ferra.ru
The capacity of modern hard drives and their speeds are constantly growing. More and more data can fit on one disk, and along with the volume, the value of the stored information increases. Now, in the event of technical problems with the drive, you risk losing much more data. Monitoring the health of the HDD is becoming increasingly important.
Usually, testing of hard drives is assigned to software tools - test utilities that determine all kinds of HDD characteristics. In addition, all modern hard drives have a self-diagnostic system - S.M.A.R.T., which constantly monitors many drive parameters offline. S.M.A.R.T. parameter attributes. can be displayed using special utilities.
Programs for testing hard drives, in my opinion, can be divided into two categories. Some are able to simply give the result in numerical form, usually for speed indicators and surface integrity; or the result is reflected in the form of a response - serviceable / not serviceable. Another category of programs, these are the means by which you can get a more objective idea of the verification process itself - display tests in the form of visual graphs.
It is far from always a simple statement by the program of checking the fact of the working state of the hard drive reflects its actual state. If the drive does not have obvious bad sectors, then this does not mean that it is in a normal state. Other reasons can lead to a significant malfunction of the drive. Even S.M.A.R.T. attributes that are within acceptable values are not always a guarantee of HDD reliability. A simple report on the suitability of a hard drive may be true at the time of the test, but a program of this kind will keep silent about the fact that the drive has been “breathing its last” for a long time and it has nothing left to live ... It will be especially unpleasant if you slip it such as purchase.
Graphical representation of HDD processes, in my opinion, is one of the most objective criteria when judging their quality. Programs that simply measure the average read speed from the surface of the entire disk without a graph can give quite plausible results. At the same time, sharp, but short-term drops in speed will be averaged with the overall result, without affecting the final performance too much. And the presence of failures in speed will simply go unnoticed. Although it is they who should be alarmed in the first place. Moreover, who knows what that average speed should actually be? You can’t get away from the schedule - it will always show what is, no matter what the reasons are. There are a number of utilities with which the check of hard drives can be presented in graphical form.
Perhaps, following the historical chronology, let's start our review with the once popular DOS utility for diagnosing hard drives - HDDSpeed. Many, undoubtedly, know the time-tested version 2.1 of this program - functional and unpretentious, but deprived of the ability to work correctly with disks larger than 8.4 GB, consider all modern disks. Although, probably, few people still know that after a long break, version 2.24 has appeared in which the problem with large disks has been solved, and it can be used to check the most modern hard drives. An excellent feature of this utility is the ability to display the processes of reading and writing in a graphical form.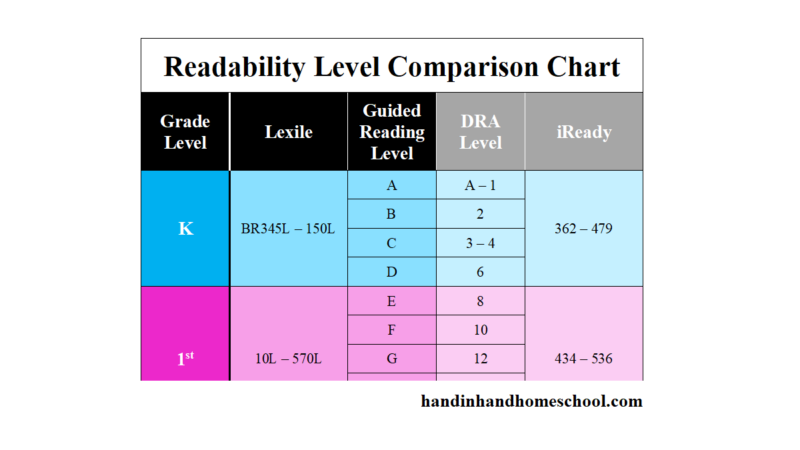 Moreover, during the write test, information on the disk is not lost. With its considerable functionality, HDDSpeed is notable for its small volume (about 200 kb in the archive), which, however, is typical for programs running under DOS. HDDSpeed 2.24 is available at this address, although this server suffers from frequent reorganizations.
Both currently available versions of HDDSpeed - v.2.1 and v.2.24 work from under DOS, if necessary, you can start it using a boot floppy disk or by rebooting into Win9X in DOS emulation mode. A single-tasking DOS environment is characterized, first of all, by its stability. However, there are also limitations that should be noted. In DOS mode, the speed of a modern hard drive is severely limited, since DMA (UDMA) modes, for which modern drives are optimized, will not be used.
When you start and select a hard drive, the program immediately determines the model, serial number and a number of other characteristics of the drive. You can find out the disk rotation speed and the effective buffer size, etc. It is possible to read information about the attributes of S.M.A.R.T. For us, the most interesting is the ability of HDDSpeed to represent the processes of reading and writing from the disk surface in a graphical form. To run these tests, go to the Performance/Graphs tab and select the appropriate mode. Although you can use the function keys to quickly launch graphics tests.
Among the graphics tests available are: linear read/write speed test, block read speed from the hard drive cache buffer, Linear verify speed test. The speed of linear verification roughly corresponds to the speed of reading from the disk surface to its cache buffer, without the influence of data transfer to RAM.
The most indicative here is the "Linear read speed" (F7) test - the linear read speed (megabytes per second) is displayed on the graph. In DOS (PIO) mode for new HDDs, this speed will be several times lower than its typical operating value in DMA (UDMA) mode. The speed of reading from the cache buffer in DOS is rather indicative, since its value is very limited by the capabilities of this OS. But the speed of verification should be paid closer attention. The graph of this test in DOS will also display high, quite real speed indicators for the tested drive.
For outdated hard drives, the normal view of the “Linear read speed” graph should have a stepwise, with a gradually decreasing speed, character (Fig. 1).
The decrease in speed is due to the fact that the real number of sectors on the inner tracks is less, which means less speed, and therefore the graph should go down. The same is true for new drives, however, the maximum speed of their work on the entire surface of the disks is much higher than the limit that the DOS environment can allow.
Therefore, the graph will most likely be an almost straight line (Fig. 2) - the maximum that is achieved by the hard drive in DOS. Although in some cases graphs may have an atypical appearance - in an ascending or curved line - conflicts and features of individual IDE controllers can affect here. Of course, the speed limit of modern drives makes their graphics less sensitive, but in case of serious problems, they will definitely affect the speed curve.
On the horizontal axis of the graph, the volume of the hard drive is represented as tracks - equal to the number of logical cylinders of the drive. On the vertical axis is the speed of Mb / s. During the test, the speed line usually trembles a little, fluctuating slightly around the current average value. After the test is completed, the HDDSpeed graph image can always be saved as a graphic file using the F2 key. The drawing will be saved in the program directory.
What should I pay special attention to? In principle, it is not so important whether the recorded speed corresponds to the maximum possible for your hard drive, or not. The very type of speed graph is important. If there are problem areas on the disk surface, then all this will inevitably become apparent in the graph image. When there are sharp drops in speed on the graph, this indicates read or write problems in this particular place. It is quite possible that there are many replaced sectors there, and the head should go towards the reserve area on them, which takes additional time, or there are problems with servomechanics. If the graph line turns red, then this is a clear sign of bad sectors that are no longer replaceable - the notorious bad blocks. It is far from always possible to understand the reason for some speed drops, but the very fact of such behavior of the hard drive indicates its problematic state.
As an example, we can give a graph of the linear read speed of a rather old Fujitsu 1.2 Gb disk (Fig. 3) in which 65536 bytes were in bad sectors. The volume of bad sectors in this case is not so large, only two clusters as for the disk file system - FAT16. In the attributes of S.M.A.R.T. drive, except for displaying the presence of bad blocks, all other indicators are within the normal range. It would seem that there are no significant problems, given the age of the disc, and it can still last a long time. And yet, the reading graph looks just awful on most of the surface. At the same time, in problem areas, a clear tapping is heard inside the drive. Soon this hard drive began to crumble quickly, and then died altogether. So it turns out that only the graphical test gave the most objective idea of the state of this drive.
Graphics tests for small capacity hard drives are best done with HDDSpeed 2.1. In my opinion, an older version of the utility gives better graphics. In HDDSpeed 2.24, the graphics curve trembles more perceptibly, but this cannot be avoided if a large-capacity drive is being examined. In the "Options / Configuration" tab, you can enable a more detailed view of the graph image - "Detailed read / write graphs". In this mode, only 500 tracks will be displayed on the grid of the screen in one pass, which increases the image scale. The continuation for the next five hundred will be drawn here, but in the next pass, in a different color, again from the beginning of the screen. And so on, until the entire volume of the hard disk is explored. This mode is more convenient to use for small hard drives. Because for disks of typical today's volumes, calculated in tens and hundreds of gigabytes, in the detailed mode there will be too many curves on the screen - it will be difficult to figure out their dense accumulation later.
In HDDSpeed, you can also run general tests that measure the main speed indicators of the hard drive. In this case, a set of tests will be worked out, which are marked in the "Options / Configuration" tab. You can find out the state of the self-diagnosis system - S.M.A.R.T. attributes, by accessing them through the "Diagnostics / S.M.A.R.T." tab.
The System Speed Test utility makes a good impression, providing the speed characteristics of hard drives and CDs in graphical form. The program has an informative interface assembled in one screen, gives out some useful information about the system, up to checking the BIOS for the “2000” compatibility problem. System Speed Test can be run from under Windows; when running, it goes into a DOS window. In the case of working in a Windows environment, some tests for the hard drive are not available, such as determining the average / maximum search time and random access time. A number of basic tests, including linear reading speed, buffer reading speed, verification speed, remain in place (Fig. 4). In addition, only with the help of this utility can you compare in UDMA mode (from Windows) on the same screen the speed of linear reading and verification - "Linear verify speed". It is considered the best result if the graphs of both tests have an almost similar shape, in this case the HDD capabilities are used to the maximum.
When running this utility from DOS, the number of tests will be somewhat larger. There will be three additional tests for disks, as well as a graphical test of memory speed, which also includes a cache of all levels. The memory test will be located in the lower right corner of the program window. However, DOS mode has its drawbacks in the case of hard drives. The fact is that the DMA mode will not work here, which means that the read speed of a modern hard drive will be several times lower than its typical value in standard UDMA modes. The graph in this case will turn out to be less informative, although in case of serious problems, they will not fail to be reflected in its form. In addition, for the normal operation of the program in DOS, it may be necessary to modify system files, as indicated in the description file in Russian attached to the program.
When checking disks, you can select full or accelerated testing modes. It is better to specify the full scan mode, it will take longer, but the results will be more objective. System Speed Test builds fairly high-quality graphs that give a plausible idea of the surface of the disk. If errors appear during reading from the disk, then the tests do not stop and the graph is built to the end. On the left, in the middle of the program screen, there is a small window where those keyboard keys are indicated with which you can control the process. To check, you can select any hard drive or CD-drive. Test results can be saved in a report file.
In addition to checking disks, which we are most interested in at the moment, using the System Speed Test, using the control keys, you can also get brief information about memory modules - manufacturers, frequencies, main timings, if they have a chip with SPD (Fig.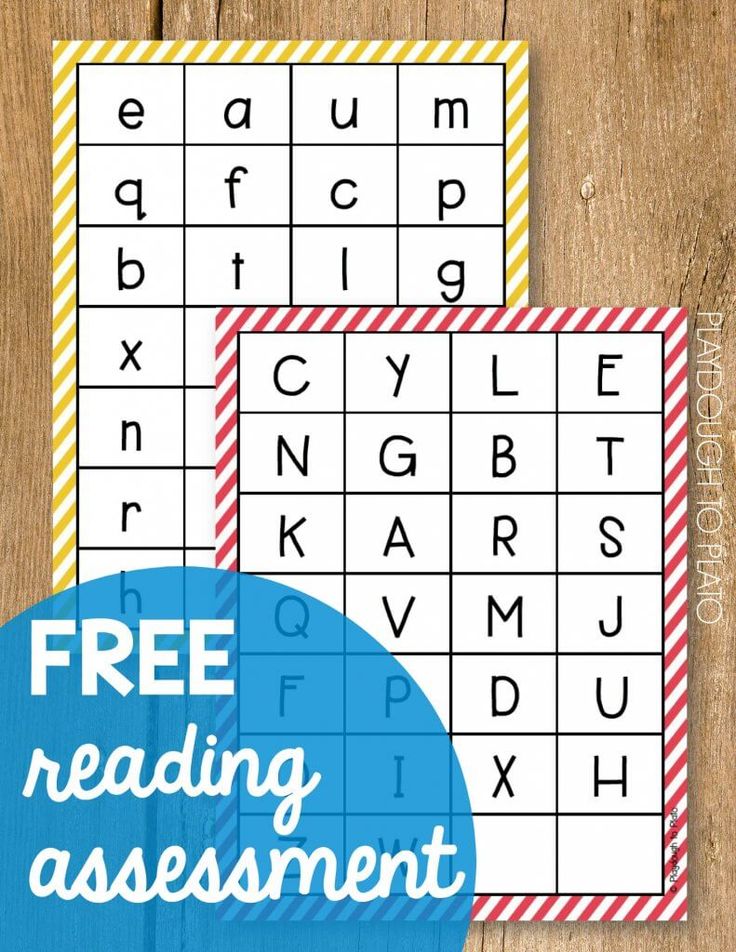 .5).
.5).
Home page of the program - http://www.tcms12.rt.ru/dxover/indexr.htm. You can download this useful utility at the following addresses: (www.tcms12.rt.ru/dxover/sst475.zip, ftp://ftp.elf.stuba.sk/pub/pc/utildiag/sst475.zip, www.dxover .stealth.ru/sst475.zip).
In reviews of computer publications and on the pages of Internet sites, when it comes to the characteristics of new disk drives, it happens that a well-known utility is mentioned - ZD WinBench 99. In principle, this is one of the many universal testers that can check both hard drives and DirectDraw functionality , For example. This program is always well compatible with new equipment, as its versions are updated on the developer's website. In addition, this program is also capable of depicting the process of reading from the surface of disks in a graphical representation. All the advantages of this diagnostic method were discussed above.
ZD WinBench 99 works in the usual Windows95/98/NT environment. Although, in my opinion, ZD WinBench 99 also has a significant drawback - its volume. After all, the installation file for this set of tests weighs almost 10 MB. Not everyone will be able to download such a whopper from the Web. Unfortunately, most of this volume is occupied by means that are rather useless, as for our case. But if you still master the jump of this rather big utility, you will get your hands on a tool for diagnosing a hard drive and more. Perhaps other tests from her set will still come in handy.
However, when using ZD WinBench 99, some specifics of working under Windows should be taken into account. Windows itself takes up a lot of resources. In addition, as a result of the multitasking of the OS, in addition to the process of testing the hard drive itself, there are other processes due to its operation. Worst of all, if the PC is low on memory, and it is not enough even for the needs of Windows itself. Then the hard drive may swap during the test, which, of course, will distort the results of the test. In addition, most often the user checks the hard drive in an environment with already installed programs, and some of them will hang in the background. Therefore, some speed drops on the reading graph here may not be related to hardware reasons for the drive, but to software reasons and the state of Windows. Short-term drops in speed, having an amplitude of up to 15-25% of the current average, will most likely be due to the specifics of the software environment. For greater reliability, it is better to run the graphical test several times in a row. The lowering of the speed in the same section in two or more passes should be alarming - here, most likely, the reasons associated specifically with the drive come into force.
To increase the objectivity of the result, you should close all applications, remove all programs running in the background from startup, and restart the computer. It is recommended to defragment the disk being checked. Ideally, it is better to do all this under a freshly installed Windows on a newly formatted hard drive, without installed applications, with a minimum of installed devices and expansion cards and drivers for them. In the latter case, the drive test result will be as reliable as possible.
Before starting the test, you should go to the menu along the path "Edit/Test Settings". So we get to the settings window (Fig. 6). Here, in the "Common" tab, first of all, you should specify the logical drive for the upcoming check, as well as check other settings. In the "Disc Inspection" tab, you can override the size of the blocks that will read the information. Here it also makes sense to enable the ability to save the chart image in a graphic file by specifying the directory and file name.
Next, in the main window, select "Disc Inspection Test" and press the start button, located right there with the image of the clock face. After some time, all tests from this section will be completed. You will get a graph of linear read speed (Fig. 7), which, in my opinion, reflects fairly plausible speed indicators for most drive models.
The information marked in the form of numbers will also be presented: the values of the initial and final reading speed, access time and processor load when working with the disk. The main approaches in the analysis of chart information are the same as in the cases described earlier. What the "Disc Inspection Test" does not like is read errors from the hard drive. If there are failures, then the chart will stop at the first of them and a corresponding warning will be issued, although there is an option to ignore errors in the settings.
By running tests from the "Disc WinMarks" series, you can get a wider range of digital values - disk speed indicators. Here, in some tests, judging by the name, the work of certain common applications is emulated. Thus, the performance of a disk drive in the environment of certain tasks is studied. All this is very interesting. However, the practical use of all this is just as very conditional, and it only makes sense when comparing drives of different models with each other. Signs of state and reliability in this case are reflected rather vaguely.
Drive v.1.0 - the program was written at one time for Windows NT, it also works normally under Windows 2000. Using Drive, you can test the hard drive for speed, including with the presentation of the results in the form of a graph, which, in principle, we are most interested in.
There are several tabs in the main window of the program (fig.8). By selecting the drive of interest in the upper area of the window, you can view some information about it in the "Disk" and "Controller" tabs. From the Benchmark tab, a fairly simple drive performance test is launched, where, in addition to the maximum and average values of the main speed indicators, the drive is assigned a certain performance index. Present in the program window and the processor load indicator.
But the most significant is the mode of graphical display of test data, which is activated by the "Speed Charts" button in the upper part of the window. When starting the graphical mode of the test, you can select the type of test: disk read speed, cache read speed, access time. The most revealing test is the read speed from the disk - "Read Speed", which is enabled first by default. During testing, the speed is displayed on the graph (Fig. 9).
Numerical readings are output separately for the maximum, minimum and average values of the test parameters. Although the main information is still given by the graph. If there are any flaws on the disk, they will certainly be reflected on the graph in the form of sharp drops in speed repeated during repeated tests in the “Read Speed” mode. Although in the case of the first reading error, having previously reported it, the program stops further testing. It is possible to save the test schedule as a file.
Another test utility, HD_Speed, is designed to test a hard drive running Windows NT/2k/XP and is distributed, like all other review programs, for free. In terms of space, this program is a kind of champion, since its only executable file takes only 13 kb - an unusual value for programs from the world of Windows. But, despite its meager size, the program has an enviable functionality: it can check not only hard drives, but CD-ROMs, as well as floppy drives. Let's add here a full-fledged, and, moreover, quite convenient and very informative graphical interface, in addition, the results of the checks are plotted in the form of a graph (Fig. 10).
HD_Speed can measure and graph the read or write speed of a disc. By default, the linear reading speed test is enabled. Please note that when checking for a write, the data on the disk is destroyed. Although the program honestly warns about this, twice before the write test is launched. Tests can be carried out both for a separate logical disk and for the entire volume of a physical disk, which is determined by the selection from the drop-down list in the program window. For the measured parameter, numerical indicators of the average and current value are displayed.
HD_Speed has a rather small window size. The size of the visible area of the coordinate grid where the graph is plotted is just as small. Under normal conditions, the visible area of the graph can fit an area of approximately 1.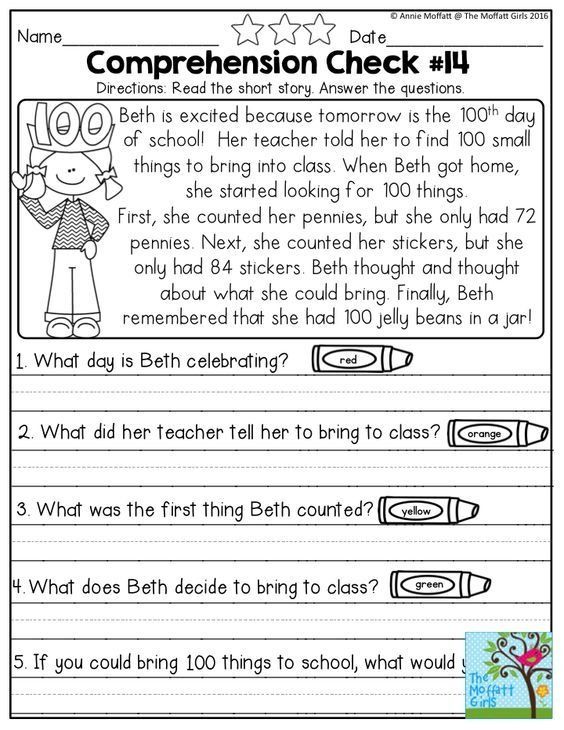 5 Gb of disk space. When plotting a graph, the coordinate grid is constantly shifted to the left, the current value of the measured parameter is displayed along the right edge of the grid window. Thus, a graph can be built for a disk of any size, but only a part of it can be constantly observed. There is no chart scrollbar, so everything that has gone beyond the window remains inaccessible for viewing. When the program is running, you will have to constantly monitor the output results, otherwise you can lose sight of important points reflected on the graph. However, the horizontal axis of the graph is not tied, as usual, to the checked disk volume. It is rather tied to the time and speed of the check. If there are damaged areas of the disk where reading is very slow or the speed drops to zero, then in this case the graph is plotted horizontally at the same speed, which is why the problem areas on the graph are depicted as very stretched.
After testing the entire specified volume, the test is restarted from the beginning, and so on until the test is stopped manually. Thus, the test can be left on for an arbitrarily long time. The program window has a window that displays the number of read / write errors registered during the scan. Despite the small size and apparent simplicity, HD_Speed is sensitive to defective areas of the disk, the reliability of the graph is no worse than that of other utilities (Fig. 11).
Moreover, only HD_Speed is characteristic, it can actually count errors and indicate their number. When a reading error occurs, the program registers it in its window and continues checking further, unlike some other test utilities that stop working on the first error. The reliability of checking disks increases greatly if you set a large number of test cycles, which is easily achieved in the case of HD_Speed. This utility can be recommended as a simple, visual and effective tool for testing HDD, FDD, CD-ROM.
In order to explore the entire surface, and not only the first logical disk, the item “Advanced size check” must be enabled in the first window of the program (Fig. 14). The graph is built very quickly, which cannot but raise doubts about the objectivity of this kind of verification, or its imitation?
The speed of reading from the buffer (batch reading) should be discussed separately. This parameter is more abstract than other indicators in the operation of the disk, and usually its value does not affect the speed of the actual operation of the HDD. It is not surprising, because the average speed of reading from a plate is usually 2 ... 3 times less than the speed of reading from a buffer. It turns out that mechanics never keep up with electronics. In addition, the read speed from the buffer is highly dependent on the motherboard and therefore can differ significantly for the same hard drive models. However, UDMA modes are determined precisely by the speed of reading from the drive's buffer. Therefore, utilities that display the read speed from the buffer in the Windows environment can, in particular, be used to check whether UDMA modes are enabled.
An issue with enabling UDMA has been observed in some early release motherboards in conjunction with certain HDD models. Also, DMA is disabled by default on Windows. Sometimes there are problems with its inclusion. To determine by the actual reading speed from the buffer, whether the corresponding modes work, and you can run HD Tach or another utility that can measure this indicator from under Windows.
If the read speed from the buffer exceeds 16 Mb/s, then this indicates that UDMA is working. Above 33 Mb/s, we can talk about the normal working condition, it shows that one of the UDMA66/100/133 modes is supported by the disk and MB. Despite the fact that almost all modern hard drives and motherboards support the UDMA100 mode, not all drives can actually work at a speed close to 100 Mb / s. Typically, drives with a rotation speed of 5400 rpm show read speeds up to 66 Mb / s, which, in general, has little effect on performance in real work.
The negative features of HD Tach 2. 62 include its capriciousness in relation to the OS. This test is best run under a freshly installed Windows and all necessary drivers. As practice shows, overloaded with installed programs, Windows for some reason does not suit HD Tach, and the latter starts to freeze.
This is the end of our review of utilities that can visualize the status of hard drives. The last advice, when checking, try to rely not only on the eyes, but also on the ears. If in suspicious areas of the graph the hard drive also makes some sounds atypical for its normal operation, then this is a doubly bad result ...
KPI of an educational project: how to measure effectiveness?
KPI is a tool that helps to analyze the effectiveness of activities and the level of achievement of goals.
In an educational project, you can apply qualitative and quantitative metrics. Let's talk about them in a little more detail.
Learn more about KPIs in the course System: Launching and Producing Online Courses
How to use KPIs?
- Conduct research and collect data regularly .
 None of the metrics will give you the information you need if you do research on an occasional, irregular basis. It is always important to track the dynamics, to see how the indicators change.
 - Any KPI should lead you to increase revenue , profit or something else tangible. Associate any metric with the potential profits that we will receive from its growth in money.
Qualitative metrics
-
COR
COR (Completion Rate) is the percentage of students who successfully complete their studies. To calculate this indicator, we take the number of those who successfully completed training and divide it by the number of those who started training. We get the percentage of people who completed your course to the end.
Why can we consider this metric to be qualitative? Because we assume by default that the better the training, the more people reach the end. In my opinion, students drop out of school, if you do not take into account force majeure, for 2 reasons:
- too difficult to study (do not understand the material, do not cope with too voluminous homework, feel inadequate)
- too easy to learn (materials seem superficial and obvious, students do not see how to put it into practice and do not want to spend time learning).
Accordingly, the higher the COR, the more, according to our assumption, the course falls into the audience's request.
-
NPS
NPS - or user loyalty index - is calculated very simply. You ask course graduates one simple question: "Rate from 1 to 10 how likely you are to recommend our service, product or service to friends or acquaintances."
The metric is calculated as the difference between the proportion of supporters and critics: from the number of people who chose numbers from 9 to 10 (that is, supporters), you subtract the number of people who chose numbers from 1 to 6 (“critics”). People who are neutrally disposed to learning, who have chosen points 7-8, are not taken into account.
An increase in NPS, that is, an increase in the number of people who are enthusiastic about your product, means in the future an increase in the percentage of returns of these or other people who received the information that you have a great product.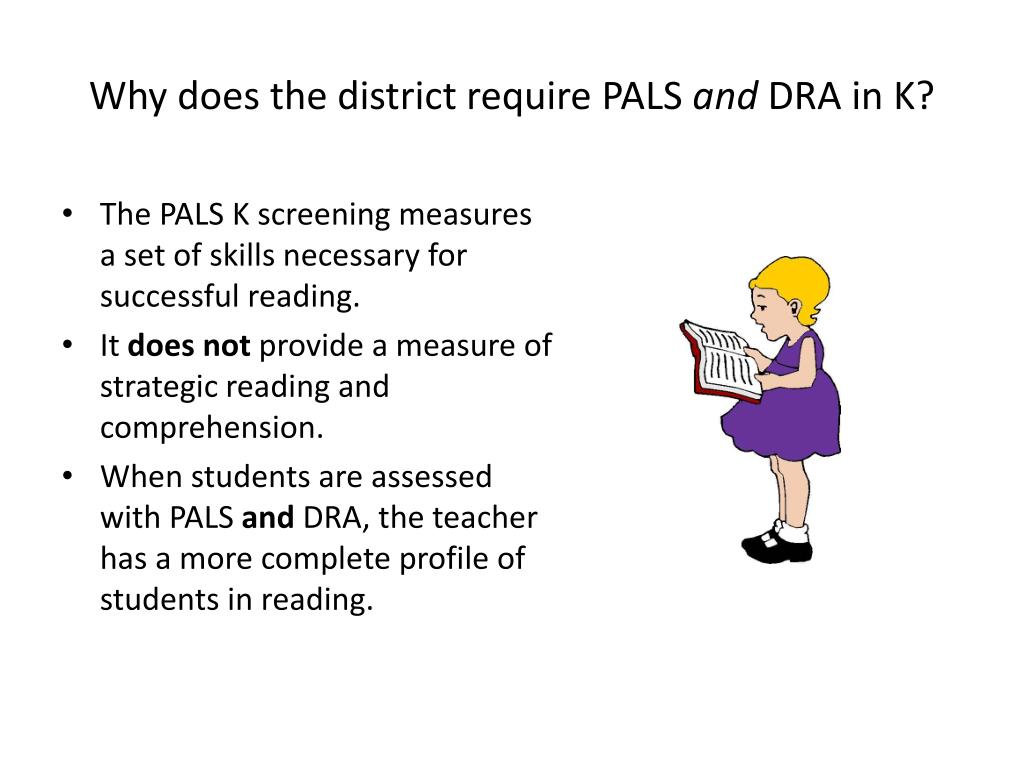
-
CSI
CSI - User Satisfaction Index is a subtype of NPS. The algorithm for calculating it is quite simple: it is an assessment of any user interaction with your service, product or service. The scale can be different: from 1 to 10 or just a yes/no answer. In Netology, for example, we use the simplest option, offering a binary like/dislike system.
It makes sense to calculate CSI after each interaction with the target audience: after a webinar, a completed course module, even after interacting with the sales team. This metric allows you to track quality at small stages of interaction: if NPS tells you if the course as a whole was a success, then with the help of SCI you will know which elements of the course turned out best for you (and which ones need to be improved).
Additional metrics
We have considered well-known metrics, but this does not mean that we should limit ourselves to them. You can use additional KPIs, for example:
- degree of familiarity with the material (for example, what percentage of students attend your webinars)
- speed of completion of practical tasks (helps to find out what tasks a student spends a day or two on, and which tasks a week or two, and correct load fluctuations)
- expert feedback rate - key metric for educational project
- the proportion of those who achieved their goal through training .
 For example, in Netology, the percentage of employed graduates is a very important metric for us.
How can quality metrics lead us to money? Very simple. If a student is deeply immersed in theoretical materials and attends classes with interest (they are interesting, of high quality and meet expectations), if he does his homework and the workload is comfortable for him, if he promptly receives feedback from experts, then his satisfaction with the stages of learning (that is, SCI) above. If throughout the course the student is satisfied with everything, then he will reach the end, and COR will increase. The more students who graduate, the higher the NPS will be. The higher the NPS, the higher the potential return on investment in product quality in the future.
Everything about the successful promotion of an educational project on the course "Building sales in an online school"
Quantitative metrics check, number of purchases and others.
 These metrics are used by companies working in any direction. Let's see how we can influence these KPIs in an educational project.
 -
Average bill
For example, you can increase the average check by increasing the value of the offer (for example, the presence of additional options included in the price), due to a comprehensive offer.
What is the average bill for our products? First of all, the competitive environment: you cannot set prices that will be higher than those of your competitors for similar products. But you can make your offer more powerful, add value to it, and thereby determine the difference in price.
For example, you can sell the user learning modules individually, step by step, or you can offer him a whole educational trajectory. You can offer memberships or course subscriptions. It works: People tend to find it easier to spend more money on educational needs than to constantly buy a little bit, closing their needs.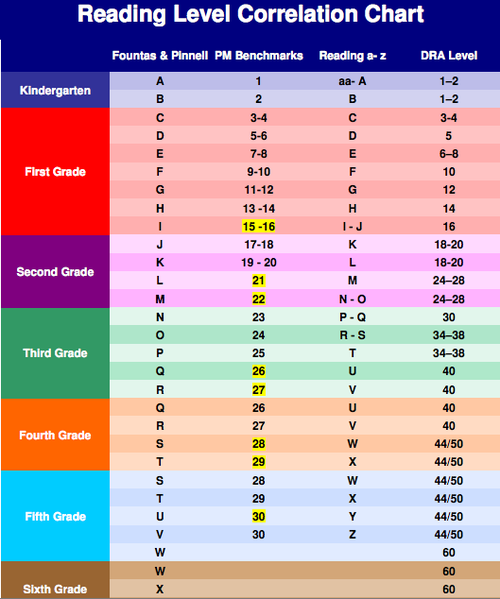
-
Number of purchases
The practice of upsells will help you increase this indicator: if a client has bought a course, you can offer him an additional module at a reduced price. Recommender systems also work well - when a client receives a discount on a product if his friends or acquaintances make purchases from you.
Please note that for an educational project, increasing the number of purchases is a long process. Not always a new client is ready to buy a lot at once. Often this requires a gradual “warming up” of the audience with useful content: the client gets acquainted with the brand, reads your e-mail newsletters, is interested in reviews, and only then makes a purchase.
New Users are conversions from leads, and leads are conversions from traffic from your site and other channels. Often, conversion from traffic becomes a metric for product managers and the marketing department, and conversion to sales becomes a KPI for the sales department.
But here it is worth considering that these metrics can have mutually exclusive influence. You can get a lot of conversions from traffic to leads, but for the most part they will be cold leads, and the conversion from leads to purchases will decrease in this case. Therefore, it is wiser, in my opinion, to set a common KPI for these departments so as not to cause conflicts.
If you have an old user base, you can take a time slice through it and find that those people who do not make a purchase immediately, with a high degree of probability, make it 6 months after being in the database. There is also a high probability of making a purchase 11-12 months after being in the database.
What to do with this information? It is worth analyzing how many touches there were with this audience in the period from 1 to 6 months and from 1 to 12 months, and understand why reactivation occurs only after reading your newsletters and, possibly, your blog for a long time.
Old user reactivation can be a good KPI for content marketers, product managers, or other departments in your online school.