First grade number of the day worksheet
Number of the Day - The Curriculum Corner 123
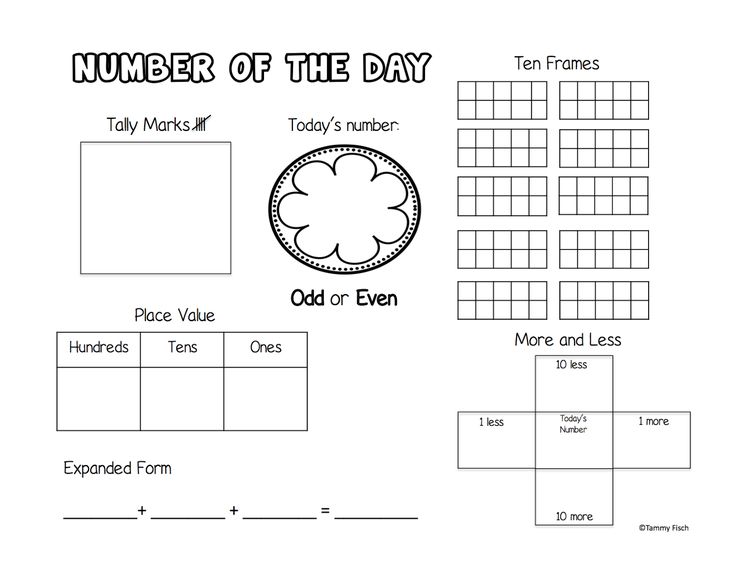
This collection of nine different number of the day worksheets will fit well into your daily number sense practice.
Providing students with number of the day practice is a great way to help children build their number sense skills.
This collection will provide you with a variety of options so you can find a fit for your students.
This is another free resource for teachers and homeschool families.
These free number of the day worksheets will give your students a daily dose of place value practice.
We think having a number of the day can be a great morning entry task that sets a daily routine in your classroom.
These pages might also be used at a math center.
Finding a fit for your students
We have made this activity easy for you to differentiate in your classroom. Choose the page that meets the needs of each student. You can also provide more than one number of the day for students ready for a challenge.
We have made this one easy to differentiate!
There are nine forms to choose the one that is just right for your students.
You will find forms that meet kindergarten through third grade standards.
Some options for using these daily number of the day worksheets include:
- Morning entry task – students can complete as they enter the room each day
- Math center – this could be a daily or weekly math center
- Small group practice – for students who need guidance, a number of the day activity might be a part of your instruction in small groups
You know your students best! Number of the day activities can provide meaningful number sense practice for your students who need it. As students master skills, we like to phase out how often students complete this activity.
For some students, this type of activity might become busy work. This is always when we work to find something new that will fit their needs!
You might choose to give students a number or let students use the number cards we created.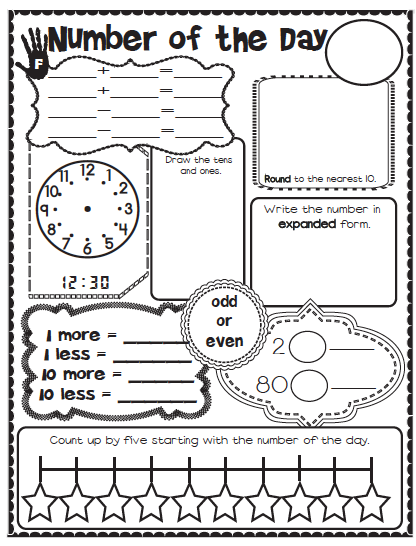
You can download the Number of the Day Worksheets here:
Math Download
We have also created number cards you can place at a basket. Instead of assigning one number for the whole class, you can have students choose a number from the basket.
This is a large file with many pages. You will find all numbers from 0 through 1,009. There is also a blank page if you would like to write your own numbers. Be sure to only print the pages you need.
We like to print these cards on colorful cards tock and laminate for durability.
Download these number cards here:
Math Card Download
Looking for more number sense building activities? Start with our unit of study:
Numbers, Counting & Ordering
You might also be interested in our set for upper grades:
Number of the Day for 456
As with all of our resources, The Curriculum Corner creates these for free classroom use. Our products may not be sold. You may print and copy for your personal classroom use. These are also great for home school families!
You may not modify and resell in any form. Please let us know if you have any questions.
Number of the Day Worksheet
6 Shares
- More
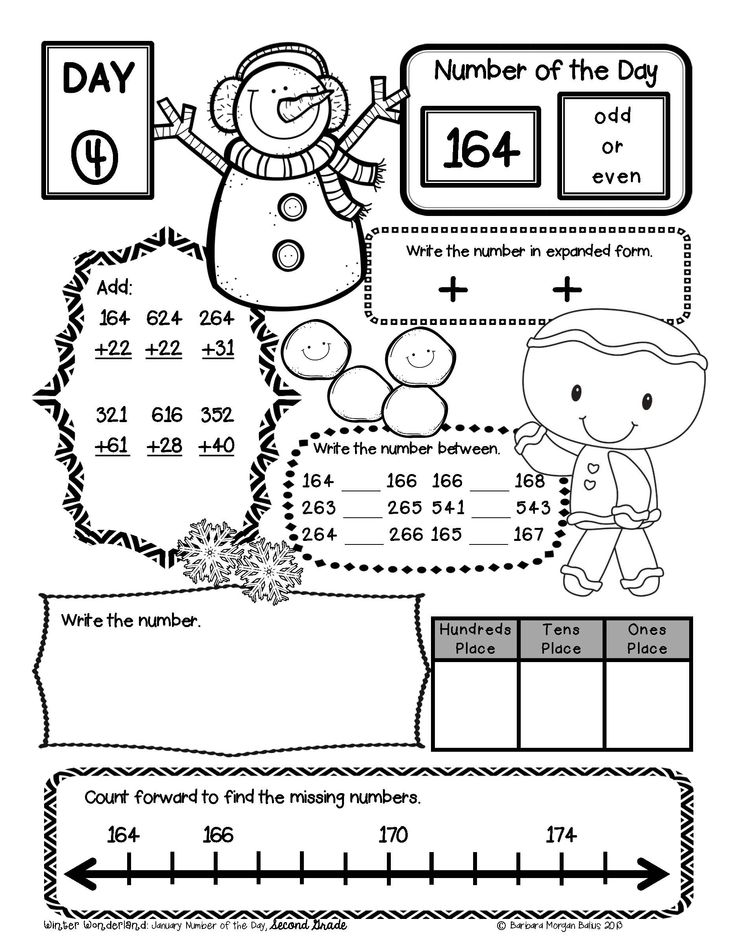
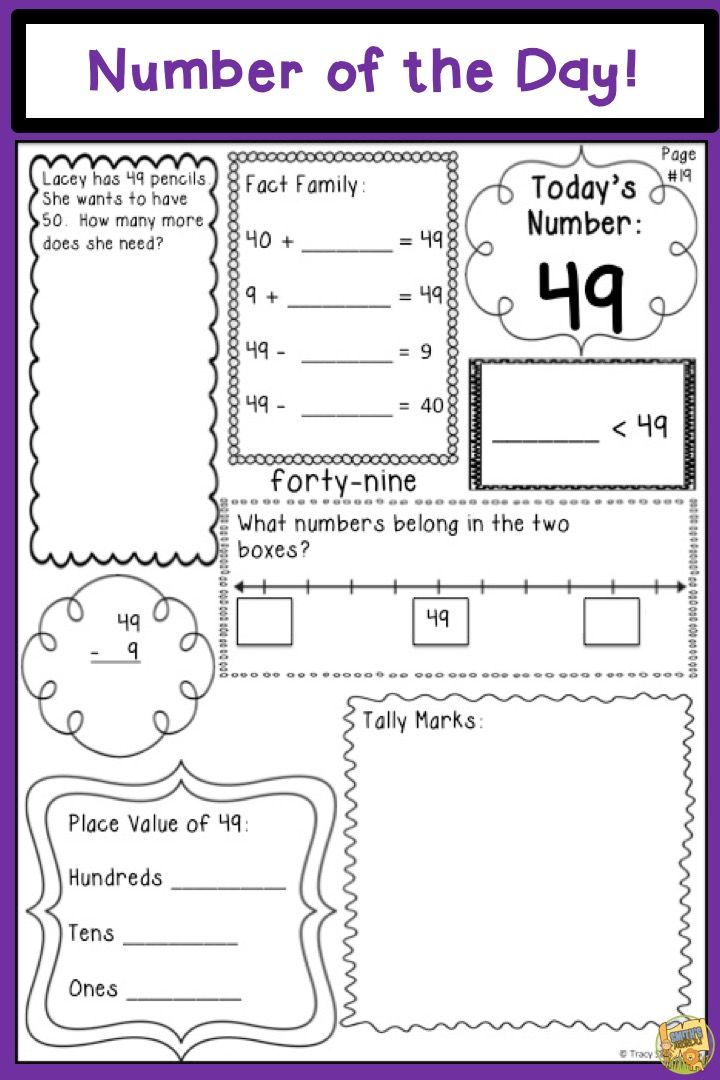
This number of the day worksheet and Google slides have children working on a hundreds chart, coloring in base ten blocks, filling in number lines, writing a number in expanded form, and more.
Place value! It is an essential part of every math curriculum. For children to be really successful in math they MUST understand this….or they will just be going through the motions.
Table of Contents
Motions that are not understood, and will be forgotten as they move on.
Number of the Day
There are many ways that you can teach place value, and doing small place value activities daily is important.
So today, I’m sharing with you a number of the day worksheet and Google slides that will help you develop place value skills every day.
You can also get a Fractions of the Day, or a Decimals of the Day
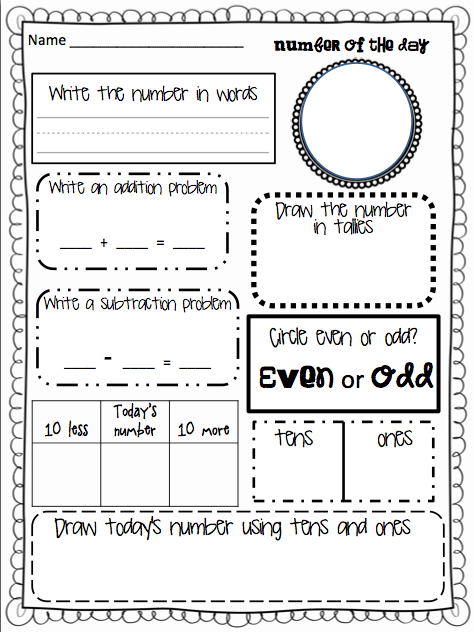
Number of the Day Sheet: Base Ten Blocks
The first part of this sheet is to color in the base ten blocks that represent the number of the day and to also write how many hundreds, tens, and ones there are.
In this example, the student was given the number 258. As you can see they wrote that there were two hundreds, and then colored in two flats.
Next, they looked in the tens place and realized that there were 5 tens or 50. The student was then able to color in five longs.
Finally, they looked at the one’s place and saw that there were eight ones. They wrote 8 in the one’s place and then colored in 8 cubes.
Expanded Form
Once this is done, they jump right to expanded form, and this is easy since we just figured out how many hundreds, tens, and ones were in the number 258.
All they need to do is put it together: 200 + 50 + 8 equals 258.
Hundreds Chart
Right underneath the expanded form, we move to a funny-looking grid. This is a hundred’s chart puzzle, and if they haven’t done these before it may be a great idea to practice with our Hundreds Puzzle game.
The student can put the number 258 anywhere in the grid, and then figure out what the rest of the numbers would be if this was a hundred chart.
In this example, the child put the 258 right in the middle. They recognized that going up one space would put them at 248, the number to the left would be 247, and the number to the right would be 249.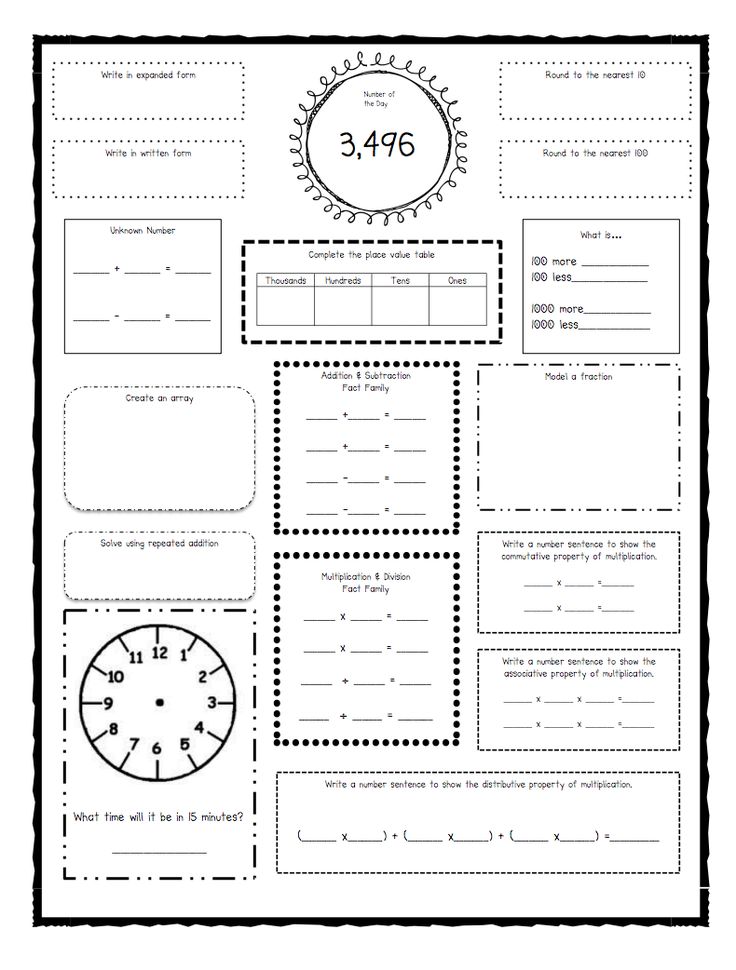
Now the student used the same strategy going down. They added 10, and then subtracted and add one from 268 to get the next two answers.
There is so much math happening here!!!
Number Bonds
Moving on to our next section, we hit number bonds. This is a wonderful way to work on fact families in a very visual way. The children figure out two numbers that equal 258, and then they fill out the number bonds and the fact families that correspond to those numbers.
If you are working with young children and want to introduce number bonds, these monster task cards are a great place to start.
Even and Odd
The next one is an easy one. Is the number even or odd? Once they figure that out, they just color in the circle.
More And Less
Understanding one more and one less, and ten more or less is an important skill. This reinforces the place value of each digit…..and this next box tackles this concept.
The children look at the number 258 and then do each of the following.
First, we do 258 + 1 = 259
Next comes 258 – 1 = 257
We move on to 258 + 10 = 268
And we end with 258 – 10 = 248
Get more adding and subtracting by 10 activities here.
Number Line
The last step of this number of the day worksheet is to put numbers on the number line. You could allow children to write the Number of the Day in the first box and move on from there….but you can definitely make it harder.
Asking them to put the number of the day in the middle or at the end of the number line will add a challenge. Now they must be able to count backward as well as count forward! A great place value lesson!
Working through a number of the day daily will help children build number sense and develop a deeper understanding of place value.
Number of the Day Printable
Below you will find the number of the day free printable and Google slides. Download the printables to your computer by clicking on the download button. Once you have downloaded them, you can print them.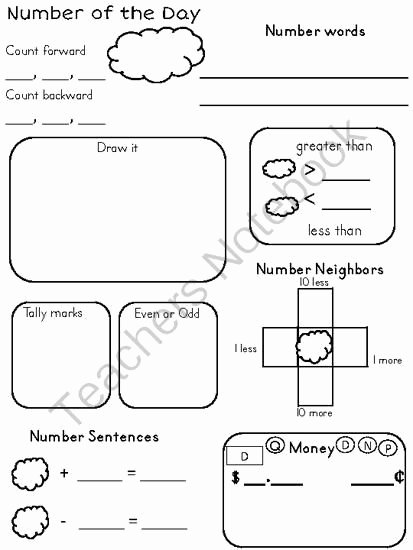
Number-of-the-Day
Number-of-the-Day-Printable-and-Google-Slides
6 Shares
- More
Create a PivotTable to analyze sheet data
The PivotTable is a powerful tool for calculating, summarizing, and analyzing data that makes it easy to find comparisons, patterns, and trends. PivotTables work a little differently depending on the platform you use to run Excel.
-
Select the cells from which you want to create a pivot table.
Note: Data must be organized in columns with one header row.
-
On the tab Insert , click the button PivotTable .
-
This will create a pivot table based on an existing table or range.
Note: If you select the Add this data to Data Model option, the table or range used for this PivotTable will be added to the Book Data Model. Additional information.
-
Select the location of the PivotTable report. Select "Create Sheet " to place the PivotTable on a new or existing sheet, and select where the new PivotTable should be displayed.
-
Press button OK .
You can select other PivotTable sources by clicking the down arrow on the button. In addition to an existing table or range, there are three other sources from which you can choose to populate a PivotTable.
Note: Depending on your organization's IT environment,
the button might include your organization's name. For example, "From Power BI (Microsoft)"
Getting from an external data source
Get from data model
Use this option if the workbook contains a data model and you want to create a PivotTable from multiple tables, enhance the PivotTable with custom measures, or work with very large datasets.
Get from Power BI
Use this setting if your organization uses Power BI and you want to discover and connect to recommended cloud datasets that you have access to.
-
To add a field to a pivot table, select the check box next to the field name in area Pivot table fields .
Note: Selected fields are added to default scopes: non-numeric fields are added to rows, datetime hierarchies are added to columns, and numeric fields are added to values.
-
To move a field from one area to another, drag it to the target area.
When new data is added to a source, all PivotTables based on it must be updated. To refresh a single PivotTable, you can right-click anywhere in its range and select Refresh . If you have multiple PivotTables, first select any cell in any PivotTable, and then on the Ribbon, select Tab PivotTable Analysis , click the arrow under the Update button and select Update All .
Operation
By default, PivotTable fields placed in the Values area will be displayed as sum . If Excel interprets your data as text, it will display as COUNT . This is why it's so important not to mix data types for value fields. To change the default calculation, first click the arrow to the right of the field name, and then select the Value Field Options option.
Then change the function in section Operation . Note that when you change a calculation method, Excel automatically adds its name to section Custom name (for example, "Sum by field field_name"), but you can change the name. To change the number format for the entire field, press the 9 button0012 Number format .
Tip: Because changing the calculation method in section Operation updates the PivotTable field name, it is not recommended that you rename PivotTable fields until you have finished customizing the PivotTable. Instead of manually changing the names, you can press the button Find and replace ( CTRL+H ), in the field Find enter Sum of field , and leave the field Replace empty.
Additional calculations
Values can also be displayed as a percentage of the field value. In the example below, we have changed the expense amount to % of the total .
You can set these options in the dialog box Value field settings on tab Additional calculations .
Display value as calculation result and as percentage
Simply drag and drop the item into the Values section twice, and then adjust the Operation and Additional Calculations parameters for each of the copies.
-
Select a table or data range on a sheet and press the 9 button0012 Insert > PivotTable to open the Insert PivotTable panel.
-
You can manually create your own pivot table or select a recommended pivot table to create. Do one of the following:
-
On page "Create Your Own Pivot Table Card" select "Create Sheet" or "Existing Sheet" to select the destination of the pivot table.
-
In the Recommended PivotTable, select New Sheet or Existing Sheet to select the destination of the PivotTable.
Note: Recommended PivotTables are only available to Microsoft 365 subscribers.
The data source of a PivotTable can be changed when it is created.
-
In area "Insert PivotTable " select the text field in section "Source" . When the source is changed , the cards on the panel will not be available.
-
Select data in the grid or enter a range in the text box.
-
Press the ENTER key or the button to confirm the selection. The panel will update with new recommended PivotTables based on the new data source.
Get from Power BI
Use this setting if your organization uses Power BI and you want to discover and connect to recommended cloud datasets that you have access to.
In the PivotTable Fields area , select the check box for any field that you want to add to the PivotTable.
By default, non-numeric fields are added to the Rows area, date and time fields are added to the Columns area, and numeric fields are added to the Values area.
You can also manually drag any available item to any of the PivotTable fields, or if the item in the PivotTable is no longer needed, drag it from the list or clear it.
Operation
By default, PivotTable fields in the Values area will be displayed as Sum . If Excel interprets your data as text, it will display as COUNT . This is why it's so important not to mix data types for value fields.
Modify the default calculation by right-clicking on any value in a row and selecting option "Sum values over ".
Additional calculations
Values can also be displayed as a percentage of the field value. In the example below, we have changed the expense amount to % of the total .
Right-click any value in the column for which you want to display the value. Select "Show values as " in the menu. A list of available values will be displayed.
Make a selection from the list.
To display the percent value of the parent total, hover over the item in the list and select the parent field you want to use as the calculation base.
When new data is added to a PivotTable data source, all PivotTables created from that data source must be updated. Right click anywhere PivotTable range and select command Refresh .
If you have created a pivot table and decide that it is no longer needed, select the entire range of the pivot table and press the DELETE key. This will not affect other data, PivotTables or charts around them. If the PivotTable is on a separate sheet that doesn't have any other data you want to keep, deleting the sheet is a quick way to delete the PivotTable0012 tables.
-
Data must be presented as a table that does not have empty rows or columns. It is recommended to use an Excel spreadsheet, as in the example above.
-
Tables are a great data source for PivotTables because rows added to the table are automatically included in the PivotTable when the data is refreshed, and any new columns are added to the list Pivot table fields . Otherwise, you must either change the source data for the PivotTable or use a dynamic named range formula.
-
All data in a column must be of the same type. For example, you should not enter dates and text in the same column.
-
Pivot tables are applied to a snapshot of data called a cache, and the actual data is not changed.
If you don't have much experience with PivotTables or don't know where to start, it's best to use the recommended PivotTable . In doing so, Excel determines the appropriate layout by matching the data to the most appropriate areas in the PivotTable. This provides a starting point for further experiments. After creating the recommended PivotTable, you can explore the different orientations and reorder the fields to get the results you want. You can also download the interactive tutorial Create your first PivotTable.
-
Click a cell in the source data range and table.
-
On the tab, Insert , click the Featured PivotTables button.
-
Excel will analyze the data and provide several options, as in this example:
-
Select the pivot table you like and click the OK button . Excel will create a pivot table on a new sheet and display a list of fields in the pivot table
-
Click a cell in the source data range and table.
-
On the tab Insert , click the button PivotTable .
-
The Create PivotTable dialog box appears with your range or table name. In this case, we use the "table_FamilyExpenses" table.
-
In section Specify where to place the PivotTable report , select the radio button On a new sheet or On an existing sheet . If you select On an existing worksheet , you will need to specify a cell to insert the PivotTable.
-
Press button OK . Excel will create an empty pivot table and list Pivot table fields .
Pivot table field list
At the top of the Field Name area, select the check box for any field that you want to add to the PivotTable. By default, non-numeric fields are added to the String area, date and time fields are added to the Column area, and numeric fields are added to area values. You can also manually drag any available item to any of the PivotTable fields, or if the item in the PivotTable is no longer needed, simply drag it from the Field List or clear it. The ability to reorder field items is one of the PivotTable features that allows you to quickly change the look and feel.
Pivot table field list
-
Sum over
By default, PivotTable fields placed in the Values area will be displayed as sum . If Excel interprets your data as text, it will display as COUNT . This is why it's so important not to mix data types for value fields. To change the default calculation, first click the arrow to the right of the field name and then select option "Parameters fields".
Then change the function in section Sum over . Note that when you change a calculation method, Excel automatically adds its name to section Custom name (for example, "Sum by field field_name"), but you can change this name.
 To change the number format for the entire field, click the Number... button.
 Tip: Because when you change the calculation method in section Summarize by the name of the pivot table field is updated, it is not recommended to rename the fields of the pivot table until the configuration is complete. Instead of manually changing the names, you can select Find ( in the Edit menu ), enter Sum of field in the Find field, and leave the Replace field blank.
-
Additional calculations
Values can also be displayed as a percentage of the field value. In the example below, we have changed the expense amount to % of the total .
You can set these options in the dialog box Field Options on tab Additional Calculations .
-
Display value as calculation result and as percentage
Simply drag and drop the element into the Values section twice, right-click the value and select Field Options , and then configure the Sum by and Additional Calculations options for each of the copies.
When new data is added to a source, all PivotTables based on it must be updated. To refresh a single PivotTable, you can right-click anywhere in its range and select Refresh . If you have multiple PivotTables, first select any cell in any PivotTable, and then on the Ribbon click the PivotTable Analysis tab , click the arrow below the Update button and select Update All .
If you've created a PivotTable and decide you don't need it anymore, you can simply select the entire PivotTable range and then press DELETE . It will not affect other data, pivot tables or charts around them. If the PivotTable is on a separate sheet where there is no more data you need, you can simply delete that sheet. This is the easiest way to get rid of the pivot table.
Additional information
You can always ask the Excel Tech Community a question or ask for help in the Answers community.
PivotTable recommendations are part of a connected experience in Office and analyze data using artificial intelligence services. If you choose to opt out of a connected experience in Office, your data won't be sent to the AI service and you won't be able to use PivotTable recommendations. For more information, see the Microsoft privacy statement.
Related Articles
Create a PivotChart
Using Slicers to Filter PivotTable Data
Create a PivotTable Timeline to Filter Dates
Create a pivot table with a data model to analyze data across multiple tables
Create a PivotTable connected to Power BI datasets
Ordering PivotTable Fields Using a Field List
Changing the PivotTable's Source Data
Calculating values in a pivot table
Deleting a PivotTable
WorksheetBase Class (Microsoft.Office.Tools.Excel) | Microsoft Learn
Twitter LinkedIn Facebook E-mail address
- Reference
Definition
- Namespace:
- Microsoft.
 Office.Tools.Excel
- Assembly:
- Microsoft.Office.Tools.Excel.v4.0.Utilities.dll
Important!
Some information refers to a pre-release product that may be subject to significant changes prior to release. Microsoft makes no warranties, express or implied, with respect to the information contained herein.
Provides the base class for the Sheet n classes in document-level projects for Microsoft Office Excel.
[System.ComponentModel.ToolboxItem(false)] public abstract class WorksheetBase : IDisposable, Microsoft.Office.Tools.Excel.IWorksheetExtension, System.ComponentModel.IComponent, System.ComponentModel.ISupportInitialize, System.Windows.Forms.IBindableComponent
- Inheritance
-
Object
WorksheetBase
- Attributes
-
ToolboxItemAttribute
- Implementations
-
EntryPoint IWorksheetExtension IExtension IComponent ISupportInitialize IDisposable IBindableComponent
The
WorksheetBase class is the base class for the Sheet n classes in document-level Excel projects created with Visual Studio. Use 9 classes0631 Sheet n for programmatic access to sheets in a project. The WorksheetBase class is a host element that represents a worksheet in document-level projects. For more information, see Host Items and Controls of the Host Application and Sheet Host Item Overview.
The WorksheetBase class provides the same members as the Microsoft.Office.Interop.Excel.Worksheet class in the Excel primary interop assembly, but adds the following functionality:0003
-
The Controls property. This property is used to add managed controls to an Excel worksheet, or to remove controls at run time.
-
InnerObject property. This property is used to get the underlying Microsoft.Office.Interop.Excel.Worksheet object for the worksheet host item.
-
The GetAutomationObject method. Override this method to provide a class in the project to the VBA code in the worksheet.
-
Document-level events such as ActivateEvent and Change that are only exposed at the application level in the Excel object model.
 That is, in the Excel object model, these events are defined in the Microsoft.Office.Interop.Excel.Application class, not in the Microsoft.Office.Interop.Excel.Worksheet class.
Creating worksheet host items
You cannot create WorksheetBase objects programmatically in Office projects.
In document level 9 projects0631 Sheet instances of the n classes (which derive from WorksheetBase ) are automatically created by the Visual Studio Toolkit for Office (runtime) when an end user opens a workbook. For more information, see Programming Document-Level Customizations.
In application-level projects, you can programmatically create sheet anchors using the GetVstoObject method. The worksheet host item that is created is a Microsoft.Office.Tools.Excel.Worksheet object, not a WorksheetBase object. For more information, see Extending Word Documents and Excel Workbooks in VSTO Add-ins at Run Time.
Usage
This type is used only in Office projects that target the . NET Framework 4 or later. The assembly that defines this type is not part of the Visual Studio Tools for Office (Runtime). You must deploy this assembly along with the solution. For more information, see Assemblies in Visual Studio Tools for Office Runtime.
Constructors
| WorksheetBase(Factory, IServiceProvider, String, String) |
Properties
| Application | Gets an Application object that represents the Microsoft Office Excel application. |
| AutoFilter | Gets an AutoFilter object that provides information about the filtered lists on the worksheet if filtering is enabled. Gets object |
| AutoFilterMode | Gets or sets a value indicating whether filtering is currently enabled on the worksheet (that is, whether filtering drop-down arrows are currently displayed). |
| Base | Gets or sets the Worksheet that this WorksheetBase extends. |
| BindingContext | |
| Cells | Returns a Range object representing all cells in the worksheet (not just the cells currently in use). |
| CircularReference | Returns a Range object representing the range that contains the first circular reference in the worksheet, or returns |
| columns | Gets a Range object that represents one or more columns on the worksheet. |
| Comments | Returns a Comments collection representing all the comments for the worksheet. |
| ConsolidationFunction | Returns the function code for the current consolidation. |
| ConsolidationOptions | Returns an Array of consolidation parameters, consisting of three elements. |
| ConsolidationSources | Returns an Array with the names of the source sheets and ranges for the current worksheet consolidation. |
| Controls | Gets the collection of managed controls contained in the worksheet. |
| creator | Returns a value indicating the application in which the worksheet was created. |
| CustomProperties | Returns a CustomProperties object that represents the identity information associated with the worksheet. |
| DataBindings | |
| data host | |
| DisplayPageBreaks | Gets or sets a value indicating whether page breaks (set manually or automatically) are displayed on the worksheet. |
| DisplayRightToLeft | Gets or sets a value indicating whether the worksheet should be displayed from right to left instead of left to right. |
| EnableAutoFilter | Gets or sets a value indicating whether autofilter arrows are displayed when using UI-only protection. |
| EnableCalculation | Gets or sets a value indicating whether Microsoft Office Excel will automatically recalculate the worksheet when necessary. |
| EnableFormatConditionsCalculation | Gets or sets a value indicating whether automatic evaluation of conditional formats is used. |
| Enable Outlining | Gets or sets a value indicating the display of outline symbols when using UI-only security. This type or member is intended for use only in projects in the 2007 Microsoft Office system. We do not recommend using smart tags in Office 2010. |
| EnablePivotTable | Gets or sets a value indicating whether PivotTable controls and functions can be used when UI-only security is applied. |
| EnableSelection | Gets or sets a value indicating the cells on the worksheet that can be selected. |
| FilterMode | Gets a value indicating whether the worksheet is actively filtering data. |
| HostContext | |
| HPagebreaks | Returns an HPageBreaks collection that represents the horizontal page breaks on a worksheet. |
| hyperlinks | Returns a Hyperlinks collection representing hyperlinks to a range or worksheet. |
| Index | Returns the index number of the worksheet within the worksheet collection. |
| InnerObject | Gets a Worksheet object that represents the underlying native WorksheetBase object. |
| ItemProvider | |
| ListObjects | Returns a collection of ListObjects on the worksheet. |
| MailEnvelope | Returns the email header for the worksheet. |
| Name | Gets or sets the name of the worksheet. |
| Names | Gets a Names collection that represents all worksheet-specific names (names defined with the "WorksheetName!" prefix). |
| Next | Returns a Worksheet object representing the next worksheet. |
| outline | Returns an Outline object representing the outline of the worksheet. |
| PageSetup | Returns a PageSetup object containing all the page setup options for the worksheet. |
| parent | Returns the parent worksheet object. |
| Previous | Returns a Worksheet object representing the previous worksheet. |
| PrintedCommentPages | Gets the number of note pages to be printed for the current sheet. This property can only be used in Excel 2010 projects.0003 |
| ProtectContents | Returns a value indicating whether the contents of the worksheet (individual cells) are protected. |
| ProtectDrawingObjects | Gets a value indicating whether the object has shape protection. |
| Protection | Returns a Protection object that represents the protection settings for the worksheet. |
| ProtectionMode | Gets a value indicating that UI-only security is being used. |
| ProtectScenarios | Gets a value indicating whether worksheet scripts are protected. |
| QueryTables | Returns a QueryTables collection representing all query tables on the worksheet. |
| Range | Returns a Range object that represents a cell or range of cells. |
| Rows | Gets a Range object that represents one or more rows on the worksheet. |
| ScrollArea | Gets or sets the range within which scrolling is allowed, as a range reference in A1 format. |
| Shapes | Returns a Shapes object representing all the shapes on the worksheet. |
| site | |
| Sort | Returns the sorted values in the current worksheet. |
| StandardHeight | Returns the standard height (default) in points of all rows in the worksheet. |
| Standard Width | Gets or sets the standard (default) width of all columns in the worksheet. |
| Tab | Returns the Tab for the worksheet. |
| Tag | Gets or sets an object that contains data about the worksheet. |
| TransitionExpEval | Gets or sets a value indicating whether Microsoft Office Excel will use the Lotus 1-2-3 expression evaluation rules for the worksheet. |
| TransitionFormEntry | Gets or sets a value indicating whether Microsoft Office Excel uses the Lotus 1-2-3 formula entry rules for the worksheet. |
| type | Returns the worksheet type. |
| UsedRange | Returns a Range object that represents all cells that currently contain a value. |
| visible | Gets or sets an XlSheetVisibility value indicating whether the object is visible. |
| vpagebreaks | Returns a VPageBreaks collection that represents the vertical page breaks on the worksheet. |
 This type or member is intended for use only in 2007 Microsoft Office system release projects. It is not recommended to use smart tags in Office 2010..
Methods
| Activate() | |
| BeginInit() | |
| CalculateMethod() | Calculates formulas on a worksheet. |
| ChartObjects(Object) | Returns an object that represents either a single embedded chart (a ChartObject object) or a collection of all embedded charts (a ChartObjects collection) on the worksheet. |
| CheckSpelling(Object, Object, Object, Object) | |
| CircleInvalid() | Circles invalid values in the worksheet. |
| ClearArrows() | Removes trace arrows from the worksheet. Trace arrows are added using the audit feature. |
| ClearCircles() | Removes circles from invalid values in the worksheet. |
| Copy(Object, Object) | Copies the sheet to another location in the workbook. |
| Delete() | Deletes the base Worksheet object, but does not delete the host item. It is highly recommended not to use this method. |
| Dispose() | Releases all resources used by the current instance of the WorksheetBase class. |
| EndInit() | |
| Evaluate(Object) | Converts a Microsoft Office Excel name to an object or value. |
| ExportAsFixedFormat(XlFixedFormatType, Object, Object, Object, Object, Object, Object, Object, Object) | Performs an export to a file of the specified format. |
| FinishInitialization() | |
| GetAutomationObject() | The Visual Studio Tools for Office (Runtime) is called to get an object that can be used by the VBA code in the worksheet. |
| Initialize() | |
| InitializeDataBindings() | |
| Move(Object, Object) | Moves the worksheet to a different location in the workbook. |
| OLEObjects(Object) | Returns an object that represents either a single OLE object (OLEObject object) or a collection of all OLE objects (OLEObjects collection) in the worksheet. |
| OnShutdown() | |
| OnStartup() | |
| Paste(Object, Object) | Pastes the contents of the clipboard into the worksheet. |
| PasteSpecial(Object, Object, Object, Object, Object, Object, Object) | Pastes the contents of the clipboard into the worksheet using the specified format. This method is used to paste data from other applications or paste data in a specific format. |
| PivotTables(Object) | Returns an object that represents either a single PivotTable report (PivotTable object) or a collection of all PivotTable reports (PivotTables collection) on the worksheet. |
| PivotTableWizard(Object, Object, Object, Object, Object, Object, Object, Object, Object, Object, Object, Object, Object, Object, Object, Object) | Creates a PivotTable object. |
| PrintOutEx(Object, Object, Object, Object, Object, Object, Object, Object, Object) | Print worksheet. |
| PrintPreview(Object) | Displays the sheet in Print Preview. |
| Protect(Object, Object, Object, Object, Object, Object, Object, Object, Object, Object, Object, Object, Object, Object, Object, Object) | Protects the worksheet from changes. |
| ResetAllPageBreaks() | Reset all page breaks on the specified worksheet. |
| SaveAs(String, Object, Object, Object, Object, Object, Object, Object, Object, Object) | Saves changes in the worksheet to another file. |
| Scenarios(Object) | Returns an object that represents either a single script (a Scenario object) or a collection of scripts (a Scenarios collection) in a worksheet. |
| Select(Object) | Select worksheet. |
| SetBackgroundPicture(String) | Specifies the background image for the worksheet. |
| ShowAllData() | Makes all rows of the filtered list visible. If autofiltering is used, calling this method changes the arrows to "All" arrows. |
| ShowDataForm() | Displays the data form associated with the worksheet. |
| Unprotect(Object) | Removes protection from the worksheet. |
| XmlDataQuery(String, Object, Object) | Returns a Range object representing the cells mapped to the specified XPath. Returns |
| XmlMapQuery(String, Object, Object) | Returns a Range object representing the cells mapped to the specified XPath. Returns |
 If there is no protection on the worksheet, this method does not work.
 Developments
| ActivateEvent | Occurs when the worksheet is activated. |
| BeforeDoubleClick | Occurs when the sheet is double-clicked before the default double-click handler is called. |
| BeforeRightClick | Occurs when any sheet is right-clicked before the default right-click handler is called. |
| BindingContextChanged | |
| Calculate | Occurs after the worksheet has been recalculated. |
| change | Occurs when any changes are made to cells in the WorksheetBase. |
| Deactivate | Occurs when the worksheet loses focus. |
| Disposed | |
| FollowHyperlink | Occurs when any hyperlink in the worksheet is followed. |
| PivotTableAfterValueChange | Occurs after a cell or range of cells in a PivotTable has been modified or recalculated (for cells containing formulas). This event can only be used in Excel 2010 projects. |
| PivotTableBeforeAllocateChanges | Occurs before changes are applied to the PivotTable. This event can only be used in Excel 2010 projects. |
| PivotTableBeforeCommitChanges | Occurs before changes are made to the OLAP data source for a PivotTable. This event can only be used in Excel 2010 projects. |
| PivotTableBeforeDiscardChanges | Occurs before discarding changes to the PivotTable. This event can only be used in Excel 2010 projects. |
| PivotTableChangeSync | Occurs after changes are made to the PivotTable. This event can only be used in Excel 2010 projects. |
| PivotTableUpdate | Occurs when a PivotTable report on a worksheet is refreshed. |
| SelectionChange | Occurs when the selection on the worksheet changes. |
| shutdown | Occurs when the sheet host item is closed. |
| startup | |
Explicit Interface Implementations
EntryPoint. 
|