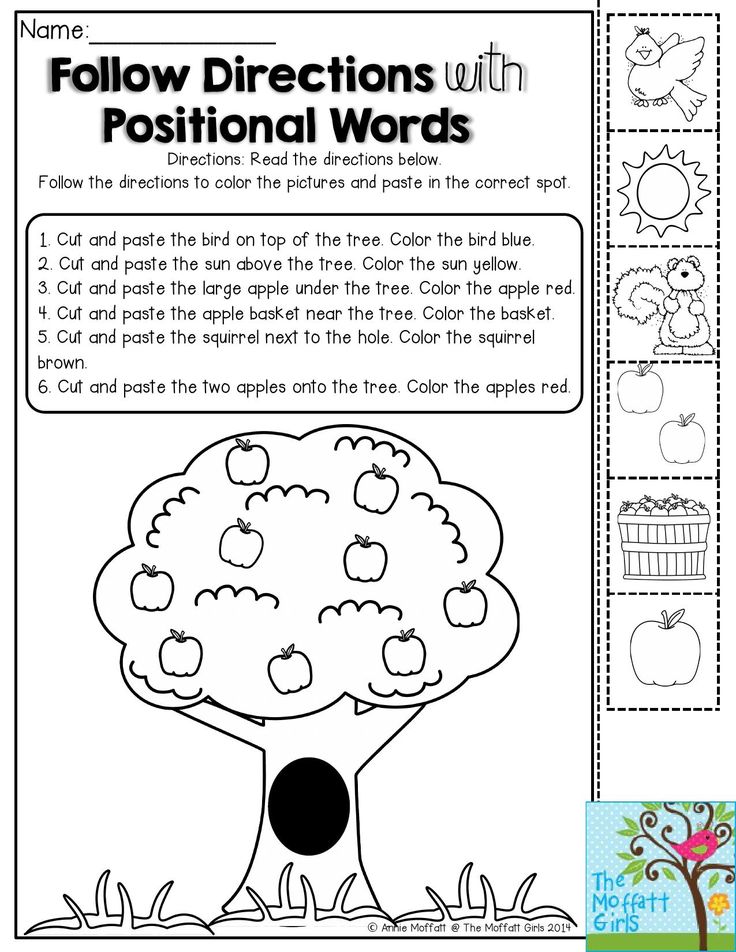
Following 2 3 step directions worksheets
Following Directions – Worksheets, Activities, Goals, and More
One Possible Hierarchy
Basic Worksheets and Activities
Click on picture to view a small preview of each activity. Click on Doc or PDF to download worksheets in preferred format.
(1) (2) (3) (4)
(5)(6) (7)
(1) “I don’t know” Activity 1 Doc PDF; (2) “I don’t know” Activity 2 Doc PDF; (3) Comprehension Questions – Days of the Week Doc PDF; (4) Comprehension Questions – Months Doc PDF; (5) Comprehension Questions – Numbers Doc PDF; (6) Feedback – Basic Doc PDF ; (7) Feedback #2 Doc PDF;
Additional Worksheets and Activities
Click on picture to view a small preview of each activity. Click on Doc or PDF to download worksheets in preferred format.
(1)(2) (3) (4) (5) (6)(7) (8)
(1)Unless and If Doc PDF; (2) Complex Directions Doc PDF ; (3) “Trick” Directions 1 Doc PDF; (4) “Trick Directions” 2 Doc PDF; (5) And and Or Doc PDF; (6) Checklist Doc PDF ; (7) Category Directions Activity – Basic 1: Doc PDF ; (8) Category Directions Activity – Basic 2 Doc PDF
Expanded Directions Comprehension StripsClick on picture to view a small preview of each activity. Click on Doc or PDF to download worksheets in preferred format.
(1)(2) (3) (4)
(1) Expanded Directions 1 DocPDF; (2) Expanded Directions 2 DocPDF ; (3) Expanded Directions 3 DocPDF ; (4) Expanded Directions 4 DocPDF
Background Information
Following directions involves using short term memory to hold known information while manipulating this information using language. Some types of words appear more frequently in directions than others – conjunctions, negatives, adjectives, and prepositions, for example, are often used in directions. Nearly every test item on one of the most commonly used assessments of following directions, the CELF-4’s Concepts and Following Directions subtest, uses some combination of conjunctions, negatives, and prepositions. These concepts are particularly critical in academic directions.
The ability to follow any specific direction depends upon the ability to comprehend the specific words within the direction. Not all one step directions are created equal. For example, a one step direction containing a negative is often more difficult than one with a similarly placed adjective.
Obviously, following directions also requires aspects outside the domain of language, such as motivation, interest, and attention. Increasing proficiency in language should provide a natural boost to these overlapping aspects.
Goal Suggestions
Cleopatra will follow basic one step directions with functional vocabulary with _____ accuracy as measured by SLP criterion referenced assessment and SLP/ teacher/ parent observation.
Marc will follow basic and expanded one step directions with curriculum relevant vocabulary…
Julius will follow basic and expanded two step directions with age appropriate curriculum relevant vocabulary…
Brutus will follow age appropriate complex directions including targeted syntax structures, such as prepositions, conjunctions, and negatives with _______ accuracy…
Functional Activity Ideas
Like this:
Like Loading...
Teaching How To Follow 2- and 3-Step Sequential Directions
This is a guest blog post by Holly, a school-based SLP, all about teaching how to follow 2 and 3-step sequential directions!
Teaching Sequential Directions
Do you have students on your caseload that can follow one-step directions pretty well, but–as soon as the complexity increases–that accuracy goes out the window?
If that’s the case for you and your students, you’re not alone! There are plenty of factors that influence the ability to follow complex directions: hearing/vision, executive function skills, language comprehension, grammar, student level of interest, task complexity, and sequencing, just to name a few. These areas were reviewed in further depth in a previous post on following simple directions — a lot of that info applies here, too!
Complex instructions are relevant for students across the grade-span. Like many domains of communication, the milestones related to following directions are geared towards younger children:
– Between 1-2 years of age, kids generally follow familiar one-step directions with support (Linguisystem, 2014)
– Between 2-3 years, children can follow two-step commands (Linguisystem, 2014)
– Around 4-5 years old, kids typically understand sequential terms (e.g., first, next, last) and respond to three-step directions at home or school (ASHA)
We know, of course, that the importance and complexity of instructions don’t end at age 5. Whether you work at an elementary, middle, or high school, following instructions serves as a major foundation for learning. These skills are also incredibly valuable for students working on vocational skills and transition plans. (Imagine your first day at a new job! There are countless tutorials to follow and procedures that you’re expected to get the hang of!) So how can we support our students no matter what level they’re working at?
In a previous post on following simple directions, we outlined the process of assessing this skill, selecting meaningful targets, using visuals and strategies, plus designing structured and contextualized intervention.
Now we’re taking it a step further by teaching how to follow multi-step, sequential directions! We’ll review different types of complex directions, plus how to teach and strengthen this skill in therapy.
Types of Complex / Multi-Step Directions
Not all directions are equally complex — that’s why it’s important to figure out what strengths and challenges are impacting a student’s ability to follow along with instructions. Here are a couple examples:
Conditional Directions: If you ride the bus after school, line up here.
Spatial Concepts: Take a seat at the nearest table and face your chair towards the front of the room.
Temporal Concepts: Before you sit down, hang up your bag on the wall.
One Action, Multiple Objects: Grab a packet, glue stick, and a pair of scissors from the table.
Multiple Actions, One Object: With your pen, circle the word you don’t know, then underline any clues that will help you figure out what the word means.
Multiple Actions, Multiple Objects: Pick out a book, bring it to the checkout counter, and present your student ID card to the librarian.
The more concepts embedded into a set of instructions, the higher the demands placed on language and working memory will be.
For a deeper dive into assessing these skills, check out the prequel to this blog post and browse through the assessment materials available through the SLP Now membership! There’s a Smart Deck to quickly probe students’ accuracy in following 1, 2, and 3-step directions.
Teaching Multi-Step Directions in Therapy
How do you feel about using anchor charts, visuals, and compensatory strategies in therapy? From kindergarten through high school, I’ve found that these kinds of support make a huge difference for students.
VisualsWhen teaching a new skill, it can be helpful to use visual aids to represent a concept. This is because many of our students are already challenged by auditory or written comprehension (Law et al., 2017), so we can use this teaching phase as an opportunity to play to any strengths! This might involve using pictures, symbols, photos, or other visual supports when teaching a skill. Here are some of my favorite visuals to use with complex instructions:
StrategiesWhen helping students strengthen skills in an area, it takes time and practice. Strategies can be taught, practiced, and used the very same day — that kind of success can be really motivating for our students when they’re starting out! Over time, using rehearsal/visualization techniques has also been found to improve students’ abilities to follow directions (Gill et al. , 2003).
These handouts (included in the SLP Now membership) are great for partnering with teachers and working on self-advocacy skills for students.
Targeting 2 & 3-Step Sequential Directions (In Therapy & Beyond!)
Once you’ve selected your targets and reviewed the skills and strategies you’ll be working on with your students, now comes the fun part… Practice!
GamesIntroduce a new game or tweak a familiar one, emphasizing the importance of listening to the instructions
RecipesCan you think of a multi-step activity that is more functional than following a recipe? Our speech-language rooms don’t often come equipped with extra space, so your recipe could be as simple as making trail mix. However, if your school has an area dedicated to cooking skills or a kitchen space that you can borrow, try incorporating it into your therapy activities!
CalendarsTry filling out a planner, agenda, or calendar with students. The working memory demands are high here (e.g., note that your spring break is from April 4th-8th, and your book report is due the following Monday), so it emphasizes the importance of using external strategies, such as writing down details!
When working with older students and developing transition plans, identify what kind of job skills involve complex directions (e.g., bagging groceries involves sorting items based on weight/shape/temperature, organizing them into a bag, and placing the bags into the cart). This is a great opportunity to incorporate your students’ interests!
Other Curriculum-Based ActivitiesTo support carryover throughout a student’s school day, collaborate with other teachers to see what activities involve complex directions. In a framework developed by Wallach (2014) and Kamhi (2014), we see that a contextualized approach to targeting these skills can be the most effective!
I hope this post has been helpful for you! Do you have any other questions or ideas for targeting multi-step directions? Feel free to comment below — thanks for stopping by!
References
American Speech-Language-Hearing Association. (n.d.) What should my child be able to do? Four to Five Years Old. Retrieved from https://www.asha.org/public/speech/development/45/.
Gill, C. B., Klecan-Aker, J., Roberts, T., & Fredenburg, K. A. (2003). Following directions: Rehearsal and visualization strategies for children with specific language impairment. Child Language Teaching and Therapy, 19(1), 85-103.
Kamhi, A. G. (2014). Improving clinical practices for children with language and learning disorders. Language, Speech, and Hearing Services in Schools, 45(2), 92-103.
Law, J., Dennis, J. A., Charlton, J. J. V. (2017). Speech and language therapy interventions for children with primary speech and/or language disorders. Cochrane Database Systematic Review.
Wallach, G. P. (2014). Improving clinical practice: A school-age and school-based perspective. Language, Speech & Hearing Services in Schools, 45, 127–136.
drafting rules and standard templates
Contents
Any company grows and develops only when each employee produces a high quality product. How to achieve this? Explain to the employee what he must do at his workplace, describe his functions and responsibilities. This requires job descriptions for each position.
What is a job description
Job description (DI) is a company regulation that describes the duties of an employee, his rights, responsibilities and qualification requirements. The purpose of this document is to describe what exactly an employee should do in the workplace and according to what rules he should interact with the team.
Labor Code says nothing about the need to develop job descriptions for employees. However, in Art. 57 states that the employment contract must list the employee's labor functions. In practice, these functions are often described in the DI and drawn up as an annex to the contract or as a standalone document. This is a good opportunity to capture ALL requirements for the position in one document.
Initially, job regulations were in demand at large enterprises, where one position could be occupied by 50-100 people. Then the efforts expended on the development and updating of a multi-page document were justified. But with the development of the economy, there were more and more positions. Now you can often see the situation in the company, when 50 out of 100 employees have different positions. It is labor intensive to develop and maintain all 50 instructions up to date.
In such cases, job functions are often described immediately in the employment contract. As a rule, indicate the duties that were prescribed in the vacancy. And if it becomes necessary to change the labor functions of an employee, they draw up an additional agreement to the employment contract.
Why do we need job descriptions
Both the employee and the employer need a workplace job description.
Employee learns what tasks he must perform in the workplace, what results the company expects from him, and how he can produce a product of the desired quality. For him, this is literally an instruction on how to do his job well.
Employer DI help:
- Rationally allocate ALL functional duties and describe them in detail. The functions described in the SID for different positions should not be duplicated.
- Justify the decision when hiring and firing employees, based on the qualification and other requirements in the JI. Objectively assess the results of the employee during the probationary period and adaptation.
- Resolve any conflict with subordinates and hold them accountable in case of disciplinary violations. The presence of DI is a strong argument in labor conflicts, disputes and litigation.
In order for job descriptions to bring the benefits described to the business, they must be written correctly.
Structure and design of the job description
Many people wonder what is the procedure for developing job descriptions, what are the rules for compiling? There are no strict requirements for issuing DIs, so you can issue them in the form in which other documents are accepted in the organization.
The classic job regulations have the following sections:
- General. This is the title of the position, its purpose, the requirements for education and experience, the position of the position on the organizational structure.
- Position functions. Description of the specific actions to be performed by the employee. To fill in, professional standards and a qualification directory are used.
- Worker's rights. The list of rights that are granted to an employee for the successful performance of his duties - what he may require from the company.
- Employee liability. What is the employee responsible for, what awaits him for violation of official duties.
- Final provisions. This section may include the effective date of this document and the revision of the work instructions.
Next, consider in detail what to write in each paragraph.
What to write in the job description: 5 key sections
General provisions
It is important to include in the General provisions section:
- Job title
- Purpose of the job.
 It is important to describe in simple words the result that the employee should produce. What he comes to the company for.
 - Position in the organizational structure of the company. It is advisable to show the entire structure and highlight the current position so that the employee can clearly see all the lines of subordination. Specify which departments he will interact with.
- Requirements for the level of education and experience, for knowledge, skills and abilities. When filling out, you can rely on two state standards - educational and professional.
Let's take a closer look at the last point. In Russia, there is a unified system of normative documents for professions and positions. The educational standard (FSES) regulates the process of obtaining a particular profession, and the professional standard regulates the process of holding a position.
If it is important for a position to have a secondary or higher education, study the list of competencies according to GEF , specify them, compare them with the professional standard and indicate in the DI.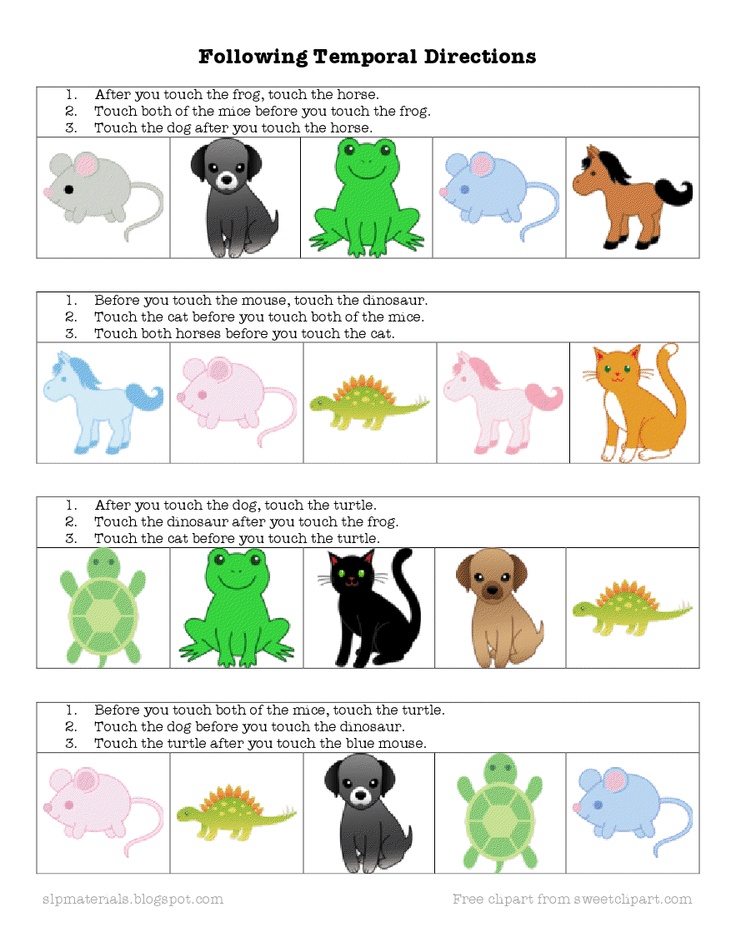 However, in modern companies, the level of education often fades into the background, and only the results of professional activity are taken into account. Therefore, sometimes it is enough to indicate competencies only from the professional standard.
Professional standards is a good help for HR. They cover a wide range of competencies and labor activities, are universal and relevant. Choose competencies from the list of competencies for a specific position, you can supplement them or partially transfer them to DI. If there is no professional standard for some position, select a similar position and update the requirements for it or use educational standards.
An example of professional standard requirements for competencies for the position of "Marketer":
Position functions
This is the main section of the job description. You can also use the professional standard to fill it out. Select the appropriate employee actions, specify them and bring them into line with the tactical goals and objectives of the company.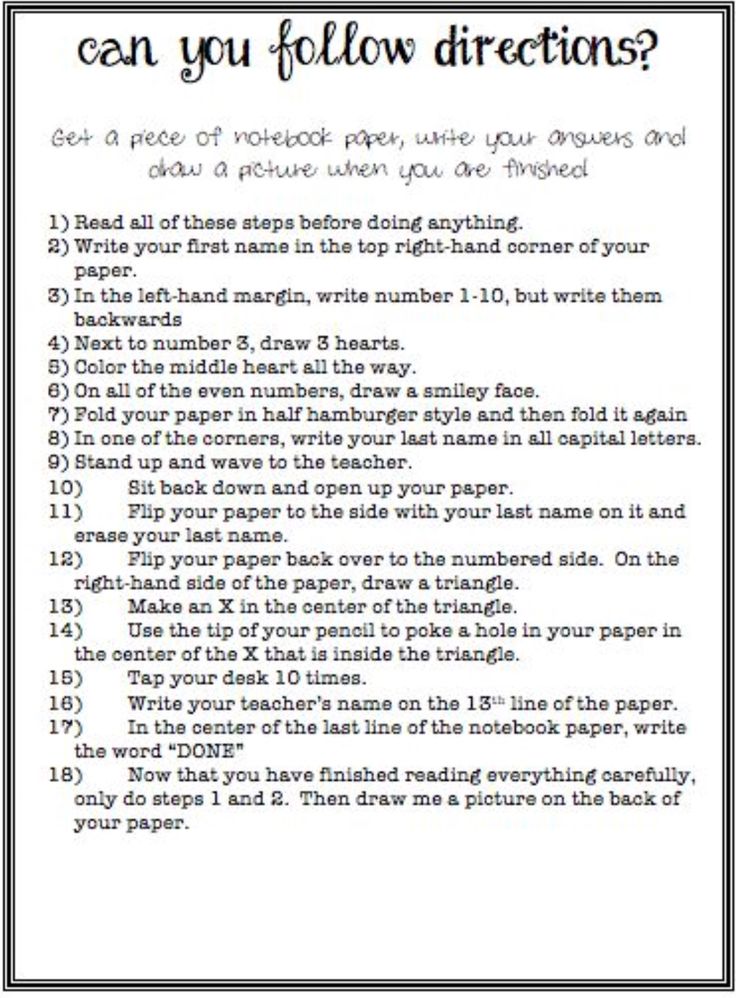 The more specifically you write down the duties, the more “transparent” the relationship between the company and the employee will be, the easier it will be for the employee to fulfill these duties. As a rule, it is difficult to cover all the duties of an employee, so you can add the phrase at the end: "and other assignments of management within the competence."
To specify the duties of an employee, it is convenient to arrange them in a tabular form. Example of duties for the head of the tender department:
Council . Additionally, write down job statistics and typical errors so that the job description of the worker is not perceived superficially.
Employee rights
What can and should be included in the rights? The list of rights is closely related to the previous section - "Duties". Here you indicate all the rights, without which the employee cannot perform his functions efficiently. For example, an employee has the right to:
Responsibility
Specify what result the employee is responsible for and what consequences they expect for non-compliance with the requirements of the DI and local regulations of the organization.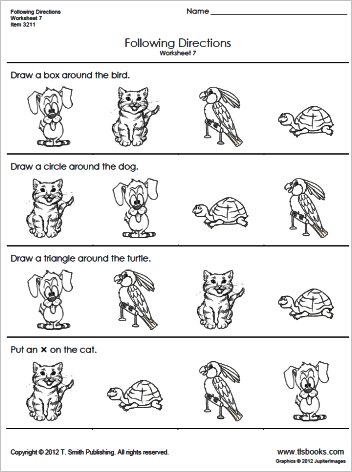 It also specifies the administrative, disciplinary, material and criminal liability of the employee.
For example, the head of marketing is responsible for:
Final provisions
Determine the frequency and reasons for reviewing the work instructions: annually / as needed / in connection with changes in the organizational structure. A good HR understands that if CI is so closely tied to the organization's tactical goals, then it's just a matter of time to rework it. Changes in the realities of the company or its organizational structure are inevitably followed by the adjustment of job regulations. It must take place by mutual agreement of the parties.
Tip . Sample standard job descriptions can be downloaded from the Internet and used as templates. But any template needs to be supplemented and the necessary specifics added.
Using the job description
Coordinate and approve the finished document with a lawyer, sign it with the general director of the company.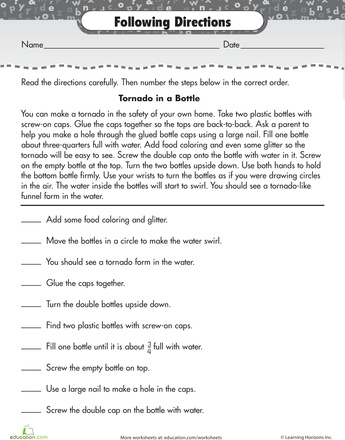 After the approval of the CI, familiarize the employees with it and ask them to sign on the familiarization sheet.
It is important to bear in mind that a job description is a legal document that is written primarily in legal language. Sometimes such documents are difficult for employees to understand. Therefore, it is desirable to make the work instruction interactive - simplify it, arrange it in the form of a training program and add it to the corporate knowledge base. Place such a job description on an online learning platform so that employees always have access to it, and you can check that they have studied and learned all the provisions.
When you hire a new employee, immediately entrust him to take the Job Benefit course. And if over time you need to change or update the job description, the employee will highlight these changes on the platform and he will be able to familiarize himself with the new information.
Tip . By itself, the work instruction will have little effect on employees.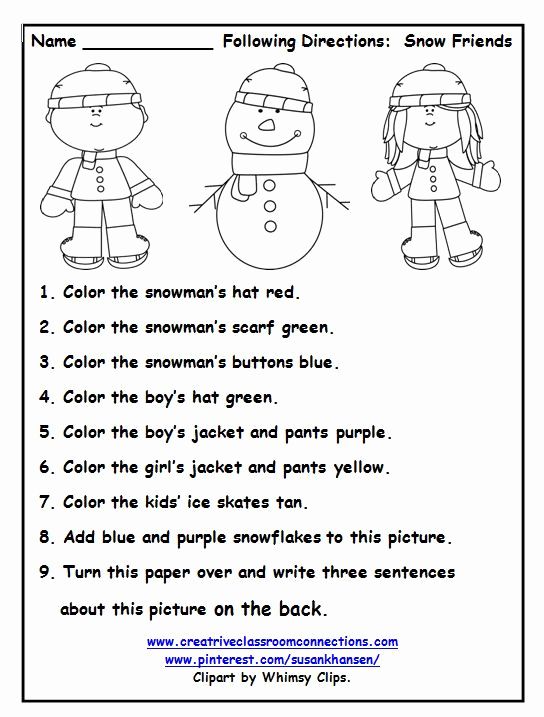 In order to bring order to the organization, it is necessary to gradually introduce various management tools: organizational structure, regulations and job descriptions according to professional standards, an employee training system, a motivation system, planning and coordination.
Answers to frequently asked questions
Who develops job descriptions?
As a rule, the development or compilation of CI falls on the heads of departments. For example, a sales manager writes work instructions for managers. And HR managers and accountants help him - they can provide a job description template and qualification directories.
In what cases is the job regulation required by law?
Public institutions are required to have official regulations, for example, for police officers and local municipalities. The rest of the companies are guided by their own needs, they will not be punished for the lack of CI.
What mistakes are often made when developing a job description?
1. Vague wording . When instead of describing specific tasks and metrics, they write “The manager must do his job with high quality”.
2. Intersection of duties in different positions. Make sure that the functions of the position are unique.
3. Race for volume . If writing a DI took 15 sheets, this does not indicate its high quality. Don't add "water" for volume.
4. Duplication of provisions on rights and obligations from the Labor Code.
What types of job descriptions are there?
CI can be individual or generic. An individual one is developed for a specific employee, and a typical one is developed for a specific position. The need to create an individual ID arises, for example, when employees of the same position perform different functions.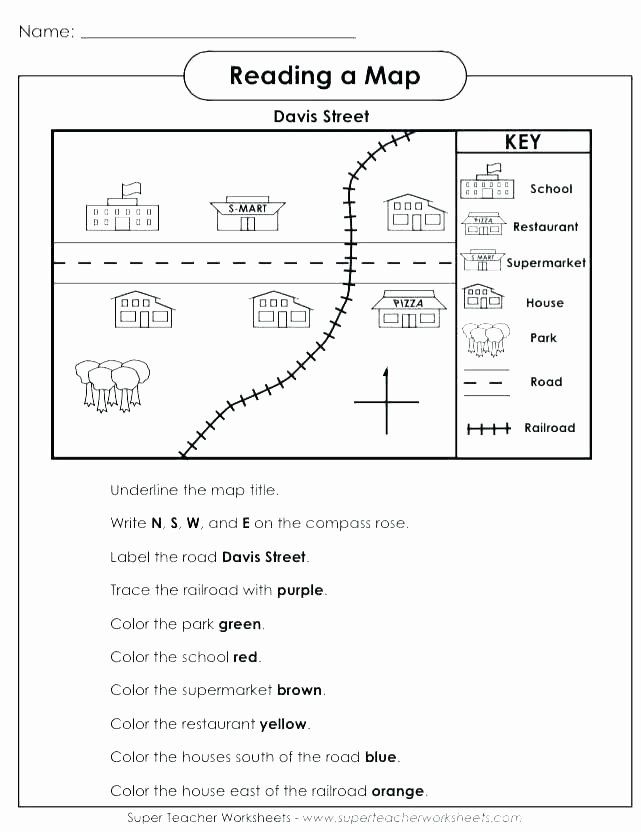 Usually, it is impractical to make a separate instruction for each employee.
Is it possible to make one job description for the whole company?
If you have a small company with only one position, you can. But in this case, there is probably no need for work instructions. And if you have a large enterprise, each position needs its own instruction, because the rights and obligations will be different.
Is it necessary to develop a new ID if the employee temporarily performs the functions of another person?
It often happens that during a holiday the tasks of one employee are transferred to another. In this case, it is enough to familiarize the employee with this job description of the person he replaces. There is no need to create a new one.
How to make changes to the job description?
Most often, the initiator of updating job regulations is the employer.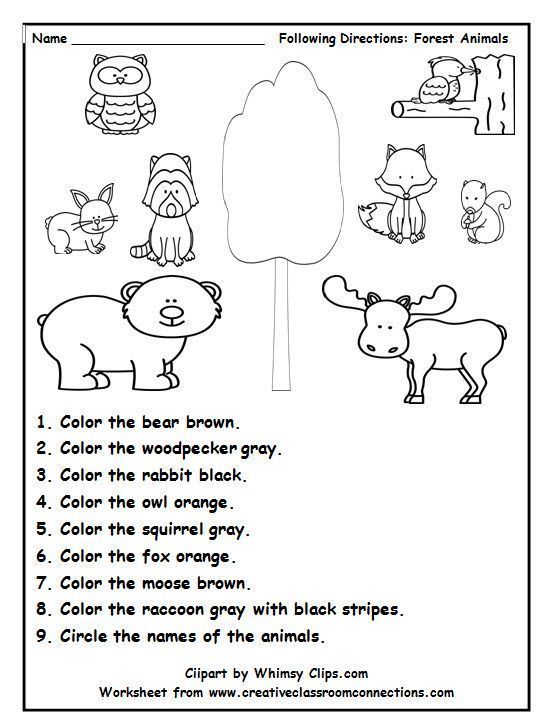 For example, it becomes necessary to transfer several new tasks to an employee or the organizational structure of the company has changed. In this case, it is necessary to issue an order to change the text of the JI or issue a new work instruction. In both cases, you need to familiarize the employee with the changes and ask to sign.
Mind map in 11 steps. Detailed instruction
Natalia Shirokova
Mind maps - an effective tool for self-development - are not as simple as they seem. They conceal great possibilities, but they reveal them only when they are created taking into account important rules. The author of the methodology, Tony Buzan, in the book "Overthinking" described the whole process in steps. Remember a problem or topic that you have long wanted to deal with, take out paper and felt-tip pens. We will draw a mind map in science.
Step 1: Preparation
Use a large piece of paper to make room for the mind map. Let it be completely clean so that lines or something else do not distract you from the creative process.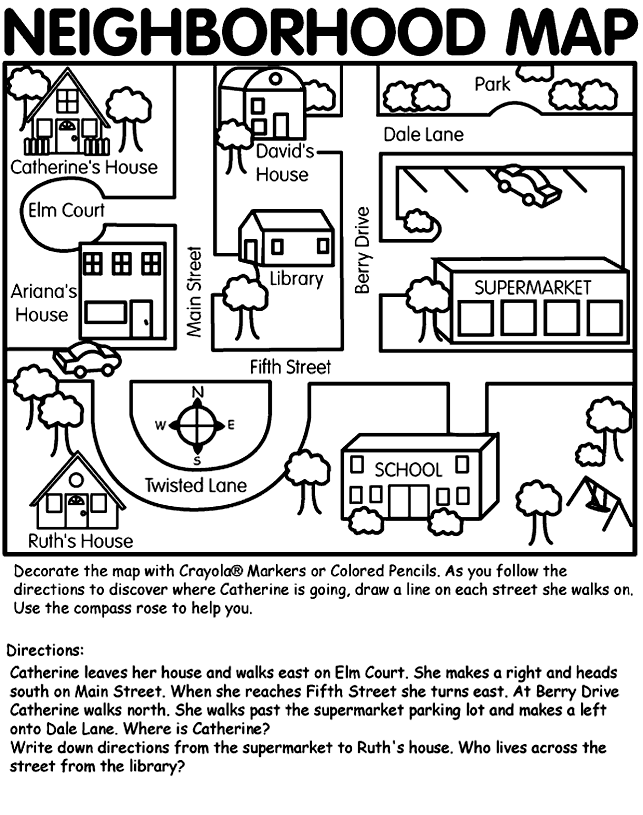 Lay it horizontally - this will give more freedom and space. In addition, information on a horizontal mind map is better perceived, since the entire page can be viewed non-linearly - from the center in a circle.
Overthinking
Place the sheet in front of you. You can sit comfortably on the floor. The artist Paula Regu specially painted her paintings, sitting on the floor, as this "childish" manner allows you to get rid of conventions and think freely and creatively. Try it.
Step 2. Choose the central image
After you have decided on the topic of the mind map, start drawing a picture in the center of the sheet. Use at least three different colors and try to make the image three-dimensional and expressive.
Get creative - think about how to symbolize your theme. If it is impossible to do without a keyword, write it, but make it colorful and voluminous. This will help start the associative process.
Step 3. Define the main ideas
The main categories, which radiate from the central image in the form of main branches, form the structure of the mind map. It is important to choose them correctly: they set the creative impulse and help to see the whole picture more clearly.
The following questions will help you decide on the main branches.
— What information or knowledge do you need?
- What seven categories do you consider the most important in the topic under consideration?
- If this were a book, what would be the titles of its chapters? What lessons or topics would it contain?
- What questions do you need to clarify? (Questions such as “What?”, “Where?”, “Who?”, “How?”, “What?”, “When?” can be very useful branches in a mind map.)
- On what subtopics can be divided into the main topic?
You can start by writing down the first ten words or images that come to mind, and then group them under general headings to form the main branches.
Step 4. Add branches
The branches closest to the center should be thicker to emphasize their importance. Above each such branch, write one of the ordering ideas.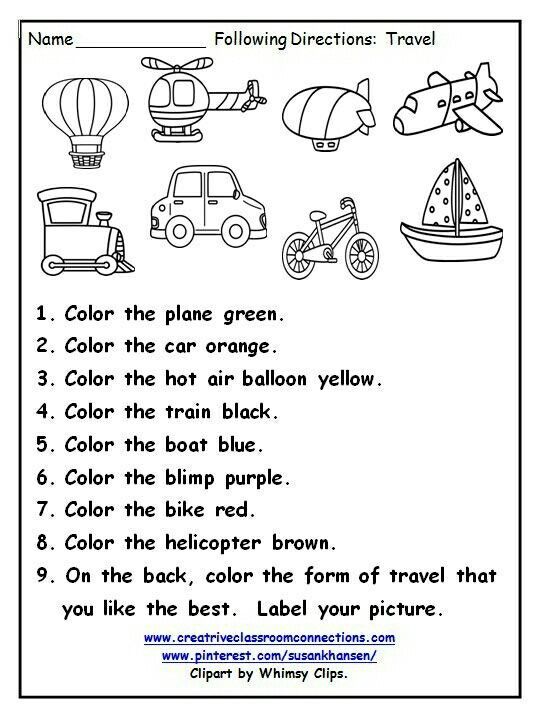 Additional branches departing from the main one will contain information related to the main idea.
Give branches natural curves to make them more visually appealing. If each branch looks unique, the information will be remembered better.
Step 5. Express ideas through images
Use as many images as possible to maximize visual impact and make the process fun. As with words, each of the pictures should occupy a separate branch. Do not worry if the talent of the artist in you has not woken up - pictures do not have to be masterpieces. Quick sketches, symbols, sketches will do just fine.
The use of imagination when creating a mind map has another advantage: it helps to improve the skill of visual perception. Studies have shown that when it comes to image recognition, people have an almost photographic memory. The most ordinary person, if shown 10,000 photographs, will be able to remember more than 98% of them.
When you make your first 100 mind maps, you will probably remember 100 out of 100.
Try to keep your images as clear as possible. The clearer the mind map, the more attractive it is. A clear image stimulates a clear response. It is clarity that will help you see the world around you through the eyes of a child or an artist. Your ability to perceive will improve.
Step 6: Play with words
To maintain clarity, impact, and freedom, do not use more than one keyword per branch. Remembering a word is much easier than a phrase. By limiting yourself to one word, you will choose it more carefully and use the analysis skill more actively.
Branch length must match keyword length. This will allow you to place the words close enough to each other and place as many associations as possible on the mind map.
Print keywords to make them easier to visualize. Given the hierarchy of ideas, you can label branches with lowercase and uppercase letters to indicate their degree of importance.
Step 7. Develop synesthesia
Synesthesia is a perceptual phenomenon in which stimulation of one sense organ leads to an automatic response of another. For example, a person with synesthesia may associate each day of the week with a different color and texture: Tuesday may be blue or a high-pile carpet, and Sunday may be yellow and bubble-like.
The mind map can be considered an organized synesthetic tool. Use all five senses: sight, hearing, taste, smell, touch. Think about the power of movement that can be visualized in the natural shape of the branches, and how else it can be shown in a mind map.
Step 8: Create Your Own Codes
We have seen that color is one of the most effective tools for enhancing memory and creativity. To increase the impact of color, create your own color code: associate specific colors with your main ideas. A carefully thought-out color code will help you quickly absorb the information presented on the mind map, improve its memorization and increase the number of creative ideas.
Step 9: Label Relationships
Similar to the coding system, branches and arrows can be used to label relationships between different areas of a mind map, showing how different concepts relate. The connecting branches can take the form of curves, loops, chains, or any other form that appeals to you.
Arrows automatically set the direction of the gaze so that it moves from one part of the mind map to another. They encourage the brain to follow the gaze and give spatial direction to thoughts, stimulating the process of creative thinking. Like connecting branches, arrows can be different in size, shape, volume. Sometimes they are multidirectional and connect several branches at once.
Step 10: Use boundaries and chunking techniques
The chunking mnemonic technique was invented by American psychologist George Armitage Miller in 1956. Chunk (from English chunk - piece, fragment) - an organizational unit of memory. When pieces of information enter memory, they can be organized so that related concepts are grouped into a single block. This process is called chunking.
When creating mind maps, chunking and boundaries can be useful. They give shape, group information, stimulating the work of short-term memory.