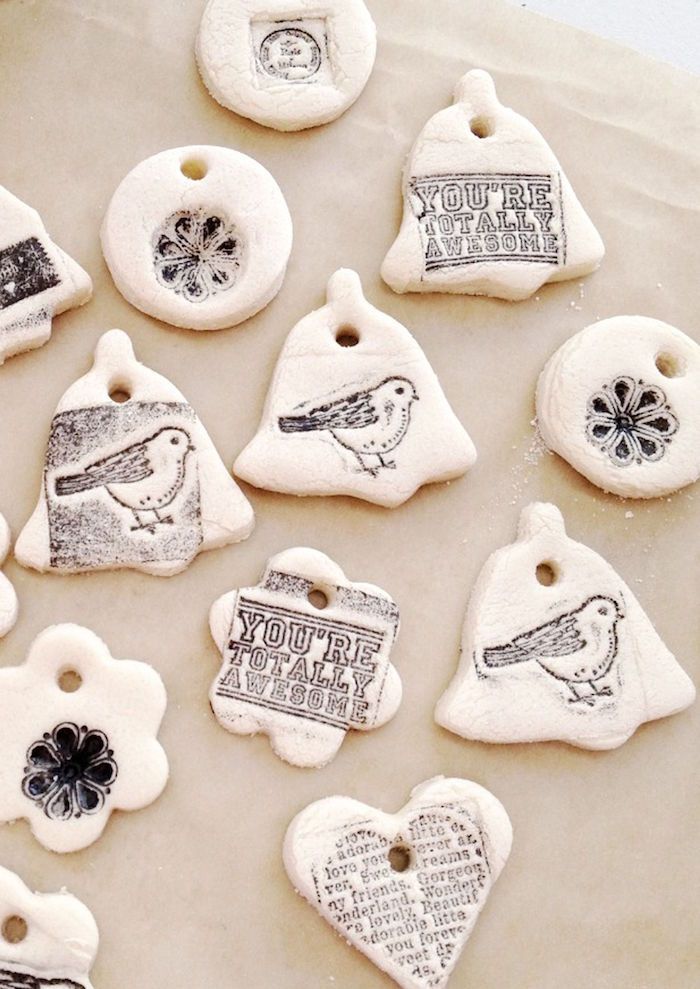
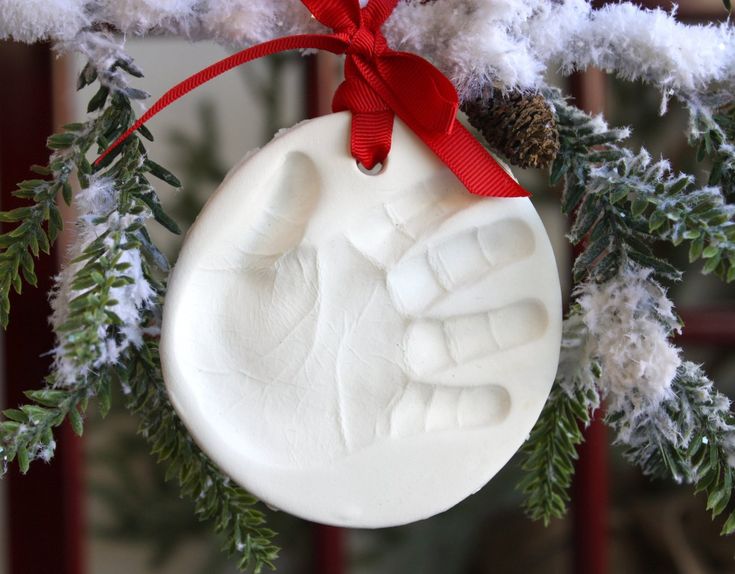
Hand print ornament recipe
Salt Dough Recipe - The Easiest Way to Make Salt Dough!
Kim146 Comments
All activities should be supervised by an adult. As an Amazon Associate, I earn from qualifying purchases. This post may contain affiliate links.
Learn how to make your own salt dough handprint ornament with this easy Salt Dough Recipe. You only need a few ingredients from your kitchen to make this salt dough! We cover all of our tips and tricks to make sure your salt dough ornaments will last for years!
RELATED: Salt Dough Ornament Recipe
Table of Contents
- Salt Dough Recipe – for Handprints & Ornaments
- Salt Dough Ingredients
- How to Make Salt Dough – an Easy Salt Dough Recipe!
- Why Is My Salt Dough Puffing Up?
- How Do I Seal Salt Dough Ornaments?
- What Kind of Paint Should I Use?
- How to Decorate Salt Dough Handprints
- How Many Ornaments Does this Make?
- Tips for Making Perfect Salt Dough
- Salt Dough Handprint & Ornament Recipe
- Get the Recipe
- More Salt Dough Ornament Ideas
Salt Dough Recipe – for Handprints & Ornaments
One of our favorite things to do with salt dough is to make handprint ornaments. But you can also use this same recipe and use cookie cutters and paint shapes instead!
For the handprint ornaments – you can make a new one every year and have a nice memento for the Christmas tree!
Don’t forget to add the year on the back of the salt dough ornament to keep track of the different years.
Salt Dough Ingredients
- 4 cups all purpose flour (Note: you want regular all purpose flour, not self-rising)
- 1 cup salt
- 1.5 cups warm water
How to Make Salt Dough – an Easy Salt Dough Recipe!
1. Combine all of your ingredients (flour, salt, warm water) and mix well until it starts to form a dough.
2. Take the dough out of the bowl and knead for at least 10 minutes.
If your dough is too dry, add a little bit more water in and continue to knead.
The dough should be smooth and roll out with not too many bumps. It should also be easy to press a handprint into it.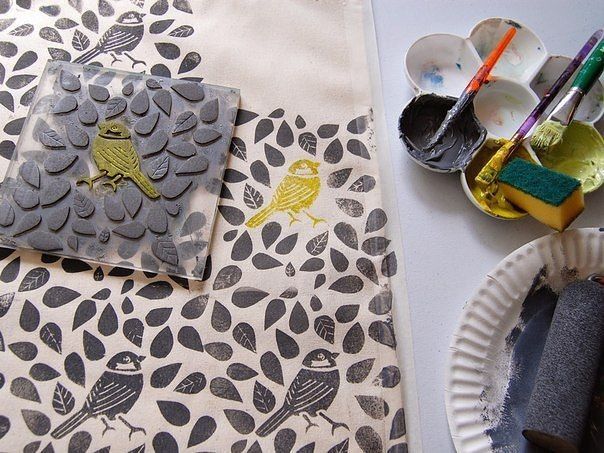 If you’re finding it’s too hard or not smooth enough, continue to knead some more. If it’s still too dry, add a little bit more water (but not too much or it may get too wet).
Roll out the dough to between 1/4 to 1/2 inch thickness. If the dough is too thick it will take too long to dry.
Press the hand into the dough.
3. Use a circle shaped bowl to trace around your handprint.
Cut out the handprint with a knife (adults to do this part).
You can also print off a circle shape or heart shape to trace around with a knife (adults to do this part).
If you have a smaller handprint you can use a circle or large heart cookie cutter.
TIP: It’s easier to press the handprint first, and then trace around it. If you have dough left over you can roll it out again and do another handprint.
4. Using a straw, make a hole in the top of the ornament.
5. Let the ornaments air dry for a day.
If you have time, let the ornaments air dry for a day. This will cut down on the baking time required and help to prevent puffing. If you do not have time, you can bake right away instead.
Bake at 250 degrees Fahrenheit for 1-2 hours. Once the top of the ornaments look dry and solid, flip over and bake on the other side.
NOTE: It’s important that you check that your oven temperature is set to Fahrenheit. One of the most common reasons the ornaments burn and puff up is that the oven temperature is Celsius. If you have a Celsius setting then you’ll want to use the lowest oven temperature, closer to 120 degrees Celsius.
If your ornaments are still doughy, put them back in for another hour. It will depend on your thickness how long you need to bake for. The thinner ornaments will take less time but thicker may take more. If it’s taking too long in the oven, let them finish drying by air drying them for a few more days. Make sure to flip them over so the bottoms also get exposed to air.
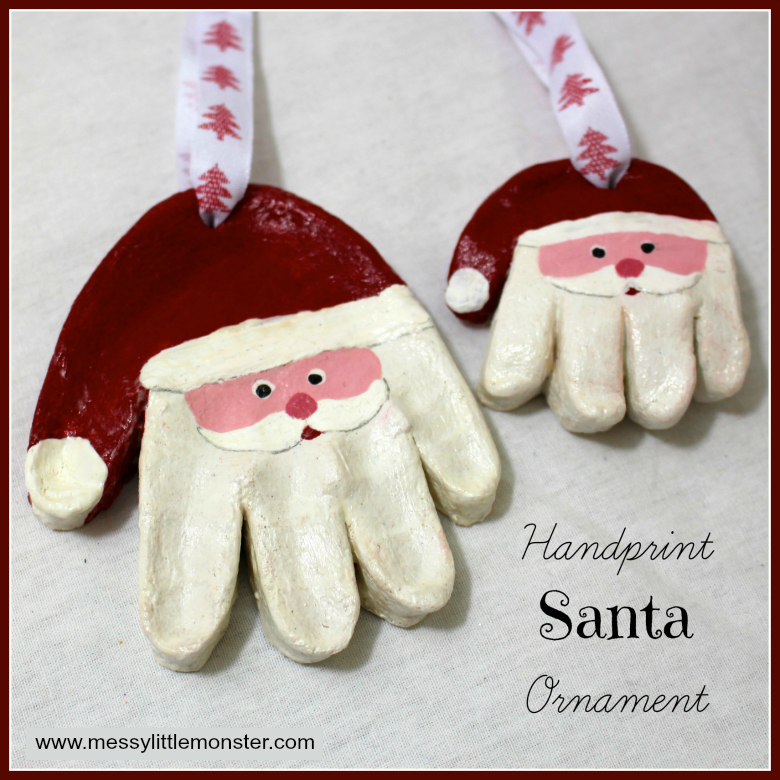
6. Once your ornaments are fully dry you can paint them.
Paint the handprint and leave the remaining ornament plain. Or you can paint the whole ornament white and then paint the center handprint once the base coat has dried.
If you want to add glitter into the handprint, decorate the whole ornament with paint first, then fill the handprint with glue. Shake glitter onto the glue.
After the paint has dried, make sure to seal with with either mod podge or a clear glaze spray. Seal the ornaments after you paint them and the paint has fully dried.
7. Tie ribbon or twine through the hole for hanging on the Christmas tree.
Why Is My Salt Dough Puffing Up?
The number one reason salt dough is puffing is due to the oven temperature. If the temperature is too high the salt dough will puff up. It is better to let your ornaments air dry for a day and then bake them. This will prevent the puffing. If you need to bake right away, bake at the lowest temperature (200-250 degrees Fahrenheit).
Note: Make sure to check your oven temperature is Fahrenheit and not Celsius.
You also want to make sure you are using regular, all purpose flour and not self-rising flour.
How Do I Seal Salt Dough Ornaments?
Once you are done, don’t forget to seal with either mod podge or a clear glaze spray. We like this spray for a durable finish. Adults should do the spraying and always follow directions of the product chosen.
Sealing the final ornaments will help stop them from cracking in a few years and prevent moisture from getting in.
What Kind of Paint Should I Use?
I like to use non-toxic acrylic paint for salt dough ornaments. The color will go on much thicker and more vibrant than kids paint. We like this brand of acrylic paint.
How to Decorate Salt Dough Handprints
You can use a heart for the shape around the handprints or you can use a circle.
For this one, we used a large heart cookie cutter as the handprints were small (baby handprints):
If you have larger handprints, you can trace around a heart print-out or use a knife (adults only) to draw a heart shape around the handprint.
We painted this one with acrylic red paint but you could choose green or even silver or gold. Then you can leave the handprint portion of the salt dough ornament either natural or use glue and add glitter to it like we did.
How Many Ornaments Does this Make?
Depending on the handprint size and thickness of the salt dough – you can get approximately 8 handprints. If you’re using the dough to make small cookie cutter ornaments you’ll get approximately 15.
If you’re hoping to make this for a classroom or with a larger group of kids, I would recommend bringing an extra batch just in case. The quantity can vary depending on size of cookie cutters, handprints and thickness of the dough. I like to roll out the dough and continue to knead together the scraps to use as much as I can.
Tips for Making Perfect Salt Dough
- Knead well to make the dough smooth – I like to knead at least 10 minutes.
- Let the ornaments air dry for a day first, if possible. This cuts back on the oven baking time and helps to prevent puffing.
- Don’t forget to flip the ornaments when baking or air drying so that the bottoms will be exposed to air.
- Seal with our recommended sealers mentioned above so that the ornaments will last for many years.
- Store the ornaments in a cool, dry place and keep away from moisture. Sealing the ornaments also prevents moisture from getting in.
Prep Time15 mins
Active Time2 hrs
- ▢ 4 cups all purpose flour
- ▢ 1 cup salt
- ▢ 1.5 cups warm water
- ▢ Clear Glaze Finish or Mod Podge
Combine all of your ingredients and knead for 10 minutes.
 If your dough is too dry add a little bit more water in and continue to knead.
Roll out the dough to a thickness that you'd like your salt dough ornament to be. We like between 1/4 to 1/2 inch thickness.
Using a large cookie cutter, cut out different shapes for your salt dough ornaments. If making handprints, place the handprints first and then trace around them.
Have your child place their hand into the salt dough ornament. If the dough is too hard to get an imprint it may be too dry. Continue to knead until smooth. You can also add in a little bit more water.
Using a straw, make a hole in the top for where you want to hang your salt dough ornament.
If possible, let the ornaments air dry for a day.
Preheat your oven to 250 degrees Fahrenheit. Bake for 1-2 hours. If your ornaments are still doughy, put back in for another hour. (It will depend on your thickness how long you need to bake for. The thinner ornaments will take less time but thicker may take more).
If you encounter too much puffing, roll out thinner ornaments and this will help reduce the puffing. If the ornament is still a bit doughy, bake for longer or let sit out a few days to harden before decorating. The thickness of the dough will determine how long you have to bake them for. We prefer to bake them at 250 degrees Fahreneheit for longer and let them air dry for a few days to prevent puffing.
Once cool, you can decorate by painting with non-toxic acrylic paint.
Spray with a clear glaze finish or finish with mod podge. Do this before adding the glitter.
To make the hand glittery, fill the handprint with glue then sprinkle glitter on top of the glue, shake off the excess and let it dry.
Kids will love helping to make this salt dough recipe. They will also have fun decorating the salt dough ornaments by painting them.
Finally, just a friendly reminder to keep these out of reach of pets (they can be toxic to dogs due to the salt content).
More Salt Dough Ornament Ideas
See over 25+ of the best Salt Dough Ornaments here for more great ideas!
These salt dough glitter ornaments are so fun to make – and you can make these for any season or holiday too!
The Best Salt Dough (for Ornaments and Crafting!) to Make with the Kids
Learn how to make classic salt dough with the kids, with baking, painting, and storage info. This method is straight forward, easy, and thorough—and they a perfect kids holiday gift for grandparents, teachers, and loved ones!
Salt Dough
This salt dough is a staple of childhood and I love doing this Christmas activity with my kids each year—and throughout the rest of the year too! We love to make salt dough handprints, ornaments, and sometimes, just any old shape they want to. It’s an easy project that we can do together—and then share as kid-made holiday gifts, keepsakes, or house decorations.
Salt Dough Recipe
Making salt dough at home is as easy as combining three pantry staples together into a dough. It’s fairly fool proof (as long as you follow the measurements!) and is a recipe that even little kids can help make.
Ingredients in Salt Dough
To make this recipe, you’ll need:
- table salt
- all-purpose flour
- water
TIP: That’s it! (I buy store brand, cheap flour for this since project to keep it very budget-friendly.)
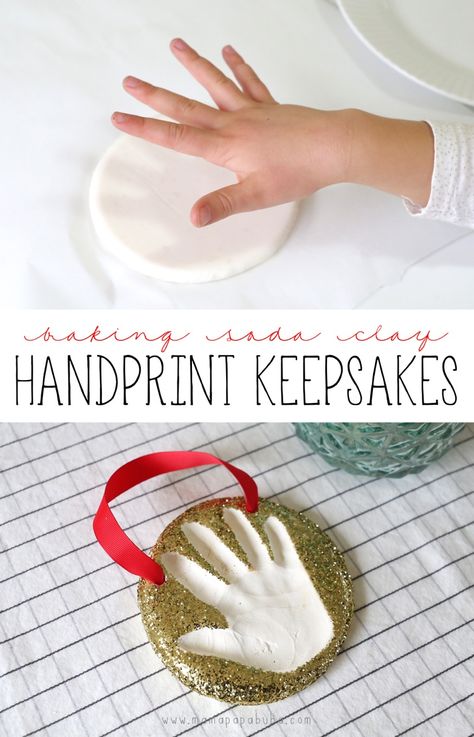
How to Make Salt Dough Ornaments Step-by-Step
Here’s a look at how to make the dough for this salt dough. Scroll down to the bottom of the post for the full information.
- Measure out the flour and water. (photo 1)
- Add the water. (photo 2)
- Stir with a wooden spoon. (photo 3)
- Keep stirring until the dough is mostly together and is hard to stir any longer. (photo 4)
- Knead a few times with hands to bring the dough together.
 (photo 5)
 - Place dough between two pieces of parchment paper and roll out. (photo 6)
TIP: You can divide the dough in sections so multiple kids can have their own dough to work with.
How to Cut Out, Bake and Decorate Salt Dough Ornaments
Once you start rolling, here’s a look at what will follow if you want to make these into ornaments. (Skip the hole poking if you want to just make these as shapes for the kids to paint.)
- Roll out, changing directions occasionally, until about 1/4-inch thick. (This may not get precise if you’re working with kids and that’s okay!) (photo 1)
- Stamp cookie cutters. (photo 2)
- Remove the dough around the shapes, then either transfer the whole piece of parchment paper to a cookie sheet OR transfer just the shapes to a parchment-lined cookie sheet. (photo 3)
- Poke holes so you have a place for a string to hang as ornaments. (photo 4)
- Press in a hand to make a handprint, if desired.
 (photo 5)
 - Bake, let cool and decorate! (photo 6)
TIP: Re-roll any remaining dough after Step 3 here to make additional ornaments.
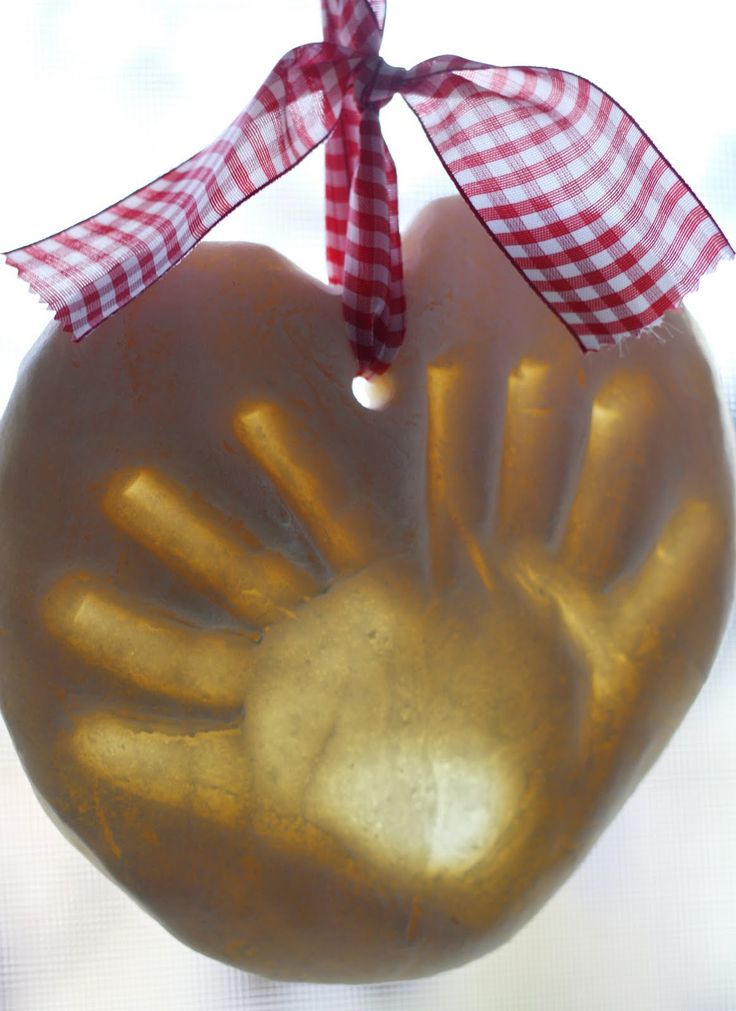
Salt Dough Handprint Ornament
Capturing a handprint in salt dough is a perfect grandparent gift, or a keepsake ornament to make for your own tree. I love pulling out our little collection year after year. Know that getting a good print may take a few tries if doing a baby’s hand!
TIP: Check the size of your round cookie cutter against your child’s hand to make sure that it’s big enough. You may need one that’s 4-5 inches in diameter.
Best Paint for Salt Dough Ornaments
If the kids are wearing smocks, the table is protected, and you are reasonably sure they won’t paint all over their hands and faces, I like using regular acrylic craft paint since it holds up best on crafts. With younger kids who may wind up wearing more of the paint, I’d recommend tempura washable paints.
TIP: We put our paint into the base of old egg cartons since we always have those on hand. You can also use paper plates.
How to Preserve Salt Dough Ornaments
To help preserve your finished dried ornaments, you can coat with a layer or two of Mod Podge or spray with a sealer. Either work well. I’d recommend coating or sealing both sides, so do one side and let it dry, and then do the second side. If using the sealer, do it in a well ventilated area without the kids too close by.
TIP: To store these ornaments from year to year, you’ll want to wrap in bubble wrap. Store in a container that won’t be banged around, dropped or exposed to excess moisture.
Why is my salt dough puffing up?
If you mistakenly use self-rising flour, they may puff. And sometimes it happens randomly. Keep the oven temperature low and if it happens consistently, you can try baking at an even lower temperature for a slightly longer amount of time.
Tips for Making the Best Salt Dough Ornaments
- If the dough is too wet and sticky, knead in a little more flour. If it’s too stiff, add a little more water. There is a big range in the way different flours absorb liquid, so there is a normal range of variation in liquid needs. It should be easy to work with—soft and not too stiff and not excessively sticky.
- Use paper lollipop sticks or a skewer to make your holes.
- Use a 4-5 inch round cookie cutter to make handprint ornaments.
- Tie on baker’s twine or thin ribbon to hang as ornaments.
- Try to get the dough to an even thickness before baking so the ornaments bake evenly.
- Bake for the time indicated and then longer if your ornaments still feel soft. They should be firm to the touch without much give.
- Let cool fully before painting.
- If you want to paint the background of a handprint ornament, do that before you paint the inside of the hand.
 Let dry before adding a second color. Some people like to paint the whole thing white or cream to give it a more finished look.
 - Use acrylic craft paint for older kids who can be trusted with paint and tempura washable paints with younger toddlers.since it holds up best on crafts. With younger kids who may wind up wearing more of the paint, I’d recommend.
- To help preserve your finished dried ornaments, you can coat with a layer or two of Mod Podge or spray with a sealer.
I’d love to hear your feedback on this project and what your kids thought of it, so please comment below to share!
Prep Time 30 minutes
Cook Time 2 hours
Total Time 2 hours 30 minutes
Author Amy Palanjian
Cuisine American
Course Holiday
Calories 1kcal
Servings 2 dozen ornaments
- ▢ 4 cups flour
- ▢ 1 cup table salt
- ▢ 1.5 cups water
Mix the ingredients together in a large bowl using a wooden spoon.
 When it becomes too stiff to stir, use clean hands to bring the dough together.
NOTE: If the dough is too wet and sticky, knead in a little more flour, about 1 tablespoon at a time. If it's too stiff, add a little more water, about 1 tablespoon at a time. There is a big range in the way different flours absorb liquid, so there is a normal range of variation here. It should be easy to work with—soft and not too stiff and not excessively sticky.
Knead a few times until the dough is uniform and soft, about 3-5 minutes.
Divide dough into 2 or 4 sections and roll out to about 1/4-½ inch thick between two sheets of parchment paper. This will help prevent sticking.
Cut out with cookie cutters. Transfer shapes to a parchment-lined baking sheet.
Repeat rolling and cutting out shapes to use up the dough.
Preheat oven to 250 degrees F.
Do a 4-5-inch circle and press in a child's handprint if desired.
Use a paper lollipop stick or a skewer to make a hole to hang as an ornament.
If making ornaments, bake for 90 minutes to 2 hours; if baking handprints, bake for 2-3 hours. Continue baking both ornaments and handprints as needed until they are until just firm to the touch, checking every 20 minutes. (It's not a problem if yours take longer than the initial baking time—it varies based on thickness and size...which will likely vary if you are baking these with kids!) They do not need to be rock hard, but should not feel squishy. Handprints will likely take longer than smaller ornaments and may take closer to 4 hours.
Remove from oven, let cool, and paint if desired with acrylic or washable tempera paint.
Once paint is completely dry, seal with Mod Podge if desired.
Mixing Bowl
parchment paper
Mini Cookie Cutters
- Divide the recipe in half to make a smaller portion of dough if desired.
- Use paper lollipop sticks or a skewer to make your holes.
- Use a 4-5 inch round cookie cutter to make handprint ornaments.
- Tie on baker's twine or thin ribbon to hang as ornaments.
- Try to get the dough to an even thickness before baking so the ornaments bake evenly.
- Bake for the time indicated and then longer if your ornaments still feel soft. They should be firm to the touch without much give but do not need to be rock hard. It is not a sign of a problem if yours take longer than mine did to bake—flours and ovens vary!
- Let cool fully before painting.
- If you want to paint the background of a handprint ornament, do that before you paint the inside of the hand. Let dry before adding a second color.
- Use regular acrylic paint for older kids who can be trusted with paint and washable tempera paint with younger toddlers.
- To help preserve your finished dried ornaments, you can coat with a layer or two of Mod Podge or spray with a sealer.
Calories: 1kcal, Fat: 1g, Saturated Fat: 1g, Polyunsaturated Fat: 1g, Monounsaturated Fat: 1g, Fiber: 3g, Sugar: 1g, Calcium: 31mg, Iron: 6mg
Tried this recipe?Rate in the comments and tag @yummytoddlerfood on IG!
DIY Easter decorations | Magic Eda.ru
04/17/2021
We make Easter decorations with our own hands - eggs in chocolate baskets.
To make Easter eggs, you will need powdered sugar, protein, a little citric acid and salt. You can tint with food coloring - you get marbled eggs. Or you can decorate with cocoa powder - there will be quail eggs.
Chocolate baskets are also quite easy and simple to make. You need to melt the chocolate and pour it into a bowl of vodka - the baskets will freeze, the vodka will evaporate, and you will get cute nests that will decorate your Easter table.
Total time: | Cooking time:
Yield: 17 pcs. | Calories: 335.65 kcal per 100 g
Ingredients
For sugar eggs:
- powdered sugar - 100 g
- protein - 12 g
- salt - 1 chip.
- citric acid - 1 chip.
- food coloring - 1 drop
- cocoa powder - 0.5 tsp.
For chocolate baskets:
- dark chocolate - 60 g
- vegetable oil raffin. - 0.5 tsp
- cold vodka - 50-100 g
- kondurin - 1 chip.
Cooking
Large photos
Small photos
-
Combine egg white (raw, you need to weigh 12 grams), a small pinch of salt and citric acid.
 Beat with a mixer until foamy. If you are afraid to use raw protein, you can pre-pasteurize the eggs.
 -
Add powdered sugar (I recommend sifting). Stir with a whisk, and then knead with your hands. Here and further to work in gloves.
-
The mass must be plastic. If it crumbles, then you need to add a little more protein. If, on the contrary, it sticks, then add a little powder.
-
Divide the mass into parts and tint with dyes - you need just a drop of gel, I add a toothpick at the tip. You can not knead until smooth, but leave stains - there will be something like a marble pattern.
-
Blind small eggs - 6-7 grams. Note that the mixture dries quickly, so don't forget to cover the part you're not currently working on with clingfilm! Arrange the blanks on a plate lined with foil and leave to dry for 10 hours.
-
For the chocolate nests, break open the bar, pour in the oil and heat in the microwave for 10 seconds, stirring each time to melt the chocolate.
 Don't overheat! I don’t melt completely, but leave the last pieces a little “not melted” - when stirring, the chocolate mass will still become homogeneous, but it definitely won’t overheat, and you won’t have to temper the chocolate.
 -
Pour the melted chocolate into the bag. Pour vodka into a small bowl - ice cold, very, very cold, so that the chocolate in it immediately, almost instantly freezes!
-
Cut the bag and squeeze it into the vodka through the mini-hole to make a nest.
-
It will harden after about 5-10 seconds. You can speed up the process if you put the bowl in the freezer each time. It is more convenient to take out with a teaspoon. Repeat this with all the chocolate until it runs out - I got 3 nests.
-
To emphasize relief, you can tint chocolate nests with kondurin - dilute 1-2 pinches in a minimum amount of vodka and paint over with a thin brush.
 Similarly, you can decorate the "gold" eggs.
 -
Some of the eggs can be decorated to look like quails. To do this, you need to dilute the cocoa powder to a small amount of vodka, and then sprinkle it with a kissel on top of the dried blanks - you get “quail eggs”.
-
Can be used to decorate Easter cottage cheese or Easter cakes, as your fantasy tells you. Happy Easter, friends!
SugarEasterHome cookingMixer, blender
Similar recipes
What else to cook?
Decorating cakes at home, with your own hands, ideas with photos
If you love baking cakes, then this article is especially for you! In this article, we will look at a variety of ways to decorate cakes with your own hands at home. You can transform an ordinary cake with the help of mastic, marzipan, icing, waffles, chocolate, icing, cream, cream, meringue, fruit, jelly, sweets, marmalade and sprinkles. We will consider each ingredient of the jewelry separately, get acquainted with the manufacturing recipe, and, of course, be inspired by a huge number of ideas.
For some cake decorating options, you will need special materials such as: a pastry syringe with nozzles, parchment paper, a sharp thin knife, spatulas of different thicknesses.
Content
- 1 Decoration of cakes mastic
- 1.1 Recipe for mastic No. 1
- 1.2 Recipe for mastic No. 2
- 2 Martzipan cakes
- 2.1 Recipe Marzipan
- 30026
- 8.1 Recipe for beaten cream
- 900
- 10.1 11.1 Jelly filling recipe
- 12.1 Methods for decorating cakes with sweets
- 13.1 Recipe
- 14.
 1 Methods for decorating cakes sprinkling
Mastics decoration
mastic is a special dough for decorating a cake. You can roll it out and cover the top of the cake, you can also create various animal figures, letters, numbers, flowers, leaves, openwork patterns and whatever your imagination desires.
The basic rule of working with mastic is that you have to work with it very quickly, as it hardens instantly. But there is a way out! When you form the decoration, pinch off the desired piece, and wrap the rest of the mastic in a film. Large figurines may crack when dry.
Mastic recipe #1
Ingredients: condensed milk, powdered milk or cream, powdered sugar, food coloring (optional). The number of ingredients directly depends on the size of the cake.
How to prepare: Take a deep bowl and mix milk powder or cream with powdered sugar. Gradually add condensed milk and mix well. You should get an elastic dough that does not stick to your hands. Add food coloring drop by drop and mix in. After cooking, immediately wrap the mastic in a film.
Mastic Recipe #2
Ingredients: water, lemon juice or citric acid, butter, powdered sugar, starch, marshmallow (white marshmallow), food coloring (optional).
Cooking process: steam the marshmallows, adding drops of food coloring if desired. Then add water and just a little bit of lemon juice or citric acid. Mix well the mixture, and then add 50 grams of butter. Separately, mix powdered sugar and starch in a ratio of 1: 3. Gradually add the corn starch mixture to the marshmallow mixture and knead well for about 10 minutes. After cooking, immediately wrap the mastic in a film.
I recommend watching the master class video!
How to decorate a #cake for a 17 year old girl
Watch this video on YouTube
I recommend the mastic cake photo gallery!
Decorating cakes with marzipan
Marzipan is a nut mass that consists of almond flour and sugar paste. Its advantages are that it keeps its shape perfectly, is quite elastic and has an amazing delicate taste. It is convenient to create all the elements of decoration from it - small figures, cake coating and voluminous decorations.
Marzipan recipe
Ingredients: 200 grams of sugar, 1/4 cup water, 1 cup lightly roasted almonds, butter.
Preparation process: Peel the almonds and finely chop them in a blender or on a grater. Make syrup from sugar and water. The consistency of the syrup should be thick. Pour the ground almonds into the syrup, stir and cook for 3 minutes. Take a bowl and grease it well with butter. Pour the marzipan into a bowl. Cool marzipan and pass through a meat grinder. Marzipan is ready! If it turns out liquid, add powdered sugar. If the marzipan is very thick, add a little boiled water.
I recommend watching this video!
Marzipan - Grandma Emma's Recipe
Watch this video on YouTube
I recommend a photo gallery of marzipan cakes!
Decorating cakes with icing
Icing is an ice pattern that looks like a winter pattern on a window and tastes like crisp ice. The advantages of icing are that it is strong enough, does not spread, and perfectly adheres to the surface of the confectionery. It can be applied over hard chocolate icing, mastic, fudge. It is worth noting that the surface on which icing can be applied should not spread and be non-sticky. The icing is applied with a confectionery syringe, then the finished product is placed in the refrigerator for further solidification. Laces, inscriptions and patterns are very beautiful.
Icing recipe
Ingredients: 3 eggs, 500-600 grams of powdered sugar, 15 grams of lemon juice, 1 teaspoon of glycerin.
Manufacturing process: refrigerate all ingredients, degrease the utensil and wipe it dry. Take the eggs, separate the whites from the yolks. Beat egg whites, add glycerin, lemon juice and powdered sugar. Beat the mass well with a whisk until it turns white. Cover the mass with cling film and place in the refrigerator for 1 hour to burst the air bubbles. The icing is ready, you can safely decorate the cake!
I recommend watching 2 amazing master classes! The first one shows in detail how to paint a cake with icing. In the second, they tell in detail how to make chic roses from icing.
Royal Icing Recipe for Brush Embroidery Cake - Decorando con GLASA REAL by CakesStepbyStep
Watch this video on YouTube YouTube
I recommend a photo gallery of cakes decorated with icing!
Decorating cakes with wafers
Wafers are materials for decorating flowers, various figures, figures. They are made from crispy waffle dough. Ready-made edible pictures based on waffle cake are also popular. You can buy this decoration in confectionery stores, supermarkets or on the Internet. It’s not possible to make waffles with an image on your own, as food ink and special equipment will be required. The advantages of waffles are that they do not crack, keep their shape perfectly and do not melt. However, they can only be used on the light surface of the cake, since when soaked, the picture can be saturated with dark cream.
Wafer decoration rules
- The surface of the cake must be perfectly even.
- The base can be thick buttercream, mastic, icing.
- The picture is applied to the uncured surface of the cake.
- Lay the picture on the table with the back up, grease it with a thin layer of liquid honey, light jam or sugar syrup. Carry out the process with a silicone brush.
- Put the picture on the cake.
- Press down a little with your hands to release the air, then smooth with a napkin.
- Conceal the edges of the picture with whipped cream poured into a pastry syringe.
- Decorate the cake with wafer figures in this way: put the figures on the table with the back side up, brush with a thin layer of liquid honey, light jam or sugar syrup and stick to the cake. Either brush just the center and form an open flower or raised butterfly wings.
I recommend watching the master class video!
How to put a waffle picture on a cake. Paw Patrol Cake
Watch this video on YouTube
Chocolate Cake Decorating
Chocolate decorating is considered a classic cake decoration. This ingredient goes well with biscuits, soufflé, mousse, puff pastry and various creams. The advantage of chocolate lies in the fact that when it is melted, it can be given any kind of shape, and when the chocolate hardens, it will not crack or spread. To decorate cakes, you can use any chocolate - black, white, milk, porous.
Methods for decorating cakes with chocolate
- To decorate a cake with chocolate chips, simply grate a bar of chocolate on a grater and sprinkle it on the cake.
- To decorate the cake with swirls, lightly heat the chocolate bar, then take a thin knife, or better, a vegetable cutter and cut off thin strips, they will immediately begin to curl.
 From them you can create chic patterns.
 - Here is another way to decorate a cake with openwork patterns, inscriptions and drawings. Melt a bar of chocolate in a steam bath. Place the chocolate in a confectionery syringe. Take parchment paper and draw patterns. Use a pastry syringe to draw patterns on parchment paper. Place the parchment in the refrigerator to harden the chocolate. Carefully remove the chocolate from the parchment and decorate the cake. If you are not good at drawing, find a beautiful pattern on the Internet, print it out, attach transparent parchment paper to the pattern and simply copy it.
- To decorate the cake with chocolate leaves, you will need real tree leaves or houseplants. Wash and dry the leaves. Melt the chocolate in a steam bath and spread it on the inside of the sheet with a silicone brush. Put in the refrigerator, and when it hardens, carefully remove the chocolate from the leaf and decorate the cake.
- Another creative way to decorate the cake is with cherries and chocolate.
 Get rid of the pits, place each cherry in melted chocolate and decorate the cake.
I recommend watching this video!
Chocolate decors
Watch this video on YouTube
I recommend a photo gallery of cakes decorated with chocolate!
Decorating cakes with icing
At the moment there are chocolate, mirror, marmalade, caramel, multi-colored, soft, milk and cream icing.
Chocolate glaze recipe
Ingredients: 1.5 tablespoons of milk, 2 teaspoons of cocoa powder, 1.5 tablespoons of sugar, 40 grams of butter.
Preparation process: take a bowl, put cocoa, sugar, butter pieces, and milk. Put on fire, melt and boil for 5-7 minutes. Cover the cake with chocolate icing using a wide knife and refrigerate to harden further.
I recommend watching the master class video!
Mirror Chocolate Frosting - Grandma Emma's Recipe
Watch this video on YouTube
Caramel Frosting Recipe
Ingredients: 150 grams of warm water, 180 grams of fine sugar, 2 teaspoons of cornstarch, 150 grams of heavy cream, 5 grams of gelatin sheet.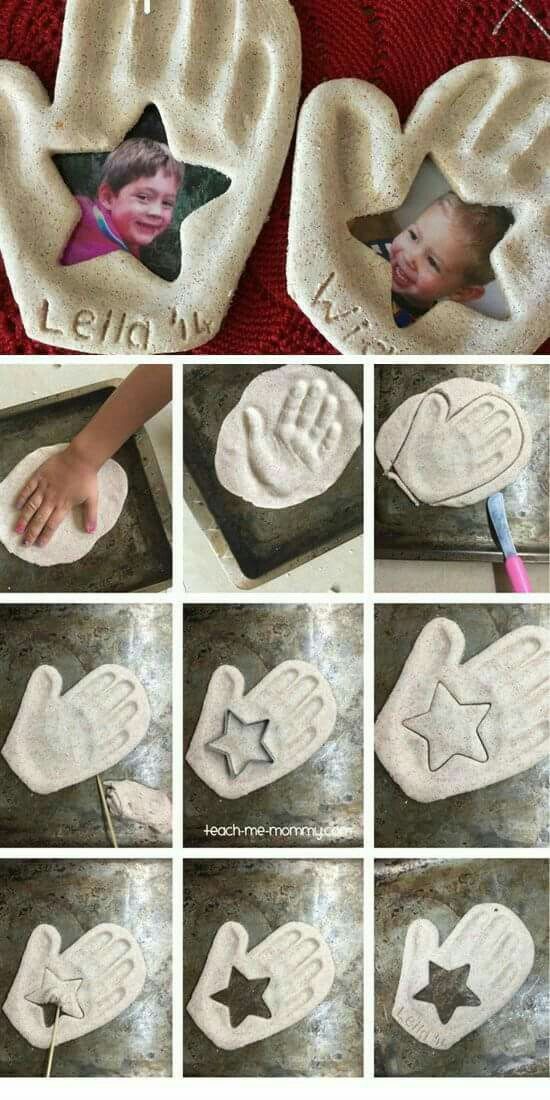
Preparation: soak gelatin in water, mix cream with starch, melt sugar in a frying pan until light brown. Add cream with starch and sugar to warm water. Boil to dissolve the caramel. Remember to constantly stir the mixture. Then pour it into the cream, mix, cool and add the swollen gelatin. Cover the cake with caramel icing using a wide knife and refrigerate to further set.
I recommend watching the master class video!
Caramel mirror glaze
Watch this video on YouTube
Marmalade glaze recipe
Cooking process: Melt marmalade in a steam bath or microwave, add sour cream, butter and sugar. Mix well and put on fire. Cook the glaze for 10 minutes, stirring constantly. Let the icing cool down a bit. Cover the cake with marmalade icing using a wide knife and refrigerate for 3-4 hours to further set.
I recommend a photo gallery of cakes decorated with icing!
Decorating cakes with butter cream
Cream is a universal decoration for cakes.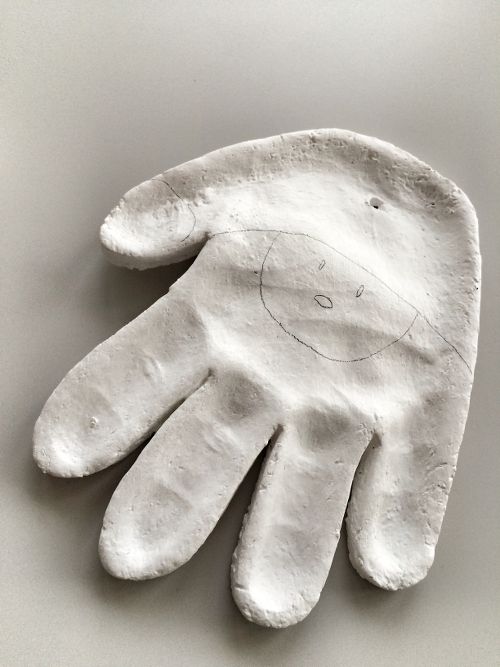 It is very convenient for them to write congratulations, make openwork frames, lush roses. Food coloring is often added to the cream.
Butter cream recipe
Ingredients: 100 grams of butter, 5 tablespoons of condensed milk, food coloring.
Cooking process: melt the butter in a steam bath or microwave. Whisk it until it becomes white and fluffy. Add condensed milk, mix well and divide the cream into portions. Add the dye of the desired color to each portion of the cream. Place the cream in a pastry syringe and create beauty, then send the cake in the cold so that the cream freezes.
I recommend watching the master class video!
BUTTER CREAM CAKE DESIGN #1#
Watch this video on YouTube
I recommend a photo gallery of cakes decorated with buttercream!
Decorating cakes with whipped cream
Whipped cream is an original airy, voluminous and delicate decoration. Their preparation does not require special products. To beautifully decorate the cake with whipped cream, you will need a pastry syringe. You need to work with cream quickly enough. Make sure all ingredients and tools are ready. The surface of the cake should be even and not too sticky.
Whipped cream recipe
Ingredients: half a liter of high fat cream from 33%, vanilla sachet, 100-200 grams of powdered sugar, 1 sachet of instant gelatin, food coloring (optional).
Preparation: put the cream in the refrigerator for 12 hours. Pour chilled cream into a deep bowl. Take another deep container, pour ice water into it. Place the bowl of cream into a bowl of ice water. Dissolve the gelatin in the manner indicated on the package. Whip the cream with a mixer (do not use a blender, as the foam will not work). Beat them until the foam is strong enough. Add powdered sugar and vanilla, then stir with a whisk. Add the dissolved gelatin in a thin stream. Put the cream in the syringe and decorate the cake.
I recommend watching the master class video!
Heart-shaped cake "BOUQUET OF ROSES" FOR LOVERS' DAY, cake decoration with cream, cake decoration
Watch this video on YouTube
I recommend a photo gallery of cakes decorated with whipped cream!
Decoration of meringue cakes
Meringue is a snow-white, crispy and very tasty decoration. It is laid out on a layer of chocolate, jam, or cream.
Meringue Recipe
Ingredients: a cup of powdered sugar, 5 chilled eggs, a packet of vanilla (optional).
Preparation: Separate the whites from the yolks, pour the whites into a dry, fat-free deep container. Beat egg whites until fluffy (10-15 minutes). Gradually pour out the powder (1-2 teaspoons) and immediately dissolve it. Add vanilla and dissolve well as well. Preheat the oven to 100 degrees, line a baking sheet with parchment paper and transfer the protein foam to a pastry syringe. Squeeze the protein mixture onto a baking sheet, creating beautiful balls or other shapes. The meringue is dried, not baked, the time the future meringue stays in the oven depends on the size of the blanks. Approximate drying time 1.5-2 hours.
I recommend watching the master class video! Irina Cooking
Decorating cakes with fruits
Fruits are very tasty, healthy and contain a huge amount of vitamins. They brightly decorate the cake with flavor combinations and rich colors. The easiest way to decorate with fruit is to fan out chopped slices of strawberries, kiwis, oranges, mangoes, and all sorts of other fruits. You can create a whole fruit canvas that blends perfectly in natural jelly.
Recipe
Ingredients: fresh fruits and berries, for fruit jelly - light juice, such as apple juice 600 ml, a glass of powdered sugar, 1 package of powdered gelatin.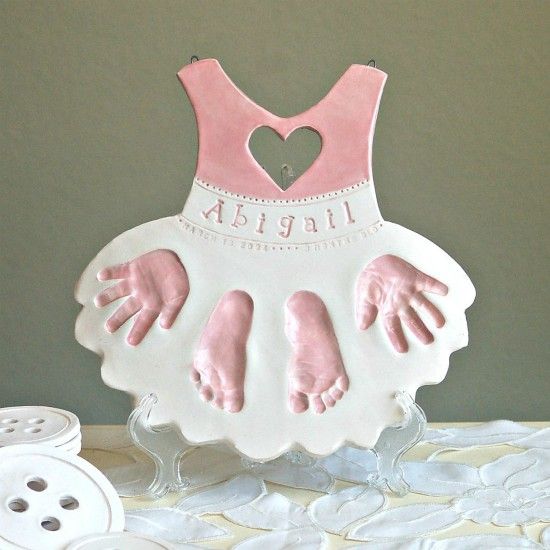
Preparation: Pour the gelatine into a glass of juice and set aside to swell. Prepare the fruits, peel them and cut into small beautiful slices. Kiwis and bananas are cut in circles, apples and oranges - in half rings, strawberries - in half, raspberries, blackberries, cherries - left whole. Melt the gelatin in a water bath, add the remaining juice and powdered sugar to it. Strain the mixture, arrange the fruit nicely in the jelly and refrigerate. When the jelly hardens slightly, transfer it to the cake, turning the container upside down. If desired, mask the edges with buttercream or whipped cream. Put the cake in the refrigerator.
I recommend watching the master class video!
Cake decoration | Decorating a cake with fruits and berries
Watch this video on YouTube
I recommend a photo gallery of cakes decorated with fruits!
Jelly cake decoration
Jelly looks very nice and has a beneficial effect on people's joints. Jelly filling goes well with various fruits. However, you can decorate the cake with it in its pure form, or you can decorate the top with jelly filling with sprinkles of coconut or nuts, be original and think over the concept of decoration!
Jelly filling recipe
Ingredients: 600 ml of juice (you can use juice of different colors), 1 package of fast-dissolving gelatin, a glass of powdered sugar.
Preparation: soak the gelatin in 1/3 of the juice and leave to swell. Then steam the gelatin with the juice. Mix powdered sugar and remaining juice, pour into molds and refrigerate. Pour off 100 ml of jelly, and put it in the refrigerator for a while so that it has time to set. Put the cake in a mold that is 3 cm higher than it. Put the jelly filling on the cake, and decorate with jelly molds on top. Steam will help to easily get the jelly blanks out of the molds. It is enough to bring the mold with jelly over the steam, and then turn it over for dessert. Put the cake in the refrigerator for 10-12 hours and do not forget to remove the mold before serving. If you want to make a jelly filling with fruit, then prepare the jelly as described above. Put it in the refrigerator for a while so that it has time to set. Spread the jelly over the nicely arranged fruit, smooth with a spatula and refrigerate overnight. To prevent the jelly from breaking during serving, cut it with a heated knife.
I recommend watching this video!
No-Bake Cheesecake Cake with Jelly and Strawberries
Watch this video on YouTube
I recommend a photo gallery of cakes decorated with jelly!
Decorating cakes with sweets
Candy is a favorite treat for children. Toddlers pay attention to the design of the cake itself, and not to the products from which the cake was made. Try to decorate the cake for the children's holiday as brightly and creatively as possible.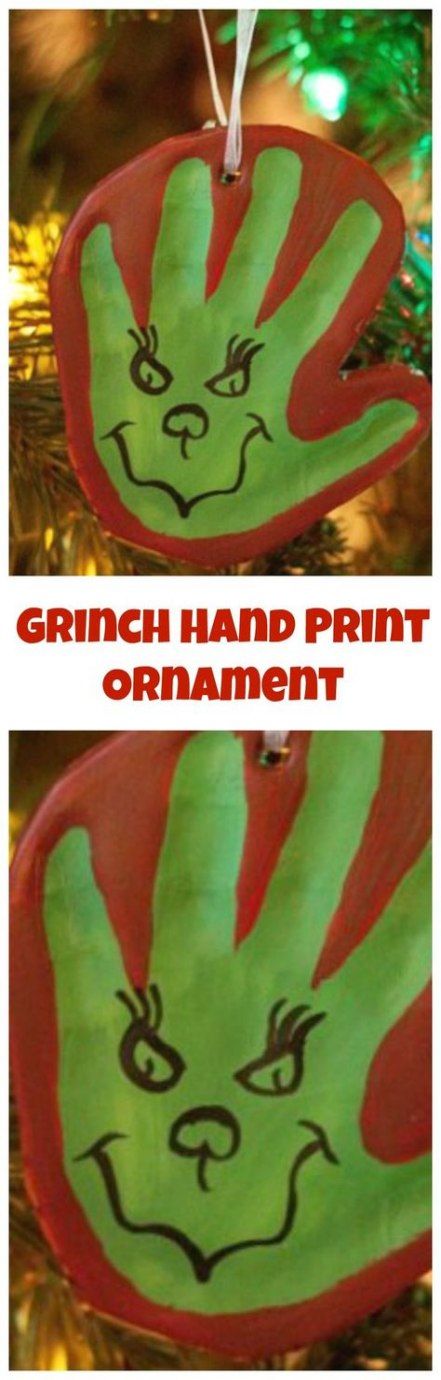 You can use all kinds of sweets except lollipops. The surface of the cake should be thick and viscous, for example - whipped cream, butter cream, icing.
Ways to decorate cakes with sweets
- The sides of the cake can be decorated with chocolate bars or waffles, and the top can be filled with dragees.
- Small toffees are great for creating a pattern or writing on a cream surface or white glaze.
- Cut the gummies into squares and randomly decorate the top of the cake with white fondant or whipped cream.
- It is good to decorate the sides with round shaped sweets, and put 3 sweets in the central part of the cake.
I recommend watching this video!
M&M's and KitKat CAKE! We do it ourselves!
Watch this video on YouTube
I recommend a photo gallery of cakes decorated with sweets!
Cake decoration with marmalade
Marmalade is an excellent material for decorating cakes. They can create beautiful drawings of different colors. It is plastic material and easy to work with.
Recipe
Ingredients: 50 grams of dark chocolate, marmalade of different colors, mastic or marzipan.
Preparation process: take parchment paper and draw an image with a simple pencil. Roll out a thin layer of mastic or marzipan on parchment. Transfer the picture to it by attaching a sheet and rolling it out with a rolling pin. Melt 50 grams of dark chocolate, then place in a pastry syringe. Draw the contour of the picture with chocolate. Melt the colored material in different containers, this can be done in a water bath or in a microwave. Fill the drawing with the desired marmalade colors. Put in the refrigerator for 3 hours. Also, the cake can be decorated with unmelted marmalade of various shapes. Flowers can be made from citrus slices and cubes. The surface of the cake for decoration with unmelted marmalade should be sticky, for example, butter cream, whipped cream.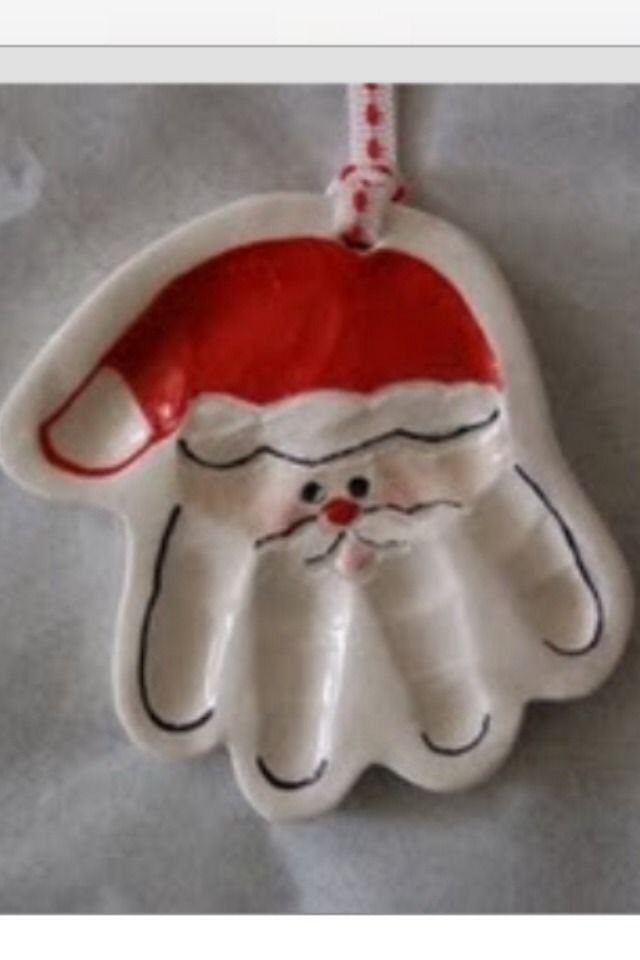
I recommend watching this video!
Making a delicious m&m cake with skittles and gummy bears
Watch this video on YouTube
I recommend a photo gallery of cakes decorated with marmalade!
Topping cakes
Topping is a universal decoration for any cake. There is a huge number of sprinkles: in the form of flowers, stars, balls, squares, circles, butterflies ... They have a very rich color scheme. You can find multi-colored, golden, silver, with pearlescent sprinkles. Toppings made from nuts, chocolate, coconut flakes, cookie crumbs and meringue are widespread.
Methods for decorating cakes with sprinkles
- Use sprinkles on sticky surfaces only. Sprinkle the cake when the icing, cream, cream is not frozen.
- If you want to create an aquarium effect, use jelly filling and sprinkles. Pour half of the jelly filling, freeze, sprinkle with sprinkles and pour over the remaining jelly.
Learn more