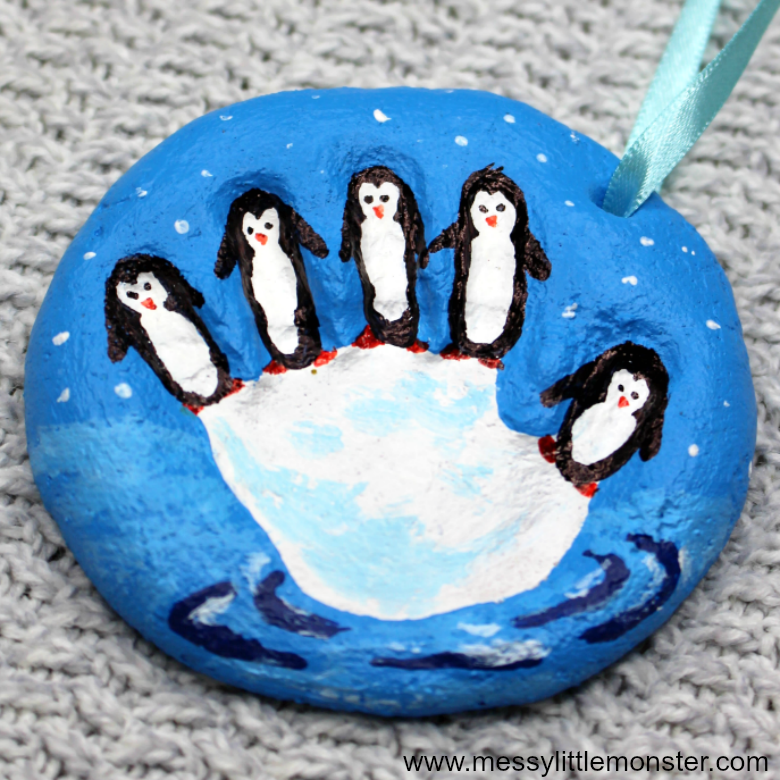
How to make handprint ornaments at home
Salt Dough Recipe - The Easiest Way to Make Salt Dough!
Kim146 Comments
All activities should be supervised by an adult. As an Amazon Associate, I earn from qualifying purchases. This post may contain affiliate links.
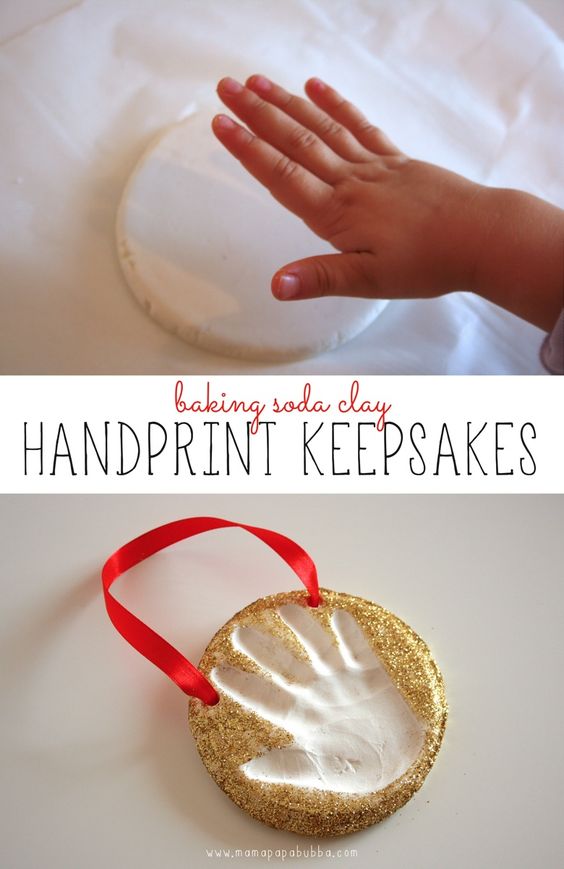
Learn how to make your own salt dough handprint ornament with this easy Salt Dough Recipe. You only need a few ingredients from your kitchen to make this salt dough! We cover all of our tips and tricks to make sure your salt dough ornaments will last for years!
RELATED: Salt Dough Ornament Recipe
Table of Contents
- Salt Dough Recipe – for Handprints & Ornaments
- Salt Dough Ingredients
- How to Make Salt Dough – an Easy Salt Dough Recipe!
- Why Is My Salt Dough Puffing Up?
- How Do I Seal Salt Dough Ornaments?
- What Kind of Paint Should I Use?
- How to Decorate Salt Dough Handprints
- How Many Ornaments Does this Make?
- Tips for Making Perfect Salt Dough
- Salt Dough Handprint & Ornament Recipe
- Get the Recipe
- More Salt Dough Ornament Ideas
Salt Dough Recipe – for Handprints & Ornaments
One of our favorite things to do with salt dough is to make handprint ornaments. But you can also use this same recipe and use cookie cutters and paint shapes instead!
For the handprint ornaments – you can make a new one every year and have a nice memento for the Christmas tree!
Don’t forget to add the year on the back of the salt dough ornament to keep track of the different years.
Salt Dough Ingredients
- 4 cups all purpose flour (Note: you want regular all purpose flour, not self-rising)
- 1 cup salt
- 1.5 cups warm water
How to Make Salt Dough – an Easy Salt Dough Recipe!
1. Combine all of your ingredients (flour, salt, warm water) and mix well until it starts to form a dough.
2. Take the dough out of the bowl and knead for at least 10 minutes.
If your dough is too dry, add a little bit more water in and continue to knead.
The dough should be smooth and roll out with not too many bumps. It should also be easy to press a handprint into it. If you’re finding it’s too hard or not smooth enough, continue to knead some more. If it’s still too dry, add a little bit more water (but not too much or it may get too wet).
Roll out the dough to between 1/4 to 1/2 inch thickness. If the dough is too thick it will take too long to dry.
Press the hand into the dough.
3. Use a circle shaped bowl to trace around your handprint.
Cut out the handprint with a knife (adults to do this part).
You can also print off a circle shape or heart shape to trace around with a knife (adults to do this part).
If you have a smaller handprint you can use a circle or large heart cookie cutter.
TIP: It’s easier to press the handprint first, and then trace around it. If you have dough left over you can roll it out again and do another handprint.
4. Using a straw, make a hole in the top of the ornament.
5. Let the ornaments air dry for a day.
If you have time, let the ornaments air dry for a day. This will cut down on the baking time required and help to prevent puffing. If you do not have time, you can bake right away instead.
Bake at 250 degrees Fahrenheit for 1-2 hours. Once the top of the ornaments look dry and solid, flip over and bake on the other side.
NOTE: It’s important that you check that your oven temperature is set to Fahrenheit. One of the most common reasons the ornaments burn and puff up is that the oven temperature is Celsius. If you have a Celsius setting then you’ll want to use the lowest oven temperature, closer to 120 degrees Celsius.
If your ornaments are still doughy, put them back in for another hour. It will depend on your thickness how long you need to bake for. The thinner ornaments will take less time but thicker may take more. If it’s taking too long in the oven, let them finish drying by air drying them for a few more days. Make sure to flip them over so the bottoms also get exposed to air.
6. Once your ornaments are fully dry you can paint them.
Paint the handprint and leave the remaining ornament plain. Or you can paint the whole ornament white and then paint the center handprint once the base coat has dried.
If you want to add glitter into the handprint, decorate the whole ornament with paint first, then fill the handprint with glue. Shake glitter onto the glue.
After the paint has dried, make sure to seal with with either mod podge or a clear glaze spray. Seal the ornaments after you paint them and the paint has fully dried.
7. Tie ribbon or twine through the hole for hanging on the Christmas tree.
Why Is My Salt Dough Puffing Up?
The number one reason salt dough is puffing is due to the oven temperature. If the temperature is too high the salt dough will puff up. It is better to let your ornaments air dry for a day and then bake them.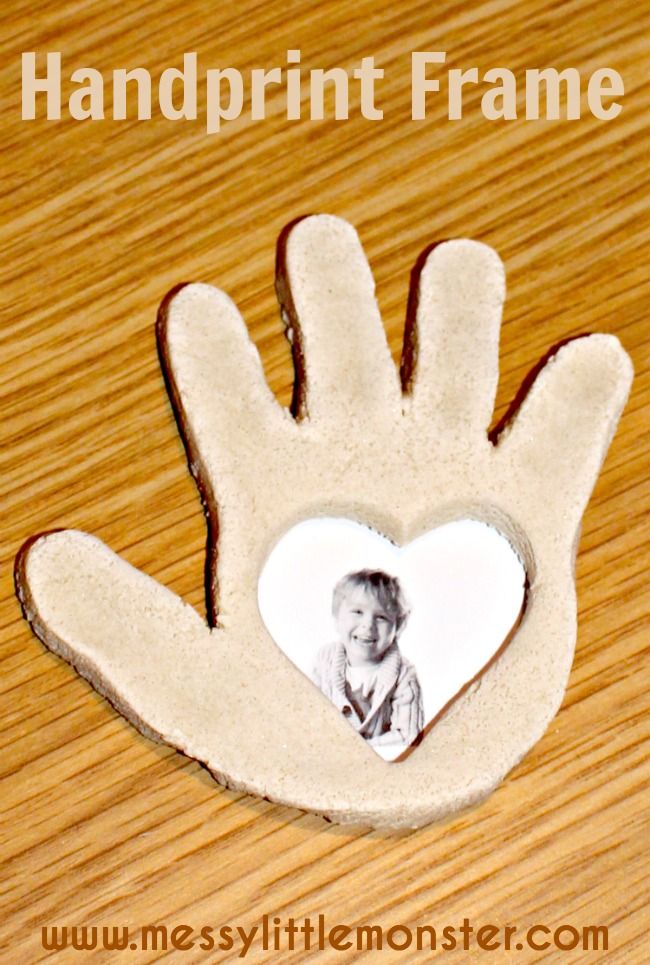 This will prevent the puffing. If you need to bake right away, bake at the lowest temperature (200-250 degrees Fahrenheit).
Note: Make sure to check your oven temperature is Fahrenheit and not Celsius.
You also want to make sure you are using regular, all purpose flour and not self-rising flour.
How Do I Seal Salt Dough Ornaments?
Once you are done, don’t forget to seal with either mod podge or a clear glaze spray. We like this spray for a durable finish. Adults should do the spraying and always follow directions of the product chosen.
Sealing the final ornaments will help stop them from cracking in a few years and prevent moisture from getting in.
What Kind of Paint Should I Use?
I like to use non-toxic acrylic paint for salt dough ornaments. The color will go on much thicker and more vibrant than kids paint. We like this brand of acrylic paint.
How to Decorate Salt Dough Handprints
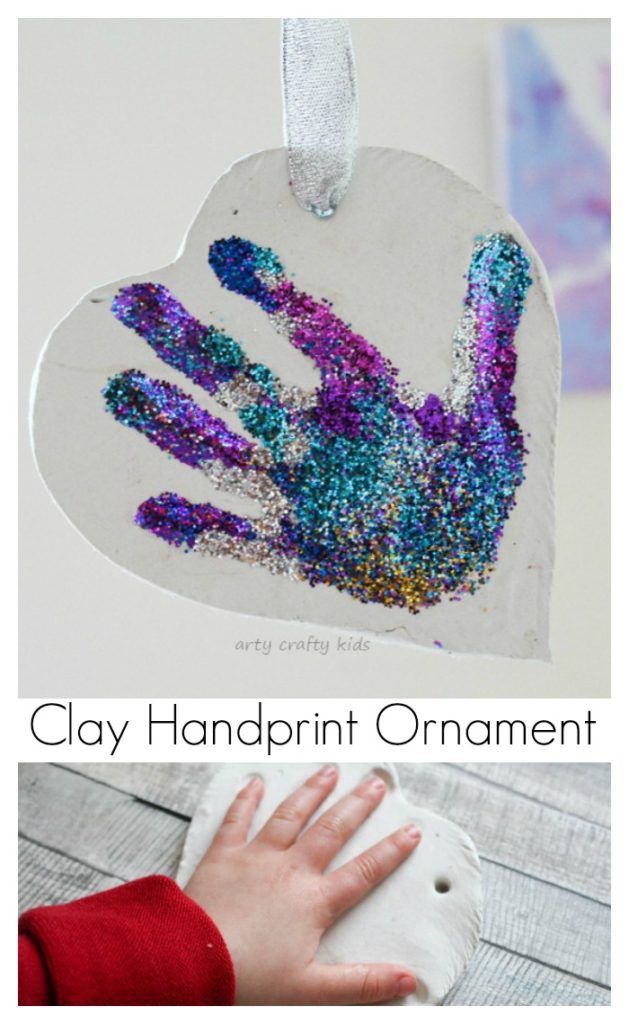
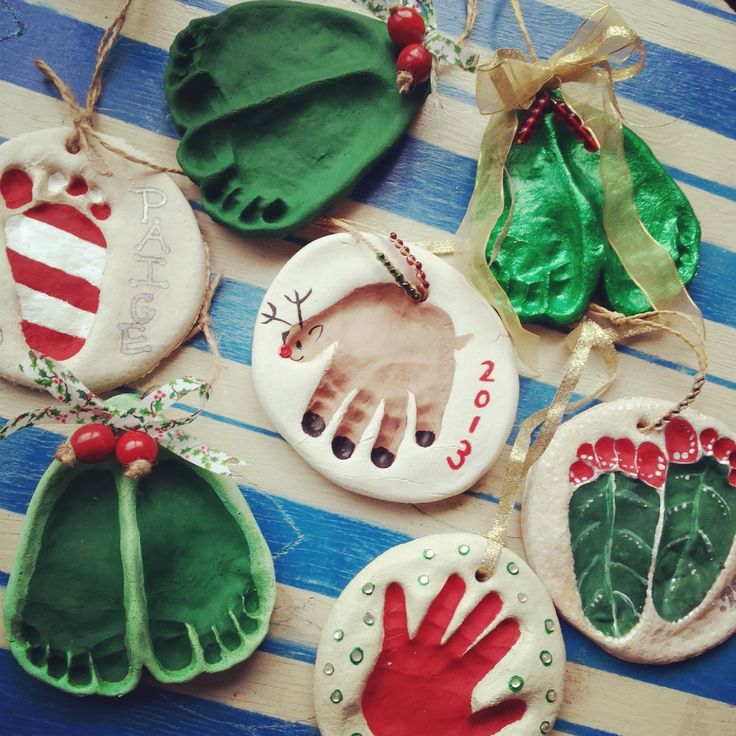
You can use a heart for the shape around the handprints or you can use a circle.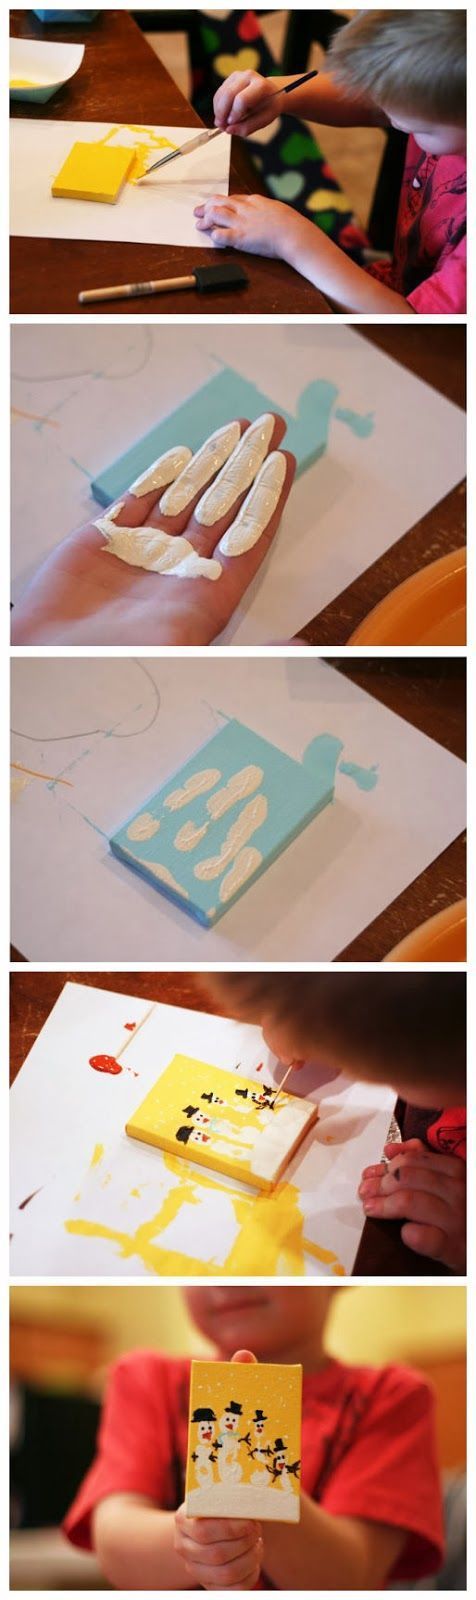
For this one, we used a large heart cookie cutter as the handprints were small (baby handprints):
If you have larger handprints, you can trace around a heart print-out or use a knife (adults only) to draw a heart shape around the handprint.
We painted this one with acrylic red paint but you could choose green or even silver or gold. Then you can leave the handprint portion of the salt dough ornament either natural or use glue and add glitter to it like we did.
How Many Ornaments Does this Make?
Depending on the handprint size and thickness of the salt dough – you can get approximately 8 handprints. If you’re using the dough to make small cookie cutter ornaments you’ll get approximately 15.
If you’re hoping to make this for a classroom or with a larger group of kids, I would recommend bringing an extra batch just in case. The quantity can vary depending on size of cookie cutters, handprints and thickness of the dough. I like to roll out the dough and continue to knead together the scraps to use as much as I can.
Tips for Making Perfect Salt Dough
- Knead well to make the dough smooth – I like to knead at least 10 minutes.
- Let the ornaments air dry for a day first, if possible. This cuts back on the oven baking time and helps to prevent puffing.
- Don’t forget to flip the ornaments when baking or air drying so that the bottoms will be exposed to air.
- Seal with our recommended sealers mentioned above so that the ornaments will last for many years.
- Store the ornaments in a cool, dry place and keep away from moisture. Sealing the ornaments also prevents moisture from getting in.
Prep Time15 mins
Active Time2 hrs
- ▢ 4 cups all purpose flour
- ▢ 1 cup salt
- ▢ 1.5 cups warm water
- ▢ Clear Glaze Finish or Mod Podge
Combine all of your ingredients and knead for 10 minutes.
 If your dough is too dry add a little bit more water in and continue to knead.
Roll out the dough to a thickness that you'd like your salt dough ornament to be. We like between 1/4 to 1/2 inch thickness.
Using a large cookie cutter, cut out different shapes for your salt dough ornaments. If making handprints, place the handprints first and then trace around them.
Have your child place their hand into the salt dough ornament. If the dough is too hard to get an imprint it may be too dry. Continue to knead until smooth. You can also add in a little bit more water.
Using a straw, make a hole in the top for where you want to hang your salt dough ornament.
If possible, let the ornaments air dry for a day.
Preheat your oven to 250 degrees Fahrenheit. Bake for 1-2 hours. If your ornaments are still doughy, put back in for another hour. (It will depend on your thickness how long you need to bake for. The thinner ornaments will take less time but thicker may take more).
If you encounter too much puffing, roll out thinner ornaments and this will help reduce the puffing. If the ornament is still a bit doughy, bake for longer or let sit out a few days to harden before decorating. The thickness of the dough will determine how long you have to bake them for. We prefer to bake them at 250 degrees Fahreneheit for longer and let them air dry for a few days to prevent puffing.
Once cool, you can decorate by painting with non-toxic acrylic paint.
Spray with a clear glaze finish or finish with mod podge. Do this before adding the glitter.
To make the hand glittery, fill the handprint with glue then sprinkle glitter on top of the glue, shake off the excess and let it dry.
Kids will love helping to make this salt dough recipe. They will also have fun decorating the salt dough ornaments by painting them.
Finally, just a friendly reminder to keep these out of reach of pets (they can be toxic to dogs due to the salt content).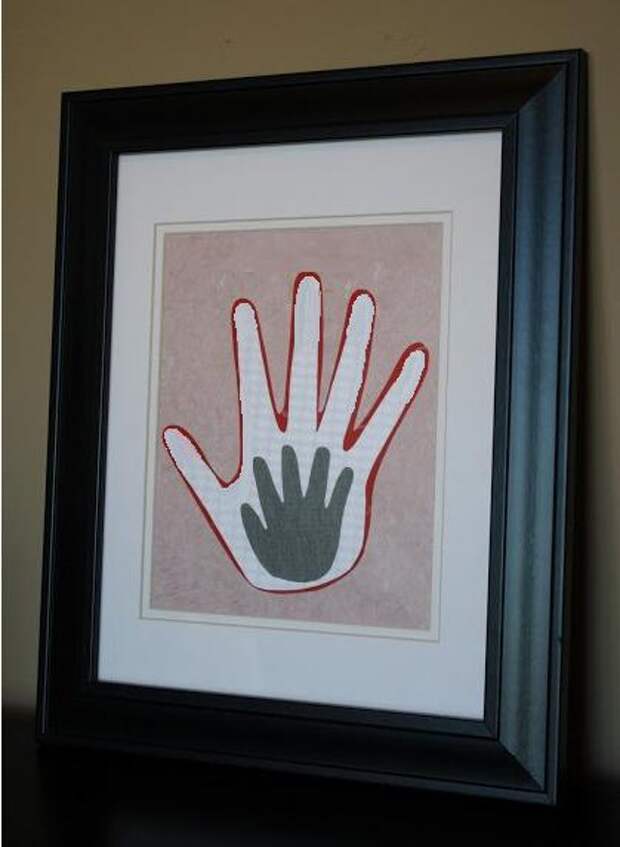
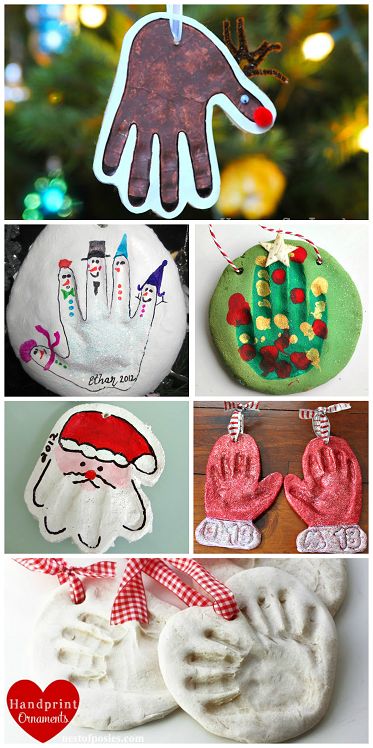
More Salt Dough Ornament Ideas
See over 25+ of the best Salt Dough Ornaments here for more great ideas!
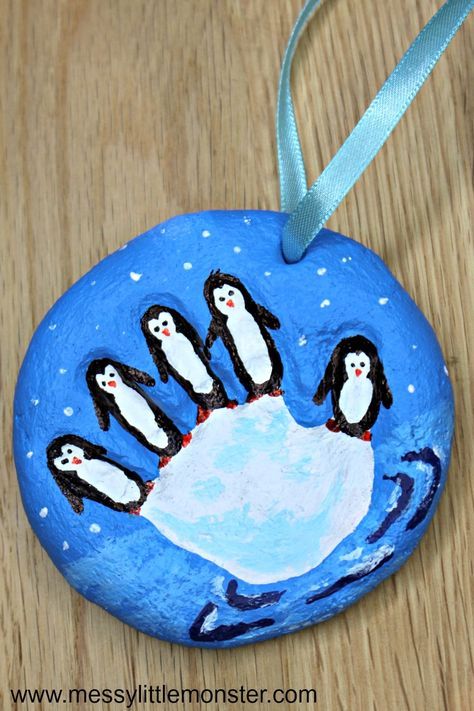
These salt dough glitter ornaments are so fun to make – and you can make these for any season or holiday too!
DIY SALT DOUGH HANDPRINT ORNAMENT
Making DIY gifts is a lot of fun. Salt Dough Crafts are popular and this salt dough handprint is such a fun project to make and also to give as a gift.
You will find a “how-to” video at the bottom of this post.
DIY SALT DOUGH HANDPRINT ORNAMENTThis page may contain affiliate links for your shopping convenience. The links help support the blog as we may earn a small commission at no extra cost to you, our readers.
If you like salt dough crafts, these adorable thumbprint salt dough magnets are quick and easy to make. This DIY photo lamp using your own family pictures is also a unique gift idea you can make at home.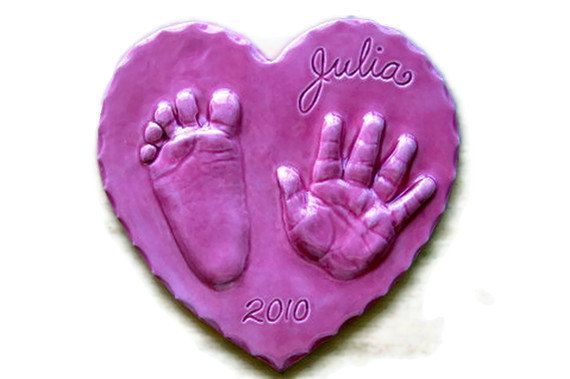
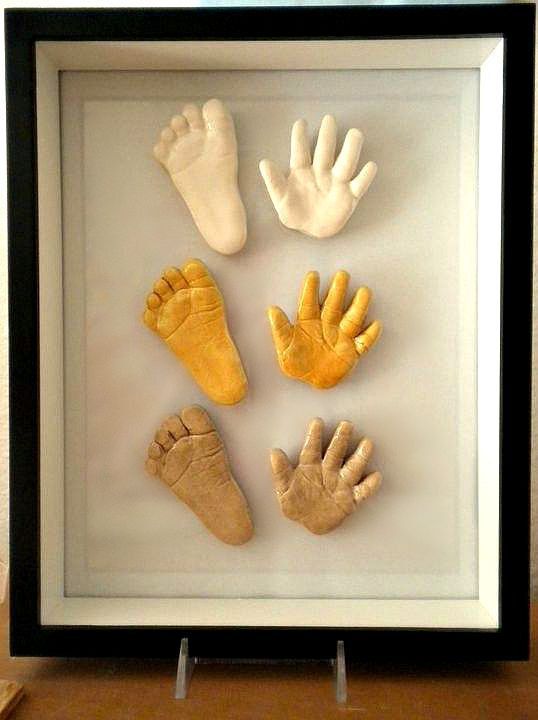
DIY Salt Dough is something that has been around for ages! I remember making a salt dough handprint ornament when I was little around Christmas time. I thought it would be cute to do all of my boy’s handprints and hang them on the wall.
Salt Dough keepsakes are a very inexpensive craft, made with items from around the house. If you’re wanting to send a handprint kit as a gift, I found an affordable one here: baby’s handprint ornament kit.
I also found this one: marshmallow clay handprint kit. I think marshmallow clay would be super fun to make at home!
SALT DOUGH RECIPEPRINTABLE RECIPE AT END OF POST
- 1 cup flour
- 1 cup salt
- 1/2 cup water
- Bowls (one for mixing, another for cutting out your circle)
- Spoon
INSTRUCTIONS:
- Mix the salt and flour in a large bowl
- Make a well in the salt/flour mixture and add the water
- Knead until smooth and shape into a ball
If you want to color your salt dough, simply mix in a few drops of food coloring while you are kneading it.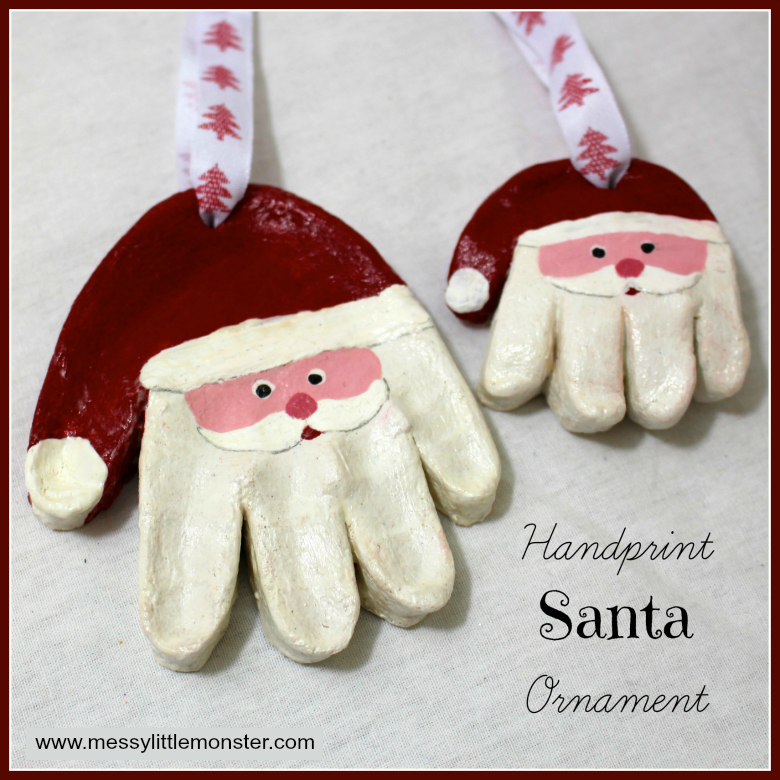
You can let your salt dough handprints air dry, but they can also be dried in the oven. Bake at 200 F until dry. The amount of time on the size and thickness of your masterpiece.
Thin flat ornaments may only take 45-60 minutes, but thicker ones like the ones I did can take 2-3 hours or more.
Make sure you store any leftover dough in an airtight container or it will get all dry and crumbly.
I can’t wait to have the salt dough handprint hanging on the wall, it’s going to be a great addition to our home décor and one that I can treasure as my children grow.
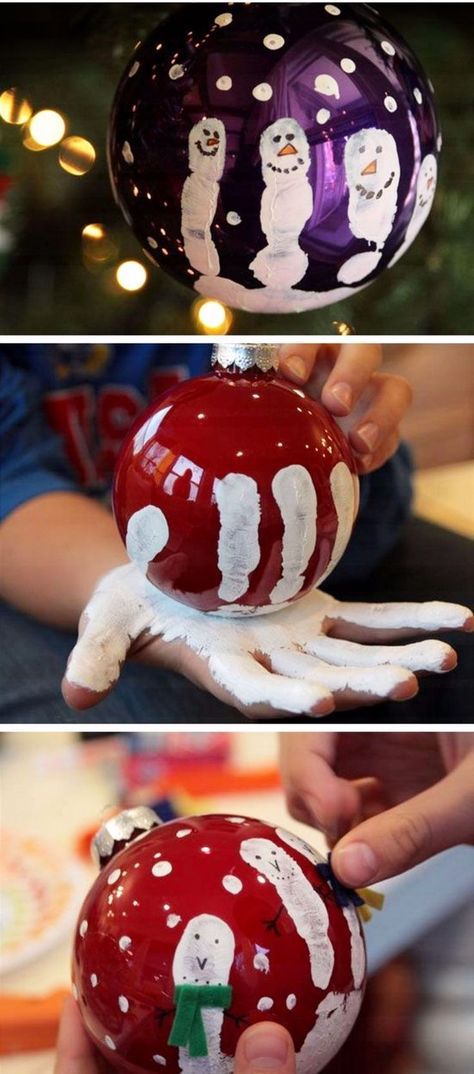
There are many other ornaments you can make with kids, to give as gifts at Christmas or anytime, really. I like buying the DIY ornaments (plastic if you have little ones!) and filling them with glitter. There are tons of things you can do with them, though.
Ingredients
- 1 cup flour
- 1 cup salt
- 1/2 cup water
- Bowls (one for mixing, another for cutting out your circle)
- Spoon
Instructions
Mix the salt and flour in a large bowl.
Make a well in the salt/flour mixture and add the water.
Knead until smooth and shape into a ball.
If you want to color your salt dough, simply mix in a few drops of food coloring while you are kneading it.
You can let your salt dough handprints air dry, but they can also be dried in the oven. Bake at 200 F until dry. The amount of time on the size and thickness of your masterpiece.
Thin flat ornaments may only take 45-60 minutes, but thicker ones like the ones I did can take 2-3 hours or more.
Make sure you store any leftover dough in an airtight container or it will get all dry and crumbly.
If you enjoyed this post be sure to check out our boards on Pinterest.
Love salt dough projects? Get more inspiration from these books:
Let’s Get Crafty With Salt Dough
Salt Dough Crafts for Kids (FREE ebook)
You’ll love this FAIRY GARDEN with SALT DOUGH FAIRY GARDEN ACCESSORIES.
You may also like this after school routine clock.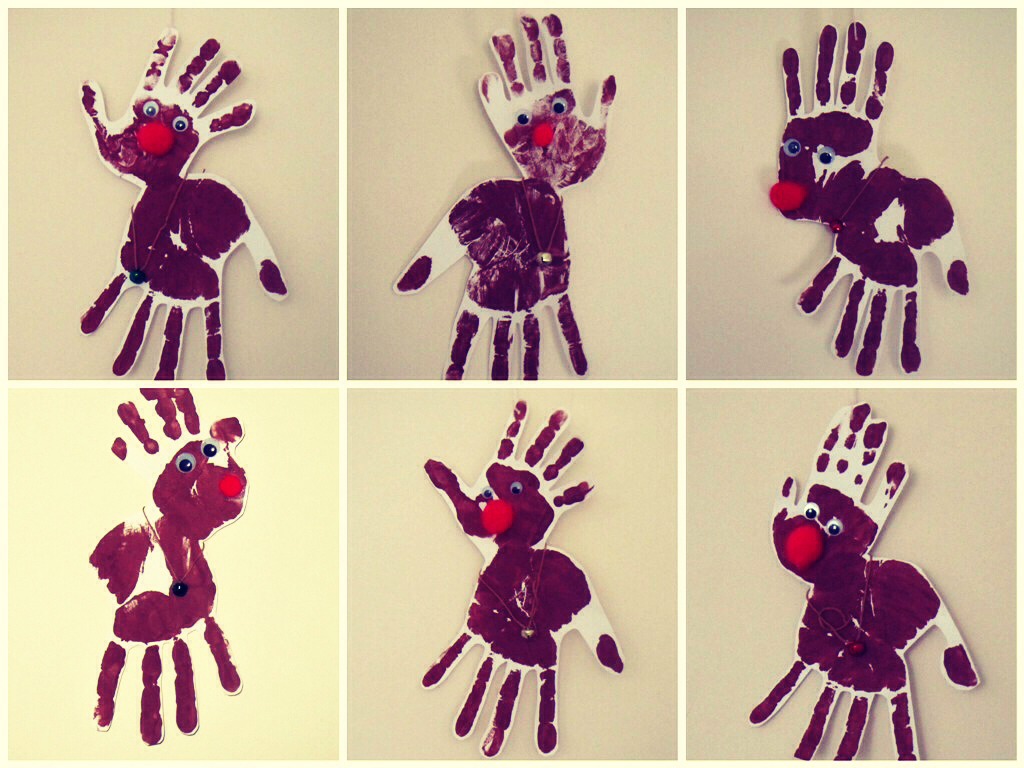
You can sign-up to get an email update each day. You can also connect with us on:
- Google+
- Blog Lovin’
Post submitted to Mommy Moment by Jennifer H.
This post is linked up to I Gotta Create, Tutorials Tips and Tidbits, The Style Sisters, Tidy Mom, Craftberry Bush, Growing Home, Sew Creative
How to make a decoration with your own hands. Types and methods.
Homemade jewelry brings bright colors to our lives and supports a special fashion for handmade - it is always popular. It can be jewelry made of beads, glass, ceramics or metals. With the development of ways to work with various materials, more complex artistic techniques were discovered - for example, electroforming. In the article, we will consider the types of original jewelry that you can make with your own hands from improvised materials - from simple products to complex ones.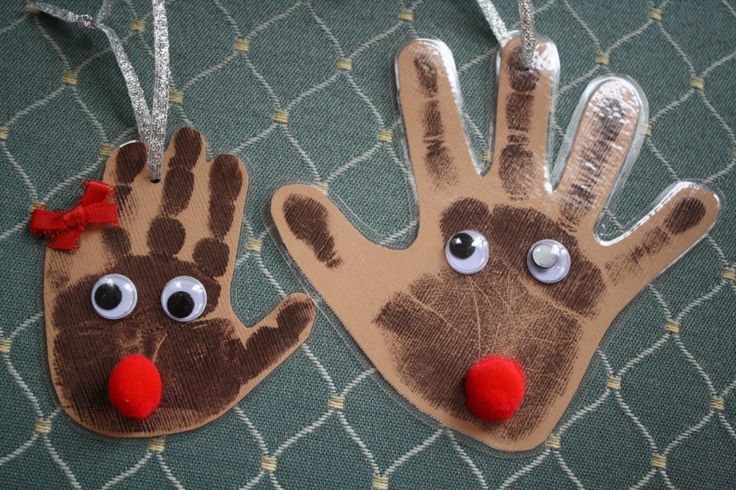
Beaded jewelry
Beads and beads are an inexpensive and obedient material even in the hands of a novice craftsman. They make not only simple baubles, but also exclusive bracelets, earrings, necklaces, beads and necklaces. Special knowledge about beading is not required to create such jewelry, but tools are needed:
- beading needle and metal scissors - for cutting metalized thread, fishing line or wire;
- forceps or tweezers to pull the needle if it does not pass through the hole freely;
- a nail file to file sharp or protruding corners of the material used;
- wire cutters and round-nose pliers for clamping accessories - pins, fasteners, locks;
- silicone or felt mat.
Now on the market for products for creativity, you can find glass, plastic, ceramic and metal beads. Beads, stones made from natural minerals, imitation pearls and rhinestones are not considered beads, but they are often used as a decorative element - especially in designer jewelry.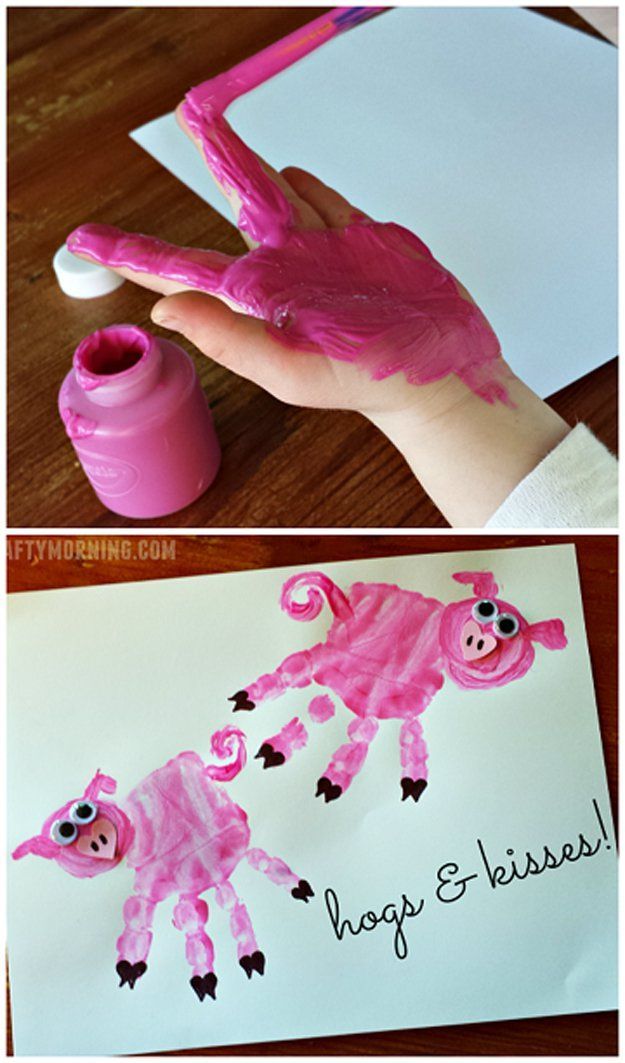
Eyeglass chain. Author Alina Valdman @lina_bijouofficial
The shape of the beads is:
- round - a classic, slightly flattened beads with a hole for stringing;
- glass beads look like elongated tubes of different lengths;
- felling - short tubes resembling glass beads;
- drops - droplets with holes at the top;
- charlotte - beads with one cut edge;
- curly beads - cylindrical, cubic, in the form of stars, hearts and other shapes.
There are many weaving techniques - looped, mosaic, parallel, crosses and others. To make a beaded jewelry with their own hands, beginners first master the threading, when the beads are successively strung on a beaded thread, and then the almost finished product is connected with fittings. Over time, lowering is combined with other techniques, resulting in jewelry made according to a more complex pattern.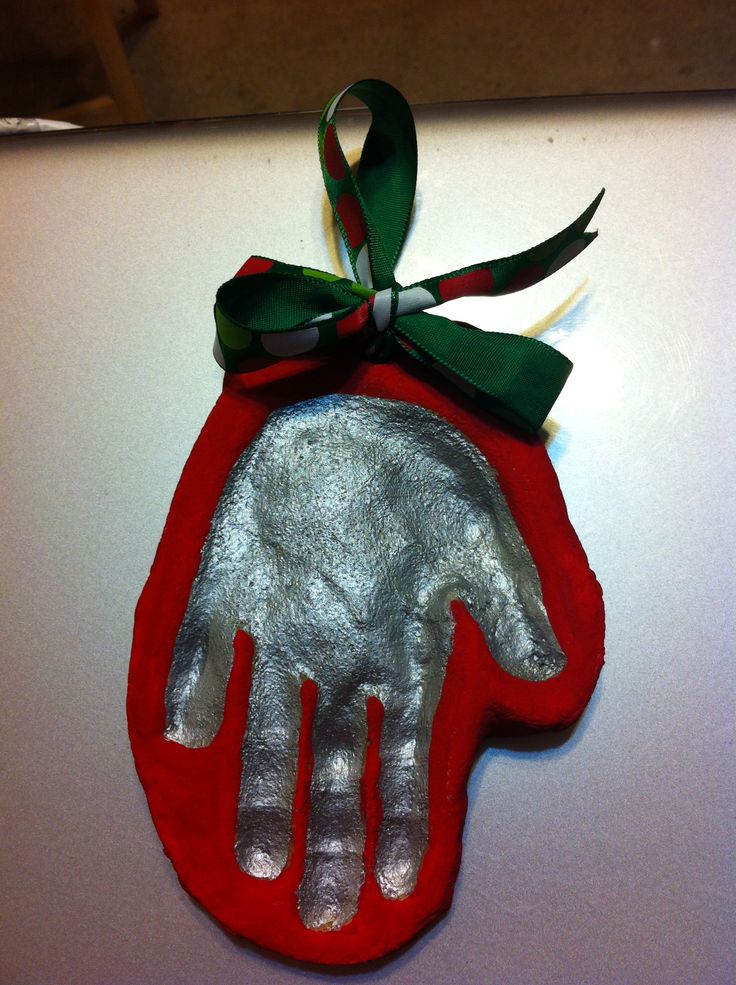
Although beaded and beaded jewelry is made from synthetic or reinforced materials, things can fall off or break over time.
Glass jewelry
Even the ancient Egyptian craftsmen used glass as a decor, which has a unique brilliance, colorfulness and special malleability during processing. Then it was glass inserts in gold or metal objects, as well as multi-colored mosaics. Over time, glasswork became a separate craft.
Now a stained-glass window made of colored glass is not only an unusual composition, but also an element of sophistication and grace in an apartment, office or on the street. Fusing is one of the most popular types of stained glass art that can be practiced at home and create exclusive glass decorations.
Fusing is translated from English as "sintering, fusion" - small colored pieces of glass are laid out on a base glass and sintered together in a furnace. The picture turns out to be seamless, with slightly blurred borders, unlike a stained-glass window - it has clear borders of glass pieces.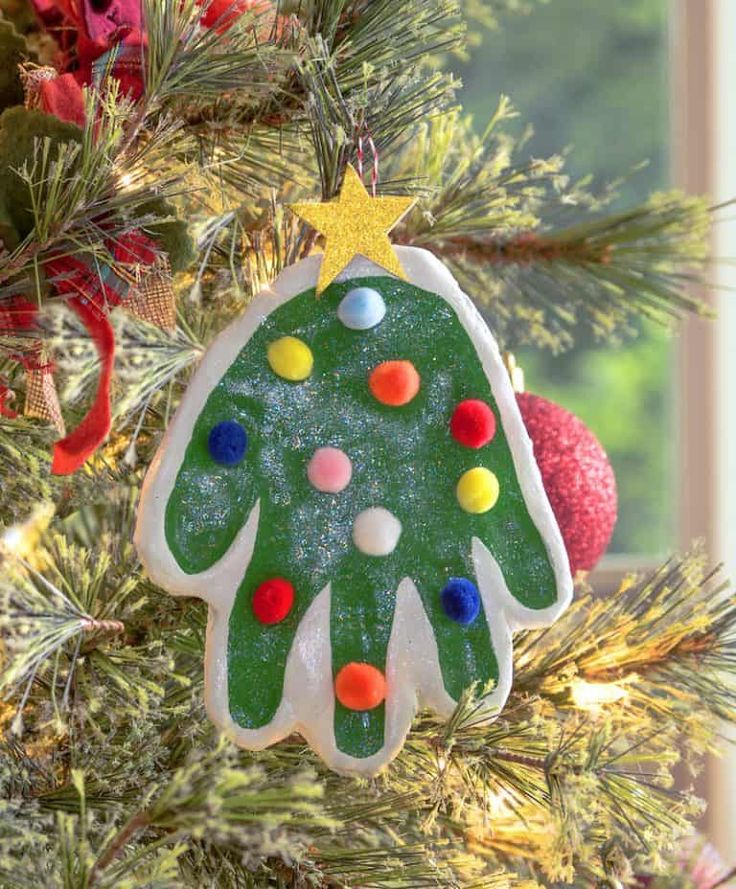 When creating jewelry using this method, hooks, chains, fasteners or locks are additionally baked into the product.
Designer jewelry made of glass by a graduate of the Art Stained Glass course. Techniques used: fusing (cabochons), Tiffany (copper tape, solder). Glass Workshop Vitrage Garage .
Glass Fusing Basic Kit
Sintering takes place in a special fusing oven: it is small, connected to a regular 220 V network and heats the product evenly, without cracking. A similar and more compact type of equipment is a special cylindrical shape for a microwave oven. It is heat-resistant, safe and, thanks to a special wall coating, bakes glass faster than an oven. Suitable for beginners and those who want to create glass jewelry at home.
You will also need:
- glass cutter;
- Sander;
- glass break pliers and round nose pliers;
- molds for blanks;
- shelves and coasters, if you bake in the oven, and not in the form;
- asbestos or leather gloves, goggles and preferably a fire extinguisher.
In the fusing technique, not just any, but special stained glass is used - it is bright, shiny, does not crack, but if it is accidentally dropped, it will break. The master, especially a beginner, must understand that it is always necessary to lay the material for probes, since in the working process the glass may spread incorrectly or lose its color and saturation. In addition, it is necessary to choose the right material and use tools.
All the subtleties of fusing are taught at the Russian Academy of Crafts. There is a lot of practice in our course "Stained Glass Artist" - from the choice of glass and the development of sketches and stencils to the creation of three-dimensional products, not only in the fusing technique, but also in tiffany, bending - that is, baking on a mold, matting, glass engraving, classic stained glass. There are daytime, evening and weekend groups, as well as a distance course for those who do not live in Moscow or the Moscow region.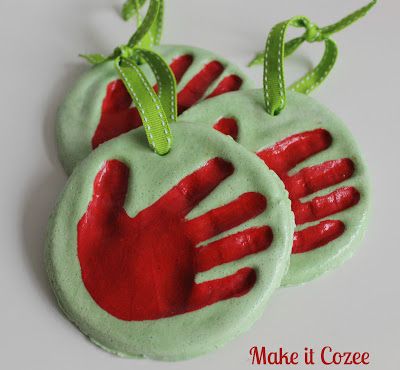 You can come up with a completely new style of glass jewelry and learn how to make it yourself in a course led by our teachers.
Ceramic jewelry
Ceramics is clay that has been fired in a kiln. The history of its use goes back to ancient times: for the first time, a person received clay from natural raw materials about 30,000 years ago. But even in the 21st century, ceramic products retain their relevance, uniqueness and, most importantly, environmental friendliness and durability. Crockery, interior decor or ceramic jewelry - the master can create any item, because this material has no boundaries for creativity.
Initially, clay is soft and pliable, but after heat treatment, hard, refractory and high-strength products are obtained from it. Clay comes in different colors: red, yellow, green, black, etc.
When creating ceramic items, including ceramic jewelry, products must be covered with glaze to decorate clay. It is she who gives the characteristic shine, smoothness and provides water resistance. Glazes are:
- transparent - fluxes and opaque - enamels;
- matte, glossy, intermediate;
- colorless and colored;
- fusible and refractory.
There are many ways to apply glaze to a workpiece - dipping, watering, spraying, brushing or sponges of different textures. Often in glazing these methods are combined, obtaining the original surface of the finished product. It can be rough, matte or glossy, grainy, with fancy smudges and more.
Sometimes the item is gilded using liquid or powdered gold. In addition to the material itself, gilding requires a fume hood and other special equipment - this is an expensive way of coating ceramics, which is used to make premium single jewelry or dishes.
Simplistically, the scheme for creating a pendant in the plastic molding technique is as follows:
- A small piece of clay is carefully crumpled in the hands, and then rolled out on a flat board into a layer of 3-5 mm.
- The pendant template (it can be a heart, a cat, a star or any figure) is placed on the layer and cut out with a knife along the contour.
- The resulting workpiece is smoothed out with uneven edges and, if necessary, decorated with a knife, brush or other tools. There is also a hole for the rope.
- Let dry. A poorly dried workpiece can be torn during firing, so it usually “rests” for 3-4 days.
- After drying, the suspension is hard, but still brittle. It is sanded, wiped with a slightly damp sponge so as not to wet the workpiece too much, and covered with colored glaze.
- The next day you can burn. Firing is carried out in accordance with the temperature regime, which is indicated on the packaging of clay and glaze.
- After firing, the jewelry will become bright, hard and ready to wear.
You can make ceramic jewelry with your own hands at home and take it to the workshop for firing - it's inexpensive.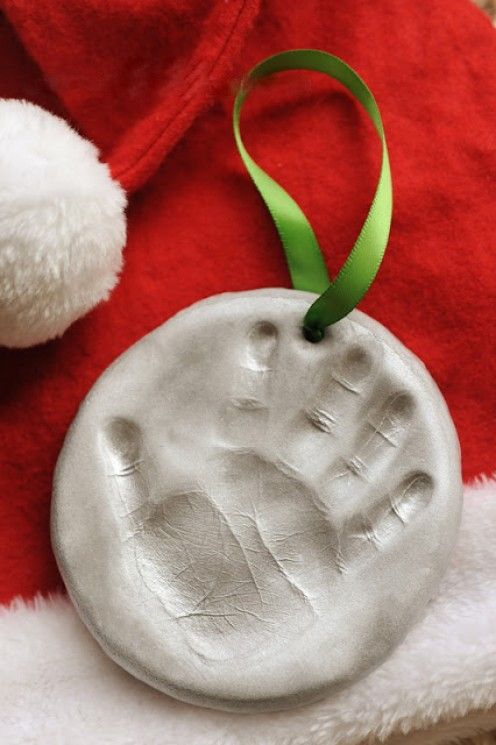 It should be remembered that clay and glaze behave differently during heat treatment and the wrong firing temperature of one or another component will completely ruin the product.
Experienced ceramists recommend that beginners learn how to work with materials under the guidance of a teacher in order to avoid mistakes in the future. In the Artistic Ceramics course, students learn the basic methods of working with clay and, immediately after graduation, can work with ceramics on their own. Graduates are issued a certificate of the profession "Manufacturer of artistic ceramics" with the assignment of 2-3 categories.
Ceramic earrings with traditional Russian pattern. city of Kostroma. Author unknown.
Electroplated jewelry
Few people know the difference between the terms "electroplating" and "electroplating". On the Internet you can find the use of these words in a variety of meanings. We consulted an expert, jeweler Lyudmila Surikova, and she explained the difference:
Electroplating is a method of metal deposition on the surface of a non-metal model under the influence of an electric current.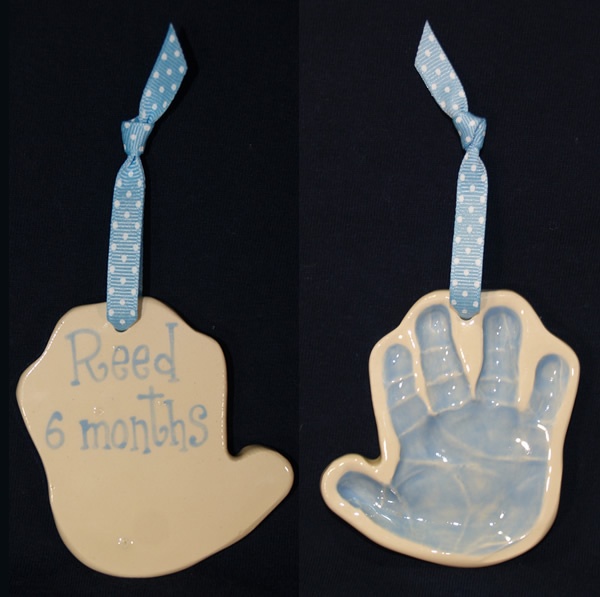 Natural elements are often used as blanks - flowers, leaves, beetles, butterflies - and as a result, exclusive jewelry, souvenirs or small sculptures are obtained. In 1837, this technique was discovered by the chemist B.S. Jacobi - he was the first to create a copper-zinc galvanic device and received a galvanoplastic copy of an engraving board with a double-headed eagle.
Electroplating - coating, deposition of metal on metal, most often precious on non-precious.
Consider the process of creating an oak leaf decoration in a simplified form:
- They take an ordinary oak leaf and cover it with a conductive powder - for example, graphite.
- Immerse in a container with electrolyte. For this, copper is most often used, that is, the workpiece is “coppered”. When the metal is deposited, a copper oak leaf is obtained.
- It is at this stage that electroplating begins - the product is silvered or gilded. The combination of electroplating and electroplating methods allows not only to obtain exclusive and expensive jewelry, but also creates a protective layer of precious metals on them.
 Unlike ferrous and non-ferrous metals, gold and silver do not rust - items processed in this way are durable. Sometimes the copper billet is coated with rhodium, a hard silver-gray metal from the platinum group. Resistant to corrosion, does not tarnish over time - its surface oxidizes only at very high temperatures or with aggressive chemical exposure.
Author's hairpin "Feather" by a graduate of the electroplating course Elena Kochetkova
Electroplating at home is feasible, but it must be carried out in a ventilated room with powerful ventilation - this is a prerequisite. What you need:
- Protective equipment - gloves, goggles and a respirator, as you need to work with chemicals and electrolytes.
- Glass container - preferably a high-quality aquarium. It acts as an analogue of a galvanic bath. Moreover, the container must completely cover the product immersed in the solution.
- Battery voltage 6-12 V.
- Copper wires 0.8-1 mm thick and a copper conductor connected to the battery.
- Heater and cooler to maintain certain temperatures. A boiler can be used to heat the solution, and a soft hose can be used to cool it, which is lowered into a container and connected to a tap with running water.
- An alcohol thermometer in the temperature range of 18-25 ° C is more accurate than an electric one.
- A circulator or aerator, since the solution must be constantly stirred during electrolysis. You can take the usual equipment for the aquarium.
- Special dishes - flasks, cups, bottles.
- Measuring equipment - scales with a measurement accuracy of up to one gram, a voltmeter, an ammeter and a hydrometer.
Electroplating has its own characteristics, where from magic to failure is one step. In the short-term course "Galvanoplasty" they provide a knowledge base and skills from safety precautions to post-processing of the product - engraving and varnishing. At the exit, each listener receives two pieces of jewelry made by himself. The course is suitable for beginners and those who want to create electroplated jewelry at home in the future.
Metal jewelry
Scientists believe that the jewelers of Ancient Egypt laid the foundation for modern jewelry. Jewelry was made from many materials - gold, bronze, emeralds, lapis lazuli and amethyst. But most of all, the masters loved to work with gold - a symbol of wealth, status and power. Also, gold jewelry was endowed with magical and even mystical properties and accompanied the pharaohs and nobles not only in worldly life, but also in the afterlife - this is evidenced by numerous archaeological finds made in the tombs. In addition, gold and precious metals were currencies in the ancient and ancient world.
Now it is a fashion accessory, a way of self-expression and fantasy. And in our time, anyone can make a piece of jewelry. The processes of making and processing metal can change, but schematically the main stages look like this:
- On paper, 2-3 sketches of the future jewelry are drawn by hand, which differ in details, inserts and clasps (if they are making a brooch, earrings, necklace or chain).
 All sketches are analyzed and the best option in terms of functionality and design is selected.
 - The selected sketch is transferred to a graphics program, creating a 3D model. If necessary, adjustments may be made. This stage is sometimes skipped and guided by sketches.
- Based on a 3D model or sketches, an exact copy of the jewelry is molded from wax or a special polymer in a flask, and then sent to the oven. The flask is an iron cylinder with liquid gypsum inside, which is designed for casting jewelry. At high temperatures, the gypsum hardens and the wax or polymer flows out of the holes. The master receives a finished casting mold with voids in the form of a future decoration.
- Further, gold, silver or platinum is poured into the cavity, and these precious metals are not used in their pure form - they are mixed with zinc, copper or nickel - that is, a ligature. At the same time, the percentage of heavy non-ferrous metals is negligible, but they significantly affect the properties of the entire alloy, giving it hardness, ductility and color.
 For educational purposes, instead of gold, brass is used, which repeats the physical and chemical properties of gold 585. After pouring, the mold is allowed to cool, and then it is opened and the product is removed.
 - At the final stage, the jewelry is ground and polished with special abrasives. The surface of the metal becomes smooth and shiny.
- If precious stones are provided in the jewelry with your own hands, a setting is made. Stones are chosen in advance so that they are in harmony with the product and fit in size. The master installs them into the grooves and performs a corner bartack or fixes them into casts. This is a very responsible and complex process that requires attention and good knowledge in gemology - the science of natural and artificial stones. After fastening, the decoration is ready.
Silver earrings with garnets. Final qualifying work from the course "Jewellery"
Without experience, one can easily make mistakes in jewelry art and do something wrong, because the metals, alloys, stones, enamels and other materials used are vulnerable and capricious. Therefore, it is better for beginners to take the basic Jeweler course, where teachers will teach you how to work with tools correctly and safely, design, and also perform basic operations for making jewelry. There is also a distance course "Jeweler Online". After training and defending a diploma, students are assigned a category that allows them to conduct individual labor activities and make jewelry not only their hobby, but also the main source of income.
Output
Homemade jewelry can be made from beads, stained glass, ceramics, precious metals, or you can master the electroforming method. When working with these materials, there are no limits for your creativity and imagination. You can learn on your own from videos from the Internet or get a basic education in any of the areas, reducing the time to enter the profession. The courses of the Russian Academy of Crafts have been effective and in demand for 12 years already - our graduates sell their author's products on marketplaces, online platforms and craft fairs.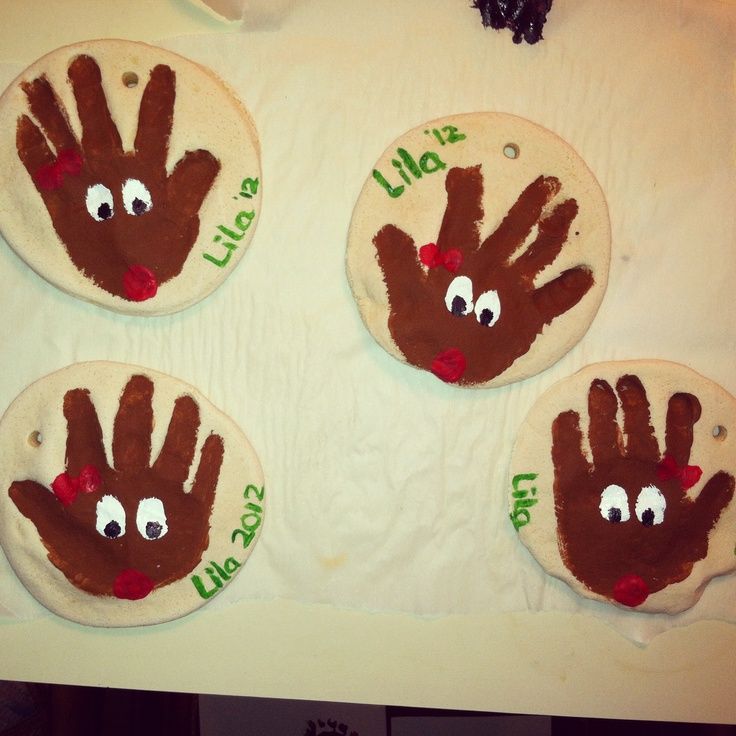
Julia Zakharova, for the Russian Academy of Crafts.
On the cover of the article, a photo of earrings of the author's work is used. Glass Workshop Vitrage Garage .
ideas for a cozy interior - INMYROOM
You just moved into a new house and the interior seems to you not cozy enough, and you don’t have money for quality repairs. Do you know how decorate the room? Designers believe that a cozy house is the one that smartly and beautifully designed. No matter how the room would be furnished, its empty walls can ruin the whole interior. Also, the design will appear unfinished. Therefore, a good solution would be to try to decorate it. Not at all necessary use the services of specialists, but it is better to try to do it on one's own.
Wall painting
Wall painting is considered one of the most beautiful ways to decorate a room, so it is not surprising that even in the old days, masters covered the walls with unique frescoes.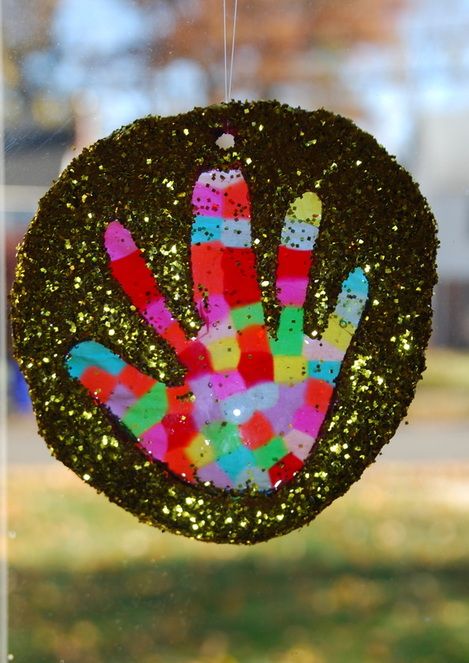 Also, by painting the walls, you can achieve an increase or decrease in space. Unlike those distant times, the painting technology in our time has not only remained the same, but has become even simpler. This is due to the fact that today only modern types of paints and materials are used to decorate walls.
Before starting wall painting, you need to carefully consider what exactly should be depicted on them, and make sure that the pattern is harmonious with the overall design of the room. Cosiness and harmony in the children's room will help to create large solid elements that should be very bright. While the living room is better suited large The drawing is only on one wall.
The next step is primer, putty walls, that is, preparation for the painting itself. Only after After that, you can start decorating the walls with drawings. Draw right away paints on the wall is better if you have artistic skills and you are sure you will do well. Otherwise, you can download lots of stencils from the internet.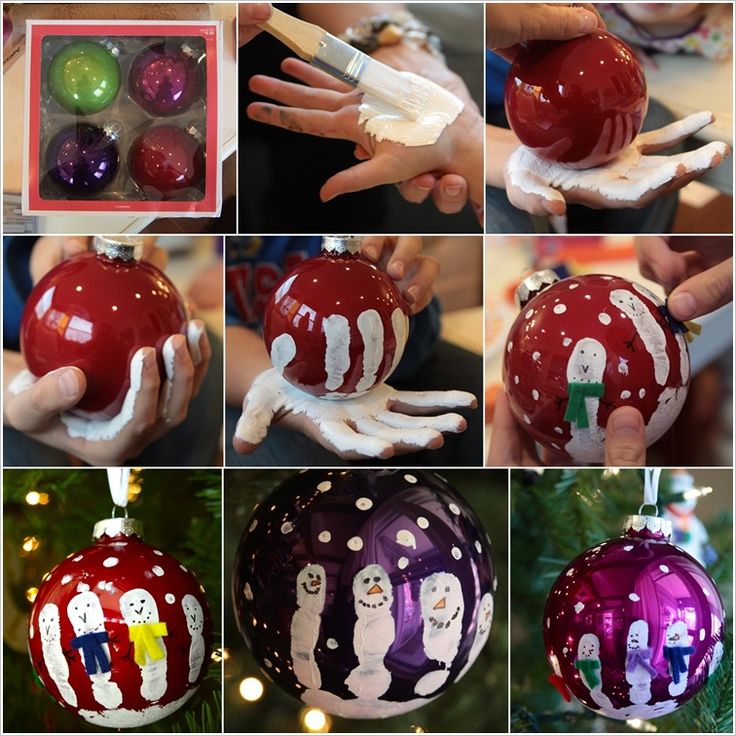 Their use is first, the stencil is applied to the wall, then circle it with a pencil or paints and only then the outline of the stencil begins.
Photographs, paintings, mirrors, clocks
Another way to beautifully decorate a room to create coziness is through photographs, paintings, mirrors and clocks. Previously, you could see black and white family photos on the walls, because they look very hospitable and cozy. To achieve complete harmony, you need to combine different photos, experiment with their sizes and the color scheme of the frames, because pictures that are the same in size look completely inharmonious, boring and unattractive in one row.
There are many options for the location of photos and paintings, depending on their size. Can be around one large picture to arrange many small ones. Also on the wall hang just one, but a large picture. It all depends on imagination and desires of the owner of the house. Moreover, when choosing a design, it is worth considering the atmosphere. the room they will be in. For example, the bedroom will be beautiful look romantic photos, common ones are more suitable for the living room family, and for children - cheerful, cheerful photos. Also, as room decorations should use panels, but it is worth remembering that they are better hang at eye level.
Mirror also considered a good option for decorating a room. The effect of warmth and comfort in the room is created provided that the mirror is hung so that it reflects photographs, paintings or panel. For mirrors, you should choose an interesting frame or make it independently, for example, using wooden clothespins, acrylic paints and varnish.
How to decorate a house with appliqués
The easiest, simplest and most original way to decorate a wall in a room is a pattern on the walls made from the remnants of wallpaper and stickers, that is, an appliqué. Using this method, you can create any pattern and pattern, as well as beautiful inscriptions by drawing them on a computer and carefully sticking them on the wall.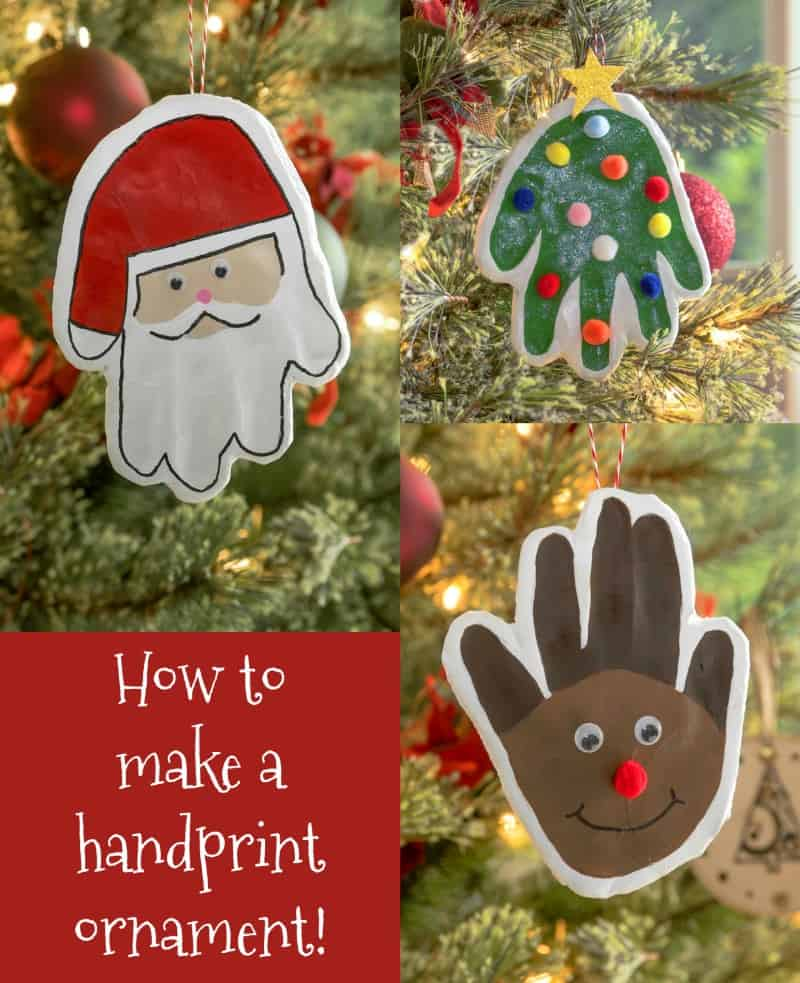 But it is worth remembering that bright applications are suitable for children's rooms, and in other rooms you can use pastel colors. If you do not pick up contrasting wallpapers for the application, then the pattern may not be noticeable enough. Using this type of wall decoration, you can not only slightly change the look of the room, but also radically transform the interior of the room.
Embroidery, textiles, pillows
Another way to decorate a room with your own hands is embroidery. If you love and know how to embroider, then this will be very easy to do. With the help of embroidery, you can enliven the interior of the room and make it more harmonious, giving completeness. The location of the embroidered paintings depends only on the individual taste and desires of the owner of the house.
The easiest way how to decorate a room - these are sofa cushions. They can also be used for contrast, and to complement the color scheme of the room. Color, fabric, cushion pattern depends on the desired effect and the interior of the room. For the best result it is advisable to experiment, but, of course, do not forget about the style of your rooms.
Paper decoration ideas
Not only pillows or paintings can decorate a room. There is an affordable and easy way: use paper. What options?
- Home decoration with gift paper. Cut wrapping pieces and place them in frames or use a roll by sticking a long strip on the wall.
- Bulky paper decorations. This type of creativity even has its own name - paper plastic. Flowers, butterflies, spirals are cut out of thick paper, bending the edges as needed. Romantic application is ready.
- Tissue paper pompoms (silence). Ten sheets are superimposed on each other, bending with an "accordion". In the middle, the workpiece is tied with a cord or fishing line. The edges are carefully unfolded, and an original decor is obtained: the pompom can be hung from the ceiling or on the wall.
- Origami. Colored or crisp white, these Japanese appliqués will decorate the walls of a living room or children's room.
Paper home decoration is an easy way to change up your interior. It will also serve as an excellent temporary solution, hiding a stain or dent on the wall, imperfection of the furniture.
Curtains for home decoration
Curtains play an important role in the interior of a room. Their change often drastically changes the look of the room. Now there is a huge selection of curtains for every taste, because their choice will not be a big problem, but will significantly help in changing the interior. When choosing curtains, it is worth remembering that they should be several tones brighter than the walls of the room. Also, do not forget about the retainers for curtains, which should fit the overall interior of the room.
Decorating a room with shelves
A functional and aesthetic way to decorate your home with your own hands is to use shelves. How to do it?
- Hang an open rack, framing it with a beautiful baguette (an example of an idea is in the photo).
- Paint the back of the shelving unit in a bright color that contrasts with the walls.
- Attach ordinary bookshelves by folding them into a word on the wall. Better if they are in color.
- Make compact shelves of non-standard shape (triangular, with polyhedral cells, in the form of crosses). Even if the decorative function of such items will prevail over the practical.
Do not forget two rules: for the shelves to really decorate the house, they must contrast with the wall, and the objects on them must be arranged harmoniously, without chaos.
Lighting
Lighting is a great way to decorate a room and plays one of the most important roles in decorating. Just changing the lighting will help to achieve huge results in decoration. After all, it is a large amount of light that is a frequent technique used by designers. Lots of natural soft light in your bedroom or living room will help you relax, while a cool color in your office will help you concentrate.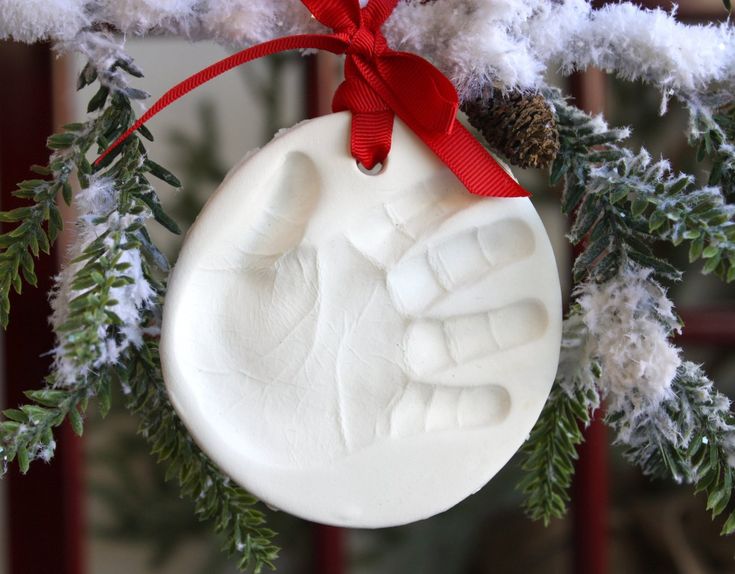
Plants, flowers
It is known that flowers and plants are not only the main source of oxygen, but also a beautiful and modern decoration for the room. With the help of plants, you can refresh the room, make the interior more natural and natural. But you need to use flowers in moderation and try not to overdo it, otherwise the room will look like a greenhouse. Flowers are chosen depending on the color and size of the plant. But it is worth remembering that plant species are selected not only depending on your taste, but also depending on the conditions needed by certain types of flowers. Some like a lot of moisture, others a lot of sunlight or shade, so this feature should also be taken into account.
DIY crafts
There are different ideas on the Internet to decorate a room with your own hands by creating a variety of crafts. Here are a few of them.
Circle painting
A very easy way to decorate a room with your own hands is a bubble painting. To create it, we only need a tablet, scissors, a large brush, matte decoupage glue, white acrylic paint and papyrus paper of the desired colors. First you need to paint the tablet with a layer of white paint and dry, then cut out circles of different sizes from papyrus paper and distribute them on the tablet according to your tastes. Next, glue the circles and gently smooth them with a brush. The bubble painting is ready. Also, instead of circles, you can use completely different shapes to your taste.
Images from Instagram
Paste photos from Instagram onto a square tablet using a brush and glue, after printing them out and cutting them out. It is worth considering the size of photos and a tablet. For 9 10x10 photos to fit perfectly, the base should be 30x30. You can also do without cardboard by sticking images directly on the wall using double-sided tape. The idea for decorating the room is ready.
Topographic threads
This way of decorating a room requires accuracy and patience.