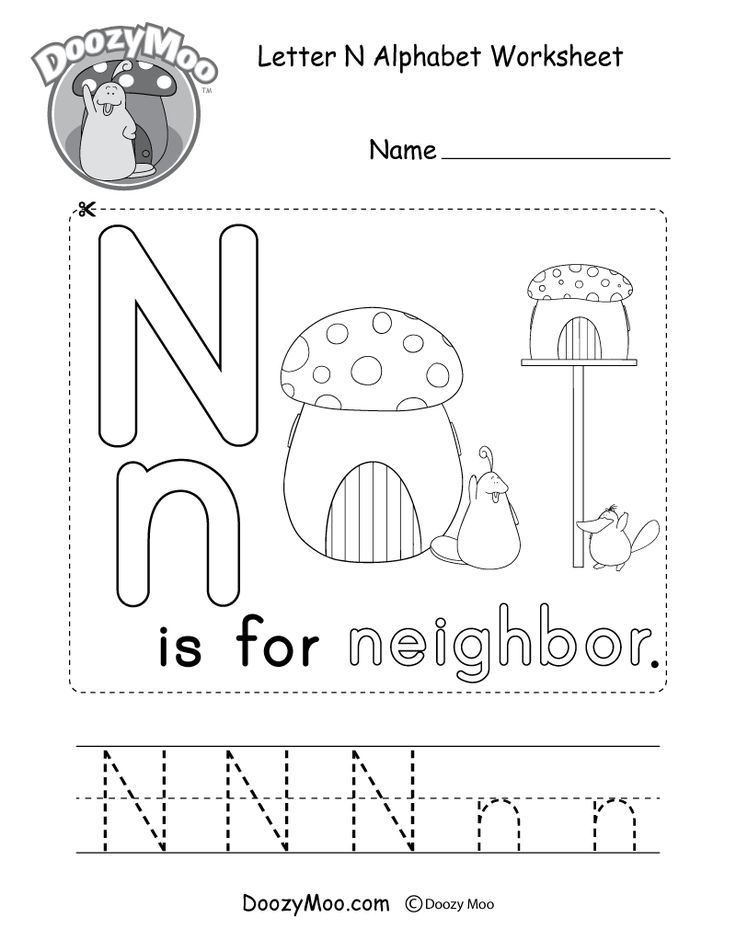
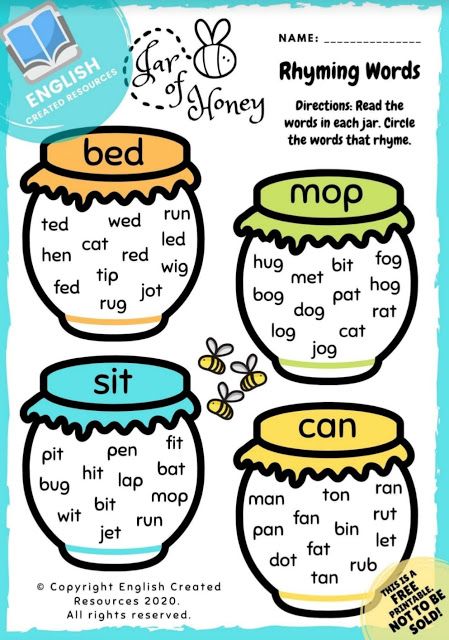
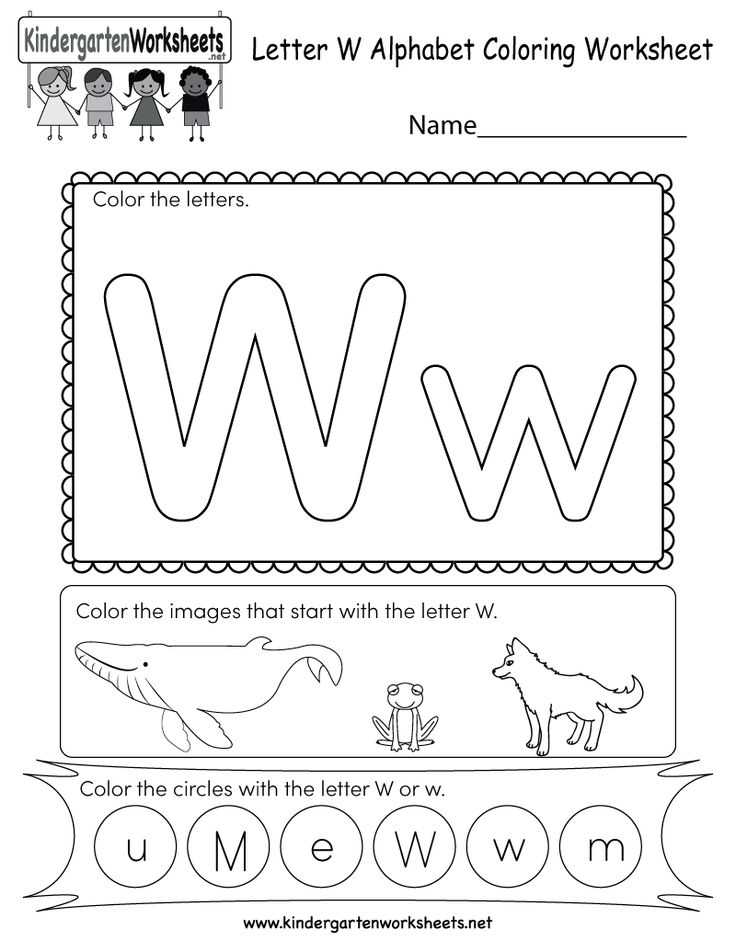
Letter naming activities
20 Activities to Support Letter Naming Fluency
We usually start teaching the alphabet by singing the ABCs song. Once kids have that down pat, it’s time for the next step—recognizing the letters in print. This skill is called letter naming fluency, and it’s a key step for pre-readers. Mostly, it just takes a lot of practice. Fortunately, there are lots of ways to make that practice fun, like these letter naming fluency activities. Easy as ABC!
1. Start with name letters
We often start teaching letter naming fluency with the letters of students’ names. That makes those letters meaningful to kids, and they’re more eager to learn. Try a simple activity like selecting the letters of their name and placing them into an envelope.
Learn more: Name Letters/How Wee Learn
2. Point, say, and learn
This is one of the simplest letter naming activities. Simply type or write the letters you want students to practice, then cut the paper into strips. Have the student point to each (they can use their finger or a colorful pointing stick) and say the letter. If you like, they can also say the sound that letter makes.
Learn more: Letter Strips/Conversations in Literacy
3. Roll and name
Grab this free printable at the link. Then have your student roll a die and read the letters in that row. (This one sneaks in a little counting practice too!)
Learn more: Fantastic Fun and Learning
4. Clip the letters
Use this tip with letter strips or make colorful letter circles like these. You can write the letters on the clothespins and ask kids to match them up. (This is especially useful for matching capital and lowercase letters.) Or, simply use plain clothespins and ask kids to clip each letter as you call it out.
Learn more: Learning With Mrs. Langley
5. Play a game of Bang!
Grab a pack of wood craft sticks from the dollar store and use them to make your own Bang! game. Players take turns pulling a stick from the container and reading out the letter. If they get it right, they add it to their pile, but if they’re wrong, it goes back into the container. If they pull the “Bang!” stick, they have to put all their letters back!
Learn more: Stay at Home Educator
6. Pull and Say
Try this with alphabet beads or a digital alphabet board. Have students pull each letter down, saying the name as they do. Then, as they slide it back up, they say the sound the letter makes.
Learn more: Pull and Say/Conversations in Literacy
7. Park letter cars
This is so fun for active learners! Label toy cars with letters and have kids drive them into parking spaces, saying the letter names (and sounds, if you like) as they go!
Learn more: Letter Cars/I Can Teach My Child
8. Pull letters from a sensory bin
Fill a plastic bin with colored rice and magnetic alphabet letters. Then give kids a magnet wand and have them pull out the letters one by one, naming them as they go.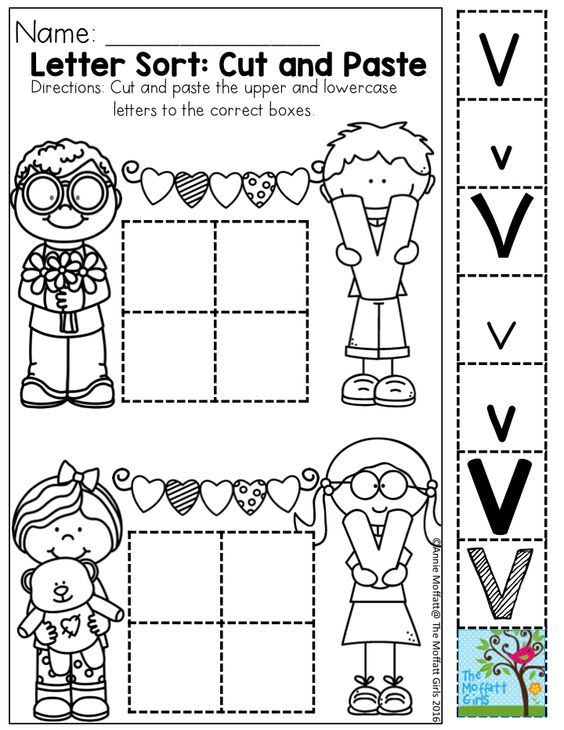
Learn more: Powerful Mothering
9. Swat the letters
Kids love getting to play with flyswatters! This one’s easy to set up, too. Just trace circles onto a large piece of paper and write a letter in each. Have kids swat the letter and say the name or call out a letter and have students swat it, repeating as they do.
Learn more: Hands On As We Grow
10. Enjoy a bowl of alphabet beads soup
Mix up a bowl of alphabet bead soup! Label spoons with letters and have kids dig out the match. You can mix the letter beads with plain beads for more of a challenge.
Learn more: Play Teach Repeat
11. Seek and find letters
This one’s so fun! Tape letters around the room and send kids off to find them as you call them out. Then have them say the sound that letter makes.
Learn more: Busy Toddler
12. Send letters down a zip-line
Kids are going to get a real kick out of the letter zip-line. Make your cards by attaching an unbent paperclip to the back. Then send them flying down the line to students, who name each letter as it arrives!
Learn more: Letter Zipline/Stir the Wonder
13. Whack balloon letters
Balloons make everything more fun! Hang balloons labeled with letters from the ceiling. Then have students swat them with a racket, saying each letter as they do.
Learn more: Balloon Letters/How Wee Learn
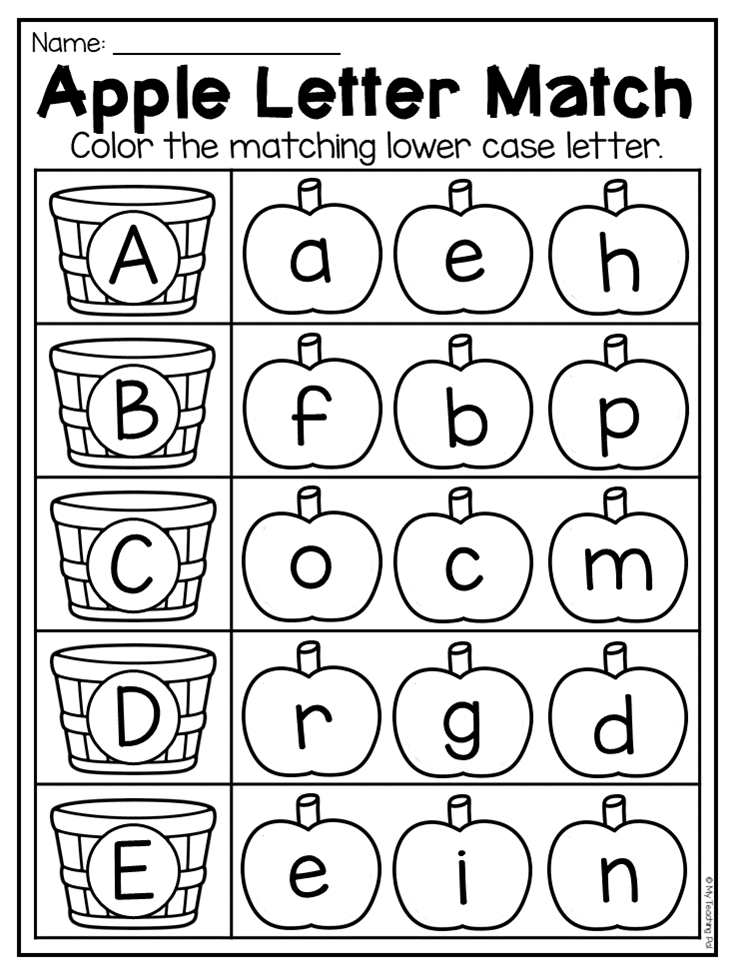
14. Match up apple letters
Grab this free printable game at the link. Kids will enjoy matching upper and lowercase letters, placing the apples in the right baskets.
Learn more: Playdough to Plato
15. Stamp letters in Play-Doh
Invest in a set of alphabet stamps, and you can use them for letter naming fluency activities and beyond. Kids stamp the letter and say it. When the Play-Doh is full, roll it out and start again.
Learn more: Letter Stamps/I Can Teach My Child
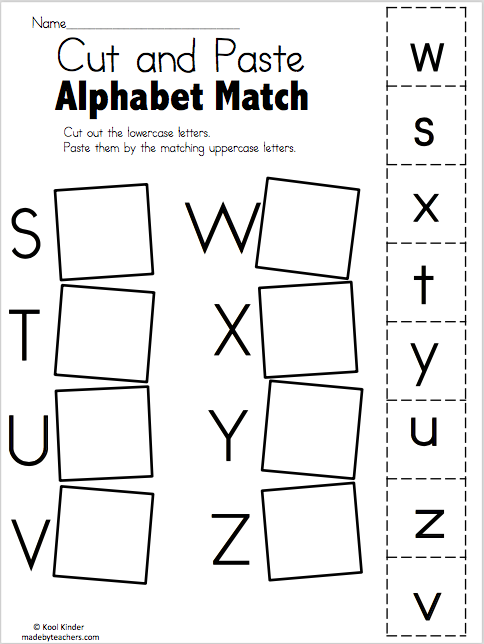
16. Match upper and lower case letters
Matching upper and lowercase letters is an important part of letter naming fluency. All you need for this activity is an egg carton and some alphabet beads.
Learn more: Letter Match-Up/I Can Teach My Child
17. Splash out with some water play
Float alphabet beads in a bin of water, then practice scooping them up and saying their names. Take this one outside on a warm day!
Learn more: Fun Learning for Kids
18. Give
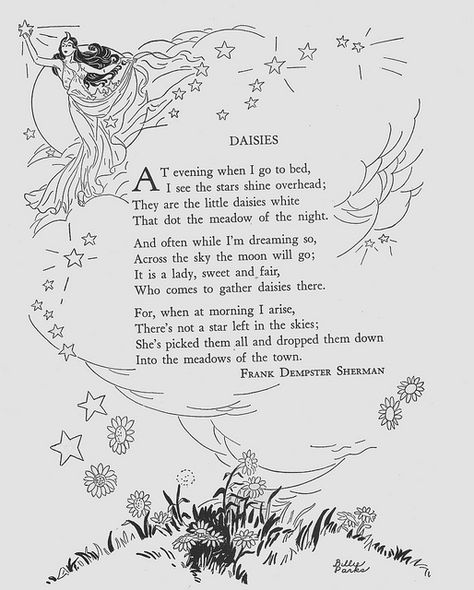
Chicka Chicka Boom Boom a new twist“A told B and B told C, ‘I’ll BEAD you to the top of the coconut tree!'” This is one of the best books for building letter naming fluency. Craft a tree from pipe cleaners, then read the story and have kids add the letter beads along the way.
Learn more: Chicka Chicka Boom Boom/Stir the Wonder
19. Try letter flashcards
Flashcards are a classroom staple for a reason—they work. See how many students can do successfully in 30 seconds, play a matching game, or try any of your other favorite flashcard games. Get lots of free printable letter flashcards at the link.
Learn more: The Spruce Crafts
20. Put together letter puzzles
Get the free printable puzzle at the link, then have kids match the upper and lower case letters as they say their names out loud.
Learn more: Primary Playground
Looking for more? Try these 26 fun, easy ways for kids to practice their ABCs.
Plus, get all the latest teaching tips and ideas when you sign up for our free newsletters!
6 Free Letter Naming Activities for Small Groups – KindergartenWorks
By Leslie Simpson · About 4 minutes to read this article.
We teach so many different skills to develop young readers. Here is my list of my top teaching alphabet identification printables and favorite free resources used this year in my guided reading groups.
These have helped me focus on specific skills to teach how to read and meet student needs.
Alphabet identification in kindergarten
I use these materials with small groups of students (4-6) who are demonstrating a similar reading level and generally similar strategies and skills.
However, I will mention sometimes I pull just 1-2 students from a group to work on a piece of a skill before calling the rest of the group to come over and join us.
I don't use these for kindergarten literacy center materials (though you could), just small group work.
My literacy centers are broader and differentiate themselves based on where students are at.
My favorite freebies
Let me start by listing some of my top alphabet identification and letter recognition free activities.
I Spy Letters - I like to give students a fun way to work on identifying letters. Once they locate a hidden letter in this I SPY workmat, then they name it and write it.
This is the alphabet version of the beginning reading strategy “What makes sense?” They use the alphabet chart and knowing the abc’s as their background knowledge/schema to draw from.
Strategy Tip: Keep an alphabet chart handy for reference so they can say their abc’s in order to find a match if they have difficulty naming it.
I Spy Jungle Letters - I love I Spy activities so much that I created another version for my class to use.
This one focuses on lowercase letters and has three different recording sheets so you can have options.
Alphabet Rock Paper Scissors - This is a twist on the classic game "rock paper scissors." Use the cards for students to identify and then compare the symbols.
This feels like a war game in the way it's played and is handy to play with an alphabet chart nearby.
Tip! Copy these cards onto colored construction paper to create sets that are easy to keep separate so that you can have multiple games going on at once with easy clean up.
Letter Name Treasure Quest - This game is a simple one. It works where students pull a letter card and identify it.
They keep it for identifying correctly as a point and there are additional cards that change up the rules for play to keep it interesting.
Everyone keeps playing until all the cards are drawn. The winner is the one with the most cards.
Flashcard Flash - This is a less "exciting" activity, but my students enjoy assessing themselves or working in partners so it works for us!
We focus on one set of letters based on the order I introduce them to the class. Each set features letters that look different from each other and have distinct sounds.
Each student has their own set of cards. It's easy to track who's cards belong to who since each child gets their cards printed onto their own color.
They like to keep track of the number they get correctly and try to improve next time.
If they use the strategy of finding it on the alphabet chart... it goes on yellow - but they can still get points for using a strategy.
When they consider the cards they got right as "points" it becomes fun!
Here are some great free letter flashcard sets we used:
- MSTDA | mstda
- NFPGHIJO | nfpghijo
- BWILRUCK | bwilruck
- EQXYZ | eqxyz
Dot Maker Letter Mazes - The idea of using visual discrimination to name letters is powerful. I use a letter maze once I've identified the 1-2 letters that are causing the most difficulty for a student and then use it specifically with them.
They get one focus letter. They begin searching for the focus letter as they practice moving left to right and top to bottom along the letter grid.
Once they find the focus letter, they have to identify its name before stamping it. I choose lots of letters that look similar to make this a challenge.
Let's wrap it up
I hope that you can use one or some of these alphabet identification ideas with your kinders in small groups!
Ready for more skills to work on? Here are my favorite 5 beginning sounds activities for free.
If you like what I do here on KindergartenWorks, then be sure to subscribe today. I look forward to sharing ideas with you weekly.
More reading in kindergarten resources
- Ending Sounds: 9 Guided Reading Skill Group Materials
- Beginning Sounds: 5 Guided Reading Activities
- Handy Guided Reading Mats for Kindergarten Groups
- 12 Must-Have Guided Reading Tools to Use in Kindergarten
About Leslie Simpson
Leslie is the teacher behind KindergartenWorks. She believes in teaching kinders how to be pretty incredible along with teaching them to read, write and think for themselves. She enjoys drinking hot tea, making mud pies with her three kids and sharing what she's learned with teachers.
Reader Interactions
Using the keyboard
Entering data into the computer Whether you are writing a letter or calculating numbers, the keyboard is the main way to enter data into the computer. Did you know that the keyboard can be used to control a computer? By memorizing a few simple keyboard commands (computer instructions), you can work more efficiently.
Key arrangement
The keys on the keyboard can be divided into several groups depending on the functions they perform.
-
Data entry keys (alphanumeric) .
 These keys contain the same letters, numbers, punctuation, and symbols found on a traditional keyboard.
 -
Control keys . These keys are used alone or in combination with other keys and are used to perform certain actions. The most commonly used keys are CTRL, ALT, Windows and ESC keys.
-
Function keys. These keys are used for specific tasks. They are named F1, F2, F3, etc. up to F12. The functionality of these keys differs from software ones.
-
Navigation keys . These keys are used to move around a document or web page and when editing text.
 These include arrow keys, Home, End, PAGE UP, PAGE DOWN, Delete, and Paste.
 -
Numeric keypad . The numeric keypad is useful for quickly entering numbers. Keys are grouped in a block, for example on a regular calculator or when adding a computer.
The following figure shows how these keys are located on a typical keyboard. Keyboard layout may vary.
Text entry
When you need to enter some text in a program, email message, or text field, you will see a blinking vertical line () called the cursor or insertion point. It shows where the text you enter will be displayed. You can move the cursor by clicking the desired location with the mouse or by using the navigation keys (see the "Using the navigation keys" section in this article).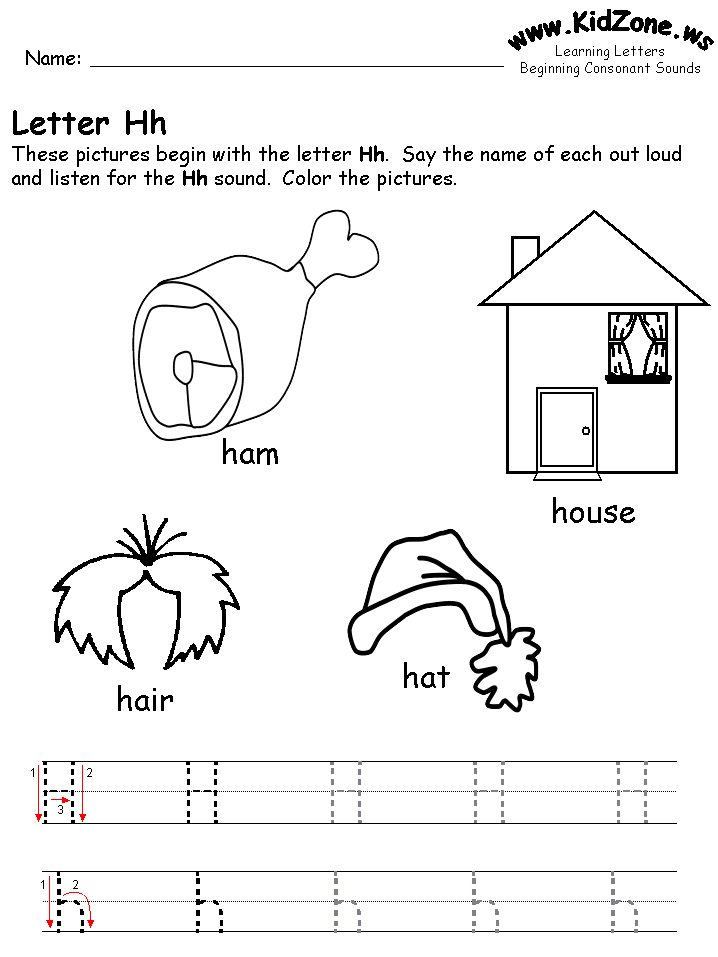
In addition to letters, numbers, punctuation, and symbols, the input keys include SHIFT, CAPS LOCK, TAB, ENTER, SPACE, and BACKSPACE.
| Key name | Use of |
|---|---|
| SHIFT | Letters entered while holding down the SHIFT key are changed to uppercase. If other keys are pressed while pressing the SHIFT key, the characters displayed at the top of those keys will be entered. |
| CAPS LOCK | To enter capital letters, press the CAPS LOCK key once. Pressing the CAPS LOCK key again turns this feature off. The keyboard you use may have an indicator light that indicates whether the CAPS LOCK key is pressed. |
| TAB | The TAB key can be used to move the cursor several positions forward. You can also use the Tab key to move to the next text field on the form. |
| ENTER | You can use the ENTER key to move the cursor to the beginning of the next line. In a dialog box, you can use the ENTER key to click the highlighted button. |
| SPACE | Pressing the SPACEBAR moves the cursor one space forward. |
| BACKSPACE | The BACKSPACE key can be used to delete the character before the cursor or the selected text. |
Using keyboard shortcuts
Keyboard shortcuts are used to perform various actions using the keyboard. They speed up the work with the computer. In fact, almost any action or command that can be performed with the mouse is faster with one or more keys on the keyboard.
In Help, a plus sign (+) between two or more keys indicates that those keys should be pressed in combination. For example, CTRL+A means to hold down the CTRL key and then press the A key. CTRL+SHIFT+A means to hold down the CTRL and SHIFT keys and then press the A key.
Find keyboard shortcuts for programs
In most programs, you can perform actions using the keyboard. To see which commands you can use keyboard shortcuts for, open the menu. Keyboard shortcuts (if applicable) appear next to menu items.
Keyboard shortcuts are displayed next to menu items.
Selecting menus, commands and parameters
You can use the keyboard to open menus and select commands and other options. In a program that has a menu with underlined letters, press the ALT key and the underlined letter to open the corresponding menu. Press the underlined letter in a menu item to select the corresponding command. In applications that use the ribbon, such as Paint or WordPad, when you press the ALT key, clickable letters are overlaid on the ribbon (rather than underlined).
Press ALT+F to open the File menu and then press P to select the Print command.
This trick can also be done in dialog boxes. If an item in the dialog box has an underlined letter next to it, it means that you can press the ALT key and the letter key to select the item.
Useful keyboard shortcuts
The table below lists some of the most useful keyboard shortcuts. For a more detailed list, see Keyboard Shortcuts.
| Press | For this |
|---|---|
| Windows logo key | Opening the start menu |
| ALT+TAB | Switch between open programs or windows |
| ALT+F4 | Closing the active element or exiting the active program |
| CTRL+S | Save the current file or document (this keyboard shortcut works in most programs) |
| CTRL+C | Copy selected item |
| CTRL+X | Cut selected element |
| CTRL+V | Insert selected element |
| CTRL+Z | Cancel action |
| CTRL+A | Select all items in a document or window |
| F1 | Display program or Windows Help |
| Windows logo key + F1 | Windows Help and Support display |
| ESC | Cancel current task |
| Application key | Opens a menu of commands related to selection in the program. |
 A similar action is performed when right-clicking a selection.
 Using the navigation keys
Navigation keys allow you to move the cursor, navigate documents and web pages, and edit text. The table below lists some of the standard functions of these keys.
| Press | For this |
|---|---|
| ARROW LEFT, ARROW RIGHT, ARROW UP or ARROW DOWN | Move the cursor or selection one character or line in the direction of the arrow, or scroll the web page in the direction of the arrow |
| Homepage | Move the cursor to the end of a line or to the top of a web page |
| END | Move the cursor to the end of a line or to the bottom of a web page |
| CTRL+HOME | Move the cursor to the beginning of the document |
| CTRL+END | Move cursor to end of document |
| PAGE UP | Move cursor or page up one screen |
| PAGE DOWN | Move cursor or page down one screen |
| DELETE | Delete character after cursor or selected text. |
| Insert | Turn insert mode on or off. If insert mode is enabled, the text you enter will be inserted at the cursor position. If insert mode is off, the text you type replaces existing characters. |
 On Windows, deleting the selected item and moving it to the Trash
 Using the numeric keypad
Numeric keypad displays numbers from 0 to 9, arithmetic operators + (with addition), - (subtraction), * (multiplication) and / (division) and decimal behind multiple dots, just like on a calculator or computer. Of course, these characters are also on other keys, but with this keyboard you can quickly enter numerical data or mathematical operations with one hand.
Numeric keypad
To use the numeric keypad to enter numbers, press the NUM LOCK key. Most keyboards have an indicator light to let you know if the NUM LOCK key is on. When the NUM LOCK key is off, the numeric keypad functions as an additional set of navigation keys (these functions are printed on the keys next to the numbers or symbols).
Using the numeric keypad, you can perform simple calculations using the calculator.
-
Open the calculator by pressing the button "Start ". In the search field, enter Calculator , and then in the list of results, click Calculator .
-
Verify that the NUM LOCK key status indicator on the key is lit.
 If it is not lit, press the 9 key0011 NUMLOCK .
 -
Use the numeric keypad to enter the first number of the expression.
-
On the keyboard, press +, -, *, or / to perform addition, subtraction, multiplication, or division, respectively.
-
Enter the next number of the expression.
-
Press the ENTER key to perform the calculation.
Three strange keys
So far, we have covered almost all the keys you use. But for the full picture, let's look at three of the most mysterious keys on the keyboard: PRINT SCREEN, SCROLL LOCK, and PAUSE.
PRINT SCREEN
A very long time ago this key didn't really map it - it sent the current screen of text to the printer. Now, pressing the PRINT SCREEN key takes a screenshot of the entire screen, which is then copied to the clipboard in the computer's memory. From there it can be in the form of CTRL + V in the form of Microsoft Paint or another program and, if necessary, printed from it.
Even more obscure is SYS RQ, which sends the PrtScn key on some keyboards. Typically, SYS RQ was created as a "system request", but this command is not included in Windows.
Tip: To take a screenshot of only the active window and not the entire screen, press ALT+PRINT SCREEN.
SCROLL LOCK
In most programs, pressing scroll LOCK does not affect the result. In some programs, pressing the SCROLL LOCK key changes the behavior of the arrow keys and the PAGE UP and PAGE DOWN keys. Pressing these keys scrolls the document without changing the cursor position or selection. The keyboard may have a light indicating that the keyboard has a SCROLL LOCK key.
PAUSE
This key is rarely used. In some older programs, pressing this key pauses the execution of the program. In addition, if the CTRL key is pressed at the same time, the program will be interrupted.
Other keys
Some modern keyboards have separate keys or buttons for quick access to programs, files, or commands. Other keyboards have volume keys, scroll or zoom wheels, and other controls. For more information about these features, see the documentation for your keyboard or computer, or visit the manufacturer's website.
Tips for using the keyboard safely
Proper use of the keyboard helps to avoid scorching or damaging your watch, arms, and hands, especially when you use your computer for a long time. Here are some tips to help you improve your keyboard experience.
-
Position the keyboard at elbow level. Your shoulders should be relaxed.
-
Center the keyboard in front of you. If your keyboard has a numeric keypad, use the SPACEBAR to center the keyboard.
-
When typing on the keyboard, your hands and wrists should "float" above the keyboard so that you can move your hands to the furthest keys instead of reaching for them with your fingers.
-
When typing on the keyboard, do not rest your hands or wrists on any surface.
 If your keyboard has a palm rest, use it only during breaks in typing.
 -
When typing on the keyboard, press the keys with light touches while keeping your wrists straight.
-
If you are not typing, rest your arms and hands.
-
Take a break every 15-20 minutes of working on the computer.
how to teach a preschooler the basics of English
| We work from 10 to 21 seven days a week! We work from 10 to 21 seven days a week! What is Jolly Phonics? Jolly Phonics is a playful method for teaching young children and elementary school students to read, write and speak English. They have created this course for children to learn English sounds and letters quickly and easily. The program quickly gained acceptance among teachers and was used in primary education and language schools around the world. As opposed to learning words by sight and shape, phonics help students develop the skill to understand how to read almost any word in English. Children are taught the correspondences between sounds (phonemes) and letters, they are taught to identify and combine individual sounds of letters and combinations to make a word. There are 42 sounds (phonemes) in English that have 90 spellings. The study of phonics allows you to effectively learn the largest number of them with minimal effort and with the help of simple instructions. Benefits of this technique1.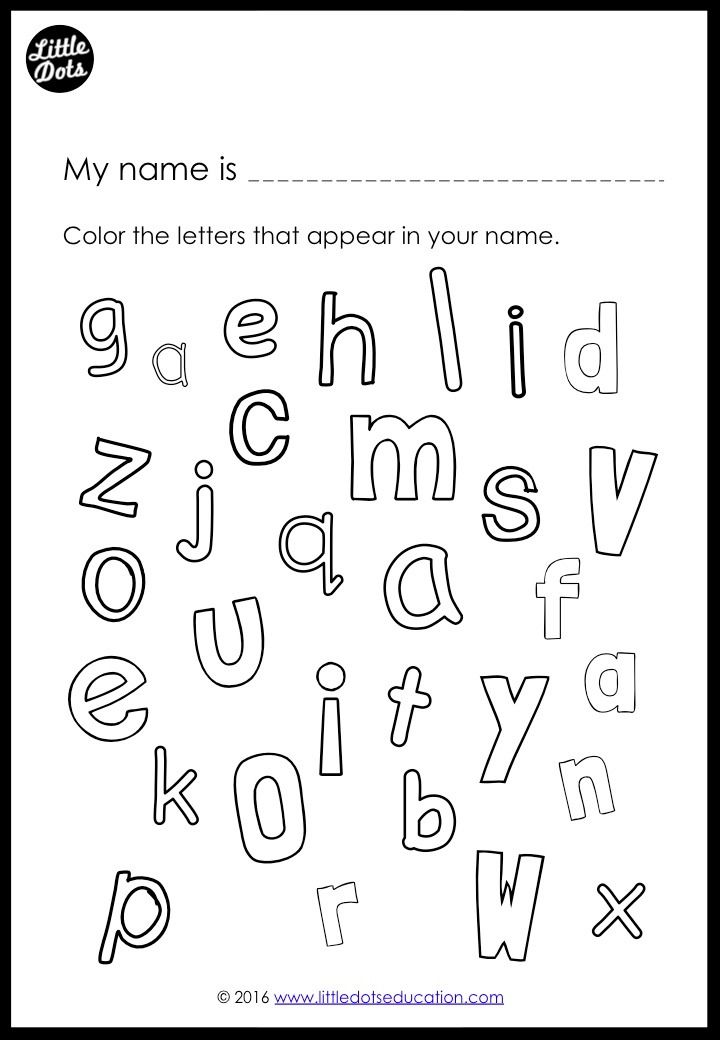 Learning sounds. Learning sounds. All sounds, of which there are 42 in English, are divided into 7 groups. Some of them are graphically represented using two letters, for example: "ai" or "ng". Such sounds are called digraphs. The letter combinations "OO" and "TN" can create two sounds each, for example, in the words look [ lʊk ], moon [ muːn ], that [ðæt], three [ θriː ]. In order to distinguish these two sounds, the digraph can be represented in two ways. Each new sound is introduced through an activity that helps children remember the letters that represent that sound. Showing a letter or combination of letters to a child, he can quickly and correctly name the sound and, at the same time, reproduce the action related to this sound. When the child gains confidence, there will be no need to use gestures. Children learn each letter not by its alphabetical name, but by the sound it represents. For example, the letter Aa /hey/ is called Aa /e/, as in the word angry, but not ai /hey/, as in the word cake.
2. The study of letter formation. At an early stage, the child must learn to write letters correctly. The English letter Сc /si/ is one of the first letters children learn to write. It is easier to draw than others. Its form contains the base for other letters, such as the letter d, p or o. Particular attention should be paid to the spelling of the following letters: - The letter -o: (starting from the top and going down counterclockwise, not clockwise) - The letter -d-: (it starts in the middle, not from the top) - The letters -m and -n, as well as similar ones, are characterized by the fact that children should start writing them with a stick, which is carried from top to bottom. 3. Merge or mix sounds.Synthesizing or mixing sounds is a process in which children pronounce individual sounds in a word, and then combine them into one whole, forming a word. For example, we pronounce each sound separately - h-e-n, then we “synthesize” all the sounds, forming the word hen. First, an adult quickly pronounces any word, while breaking it into sounds and determining whether the child is able to hear this word. If the word is difficult for the child, the teacher repeats it again. Some children may take longer to recognize a word. It is better to start with simple words: b-u-s, t-o-p, c-a-t and d-o-g. Since some sounds are digraphs, i. The Jolly Phonics Regular Word Blending Cards can be used to practice improving your blending skills. When pronouncing sounds in combination, for example, in the word flag, children learn to pronounce the first two sounds in one block: -fl -a -g, and not -f -l -a -g, which helps to increase reading speed. Some English words are irregularly spelled and cannot be read by sound fusion, such as said, was, and one. Unfortunately, there are many such words, so the irregular part of the word must be memorized. These are the so-called "tricky" words or "Tricky Words". 4. Identification of sounds in words. One of the easiest ways to learn how to write words correctly is to listen carefully to the sounds that make up words. According to the rules of the game, it is necessary to pronounce a word and ask the child to name the first sound in this word. Then try to recognize the final sounds and, finally, the sounds in the middle of the word, which are usually the most difficult. It is better to start with simple words consisting of three letters: cat, hot, big and the like. You can simply pronounce the word and then decompose it into sounds, accompanying each sound with a clap. And do not forget about digraphs - the word fish, for example, has 4 letters, but only 3 sounds: f-i-sh. To successfully learn how to decompose words into sounds, you can use rhymes and poems, for example: s - Weave hand in an s shape, like a snake, and say ssssss. 5. Spelling of compound words.There are several ways to help children learn to write complex irregular words correctly: 1. Look, Close, Write, Check. First you need to consider with the child the word and its spelling; determine where the "cunning" part of this word is located. Then close the word and ask the child to write it correctly. 2. Say the word as it sounds. Say each sound in the word, for example, the word -was should sound like - w-a-s, however, in fact, it is pronounced | voz |. 3. Mnemonics. Each initial letter of the phrase stands for the word we want to write. For example: laugh - Laugh At Ugly Goat's Hair. 4. Spelling is also improved by using capital letters.
We use Jolly Phonics when preparing children for international schools in Russia and abroad, because Jolly materials are required in many countries. 
|
 With daily classes according to this method, the child can cheerfully read in English in 3-6 months. Jolly Phonics authors Susan Lloyd and Sarah Wernham are primary school teachers at Woods Loke School in England.
  Similarly, the letter Nn is called nn /nn/, as in nose, not /en/. Letter names follow at a later stage. Letters must not be entered in alphabetical order. With the help of the first group of letters (s, a, t, i, p, n) it is easier to compose easier words - sit, cat, big, pen, note. Sounds that have more than one way of writing are initially presented in one form. For example, the sound ai in the word “rain” is presented first, and then the alternative combinations a-e (lake) and -ay (stay) are given. These and other examples can be found in the Jolly Phonics Word Book.
  It is important to remember that no letter starts from the bottom. If the words are written "with one movement of the hand", it is easier to remember their correct spelling. Many letters, such as h, m or u, have a “tail” at the bottom right to make it easier to change to uppercase writing, in which letters are connected to each other.
  e. consist of two letters, it is necessary to pronounce exactly the digraph - “ch”, and not the letters separately - s - ch - oo - l. With practice, children will be able to recognize one sound in the digraph, combining it with others to form words.
  And for the practice of such listening, there is a simple and popular game “I spy” - “I see, I see”.