Leveling guided reading books
How to Determine the Reading Level of a Book
This content contains affiliate links. When you buy through these links, we may earn an affiliate commission.
Fountas and Pinnell, Lexile Level, Primer, Pre-primer, Beginning Reader are all terms you may have heard if you have a young reader in your house. Seriously, what does it all mean? Is there actually a way how to determine the reading level of a book? If your child can read The Cat in Hat, which is a level J in Guided Reading, can she independently tackle Diary of a Worm, which has a Lexile Level of 510L or is she ready for Keena Ford and the Second Grade Mix-Up, even though that one has a DRA of 30?
Through this post, I am going to attempt to elucidate and explain reading levels. So scroll through to find the system that your child’s teacher uses or pour yourself a large cup of coffee and sift through all of the various ways educators, librarians, and book publishers level and categorize books for young readers.
Reading Levels Are Like Starbucks Sizes
I admit, I don’t visit Starbucks unless I have a gift card. I am also that person who goes to Starbucks and still tries to order a large iced tea. The barista calmly asks if I would like a venti or a trenta and then explains that I need to choose between Passion Tango, Matcha Green, or Guava White Tea. Then comes the question of sweetened, unsweetened, or added lemonade.
For the young reader, finding a book that can be read independently can be as tricky as remembering all of the variables in a Starbucks order. Little readers who are not familiar with reading levels or taught to find a “good fit book” often go for books that are too easy and boring, too difficult and frustrating, or, like my kindergarten son, books that have too many unreadable Star Wars planet names like Kashyyyk. If a child knows her reading level, she can find books that contain sight words she knows, plot lines that are not too advanced, and vocabulary that is manageable.
Explain the Levels, Please
There are many different ways that books are leveled. Here are the three most popular methods for how to determine the reading level of a book.
Developmental
Children become readers by moving through different developmental reading stages. These stages range from the emergent pre-reader to the expert fluent reader. Typically, the emergent pre-reader is between six months and six years of age, while the expert fluent reader is 16 years and older. The developmental categories are broader categories than many of the other leveling systems.
Letter Levels
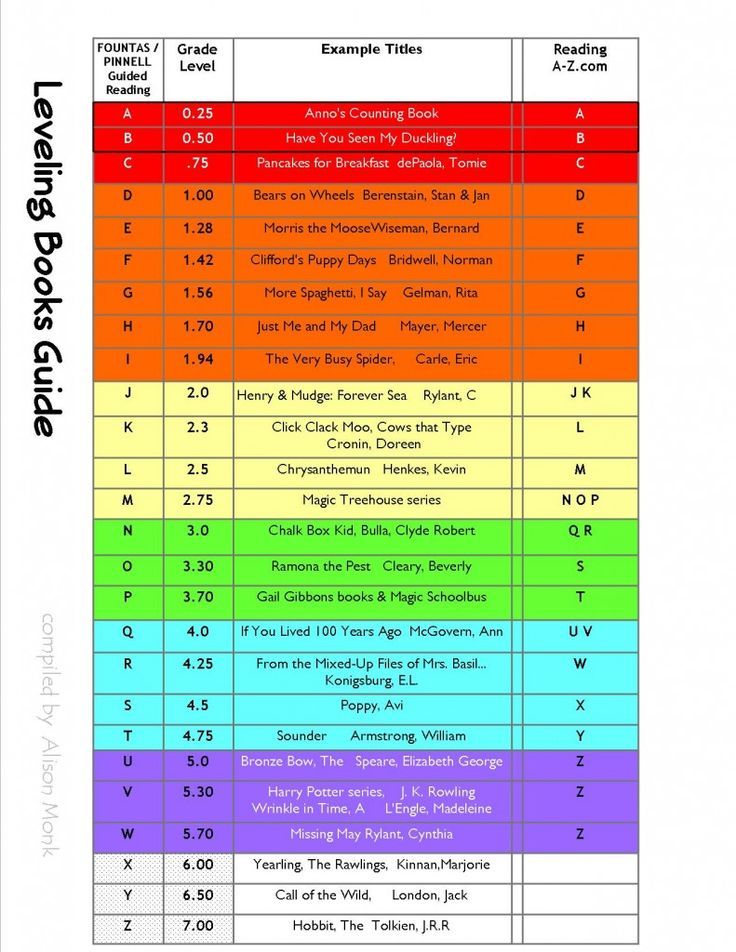
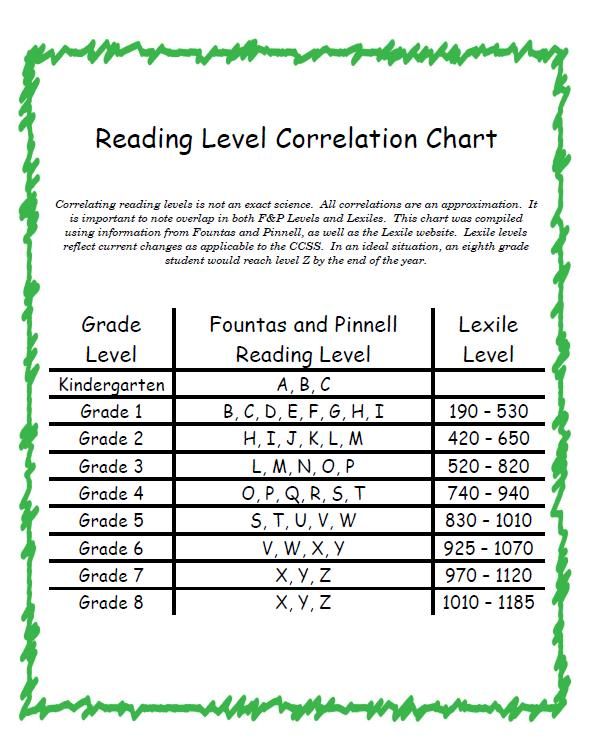
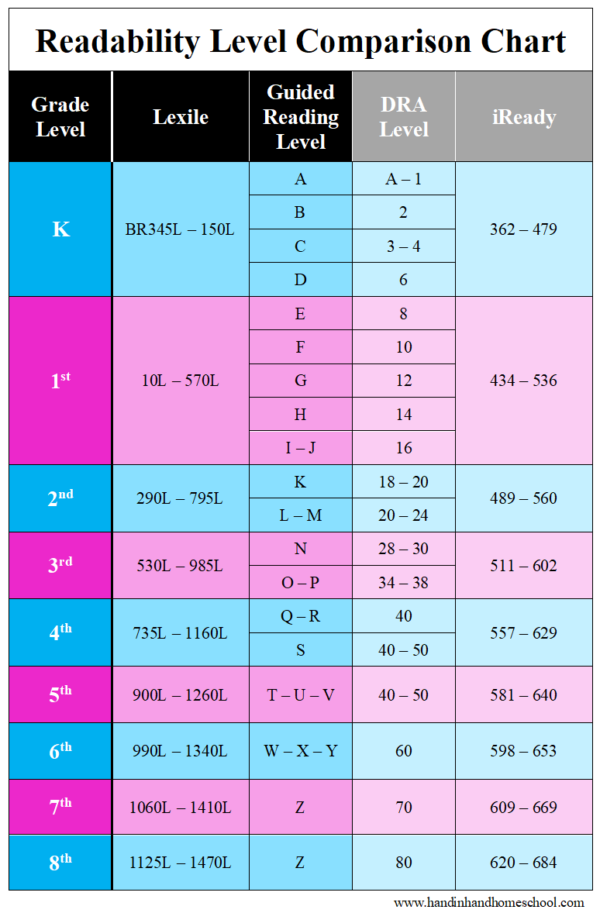
When I taught first and second grade, I found letter levels to be the most kid friendly way to organize a classroom library. If your child’s school levels books using Fountas and Pinnell, Reading A-Z, Scholastic Books, or Guided Reading Levels, then books will be leveled using a letter system. While it would be nice, these leveling systems do not always correlate. A book that is a Reading A-Z Level P, is not always a Level P using the Guided Reading Levels.
Number Levels
Books can be leveled through such systems as Lexile Numbers, The Direct Reading Assessment (DRA), and Reading Recovery. These systems measure texts by complexity and a reader’s skill level and then assign a number.
I Have My Child’s Reading Level, Now What?
Throughout the school year, your child’s teacher will probably perform reading inventories or assessments with your child. These will determine your child’s reading level.
If you homeschool or your child’s school does not use leveled reading, then use a simple test called the “five finger test” to roughly determine your child’s reading level. Have your child choose a book and open to the second page. Ask your little one to read the text out loud. If your child struggles with independently reading five or more words on that page, the book is too difficult and is not a good fit. You should also ask some comprehension questions to make sure that your young reader understands what she is reading. When a book passes the five finger test, use one of the links below to determine that book’s reading level.
Once you have the reading level, take a look at these five helpful websites, apps, and charts that will help you and your child find or level the perfect book:
- Book Wizard : Type in the title of a book to retrieve the Guided Reading Level and grade level.
- Lexile Find-a-Book :Visit this site to find the Lexile Number for a specific book or to generate a list of books with a particular Lexile Number.
- Reading A-Z Level Correlation Chart : This is the best conversion chart out there for reading levels.
- Reading Levels Explained : Check out this very clean and user friendly site if you are still feeling overwhelmed by all of the reading level systems.
- Literacy Leveler app : Download this app and then use it to scan a book’s ISBN to see its Lexile, DRA, and GRL.
Levels Should be Helpful, Not Stressful
Reading levels should not feel restrictive. They should be used as helpful tools and not as a draconian system that kills the love of reading. Encourage your child to read books on her level, but don’t be upset if she chooses to reread an old favorite or picks up a nonfiction book that has some advanced vocabulary. Imagine how horrible it would be if adults had to always adhere to a reading level. I am well aware of the fact that some of my beach reads are probably a fourth grade reading level, with a Guided Reading Level of Q, 820L, and DRA of 40. I may not always be challenged as a reader, but it is still fun to sip my trenta Passion Tango unsweetened iced tea and enjoy a book simply for the fun of reading.
Need some books to practice leveling? Help yourself to 50 Must-Read Books for Beginning Readers, 20 Must-Read Books for First Graders and Second Graders, The Best Chapter Books for Kids: Engaging with Words, and 70 Must-Read Books for 3rd Graders.
Tools to Help You Level Your Classroom Library
A few weeks ago, I shared tips for organizing your classroom library.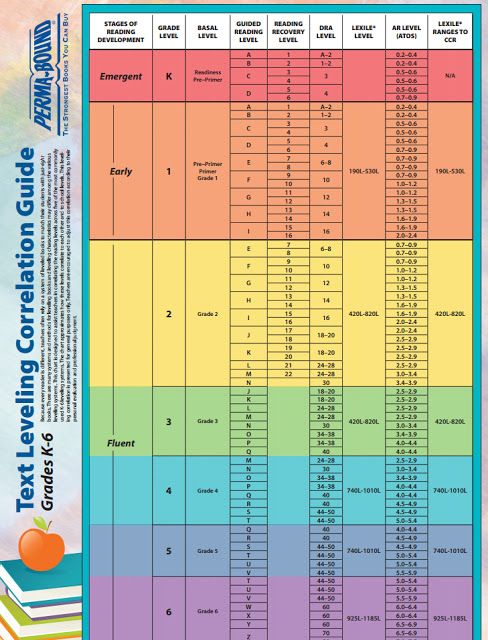 The response to that blog post has been overwhelming! In the post, I explained that I sort the books in my own classroom library by reading level, as well as theme.
Sorting by theme is the easy part. We all know the importance of providing developmentally appropriate texts to students, but leveling an entire library can be a daunting task … until today!
I have researched a few of the top tools (both free and paid) for aiding teachers as they level their classroom libraries. Today I bring you pricing information, photos of the tools in action, and my HONEST opinion of each resource so you can make an informed decision about what will work best for you as you level your own classroom library.
I was pleased to discover that several companies provide iPhone and Android apps that allow you to scan the barcode and receive leveling results within seconds! Free or paid, iPhone (and Android) apps are my favorite type of resource because they are the fastest and most efficient way to level your books.
I’ll start by walking you through a few of the apps I recently installed on my iPhone. It is important to note that whether it was free or paid; no single app was able to identify and provide leveling information for EVERY book in my library. As you might expect, the paid apps sometimes provided data which was lacking in the free apps. In other cases, the FREE Scholastic Book Wizard app provided information about books that the paid apps did not! I would not expect a single resource to single-handedly level your entire classroom library, but each of the apps I successfully tested were able to level an impressive amount of books from my own library.
Scholastic Book Wizard App
Looking for a great FREE resource to help you get started? Start with the Book Wizard app from Scholastic! The app allows you to manually search (by typing the name of a tittle, author, or keyword). Most importantly, the app has a scanner that allows you to simply scan the bar code to quickly search the database for book information. I was pleased to discover that information for MANY of my classroom books was available in the app. A brief synopsis of the book is included on the “Book Info” screen as well as title, author, and book level information. The one (minor) downside was that the level information was presented in a rather tiny text. As a result, the book level didn’t jump out at me, I had to really look at the screen to see it.
Bonus Feature: The Scholastic Book Wizard app also allows users to create an inventory of all titles in classroom library. You can also designate how many copies of the book you own and additional notes (such as where the book is filed in your library). I did not see any means to check books in or out. The list would mostly be a helpful tool for helping teachers quickly find a book or keep track of books they already own.
Level It App
My favorite of the paid apps was the Level It app. Just like Book Wizard, this app allows users to manually search for a book, or use your phone’s camera to scan a book’s bar code. This app also provides a description of the book with title, author, and level information. I loved how the levels are easier to discern with a quick glance at the screen. When I had a big stack of books that needed to be leveled, I appreciated being able to quickly and easily find this information so I could move on to the next book in the pile. This app is available for iPhone and Android users.
Bonus Feature: The Level It app includes a feature to inventory your classroom library, along with a class roster. This allows the teacher to create individual student profiles and the ability to check in/out books to specific students. This is not a feature that I can see myself implementing in my kindergarten classroom, but I know it is a tool that will prove to be useful for MANY classroom teachers.
Literacy Leveler App
The Literacy Leveler App by FikesFarm, LLC is similar to the Level It app, but a bit more basic. Priced at $3.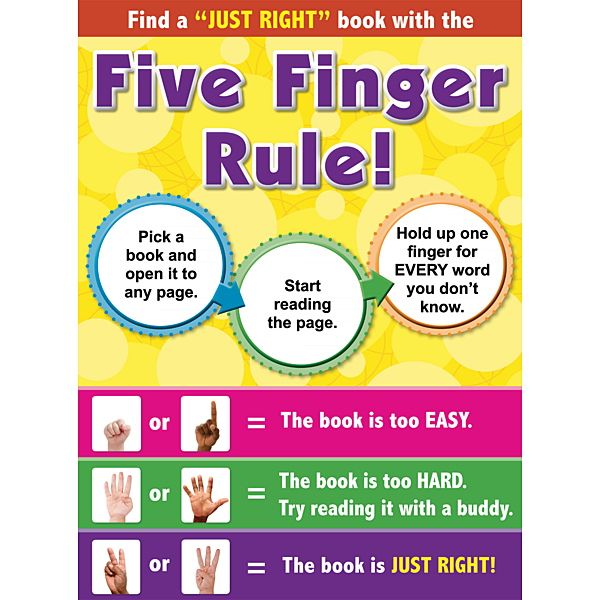 99, this app is currently only available for iPhone users. It allows users to manually search by title, author or ISBN; as well as scan each book’s bar code. Although the format of the app is simplistic compared to Level It (the other leading paid app for iPhone users) and did not include a book synopsis, I did appreciate the fact that book level information was boldly formatted and easy for users to see.
Bonus Feature: The Literacy Level app allows teachers to create an inventory of all titles included in their classroom library. It does indicate how many copies of a title a teacher possesses; nor does it allow teachers to make notes about each book. Despite its limitations, the library tool allows teachers to easily see a list of all books in their classroom library books at a given reading level with a quick touch of the screen.
Classroom Organizer App
Another free app for iPhone and Android users is the Classroom Organizer app from Booksource. The app allows teachers to determine reading levels, organize, and track books in their classroom library. The description of this app sounds amazing (especially for a free product). Unfortunately, the great features offered by this app are overshadowed by it’s shortfalls for usability. I followed the instructions and got started by creating an online account with Booksource, but after nearly a dozen attempts, have not been able to successfully log in to the app. Some things should simply not be this much of a challenge. I’m sure it’s a wonderful app, but I have yet to see it in action.
If you don’t have a smart phone or you prefer to look things up on your computer (the new old-fashioned way), there are a few websites that can be equally helpful as you level the books for your classroom library.
A to Z Teacher Stuff Leveled Books Database
The Leveled Books Database at A to Z Teacher Stuff allows users to search by title or author to determine the reading level for student books. Teachers have the option of searching to find Guided Reading Level or Reading Recovery Level.
Although the database is not comprehensive (MANY popular titles from my classroom library are missing from the online resource,) it is free and helpful for some books. If you are just getting started, this is a resource that should not be overlooked.
Scholastic Book Wizard
If you love the Book Wizard app, you should know that this was the website that started it all. The Scholastic Book Wizard is a free website that allows educators to search by title, author, or keyword. Users can view a book’s Grade Level Equivalent, Guided Reading Level, or Lexile Measure. The extensive database was my first step when I began to level my own classroom library a few years ago.
Fountas & Pinnell Leveled Book Website
For educators seeking a more official means of leveling their classroom books, the Leveled Book Website from Fountas & Pinnell is available as a subscription service. With a base price of $25 for an annual membership, group discounts are also available.
I Leveled My Books… Now What?
Once your classroom books have been leveled, you will want to make them easily accessible to your students. My own classroom library consists of two categories: books sorted by level and books sorted by theme. The box containing each type of book is clearly labeled, and each book contained within the box is given a small coordinating label. This way, students have a clear visual cue to help them return books to their proper location.
My Kindergarten Classroom Library
Find out more about my classroom library in this blog post. Learn how it’s organized, where to shop for my favorite book bins and see the little touches I added to make it extra special for my students.
Classroom Library Labels
Organize your library in style with my classroom library labels. Available in {Black Series} and {White Series}, this downloadable product includes labels for a variety of levels and themes to suit your classroom needs. Classroom Library Labels can be purchased in my TpT store.
Do you have plans to level your classroom library this summer?
What is your favorite book leveling resource?
Basic Managed File Workflows in InDesign
- InDesign User Guide
- InDesign Basics
- Introduction to InDesign
- What's New in InDesign
- System requirements
- General
- Using Creative Cloud Libraries
- What's New in InDesign
- Work environment
- Basic information about the work environment
- Toolbox
- Parameter setting
- Operating environment "Touch control"
- Default key combinations
- Document recovery and cancellation
- Capture Extension
- Basic information about the work environment
- Introduction to InDesign
- Creating Documents and Layouts
- Documents and Pages
- Creating Documents
- Working with master pages
- Working with multiple documents
- Set the page size, margin or issue area
- Working with files and templates
- Creating book files
- Adding basic pagination
- Numbering of pages, chapters and sections
- Converting QuarkXPress and PageMaker documents
- Sharing content
- Basic Workflows with Managed Files
- Saving documents
- Nets
- Nets
- Grid formatting
- Layout Tools
- Rulers
- Documents and Pages
- Add content
- Text
- Add text to frames
- Text block linking
- Arabic and Hebrew options in InDesign
- Creating text along a path
- Markers and numbering
- Glyphs and special characters
- Text layout
- Text variables
- Creation of QR codes
- Text editing
- Text alignment
- Wrap text around objects
- Linked objects
- Related content
- Paragraph formatting
- Character formatting
- Find/Replace
- Spell checker and language dictionaries
- Typography
- Using fonts in InDesign
- Kerning and tracking
- Text formatting
- Text formatting
- Working with style packs
- Tabs and indents
- Review text
- Track and review changes
- Add editorial notes in InDesign
- Import PDF file comments
- Adding links
- Creating a table of contents
- Footnotes
- Creating an index
- Endnotes
- Signatures
- Styles
- Paragraph and character styles
- Mapping, exporting, and organizing styles
- Object styles
- Drop caps and nested styles
- Working with styles
- Leading
- Tables
- Formatting tables
- Creating tables
- Table and cell styles
- Selecting and editing tables
- Stroke and fill tables
- Interactive functions
- Hyperlinks
- Dynamic PDF documents
- Bookmarks
- Buttons
- Forms
- Animation
- Cross references
- Structuring PDF documents
- Page transitions
- Audio and video
- Forms
- Graphic objects
- Introduction to paths and shapes
- Draw with Pencil Tool
- Drawing with the pen tool
- Apply line parameters (dash)
- Compound paths and shapes
- Edit contours
- Clipping paths
- Changing angle parameters
- Alignment and distribution of objects
- Related and embedded graphics
- AEM Resource Integration
- Color and transparency
- Color application
- Using colors from imported graphics
- Working with color swatches
- Mixing colors
- Shades
- Introduction to spot and process colors
- Overlay colors
- Gradients
- Flattening a transparent graphic
- Add transparency effects
- Text
- Exchange
- Sharing and collaboration
- Send for editing
- Checking a published InDesign 9 document0005
- Feedback management
- Publication
- Hosting, exporting and publishing
- Internet publishing
- Copying and pasting graphic objects
- Exporting content to EPUB format
- Adobe PDF Options
- Export content to HTML format
- Export to Adobe PDF
- Export to JPEG format
- Export to HTML
- Overview of DPS and AEM Mobile
- Supported file formats
- Printing
- Booklet printing
- Marks and bleed
- Printing documents
- Inks, color plates and screen lines
- Overlay
- Creating PostScript and EPS files
- Preflight files before sending
- Printing thumbnails or large documents
- Preparing PDF files for service providers
- Preparation for printing plates
- Hosting, exporting and publishing
- InDesign Extension
- Automation
- Data Merge
- Plug-ins
- Capture extension in InDesign
- Scenario development
- Automation
- Troubleshooting
- Corrected errors
- Crash on startup
- Settings folder error: read-only
- Troubleshooting File Problems
- Unable to export to PDF
- Recovery of InDesign documents
Adobe InCopy LiveEdit workflow plug-ins allow authors and editors to create a copy in InCopy while designers prepare layouts in Adobe InDesign. These workflows use container files called Collections to group related pieces of content, as well as file blocking and notification tools to share and update files in InCopy or InDesign. Files for this can be transferred over a local network or as compressed packages via e-mail.
In collaborative workflows, InDesign users export text and images to a shared folder on the file system. The files in this folder are made available to InCopy users, who can write and edit the content. Selected text and graphics frames are exported either as a stack or as separate InCopy files, where they become part of a guided process and linked to the InDesign document via links. These shared files are called managed files . When users work on an assignment file or an InDesign file on a local server, changes to the associated layout or content are propagated to all users involved in workflows on that document.
The same content file can be opened by multiple InCopy or InDesign users at the same time, just as an assignment file can be opened by multiple InCopy users at the same time. However, at any given time, only one user can Retrieve from the server (check out) an InCopy file for modification. Other users can view the file in read-only mode. A user who checks out a managed InCopy file for modification can use it at the same time as other users by saving the file to a shared server or checking it in to an InDesign user, but other users cannot make changes to the file until the file is checked in to the public (check in). This system allows multiple users to access the same file, but users cannot overwrite changes made by another user.
For more information, see the InCopy LiveEdit Workflow Guide (PDF) at www.adobe.com/go/learn_liveedit_en.
The content of is either body text in one or more frames, or imported graphics. There are five main ways to work with content in InCopy: open an assignment file, open an assignment package, open a linked InCopy file, open an InDesign file with linked InCopy files, or create all content in InCopy.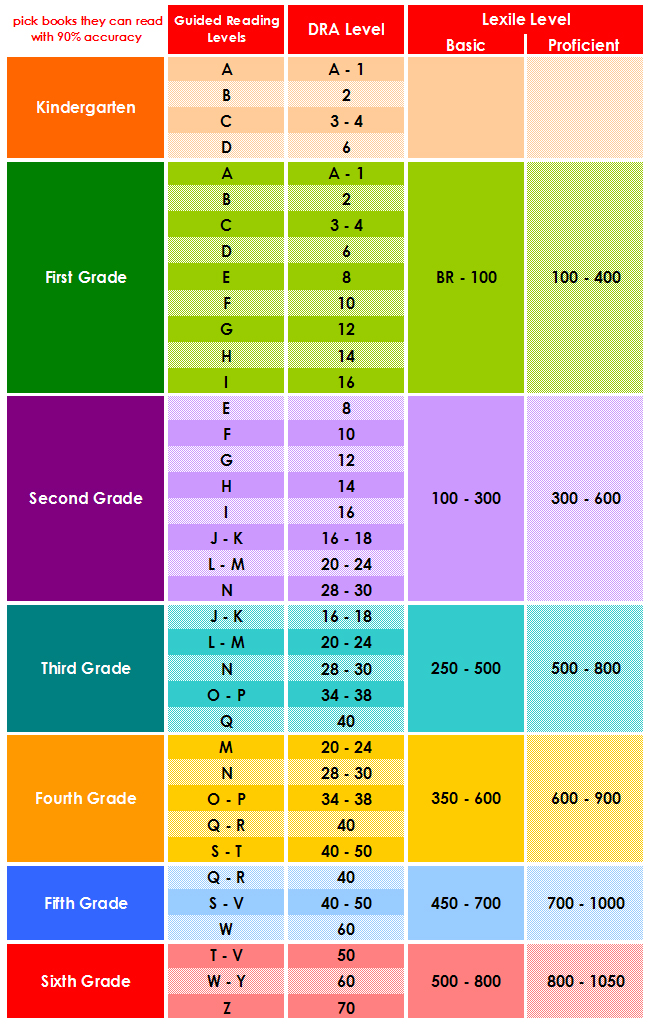
Opening assignment files created in InDesign
InDesign users can create an assignment file and define content to share. This method allows an InDesign user to link appropriate components (heading, body text, graphics, captions, and so on) and then assign them to different InCopy users for writing and editing. InCopy users open the assignment file and work only with the components that have been assigned to them. In Quick View, InCopy users can see how their edited copy is linked to the InDesign layout without having to open the entire InDesign document. But if the layout changes, the InDesign user must update the assignments to notify InCopy users of the change. Collection files can be shared on the server or using collection packages.
An InDesign document (.indd) with an assignment file (.icml) consisting of three linked content files (.incx). The assignment and its components are represented in the Assignments panel and can be opened in InCopy.
Opening collection packages
Using collection packages is especially useful when designers and writers work on the same project but do not have access to a local server. In such cases, the InDesign user can create one or more packages and email the compressed files to designated InCopy users. InCopy users can open assignment packages, edit their contents, and return the packages to the InDesign user, who can then update the document.
Opening linked InCopy files exported from InDesign
In some workflows, InDesign users can export text and graphics as separate files instead of including them in an assignment file. Exporting individual files is useful if the user is working with unrelated graphics or unrelated parts of text. But in this case, InCopy users cannot see how the content fits into the InDesign layout.
An InDesign document (.indd) opened in InCopy includes three linked but unassigned content files (.icml)Opening InDesign documents with linked InCopy files
To see all page elements in context with the entire layout, InCopy users can open and edit an InDesign document in InCopy. This can be useful when editing and inserting text, if it is important for the user to see the entire layout, and also in cases where almost all materials in the document are being edited, and not just some. When the InCopy user edits the content, the InDesign user can update the links to the modified files. If the InDesign user changes the layout, the InCopy user is notified of this change at the time the InDesign document is saved.
Create all content in InCopy
InCopy can create content that is not associated with an InDesign file. These standalone documents allow you to enter text, assign fonts and styles, and import graphics from other applications (such as Adobe Illustrator and Adobe Photoshop) to enhance text. You can also embed tags for later use in XML format. This is a good option for an editorial workflow where content comes before structure. For standalone InCopy documents, you can also set and change the text area, page size, and orientation. However, if the story is later linked to an InDesign document, the settings used in InCopy are overwritten by the InDesign settings.
To make a file manageable, you must include it in an assignment file, export it from InDesign as InCopy content, or place it as InCopy content in InDesign. Managed files inform both the state of the content and the owner. With Managed Files, you can do the following:
-
lock and unlock content to ensure file integrity is maintained;
-
notify InCopy users when an InDesign layout is out of date;
-
identify the user working with the file;
-
notify users when an InCopy content file is out of date, in use, or editable. Notification methods include alerts, frame icons, status icons in the Links panel, and status icons in the Assignments panel.
Read only files0391 read-only . Only the user who checked out the file for modification can make changes to a file. When a user checks out a content file for modification, the plug-in creates a lock file (*.idlk) giving that user exclusive control over making changes. A read-only file has the following characteristics.
-
The InCopy user cannot manually format the text in this file. But if text has been assigned font or paragraph styles, the InDesign user can change the definition of those styles and thus change the formatting of the text, even if the file has been checked out for editing by someone else. These changes to the style definitions will be visible in the text as soon as the InDesign user updates the file.
-
In general, neither an InCopy user nor an InDesign user can change objects such as text and applied styles in locked content. Some objects, such as character or paragraph styles, are only used by this content. For example, in locked content, you cannot change how a character style is applied to objects, but you can change the character style itself, thereby changing the appearance of the text.
-
An InDesign user can change the margins and columns of text content, as well as its shape, placement, and the number of text frames the story occupies.

-
An InDesign user can change the geometry and formatting of a graphics frame without checking out the graphic for editing. An InCopy user cannot change the graphics frame or frame format. But in order to change the graphic itself (for example, rotate or scale it), both the InDesign user and the InCopy user must fetch the graphics frame from the server to modify.
To make sure you're working with the latest content and not overwriting someone else's work, use the following methods.
-
Store collection files on a server accessible to all team members. If team members do not have access to the server, collection packages can be created and distributed.
-
When you create a collection, a special folder is created to store the collection file and its contents. Use these collection folders to store collection files and content files. They make it easier to manage shared files in a workgroup and ensure that users open the correct files.
-
In InCopy, open an assignment file instead of a single InCopy story. In this way, you can view inline and layout data in Galley and Layout views. If you are exporting content without assignment files, you must open the InDesign file to view the inline and layout data.
-
With the assignment file open, open an InDesign document or check out content from the server to edit in InDesign or InCopy; make sure the frame edges are visible (View > Auxiliaries > Show Frame Edges) so you can see the frame icons when they appear.
-
In InDesign, if you want to remove files from your workflows (for example, due to a scheduled production start date), you can unlink those files or cancel the assignment package.
With workflow management between InCopy and InDesign, authors and editors can create, overwrite, enhance, and edit documents while designers prepare the layout. Typical workflows include managing files on a local server, sharing files by sending packages via email, or a combination of the two.
These workflows assume you have a basic InDesign template with layout geometry, styles, and boilerplate text. Layout geometry includes page dimensions as well as text and graphics frames. InCopy uses these elements to display data about the inline.
Local Server Workflow
1. In InDesign, create assignments and populate them with content.
In this step, the exported text and graphics frames are included in the managed process, where they are available to InCopy users for writing and editing.
2. Make the collection files available to InCopy users.
Save the files on a server accessible to all workflow participants.
3. In InCopy, open the assignment file, check out the material or graphic to edit from the server, and edit the material or graphic.
InCopy, the Assignments panel only displays files with content assigned to the user. Whenever a file is saved to a local server, the changes are saved to the file system, and anyone working on that document (either an InDesign layout or another managed content file in the document) is notified of the changes. These users can refresh the content to see the latest changes. Content remains checked out for modification until you check it back into the public domain.
4. Do the necessary layout work in InDesign.
Whether or not content files are edited in InCopy, InDesign users can work with document layout. In this case, you do not need to retrieve the document from the server for editing. When an InCopy user saves content checked out for modification, the InDesign user can refresh the content in the layout to reflect the latest changes.
5. Continue working in InCopy.
When you're done editing, return the content to the public. After that, other users can check out and work with the content to edit from the server. If a user changes the layout in InDesign at the same time, you can update and view the layout geometry as you work.
6. In InDesign, verify that all content checked out for editing has been checked in.
Managed workflows let you know who checked out files for modification. When the content files are checked in from the server, InDesign users can check out the content files from the server to finalize the layout.
Email workflow
1. In InDesign, create and send assignment packages.
Create collection packages and assign the content to the right InCopy users, then forward the packages to the InCopy users. To avoid editing conflicts, package files are automatically checked out from the public domain.
2. In InCopy, open the assignment package, check it out from the server, and edit the story or graphic.
When you receive the collection package in your email, double-click it to open it in InCopy. File changes are only saved locally. Other users will not be notified of the changes.
3. Do the necessary layout work in InDesign.
InDesign users can work with document layout whether or not content files are packaged. In this case, you do not need to retrieve the document from the server for editing. If you need to update the layout or assignments, you can send the updated package to InCopy users.
4. Check in the edited package into InCopy.
When you're done editing, check in the content to the public, and then forward the modified package to the person you got it from. After that, other users will be able to extract the content from the server, see the latest revision and work with the file.
5. In InDesign, verify that all content checked out for editing has been checked in.
Managed workflows let you know who checked out files for modification. Once collection packages are checked in, content in those packages becomes editable. When the files are returned to the public, InDesign users can check them out from the server to finalize the layout.
Each user participating in workflows must have a name. This identification allows you to find out who checked out a particular file for modification and make that information available to other users.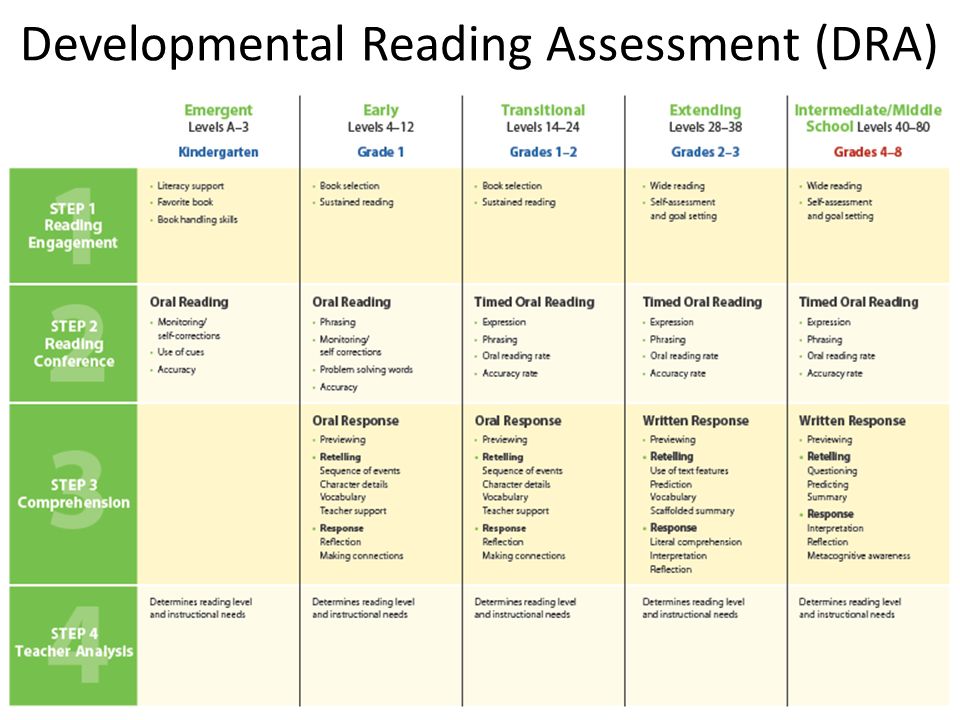 Identification is also required in order to retrieve a file from the server for modification.
If you have already provided a username and want to change it, you must check in any content you have checked out first. Otherwise, if you change your user ID during an edit session, you will not be able to edit the checked out content, as it will be locked under a different username.
User authentication is application dependent. No user can have multiple identities for the same application.
The InCopy Comments and Change Tracking features use the name you specify to identify the author of the comment or tracked change.
-
Do one of the following:
-
Enter a unique name and click OK.
If you did not enter a username in this way, the first time you try to perform an action in the workflow, you will be prompted to enter a username.
The Color pop-up menu in this dialog box is for identifying editorial notes and tracked changes.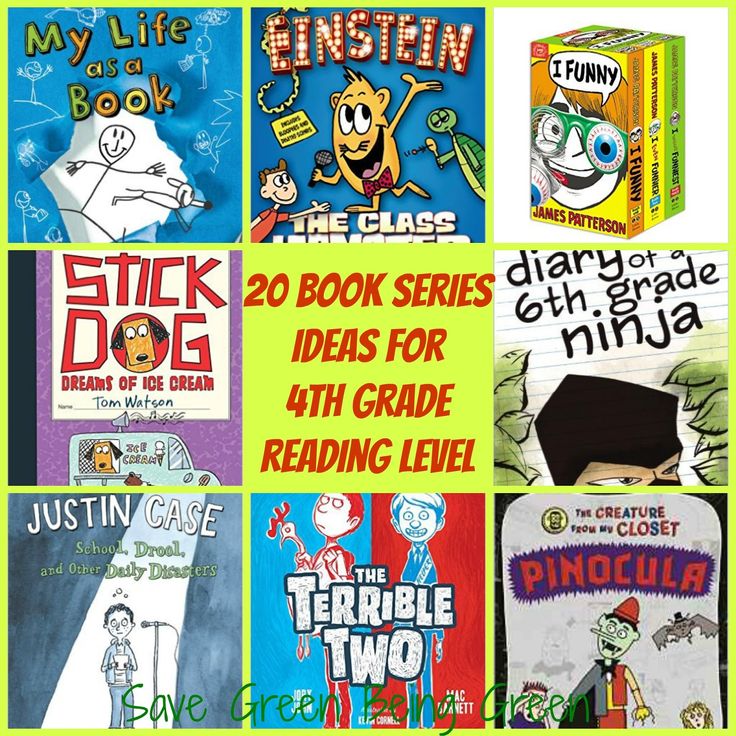 You can optionally select a color here, but this will not affect anything in the managed workflow.
Icons can appear in text and picture frames, in the Assignment panel, and in the Content panel (InCopy only). Edit status icons appear next to the managed file in the Links and Assignments panel to indicate the status of the content. Icons appear in frames containing linked InCopy content (in Layout view in both InDesign and InCopy). These icons also indicate the state of the content and can be used to distinguish between managed and unmanaged content. The corresponding tooltip indicates the edit state and owner. To display frame icons, you need to make sure that InDesign and InCopy have the option to show frame edges turned on (View > Auxiliary Items > Show Frame Edges).
(InDesign) The InDesign document window must be in Normal mode for the frame edges to show. (Click the Normal Mode button in the lower left corner of the Tools panel. )
| Icon | Name | Access path |
|---|---|---|
|
| Available | Assignment panel (InDesign and InCopy), text and picture frames |
|
| "Using [name] " | Assignment panel, text and picture frames |
|
| Editing | Assignment panel, text and picture frames |
|
| Available and Obsolete | Text and graphics frames |
|
| "Using [name] " and "Deprecated" | Text and graphics frames |
|
| Editing and Outdated | Text and graphics frames |
|
| Obsolete | Selections palette |
|
| "Text content is out of date" | Assignment panel and text frames |
|
| "Text content updated" | Assignment panel and text frames |
|
| "Graphic content out of date" | Assignment panel and picture frames |
|
| "Graphic content updated" | Assignment panel and picture frames |
|
| "Packaged content" | Collections Palette |
The Out of Date icon on the Available, In Use, Editing, Text Content, and Graphic Content icons indicates that the content is out of date; those.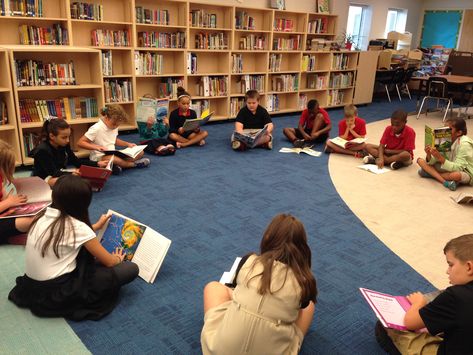 the version contained in the file system is newer than the version on the user's computer.
Related content
- Exporting content as separate InCopy files (InDesign)
- Working with offline documents
- Deleting links to content files (InDesign)
- Tracking and viewing changes
- Adding editorial notes 9003 InDesign
Creating Book Files with Adobe InDesign
User Guide Cancel
Search
- InDesign User Guide
- InDesign Basics
- Introduction to InDesign
- What's New in InDesign
- System requirements
- General
- Using Creative Cloud Libraries
- What's New in InDesign
- Work environment
- Basic information about the work environment
- Toolbox
- Parameter setting
- Operating environment "Touch control"
- Default key combinations
- Document recovery and cancellation
- Capture Extension
- Basic information about the work environment
- Introduction to InDesign
- Creating Documents and Layouts
- Documents and Pages
- Creating Documents
- Working with master pages
- Working with multiple documents
- Set the page size, margin, or release area
- Working with files and templates
- Creating book files
- Adding basic pagination
- Numbering of pages, chapters and sections
- Converting QuarkXPress and PageMaker documents
- Sharing content
- Basic Workflows with Managed Files
- Saving documents
- Nets
- Nets
- Grid formatting
- Layout Tools
- Rulers
- Documents and Pages
- Add content
- Text
- Add text to frames
- Text block linking
- Arabic and Hebrew options in InDesign
- Creating text along a path
- Markers and numbering
- Glyphs and special characters
- Text layout
- Text variables
- Creation of QR codes
- Text editing
- Text alignment
- Wrap text around objects
- Linked objects
- Related content
- Paragraph formatting
- Character formatting
- Find/Replace
- Spell checker and language dictionaries
- Typography
- Using fonts in InDesign
- Kerning and tracking
- Text formatting
- Text formatting
- Working with style packs
- Tabs and indents
- Review text
- Track and review changes
- Add editorial notes in InDesign
- Import PDF file comments
- Adding links
- Creating a table of contents
- Footnotes
- Creating an index
- Endnotes
- Signatures
- Styles
- Paragraph and character styles
- Mapping, exporting, and organizing styles
- Object styles
- Drop caps and nested styles
- Working with styles
- Leading
- Tables
- Formatting tables
- Creating tables
- Table and cell styles
- Selecting and editing tables
- Stroke and fill tables
- Interactive functions
- Hyperlinks
- Dynamic PDF documents
- Bookmarks
- Buttons
- Forms
- Animation
- Cross references
- Structuring PDF documents
- Page transitions
- Audio and video
- Forms
- Graphic objects
- Introduction to paths and shapes
- Drawing with the Pencil Tool
- Drawing with the pen tool
- Apply line parameters (dash)
- Compound paths and shapes
- Edit contours
- Clipping paths
- Changing angle parameters
- Alignment and distribution of objects
- Related and embedded graphics
- AEM Resource Integration
- Color and transparency
- Color application
- Using colors from imported graphics
- Working with color swatches
- Mixing colors
- Shades
- Introduction to spot and process colors
- Overlay colors
- Gradients
- Flattening a transparent graphic
- Add transparency effects
- Text
- Exchange
- Sharing and collaboration
- Send for editing
- Checking a published InDesign document
- Feedback management
- Publication
- Hosting, exporting and publishing
- Internet publishing
- Copying and pasting graphic objects
- Exporting content to EPUB format
- Adobe PDF Options
- Export content to HTML format
- Export to Adobe PDF
- Export to JPEG format
- Export to HTML
- Overview of DPS and AEM Mobile
- Supported file formats
- Printing
- Booklet printing
- Marks and bleed
- Printing documents
- Inks, color plates and screen lines
- Overlay
- Creating PostScript and EPS files
- Preflight files before sending
- Printing thumbnails or large documents
- Preparing PDF files for service providers
- Preparation for printing plates
- Hosting, exporting and publishing
- InDesign Extension
- Automation
- Data Merge
- Plug-ins
- Capture extension in InDesign
- Scenario development
- Automation
- Troubleshooting
- Corrected errors
- Crash on startup
- Settings folder error: read-only
- Troubleshooting File Problems
- Unable to export to PDF
- Recovery of InDesign documents
Impartial language.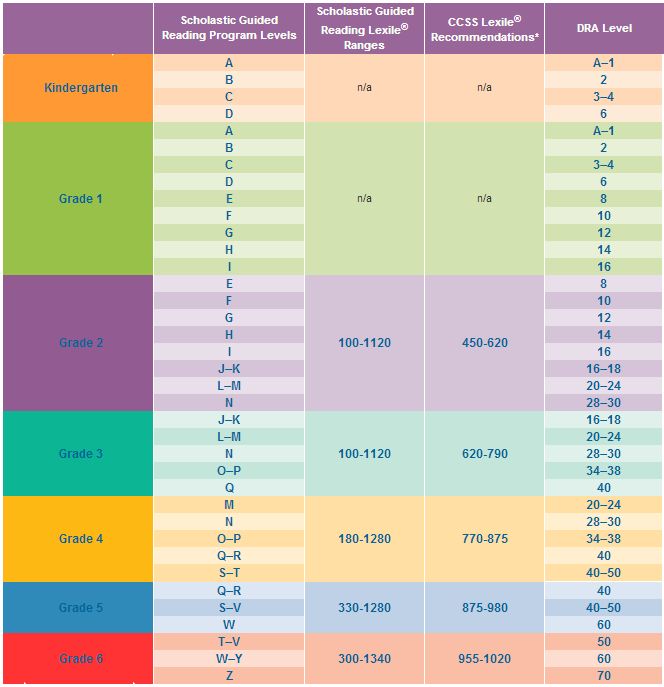 We're replacing non-inclusive language in InDesign 2022 (version 17.0) and beyond to reflect Adobe's core values of inclusion. Any reference to the Master page is replaced by a link to the Parent page in our help articles for English, Danish, Hungarian, Spanish, Italian, Brazilian Portuguese, Portuguese, and Japanese .
A book file is a set of documents that can share styles, color swatches, master pages, and other elements. Book documents can be page numbered, printed as individual book documents, or exported to Files > PDF. One document can belong to several books.
One of the documents added to the book file is style source . By default, the style source is the first document in the workbook, but you can select a new style source at any time. When Book 9 Documents1223 is synchronized , the styles and swatches of the workbook documents are replaced with the styles and swatches from the style source.
-
Select File > New > Book.
-
Enter a title for the book, specify a location, and click the Save button.
The Book palette appears. The book file will be saved with the .indb extension.
-
Adding documents to a book file.
When a book file is created, it opens in the Book palette. The Book palette is the work area of a book file where you can add, remove, or organize documents.
-
Choose Add Document from the Book panel menu, or click the plus button at the bottom of the panel.
-
Select one or more Adobe InDesign documents to add, and then click the Open button.
You can drag files to the Book panel from an Explorer (Windows) or Finder (Mac OS) window. You can also drag a document from one workbook to another. To copy a document, press and hold Alt (Windows) or Option (Mac OS).
-
If you select documents created in an earlier version of InDesign, they will be converted to Adobe InDesign CS5 format when added to the book.
 In the Save As dialog box, enter a new name for the converted document (or leave the name as is), then click the Save button.
 Adobe PageMaker or QuarkXPress documents must be converted before they can be added to a book.
-
If necessary, reorder the documents in the palette by dragging them up or down to the desired location in the list.
-
To specify a document as the style source, check the box next to the document name in the palette.
To open a document in a book file, double-click the document name in the Book palette.
Each open book file appears on a separate tab in the Book panel. If multiple books are open at the same time, click the appropriate tab to navigate to that book and access the menu for the desired palette.
Icons in the Book palette indicate the current status of a document, such as whether the document is open, missing (the document was moved, renamed, or deleted), changed (the document was edited, or page or section numbers changed when the document was closed), or in use (document opened by another user in a workflow).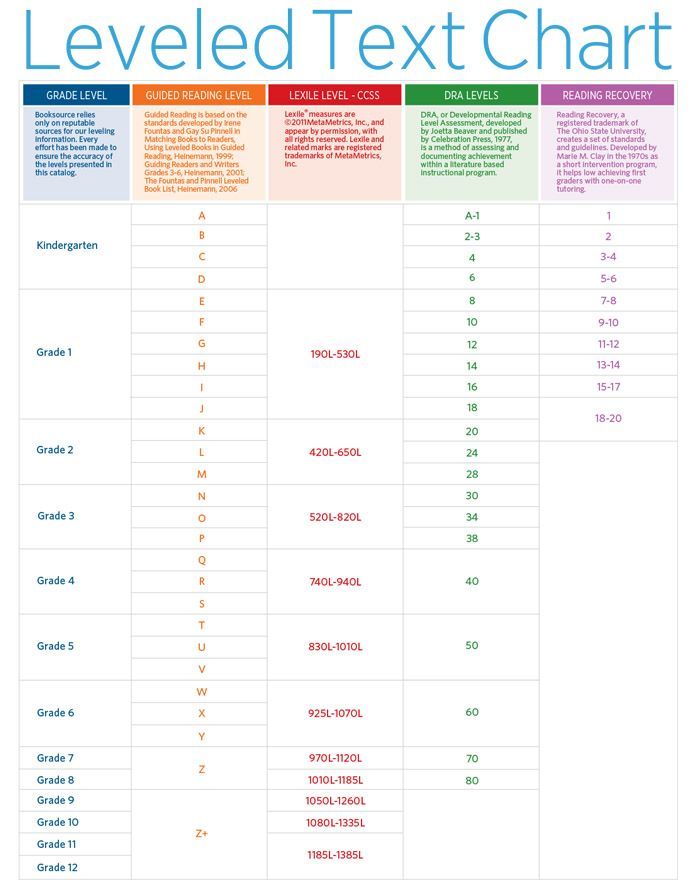 Icons do not appear next to closed documents.
To find the path to a document in a book, hold the cursor over the document name until a tooltip appears. Or choose Document Info from the Book panel menu.
Saving a book file
Book files are stored separately from document files. For example, if you choose Save Book, InDesign saves your changes to the book, not to the documents in the book.
-
Do one of the following.
-
To save the book with a new name, choose Save Book As from the Book panel menu, specify a location and file name, and then click the Save button.
-
To save the book with the same title, choose Save Book from the Book panel menu, or click the Save button at the bottom of the Book panel.
-
If the workbook is on a server, you must have a file management system in place so you don't accidentally overwrite corrections made by other users.
Closing a book
- To close a single book, choose Close Book from the panel menu.
- To close all open books in one palette at once, click the close button on the title bar of the Book palette.
Deleting documents from a book
-
Select a document in the Book panel.
-
From the Book panel menu, choose Delete Document.
Deleting a document from a book does not mean deleting the file from disk, the document is deleted only from the book file.
Replacement of documents in the book
-
Select a document in the Book panel.
-
From the Book panel menu, choose Replace Document, navigate to the document you want to replace the current one with, and click Open.
Opening a book file in Explorer or Finder
-
Select a document in the Book panel.
-
From the Book panel menu, choose Reveal in Explorer (Windows) or Reveal in Finder (Mac OS).
A window opens with an overview of the selected file.
When documents in a book are synchronized, the specified elements (styles, variables, master pages, trapping styles, cross-reference formats, conditional text options, numbered lists, and color swatches) are copied from the style source to the specified documents in the book, replacing elements with matching names.
If the elements present in the style source are not found in the synchronized documents, they are added. If some elements are missing from the style source, the corresponding elements in the synchronized documents remain unchanged.
Selection of elements to synchronize
-
From the Book panel menu, choose Sync Options.
-
Select the elements to copy from the style source to other documents in the book.
Be sure to select all styles included in the definition of other styles. For example, an object style can contain paragraph and character styles, which in turn contain patterns.
-
Select style match groups to avoid duplication of uniquely named styles that have been moved into or out of style groups.
Suppose a style source contains a character style in a group, and the document being synchronized contains the same character style outside the group. If this parameter is set, the character style is moved to the style group in synchronized documents.
If this option is not set, a second instance of the character style in the style group is created with the settings that match the style source. The character style outside the style group is not changed.
If a document contains multiple styles with the same name (for example, character style 1 in a style group and character style 1 outside the style group), InDesign behaves as if the option is not set. For best results, create styles with unique names.
-
Click OK.
Synchronizing documents in a book file
You can synchronize a book without opening its documents. InDesign opens closed documents, makes changes, and then saves and closes the documents. Documents that are open at the time of synchronization are modified but not saved.
-
In the Book palette, check the box next to the document you want to be the style source; the style source icon indicates which document is the style source.
Selected style source -
Verify that the elements to be copied from the style source are selected in the Synchronization Options dialog box.
-
In the Book palette, select the documents that you want to synchronize with the style source document. If no documents are selected, the entire workbook is synced.
To make sure that no document is selected, click in the free gray area below the list of documents in the book; you may have to scroll through the list or resize the Book panel to do this. To deselect a document, Ctrl-click (Windows) or Command-click (Mac OS) the document.
-
Choose Synchronize Selected Documents or Synchronize Book from the Book panel menu, or click the Synchronize button at the bottom of the Book panel.
Selecting Edit > Undo from the menu will undo changes only to documents that are open at the time of synchronization.
Synchronize master pages
Master pages are synchronized in the same way as other elements: master pages with the same names as in the style source (for example, A-Parent) are replaced. Synchronizing templates is useful for documents that use the same design elements, such as headers and footers. However, if you want to store page elements on the master page in documents other than the style source, do not synchronize the master pages, or create master pages with different names.
All master page elements that are modified on document pages after the first master page sync lose their association with the master. Therefore, if you plan to synchronize master pages in a book, we recommend that you synchronize all documents in the book before starting the design process. In this case, the modified master page elements will retain their association with the master page and will continue to be updated from the modified master page elements in the style source.
We also recommend that you synchronize master pages from only one style source. When synchronizing from a different style source, modified master page elements may lose their association with the master page. If you want to sync with another style source, first clear the Master Pages check box in the Sync Options dialog box.
A book file created in a previous version of InDesign can be converted by opening and saving the file in InDesign CS5. When a converted workbook is synchronized, renumbered, printed, packaged, or exported, the documents it contains are also converted to InDesign CS5 format. You can overwrite or keep the original document files.
-
From the InDesign CS5 menu, choose File > Open.
-
Select a book file created in a previous version of InDesign and click OK.
If the book contains documents saved in a previous version of InDesign, a warning is issued.
-
From the Book panel menu, choose Save Book As.
 Specify a new name for the converted book file and click the Save button.
Converting documents in a book
-
Open the book file in InDesign CS5.
-
Book panel menu:
-
If you want the original documents to be overwritten during conversion, select the Automatic Document Conversion check box.
-
If you want to keep the original documents and save the converted documents with a different name, clear the Automatic Document Conversion check box (the list of documents in the workbook will be updated to include the converted files, not the originals).
-
-
Do any of the following to convert documents.
-
From the Book panel menu, choose Synchronize Books (see Synchronize Book Documents).
-
From the Book panel menu, choose Update Numbering > Update All Numbers.
-
-
If the Automatic Document Conversion check box is not selected, InDesign prompts you to save each converted document with a new name.

Documents will also be converted when the book is printed or exported to Adobe PDF.
You can set options for numbering pages, chapters, and paragraphs in a book. In a book file, numbering styles and starting page and chapter numbers are determined by each document's settings in the Numbering and Section Options or Document Numbering Options dialog box. You can access one of these dialog boxes by choosing the Layout > Numbering & Section Options menu in a document or Document Numbering Options from the Book panel menu.
For information about adding page numbering to your document, see Adding basic page numbering.
The appearance of numbered paragraphs (for example, lists of pictures) is determined by the numbered list style included in the paragraph style.
The page range appears next to the name of each document in the Book panel. By default, InDesign updates the page and section numbering in the Book panel when pages are added or removed from book documents, and when changes are made to the book file, such as reordering, adding, or deleting documents.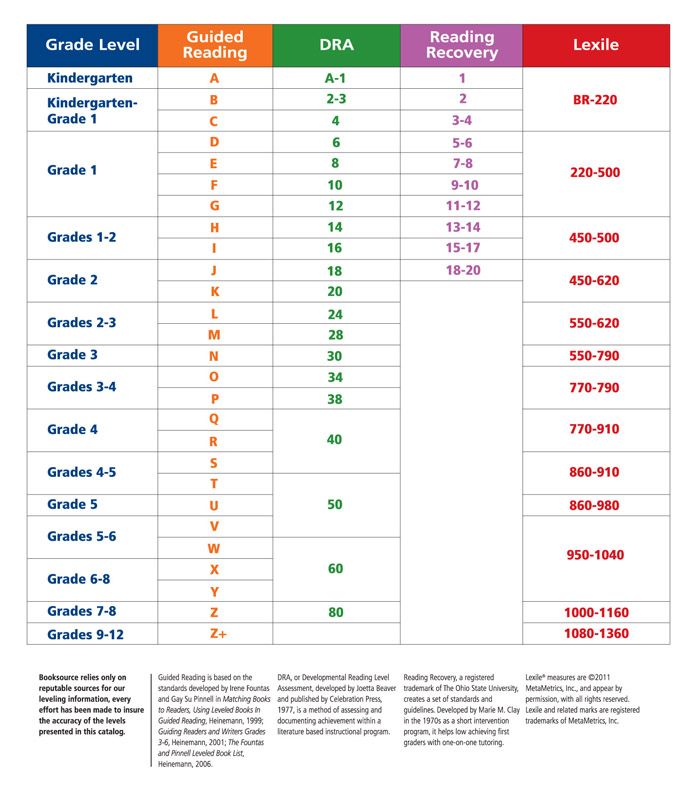 You can turn off the option to automatically update page and section numbers and update the numbering in the book manually.
If the numbering of the updated workbook is incorrect, it is possible that absolute numbering is set instead of section numbering in the General section of the Preferences dialog box. See Show absolute or section numbering in the Pages panel.
If the document is missing or cannot be opened, a question mark "?" from the position where the missing document should be to the end of the book. This means that the actual page range is unknown. Before updating the numbering, delete or replace the missing document. The "In Use" icon next to the document name means that the document is opened by another user in a workflow; to update the numbering, this user must close the document.
Change page and chapter numbering settings for each document
-
Select a document in the Book panel.
-
From the Book panel menu, choose Document Numbering Options, or double-click the document's page numbers in the Book panel.

-
Set pagination, section, and chapter numbering options. (See Document numbering options.)
-
Click OK.
If, instead of selecting the Automatic Page Numbering option, you specify the start page number of a document in a book, the document will start on the specified page; and all subsequent documents in the book will be renumbered accordingly.
Start numbering on an even or odd page
You can start page numbering in a document on an even or odd page.
-
From the Book panel menu, choose Book Page Number Options.
-
Select Continue on next odd page or Continue on next even page.
-
Select the Insert Blank Page check box to add a blank page at the end of any document before the next one, which must start on an odd or even page, and click OK.
Turn off automatic numbering in a book
-
From the Book panel menu, choose Book Page Number Options.

-
Clear the Automatically update page and section numbers check box, and then click OK.
-
To manually update page numbering, choose Update Numbering > Update All Numbers from the Book panel menu.
You can also update only page and section numbers or chapter and paragraph numbers.
Using paragraph numbering in books
To use numbering for lists of pictures, tables, or other items, you must first define the numbered list to use in the paragraph style. The definition of a numbered list determines whether continuous paragraph numbering will be used throughout the documents of the book.
-
Open the document used as the style source for the book.
-
Select the Text menu > Bulleted & Numbered Lists > Define Lists.
-
Select New to define a list, or select an existing list and the Edit command.
-
Select Continue Numbering Between Stories and Continue From Previous Document in Book at the same time.
Learn more