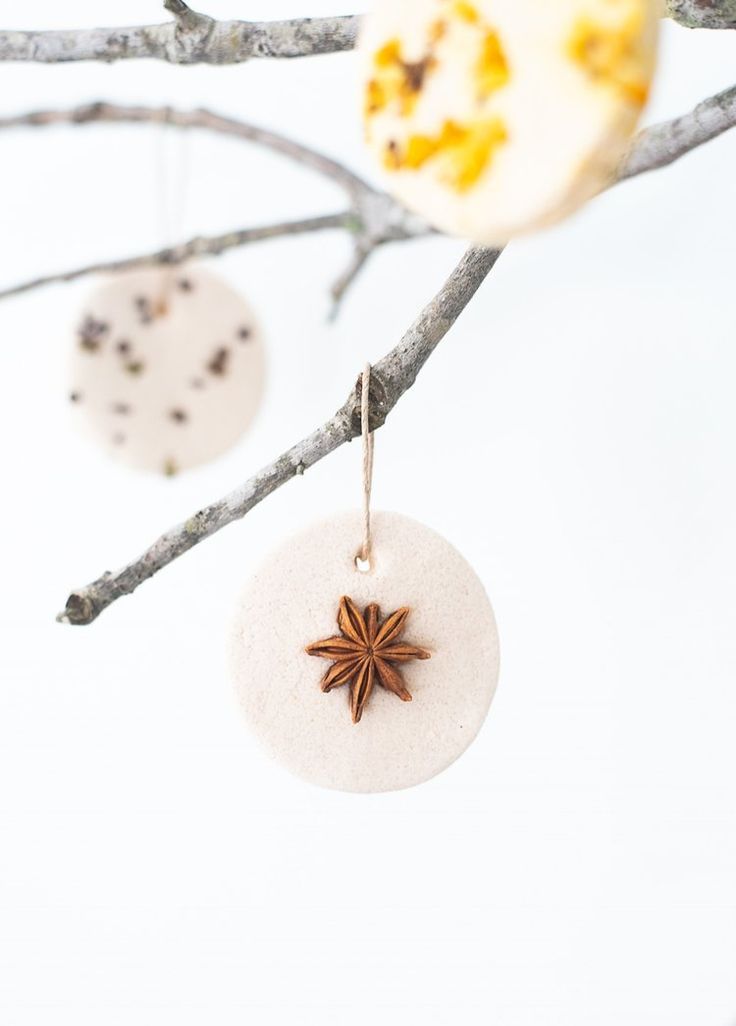
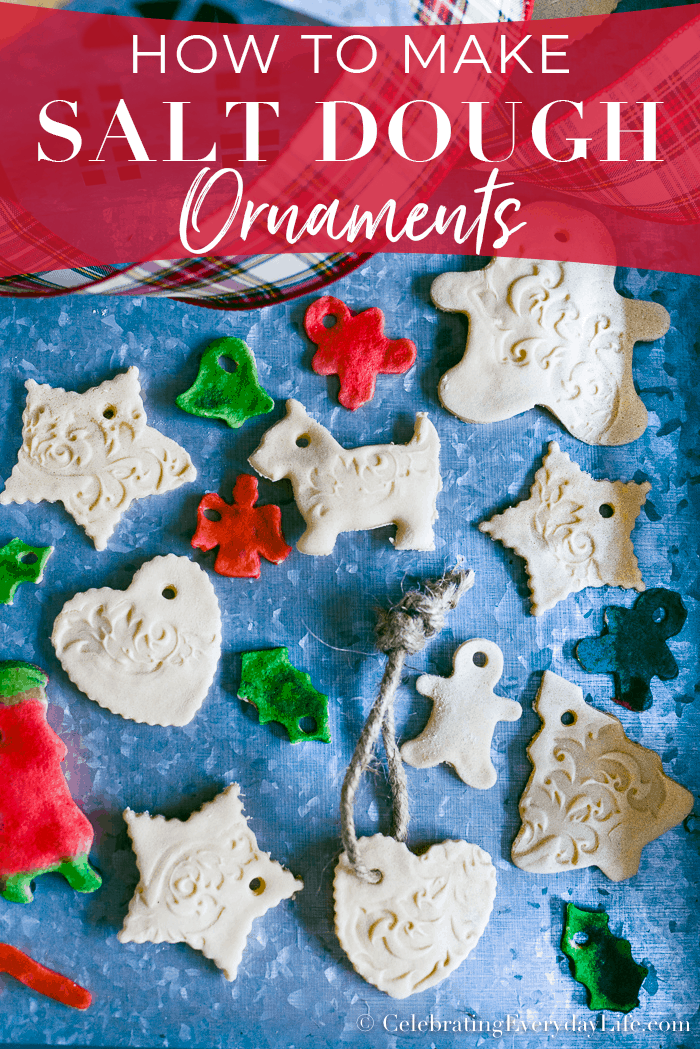
Salt dough christmas ornament
The Best Salt Dough (for Ornaments and Crafting!) to Make with the Kids
Learn how to make classic salt dough with the kids, with baking, painting, and storage info. This method is straight forward, easy, and thorough—and they a perfect kids holiday gift for grandparents, teachers, and loved ones!
Salt Dough
This salt dough is a staple of childhood and I love doing this Christmas activity with my kids each year—and throughout the rest of the year too! We love to make salt dough handprints, ornaments, and sometimes, just any old shape they want to. It’s an easy project that we can do together—and then share as kid-made holiday gifts, keepsakes, or house decorations.
Salt Dough Recipe
Making salt dough at home is as easy as combining three pantry staples together into a dough. It’s fairly fool proof (as long as you follow the measurements!) and is a recipe that even little kids can help make.
Ingredients in Salt Dough
To make this recipe, you’ll need:
- table salt
- all-purpose flour
- water
TIP: That’s it! (I buy store brand, cheap flour for this since project to keep it very budget-friendly. )
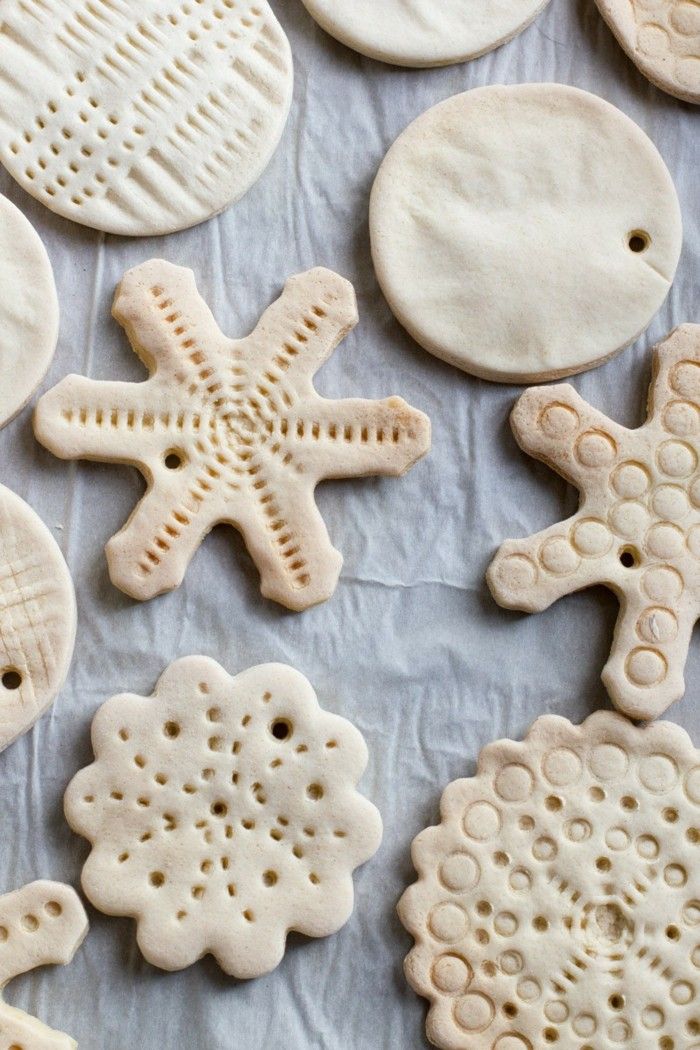
How to Make Salt Dough Ornaments Step-by-Step
Here’s a look at how to make the dough for this salt dough. Scroll down to the bottom of the post for the full information.
- Measure out the flour and water. (photo 1)
- Add the water. (photo 2)
- Stir with a wooden spoon. (photo 3)
- Keep stirring until the dough is mostly together and is hard to stir any longer. (photo 4)
- Knead a few times with hands to bring the dough together. (photo 5)
- Place dough between two pieces of parchment paper and roll out. (photo 6)
TIP: You can divide the dough in sections so multiple kids can have their own dough to work with.
How to Cut Out, Bake and Decorate Salt Dough Ornaments
Once you start rolling, here’s a look at what will follow if you want to make these into ornaments. (Skip the hole poking if you want to just make these as shapes for the kids to paint.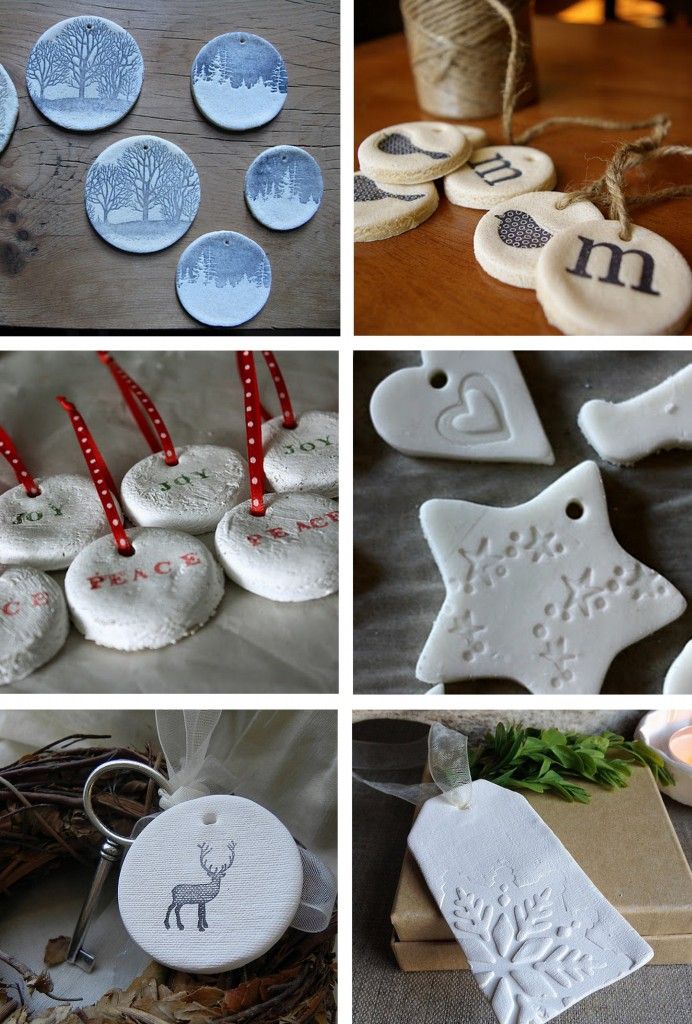 )
)
- Roll out, changing directions occasionally, until about 1/4-inch thick. (This may not get precise if you’re working with kids and that’s okay!) (photo 1)
- Stamp cookie cutters. (photo 2)
- Remove the dough around the shapes, then either transfer the whole piece of parchment paper to a cookie sheet OR transfer just the shapes to a parchment-lined cookie sheet. (photo 3)
- Poke holes so you have a place for a string to hang as ornaments. (photo 4)
- Press in a hand to make a handprint, if desired. (photo 5)
- Bake, let cool and decorate! (photo 6)
TIP: Re-roll any remaining dough after Step 3 here to make additional ornaments.
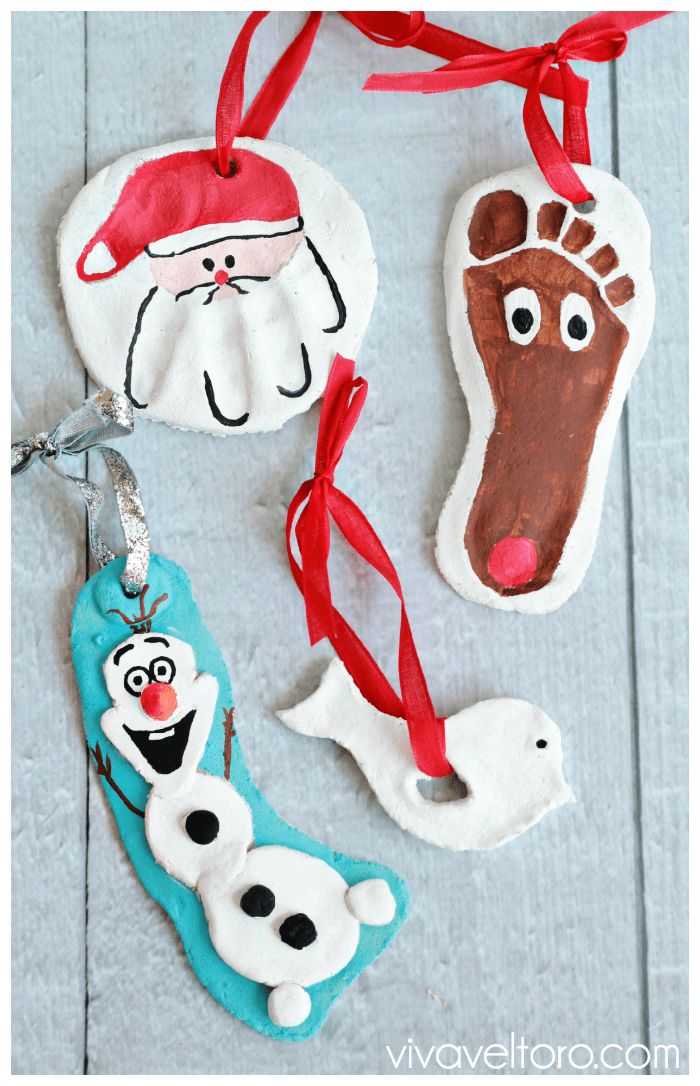
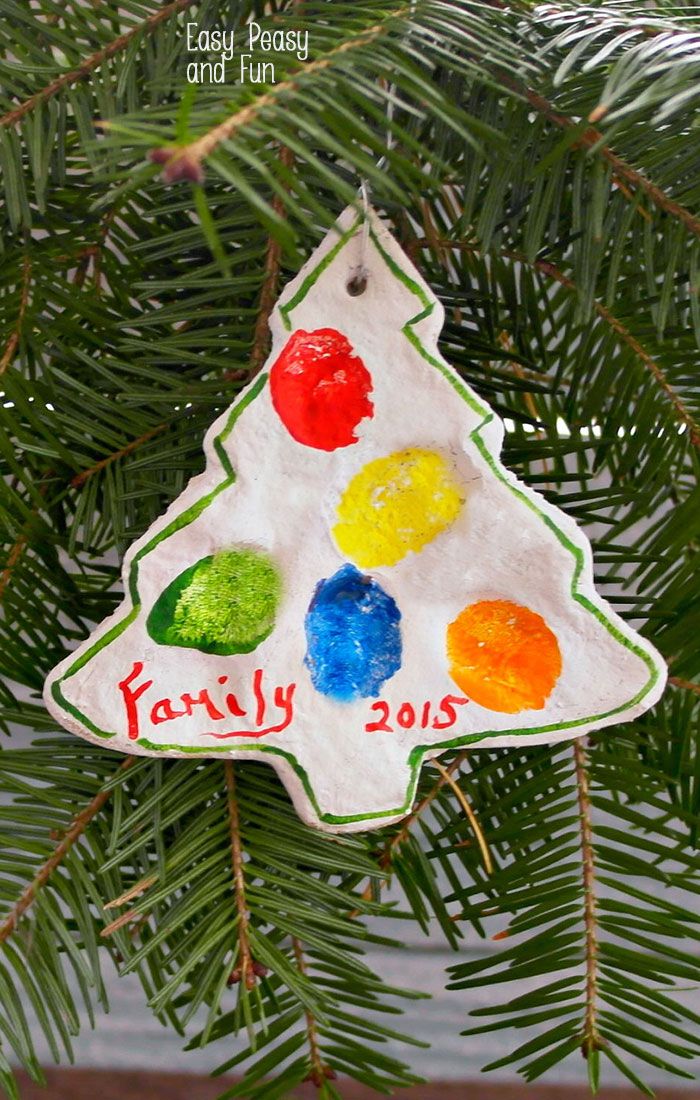
Salt Dough Handprint Ornament
Capturing a handprint in salt dough is a perfect grandparent gift, or a keepsake ornament to make for your own tree. I love pulling out our little collection year after year. Know that getting a good print may take a few tries if doing a baby’s hand!
TIP: Check the size of your round cookie cutter against your child’s hand to make sure that it’s big enough.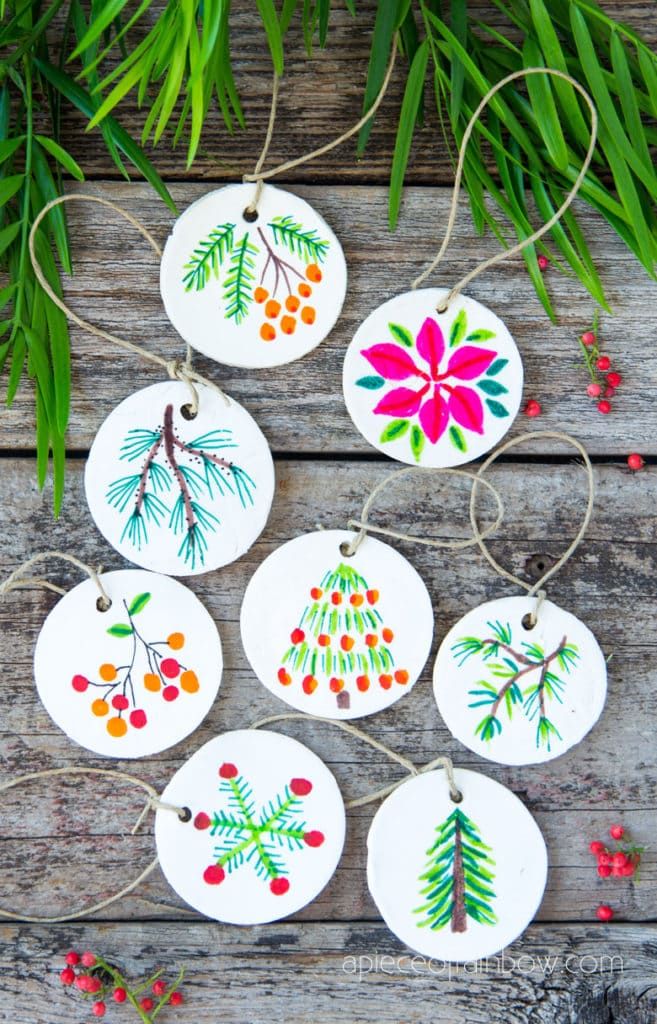 You may need one that’s 4-5 inches in diameter.
Best Paint for Salt Dough Ornaments
If the kids are wearing smocks, the table is protected, and you are reasonably sure they won’t paint all over their hands and faces, I like using regular acrylic craft paint since it holds up best on crafts. With younger kids who may wind up wearing more of the paint, I’d recommend tempura washable paints.
TIP: We put our paint into the base of old egg cartons since we always have those on hand. You can also use paper plates.
How to Preserve Salt Dough Ornaments
To help preserve your finished dried ornaments, you can coat with a layer or two of Mod Podge or spray with a sealer. Either work well. I’d recommend coating or sealing both sides, so do one side and let it dry, and then do the second side. If using the sealer, do it in a well ventilated area without the kids too close by.
TIP: To store these ornaments from year to year, you’ll want to wrap in bubble wrap. Store in a container that won’t be banged around, dropped or exposed to excess moisture.
Why is my salt dough puffing up?
If you mistakenly use self-rising flour, they may puff. And sometimes it happens randomly. Keep the oven temperature low and if it happens consistently, you can try baking at an even lower temperature for a slightly longer amount of time.
Tips for Making the Best Salt Dough Ornaments
- If the dough is too wet and sticky, knead in a little more flour. If it’s too stiff, add a little more water. There is a big range in the way different flours absorb liquid, so there is a normal range of variation in liquid needs. It should be easy to work with—soft and not too stiff and not excessively sticky.
- Use paper lollipop sticks or a skewer to make your holes.
- Use a 4-5 inch round cookie cutter to make handprint ornaments.
- Tie on baker’s twine or thin ribbon to hang as ornaments.
- Try to get the dough to an even thickness before baking so the ornaments bake evenly.

- Bake for the time indicated and then longer if your ornaments still feel soft. They should be firm to the touch without much give.
- Let cool fully before painting.
- If you want to paint the background of a handprint ornament, do that before you paint the inside of the hand. Let dry before adding a second color. Some people like to paint the whole thing white or cream to give it a more finished look.
- Use acrylic craft paint for older kids who can be trusted with paint and tempura washable paints with younger toddlers.since it holds up best on crafts. With younger kids who may wind up wearing more of the paint, I’d recommend.
- To help preserve your finished dried ornaments, you can coat with a layer or two of Mod Podge or spray with a sealer.
I’d love to hear your feedback on this project and what your kids thought of it, so please comment below to share!
Prep Time 30 minutes
Cook Time 2 hours
Total Time 2 hours 30 minutes
Author Amy Palanjian
Cuisine American
Course Holiday
Calories 1kcal
Servings 2 dozen ornaments
- ▢ 4 cups flour
- ▢ 1 cup table salt
- ▢ 1.
 5 cups water
Mix the ingredients together in a large bowl using a wooden spoon. When it becomes too stiff to stir, use clean hands to bring the dough together.
NOTE: If the dough is too wet and sticky, knead in a little more flour, about 1 tablespoon at a time. If it's too stiff, add a little more water, about 1 tablespoon at a time. There is a big range in the way different flours absorb liquid, so there is a normal range of variation here. It should be easy to work with—soft and not too stiff and not excessively sticky.
Knead a few times until the dough is uniform and soft, about 3-5 minutes.
Divide dough into 2 or 4 sections and roll out to about 1/4-½ inch thick between two sheets of parchment paper. This will help prevent sticking.
Cut out with cookie cutters. Transfer shapes to a parchment-lined baking sheet.
Repeat rolling and cutting out shapes to use up the dough.
Preheat oven to 250 degrees F.
Do a 4-5-inch circle and press in a child's handprint if desired.
Use a paper lollipop stick or a skewer to make a hole to hang as an ornament.
If making ornaments, bake for 90 minutes to 2 hours; if baking handprints, bake for 2-3 hours. Continue baking both ornaments and handprints as needed until they are until just firm to the touch, checking every 20 minutes. (It's not a problem if yours take longer than the initial baking time—it varies based on thickness and size...which will likely vary if you are baking these with kids!) They do not need to be rock hard, but should not feel squishy. Handprints will likely take longer than smaller ornaments and may take closer to 4 hours.
Remove from oven, let cool, and paint if desired with acrylic or washable tempera paint.
Once paint is completely dry, seal with Mod Podge if desired.
Mixing Bowl
parchment paper
Mini Cookie Cutters
- Divide the recipe in half to make a smaller portion of dough if desired.
- Use paper lollipop sticks or a skewer to make your holes.
- Use a 4-5 inch round cookie cutter to make handprint ornaments.
- Tie on baker's twine or thin ribbon to hang as ornaments.
- Try to get the dough to an even thickness before baking so the ornaments bake evenly.
- Bake for the time indicated and then longer if your ornaments still feel soft. They should be firm to the touch without much give but do not need to be rock hard. It is not a sign of a problem if yours take longer than mine did to bake—flours and ovens vary!
- Let cool fully before painting.
- If you want to paint the background of a handprint ornament, do that before you paint the inside of the hand. Let dry before adding a second color.
- Use regular acrylic paint for older kids who can be trusted with paint and washable tempera paint with younger toddlers.
- To help preserve your finished dried ornaments, you can coat with a layer or two of Mod Podge or spray with a sealer.
Calories: 1kcal, Fat: 1g, Saturated Fat: 1g, Polyunsaturated Fat: 1g, Monounsaturated Fat: 1g, Fiber: 3g, Sugar: 1g, Calcium: 31mg, Iron: 6mg
Tried this recipe?Rate in the comments and tag @yummytoddlerfood on IG!
Salt Dough Ornament Recipe - The Best Ideas for Kids
Kim 60 Comments
All activities should be supervised by an adult. As an Amazon Associate, I earn from qualifying purchases. This post may contain affiliate links.
Salt dough ornaments are the perfect Christmas craft and activity to do with your kids. Make them to give as gifts or simply to hang on your own tree. We will walk you through our easy salt dough ornament recipe and answer any questions you may have on how to make salt dough!
RELATED: Salt Dough Handprint Recipe
Table of Contents
- Salt Dough Ornament Recipe
- Ingredients Needed to Make This Salt Dough Ornament Recipe
- How to Make Salt Dough – Ornament Recipe
- Get the Recipe
The best part about making salt dough is it’s easy! And you typically already have the ingredients on hand – salt, flour and water.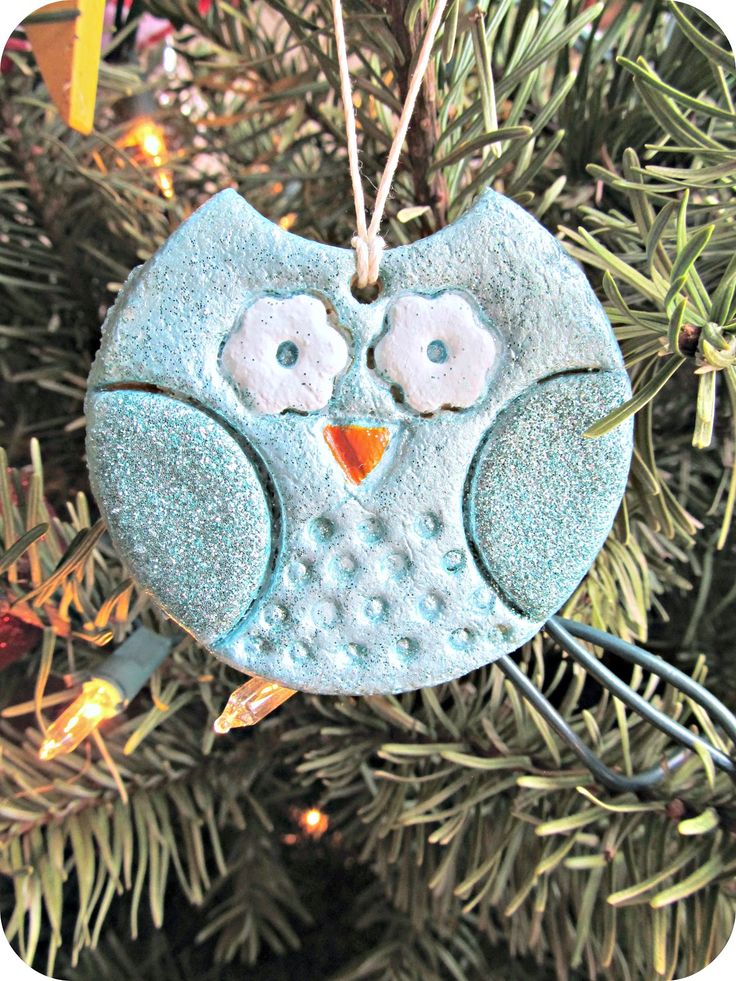 Don’t worry if you don’t have the decoration supplies just yet. Make your batch of salt dough, bake and then let them air dry for a few days before decorating.
Just a friendly reminder that salt dough can be dangerous to pets if ingested – please keep out of reach of pets.
We’re going to show you how to make these glittery salt dough ornaments. Your Christmas tree will be glistening with these homemade ornaments!
Ingredients Needed to Make This Salt Dough Ornament Recipe– 4 cups Flour
– 1 cup Salt
– 1.5 cups Water (maybe a little more)
– Christmas Cookie Cutters
– Acrylic Paint
– Glitter
– Clear Glue
– Gold Twine
– Clear glaze spray or Mod podge
How to Make Salt Dough – Ornament Recipe1.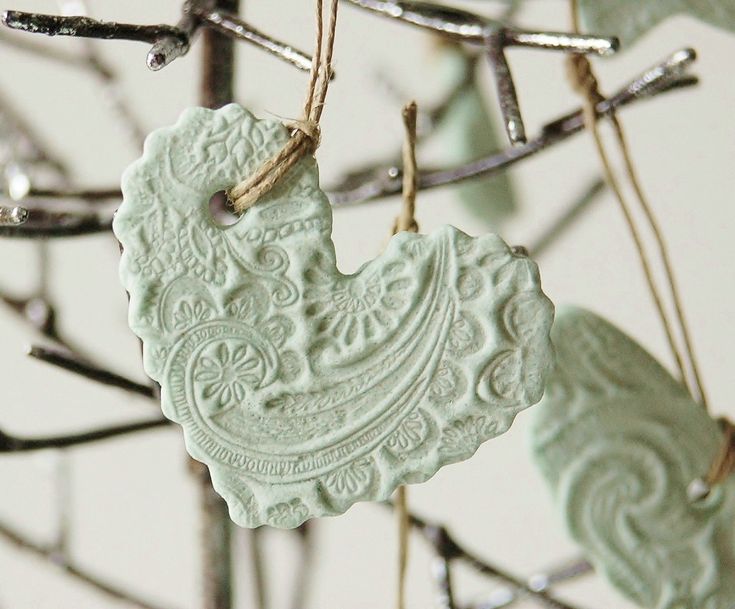 Preheat your oven to 200 degrees Fahrenheit.
Note: Check what temperature your oven setting is. If your oven temperature is Celsius you will need to bake at a much lower temperature (the lowest setting is usually a good one to start with).
Adults will need to do the baking part, but kids can help decorate!
2. Combine your flour, salt and water and mix well. Knead for 10 minutes. If your dough is too dry, add a little bit more water. If it’s too sticky, add a little bit of flour. It will help to place flour down on your surface when kneading and on your hands.
Keep kneading until the dough becomes really smooth. This takes about 10 minutes.
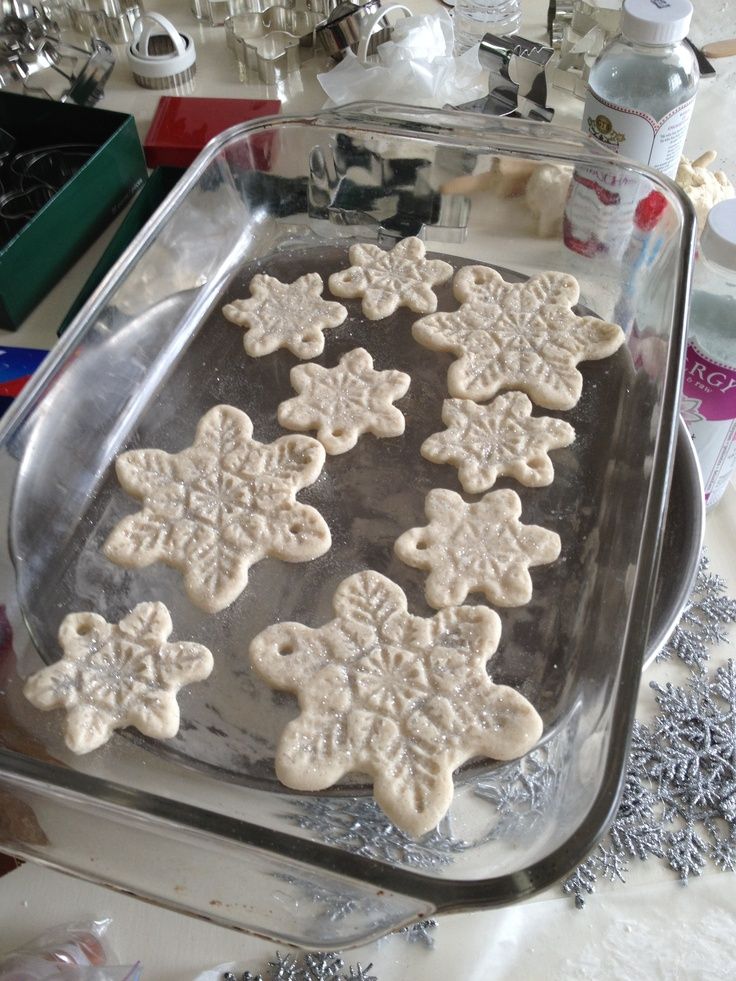
3. Once you’re done kneading, roll out the dough to about 1/2 cm thickness. The thinner you make the ornaments, the better they will thoroughly bake and dry through. If you make them too thick they will take too long to dry.
4. Using your Christmas cookie cutters, cut out different shapes for your salt dough ornaments.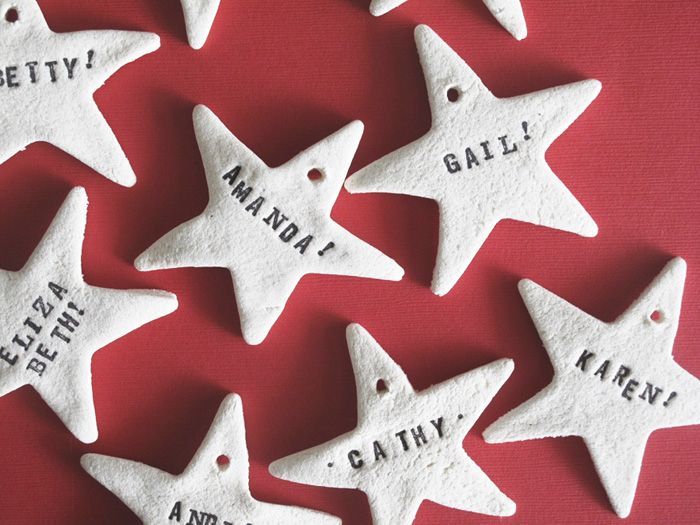
5. Using a straw, make a hole in the top of the ornament for where you would like the twine to hang.
6. For a faster baking process, we like to let the dough air dry for a day.
Bake for 1-2 hours. If your ornaments are not completely dried through when you pull them out put back in for another hour. The baking time will vary greatly depending on the size and thickness of your ornaments. Larger ornaments will take longer whereas smaller ornaments will take less time. You can also let them air dry for a day before baking and this will cut down on the baking time.
Make sure to flip them when air drying or baking so that the bottoms of the ornaments dry also.
Note: If you notice puffing when baking, it is likely because the ornaments are too thick. In this case, let them air dry for a few days before baking and make sure they are baking at a low temperature for your oven (200 degrees Fahrenheit).
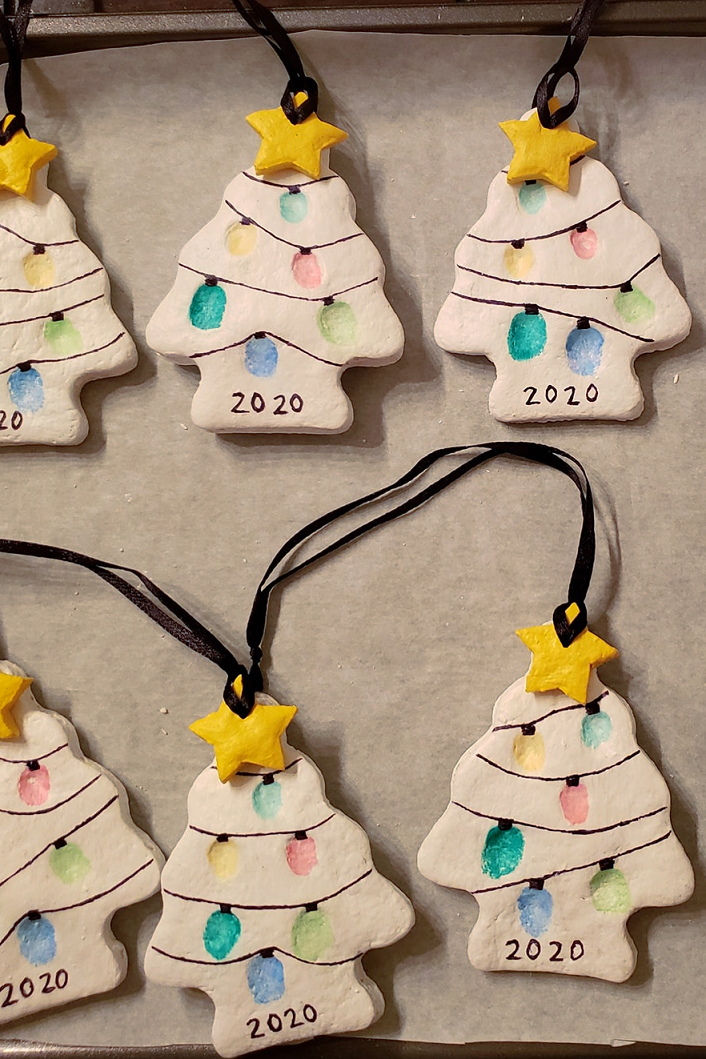
7. Once cool and completely dried, paint with non-toxic acrylic paint. We used white for the snowflake, red for the mitten, green for the Christmas tree and gold for the bell.
8. Before adding the glitter, you’ll need to seal the ornaments. This will help them keep longer. Make sure your ornaments are completely dried through before sealing. Spray with a clear glaze spray (adults only) or finish with mod podge.
9. Now add clear glue on top of your ornament. Shake glitter on top until you fill the ornament with glitter. Kids will love helping with this part!
Once you’re done, add your gold twine for hanging them on the tree.
Storage Tip: Keep in a cool, dry place when not in use.
Prep Time15 mins
Active Time2 hrs
Total Time2 hrs 15 mins
- ▢ 4 cups flour
- ▢ 1 cup salt
- ▢ 1.5 cups water *Maybe a little more water needed once kneaded.
Preheat your oven to 200 degrees Fahrenheit. Important: Check what temperature your oven setting is. If your oven temperature is Celsius you will need to bake at a much lower temperature (the lowest setting is usually a good one to start with).
Adults will need to do the baking part, but kids can help decorate!
Combine your flour, salt and water and mix well. Knead for 10 minutes. If your dough is too dry, add a little bit more water. If it's too sticky, add a little bit of flour. It will help to place flour down on your surface when kneading and on your hands.
Keep kneading until the dough becomes really smooth. This takes about 10 minutes.
Once you're done kneading, roll out the dough to about 1/2 cm thickness. The thinner you make the ornaments, the better they will thoroughly bake and dry through.
 If you make them too thick they will take too long to dry.
Using your Christmas cookie cutters, cut out different shapes for your salt dough ornaments.
Using a straw, make a hole in the top of the ornament for where you would like the twine to hang.
For a faster baking process, we like to let the dough air dry for a day.
Bake for 1-2 hours. If your ornaments are not completely dried through when you pull them out put back in for another hour. The baking time will vary greatly depending on the size and thickness of your ornaments. Larger ornaments will take longer whereas smaller ornaments will take less time.
Make sure to flip them when air drying or baking so that the bottoms of the ornaments dry also.
Once cool and completely dried, paint with non-toxic acrylic paint. We used white for the snowflake, red for the mitten, green for the Christmas tree and gold for the bell.
Before adding the glitter, you'll need to seal the ornaments. This will help them keep longer. Make sure your ornaments are completely dried through before sealing. Spray with a clear glaze spray (adults only) or finish with mod podge.
Now add clear glue on top of your ornament and shake glitter on top until you fill the ornament with glitter.
To preserve longer - it is recommended to seal your ornaments.
Storage: Keep stored in a cool, dry place when not in use.
These have to be our favorite salt dough ornaments we’ve made and they look great on the Christmas tree!
Looking for more fun Salt Dough Ideas?
See over 25+ Salt Dough Ornament Ideas – these are such cute keepsakes!
These Salt Dough Handprint ornaments are our most popular salt dough ornament. See how to make these adorable handprint keepsakes!
And for another ornament idea – make these salt dough star ornaments. These look great with the bell added!
50+ master classes with photos step by step
A wonderful time, festive and magical is the New Year, for which adults and children prepare gifts and souvenirs for friends and loved ones. It is not necessary to shop in the store, delicious gifts can be prepared independently from improvised materials, such as puff pastry. Crafts are original, bright. Christmas trees are decorated with unique toys, used as original and unusual souvenirs.
To create crafts, salt dough, paints, beads, ribbons, rhinestones and other materials are prepared to decorate a gift, make it unusual, exclusive, delightful. Crafts created by one's own hands have a soul, because they are created sincerely, with inspiration.
New Year's dough crafts for beginners
Beginners are advised to take on simple crafts that do not require special modeling skills. An excellent option for New Year's crafts from dough will be toys cut out using baking dishes.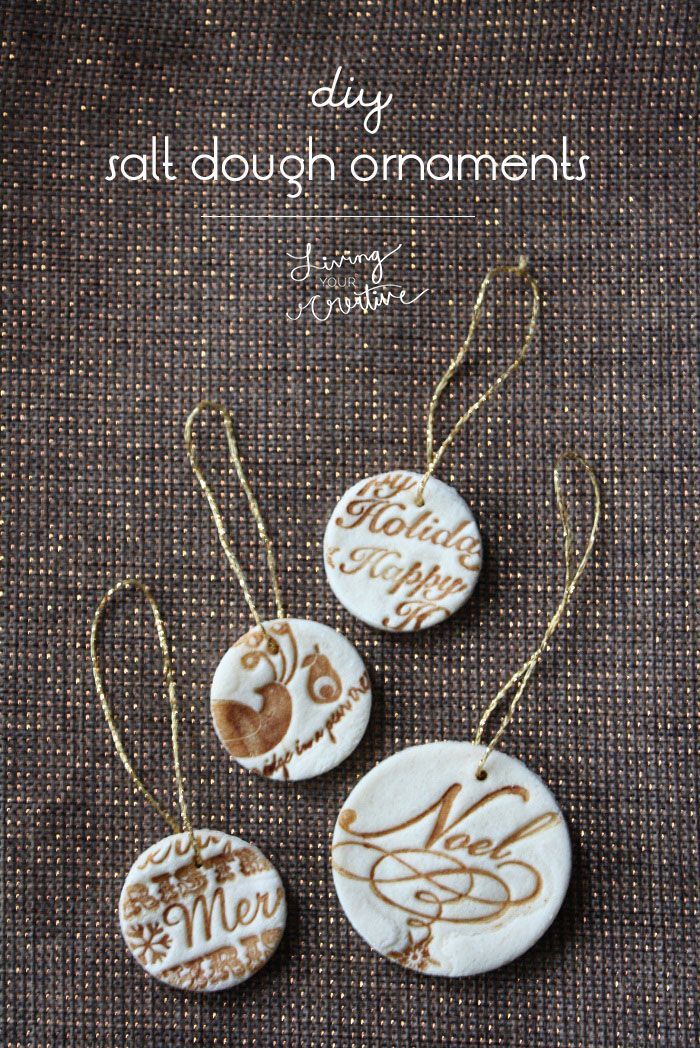
#1 Christmas decorations from salt dough: a step-by-step master class
We prepare dough or cold porcelain, roll it out with a rolling pin several millimeters thick, cut out figures using baking dishes, make a hole for the thread and send the toys to dry. After drying, paint the products and additionally decorate with sparkles. We thread a thread and Christmas toys from the dough are ready!
#2 Simple New Year crafts made from dough using baking molds
And one more version of Christmas toys made from dough. Unlike the previous MK, in this we will decorate crafts not with paints, but with buttons and ribbons. It is necessary to glue the decor elements after the products have completely dried.
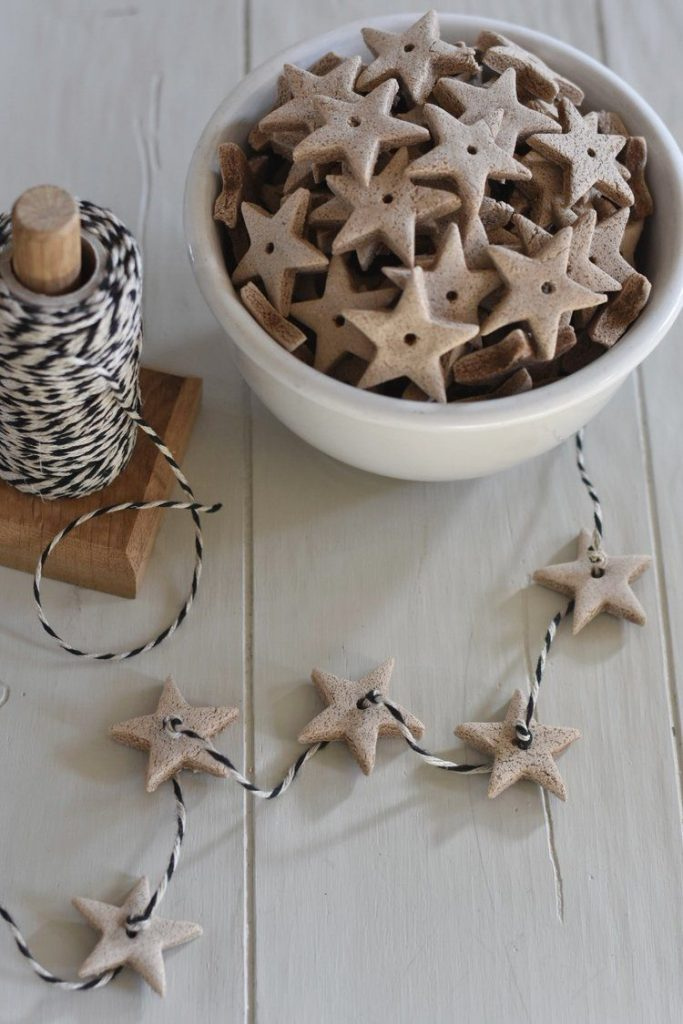
#3 Salt dough Christmas garland
Not only toys, but also garlands can be made from dough using baking molds. To make it convenient to pull the thread, make holes for it not from above, but in the first third of the craft. The base thread should be stretched only after the dough has completely dried.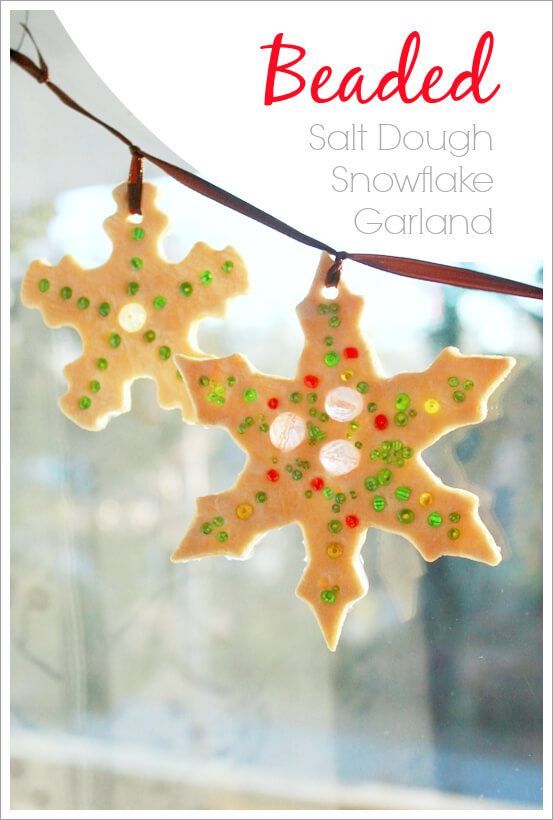
#4 New Year's crafts from the “Gingerbread Man” dough
Cut out gingerbread men from the dough (it is more convenient to do this using a special mold), wait for it to dry, decorate with stained glass or acrylic paint. Depending on how exactly you will use the ginger man, make a hole for the thread either at the top or in the first third.
#5 Do-it-yourself dough stars: Christmas crafts from improvised materials
Simple dough stars decorated with small elements - a simple but very original way to decorate a Christmas tree or a gift. You can also make an original garland from salt dough stars. To make the garland more original, roll out the dough, make an imprint on it, for example, an openwork napkin, and then cut out the details. Do not forget to make holes in the right places and only after that send the craft to dry.
#6 Dough craft for children
Very young needlewomen and needlewomen can't make complex crafts yet, but leaving a print of your hand is a great pleasure. A heart with a small palm will be an excellent New Year's gift for grandparents, and after the crafts have completely dried, the kids will take great pleasure in decorating, especially if sparkles are used. From the imprint of a child's hand, you can also make a bullfinch.
#7 DIY salt dough starfish
Such a star will be an ideal gift for lovers of the sea and the sun. While we have winter and the cold is fierce, this little star will remind you of the warm sea and the scorching sun. See the step by step tutorial below.
#8 New Year's Dough Crafts for Beginners
For those who don't have time to master modeling, simple Christmas balls from dough are an excellent option. So that the craft does not look too simple, you can color it at your discretion. You can take note of our ideas or get inspired to create your own creation.
#9 Simple New Year crafts made from dough
And this is an option for those who still like to tinker. If you don’t have much experience in modeling, you can make simple crafts: a Christmas tree, a holly, a lollipop, a ball.
#10 Dough stars with a luminous core
Dough stars with a luminous center will become an unusual Christmas craft. With a larger shape we cut out an asterisk, with a smaller shape - the core. We cover the baking sheet with parchment, put the stars, and put plastic beads in the middle. We put it all in the oven and wait until the beads melt.
#11 Christmas decorations from dough from four-legged friends
If there is a four-legged friend in the house, some attribute of fluffy will be an excellent option for Christmas tree decorations from dough. For example, you can make a paw print or a personalized bone. The four-legged member of the family should also contribute to the decoration of the New Year tree.
#12 Christmas toy made of dough with a spruce sprig
Winter motifs can be added with a spruce sprig. Roll out the dough and firmly attach a spruce branch to it so that it prints well. Cut out the circle and send the craft to dry. After the paint has completely dried, draw the imprint of the spruce paw and the Christmas ball from the dough is ready!
#13 New Year's dough mitten: making Christmas decorations from scrap materials
You can make a mitten as a New Year's craft. You can decorate the product in different ways, for example, paint it or make an imprint of an openwork napkin. In general, turn on your imagination!
#14 Easy New Year's Dough Craft for Beginners
Another New Year's craft for beginners. We cut out round blanks from the dough (this can be done with an ordinary glass). We make holes for the threads along the diameter and send the workpieces to dry. After complete drying, we stretch colored threads into the holes. You can additionally decorate with beads, rhinestones or sparkles.
#15 New Year's dough craft month
Another great New Year's craft for those who don't have cutouts is the month. It is very easy to do and looks very impressive. Decor options of your choice.
#16 Dough bird: do-it-yourself Christmas crafts
If there are no baking molds and you don't want to make ordinary round Christmas decorations, the dove of peace will come to the rescue. If you do not like our birds, you can find a template on the Internet. Roll out the dough, attach the template, cut along the contour and send to dry. After drying, decorate as you wish.
#17 New Year crafts from improvised materials: dough and sticks
And this option is for the most desperate. In addition to the test, you will also need sticks. For residents of megacities, the search for ordinary wooden sticks can become a real quest, but if the kids have already dragged home all sorts of “necessary” twigs, it's time to use them!
#18 Christmas tree lollipop made of salt dough
To develop fine motor skills of children, you can make a Christmas candy. To do this, prepare the dough in two colors (without dye and with dye). We told how to color the dough at the beginning of the article. Roll out sausages of two colors and weave them together with a flagellum. Bend the stick into a cane shape and you can send it to dry.
#19 “Knitted” dough heart: making New Year crafts from improvised materials
If you really want to surprise your friends and relatives, then you can make such a warm heart.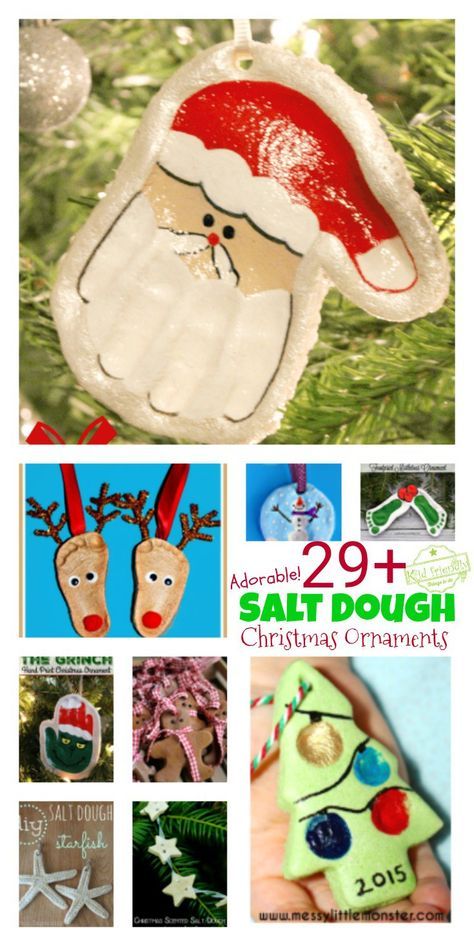 To do this, roll out a few thin sausages and twist them into flagella, put on top of the base and cut out with a baking dish. By the way, mittens will look great in this version.
Do-it-yourself Christmas trees made of dough
It's hard to imagine the New Year without a Christmas tree. And it just so happened that it is the Christmas tree that decorates our homes during the New Year holidays. A green beauty with colorful lights makes this time of year truly magical. So why not make the main symbol of the New Year in miniature as a gift to dear and close people. From the test you get a very original craft.
#1 Miniature Christmas tree made of dough
You don't have to buy a real Christmas tree to decorate your home or office. A miniature forest beauty can be made at home from improvised materials, such as salt dough or cold porcelain (we told the recipes above). From the mass for modeling we form a cone, and then with the help of scissors we “pinch off” the paws.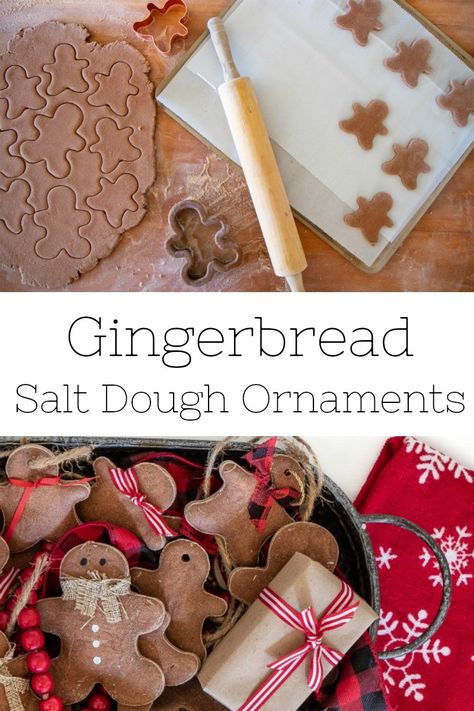 For greater realism, the paws can be bent up a little. Next, we send the Christmas tree to dry. After complete drying, the craft can be further decorated, for example, with sparkles, beads, rhinestones, etc.
#2 Christmas tree toy made of Christmas tree dough for children
You can make simple crafts with little ones. Using a mold, cut out a Christmas tree from the dough, leave fingerprints in it and send it to dry. After the craft is completely dry, paint it. Fingerprints can be designed in the form of Christmas toys, you can combine them with a strip and get a garland, and if you slightly correct the shape of the prints, making them more elongated, you can depict luminous lanterns. In general, there is no limit to the flight of fancy!
#3 A simple Christmas tree made from dough: making New Year's crafts from improvised materials with children
Kids just love to sculpt, in addition, this activity is very useful for developing fine motor skills. With the smallest, it’s worth starting with a simple one. Prepare the dough, roll it out and cut out some Christmas trees (with or without a mold). Decor options can be countless, for example, ribbon and sequins (after drying), add lace patterns (you can print an openwork napkin before cutting the Christmas tree) or decorate crafts with buttons, beads, candies or marmalades. Buttons can be glued both before and after drying, but you should decorate with lollipops or marmalade before drying and dry in the oven (the lollipops will melt and look like glass decorations).
#4 3D star Christmas tree made of dough
If you consider flat crafts to be banal, you can make a 3D Christmas tree, for example, from stars. To do this, you will need stars of different sizes (you can cut it out using a mold or mold it yourself). In each star in the center, make a hole for the thread and send to dry. After drying, string the stars on a thread, and for more originality, insert a bead between each link. We tie knots, cut off the excess and a voluminous Christmas tree made of dough with our own hands is ready!
#5 DIY Christmas tree made from salt dough
Another version of the Christmas tree made from stars for those who do not have cutouts.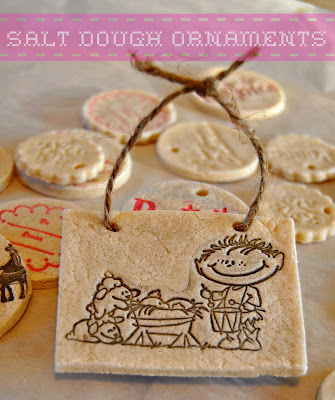 Making asterisks without foma is very simple. To do this, cut out a circle, divide it into 5 sectors and give each sector with your fingers the shape of an arrow. Then fold the stars on top of each other and send the craft to dry. After complete drying, you can proceed to the decor.
#6 Miniature dough Christmas tree with spade maker
An excellent dough Christmas tree is made with a spade maker. It is better, of course, to pre-color the dough with green pigment. Pass the dough through the garlic maker, and then carefully glue these sausages to the paper cone. You can glue the dough for a moment. After drying, the Christmas tree can be further decorated with sparkles.
#7 Another Christmas tree with the help of a spadefoot
An original Christmas tree will turn out if the dough passed through the spadefoot is rolled into loops, and these loops are glued to the base cone. Outwardly, the Christmas tree will look like a craft made of threads. In general, unusual!
More Christmas trees from improvised materials you will find in the article:
Published: September 30, 2021
DIY foamiran Christmas tree For the New Year holidays, there is nothing better than a souvenir that is made with your own hands.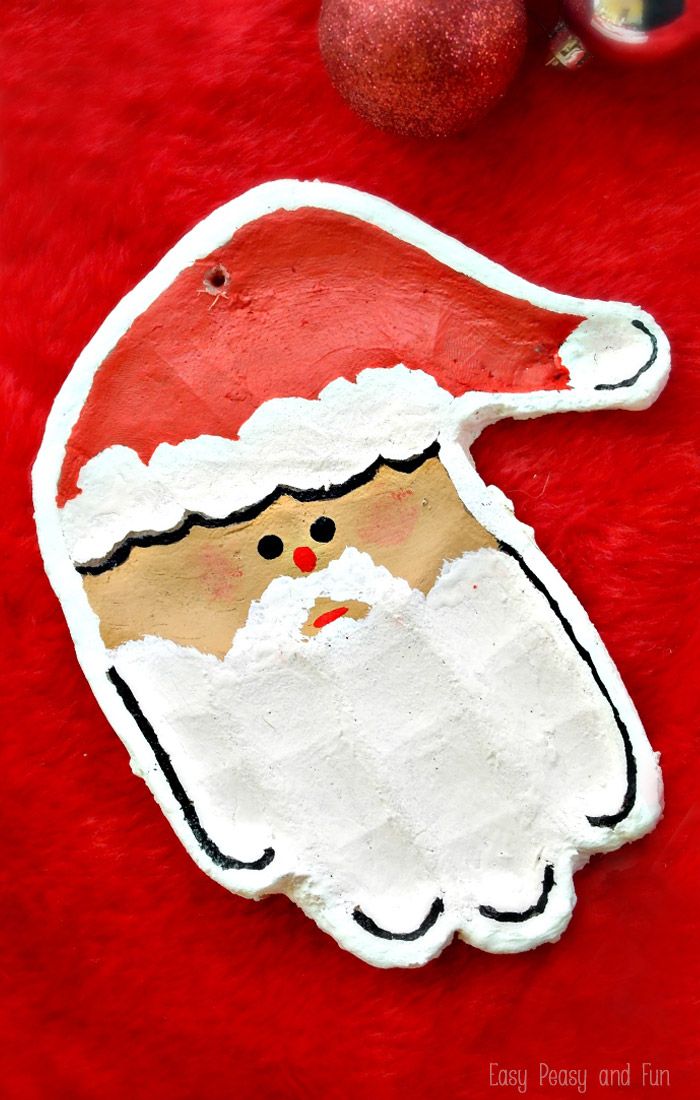 A tree made of foamiran can just become such a souvenir. Making such a craft is quite simple. Cut out figures from foamiran: stars, circles, squares, hearts, etc. and a cone. Glue decorative elements on the cone. The option is more complicated, but more original can be done like this. […]
Do-it-yourself Santa Claus and Snow Maiden made of dough
Well, what is the New Year without a good Grandfather and his assistant granddaughter? Sculpting people is a special skill, and small details will help develop motor skills. In addition, who knows, maybe after such home entertainment your child decides to become a sculptor, and his work will surpass Michelangelo himself in the future!
#1 Crafts from palms for the New Year: making Santa Claus
A simple craft made from salt dough on a palm print. It should be painted only after the product has completely dried. By the way, do not forget to make a hole for the thread before drying.
#2 Dough Santa Claus: easy craft for kids
Kids can also make a simple flat Santa Claus craft.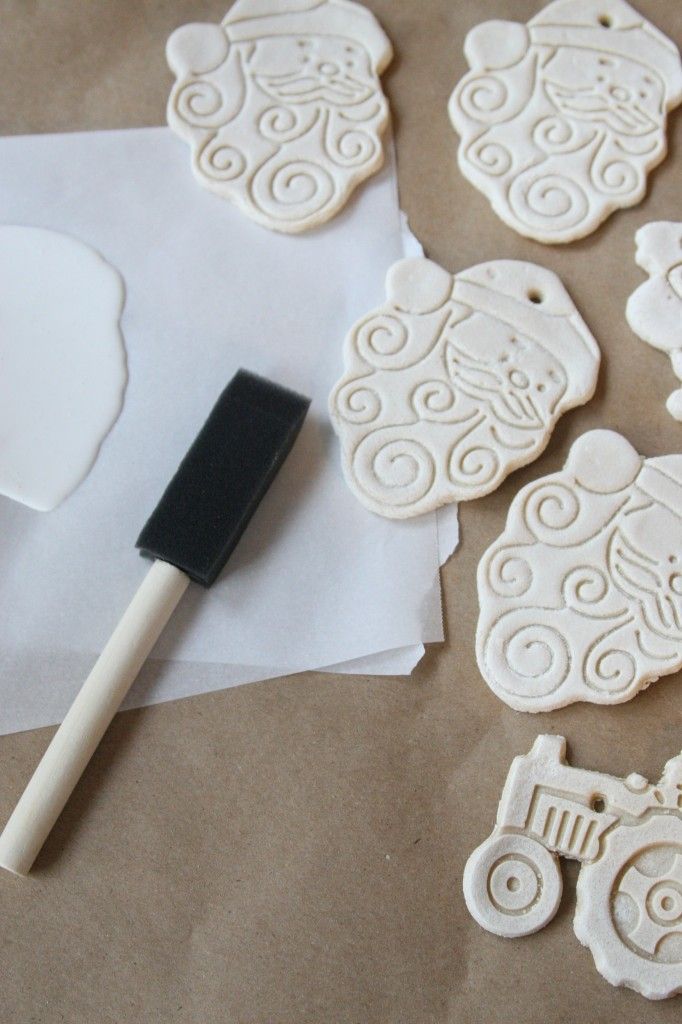 Roll out the base in the form of a drop. Glue a piece of dough, previously cut into strips, into the lower part, then glue the mustache and hat. We slightly twist the strips of the beard and mustache into flagella and send Grandfather to dry. After complete drying, proceed to the decor.
#3 Dough Santa's Head
Another version of a simple flat salt dough craft. In this version, the beard is made from separate "sausages" that are carefully glued to the lower part of the face. This job is suitable for older children.
#4 Christmas toy Santa Claus made of dough with photo step by step
will require patience and perseverance from the creator. See step by step guide below.
And more ideas of Santa Claus's head from the dough
You can already come up with the design of your own craft, but we decided to throw in a few more ideas that, in fact, differ only in the way the beard is made. A wadded beard for Grandfather can be made by passing the dough through a garlic maker or making an openwork print; all kinds of curls will also look great.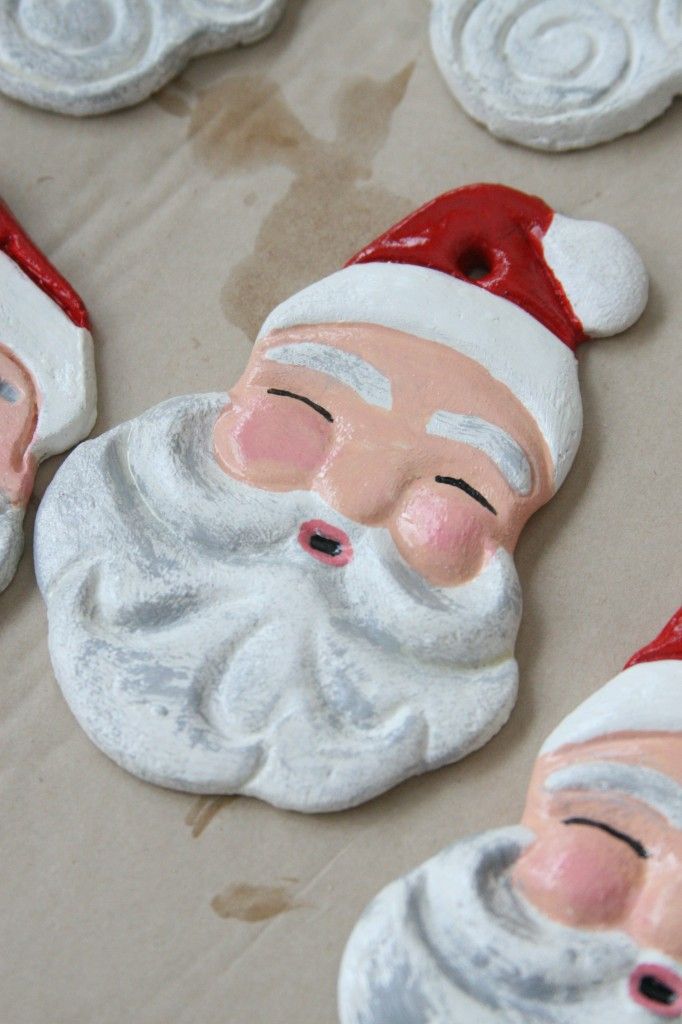
#5 Do-it-yourself Santa Claus for the Christmas tree from dough
You can make a cute Grandfather in full growth. A flat craft of such a plan is done very simply. To get started, you will need a figure template (you can draw it yourself or find it on the World Wide Web if you don’t like ours). Next, cut out the outline from the dough, and then the constituent elements. When the figurine is assembled, we send it to dry. After complete drying, you can proceed to the decor.
And more ideas for flat crafts from salt dough “Santa Claus”
#6 Santa Claus from salty theta on a frame step by step with photo
You can make a three-dimensional figure of Santa Claus from dough. To do this, you will need a cone-shaped frame, which can be made, for example, from foil. We wrap the frame with dough, the head can be put on a toothpick or glued with glue. For a beard, three dough on a fine grater and attach to the face. We send to dry. After complete drying, you can proceed to additional decor.
#7 Santa Claus from salty theta on a lamp frame: step by step master class
You can use an old light bulb as a base for the Salt Dough Case. It should be noted right away that you need to dry such a craft in the air, and not in the oven. The glass part of the light bulb will serve as the body, and we will “put” the head on the base. Step-by-step photo master class, see below.
#8 Do-it-yourself Snow Maiden from salt dough on a frame
And here is a step-by-step master class of Snow Maiden from salt dough. In this MK, we make the granddaughter of Santa Claus on a foil frame. We “sit” the head on a toothpick. You can decorate the Snow Maiden from dough only after the craft has completely dried.
And more Santa Claus ideas from dough on a frame
You can also use a cut plastic bottle as a frame for Grandfather. A beard can also be done in different ways: just stick thin strips on it or pass the dough through a spadefoot. Cotton wool also looks great as a beard.
#9 Father Frost and Snow Maiden: making crafts for the New Year from salt dough
And here is a variant of three-dimensional figurines made from dough without a frame. It should be noted right away that voluminous crafts made from dough without a frame dry much longer, because. they have more tests. In general, working with dough is like working with plasticine, only the dough then dries up. Start decorating the figurines only after complete drying. Master class on modeling, see below.
Salt dough snowflakes: making New Year crafts from improvised materials
A snowflake made from dough will be no less New Year's craft. You can decorate such a craft with a Christmas tree, a gift, and an interior. And you can give as a New Year's souvenir to friends or acquaintances.
#1 Dough snowflake with openwork imprint
Making an openwork snowflake out of salt dough is a laborious task. Therefore, we will be cunning. To give the craft delicacy, we use a knitted napkin. Roll out the dough, put a napkin on top and go over it with a rolling pin to print the pattern. Next, using the form, cut out the snowflake and send the craft to dry.
#2 Openwork snowflake from dough step by step with photo
And here is a more complex version of a snowflake from dough. You will need cutouts and a prepared plan. It is best to draw a diagram of your snowflake on paper in advance, and then proceed to cut out the elements. To proceed with the decor only after complete drying!
#3 Do-it-yourself snowflake from salt dough
And another version of a snowflake made from dough. You make various elements from dough sausages: circles, droplets, ovals. Connect them together into a single structure. It is better, of course, to draw a snowflake on paper in advance, and then proceed to the test. You will find two options for such a snowflake in the MK below.
More ideas for DIY lace snowflakes from dough
Need more snowflakes?
Published: November 28, 2017
Without what is it difficult to imagine the New Year? Of course, without a Christmas tree, Santa Claus, and it is extremely difficult for us, the inhabitants of the northern latitudes, to imagine the New Year without snow and snowflakes! If you want to create a truly New Year's atmosphere in the house, then do not be lazy and decorate everything around with snowflakes.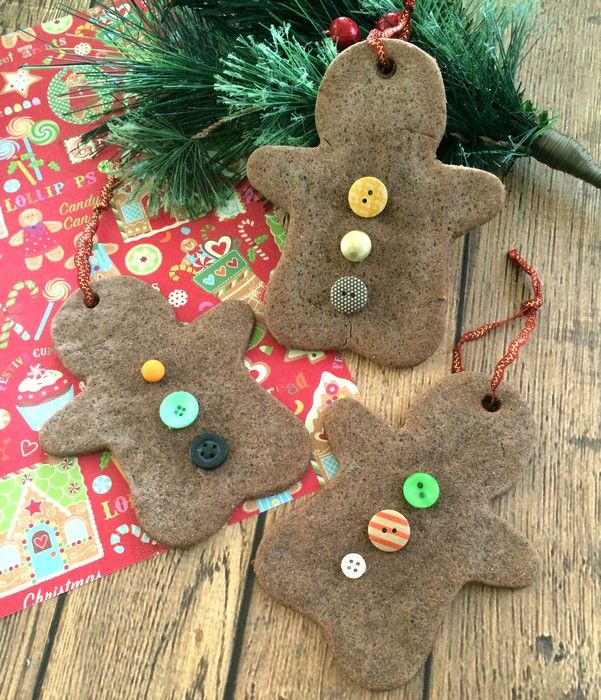 Snowflakes can be flat or voluminous, carved or not. In addition, it is worth abandoning the stereotype […]
Dough snowman
Salt dough can also be used to make a snowman. The main helper of Santa Claus will look great not only on the Christmas tree as a toy, but also as a hand-made figurine or a decorative element on a New Year's card.
#1 New Year's salt dough snowman
A very simple Christmas tree toy in the form of a snowman can be made from salt dough. We cut out the base circle, glue the carrot nose, make a hole for the egg and send it to dry. After complete drying, paint the snowman and you can decorate the Christmas tree!
More Easy Salt Dough Snowman Ideas for New Year:
#2 DIY Bulky Dough Snowman
It's very easy to make a 3D snowman. From the dough we roll three balls of different sizes (for the body of a snowman), put them together and send them to dry. After complete drying, the crafts are painted and decorated. Ribbons, scraps of fabric, pompoms, etc.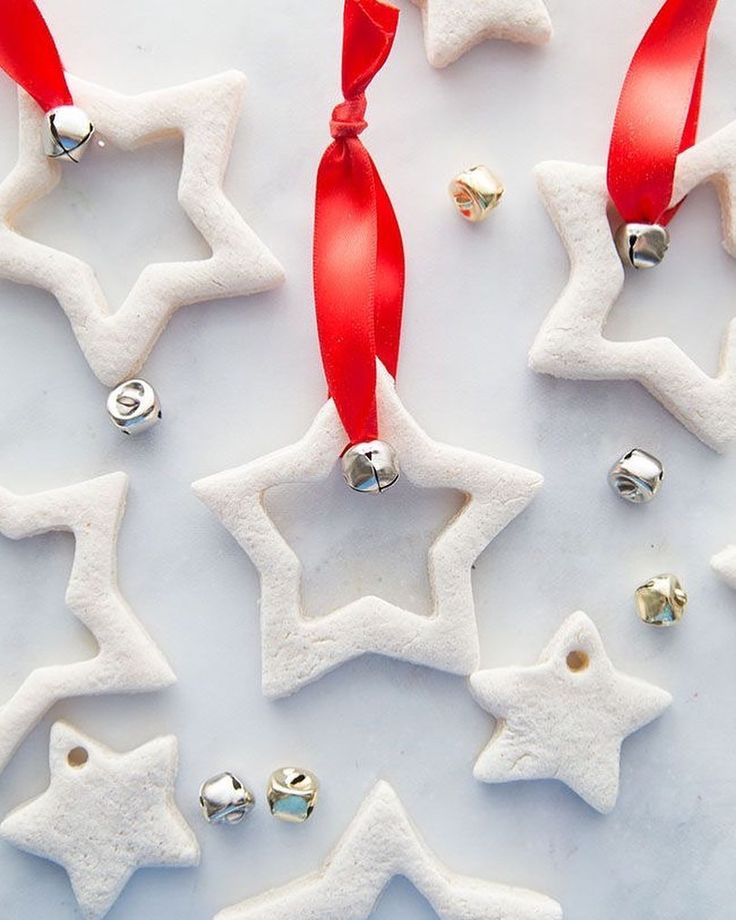 can be used as decor.0011
And here is another simple version of a three-dimensional snowman made of dough. The modeling mass can be dyed with dye, or you can make a snowman from ordinary dough, and then color it. We make a panicle for a snowman from dough, passing it through a garlic maker. See the step by step tutorial below.
More ideas for do-it-yourself voluminous snowmen from dough
#4 Fridge magnet Snowman from dough step by step with photo
As a New Year's souvenir, you can make a fridge magnet from dough. A great themed craft would be a snowman. See below for a step-by-step master class with a photo on making a magnet.
More ideas for magnets
#5 Christmas tree dough snowman
Salt dough snowmen make a great Christmas tree decoration. In addition, the kids will like to decorate the forest beauty with handmade toys. In terms of manufacturing, such a snowman is very simple: we draw a template on paper (you can find a ready-made one), cut out the base, and then glue the rest of the details (face, hands, gift, scarf, etc.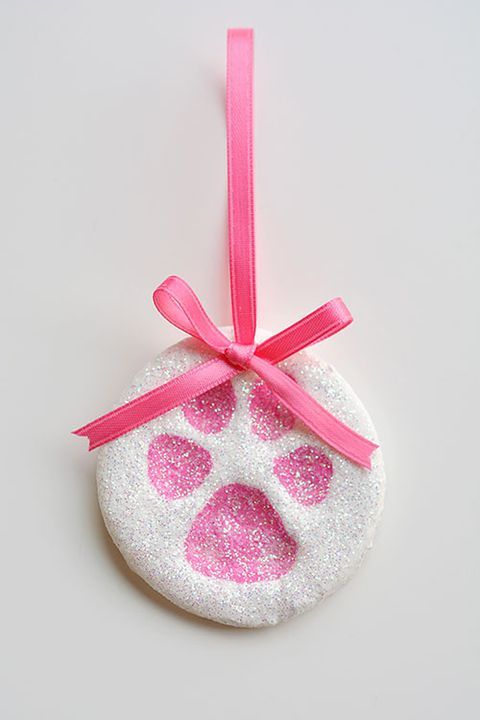 ). We send for drying and only after complete drying we proceed to coloring. Important! Before sending it to dry, do not forget to make a hole for the thread, otherwise you will have to adapt the craft for a fridge magnet.
#6 Do-it-yourself ice-cream snowman from salt dough: a step-by-step master class
It's hard to find a child who hasn't eaten snow at least once in his life. Yes, white and fluffy, it looks very appetizing. Well, everything is possible in the New Year, and even ice-cream snowmen! They can decorate the Christmas tree or attach a magnet to the back and hang it on the refrigerator. In any case, they will look very cool!
We have more snowmen:
Published: December 11, 2017
The New Year is just around the corner. Absolutely everyone is looking forward to this holiday, especially children! We associate the New Year with snow and all the accompanying winter fun: sledding, skiing, skating and, of course, a snowman. As soon as the first snow falls, the children run into the yards to make a snowman. But what to do if there is no snow, but the soul is […]
DIY salt dough angel
Still don't know what to give your loved ones for the New Year? Give an angel made with your own hands. Wonderful figures are obtained from salt dough or cold porcelain, which can be easily prepared at home from improvised materials (we wrote the recipes above). In this article you will find step-by-step master classes for making dough angels.
#1 DIY Christmas angel step by step with photo
A wonderful angel that can be hung on a Christmas tree. This little keeper will be an excellent decoration for a forest beauty. In addition, a handmade angel can be safely presented to relatives and friends.
#2 DIY salt dough angel: step-by-step instructions with photo
And here is another step-by-step instruction with a photo for making a DIY Christmas angel from salt dough. This version of the angel is a little simpler than the previous one, so you can safely involve the smallest in the work.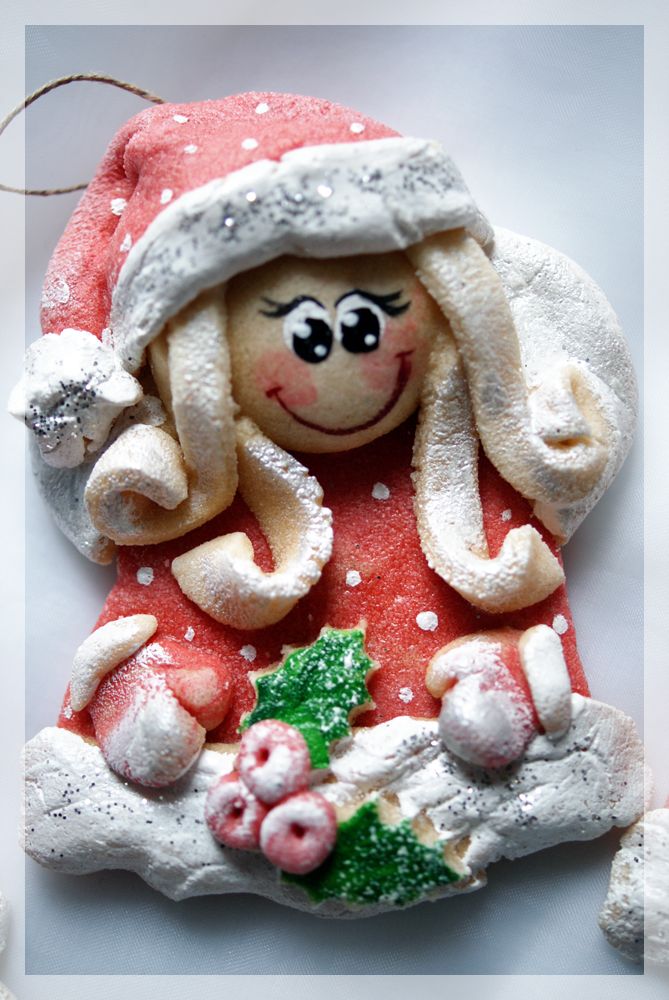 Of course, you can't do without the help of your mother!
#3 DIY salt dough Christmas angel
And another cute Christmas angel that will be a great home decoration and create a holiday atmosphere. The figurine is very easy to make, but it looks very impressive. Handmade salt dough angel will be a great addition to a New Year's gift.
#4 Fridge magnet angel made of salt dough: master class
As a New Year's gift to relatives and friends, you can make a Christmas angel magnet. See the step-by-step master class for making below.
More dough angel ideas for you, get inspired and create your own!
More ideas for salt dough Christmas angels
DIY salt dough houses
Small fairy houses made of salt dough will be a great home decoration and will help create an atmosphere of warmth and comfort on cold winter days. Like all dough crafts, houses can be flat or voluminous. Moreover, bulk products can be made as a candlestick. A miniature house with luminous windows looks very cool in the evening. And to complete the fabulous image, you can separately mold the inhabitants for your house.
#1 Salt Dough Flat House to Decorate the Christmas Tree
The easiest DIY salt dough house to make is a simple flat craft. We roll out the dough several millimeters thick, cut out the outline of the house and decorative elements (windows, door, roof, etc.). We assemble the craft, make a hole for the thread and send it to dry. After complete drying, we proceed to the decor.
More ideas of dough houses for decorating the Christmas tree
#2 New Year's house made of salt dough: making a panel with your own hands
You can make incredibly beautiful panels and paintings from salt dough. In the New Year theme, houses covered with snow look especially cool. Snow can be made from Styrofoam balls, glitter, salt, cotton wool and much more.
#3 Salt dough house: making a New Year's magnet
An original New Year's gift will be a magnet in the form of a house covered with snow.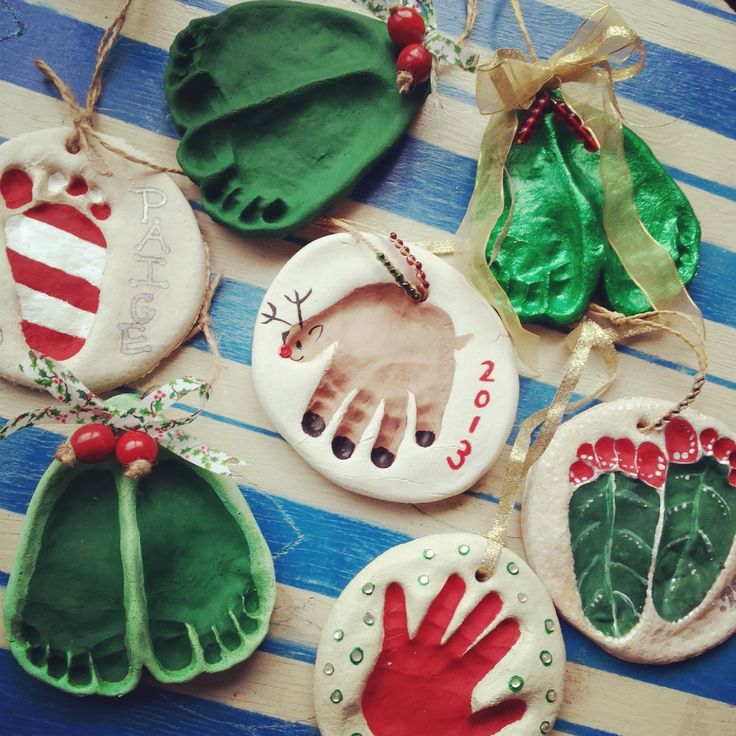 Such a gift is especially valuable, because. made by hand. The idea is simple: cut out the base of the house from the dough, then glue various decorative elements on top, dry it, paint it. Glue the felt to the back of the craft, and a magnet on it. Voila, our Christmas craft is ready!
More ideas for houses made of dough panels:
#4 Christmas house made of salt dough: making an original candlestick with your own hands
Christmas house made of salt dough can be used as a candlestick, it looks very cool. So, prepare the salt dough, roll it out to about 1-1.5 cm thick. Cut out the walls, windows and doors. You can do this with special molds, and if there are none, then use a clerical knife and a ruler. Glue all the walls and glue the roof. Cover the joints with the rest of the dough. When the house is dry, sand the bumps with sandpaper and enjoy your creation!
#5 Christmas candlestick in the shape of a house: making crafts from salt dough on a frame
will require more creativity.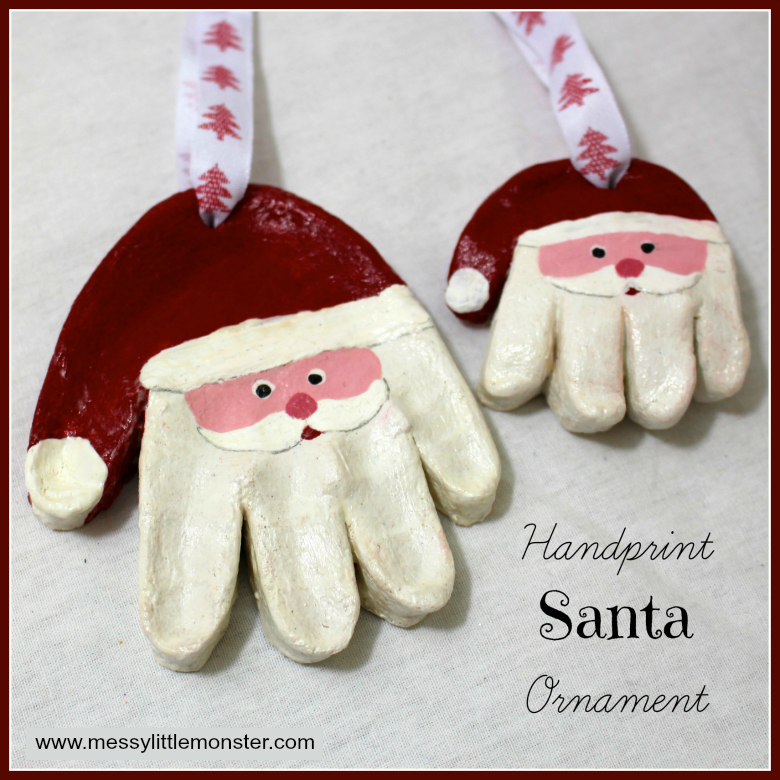 As a frame, you can use not only a plastic jar, it can be a glass or tin can, even a frame made of thick paper (for example, a toilet paper or paper towel sleeve) will do. In order for the house to be well removed from the frame, the jar can be wrapped with foil. Next, we glue the frame with dough, decorate it, send it to dry (the base of the house and the roof are burned separately, that is, in a disassembled state). When the blanks are dry, we remove the base and close up the bottom of the house. Next, we glue the roof and proceed to the decor of the future candlestick.
#6 Candlestick house made of salt dough: decorating the house for the New Year
And another version of the candlestick in the shape of a house on a jar. Decor options can be very different, you just need to dream up a little and you will get a charming winter house.
More ideas for salt dough candlestick houses:
#7 DIY salt dough house step by step with photo
In this master class you will learn how to make a DIY salt dough house on a cardboard frame. To begin with, you will need to make a house out of cardboard, making all the necessary holes for the windows in it. Further, according to the size of the house, we make dough blanks, immediately decorating them. After the dough pieces have dried, glue them onto the cardboard house. The dough perfectly "sits down" on the Moment. We cover the joints with the remnants of fresh dough and smooth them with a brush and water. Next, glue the roof. Please note that the roof is glued with fresh dough, and not with a dried blank. Next, we move on to painting and decoration. Styrofoam balls are used as snow in this MK.
#8 Salt dough house on a frame: master class with photo
And here is a version of a house on a can frame. When the house dries, the frame can be removed, or you can not clean it. This is critical if you want to make a candlestick, but if it’s just a house, then it’s not necessary to remove the base. Nasim relief drawing and send the house to dry. After complete drying, you can proceed to the decor.
#9 Salt dough house on a bottle: master class step by step
And another version of a house on a bottle. As we said above, you can use any suitable element as a frame: a glass jar or bottle, a plastic jar (bottle), a tin can, plastic canisters, foam bases and more.
More dough house ideas:
Do you want more houses? We have!
Published: November 13, 2017
New Year's time is coming - the time of miracles, when everyone can feel like a little helper of the kindest old man in the world. After all, think if, in addition to gifts for the children of the whole planet, the old grandfather also had to decorate our houses, how would he manage to do everything. That is why we, adults, help him in every possible way, because it is impossible for children to stop believing in [...]
Salt Dough Christmas Wreaths
Lately, Western traditions are increasingly appearing in our homes. If you also decided to pay tribute to fashion, we have several workshops on making Christmas wreaths from salt dough. If bourgeois traditions have no place in your home, scroll on, after the wreaths, we still have some cool ideas for DIY dough crafts!;)
#1 Simple dough wreath
Traditionally, our western neighbors decorate Christmas wreaths with green plants, and holly or holly tolerates frost well, which is why it is so often found as a decorative element in Western culture. It is quite difficult to find this plant here, so we will decorate the wreath with dough holly.
#2 New Year's dough wreath for children
If you need to keep the little ones busy, you can make this simple wreath. It is desirable to color the dough at the time of preparation by adding a few drops of green dye to it. Fir twigs, cinnamon sticks, star anise, cloves, bead and more are useful for decoration. Well, then - a flight of fancy!
#3 DIY Christmas wreath made of dough
You can decorate a Christmas wreath with any elements, for example, dough stars. And you can make the basis for a wreath with a pigtail (as in the first version) or a tourniquet (as here).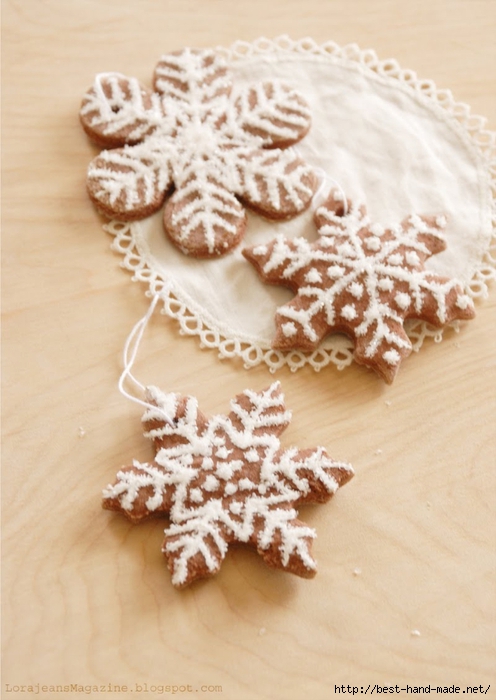 The main thing to remember is that you can paint a craft from salt dough only after it has completely dried!
#4 Do-it-yourself autumn wreath: a step-by-step master class
An autumn wreath will be an excellent option for school / garden crafts. If you didn’t have time to dry the leaves in the fall, it doesn’t matter, you can make them from salt dough. Moms will have to prepare paper templates, and the kids will take care of the rest. The leaves need to be cut, make veins on them and send to dry. After complete drying, paint and glue on a cardboard base. Salt dough sticks well to Moment.
#5 Delicate Christmas wreath made of dough, decorated with roses
If you want to add some tenderness and romance to your decor, then pay attention to this craft made from salt dough. It is better to color the dough for roses with a dye during kneading, this will help to avoid the laborious work of coloring flowers. See step by step guide below.
#6 Christmas Wreath Alternative
If you don't like Christmas wreaths, you can make an alternative craft, more traditional in our culture - a horseshoe for good luck.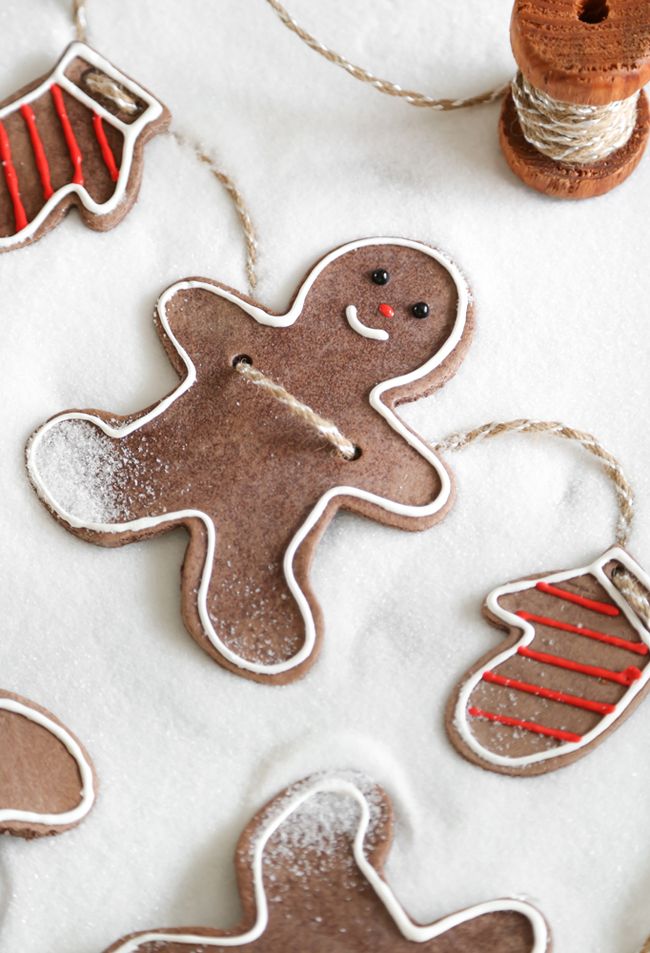 If you paint it in the appropriate New Year's colors, you get a great themed decoration. To make it more festive, you can decorate the horseshoe with a spruce branch, snowflakes (from dough, of course), cones, etc.
More Christmas salt dough wreath ideas:
Need more wreaths? We have!
Published: October 2, 2020
A Christmas wreath is a traditional Christmas decoration. Usually it is hung on the door, but it will look no less original on the wall or above the fireplace. If the wreath is light, then they can decorate the window opening, attach it to the curtain. You can make such a Christmas decoration with your own hands, using any materials that you have in your house. New Year's wreath of tinsel Bright […]
Do-it-yourself salt dough animals
Another option for crafts made from salt dough for the New Year can be animal figurines. We will not give all possible options in the article, but only those that we liked the most.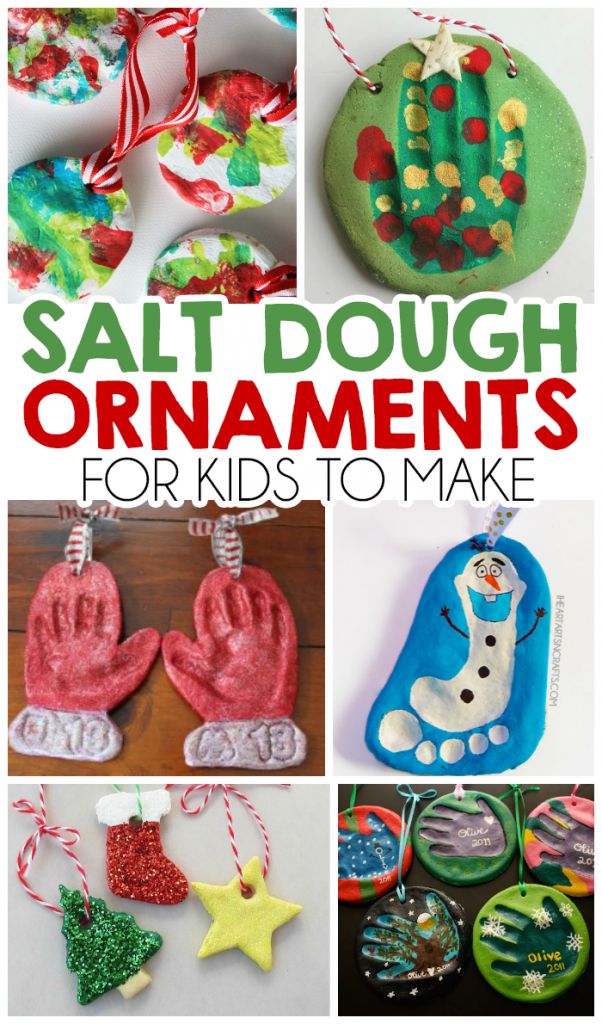 You can get inspired and make something of your own, or you can take a ready-made idea, especially since they all come with step-by-step photo instructions.
#1 Do-it-yourself salt dough owl: Making Christmas decorations with children
The most popular animal that is made for the New Year is an owl. Yes, the forest predator does not sleep in winter. In addition, a small feature of owls is to stay awake at night, we add some mysticism and mystery to them, which is very useful on the most magical night of the year!
#2 Volumetric owl made of dough: decorating the house for the New Year
Another variant of an owl made of dough can be a volumetric figurine of a feathered predator. The manufacturing process will require patience and perseverance from the master, although there is nothing complicated in this craft. Try it and see for yourself! Step-by-step master class with a photo, see below.
More owls from the test:
No time to explain, just download owl templates!
Template Template Template
#3 New Year crafts from salt dough: making a penguin
Penguins are no less relevant during the New Year holidays. Penguins won special love of children after the cartoon Madagascar. Well, why invent a bicycle if the idea of a New Year's craft from dough for children is on the surface. It's decided: we're making a penguin!
#4 New Year crafts from salt dough: making a hedgehog
You can make a wonderful hedgehog from salt dough. A prickly ball will be a great decoration, and will also go with a bang as a gift to grandparents. How to make a hedgehog step by step with a photo is described below.
#5 New Year's crafts from salt dough: making a lamb
Lambs also look great as New Year's decor. In this master class, you will learn how to make a lamb out of dough with movable elements. See photo instructions below.
#6 Dough lamb: Christmas crafts for kids
And here is a variant of a voluminous lamb that even kids can handle. A large number of small details will help develop fine motor skills and have fun with the whole family!
#7 Dough fish: do-it-yourself Christmas crafts
If you want to make an unusual DIY craft for the New Year, then pay attention to such a fish. By the way, such a fish will be a great addition to a gift for a fisherman!
#8 New Year crafts: dough horse
It is very easy to make a horse out of dough. By the way, if you don’t already know, then the domestic Santa Claus delivers gifts to kids on a troika of horses, and not on deer, like his Western counterpart. You can make a whole horse farm out of dough, decorate a Christmas tree with them and give them away to friends and acquaintances!
#9 Do-it-yourself Christmas pig from dough: master class
This pig from dough is not difficult to make, so you can safely involve your little ones in the work. Remember that we paint the figurine from the dough only after complete drying.
#10 Salt Dough Christmas Crafts: Making a Pig
Another cute dough pig variant. This craft can be used as a Christmas toy or as a fridge magnet. See the step by step tutorial below.
#11 Craft for the New Year a pig from dough
And a variant for experienced craftswomen.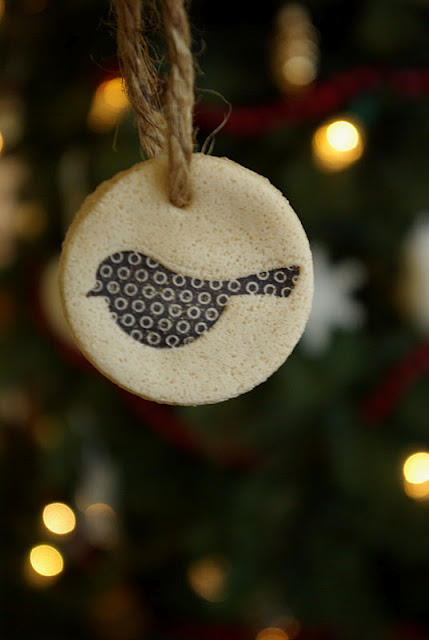 In general, crafts of any complexity can be made from dough, it all depends on your modeling skills. Well, we wish you creative success, inspiration and productive New Year holidays!
Salt dough recipe
To create a toy for the New Year holiday, you will need to prepare salt dough. Ingredients required for this:
- Edible salt - 1 part;
- Flour - 1 part;
- Water - ½ part.
Mix all dry ingredients in a bowl, gradually adding water. The resulting mixture should have a soft consistency, not stick to the hands, not be too thick. Knead the dough thoroughly so that it does not crumble, does not crumble.
To make the dough white, add ¾ parts white acrylic paint to the ingredients.
Cold porcelain recipe
In addition to salt dough, you can use the so-called cold porcelain, which is more like polymer clay, to make crafts. You can easily prepare cold porcelain at home. For this you will need:
- Baking soda - 1 part;
- Corn or potato starch - 1 part;
- Water - 1 part.
Pour the dry ingredients into the pan and mix well. then add water and mix well again until a homogeneous mixture without lumps is formed. Put the pan with the mixture on a small fire and stir constantly, cook for 1-3 minutes until thickened. Put the resulting mass on the table, let cool to room temperature and knead well for 2-3 minutes. Everything, cold porcelain is ready to use.
Store cold porcelain in an airtight plastic bag.
How to dry crafts
There are several ways to dry crafts made from salt dough or cold porcelain. The first is natural. Leave the products for several days in a dry and warm place. The thicker the layer of dough in the craft, the more time it will take for it to dry completely. On average, it takes 24 hours for 1 mm of dough to dry naturally. Crafts from cold porcelain dry much faster - 8-12 hours.
Use for drying and oven. It is heated as much as possible, and then ready-made crafts are placed in it.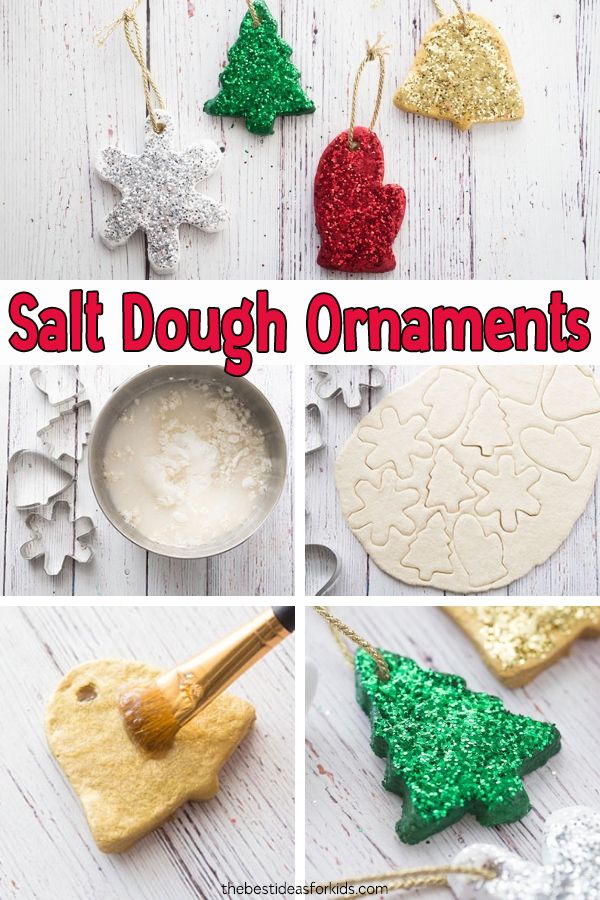 After that, the oven must be turned off. Do not open it until it has completely cooled down.
Let's open the secret. Crafts will not stick to a baking sheet if you cover it with parchment paper.
How to color finished crafts
There are many ways to make colorful dough gifts. You can paint dough or cold porcelain using various paints (oil, acrylic, gouache, etc.) and food coloring, for this you need to add color to the finished mass and knead until the color is even.
Roll out the colored dough with a rolling pin and create figures. Multi-colored products look amazing, they turn out bright, colorful.
Also handicrafts are painted later, using gouache, felt-tip pens, pens of different shades.
Toys are decorated with various accessories, ribbons, rhinestones, beads, sequins, and other items. Here you can embody all creative ideas, fantasies.
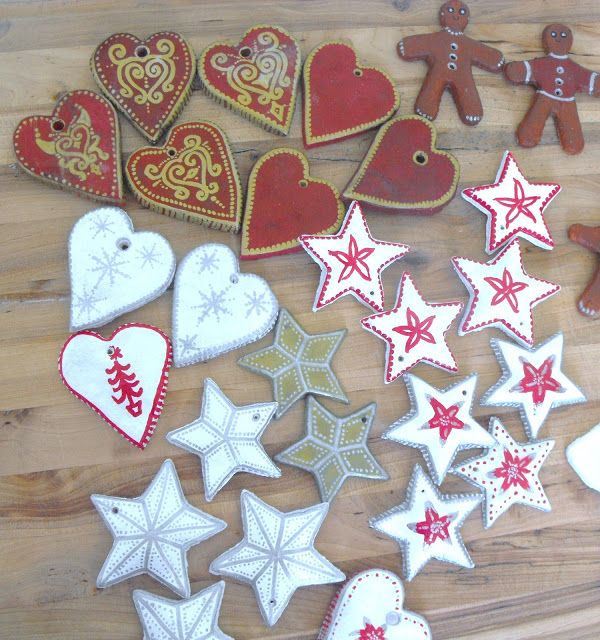
Salt dough gifts may vary. These are snowflakes and Christmas decorations, Santa Claus, a Christmas tree, the moon and various animals, hearts, flowers, and other decorations.
Making salt dough toys is a lot of fun. Children like to make crafts, it perfectly develops fine motor skills of hands, cheers up. Adults can also get carried away with modeling. And New Year's handicrafts, which are created by oneself, will surely please, will cause admiration.
Help us become better: if you notice an error, select the fragment and press Ctrl+Enter .
Crafts from salt dough for the New Year 2022: photos, master classes, ideas!
New Year's Eve is a wonderful time and the best time to enjoy spending time with family and children. Kids love Christmas crafts and homemade Christmas toys. Messing with dough is also one of the favorite activities for children. By combining both, you can decorate the Christmas tree with wonderful unique toys.
In this article:
- Salt dough recipe.
- How to dry crafts?
- What and how to paint products?
- Ideas for decorating crafts.
Salt dough recipe
You will need:
- 1 part fine table salt;
- 1 part white table flour;
- 1/3 potato starch;
- mixing water.
Mix all dry ingredients in a bowl and knead the mass, gradually adding water. The mass should be of a pleasant consistency - not stick to your hands, and not be too tight (do not break or crumble).
After the salt dough is ready, decide when you will dye the pieces. You can paint the mass immediately, or you can paint the toys after baking.
How to dry Christmas crafts?
A few words about drying. To make the dough firm, you can simply wait a few days, or bake it in the oven. It is necessary to heat the oven to the maximum temperature, then put the salted crafts laid out on a baking sheet. Then you need to turn off the oven, and do not open it until it has cooled completely. You can bake on a very low heat (like croutons), but then you have to make sure that they do not burn. Another little secret - so that the figures do not stick, cover the baking sheet with a baking sleeve.
Of course, not all salt dough crafts can be dried in the oven.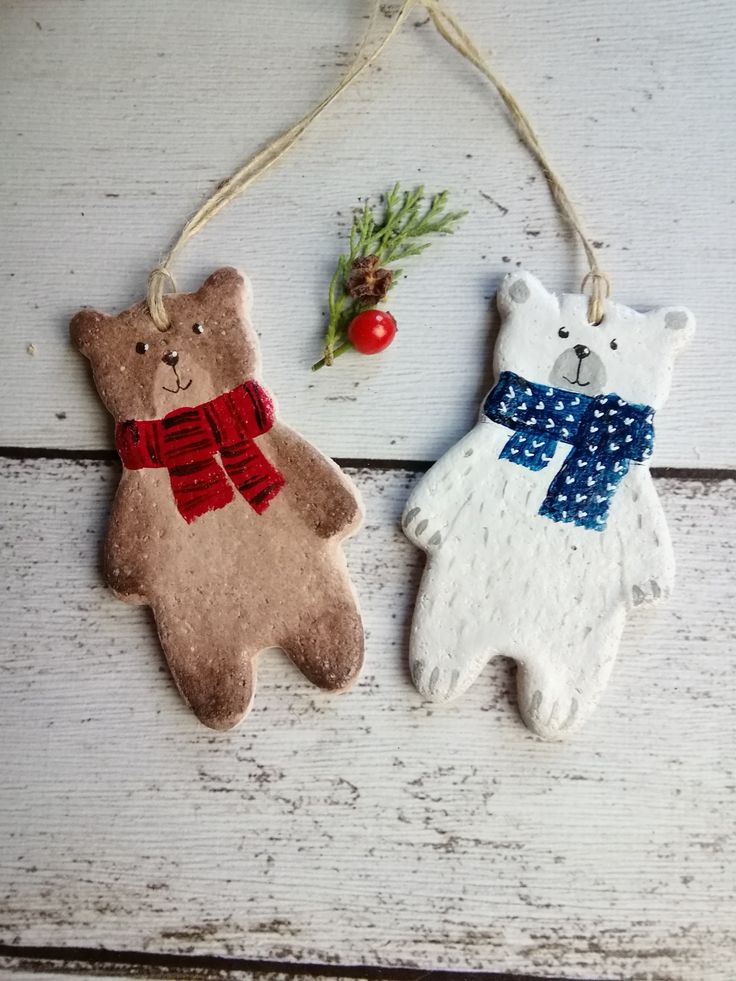 For example, decorated with beads or beads, you need to dry naturally.
How to paint the finished product?
There are several ways to make items colorful. Dry cosmetic pigments and water-soluble food colorings, which are used to make handmade soap, are best suited for this. If they are not, then you can use Gouache, or watercolors.
After the salt dough is colored, it must be carefully rolled out with a rolling pin and cut out the desired figures with molds. Dough products of different colors look very interesting (as in the picture). It is a great pleasure for kids to engage in this kind of mixing.
Another way is to make white dough crafts and then decorate them - there are many ways. Kids will do it with gouache, older children can draw beautiful patterns with felt-tip pens or a gel pen.
Acrylic paints are an excellent decoration! If you make an ornament on crafts with silver paint, they will look like real New Year's cookies! The paints with brilliant pigment look very advantageous!
Decor Ideas
Besides coloring, there are many ways to decorate future toys.