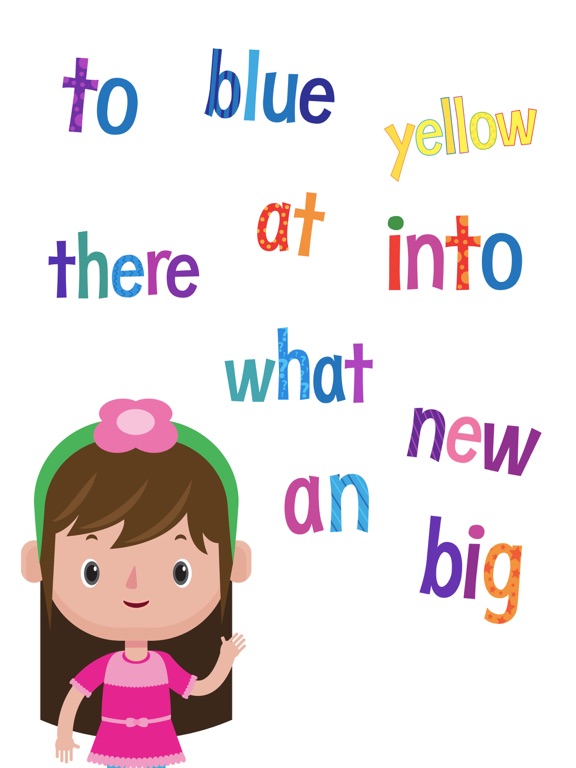
Sight words there
How to Teach Sight Words According to the Science of Reading
Today, I want to share 3 fun and effective activities to teach students how to read sight words. If you’ve been hearing a lot about the Science of Reading lately, you are not alone! The Science of Reading has been around for decades, but there seems to be a bit of “buzz” around it right now as teachers are closely looking at their teaching practice in the classroom.
With sight words in mind, many teachers (self-included) used to call them “snap” words and really try to skill and drill these words into our students’ minds with memorization practice! While rote memorization works for some of our students, the 3 activities I share today align with the research behind the Science of Reading and they’re meant to be simple and fun! As a teacher, you should be able to watch this video, see how to use the activities, then use them in your own classroom right away!
In case you want to watch/listen to this information, feel free to watch the video I made for YouTube below. It includes all the same content but in video format:
Alright, let’s dive on in!
One thing to consider is that for a long time, teachers thought sight words were words that couldn’t be sounded out and instead, needed to be memorized whole so students could recognize them on sight. That’s actually not true, and many sight words CAN be sound out or at the very least, have many recognizable patterns that can be sound out by students.
As David Kilpatrick shares, when a student memorizes a sight word, what they’ve actually done is memorized the sequence of letters they see in a word. A sight word can be a high-frequency word (think Dolch and Fry), but realistically a sight word is ANY word your students have come to recognize by sight! So all the activities shared below can be used for any words you want to teach your students!
1.
 Phoneme Mapping
The first activity I want to share for sight words is phoneme mapping. In this activity, students will map out the sounds they hear in a word and eventually add in the graphemes (letters) for each sound as well!
Remember, many of the words on our high-frequency word list actually include patterns we teach. For example, the words think, when, how, just, can. With these regularly spelled sight words, you will want to do this process in a few steps:
First, say the word aloud, “with” and have students repeat it back.
Then, have students count out the phonemes they hear in the word /w/ /i/ and /th/ and they can hear it has 3 different sounds. I would then show students the letters (or graphemes) that represent each phoneme they hear in the sound. I like to do this using sound boxes and play-dough or counters because we can add a little multi-sensory fun into the activity. If you were using the high-frequency word, first. It would have 4 boxes and students would follow the same steps with /f/ /ir/ /s/ /t/.
Now, you might be wondering, what do we do with the irregularly spelled sight words?!
Words like said and some can still use phoneme-grapheme mapping and it is beneficial because we know that students aren’t memorizing the word as a whole, but instead, they are memorizing the sequence of letters/sounds. The word said, for example, has a regular /s/ sound and the beginning and a regular /d/ sound at the end, so we can let students see that right off the bat. The only sound they will need to memorize is the irregular /e/ sound that ai is making in the word. To help students see this sound is irregular, I like to use the heart-word strategy and put a heart around the irregular sounds.
You see all about the heart-word strategy from Really Great Reading by heading over to their blog post about it: heart word strategy for sight words. When students are looking at the high-frequency words above, they can quickly see that first is spelled regularly and they will learn all the phonics patterns they need to spell and read that word and that the word, said, has one irregular sound to memorize!
2.
 Teach Sight Words with a Multi-Sensory Approach
Research has shown for a long time now that students don’t all learn in just one way. Children learn best when they can use different parts of their brain through a multisensory approach and use the four learning modalities (visual, auditory, kinesthetic, and tactile).
To help you brainstorm some ideas for teaching these words with a multisensory approach would be to use something like “skywriting.” After doing an activity like phoneme-mapping above, you could have students practice skywriting the words. To do this, they would hold their arm high up in the sky and simply write out the words in the sky.
Some other ways include using these finger lights! I talk about how I love this tool in my favorite literacy tools for small group reading post, but for this students can simply wear the light and “write” the word on their desk, on the wall, or on some dark construction paper! For a really fun, albeit messy, activity, kids love tracing letters and words into some shaving cream spread out on their desk!
Now it is important to remember that as you are doing these multi-sensory activities, you are still emphasizing that sound-letter connection. You want students to be able to think about the phonemes they are hearing in each word before they start memorizing each letter.
For some other multi-sensory learning ideas, I like to use letter magnets! Now word-building with letter tiles or magnets is nothing new, but an activity I like to with letter magnets is as follows:
After I have already taught the high-frequency word, some, for example, I will show the class how it is spelled with the letter magnets. Now without them looking (have them close their eyes or turn the whiteboard around), I will either switch some letters around (soem) or remove a letter altogether (soe). Then, I ask students “what is wrong?” This gives students an opportunity to think about what they know about the word and the way it is spelled and figure out what might be wrong when they see the word spelled incorrectly. This has students really reflecting on the order of the letters in words they will see often!
Now naturally, you will only want to do this to further progress students’ knowledge about a word so you will want to do an activity like this one after students have practiced some of the previously taught sight word activities!
Last, but certainly not least, add some songs into your sight word teaching! You can use some Jack Hartmann song or use a popular jingle (B-I-N-G-O!) and have students spell their newly learned words to that tune. Now, like the magnet activity above, I wouldn’t start with students learning the word this way, but it’s a great way to have students practice their sight words in another fun way!
3. Compare, Sort, & Match Sight Words by Sound
The last SOR-aligned sight word activity I wanted to share today is to have students compare, sort, & match sight words by sound!
Now, to have students learn how to do this, I like to model this whole group with all my students. Here is an example of 6 words I chose from the Dolch 1st grade high-frequency word list. I chose these words because some have matching beginning, middle, and final sounds. After doing a few of the previously mentioned activities, I would ask students to take a look at the words and see if they can find any that have matching beginning sounds:
You can see above that him and had both start with /h/ and let and live both start with /l/.
I would ask students do any have the same middle sound? Him, live, and think have the /i/ sound.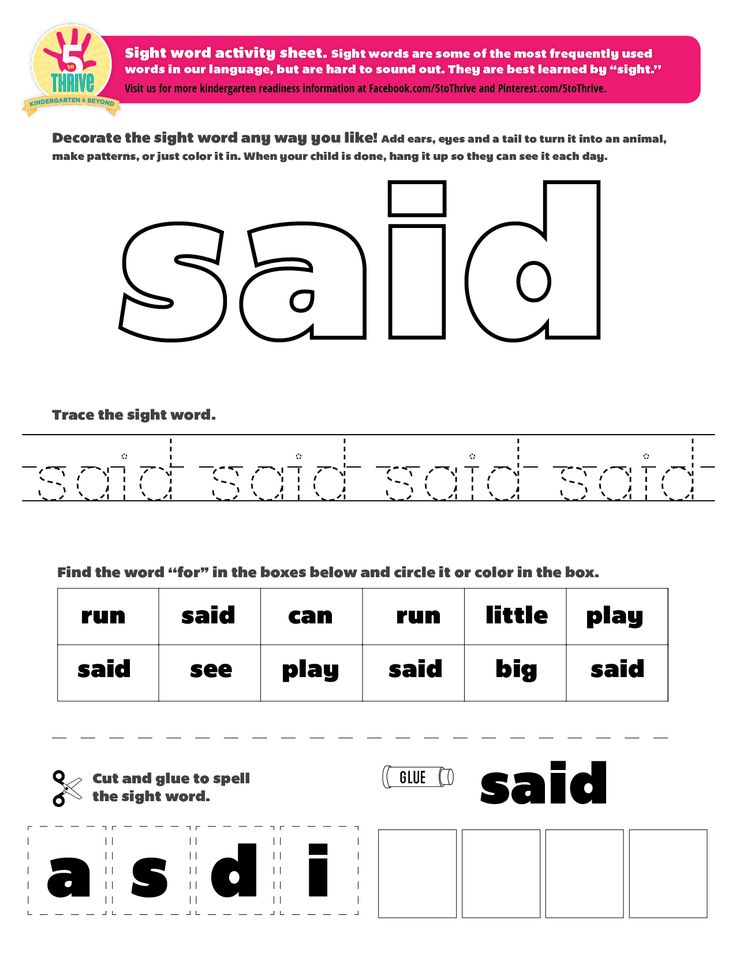 And lastly, both him and from end in /m/. When doing an activity like this one, I would point out one or two matches and then give students lots of think time to read the words and see if they can also find matches.
If you give students sight word cards to practice independently, having them sort and group their sight words by sounds. There is really no wrong way to have them match the words by sound as long as they’re correctly identifying the sounds they hear in each word!
Another way to have students practice matching sounds is with the game memory. Instead of students flipping their cards over to find the matching WORD (with – with). They would flip over two words with the same sounds (beginning, middle, or end).
As I am sure you may be noticing, all these activities are really trying to help students focus on the SOUNDS in each word and not just the letters. Scientifically speaking, students are better able to recognize and memorize these sight words when they are able to quickly locate and identify the grapheme-phoneme connection rather than just memorizing a series of letters or the word as a whole.
I hope this post gives you some ideas for how to teach sight words in your own classroom!
If you want to remember this post for later, pin it below:
A New Model for Teaching High-Frequency Words
We have visited many schools to observe intervention lessons and core reading instruction. For years we have been struck that even schools embracing research-based reading instruction teach high-frequency words through rote memorization. It is as if the high-frequency words are a special set of words that need to be memorized and can’t be learned using sound–symbol relationships.
A number of years ago, a teacher we respect enormously asked for help because many of her Tier 2 students and all of her Tier 3 students in first and second grades were failing to learn high-frequency words, even though they were progressing in their phonics lessons. We observed her teaching the digraph th to a group of four Tier 3 first grade students. This lesson was in April. Her students had learned to read CVC words and this was their first lesson with digraphs. The high-frequency words the students were responsible for knowing in this lesson were the color words: blue, red, yellow, orange, purple, and green. None of the four students could spell more than two of the words accurately. All four students had difficulty reading those words when they were mixed into lists with other high-frequency words. (Indeed, they were having difficulty reading all the high-frequency words in the lists.)
These students could read words that followed spelling patterns they had learned and practiced, but they struggled learning words that made no sense to them from a sound–spelling viewpoint. We suggested that the students learn high-frequency words according to spelling patterns, and not according to frequency number or theme.
Together with the teacher, we organized the high-frequency words to fit into the phonics lessons so that the words were tied to spelling patterns students were learning. First, we focused on identifying decodable high-frequency words such as but, him, and yes and integrating them into phonics lessons instead of teaching them as words that had to be memorized. Next, we identified irregularly spelled high-frequency words such as said, you, and from. These words have two or three letter sounds students knew and only one or two letters that had to be memorized. We integrated 2 or 3 of these words into a phonics lessons, and students learned to identify the letters spelled as expected and to learn “by heart” the letters not spelled as expected.
With this approach, students had an easier time learning to read the word said because they knew that only the letters ai are an unexpected spelling. Students also soon stopped confusing was and saw because they learned to think about the first sound before reading or spelling those words. The teacher told us that she, her students, and their parents were thrilled that they were no longer “banging their heads against the wall” going over and over the words as students tried to memorize how to read or spell high-frequency words with little success.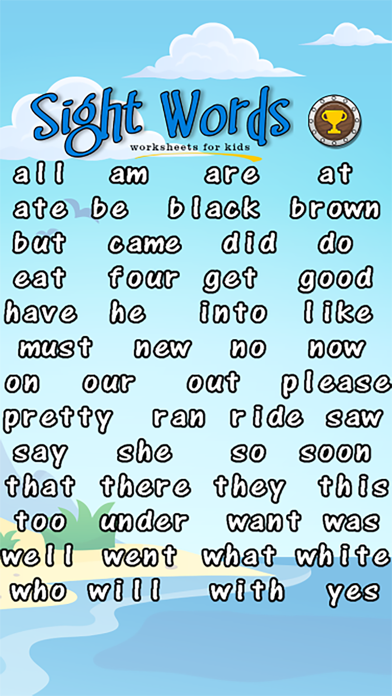
Current practices
High-frequency words are often referred to as “sight words”, a term that usually reflects the practice of learning the words through memorization. These words might be on the Dolch List, Fry Instant Words, or selected from stories in the reading program. Common practice often includes sending these “sight words” home for students to study and memorize, or drilling with flash cards in school. Students may start with word #1 and progress through the words in the order of frequency. Some teachers, like our friend above, group the words in categories, such as numbers or colors, whenever possible. In essence, high-frequency word instruction is often fully divorced from phonics instruction. While this method works for many students, it is an abysmal failure with others.
Overview of suggested restructuring
Integrating high-frequency words into phonics lessons allows students to make sense of spelling patterns for these words. To do this, high-frequency words need to be categorized according to whether they are spelled entirely regularly or not. Restructuring the way high-frequency words are taught makes reading and spelling the words more accessible to all students. The rest of this article describes how to “rethink” teaching of high-frequency words and fit them into phonics lessons.
Teach 10–15 “sight words” before phonics instruction begins
Many kindergarten students are expected to learn 20 to 50, or even more, high-frequency words during the year. The words are introduced and practiced in class and students are asked to study them at home. Learning these “sight words” often starts before formal phonics instruction begins.
Children do need to know about 10–15 very-high-frequency words when they start phonics instruction. However, these words can be carefully selected so that they are the “essential words” that are not decodable when the short vowel patterns VC and CVC are taught. Words such as at, can, and had are easier for students to learn using phonics than by simply memorizing them.
We recommend teaching 10–15 pre‐reading high-frequency words only after students know all the letter names, but before they start phonics instruction. (Students who have not learned their letter names inevitable struggle to learn words that have letters they cannot identify.) Teaching students to read the ten words in Table 1 as “sight words” even before they begin phonics instruction is unlikely to overburden even “at risk” students. These ten words can be used to write decodable sentences when phonics instruction begins. The words in Table 1 are suggestions only, and teachers may revise or add words based on their reading materials and their students. For example, the words are and said are often added.
To teach these ten pre-reading sight words, we recommend introducing one word at a time. Teaching these words in the order listed can minimize confusion for students. For example, the and a are unlikely to be confused, as are I and to. However, to and of are widely separated on the table because both are two-letter words with the letter o, and t and f have similar formations.
As we recommended above, the words in Table 1 should not be taught or practiced until a student knows all the letter names.
Students can demonstrate they know these words in a number of ways, including (1) finding the word in a list or row of other words, (2) finding the word in a text, (3) reading the word from a card, and (4) spelling the word.
If students know letter sounds and can identify the first sound in a word, the following words can be tied to beginning letter sounds because the initial sound is spelled as expected: to, and, was, you, for, is. The word I is easily recognized by students who know their letter names. On the other hand, the words the, a, and of cannot be tied to known letter sounds.
Teaching a “ditty” to help students learn the, a, and of works for many students. Teachers have had success teaching students to sing the ditties below. It is important that students have the word in front of them when they say the ditty. They should point to the word when they say it in the ditty, and point to the letters when they say them in the ditty.
- The: I can say ‘thee’ or I can say ‘thuh’, but I always spell it ‘t’ ‘h’ ‘e’
- A: I can say ‘ā’ or I can say ‘uh’, but I always spell it with the letter ‘a’
- Of is hard to spell, but not for me. I love to spell of. ‘o’ ‘f’ of, ‘o’ ‘f’ of, ‘o’ ‘f’ of
Table 1: 10 Sight Words for Pre-Readers to Learn
| Word | Dolch Frequency Rank | Fry Frequency Rank |
|---|---|---|
| the | 1 | 1 |
| a | 5 | 4 |
| I | 6 | 20 |
| to | 2 | 5 |
| and | 3 | 3 |
| was | 11 | 12 |
| for | 16 | 13 |
| you | 7 | 8 |
| is | 22 | 7 |
| of | 9 | 2 |
Dolch words are from: Dolch, E. W. (1936). A basic sight vocabulary. The Elementary School Journal, 36(6), 456-460.
Dolch Rankings were found on lists at K12 Reader and Mrs. Perkins Dolch Words.
Fry words and rankings are from: Fry, E., & Kress, J.K. (2006). The Reading Teacher’s Book of Lists. Jossey-Bass: San Francisco.
Flash Words and Heart Words defined
For instructional purposes, high-frequency words can be divided into two categories: those that are phonetically decodable and those with irregular spellings. We call high-frequency words that are regularly spelled and thus decodable “Flash Words”.
Although their spelling patterns are easily decoded, Flash Words are used so frequently in reading and writing that students need to be able to read and spell them “in a flash”. Examples of Flash Words at the cvc level are can, not, and did. Irregularly spelled words are called “Heart Words” because some part of the word will have to be “learned by heart.” Heart Words are also used so frequently that they need to be read and spelled automatically. Examples of Heart Words are: said, are, and where.
Words on any high-frequency word list can easily be categorized into Flash Words and Heart Words. However, be cautioned that a word may change categories. For example, early in a phonics scope and sequence, see may be a Heart Word because the long e spelling patterns haven’t been taught. When students learn that ee spells long e, see becomes a Flash Word. Further, many of the Heart Words can be categorized into words with similar spellings. This article categorizes words on the Dolch List of 220 High Frequency Words (Dolch 220 List)1. The method we use to categorize words on the Dolch 220 List works with any high-frequency word list.
Flash Words
One hundred and thirty-eight words (63%) on the Dolch 220 List are decodable when all regular spelling patterns are considered. Tables 2A, 2B, and 2C show the 138 decodable words categorized by spelling patterns. These tables can help teachers determine when to introduce the words during phonics lessons. Table 2A may be most useful for teachers of beginning reading because it lists the 60 one-syllable decodable words with the short vowel spelling pattern.
Table 2A: Flash Words (Decodable Words)
60 One-Syllable Words with Short Vowel Spelling Patterns
(Numbers in parentheses are the Dolch frequency ranking)
| VC | CVC | Digraphs | Blends | Words Ending in NG and N |
|---|---|---|---|---|
| (Sorted by vowel spelling) | (Sorted by vowel spelling) | (Sorted by digraph) | (Sorted by ending blends, then beginning blends) | (Sorted by ending letters) |
| at (21) | had (20) hot (203) | that (14) | and (3) | sing (213) |
| am (37) | can (42) but (19) | with (23) | just (78) | bring (155) |
| an (72) | ran (111) run (163) | then (38) | must (149) | long (167) |
| it (8) | him (22) cut (188) | them (52) | fast (182) | thank (216) |
| in (10) | did (45) get (51) | this (55) | best (210) | think (110) |
| if (65) | will* (59) yes (60) | much (142) | went (62) | drink (159) |
| on (17) | big (61) red (80) | pick (185) | ask (70) | |
| off* (132) | six (120) well* (109) | wish (217) | its (75) | |
| up (24) | sit (191) let (112) | when (44) | jump (98) | |
| us (169) | not (49) tell (141) | which (192) | help (113) | |
| got (93) ten (153) | stop (131) | |||
| black (151) |
*Students easily understand that two consonants at the end of a word spell one sound.
1The source for words on the Dolch 220 List is: Dolch, E. W. (1936). A basic sight vocabulary. The Elementary School Journal, 36(6), 456-460. Tables in this article show frequency rankings for words on the Dolch 220 list. Rankings for words on the Dolch 220 List can be found in many places, but we did not find a primary source that can be attributable to Dr. Dolch.
Rankings were retrieved on March 15, 2013, from K12 Reader and Mrs. Perkins Dolch Words.
Flash Words that can be taught with spellings students know will vary at any given time, depending on which phonics patterns students have been taught. For example, the words had, am, and can will be decodable when students have learned short a and vc and cvc spelling patterns. That, when, pick, and much will be decodable after students learn digraphs and can read words with digraphs. The words just, went, black, and ask will be decodable when students learn to read words with blends.
Flash Words should be introduced when they fit into the phonics pattern being taught, which is different from teaching them based on their frequency of use. Flash Words are different from other decodable words only because of their frequency. They are called Flash Words because students will need lots of practice to read and spell these words “in a Flash”. These are called “Flash Words” instead of “sight words” because students do not have to memorize any part of Flash Words. They can use their knowledge of phonics patterns to read and spell the words.
Flash Words with advanced vowels to teach with early phonics instruction
Table 2B shows 60 one-syllable words with more advanced vowel spelling patterns. A few of these are so frequent that they will need to be taught when students are still learning the short vowel spelling patterns (VC and CVC) during phonics lessons.
Table 2B: Flash Words (Decodable Words)
60 One-Syllable Words With R‐Controlled, Long, and Other Vowel Spellings
(Numbers in parentheses are the Dolch Frequency Ranking)
| r-Controlled Vowels | CV Long Vowel | VCe (silent e) | Vowel Teams with Long Vowel Sounds | Vowel Teams with Other Vowel Sounds |
|---|---|---|---|---|
| (Sorted by vowel spelling) | (Sorted by vowel spelling) | (Sorted by vowel spelling) | (Sorted by vowel sound, then vowel spelling) | (Sorted by vowel sound, then vowel spelling) |
| for* (16) | I* (6) | came (69) | play (127) | out* (31) |
| or* (123) | he* (4) | take (94) | may (130) | round (140) |
| start (150) | she* (15) | make (114) | say* (183) | found (200) |
| far (205) | be* (33) | made (162) | see* (48) | down* (40) |
| her* (28) | we* (36) | gave (164) | green (99) | now* (66) |
| first (146) | me* (58) | ate (177) | sleep (116) | how* (88) |
| hurt (186) | go* (35) | like (53) | keep (143) | brown (117) |
| so* (47) | ride (76) | three (170) | look (26) | |
| no* (68) | five (119) | eat (125) | good (82) | |
| my* (56) | white (152) | read (197) | new (148) | |
| by* (103) | clean (208) | soon (161) | ||
| fly (138) | right (90) | draw (207) | ||
| try* (147) | light (184) | saw* (106) | ||
| why (198) | own (199) | |||
| show (202) | ||||
| grow (209) |
* Many programs teach these words as Heart Words when students are still learning to read words with short vowels.
Traditionally, many words in Table 2B would be taught as “sight words” and not included as part of phonics lessons. These words might be introduced as they are encountered in a story, or they might be taught in order. For example, he would be taught as high-frequency word #4, then she taught as high-frequency word #12, with we (#26), be (#33), and me (#58), following later.
Under the new model, words with asterisks in Table 2B are still introduced when short vowels are being taught. The difference in the new model is that these words are grouped together by vowel spelling pattern to make it easier for students to remember the words. Instead of teaching he in isolation as a word to be memorized, we teach he, be, we, me, and she together (as shown in the CV column in Table 2b) and point out that the letter e spells the long e sound. Go, no, and so can be taught together, as can my, by, and why.
Students will learn words more easily when grouped together by similar spelling than by memorizing words one at a time as whole units. If the curriculum requires a Flash Word to be taught before the vowel pattern has been introduced, teachers can refer to Table 2B to find words that can be grouped together.
Flash Words with two and three syllables
Table 2C shows 16 Flash Words with two syllables and one Flash Word with three syllables. We recommend teaching these words after students have learned to read two‐syllable words in phonics instruction. If these words must be introduced earlier, students will learn them more easily if the teacher breaks the words into syllables and shows any known letter sounds in each syllable. This way students learn to read each syllable and blend the syllables into a word, instead of having to memorize the whole word.
Table 2C: Flash Words (Decodable Words)
17 Two-Syllable Words and 1 Three-Syllable Word
(Numbers in parentheses are the Dolch Frequency Ranking)
| CVC | "A" Spells Schwa in First Syllable | Short Vowels and r-Controlled Vowels | Short Vowel and Long Vowel | All Other Two-Syllable Words | Three-Syllable Word |
|---|---|---|---|---|---|
| seven* (134) | about* (84) | after (108) | myself (139) | little (39) | every** (96) |
| upon (211) | around* (85) | never (133) | open* (165) | over (73) | |
| away* (101) | better (172) | funny (175) | going (115) | ||
| under (196) | yellow 118) | ||||
| before (124) |
* These words have a schwa sound in the first or second syllable.
** This word is often pronounced with two syllables, especially in conversation.
Heart Words
The Dolch 220 List has 82 Heart Words (37%) that are shown on Tables 3A and 3B. Heart Words have Heart Letters, which are the irregularly spelled part of the word. For example, o is the Heart Letter in the words to and do.
Some of the Dolch Heart Words with similar spelling patterns can be grouped together, even though the spelling patterns are not regular. Table 3A (on the next page) shows 45 Heart Words grouped according to similar spelling patterns. The table also lists twelve words not on the Dolch List. These twelve words have similar spelling patterns to the Dolch words listed, and the words are likely to be words already in young students’ vocabularies. For example, could and would are Dolch words. We recommend adding should when could and would are taught, even though it is not on the Dolch 220 List.
The groups of words in Table 3A can be added to any phonics or spelling lesson, with the Heart Letters pointed out. For example, the words his, is, as, and has can all be taught as vc and cvc words in which the letter s is the Heart Letter because it spells the sound /z/.
Table 3A: Heart Words
59 Words Grouped by Similar Spelling Patterns
45 Words from the Dolch List and 14 Not on the Dolch List
(Numbers in Parentheses Are the Dolch Frequency Ranking)
(Diamond [♦] indicates word is not on the Dolch List, but it fits the spelling pattern)
| Unusual Spelling Pattern | High-Frequency Words |
|---|---|
| s at the end of the word spells /z/ | his (13), is (27), as (32), has (166) |
| v is followed by e because no English word ends in v | have (34), give (144), live (206) |
| o-e spells short u /ŭ/ | some (30), come (64), done (180) |
| o spells /ōō/ (as in boot) | to (2), do (41), into (77) |
| rhyming words spelled with the same last four letters | there (29), where (95) |
| s spells /z/ in a vce word | those (179), these (212) |
| all spells /ŏll/ | all (25), call (167), fall (193), small (195), ball ♦ |
| oul spells /ŏŏ/ (as in cook) | could (43), would (57), should ♦ |
| e at the end is after a phonetic r-controlled spelling | were (50), are (63) |
| vcc and cvcc words with o spelling long o /ō/ | old (102), cold (136), hold (173), both (190) |
| cvcc words with i spelling long i /ī/ | find (167), kind (189), mind ♦ |
| words similar in meaning and spelling | one (54), once (160) |
| a after w sometimes spells short o /ŏ/ | want (86), wash (201), watch ♦ |
| ue spells /ōō/ as in boot | blue (79), glue ♦, clue ♦, true ♦ |
| u spells /ŏŏ/ (as in cook) | put (91), full (178), pull (187), push ♦ |
| rhyming words with silent l | walk (121), talk ♦ |
| rhyming words - the letter a spells short i or short e (depending on dialect) | any (83), many (218) |
| oo at the end of a word spells /ōō/ (as in boot) | too (92), boo ♦, moo ♦ |
| or spells /er/ | work (145), word ♦, world ♦ |
| uy spells long i /ī/ | buy (174), guy ♦ |
Teaching Heart Words
Table 3B shows 37 Heart Words not easily grouped by spelling patterns.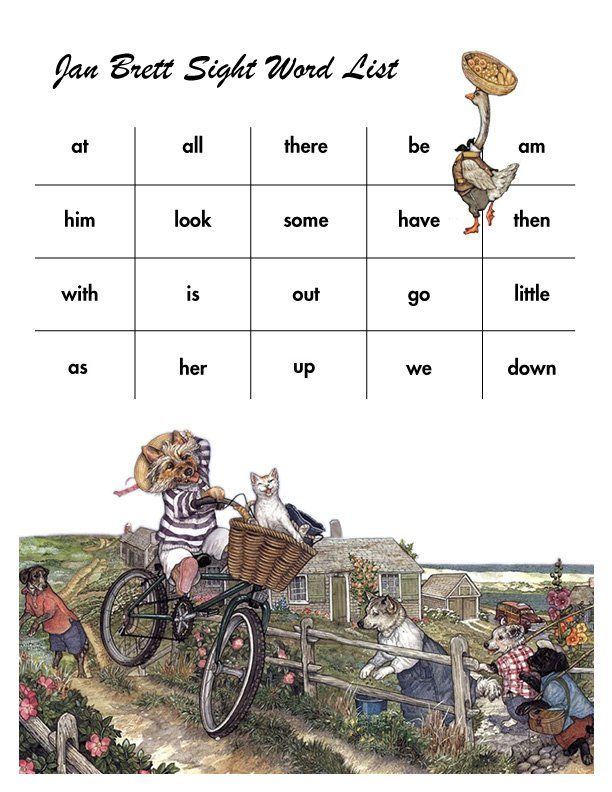 Most of the words are more difficult for spelling than for reading.
As with all Heart Words, these words can also be incorporated into phonics instruction when students learn to read the regularly spelled letters a word. For example, when students know the digraph th, they and their can be introduced. The digraph th in both these Heart Words is a regular spelling for the sound /th/. The Heart Letters are ey in they and eir in their. Similarly, the Heart Letter in the word what is a, and the Heart Letter in the word from is o.
Table 3B: Heart Words
37 Words that Do Not Fit into Spelling Patterns
(Numbers in parentheses are the Dolch Frequency Ranking)
| the (1) | very (71) | here (105) | does (154) | use (181) |
| a (5) | yours (74) | two (122) | goes (156) | carry (194) |
| of (9) | from (81) | again (126) | write (157) | because (204) |
| you (7) | don’t (87) | who (128) | always (158) | together (214) |
| was (11) | know (89) | been (129) | only (168) | please (215) |
| said (12) | pretty (97) | eight (135) | our (171) | shall (219) |
| they (18) | four (100) | today (137) | warm (176) | laugh (220) |
| what (46) | their (104) |
Students enjoy drawing a heart above Heart Letters, and the hearts help them remember the irregular spellings.
For example, in the word said, the hearts would go above ai because those letters are an unexpected spelling for short e (/ĕ/). A student’s practice card for the word said is shown at the right.
Implementing the new model
In order to implement the new phonics-based model for teaching high-frequency words, teachers will need to fit high-frequency words into phonics instruction. To do this, generally a committee of three or four kindergarten and first grade teachers organizes their lists of high-frequency words according to Heart Words and Flash Words by spelling patterns. Next they determine when and how high-frequency words fit into the phonics scope and sequence. These same teachers provide professional development to show other teachers how to implement the new model.
Sometimes a coordinated effort to change the way high-frequency words are taught is not an option, and teachers are able to only partially implement the suggestions in this article. These teachers continue to introduce the words as determined by their curriculum. However, they tell students whether the “sight word” is a Flash Word or a Heart Word, and they introduce the words by teaching letter–sound relationships as outlined in this article. Further, teachers introduce words with similar spelling patterns whenever possible. For example, if only the word would is scheduled to be introduced, they also teach could and should, which fit the spelling pattern. Finally, these teachers do not hold students accountable for high-frequency words that are beyond the spelling patterns that have been taught in phonics lessons.
The new model allows a different approach for working with students who have difficulty learning high-frequency words. For example, students working on short vowel patterns may confuse her and here, which are often introduced early as part of the “sight word” list. A teacher who recognizes the source of this confusion would not expect students to continue trying to memorize the two words. Instead, the teacher would include her as part of instruction on r-controlled vowels and include here when silent e is taught. Students will be less likely to misread or misspell these words when they understand the relation of the spelling er to the sound /er/ and the spelling ere to the sound /ēr/.
Traditionally, students would have continued struggling with and failing to memorize these easily confused words. With the new model, those students are not held accountable for accurately reading and spelling the words until they can understand and use the sound–spelling correspondences. All teachers using this approach say that students learn to spell and read the words much more easily than with the traditional approach.
About the authors
Linda Farrell and Michael Hunter are founding partners of Readsters, LLC. They provide professional development and write curriculum to support excellent reading instruction to students of all ages. Their favorite work is in the classroom where they can model effective reading instruction and coach teachers. Their most unusual work so far has been helping develop early reading instruction for children in Africa who are learning to read in 12 different mother tongue languages that Linda and Michael don’t even speak.
Tina Osenga was a founding partner at Readsters, and she is now retired.
Kalashnikov Club | The basis of a precise shot: rules for aiming
Georgy Gubich, a Kalashnikov specialist in the field of civilian small arms, talks about the rules for using a closed mechanical diopter sight
More than a year ago, the article “Mechanical sights. Types and features ”, where I tried to give information for reflection on what are the fundamental differences between open and closed sights, as well as describe the differences in aiming methods. It turned out that the article, in addition to not convincing everyone, in some cases raised even more questions than it answered, and sometimes even led to outbursts of rage in an attempt to deny the obvious.
I think this happened due to the fact that, in fact, some readers perceived the analytical material as the rules for aiming with a diopter sight, and even superimposing on it the established aiming technique with an open mechanical sight.
Therefore, in this article I focus on the rules for using mechanical sights - open and diopter. But first, let's turn our attention to the ability to achieve shooting targets by taking the rules for using scopes out of context.
I would like to start with quotes from a book that can rightfully be considered the quintessence of Soviet methods of sports shooting - A.A. Yuryev, "Sport Shooting", Moscow, FIS, 1962 (Second edition):
“An indispensable condition for correct aiming should be such an interposition of sighting devices (regardless of the types of sights) in which a “smooth front sight” is maintained.
When aiming with an open sight, a “flat front sight” will be such a visible arrangement of sighting devices in which the front sight falls in the middle of the sight slot, and the top of the front sight is flush with the upper edges of the slot.
“When aiming with a diopter sight with a “flat front sight”, the top of the rectangular front sight (or the center of the hole of the ring front sight) will be aligned with the center of the diopter hole.”
Thus, the “flat front sight” for an open sight is the top of the front sight at the same level as the top of the rear sight, the side gaps (if any) are the same size, and the “flat front sight” for a diopter sight is the top of the front sight in the center of the diopter hole.
For open sights:
1. Front sight in the middle of the slot
2. The top of the front sight is at the level of the mane of the rear sight
The figures presented in this article are schematic and not capable of conveying the full picture, but will help you visualize the main theses of the article.
For diopter sight:
1. The top of the front sight is in the center of the rear sight hole
Separately, it is worth focusing on the fact that in the case of a diopter sight, we are talking about the top of the front sight, and not its other part (middle, 2/3, etc. ). Perhaps you yourself have encountered similar manifestations in your practice:
From the point of view of directly building the correct sighting line, you can aim not with the top of the front sight, but, for example, with its base or protection, and, subject to the condition of uniformity, such options will also work. But there is no need to talk about ease of use. We must not forget about the different types of flies, types of protection and the position of the flies relative to the protection (because the vertical displacement of the STP when bringing the weapon to normal combat is often carried out by screwing in or twisting the front sight), and getting used to centering relative to the diopter hole, for example, a round front sight , you can run into a problem when picking up a weapon that does not have a trigger.
Regardless of the conditions, the position of the top of the front sight in the center of the diopter is optimal.
Again we return to quotes from the book of A. A. Yuryev "Sport Shooting" (Second Edition, Moscow, FiS, 1962):
“Thus, the accuracy of aiming depends on the ability of the shooter to always keep the “smooth front sight” in the same way and combine its top with the lower edge of the “apple” of the target (with the aiming point).
At first glance, the aiming scheme outlined above seems simple and understandable. But when the shooter wants to put it into practice, he will face many difficulties during shooting.
The main practical difficulties that arise in front of the shooter during aiming are due to the peculiarities of the structure of the eye and its work as an optical apparatus in the process of aiming.
“... the eye cannot simultaneously clearly see objects that are at different distances from it, in this case, the slot of the sight, the front sight and the “apple” of the target. So, if you clearly see the front sight, then the target and the slot of the sight will be perceived by the eye as blurry; if you focus your vision on the target, the front sight and the slot of the sight will be blurry. Some shooters, while aiming when firing from a rifle, “run across” their gaze from the front sight to the slot, then to the third object - the target, doing this quickly and several times until they combine all three points on one straight line. This method of aiming causes rapid fatigue of the muscular apparatus of the eye and can be used in the initial form of learning to aim, and then only at first. With this method of aiming, it is very difficult for the shooter to conduct, for example, high-speed shooting when it is limited by time. The same applies to standing shooting, when the athlete does not have the opportunity to pay much attention to aligning and refining the position of the front sight in the slot. Therefore, while aiming when shooting from a rifle, the shooter must sacrifice something and strive to clearly, sharply see only one of three objects: either the front sight, or the slot, or the target.
Based on practice, the vast majority of shooters, when shooting from a rifle, try to see the front sight sharply, being forced to somewhat neglect the sharpness of the image and the cut of the sight and the “apple” of the target. At the same time, one should not be embarrassed by the fact that the sight slot is perceived as fuzzy and, as it were, doubled ... "
At first glance, everything is quite simple, obvious and has long been known. Almost the same thing can be seen in the manual on shooting (NSD), for example:
"119. To aim, you need to close your left eye, and look with your right eye through the slot of the sight at the front sight so that the front sight falls in the middle of the slot, and its top is on a par with the upper edges of the mane of the aiming bar, i.e., take an even front sight.
© Guide to the 5.45 mm Kalashnikov assault rifle (AK74, AKS74, AK74N, AKS74N) and 5.45 mm Kalashnikov light machine gun (RPK74, RPKS74, RPK74N, RPKS74N). Moscow: Military publishing house of the Ministry of Defense of the USSR, 1976.
We level the front sight vertically and horizontally - and "there will be happiness."
It is worth noting that the NSD does not say anything about what specifically needs to be focused on, therefore, the correct formation of the skill remains on the conscience of the leader at the training place.
This is what concerns working with an open sight. Further about the diopter. And again we return to A.A. Yuryev’s “Sport Shooting” (Second Edition, Moscow, FiS, 1962):
“A diopter sight greatly facilitates and simplifies aiming, since the shooter is relieved of the need to see one of the three objects (sight slot) during shooting, which is closest to the eye, and therefore the most inconvenient for visual perception.
The role of the slot in the diopter sight is performed by a small round hole (diopter). When aiming, the shooter needs to look through it and see only two objects - the front sight and the target.
To aim with a diopter sight, the shooter, looking through the diopter hole with his right eye, brings the top of the rectangular front sight under the lower edge of the target "apple" or places the "apple" of the target in the center of the front sight ring.
During aiming, the shooter should not particularly divert his attention to searching for the center of the diopter hole and aligning the top of the front sight with it; due to the sense of symmetry of the eyes, this work is able to perform automatically and involuntarily.
If the shooter makes an inaccuracy in determining the center of the hole and the location of the top of the front sight in it, and the line of sight turns out to be somewhat shifted to the side, there will be no big mistake in aiming, because the point of the diopter hole itself is relatively small.
Thus, in order to ensure accurate and uniform aiming with a diopter sight, the shooter must basically mobilize all his attention to correctly and uniformly position the top of the front sight relative to the aiming point, while carefully maintaining the same clearance.
Likewise, there are no secrets.
If we turn to foreign sources, for example, an analogue of our NSD - Field manual, we will find that it says about the same principles of a “smooth front sight”.
Figure 4-15. Correct sight alignment
RIFLE MARKSMANSHIP M16A1, M16A2/3, M16A4, AND M4 CARBINE (Change 4). Washington: US Army, 2006.
RIFLE MARKSMANSHIP M16-/M4-SERIES WEAPONS (Change 1). Washington, DC: HEADQUARTERS DEPARTMENT OF THE ARMY, 2011.
The referenced Field Manual FM3.22-9, although without much detail, mentions that the centering of the front sight in the rear sight hole ring, the eye is able to perform independently.
But in reality, many people have doubts, bordering on distrust, regarding the possibility of automatically centering the front sight in the diopter ring. The fact is that here we are hindered by stereotypes formed by the experience of working with "open mechanics". If you are shooting for the first time using a diopter sight, then instinctively you want to center the geometric center of the visible part of the front sight. We have already seen that this is not true, although, as discussed in the first article, a small shift will not lead to catastrophic consequences.
It must be remembered that the top of the front sight is located in the center of the rear sight hole, and not its geometric center. With the development of the skill, this error disappears rather quickly, and the eye puts the top of the front sight in the center of the rear sight ring. Let's look at this through the prism of the real conditions for the use of weapons.
If you need to make an accurate shot, for example, at a distant small target, you can always take a fraction of a second to control the position of the top of the front sight in the diopter hole, while preparing a quality preparation for an accurate shot. And if you need to make a quick shot, your focus will be on the target, which you will automatically place in the center of the diopter, and small possible deviations of the front sight (which, by the way, is more clearly visible due to the effect of increasing the depth of field) from the center of the rear sight ring will not give a significant absolute deviation of the bullet from the aiming point, tk. if you needed to make a quick shot, then most likely the target is close and large-sized.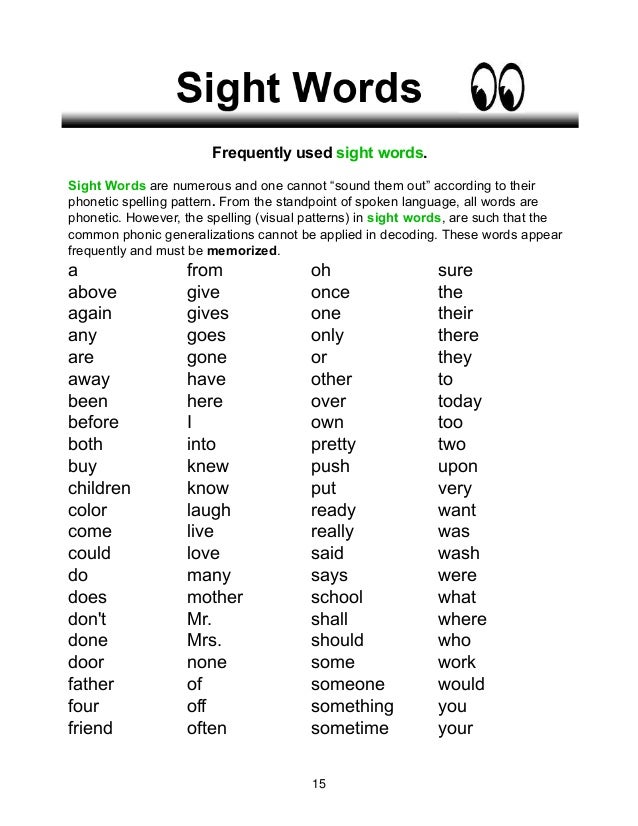
I would like to draw your attention to one more nuance from our NSD, namely, to the part where it is written “you need to close your left eye”! As is often the case in manuals, there is no description and explanation of why it is necessary to squint your eyes, since such documents are made according to the “read-do” principle and are aimed (or contribute) to simplifying the procedures for further copying to students. It can be assumed that in this way an attempt is made to increase control over the sighting image and the "smooth front sight" by cutting off half of the visual field or, which may be even more priority, an attempt to forcibly get rid of the problem of determining the "leading" eye.
And again we return to quotes from A.A. Yuryev’s “Sport Shooting” (Second Edition, Moscow, FIS, 1962):
shooters. Another disadvantage is that closing one eye is almost always accompanied by more or less tension in the muscles of the eyelids and pressure of the eyelid of the aiming eye on the eyeball; the latter affects the light-refracting apparatus and thereby negatively affects visual acuity. The third point that adversely affects the accuracy of shooting is the involuntary expansion of the pupil of the open eye in response to covering or closing the other. Based on this, it is best to turn off the second eye from the work not by physical means - by closing, but by psychological suppression of the visual impressions of the open, not aiming, left eye.
It follows from the text that closing one's eyes has many negative aspects.
To consciously suppress the perception of the picture by the “guided” eye, the following training method can be used: at the initial stage of mastering the aiming technique, the shooter closes his left eye, then learns to aim with both eyes, first slightly squinting his left eye to produce an accurate shot, then gradually opening his eye more and more , proceeds to shoot with both eyes open. In case of lack of time for full-fledged training, it is possible to use a simple algorithm in training the shooter: close your eye - level the front sight.
The described training methodology allows achieving a high quality of aiming in classical bullet shooting and, for example, in applied military exercises AK-3 and AK-4, and if other skills necessary for firing a shot are available at a high level, a high level of shooting accuracy.
And now let's move a little away from the mentioned conditions, when:
- the target is static;
- target contrast;
- target is well lit.
And consider, for example, the conditions for performing exercises according to the rules of the international confederation of practical shooting from a carbine in the open air.
A beige cardboard target against a sand bank or a white target against a snowy shooting range will have low contrast and may be poorly lit, such as side or contrast light. Under such conditions, keeping a "smooth front sight" and combining its top with a faintly distinguishable target will become a non-trivial task. And in the case of using “focus on the front sight”, it will lead to the need for constant refocusing of the eye (accommodation) from the front sight to the target and back to clarify the correct aiming.
Or another situation: the bullet shooter knows for sure that it makes no sense to look at the target after the shot - black holes in the black "apple" of the target at 50/100/300 meters still cannot be seen. The practical shooter also knows not to look at cardboard targets. But, after shooting at a metal falling target - “popper”, even if the shooter is mentally able to make a good “mark” of the shot and the sound of a bullet hitting was heard, it is necessary to look at the target and make sure that the target has fallen. Otherwise, it will be considered unaffected. And here a diopter sight is more convenient than an open one - refocusing, if it is needed at all, is much easier and faster.
In these cases, the use of diopter sights makes it possible to significantly simplify these tasks: there is no need to level the front sight in the rear sight, as already mentioned in the quote from Sports Shooting - the eye performs this function involuntarily; increasing the depth of field makes aiming easier, there is no need for additional accommodation of the eye. In a diopter sight, when focusing on the front sight, the “blurring” of the target is much less than when looking through an open sight.
If we are guided by the contents of the manuals on shooting (NSD), then for the successful completion of tasks in battle, at a minimum, it is necessary:
If you close one eye while shooting, at least 30% of the field of view is cut off. Is it right to close your eyes in this case? The question is rhetorical.
"Skillfully shoot at all kinds of targets"
A properly trained shooter should be able to do this regardless of the type of sight on his weapon. Do not forget also about the ability to determine the distance to the target, as well as the removal of the aiming point in accordance with the excess of the trajectory, if necessary.
“Observe the results of the fire and skillfully correct it”
It is worth noting here that the manuals list specific methods of observation and evaluation: bursts of hits, bullet tracks and changes in the behavior of the enemy. front sight, the top of a clearly visible front sight on the target blur. If the paths of tracer bullets are more or less visible at the same time, then observing the bursts will require a shift in the gaze to the target and the space surrounding it. And how long will it take to transfer focus from the front sight to the target, for example, at 200 meters, and back? A second and a half? Plus or minus.
So it turns out - either the correct aiming picture, or a timely and, with a greater degree of probability, an effective shot.
Let's imagine a more realistic situation. The enemy in camouflage disguises himself in thickets and moves at the same time. How can you generally fire at such a target, focusing on the front sight, while observing the results of the shooting and adjusting it if necessary, if the target is already barely distinguishable and changes its position?
The answer is simple - when using an open sight, aiming in accordance with the canonical rules from the textbook is often impossible. They shoot, sacrificing accuracy - focusing on the target with blurry front and rear sights. And with the advantages of a diopter sight, expressed in an increase in the depth of field and the absence of the need for perfect focusing on the front sight, aimed fire at a complex target merging with the background is real: tracks are visible (when using tracer bullets), bursts of hits are visible and enemy behavior is visible - remains on place, took cover or fell stricken.
Do not forget also that when looking through an open sight, the shooter, maintaining a "smooth front sight", does not see the space below the level of its top. When looking through the rear sight, there is an observable field below the top of the front sight.
Why do dissatisfaction and denial arise among those who, having extensive experience in shooting with an open mechanical sight, tried to shoot with a diopter sight?
As a rule, everything lies in the wrong use. Shooters complain about the narrow field of view in the sight, about the rear sight itself, which blocks part of the view, that the front sight is “impossible” to center in the diopter ring.
But, if you follow simple rules, which, unfortunately, are little known, then everything becomes much simpler and clearer.
First, position the eye at a distance of 4-8 cm. At this distance from the eye from the diopter hole, a balance is maintained between the angle of the field of view through the diopter hole and the ease of intuitively positioning the top of the front sight in the center of the hole. In this case, the rear sight ring blurs into a ghostly shadow and becomes almost invisible. A shooter who does not close his eyes when shooting cannot lose part of his field of vision at all, because the brain will supplement the entire missing picture from the right pupil with information from the left. The required distance from the diopter to the eye can be maintained either by correcting the manufacture, or by changing the length of the adjustable stock. By the way, it is not possible to install a diopter sight on any type of small arms, precisely because of the requirements for the distance to the eye.
Secondly, if you have just started to master shooting using a diopter aiming device, you need to focus on the location of the upper cut of the front sight in the center of the diopter. In the future, to make any significant effort to center the top of the front sight in the rear sight ring, as already mentioned not only by me, but also quoted from, I’m not afraid of this word, the greatest work on teaching the technique of producing a well-aimed shot, there is practically no need - eye will do so involuntarily. The same thing was mentioned in the first article, when the ability of a diopter sight to reduce parallax was briefly described. You can read more about this effect in a recently published translation of a practical study on this topic.
Thirdly, the canonical rule "focus on the front sight." But, depending on the conditions, due to the increase in the depth of field of the depicted space, in order to achieve the goals of making a shot, it is possible to shift the focus of vision to the target without losing the quality of aiming.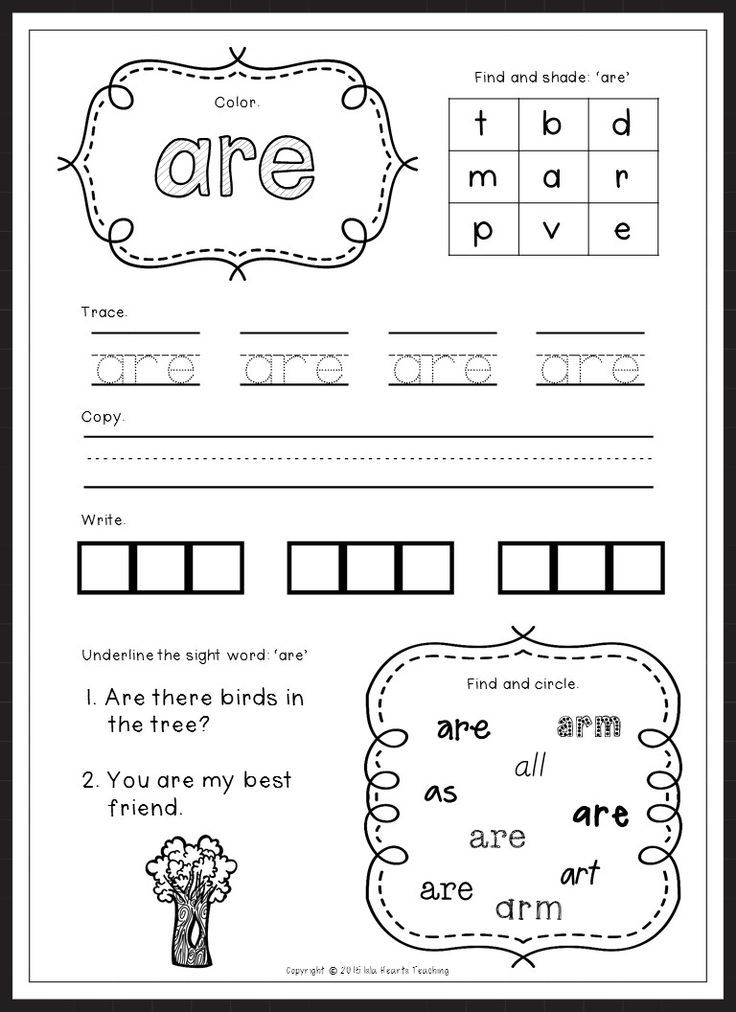
And again, briefly about the rules of shooting using a diopter sight (after determining the range to the target, setting the sight and / or taking out the aiming point and forming the correct position, which will ensure the necessary removal of the eye from the sight):
- front sight focus;
- top of the front sight in the center of the diopter;
- the top of the front sight on the aiming point.
SUMMARY
ANY mechanical aiming device allows you to make an accurate shot, provided that the shooter is able to distinguish the target, it's just a matter of skill. But it is undeniable that different types of scopes have their own unique advantages and disadvantages.
The prevalence of the advantages of one type of sight over another in specific conditions of use and determine our choice of sighting device. And it is precisely for the correct understanding and high-quality use of sighting devices that appropriate competencies are needed. If you do not know how to use a microscope, then it turns out that a magnifying glass works better.
AR-15 mechanical sights - LiveJournal
My comrades kicked me a long time ago to post this promised material about the mechanics of "arches". From my point of view, the AR-15 platform is one of the most successful of what is available in the civilian rifle / carbine format on the territory of Ukraine.
Yes, optics greatly reveal the potential of personal weapons. But let's face it - few of us use the original Trijicon, whose price is twice the cost of the weapon itself. And that budget optics in the price range of 200-700 US dollars, which we put on our rifles and carbines due to its cheapness, is difficult for me to take seriously as "one optic for all occasions." For competition and hunting, of course. But I personally saw how when the carbine fell, the settings were lost even on good sights. And in a critical situation, this is a pretty shitty event in the life of a shooter.
Therefore, in my opinion, it’s like with “mechanics” in a car - you can drive all your life on an “automatic”, but you need to be able to drive everything, including the old ZIL-130 and the rare K-750 with a sidecar. Taking into account our difficult life as Ukrainian shooters, you should not neglect simple solutions, which are often just as good :)
Therefore, here is the promised decent translation material, corrected by me. This material explains that the "mechanics" on your AR-15 platform rifle are far from archaic and have the right to life. There are not enough pictures, boredom :)
The author's style of the original has been preserved as far as possible.
Awesome manual for AR15 iron sight version 1.0
- Mechanical sights. Antiques?
- Yes.
- Are they any use?
- Undoubtedly.
The iron sights that are sold (or are currently more often "not sold") with your AR-15 carbine are used inappropriately by most shooters. Buyers usually do not have a clue about the basic principles of operation of mechanical sights.
The purpose of this overview is to provide a clear and understandable briefing on the use and specifications of mechanical sights. By "understandable", I mean that everything will be explained in the most simple way and you will not find better instructions on the Internet. Nowhere.
So, if your goal is to understand the design and use of your mechanical sight, you've come to the right place.
Let's start with the correct use and application. This article assumes that you have a clear understanding of how the scope works and will try to inform you about the finer details of using mechanical scopes. If you want to watch a video on how to zero in your AR-15 carbine before reviewing, watch this video:
Mechanical sights for AR15: basic principles
Zeroing and good accuracy are concepts that may sound a little foreign to a beginner shooter. Give a beginner an AR-15, especially one who has never used "mechanics" and he will probably not figure out how to use it properly.
The current generation of shooters, raised on military computer "shooters", may know about zeroing guns in theory, but they will need the right technique. Modern PC games usually show a crystal clear, well-focused image through the scope, but unfortunately real scopes don't work that way.
In video games through a mechanical sight, everything but the rear sight is in focus. Alas, the human eye is arranged differently. When focusing on the target, the front sight will appear blurry, and when focusing on the front sight, the target will appear blurry. The degree of blur also depends on the size of the hole and the distance between the sights. One can only dream of such clarity and sharpness of the image as in the example above ...
When using the AR-15 mechanical sight, we must note that there are 2 different rear sight systems: a large diopter / aperture (Ghost Ring) and a small diopter / aperture ( Peep Sight).
The main visual difference is that one hole is larger than the other. Although at first glance it may seem that their use will be identical, certain characteristics make each of the systems unique in relation to the target and the situation in which you shoot. Before we discuss the differences, let's take a closer look at certain types of shooting for those who come across this platform for the first time.
Your rifle/carbine puts all the burden of aiming at the target with the scope and gently pulling the trigger on your shoulders - so as not to disturb the position of the weapon in relation to the target. In short, in the process of shooting with a mechanical sight, you must:
• Align front sight and rear sight
• Align front sight and rear sight on target
• Start selecting trigger stroke while maintaining focus on target/front sight
• Continue pulling trigger until shot is fired
All of the above are mandatory for successful shooting with a mechanical sight.
The AR-15 has a set of rear sights with different methods of use, small and large diopters. They are also often referred to as apertures. A larger diopter (aperture) has a distinctive marking of 0-200.
Each of them has its strengths and weaknesses, but they have one thing in common - when aiming through any such system, you need to ignore (look through, not focusing) either a small or a large aperture. Unlike the open sights on the AK platform or on the old father's 30/30 lever, the high and low diopters are positioned to allow you to shoot without concentrating on them.
The proximity of the eye to the small/large aperture forces you to perform a very simplistic alignment of the eye, rear sight and front sight. As long as you look through the aperture, your rear sight remains in the most comfortable aiming position. In the process of aiming, do not pay attention to the diopter, but concentrate on the front sight and the target itself. This will make it easier for you to shoot with the AR-15 iron sight.
So, what are the differences in the use and application of large and small diopters? Let's figure it out.
We delve into the design of a large diopter.
"Ghost Ring" aka high diopter is an enlarged diameter "Peep sight", standard for stock USGI handle with a built-in sight on M-16 military rifles. It is also found in most models of back-up sights (including folding ones). Unless otherwise noted, be aware that the large and small apertures (rear sight holes) will have different zeros.
Some scopes promote "single plane apertures". This means that both small and large apertures (holes) will have one zero mark.
USGI apertures have a different zero point between the large and small diopter, which deviates vertically by 2.5 arc minutes, or roughly 6.35 cm at a distance of 100 meters. Take note of this, but for now let's forget about this aspect and focus on using a large diopter.
Large diopter is a simple tool with the ability to quickly aim. It is useful when shooting in low light and when shooting in close proximity to targets. The diameter of the hole in the large diopter makes it important for centering the front sight in the field of view.
A large diopter is good to use when your eye is focused on the target and not on the front sight!
This way the front sight will look like a blur as long as your eyes are focused on the target. Aim the "blurred" front sight at the target and pull the trigger with an emphasis on speed over accuracy.
Using a large diopter while focusing on the front sight is wrong.
This will cause you to see the front sight clearly, while the target itself will remain blurry, and the ability to distinguish targets will be simply terrible. Using a large diopter in combination with focusing on the front sight will result in you not being able to see what your target is doing, as well as making it difficult for you to see targets even at distances up to 100 meters.
Therefore, focus on the target, point the blurred front sight at it and shoot quickly.
It is also important to use a large diopter in low light, as a small diopter will darken the image, resulting in poor shooting.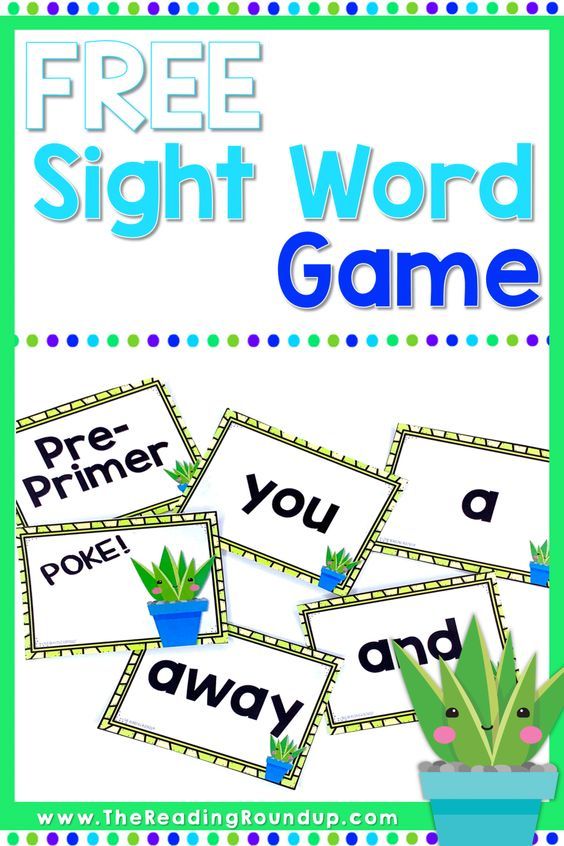 Thus, I have briefly described the correct use of a large diopter.
For this reason, "Ghost ring" is usually marked 0-200, indicating your aperture for short to medium distances from 0 to 200 meters.
Small diopter introduction.
"Peep sight", also known as a small aperture. And here we get to the point. This roughly 2mm diameter hole is a marvel of conventional carabiner technology and is a significant departure from a large diopter.
This high-precision aperture will be very useful for daylight shooting and precision shooting at both close and long ranges. The key to understanding this aperture is understanding the depth of field, aperture, and focus data. Let's start with the terminology based on how useful it is to the carbine.
Depth of field: your ability to focus on the front sight and still see the area close to the flight path relatively clearly. This is enhanced by a ring sight (diopter) and can be increased/decreased, depending on several factors, which we will look at later.
Aperture: a small viewing hole through which you look at the front and target.
Focus: The correct use of the ring sight is to ignore it and focus on the front sight, not the target.
While using a small diopter, we are given some visual enhancers...
Let's do a little experiment. Stretch your hand forward and raise your finger. Focus on it. How blurry is the background? The background is usually very blurry.
This is because the human eye can clearly focus on either a near or far object, but not both at the same time. A ring sight works like an aperture for your eye, and is somewhat like a camera with a small aperture. Have you ever used a pinhole camera without a pinhole lens? They have a very small aperture, allowing light rays to enter the chamber in the form of a very narrow cone. This enhances the depth of field and allows the camera to focus on something close and still see distant objects with remarkable clarity.
The Peep Sight aperture forces your eye to look through a small hole that limits the angle at which light is reflected from the target and reduces the width of the view to a very narrow cone.
Your eye can then focus on a clearly visible front sight and still be able to see enough detail close to the trajectory of the shot with enough clarity to aim and make an accurate shot. A large diopter cannot do this because of its large size.
Thus, "Peep sight" allows your eye to be fully focused on a well-defined front sight and allows you to fine-tune it to a "relatively" clearly visible target.
Moreover, a small diopter reduces parallax, also known as centering error. Remember, we described
centering when aligning the eye with the whole? So this is not the end yet.
Using a large diopter, you need to place the front sight clearly in the center of the field of view. Otherwise, you will lose the accuracy of the sight in relation to the target.
A small diopter is not as prone to errors when centering the front sight. The phrase that it “removes parallax” means that it resists centering errors with its entire design. As long as you see the front sight through a small diopter, you are almost perfectly centered on the front sight.
The only time a small diopter is prone to the parallax problem is when you let the front sight touch the blurry contours of your rear sight in your field of view.
The indicated information about Peep sight allows us to draw two conclusions about small apertures:
1) They provide near perfect aiming.
2) The shooter can ignore the precise centering of the front sight in the center of the field of view and instead can immediately focus on direct aiming at the center of the target with the front sight.
It remains astonishing to me that such an old design operates with virtually no parallax in much the same way as modern red dot sights. Instead of wasting time trying to center everything and everything, you know that focusing on the front sight and the target will allow you to speed up the shooting process. It will also increase the speed at which you hit the target and make your shooting more accurate.
So, if you delve into the peculiarities of the Peep Sight small diopter, it turns out that this is just a wonderful device.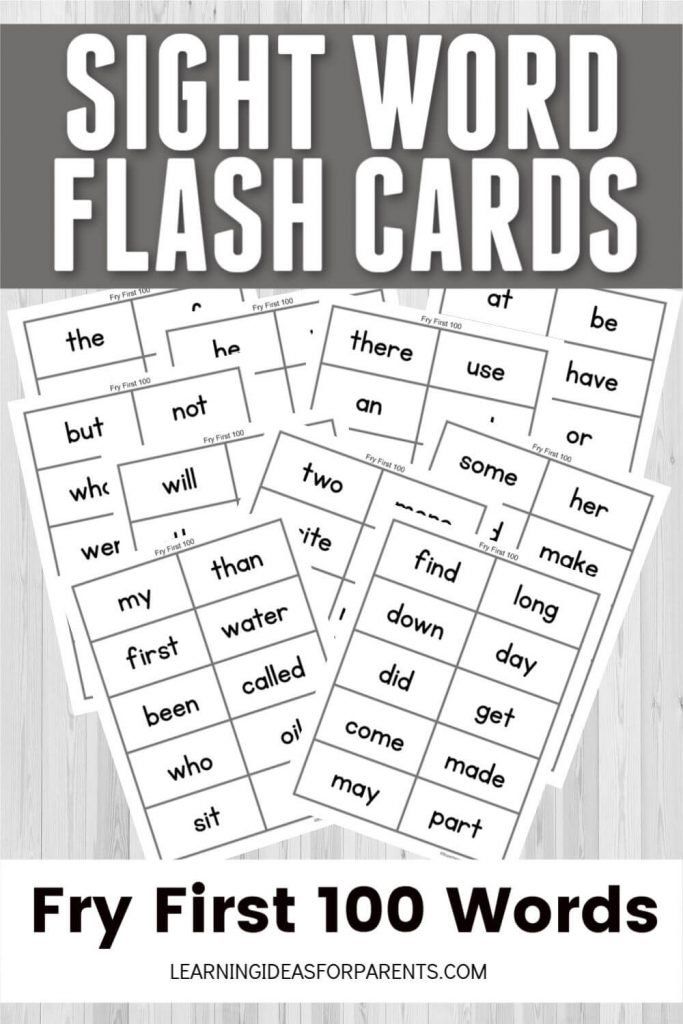 It is excellent for shooting with the naked eye (without optics) and proves to be much more useful than a rear sight with a slot like an AK.
So what are the things that affect your mechanical sight? Let's talk about the length of the sighting line.
Line of sight length – the longer the better.
You must have heard these words: the longer the aiming line, the more accurate the shot is? The length of the sighting line is the distance between the front sight and the whole. The greater this distance, the more accurately the shooter can aim and hit the target. The way it is.
Remember how a small aperture allows you to focus on the front sight and still keep the target not blurry?
If we reduce the distance between the front sight and the whole, we thereby reduce the ability of a small diopter to compensate for the effect of depth of field.
As soon as we move the front sight closer (the front sight is our ideal focal point for using the aperture), our depth of field and clarity near the target decreases. Focusing on an object that gets closer and closer to a small diopter reduces the effectiveness of the depth of field.
From the length of the sight line of the rifle to the length of the sight line of the carbine, the deterioration in visual clarity is small, but nevertheless noticeable in comparison with similar examples in other sight systems ,5" if we're talking about classic army sizes. Our civilian 16", most common in Ukraine, is somewhere in the middle) .
Can you still shoot at a target with a carbine with a diopter at a distance of 400 meters? Definitely yes, it's just that the target will look a little more blurry than when shooting with a rifle aiming line.0003
The farther the front sight (focal point) is located on the barrel, the more the depth of field and clarity of the target is enhanced with a small diopter.
The closer to the eye we bring the focal point, the more the depth of field deteriorates and the target becomes more blurred and difficult to recognize.
To cope with this, you need to reduce the diameter of the small aperture. After experimenting with reflex sights designed to US Army standards, I found that reducing the aperture size helps reduce this effect. In fact, drastically reducing the aperture to .042” increased the depth of field on both rifle and carbine to a degree that is unlikely to be surpassed by a standard aperture on a military “mechanic” (USGI handle).
Light also plays a big role here. As soon as we reduce the size of the diameter of the small diopter, we thereby reduce the amount of light that will reach our eye. As soon as it gets dark, we will need to switch to a large diopter before anyone else does with a standard size small diopter.
So, with a short line of sight, setting a small diopter (if you can find one) will help you maintain proper focus on the front sight and still see the target clearly.
Correcting common mistakes made when shooting at the shooting range.
The biggest mistake I see in range shooting is the wrong rear sight.