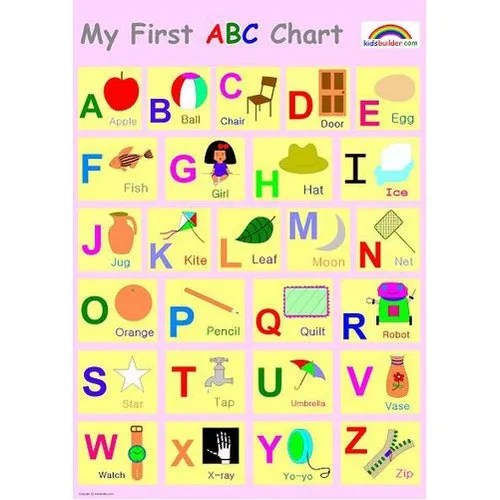
Best way to teach letters and sounds
5 Fun And Easy Tips
Letter sounds are one of the very first things your child will encounter when they begin to explore reading.
By recognizing the phonetic sounds that alphabetic letters make, your child will take their first big step toward associating words with their individual sounds, an essential tool for, when the time is right, sounding out words.
Most new readers start from the same place — by learning their letters! And no matter where your child is on their reading journey, working with them on their letter sounds is a great way to help strengthen their fundamental skills.
Here are five fun and effective tips for working on letter sounds with your child.
5 Fun And Easy Ways To Teach Letter Sounds
1) Touch And Feel Letters
Humans are tactile creatures, and we depend on touch to tell us a lot about the world around us. This is especially true of kids when they’re learning!
Although most traditional reading curriculums focus on auditory and visual cues for letters and their sounds, touch can be helpful, too. We have five senses, after all, so we might as well take advantage of them!
As opposed to relying solely on how a letter looks when it’s written (and flat), adding in a physical sensory element can help your child build a stronger connection to the letter sound they’re trying to learn.
Doing this engages an extra part of their brain while they learn. Not only will they know what the letter looks and sounds like but also what it “feels” like. Associating the “feel” of a letter with its pronunciation may help them gain a better understanding of letter sounds more quickly.
There are plenty of options for exploring reading through your child’s sense of touch. The best part? Your child will get to do one of their favorite things — make a mess! Letting them get messy with letters provides a great incentive to learn.
If you’d like to try this tactile learning style, you can get started by grabbing a few blank pieces of paper. Using a thick, dark marker, write out the letters you want your child to work on.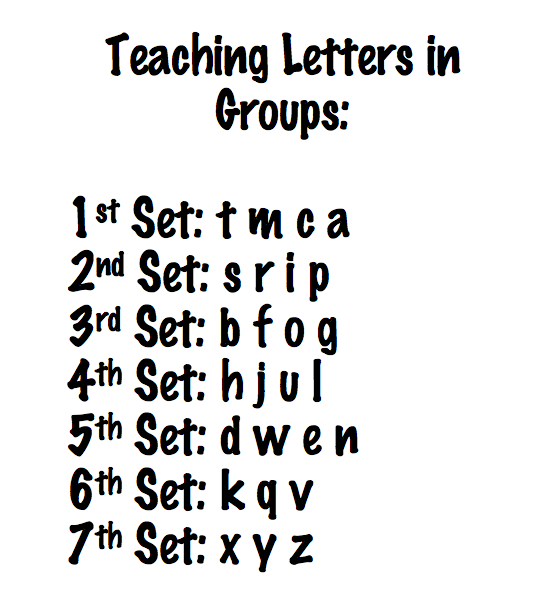
Then, you can simply grab whatever you have around the house that is malleable enough to form into letters. PlayDoh or kinetic sand are both great options.
We recommend saying the associated letter sound as your child looks at and forms the written letter with the PlayDoh or kinetic sand. You can also encourage them to shape their material over the outlined letter on the page if they need some extra guidance.
Feel free to also brainstorm words with them that share the letter sound they’re practicing. This could help them make even more connections to the letter and its sound!
If you don’t mind a little extra clean up, shaving cream can also be a great option! Simply spread out the shaving cream on a flat surface. Trace out the letter for them in the shaving cream, then ask them to do the same while you repeat the letter sound.
2) Connect Letter Sounds To Familiar Symbols
Letters and their sounds might be unfamiliar to your child. By making a connection between letter sounds and items or symbols your child might already be familiar with, you can help bridge the gap between what they don’t know yet and what they do!
Utilizing things that your child already knows and loves may encourage them to get more engaged with learning their letter sounds. Familiar ideas will also make them feel more confident and comfortable while learning.
For example, if you want to start with the letter “T,” consider printing out pictures of things that start with “T” that your child loves, such as trucks and tigers. Let your child choose which pictures to use, and then help them create their very own alphabet book with those images!
Working with your child to construct their personal letter-sound alphabet — a mixture of the specific picture you want them to learn to associate with a particular letter sound — is an easy and fun craft project that will pay off in the long run.
The more personalized you can make the learning process the more fun your young learner will have!
Familiarity can also help your child beyond simply learning the letter sound: it helps them build confidence! The more your child feels like they understand and know what they’re reading, the more likely they’ll be to develop an enthusiasm for learning.
3) Repetition, Repetition, Repetition
This technique focuses on repetition, which is great for getting your child familiar with their letter sounds. By consistently repeating the same letter sounds to them, you can help your child more easily pick up on them.
A great idea might be to focus on introducing your child to one letter sound at a time. You could make a “letter of the week” jar for your child. Place an empty jar on your counter labeled with the letter sound for the week.
Every time your child points out a word they’ve heard that starts with the letter sound of the week, they earn a “ticket” or “point” in the letter sound jar (you could also use stickers on a poster if you don’t have a jar handy).
Challenge your child to gain three or four points (or more!) during the day. You’ll want the jar to be somewhere your child sees it often — maybe in the kitchen so you can prompt your learner to think of a word while you’re making dinner or washing dishes!
They don’t have to rely on only the things they hear or see in real life, especially when it comes to those trickier letter sounds (like x, q, or z). Consider using some of your daily reading time to flip through magazines or books and point out the letter sound whenever you come across it.
Emphasizing repetition this way really gives your child the chance to focus intensely on a single letter and explore the primary sound it represents!
Giving them ample amounts of time, practice, and exposure to one sound at a time may help them with their learning longevity.
4) Digital Letters In The 21st Century
Technology is a huge new factor in modern-day learning. Not only do children learn how to read and write texts, but now they also have to learn how to use a keyboard at a very young age.
While too much media time can be bad for your child, there are ways to be mindful about media consumption and incorporate media into their letter-sound learning. Especially for busy families, media can be a really useful asset to add to your parenting tool belt.
If you’re looking for a safe, personalized, and reliable place for your child to work on their reading and letter-sound skills, our online learning center has tons of playful games and exercises!
Your child can also use a simple keyboard to engage their letter-sound skills. For this activity, you can call out the sound of a letter and ask your child to hit or point to the letter it matches on a keyboard.
This exercise is easy and versatile, as you can use any keyboard you have around — on your phone, your computer, or a device designed for kids. And your child will probably love pretending to be a grown-up just like you!
5) Bingo
Classics are classics for a reason. And Bingo is a time-tested, kid-approved game!
If you’d like to take a shot at this activity, draw or print out a Bingo sheet that has pictures of things your child is familiar with (remember tip #2!). We recommend sticking to things they see daily, like apples (for the “a” letter sound), bikes (for the “b” letter sound), and so on.
To play, call out a letter sound and instruct your child to mark off the picture that begins with the same sound. If your child has siblings or neighborhood friends, consider inviting them to play along (it makes for a great virtual game, too).
The first to make it to bingo wins!
Making Letter Sounds Fun And Functional
We hope these tips were helpful and gave you some creative ideas for how to get your child engaged with letter sounds (while having a blast along the way!).
We always want to leave you with a reminder that on the journey toward helping your child become a confident, enthusiastic reader, it may take some time to discover what learning strategies are the perfect fit for them. That’s OK!
If you ever need a little extra help or want to switch up your child’s learning routine, our learning center is always open and full of engaging and effective exercises for your emerging reader!
Author
How to Teach Letters and Sounds Correctly - Structured Literacy
by Karina Richland | Sep 10, 2022 | Multisensory Teaching, Phonological Awareness, Reading, Reading Skills, Rhyming | 4 comments
Teaching letters and sounds can seem complicated, but it doesn’t have to be! There are a few key things you can do to make the process smoother for both you and your student. In this blog post, I will discuss the importance of phonological awareness before teaching letters and sounds, as well as the best sequence for teaching letters and sounds. I will also provide tips on using tactile materials and multisensory activities in your classroom. Finally, I will give you some helpful hints on watching your students’ pronunciation. Follow these simple steps, and you’ll be on your way to teaching letters and sounds like a pro!
Step 1: Build Phonological Awareness Before Teaching Letters and Sounds
Building phonological awareness is a crucial step in teaching letters and sounds. What is phonological awareness? It means that your student can recognize sounds, rhythm, and rhyme involving spoken words. You hear it and you speak it. There is no print involved in phonological awareness. Phonological awareness happens long before your students are introduced to letters of the alphabet. There are three main areas of phonological awareness: Rhyming, Syllables, Phonemic Awareness
Research has shown us that phonological awareness is highly related to later success in reading and spelling. Students therefore need to master these three skills before learning to read. To learn more, please read this post:
What is Phonological Awareness?
Step 2: Teach Letters and Sounds in Isolation
Once phonological awareness has been established, it’s time to start teaching the letters and sounds of the alphabet. Here are some tips on how to teach this to your student so that they are successful.
Teach Lowercase Letters First
Lowercase letters should be taught before uppercase letters. Your student will come across lowercase letters the most when they begin printing and blending words, so they will need a solid knowledge of the lowercase letters. Uppercase letters are usually easier for children to master and they typically gain proficiency with uppercase letters due to more frequent exposure in environmental print as well as with initial uppercase letters in names. Therefore spending more time teaching the lowercase letters will benefit your student greatly.
Teach Each Letter in Isolation
You will want to work on just one letter at a time and not teach a new letter until the previous letter has been mastered. Go slowly and use a lot of repetition. If you are working with a reading program such as the PRIDE Reading Program, you will simply follow the program’s direction and use the program’s scope and sequence.
Review Previously Learned Letters
Each time you add a new letter to the mix, review the previously learned letters. Because your student needs a lot of repetition, it is really important to review, review, review. When you hold up the letter flashcard, you will want your student to say the letter sound and the letter name within three seconds.
Say, “When I hold up a letter, say the letter’s name and give its sound.”
If your student is not saying the letter and sound in three seconds…go back and reteach. It means you went too fast and didn’t give your student enough time and enough practice to master the letter and sound.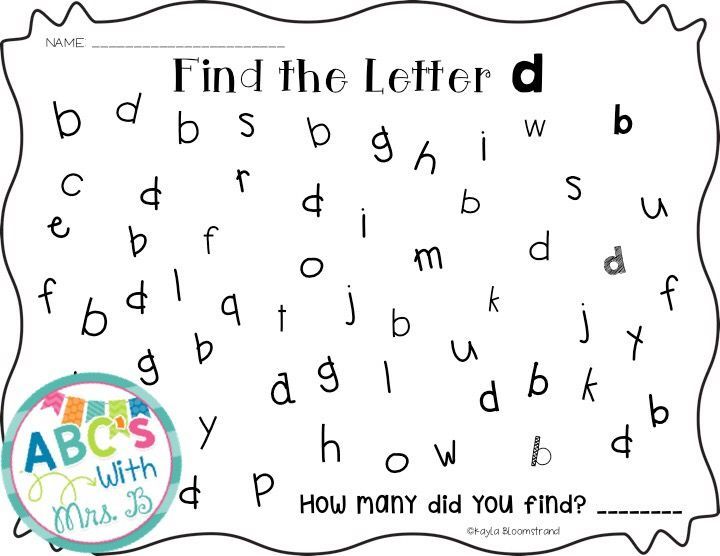 For some students, learning the letters and sounds of the alphabet can take up to a year!
Take your time and go slowly. There is no rush. It is really important that each letter and sound ‘stick’ and that can only happen slowly over time with practice and repetition.
Use Tactile Materials
Use lots of tactile materials when teaching letters and sounds.
Ex: glitter glue, sand, play dough, LEGOS or canvas (to write and feel the letters)
You can watch this video with our favorite teacher Ms. Reneé to give you some ideas on how to make your own tactile letters cards!
Use Multisensory Activities
Multisensory means engaging more than one sense at a time. You see it, you say it, you hear it, you touch it, and you move with it! Using multisensory activities in your alphabet lessons makes learning fun and memorable. Here are some multisensory activities you can use when you are teaching your child the letters and sounds of the alphabet:
- Pair up with your student and write letters on each other’s backs with a finger. Guess what the letter is!
- While sitting on a carpet, write down each letter directly onto the carpet with two fingers.
- Fill a tray with sand or salt and write the letters in it.
- Spread shaving cream out on a tray and have your child write out the letters in the cream.
Here are some more alphabet activities and games that you might be interested in checking out:
Alphabet Q-Tip Letter Activity
Fly Swatter Alphabet Game
Alphabet Movement Activity: Simon Says
Step 3: Watch Your Student’s Pronunciation!
Once your student is able to identify letters and produce their sounds, it’s important to start monitoring their pronunciation. When you begin to introduce each letter and sound to your student, make a note of not adding an extra vowel sound at the end. For example, if you say /tuh/ instead of /t/.
Continuous Sounds
These are the letters that make one continuous or stretched out sound. These are easy sounds. You can elongate these sounds.
m, s, f, l, r, n, v, z
Clip Sounds
These are the letters that are not as easy to pronounce in isolation without adding an extra vowel sound to the end. The vowel sound should be “clipped” to make it as short as possible.
A trick that I have learned is to put your hand in front of your mouth. When you say a clip sound, there will be a little puff of air. Stop saying the sound as soon as you feel the puff of air. These are the clip sounds.
b, c, d, g, p, t, k, j
Tricky Sounds
These are the tricky ones to teach. I have to play around with them a bit until I figure out the right way to pronounce the letter without adding the vowel to the end.
h, w, y, x
It is not necessary to teach the continuous sounds before the clip sounds. You can teach the alphabet anyway you choose. Personally, I like to first teach all of the consonants before teaching vowels. I use the vowels to teach beginning blending. I also separate the b and d to avoid reversals.
If you are interested in learning more about how to teach reading and spelling, don’t miss out on our FREE Orton-Gillingham, Structured Literacy Introduction Course!
By following these simple steps, you’ll be on your way to teaching letters and sounds like a pro! Just remember to start with phonological awareness, teach each letter in isolation, use multisensory activities and a lot of repetition, and watch your students’ pronunciation. With a little bit of teaching effort, your student will be reading and writing in no time!
Please don’t leave without checking out the PRIDE Reading Program. The PRIDE Reading Program is an Orton-Gillingham curriculum that is used by teachers, tutors, and homeschooling parents worldwide with great success.
All of the skills mentioned in this post are included in the PRIDE Reading Program. Your student will enjoy learning letters and sounds with an Orton-Gillingham step by step approach in the Beginning Letters & Sounds Book. Activities and games are included and a simple to use, 100% scripted Teaching Guide for all parents, teachers, and tutors to use.
PRIDE Reading Program
Karina Richland, M.A., is the author of the PRIDE Reading Program, a multisensory Orton-Gillingham reading, writing and comprehension curriculum that is available worldwide for parents, tutors, teachers, and homeschoolers of struggling readers. Karina has an extensive background in working with students of all ages and various learning modalities. She has spent many years researching learning differences and differentiated teaching practices. You can reach her by email at [email protected] or visit the website at www.pridereadingprogram.com
5 Ways to Learn the Alphabet Quickly and Easily with a 3-6 Year Old Child – Somersault
Before learning the alphabet with a child, it is important to understand what you are not going to do. Namely, learning to read. This is a more complex skill, so it is worth putting it off until the time when the child gets acquainted with all the letters and will confidently recognize them and write on their own. Until then, put off the alphabet and reading by syllables.
In this article, we have put together the basic principles to quickly learn the Russian alphabet with a 3-6 year old child in a playful way. For all games with letters, you can use plasticine, paints and any improvised means or magnetic letters - they will easily attract the attention of the child.
Contents:
- Learn the Alphabet Easily: Basic Principles
- 5 ways to learn the alphabet with your child
- From alphabet to reading
How to Learn the Alphabet Easily: Basic Principles
Each child can find an easy way to learn the alphabet that suits him or her, but there are basic principles that are important for all children. If you do not follow them, study will turn into drill and the child is unlikely to ever love to read. Here are a few such principles on how to properly learn the alphabet for a child.
- Learn sounds first, not letters . At the first stage of learning, it does not matter how the letters in the alphabet are called correctly. Now only sounds are important for the child - "d", and not the letter "De". The names of the letters will only confuse the child, who first needs to learn to recognize the shape of the letters and their sound.
- Not learning the alphabet in the correct sequence . Until a child goes to school, it is of no use to him to know how the letters are arranged in the alphabet. This information will only distract him from what is really important: how the letters look and sound. The sequence of the alphabet can be learned later or even at school, where this knowledge will be tested by the teacher.
- Do not turn learning into a lesson .
 Learning from call to call is difficult even for children at school, let alone a baby. Therefore, all learning should take place in a playful way and not for long: 5-7 minutes a day to get acquainted with the letters will be enough. Gradually, this time can be increased, especially if the child likes the proposed games with letters.
 - Use material objects . At the age of 3-6 years, the child learns the world by touch and taste. It is difficult for him to work with abstract letters spoken aloud. Therefore, it is better to stock up on plasticine and paints and create letters that are more understandable to the child and can be touched. Such a game for children will allow the child to learn the letters of the alphabet and he will recognize them in different forms regardless of what they are made of.
- First vowels, then consonants . Vowel sounds are easier to pronounce, so it's worth starting with them.
The main thing is not to force anyone. If you see that the child is inquisitive, enjoys exploring the world and is ready to learn, you can move on to learning letters and the alphabet. So the child will be happy to learn the alphabet in a playful way and gradually learn to read. So that the game is not abstract, you can use the magnetic letters TUMBLING.
5 ways to learn the alphabet with your child
1. Use an interesting topic to study
Use your child's interest to spur his motivation to learn. For example, if your kid is crazy about cars, let them be the topic in which you learn the alphabet. Use any words related to cars:
"A" - bus
"B" - trunk
"C" - driver, etc.
You can show cars and their parts, draw or sculpt from plasticine. It is important that the child's focus shifts from learning to doing what they love. Additionally, the method will help expand vocabulary and knowledge about the world.
2. Cross out a letter of the alphabet in the list
Fill in a small square with arbitrary letters. The task is to cross out only the letter that you are studying. This will help the child focus on one letter and not get distracted by the ones he doesn't remember or don't know.
3. Pulling the letters of the alphabet out of the pouch
The soft-touch magnetic letters are perfect for this method. Put the letters in a bag and give the child the task, without looking, to pull out only the letter that you thought of. Let there not be too many letters in the bag, otherwise the child will get confused. 6-7 pieces will be enough. To start, use letters that are very different in shape, such as "O" and "M". Gradually, the complexity can be increased and searched among similar letters, for example, "K" and "X". Don't forget to praise and encourage your child. You can alternate the learning process with desktops.
4. Recognize letters of the alphabet by ear
You pronounce a word, and if it contains a hidden letter, the child claps his hands.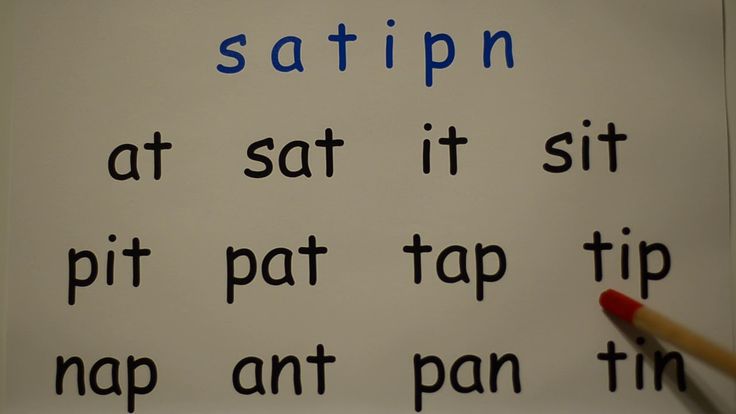
With this game for kids, you can learn individual letters or the entire alphabet. For example, you name a word, and the child inserts its first letter into the insert frame. To stimulate your child's interest, you can use only words from his favorite topic, for example, the names of animals.
5. Guess words starting with the first letter
You choose one letter and think of a word that starts with that letter. For example, the letter "Z":
- What is this animal with big ears and loves carrots?
- Hare!
This game form is again suitable for learning individual letters or the entire alphabet. If you learn only one letter, the child gets used to quickly recognizing it in different words. And if you give words with different letters, the child as a whole learns to understand with which letter they begin. With the study of the account and the English language will also help TUMBLING.
From the alphabet to reading
When a child learns the Russian alphabet, confidently recognizes all the letters in different words and can draw or mold them on his own, it is worth moving on to reading. Because you need to learn the alphabet just so that the child can read. If knowledge is not used, it will hang as an extra burden, and by the time school will be forgotten. Therefore, you should not learn the alphabet too early: at 3-4 years old, a child is simply not interested in reading books in order to learn something new. He is more interested when his mother reads. Conversely, by the age of six, the child will be glad to have his own books to read them himself.
The best way to learn letters. Part 1. A game method for learning the alphabet
Perhaps the title of this article will seem immodest to you, and the author - presumptuous. Perhaps you think that the author used such a title in order to attract the attention of readers.
Yes, it is. The purpose of this heading is to draw your attention to the really most effective way to teach a child the letters of the Russian alphabet in the shortest possible time and teach him to pronounce these letters with sounds. You will see for yourself the simplicity and effectiveness of this method by reading this article and starting to teach your child letters with its help. After five lessons, your child will know all 10 vowels well and begin to memorize consonants, even if before that he did not know a single letter. And, most importantly, he will learn letters in the process of games and will remember them firmly.
But first, a small digression. Before you start teaching your child letters, you must decide what he needs it for. Some parents are proud that they managed to teach letters to a two-year-old or even a one-and-a-half-year-old child. But this is worth doing only if at the same time you start teaching the child to read. Any knowledge should immediately find its practical application. And learning letters by itself, without learning to read at the same time, does not make sense. There are many other, equally effective, ways to develop a child's memory and stimulate the brain during the formation period. It’s also good if, by the beginning of learning to read, the child forgets these prematurely learned letters and does not pronounce them the way he was once taught: Be, We, Ge ... or By, You, Gee ..., otherwise when reading it it will bother him a lot. You ask: "Well, if you teach a child letters and reading at the same time, then at what age is it better to start, from the age of two is it already possible?" I believe that at home, in a family, a mother with a child of this age can already be engaged; but first for half a minute, and then for several minutes during the day. As a result of such "lessons", built in the form of a game, the child will develop the ability to concentrate on a particular activity, and then, starting from the age of three and even a little earlier, he can be taught to read in a group of children like him. Just do not forget that learning to read, and especially early, should take place without coercion, in the game, against the backdrop of positive emotions.
A game method for learning ten vowels in 5 lessons
So, you set out to teach your child to read books. You will start, of course, by learning letters with him. In what order should they be taught? Of course, not in alphabetical order and not in complete disorder when a child is given mixed vowels and consonants.
An important factor at the initial stage of learning to read in warehouses is the child's solid knowledge of the ten letters denoting vowels (hereinafter, for simplicity, I will simply call them "vowels"). I have repeatedly drawn my attention to the fact that children who do not read well, even schoolchildren, hesitantly name vowels, and when reading they stumble, remembering whether it is E , or E , or Yu . In view of the paramount importance of knowing ten vowels for full reading (so that the child does not "stumble" in each warehouse), I developed this game technique for quickly learning them, which I have been successfully using for several years now.
The duration of each of the five lessons of this technique is a few minutes. Lessons are held twice a week, and on the other days of the week, parents repeat the contents of the previous lesson with their child for two to seven minutes a day. I calculated that teaching a child ten vowels using this method takes a total of just over an hour.
The methodology is based on the principle of multiple display and synchronous voicing of a group of characters with their gradual partial replacement, proposed by the outstanding teacher Glenn Doman. In this case, the task is facilitated by the fact that in Russian the vowels form pairs that seem to rhyme: A - I, O - E, U - Yu, Y - I, E - E . I supplemented the multiple display with five reinforcing games I developed.
- The purpose of the lessons according to this method is to give the child a solid knowledge of ten vowels in five lessons. Often, parents believe that their child does not need this: "He has known all the letters since the age of two." When you start showing him the letters, it turns out that he does not know them well.
 Confused E with Yo or with Yu , does not know E , S , sometimes thinks, remembering some letter. Before starting to learn to read, the child's knowledge of all vowels must be brought to automatism.
 - From other ways of studying letters, which often only slow down their assimilation and make it difficult to use ( A - watermelon, I - turkey or O - like a bagel, Yu - Yulina letter, I looks like a pillar with a flashlight, etc.), this technique is simple and effective.
Lesson 1: Vowels a-z, o-o
Write or print the vowels on heavy white paper, each on a separate card: the letters A, O, Y, Y, E cards 12x10cm in size, and Ya, Yo, Yu, I, E - in blue bold font of a slightly smaller size on cards 9x10cm. In the first lesson, you will only need cards A, Z, O, E .
On the back of each card, write this letter by hand for yourself so you don't have to look at the front side when showing the letters to the child.
Classes can be taught by a teacher or one of the child's parents.
Display of the first two pairs of vowels (A - Z, O - Y).
Stack two pairs of cards as shown in the left illustration, with the reverse side facing you. Move the card A closest to you forward (as indicated by the arrow in the right picture) and show it to the child. Say: "This is A ". Then shift the next card forward and say: "This is I am "; then - "This is - O "; and then - "This is E ". Show each card no longer than 1 second. Do it fun, in the form of a game. Look not at the cards, but into the eyes of the child to see where he is looking , and attract his attention. Most children already know the letters A and O . You can pause and give the child the opportunity to name them himself. make mistakes. And don't ask your child to repeat them. Your task is to quickly show these four letters and at the same time recite a small rhyme:
"This is A "
"This is I "
"This is O "
"This is YO "
Children can easily remember longer poems, and even more so such an easy rhyme they will soon begin to repeat on their own.
If you are a teacher, explain to the child's mother in class that she must show and say these four letters every day until the next class at least five times a day. Have her do this the first time in your presence so you can correct her if she does something wrong. Feel free to explain everything to your parents in as much detail as you would to their children, and check how they understood you. Shuffle the cards. Ask your mom to put them in the right order. Then she should sit or put the child in front of her and look into his eyes while showing the letters.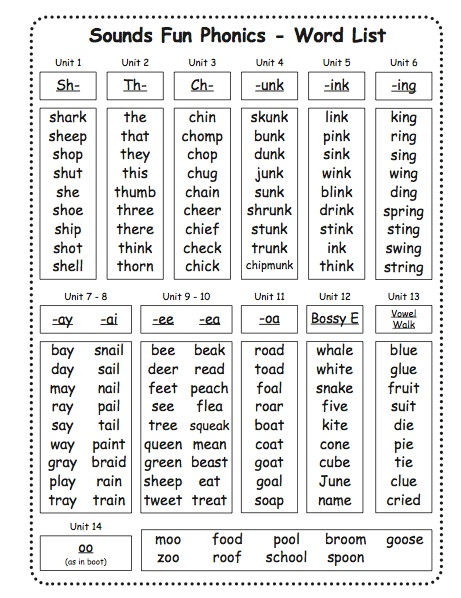 She must pronounce letters unfamiliar to the child clearly and before him. A typical mistake is when mom takes out another letter and holds it in her other hand without covering the last letter with it. In this case, the child sees two letters at the same time.
Tell your mother that all homework will take her half a minute a day, because one such display lasts five seconds. It is only important not to skip them. Gradually, the pause after the word "This is ..." should be increased, and the word itself should be pronounced with an interrogative intonation, as if encouraging the child to name the letters himself. The child must simply name the letter. He should not say "this is A " or "letter A ". Give your mother the four letters you made, ask them to bring them with you to class.
Lesson No. 2: reinforcing the vowels a-z, o-o
By the beginning of this lesson, the children had already repeated for two or three days after their mother A, Z, O, Y and remembered them well in this order .
Reinforcing games.
Now with these four letters you need to play five reinforcing games so that the children remember them firmly both in the order of the learned rhyme and separately.
Place four cards on the table in front of the child in pairs, calling them out loud, in the order in which they were shown to him. After that, start playing.
1st game. "Wind". Explain to the child that the red letters are big brothers and the blue letters are little brothers. Then say: "The wind came up and mixed all the brothers." Shuffle the letters yourself so they don't turn upside down. Then let the child put them in order in pairs, calling out loud: A - next to I , O - next to E (at first with your help).
2nd game. "Hide and Seek". Cover the smaller cards with large ones (red letters on top) and change the order of these pairs: "The little brothers hid under the big ones and changed places so that Lenochka would not find them. Guess which little brother hid under the big brother O ? That's right, under O hid Yo ! And under A ? That's right, I'm !"
Game 3. Hide and Seek. Play the same way, but this time it's the other way around - the big brothers hide under the little ones.
Game 4. Crow. Drive palms over the cards laid out in the correct order, and say: "The crow flew, flew, flew, flew and ... ate a letter." Quickly cover one of the letters with your palm: "What letter did the crow eat?" It is better to drive with both palms at the same time to it was more difficult for the child to guess which letter you were going to cover. If he could not answer quickly, tear off your palm for a moment and cover the letter again.0005 O . That's right, Ё !" Over time, the child will remember the location of the letters and guess them easily.
5th game. "Cards". Now play with the same cards with the child the way adults play cards. You shuffle the cards , then you throw a card on the table in front of him and ask: "What is it?" Named correctly - he won and took the card, he made a mistake - another student takes it, and at home - mom. Do not rush to allow other students to prompt, let the child think a little. At first, try to throw cards in pairs: first O , followed by Yo , A - I , etc. If the child wins confidently, throw in pairs, but in reverse order. Then start throwing around.
The mother present at the lesson memorizes and writes down how to play these five games at home. You only need to play once a day, unless the child himself asks for more. But each time stop the game while he still wants to play: "We'll finish the game another time."
Display of three pairs of vowels (A - Z, O - Y, Y - Y).
After you have played five games with the first two pairs of letters, take out the next pair of cards you made Y - Y , write them on the back for yourself and add them to the pile (after the lesson, give this pile, all six letters , mother).
| A | I |
| O | E |
| U | U |
Show for the child already, as you are already, as you are, you can do it. Only this time the first four letters are called by the child, and you quickly name the last two yourself, preventing him from making a mistake (remind your mother about this too). Give mom the same instructions as in lesson number 1. By the next lesson, in two or three days of the show, the child will already remember a new rhyme:
"This is A "
"This is I "
"This is O "
"This is YO "
"This is in "
" Yu "
Give your mother these six letters you made, ask them to bring them with you to the next lesson.
Attention! After lesson No. 2, the mother shows the child several times a day already these three pairs of vowels, but so far she plays reinforcing games with him only for the first two pairs ( A - I, O - E ) once a day.
Lesson 3: Vowels u-u, s-i
By the beginning of this lesson, the children have already learned the rhyme: "
" This is ё "
" This is in "
" This is Y ,
A, O, O, O, Y Thanks to five consolidating games, they know and score . Now you need to consolidate the knowledge of the last vowels they learned Y and Y .
Reinforcing games.
Place the next six cards in pairs on the table in front of the child, calling them out loud, in the order in which they were shown to him. After that, play the games described in detail in the lesson No. 2.
| A | I | ||||||||||
| O | Yo | ||||||||||
| O | Y |
| Y | Y |
| Y | I |
Show your child these three pairs of letters as you did in previous lessons. As before, the child calls the first four letters, and you quickly name the last two yourself, preventing him from making a mistake (remind your mother about this too).
Give your mother all the letters you made, ask them to bring them with you to the next class. Tell mom that all homework will now take her no more than six minutes a day and remind her that it is important not to miss any of them.
Attention! Pay attention to the mother that after this lesson, the child needs to be shown these three pairs of vowels several times a day, putting aside the well-known to him A - Z . And in the evening, you need to play reinforcing games with him only for the first three pairs: A - I, O - E, U - Yu (so far without S , - And ).
Lesson No. 4: reinforcing all the vowels
By the beginning of the fourth lesson, the children know the following vowels in pairs: A - I, O - E, U - Yu, Y - I , and the letters A, I, O, Yo, U, Yu , thanks to fixing games, are also known randomly. Now you need to consolidate the knowledge of the last vowels they have learned S and AND .
Reinforcing games.
You already understood that the number of vowels with which we play reinforcing games increases with each lesson: in the second lesson we played with four letters, in the third - with six, and now these five games need to be played with eight letters . A - I and O - E , and you get the last pair you made E - E . Write these cards on the back for yourself and add them to the stack. The total number of letters shown is still six and the rhyme remains just as easy to remember. It is also important that the letters E and E , which children often confuse, never "meet" when shown: when the letter E "came" in the fourth lesson, the letter E had already "left". The cards are now stacked in the following order.
| In | U |
| s | and |
| E | E |
Show these three pairs of letters to your child, as the previous three pairs of letters are the previous ones. As before, the first four letters are called by the child, and you quickly name the new ones E and E yourself, without letting him make a mistake (once again remind your mother of this). Give your mother all ten letters you made, ask them to bring them with you to class. Tell her that all homework will now take her no more than six or seven minutes a day and remind her that it is important not to miss a single one.
Attention! Pay attention to mom that after this lesson, the child needs to be shown several times a day the last three pairs of vowels, putting aside the well-known to him A - Z and O - E . And in the evening, you need to play reinforcing games with him once for the first four pairs: A - I, O - E, U - Yu, S - I (so far without E, E ).
Continued
Sergey Polyakov
Article provided by the site "7 steps to the book"
This article corresponds to the current level of understanding of early development, given in the book Read before you walk in 1995-1996.
The author quite rightly states:
"Before you start teaching a child letters, you must decide what he needs it for. "
"
"Any knowledge must immediately find its practical application."
- That is, letters should be learned if you teach reading at the same time, otherwise the child will quickly forget the letters.
What is the author's error, if any?
This error is purely technical, but it can play a fatal role - the author himself, apparently, is intuitively aware, but he calls "letters" - letters, not letter sounds, as recommended in the system of "real early development Read - before walking ". It can be seen from the text that he does not exclude naming the letters BE, GE, DE, etc. But this is categorically excluded in Tyulenev's system, which, since the 80s, that it is impossible to say to a child BE, GE, etc., even once, because the child instantly remembers and then it is very difficult for him to compose words from the letters BE, ME, GE etc.!
Another clarification.
When asked at what age, the author replies that one can start from the age of two: during the day. "
"
That's right, but you can start according to the method of Reading - earlier than speaking Sharovarov and "Reading - before walking" by Tyulenev, you can start even before the year.
So, in 2002, in fact, it was recorded that a child can be taught to read using a special method as early as six months - this was reported at this conference.
Here's another clarification. The author recommends:
"Write or print the vowels on thick white paper, each on a separate card: the letters A, O, U, Y, E in large bold red font on cards 12 × 10 cm in size, and Z, Y, Y, Y , E - in bold blue font of a slightly smaller size on cards 9 × 10 cm ..."
- for group classes, this size of cards may come in handy.
However, since 1988, it has been proven that much smaller cards can be used, for example, cards "The ABC of genius" - the Universal Developmental ABC of Methods of Intellectual Development, abbreviated - URAMIR - for classes with a newborn have dimensions of 7 x 3 cm.
In general, the article is wonderful, although there are no references to primary sources, and many of the ideas and recommendations of the book Read before walking in this article are either not learned, or the author does not know about them ...
I think that's it, as Polyakov did, it is necessary to work out each step of the methods of early development. :)
2010-06-10, Friend and comrade
Thank you for your careful reading, Friend and comrade. I'll try to explain something. BE, ME, ES we never tell children and teach their parents to pronounce pure sounds. I use terms for adults. You can read more on this topic on the same site my latest article on the features of teaching preschoolers (click on More articles by the author). There is only one page.
I don't pretend to be the first in everything, I've been working with preschoolers for 15 years, and only in the last 2-3 years I decided to sum up my experience, it's not a waste for him.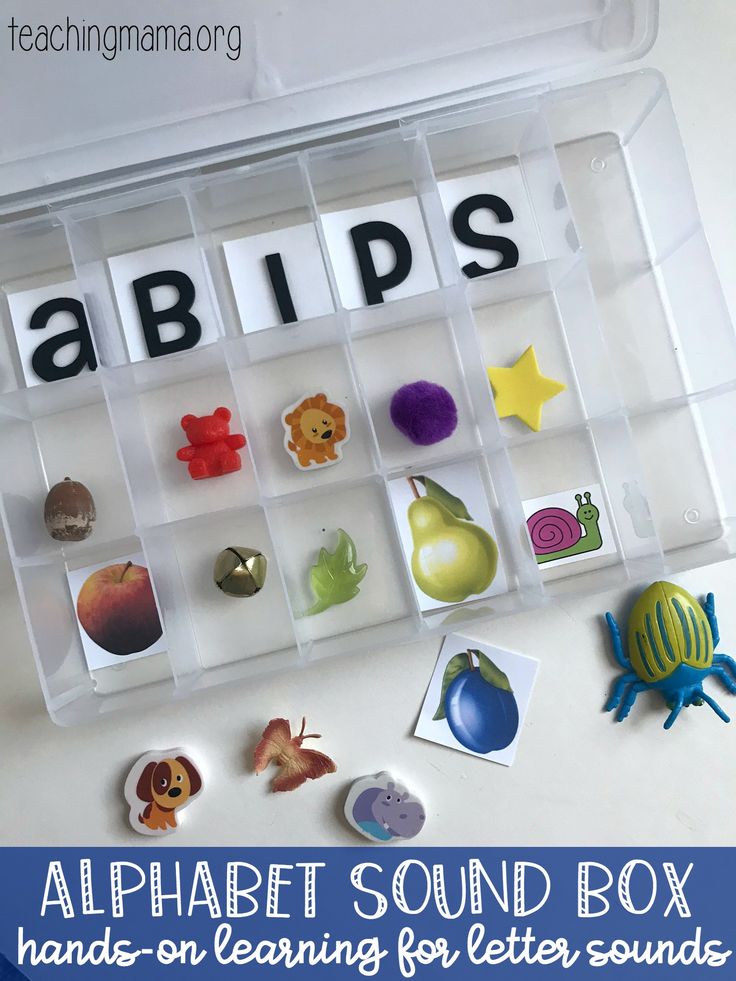 I personally consider Zaitsev to be the first, but I ignore the Zaychists who observe the purity of his teaching. Zaitsev is Gagarin in our region, but all his followers should not fly in a cramped single-seat capsule.
I myself like my technique, because it always gives good results. And yet I have not met another, set out in the same detail, with a detailed explanation of each game. According to the same principle, a methodology for teaching counting was developed (7ya.ru also published it, but only the beginning). When I worked in the nuclear power industry, I had to participate in the preparation of programs for the start-up and adjustment of nuclear power plants. They are just as detailed, each step is described there. That experience has come in handy.
Thank you for your interest.
2011-12-26, Author Sergey Polyakov
Hello, I really want to start teaching a child using this method. But I just can't find an answer to the question: why are the vowels blue and the consonants red? Won't this bring the child down, because later at school there will be a completely different distribution? .