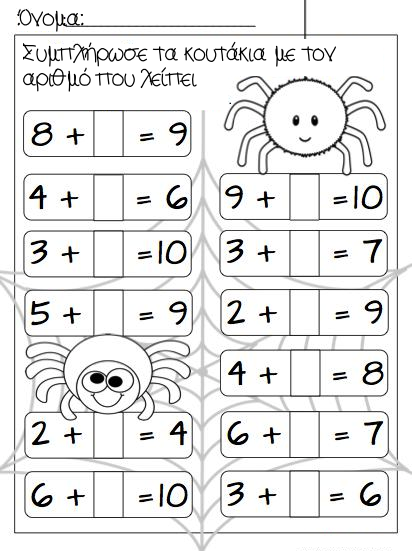
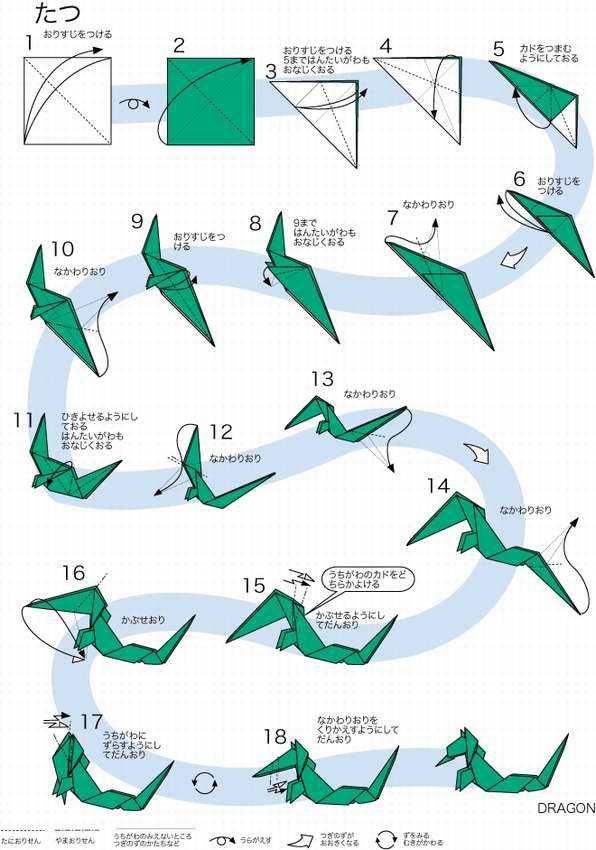
How to make a pterodactyl
Joost Langeveld Origami Page
Joost Langeveld Origami Page
Home - Gallery
- Contact - My upper floor - Videos -
Privacy Policy
step by step instructions for an origami
PTERODACTYL
I
used a cream/yellow colored paper to fold this dino, but it also looks
good when you fold
it
of a pink colored paper.
Step
1:
The backside of this origami paper is white.
Turn the paper.
Step
2:
Prefold over these 4 lines
Step
3:
First valley-fold over the 2 lines at the bottom-right.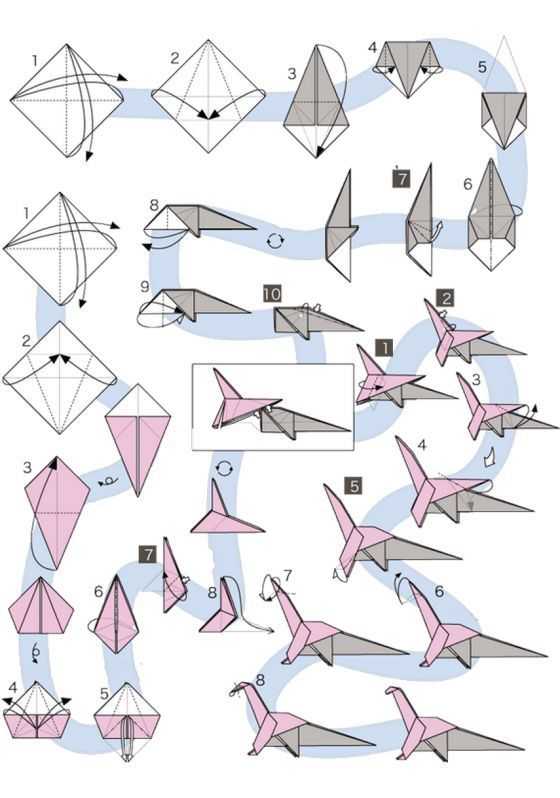
Then mountain-fold over the 2 lines in the middle.
And valley-fold over the 2 lines at the top left.
Step
4:
Pull the flap indicated by the arrow upwards
Step
5:
Press the flap flat
Step
6:
Valley-fold over these 2 purple lines
Step
7:
Unfold the folds of step 6
Step
8:
Pull the edge indicated by the arrow downwards
by making a valley-fold over the purple line
Step
9:
Press the edges downwards, see arrows
Step
10:
Valley-fold the triangular flap upwards
Step
11:
Repeat steps 5 to 10 on the other 3 flaps
Step
12:
Pull the ends at the bottom/backside of the arrows
outwards, in the direction of these 2 arrows
Step
13:
Fold the triangular flap to the inside of the model by
making a mountain-fold over the purple line
Step
14:
Push the 2 ends towards each other again, see arrows
Step
15:
Repeat steps 12 to 14 one more time, see arrow
Step
16:
Bookfold one layer to the left over the purple line.
Do the same on the backside of the model
Step
17:
Valley-fold the flap downwards over the purple line.
Do the same on the backside of the model
Step
18:
Bookfold 2 edges to the right over this purple line
Step
19:
Valley-fold over this purple line
Step
20:
Fold the edges of step 18 back to the left
Step
21:
Repeat steps 19 and 20 on the end indicated
by the arrow
Step
22:
Mountain-fold over these 2 purple lines
Step
23:
Mountain-fold over these 2 purple lines
Step
24:
Valley-fold over this line
Step
25:
Valley-fold over this line
Step
26:
Repeat steps 24 and 25 on the other side,
see arrow
Step
27:
Press the end flat between your fingers by
making a mountain-fold over the short purple
line.
Step
28:
Press this end flat too, see purple line
Step
29:
Press the body flat from aside by making
a mountain-fold over this purple line.
Step
30:
Make an outside reverse fold on the upper layer of
the head (=valley-fold over the 3 purple lines)
Step
31:
Hold the model between 2 fingers on the spot indicated
by the yellow dot.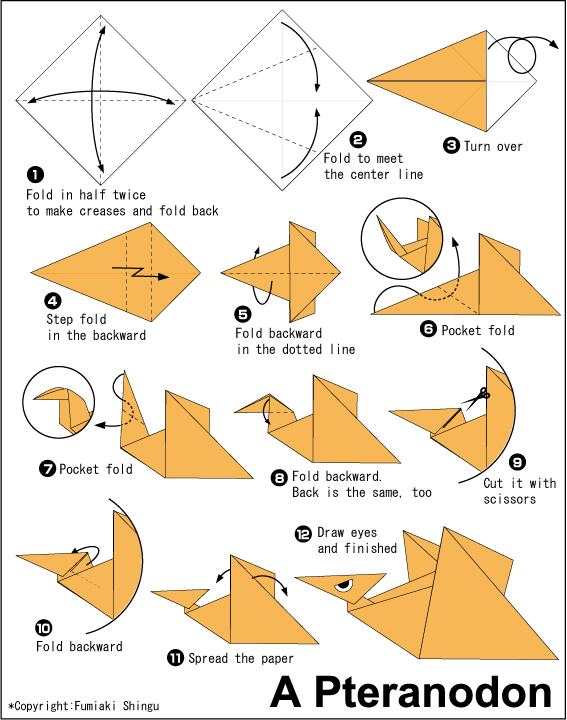 Then, push the head to the right with
your other hand
(=mountain-fold over the 2 lines on the
left and a valley-fold over the 2 lines on the right)
Step
32:
Pull the flap indicated by the arrow downwards
Step
33:
Valley-fold the flap in half over the purple line
Step
34:
Push the edge indicated by the large arrow inwards
with one finger.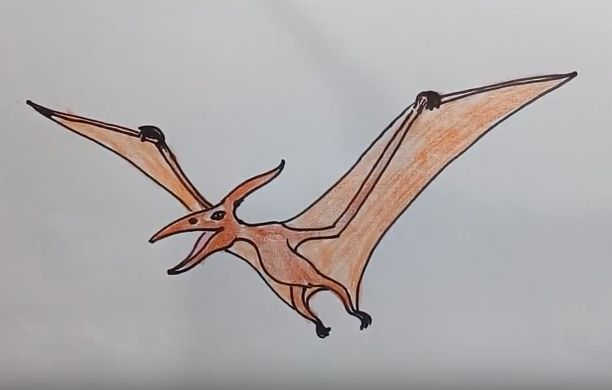 Do the same on the other side of the
neck, see smaller arrow.
Step
35:
Mountain-fold over these 2 purple lines
Step
36:
Press the neck further inwards from aside.
Finally, fold the wings upwards a little, see
purple lines.
DONE!
And in this video I show you how to fold the Pterodactyl:
Paper Pterodactyl Puppet - The Craft Train
By Kate 43 Comments
This post may contain affiliate links.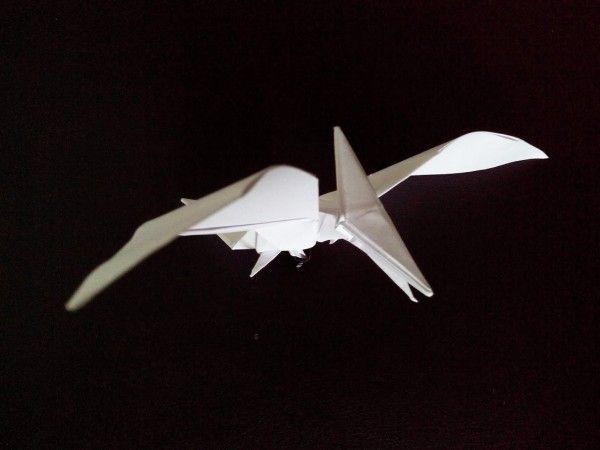 I may receive commissions for purchases made through links in this post at no cost to you.
Here is a fun and easy paper pterodactyl puppet craft for kids. The template to make this paper puppet is free!
I love puppet crafts because they provide kids with a fun activity along with a DIY toy to play with (keeping them occupied for a little bit longer, haha).
This is perfect for dinosaur lovers, and is great when you need a low-mess, low-prep activity to keep your kiddos busy.
This printable craft was first published in 2015 and has been updated and reshared for todays audience
You might also like our paper plate dinosaurs
Not long ago I made some toilet roll dinosaurs. There was a Triceratops and Diplodocus and I had planned to add to the collection with a Pterodactyl. Turns out it worked better and was easier to make from paper, which is not quite as trendy as crafting with paper rolls right now but just as much fun don’t you think?
My girls were very taken with these puppets, they named them Snowflake, Pineapple and Hearts (the green one is Hearts). Here is a quick tutorial on how you can make one at home, it won’t take long.
You will need
- String
- A long craft stick or dowel rod (or any stick really)
- A hole punch and scissors
- Tape
- The free printable template below printed out on heavy paper or light card stock – mine is 160gsm which is about the maximum weight that will go through my ink jet printer. Alternatively print it out on plain paper and trace the shape onto a heavier pice of card stock.
How to
To begin with score the fold line with a blunt knife (like a butter knife) and ruler. This might sound a bit weird and unnecessary but it gives you a really perfect, clean fold. You will find it’s really easy to fold after scoring the line and it helps for this project because the Pterodactyl balances on a single string so any unevenness might cause it to tilt off balance and not work properly.
Once it’s folded cut along the black line with a pair of scissors, including the slit on the head and the extra mouth piece on the bottom of the page.
Fold the wings down evenly. The mouth piece goes through the slit with half of it sticking out the top for the spike on the back of the Pterodactyl’s skull.
Use a hole punch to carefully make two holes over the dots marked, trying to keep them right on the fold line to keep your puppet balanced.
Then tie the string through the two holes and onto the stick and you have your puppet!
If you find that your puppet won’t balance properly you might need to add a small piece of tape underneath on it’s belly to keep the string in place. I made about six of these and only one actually needed the tape.
They were a hit at our place!
More ideas for dinosaur fans
- Here are some hilarious printable dinosaur jokes kids will love
- Make 12 different paper plate dinosaurs using our printable templates
- This dinosaurs in sticky mud activity will keep preschoolers busy for hours
- Make a dinosaur small world in a suitcase for portable fun
- These paper roll dinosaurs are a big favourite of our readers!
How to complete Wind, Courage and Wings quest in Genshin Impact
October 8, 2020
Heading: News, Tips
Platforms: Android, iOS, Miscellaneous
Hello people! Today on Gadgetplay we will analyze how to complete the side quest: Wind, Courage and Wings in Genshin Impact.
Mischievous Rabbit. Chapter 1.
Wind, courage and wings.
As usual, I will first list all the tasks of this quest.
Mondstadt glider.
- Go to the entrance of the Adventurer's Guild.
- Walk the distance in the given time following the markers.
- Talk to Amber.
- Follow the set route and reach the finish line at the specified time.
- Talk to Amber.
- Approach the entrance to the Cathedral of Barbatos.
Permit to fly.
- Talk to Amber.
- Follow the set route and reach the finish line at the specified time.
- Talk to Amber.
- Approach the exam site.
Permit to fly.
- Talk to Amber.
Fly like the wind.
- Talk to Amber.
They call him Pterodactyl.
- Direction Pterodactyl.
- Find the footprints of the Pterodactyl.
- Defeat the Raiders.
- Find the Pterodactyl.
- Talk to Farrah.
- Check the source of the strange sound.
- Find the Pterodactyl using the clues.
- Talk to Amber.
- Track down the Pterodactyl.
This is how scouts work.
- Talk to Amber.
- Obtain a flying license at the cathedral.
- Talk to Amber.
- Find and arrest the Pterodactyl!
- Fly over the abyss.
- Capture a Pterodactyl.
- Defeat the monsters.
- Talk to Amber.
- Enter Pterodactyl's hideout.
How did I go.
At the very beginning we meet Amber and she gives us guidance. Next, we need to come to the exam outside of Mondstadt.
One of the worst nightmares of any gamer is flying through the rings (watch Nerd's Superman video). But nothing the very first task is carried out easily enough.
Next, we return to Mondstadt for another trial with the rings. It's a little more complicated here, I started over a couple of times. You just need to be careful, there are air currents on the ground. If you fall, then just find the airflow near you and take off again and fly through the unactivated rings.
At the test, we are stopped by a local knight who mistook us for an accomplice of a flying villain named Pterodactyl. Now we have to find this villain.
First we look for clues, their approximate location is marked on the map.
We find such luminous lights with an arrow as on the screen above.
Next, you have to deal with the bandits and save Farr. There will generally be a couple of skirmishes before you approach the dungeon.
Now we need to go through the dungeon as usual at the end of the Genshin Impact quests.
Recommend level 15 squad to enter. I never found where this level is indicated, perhaps this is some kind of general indicator, I had a lower level. I went in and pumped one of my characters and after that the task no longer glowed red, which means the level has risen.
We'll have to fly a bit again. There is nothing complicated like with rings, we fly and drop bombs on enemies. If you fell, then we are looking for a stream of air and take off again, the goal is to kill all enemies!
Where there are barrels, you can make a big boom!
I had a rather incomprehensible place, I had to make a big jump, but I fell. But then I took the camera away and saw that before the exit there are rings, jumping into which the character accelerates and soars further!
Then you have to run a little! At the moment, which is on the screen above, you will need to destroy the energy source in order to unlock the mechanism.
For this we use the Ember bow. We shoot at the left and right source of energy. Next, activate the cube to open the door.
Next, a small battle awaits us, in which it is better to immediately eliminate the enemies at the top.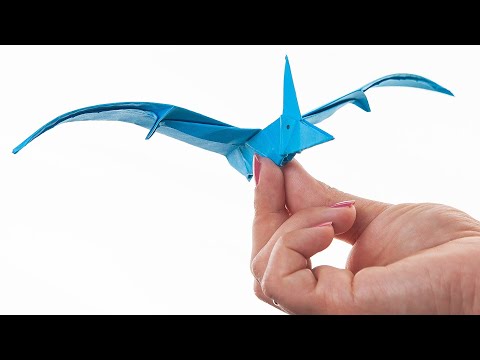
Next is another door.
Easy flight through the rings.
Well, here is Pterodactyl! The heroes will figure out for a long time how to jump to it so as not to fall, but in fact there is a stream of air over the abyss, just jump and that's it
Now you need to fill up the Pterodactyl, I'm not special in battles yet, so I did everything the old fashioned way, just attacked!
At the very end, we need to visit Amber again and collect our license to fly over the city from her.
Well, that's all, the task is completed. Nothing complicated as you can see! Below is a link to the rest of the quests and tips for Genshin Impact. Good luck!
- How to create an account in Genshin Impact
- How to activate promo code in Genshin Impact
- All Genshin Impact articles
Tags:genshin impact, RPG
"Pterodactyl skull" turned out to be part of a huge strange fish
February 16, 2021 16:42 Anatoly Glyantsev
A complete fossil of a fish from the coelacanth order.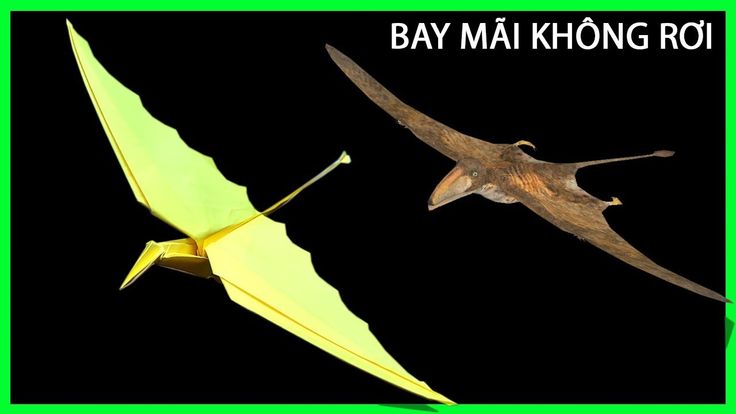
Photo of the University of Portsmouth.
Next to the bones of the pterosaur, the fossilized remains of the lung of a huge fish suddenly appeared.
Photo of the University of Portsmouth.
The location of the lung in the body of an ancient fish.
University of Portsmouth illustration.
Judging by the size of the fossilized lung, the Mesozoic fish had outstanding dimensions.
Photo of the University of Portsmouth.
Scientists have discovered the fossil remains of a huge fish that has not only gills, but also lungs. Surprisingly, an outstanding discovery was made quite by accident.
A collector who turned to paleontologists for an expert opinion helped scientists make an outstanding discovery. What he believed to be the skull of a pterosaur turned out to be the fossilized lung of a huge fish, a close relative of those that once conquered the land.
The discovery is described in a scientific article published in the journal Cretaceous Research.
This paleontological detective story began with a collector purchasing a stone slab containing the remains of a pterosaur. The fossil preserved several wing bones, as well as what was believed to be the skull bones of a flying reptile.
The fossil's new owner turned to experts to better identify it. To the surprise of the researchers and the disappointment of the collector, it turned out that the "pterosaur skull" had nothing to do with either pterosaurs or skulls.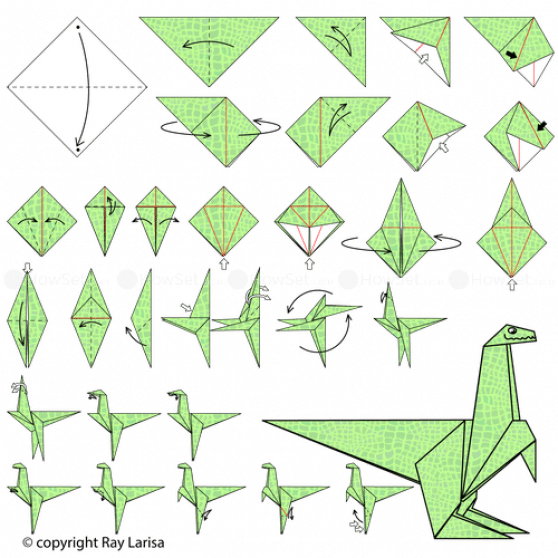
The fossilized remains of the lung of a huge fish suddenly appeared next to the bones of a pterosaur.
Photo of the University of Portsmouth.
Meticulous experts found out that in front of them is not a solid bone, but an articulation of many thin bone plates that were once separated by connective tissue. By characteristic features, they identified the bony walls of the lung of a fish from the coelacanth order.
Explain. All fish have gills and breathe oxygen dissolved in water. But some types of fish (in particular, coelacanths) also have lungs that give them the ability to breathe air.
This is a very useful skill for an inhabitant of shallow, drying waters, allowing one to crawl to the saving water without suffocating along the way.
It was the descendants of coelacanth-like fish that once became the first vertebrates to come out of the ocean onto land. In this they were helped not only by the "omnivorous" respiratory system, but also by the special structure of the fins, which became the prototype of the quadrupedal limbs.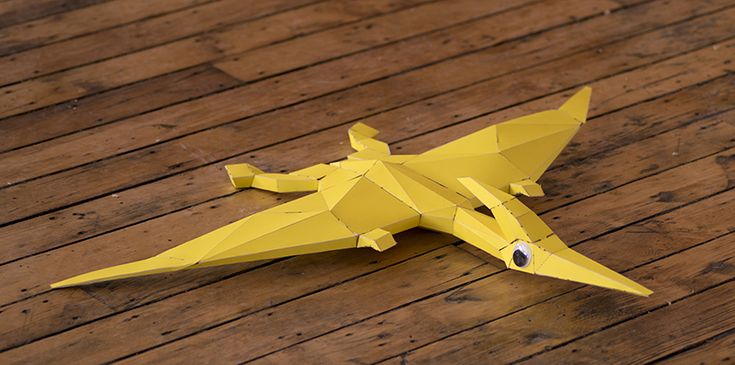 No wonder paleontologists of the 20th century called these fish lobe-finned (now this name is no longer used).
The location of the lung in the body of an ancient fish.
University of Portsmouth illustration.
By the way, the conquest of land took place about 400 million years ago, hundreds of millions of years before the appearance of the first dinosaurs.
Coelacanths disappeared from the fossil record at the end of the Jurassic and were once thought to be extinct. However, in 1938, the first coelacanth was caught in the ocean (this genus belongs to the coelacanths). And at the end of the 20th century, another modern type of coelacanth was discovered. These species have changed little over hundreds of millions of years, which is why they are called living fossils.
The lungs of ancient (but not modern) coelacanths were protected by a kind of bony shell. Experts recognized him in a strange fossil, although it is not clear how he ended up next to the bones of a pterosaur.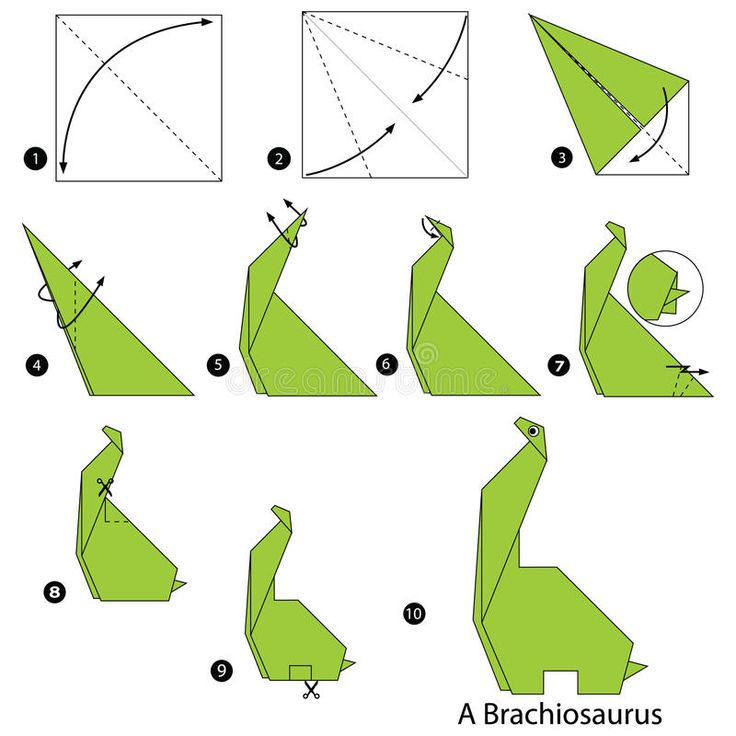
Why did the discovery surprise the researchers so much? First, the dimensions. Judging by the size of the lung, the body length of the fish ranged from 3.6 to 5.5 meters. Never before have experts encountered such huge coelacanths, modern or extinct. For comparison: the size of modern coelacanths does not exceed two meters.
Judging by the size of the fossilized lung, the Mesozoic fish had outstanding dimensions.
Photo of the University of Portsmouth.
Of course, wildlife also knows larger fish. For example, whale sharks grow up to 12 meters or more, and white sharks sometimes overcome the six-meter mark. So the ancient inhabitant of the seas is not a champion in size. But still, fish with such dimensions are rare.
The second thing that surprised paleontologists was the age of the find. She is 72-66 million years old, that is, she belongs to the very end of the Cretaceous period. Prior to this, we repeat, the "youngest" of the fossil coelacanths belonged to the previous - Jurassic - period.