Flour salt ornaments recipe
The Best Salt Dough (for Ornaments and Crafting!) to Make with the Kids
Learn how to make classic salt dough with the kids, with baking, painting, and storage info. This method is straight forward, easy, and thorough—and they a perfect kids holiday gift for grandparents, teachers, and loved ones!
Salt Dough
This salt dough is a staple of childhood and I love doing this Christmas activity with my kids each year—and throughout the rest of the year too! We love to make salt dough handprints, ornaments, and sometimes, just any old shape they want to. It’s an easy project that we can do together—and then share as kid-made holiday gifts, keepsakes, or house decorations.
Salt Dough Recipe
Making salt dough at home is as easy as combining three pantry staples together into a dough. It’s fairly fool proof (as long as you follow the measurements!) and is a recipe that even little kids can help make.
Ingredients in Salt Dough
To make this recipe, you’ll need:
- table salt
- all-purpose flour
- water
TIP: That’s it! (I buy store brand, cheap flour for this since project to keep it very budget-friendly. )
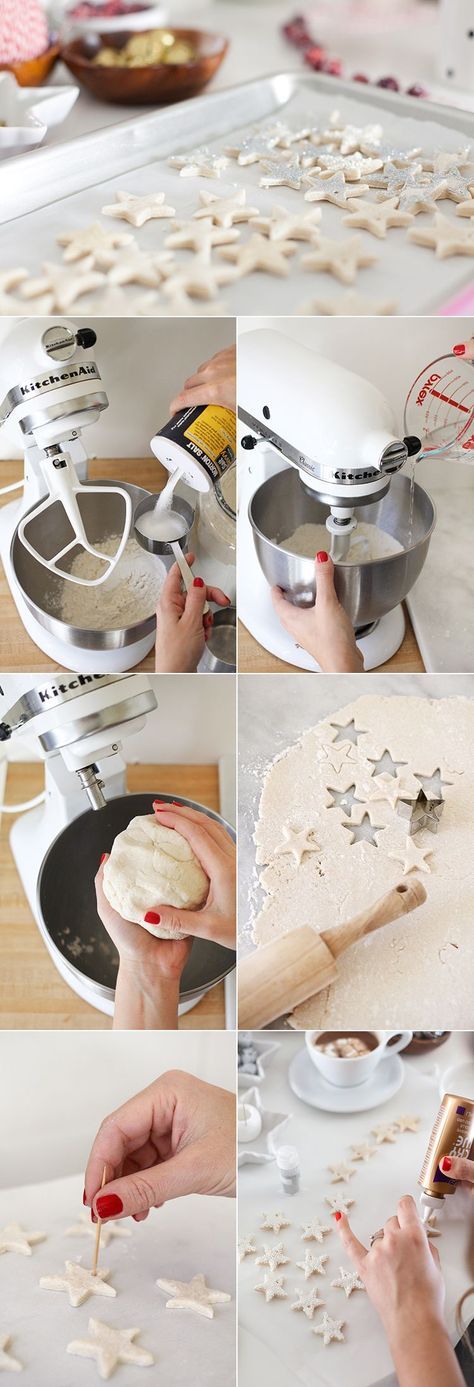
How to Make Salt Dough Ornaments Step-by-Step
Here’s a look at how to make the dough for this salt dough. Scroll down to the bottom of the post for the full information.
- Measure out the flour and water. (photo 1)
- Add the water. (photo 2)
- Stir with a wooden spoon. (photo 3)
- Keep stirring until the dough is mostly together and is hard to stir any longer. (photo 4)
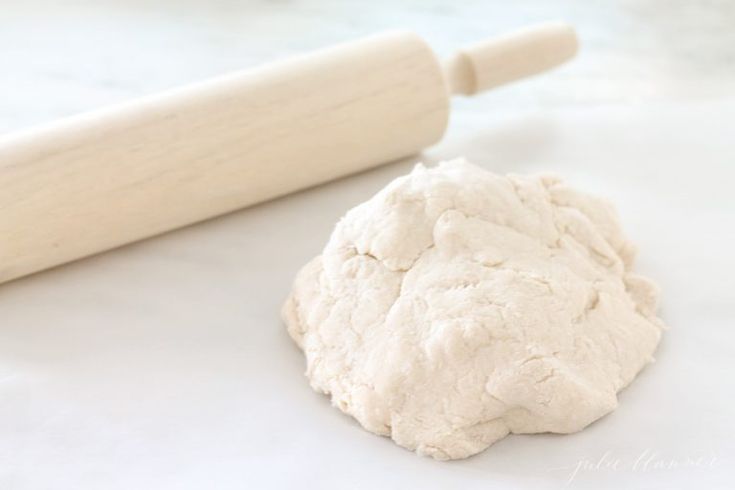
- Knead a few times with hands to bring the dough together. (photo 5)
- Place dough between two pieces of parchment paper and roll out. (photo 6)
TIP: You can divide the dough in sections so multiple kids can have their own dough to work with.
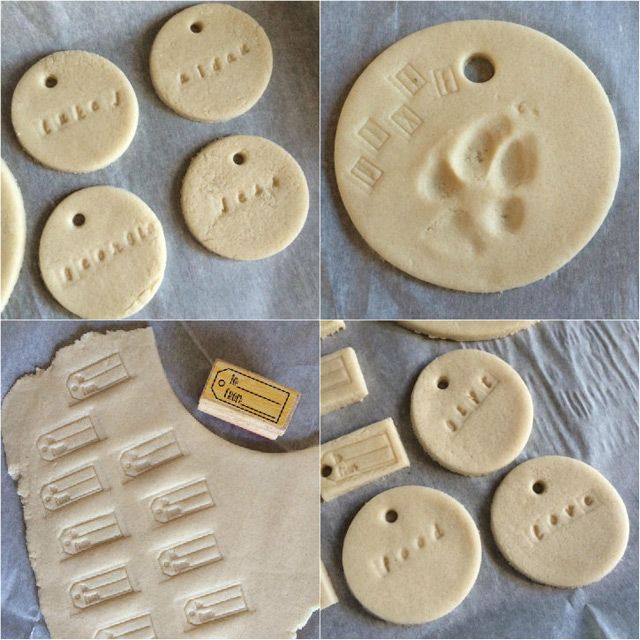
How to Cut Out, Bake and Decorate Salt Dough Ornaments
Once you start rolling, here’s a look at what will follow if you want to make these into ornaments. (Skip the hole poking if you want to just make these as shapes for the kids to paint. )
)
- Roll out, changing directions occasionally, until about 1/4-inch thick. (This may not get precise if you’re working with kids and that’s okay!) (photo 1)
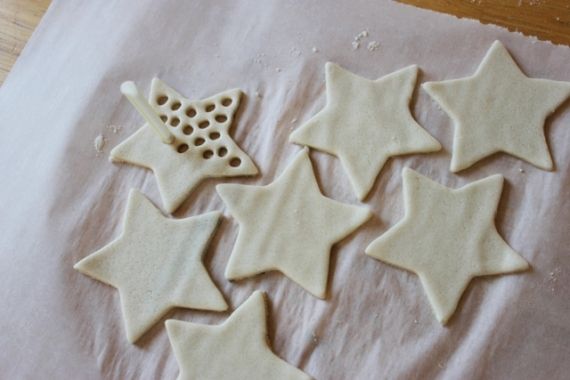
- Stamp cookie cutters. (photo 2)
- Remove the dough around the shapes, then either transfer the whole piece of parchment paper to a cookie sheet OR transfer just the shapes to a parchment-lined cookie sheet. (photo 3)
- Poke holes so you have a place for a string to hang as ornaments. (photo 4)
- Press in a hand to make a handprint, if desired. (photo 5)
- Bake, let cool and decorate! (photo 6)
TIP: Re-roll any remaining dough after Step 3 here to make additional ornaments.
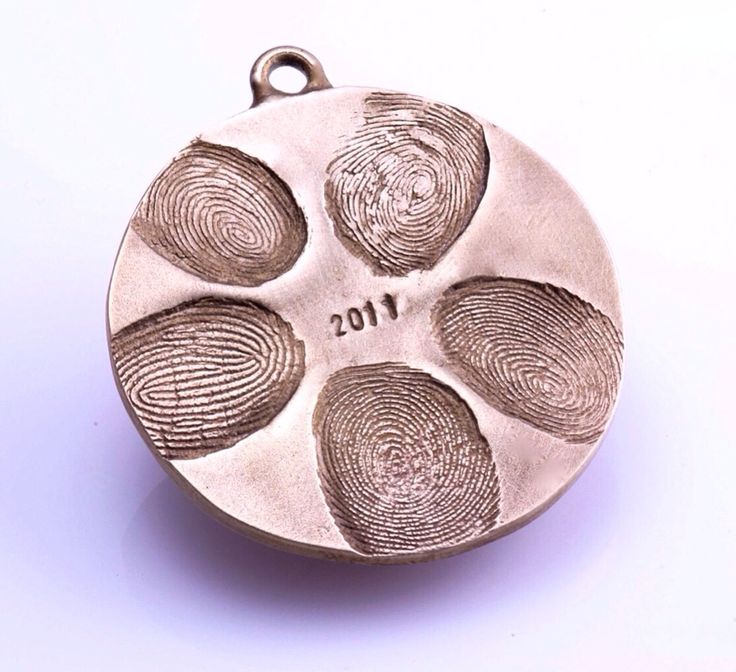
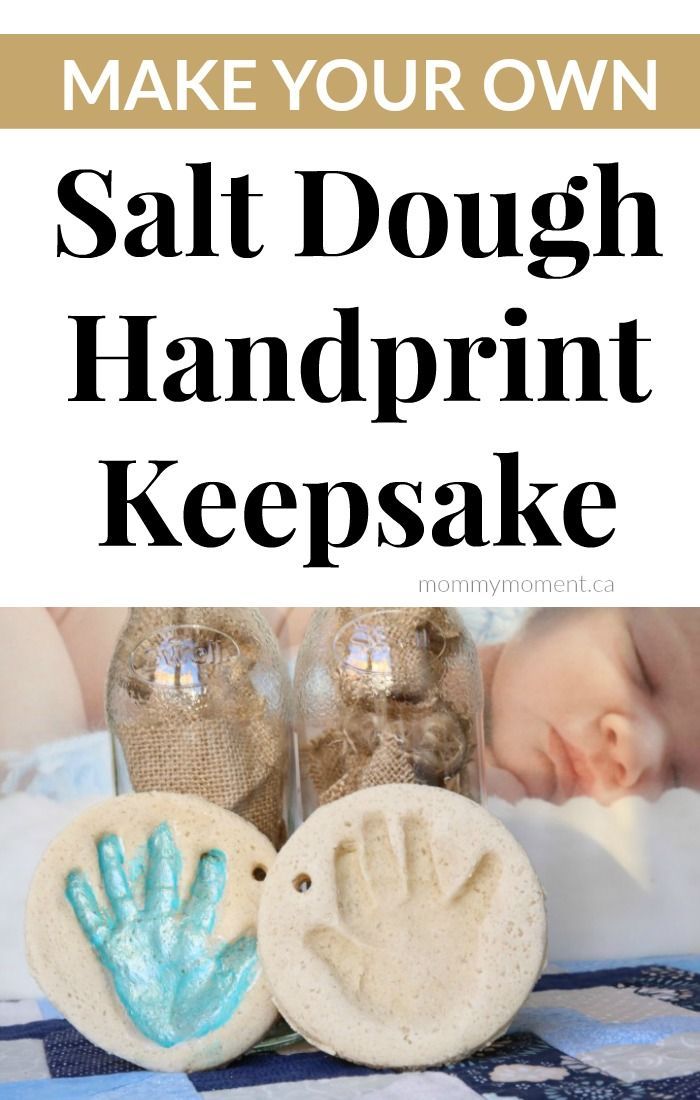
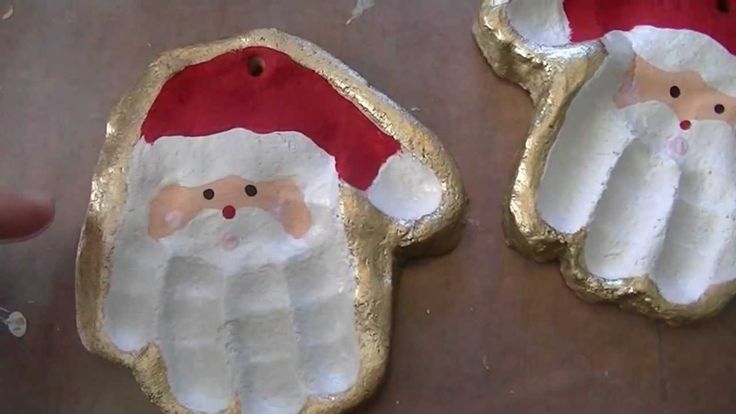
Salt Dough Handprint Ornament
Capturing a handprint in salt dough is a perfect grandparent gift, or a keepsake ornament to make for your own tree. I love pulling out our little collection year after year. Know that getting a good print may take a few tries if doing a baby’s hand!
TIP: Check the size of your round cookie cutter against your child’s hand to make sure that it’s big enough. You may need one that’s 4-5 inches in diameter.
Best Paint for Salt Dough Ornaments
If the kids are wearing smocks, the table is protected, and you are reasonably sure they won’t paint all over their hands and faces, I like using regular acrylic craft paint since it holds up best on crafts. With younger kids who may wind up wearing more of the paint, I’d recommend tempura washable paints.
TIP: We put our paint into the base of old egg cartons since we always have those on hand. You can also use paper plates.
How to Preserve Salt Dough Ornaments
To help preserve your finished dried ornaments, you can coat with a layer or two of Mod Podge or spray with a sealer. Either work well. I’d recommend coating or sealing both sides, so do one side and let it dry, and then do the second side. If using the sealer, do it in a well ventilated area without the kids too close by.
TIP: To store these ornaments from year to year, you’ll want to wrap in bubble wrap. Store in a container that won’t be banged around, dropped or exposed to excess moisture.
Why is my salt dough puffing up?
If you mistakenly use self-rising flour, they may puff. And sometimes it happens randomly. Keep the oven temperature low and if it happens consistently, you can try baking at an even lower temperature for a slightly longer amount of time.
Tips for Making the Best Salt Dough Ornaments
- If the dough is too wet and sticky, knead in a little more flour. If it’s too stiff, add a little more water. There is a big range in the way different flours absorb liquid, so there is a normal range of variation in liquid needs. It should be easy to work with—soft and not too stiff and not excessively sticky.
- Use paper lollipop sticks or a skewer to make your holes.
- Use a 4-5 inch round cookie cutter to make handprint ornaments.
- Tie on baker’s twine or thin ribbon to hang as ornaments.
- Try to get the dough to an even thickness before baking so the ornaments bake evenly.
- Bake for the time indicated and then longer if your ornaments still feel soft. They should be firm to the touch without much give.
- Let cool fully before painting.
- If you want to paint the background of a handprint ornament, do that before you paint the inside of the hand. Let dry before adding a second color. Some people like to paint the whole thing white or cream to give it a more finished look.
- Use acrylic craft paint for older kids who can be trusted with paint and tempura washable paints with younger toddlers.since it holds up best on crafts. With younger kids who may wind up wearing more of the paint, I’d recommend.
- To help preserve your finished dried ornaments, you can coat with a layer or two of Mod Podge or spray with a sealer.
I’d love to hear your feedback on this project and what your kids thought of it, so please comment below to share!
Prep Time 30 minutes
Cook Time 2 hours
Total Time 2 hours 30 minutes
Author Amy Palanjian
Cuisine American
Course Holiday
Calories 1kcal
Servings 2 dozen ornaments
- ▢ 4 cups flour
- ▢ 1 cup table salt
- ▢ 1.
 5 cups water
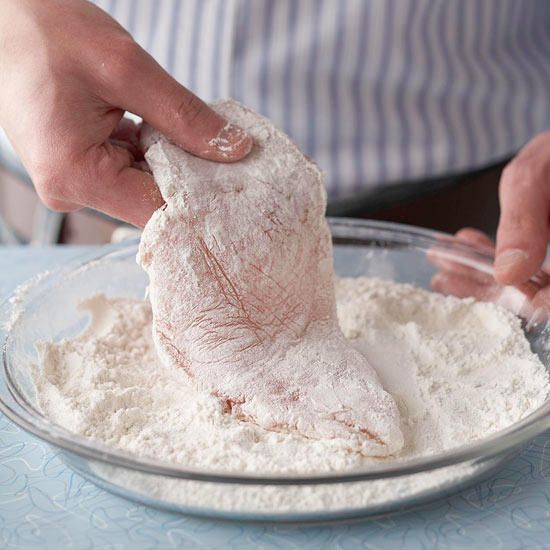
Mix the ingredients together in a large bowl using a wooden spoon. When it becomes too stiff to stir, use clean hands to bring the dough together.
NOTE: If the dough is too wet and sticky, knead in a little more flour, about 1 tablespoon at a time. If it's too stiff, add a little more water, about 1 tablespoon at a time. There is a big range in the way different flours absorb liquid, so there is a normal range of variation here. It should be easy to work with—soft and not too stiff and not excessively sticky.
Knead a few times until the dough is uniform and soft, about 3-5 minutes.
Divide dough into 2 or 4 sections and roll out to about 1/4-½ inch thick between two sheets of parchment paper. This will help prevent sticking.
Cut out with cookie cutters. Transfer shapes to a parchment-lined baking sheet.
Repeat rolling and cutting out shapes to use up the dough.
Preheat oven to 250 degrees F.

Do a 4-5-inch circle and press in a child's handprint if desired.
Use a paper lollipop stick or a skewer to make a hole to hang as an ornament.
If making ornaments, bake for 90 minutes to 2 hours; if baking handprints, bake for 2-3 hours. Continue baking both ornaments and handprints as needed until they are until just firm to the touch, checking every 20 minutes. (It's not a problem if yours take longer than the initial baking time—it varies based on thickness and size...which will likely vary if you are baking these with kids!) They do not need to be rock hard, but should not feel squishy. Handprints will likely take longer than smaller ornaments and may take closer to 4 hours.
Remove from oven, let cool, and paint if desired with acrylic or washable tempera paint.
Once paint is completely dry, seal with Mod Podge if desired.
Mixing Bowl
parchment paper
Mini Cookie Cutters
- Divide the recipe in half to make a smaller portion of dough if desired.
- Use paper lollipop sticks or a skewer to make your holes.
- Use a 4-5 inch round cookie cutter to make handprint ornaments.
- Tie on baker's twine or thin ribbon to hang as ornaments.
- Try to get the dough to an even thickness before baking so the ornaments bake evenly.
- Bake for the time indicated and then longer if your ornaments still feel soft. They should be firm to the touch without much give but do not need to be rock hard. It is not a sign of a problem if yours take longer than mine did to bake—flours and ovens vary!
- Let cool fully before painting.
- If you want to paint the background of a handprint ornament, do that before you paint the inside of the hand. Let dry before adding a second color.
- Use regular acrylic paint for older kids who can be trusted with paint and washable tempera paint with younger toddlers.
- To help preserve your finished dried ornaments, you can coat with a layer or two of Mod Podge or spray with a sealer.

Calories: 1kcal, Fat: 1g, Saturated Fat: 1g, Polyunsaturated Fat: 1g, Monounsaturated Fat: 1g, Fiber: 3g, Sugar: 1g, Calcium: 31mg, Iron: 6mg
Tried this recipe?Rate in the comments and tag @yummytoddlerfood on IG!
Salt Dough Ornament Recipe - The Best Ideas for Kids
Kim 62 Comments
All activities should be supervised by an adult. As an Amazon Associate, I earn from qualifying purchases. This post may contain affiliate links.
Salt dough ornaments are the perfect Christmas craft and activity to do with your kids. Make them to give as gifts or simply to hang on your own tree. We will walk you through our easy salt dough ornament recipe and answer any questions you may have on how to make salt dough!
RELATED: Salt Dough Handprint Recipe
Table of Contents
- Salt Dough Ornament Recipe
- Ingredients Needed to Make This Salt Dough Ornament Recipe
- How to Make Salt Dough – Ornament Recipe
- Get the Recipe
The best part about making salt dough is it’s easy! And you typically already have the ingredients on hand – salt, flour and water. Don’t worry if you don’t have the decoration supplies just yet. Make your batch of salt dough, bake and then let them air dry for a few days before decorating.
Just a friendly reminder that salt dough can be dangerous to pets if ingested – please keep out of reach of pets.
We’re going to show you how to make these glittery salt dough ornaments. Your Christmas tree will be glistening with these homemade ornaments!
Ingredients Needed to Make This Salt Dough Ornament Recipe– 4 cups Flour
– 1 cup Salt
– 1.5 cups Water (maybe a little more)
– Christmas Cookie Cutters
– Acrylic Paint
– Glitter
– Clear Glue
– Gold Twine
– Clear glaze spray or Mod podge
How to Make Salt Dough – Ornament Recipe1. Preheat your oven to 200 degrees Fahrenheit.
Note: Check what temperature your oven setting is. If your oven temperature is Celsius you will need to bake at a much lower temperature (the lowest setting is usually a good one to start with).
Adults will need to do the baking part, but kids can help decorate!
2. Combine your flour, salt and water and mix well. Knead for 10 minutes. If your dough is too dry, add a little bit more water. If it’s too sticky, add a little bit of flour. It will help to place flour down on your surface when kneading and on your hands.
Keep kneading until the dough becomes really smooth. This takes about 10 minutes.
3. Once you’re done kneading, roll out the dough to about 1/2 cm thickness. The thinner you make the ornaments, the better they will thoroughly bake and dry through. If you make them too thick they will take too long to dry.
4. Using your Christmas cookie cutters, cut out different shapes for your salt dough ornaments.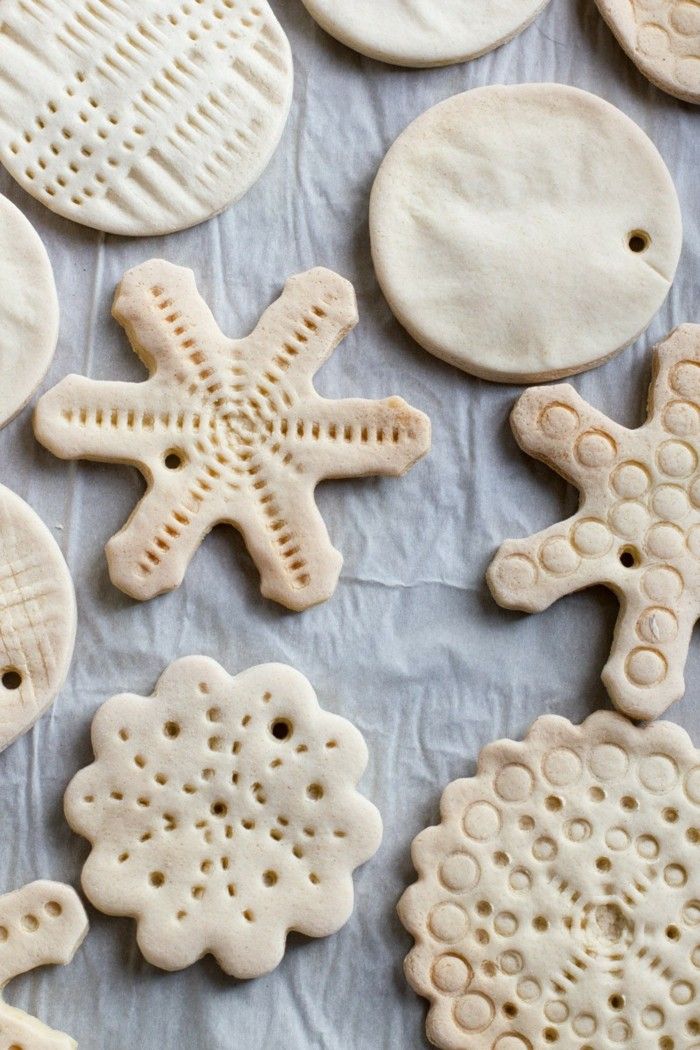
5. Using a straw, make a hole in the top of the ornament for where you would like the twine to hang.
6. For a faster baking process, we like to let the dough air dry for a day.
Bake for 1-2 hours. If your ornaments are not completely dried through when you pull them out put back in for another hour. The baking time will vary greatly depending on the size and thickness of your ornaments. Larger ornaments will take longer whereas smaller ornaments will take less time. You can also let them air dry for a day before baking and this will cut down on the baking time.
Make sure to flip them when air drying or baking so that the bottoms of the ornaments dry also.
Note: If you notice puffing when baking, it is likely because the ornaments are too thick. In this case, let them air dry for a few days before baking and make sure they are baking at a low temperature for your oven (200 degrees Fahrenheit).
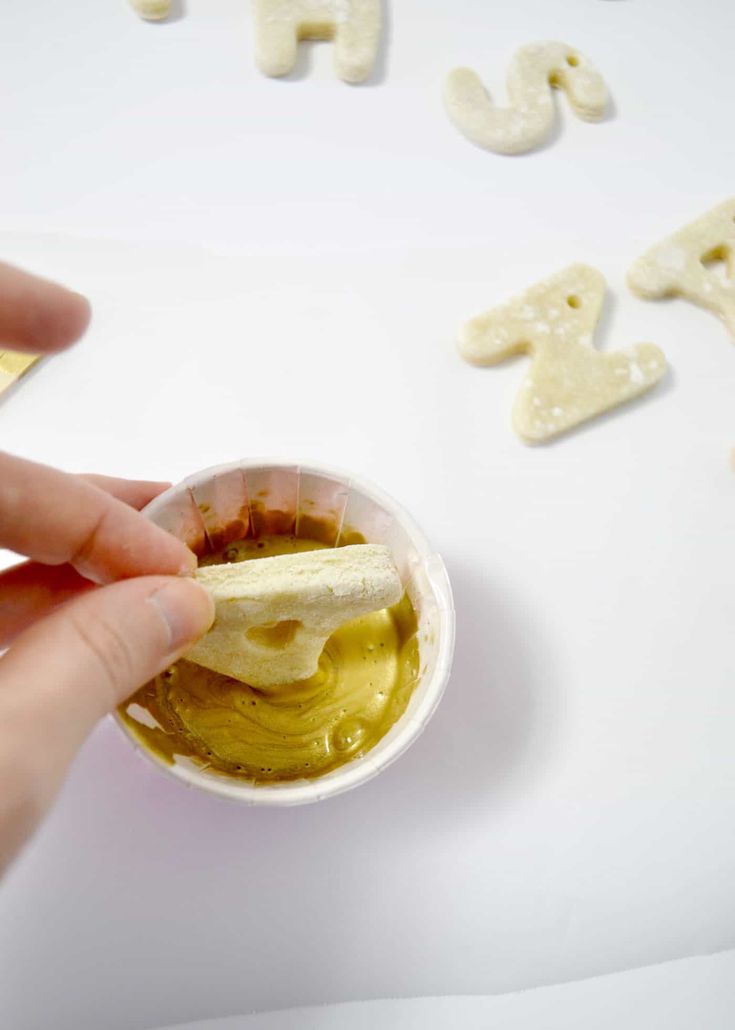
7. Once cool and completely dried, paint with non-toxic acrylic paint. We used white for the snowflake, red for the mitten, green for the Christmas tree and gold for the bell.
8. Before adding the glitter, you’ll need to seal the ornaments. This will help them keep longer. Make sure your ornaments are completely dried through before sealing. Spray with a clear glaze spray (adults only) or finish with mod podge.
9. Now add clear glue on top of your ornament. Shake glitter on top until you fill the ornament with glitter. Kids will love helping with this part!
Once you’re done, add your gold twine for hanging them on the tree.
Storage Tip: Keep in a cool, dry place when not in use.
Prep Time15 mins
Active Time2 hrs
Total Time2 hrs 15 mins
- ▢ 4 cups flour
- ▢ 1 cup salt
- ▢ 1.5 cups water *Maybe a little more water needed once kneaded.

Preheat your oven to 200 degrees Fahrenheit. Important: Check what temperature your oven setting is. If your oven temperature is Celsius you will need to bake at a much lower temperature (the lowest setting is usually a good one to start with).
Adults will need to do the baking part, but kids can help decorate!
Combine your flour, salt and water and mix well. Knead for 10 minutes. If your dough is too dry, add a little bit more water. If it's too sticky, add a little bit of flour. It will help to place flour down on your surface when kneading and on your hands.
Keep kneading until the dough becomes really smooth. This takes about 10 minutes.
Once you're done kneading, roll out the dough to about 1/2 cm thickness. The thinner you make the ornaments, the better they will thoroughly bake and dry through.
 If you make them too thick they will take too long to dry.
Using your Christmas cookie cutters, cut out different shapes for your salt dough ornaments.
Using a straw, make a hole in the top of the ornament for where you would like the twine to hang.
For a faster baking process, we like to let the dough air dry for a day.
Bake for 1-2 hours. If your ornaments are not completely dried through when you pull them out put back in for another hour. The baking time will vary greatly depending on the size and thickness of your ornaments. Larger ornaments will take longer whereas smaller ornaments will take less time.
Make sure to flip them when air drying or baking so that the bottoms of the ornaments dry also.
Once cool and completely dried, paint with non-toxic acrylic paint. We used white for the snowflake, red for the mitten, green for the Christmas tree and gold for the bell.
Before adding the glitter, you'll need to seal the ornaments. This will help them keep longer. Make sure your ornaments are completely dried through before sealing. Spray with a clear glaze spray (adults only) or finish with mod podge.
Now add clear glue on top of your ornament and shake glitter on top until you fill the ornament with glitter.
To preserve longer - it is recommended to seal your ornaments.
Storage: Keep stored in a cool, dry place when not in use.
These have to be our favorite salt dough ornaments we’ve made and they look great on the Christmas tree!
Looking for more fun Salt Dough Ideas?
See over 25+ Salt Dough Ornament Ideas – these are such cute keepsakes!
These Salt Dough Handprint ornaments are our most popular salt dough ornament. See how to make these adorable handprint keepsakes!
And for another ornament idea – make these salt dough star ornaments.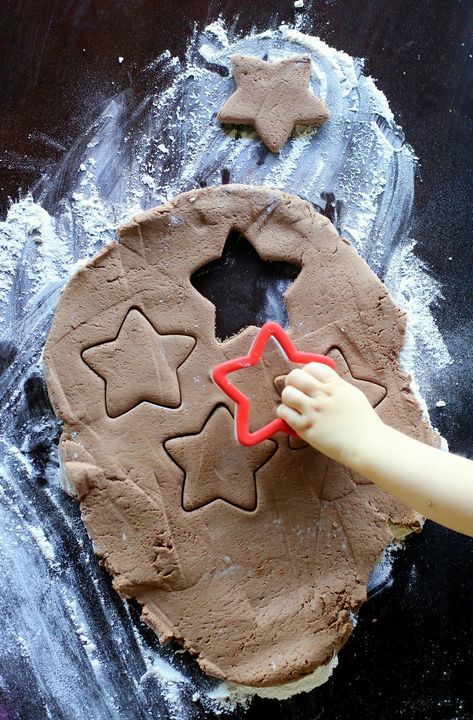 These look great with the bell added!
Salt mass recipe Dorota Kaminska
- Salt mass - recipes
- Do you like Dorothy's recipes?
- Do you have Instagram?
- Do you like Youtube?
- Do you like Dorothy's recipes?
- Do you have Instagram?
- Do you like Youtube?
- Do you like Dorothy's recipes?
- Do you have Instagram?
- Do you like Youtube? nine0004
- Do you like Dorothy's recipes?
- Do you have Instagram?
- Do you like Youtube?
- Do you like Dorothy's recipes?
- Do you have Instagram?
- Do you like Youtube?
- Salt mass - kneading
- Salt mass - drying and baking
- Salt mass - storage
- Salt mass - dyeing
Known for hundreds of years salt mass is used for the production of large and small jewelry. The folk art tradition of modeling salt mass ornaments, passed down from generation to generation, is very popular among people who want to showcase their creativity, who love to surround themselves with beautiful handmade items. Making toys from salt mass is a great idea for your own hobby, spending time with your children, and even a paid job. At a time when technology is constantly evolving, it is worth turning to tradition and making salt mass jewelry for yourself or as a gift for a loved one. nine0047
The beginning of salt mass modeling can be found in the cultures of the ancient Egyptians, Greeks and Romans, who, while making flour, salt and water from religious objects, sacrificed and sacrificed their deities. In Europe, salt mass became popular with the introduction of the custom of decorating the Christmas tree. Poor people made their own bread dough, from which they made Christmas decorations. To protect the cake from mice, a large amount of salt was added to it.
The custom of making salt decorations almost disappeared during the First World War, when it was difficult to mine salt in Europe. After the wars, the custom gradually began to recover, and today one can easily find many modeling enthusiasts in salt and milk cake.
Salt mass - recipes
Depending on the size and purpose of the target model that we want to carve, it is worth using other components of the salt mass and their proportions. The mass of salt for large, simple models should contain more salt than mass for smaller models and those that will have many very small elements (for example, jewelry), as well as the addition of potato flour or thin sticky elastic cake for wallpaper. nine0047
Because flours from different manufacturers differ in starch content (the more starch in the flour, the better the quality of the salt mass), the final, desired consistency of the salt mass should be adjusted by increasing or decreasing the amount of water added. NOTE. The amount of additional water should not be too large. Salt mass with twice the amount of water during baking will rise too quickly, and large bubbles or cracks will form on its surface. nine0047
Salt mass for simple models, without small decorations. The bulk of salt water, salt and flour.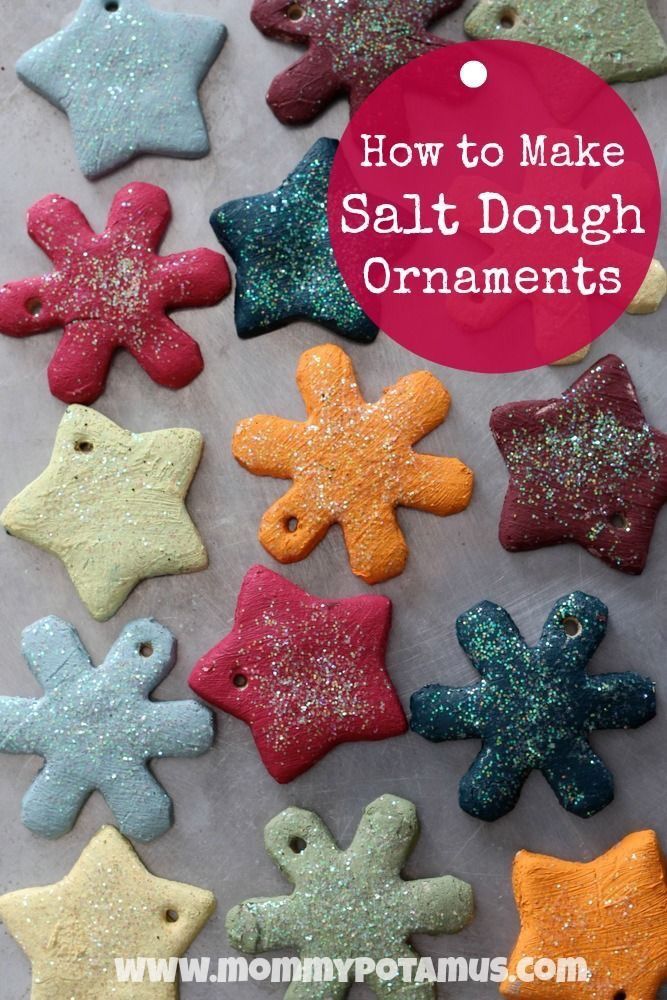
Serves : 500 g (approx.)
☟ In my recipes, a glass is always 250 ml, a cube of butter is 200 g, and a spoon or teaspoon is flat, unless I explicitly state.
- 200 g flour
- 200 g salt
- 125 ml water
Do you want to convert measures and weights? here calculator ,
Do you like Dorothy's recipes? nine0079
Buy now the book in my shop 20% CHEAPER.
Would you like to know more? "Superfood in Polish" is a book in which I show recipes for delicious dishes rich in vitamins, minerals and healthy fats by Polish superfoods that you buy at the bazaar and at your local store :).
You can see what it looks like inside and it is ONLY available for purchase in my online store - you will not find it in stationary bookstores! nine0047
- It is best used for simple models, without small decorations.
- Kitchen calculator for converting weights and volumes to spoons and glasses
-
Sift the flour into a bowl or onto the dough.

-
Add some salt to the flour and form a mound.
-
We create a hollow in the barrow and, gradually adding water, begin to knead.
-
We make salty mass for about 10 minutes. nine0047
Do you have Instagram?
Add me to see @dorotakaminska and take a photo of the dish by tagging #dorotakaminska.
Do you like Youtube?
Subscribe to my channel!
Highly flexible salt paste with wallpaper adhesive, suitable for air drying, designed to make more complex, smaller items such as pendants and jewelry.
☟ In my recipes, a glass is always 250 ml, a cube of butter is 200 g, and a spoon or teaspoon is flat, unless I explicitly state. nine0047
- 200 g flour
- 200 g salt
- 2 tablespoons wallpaper paste (liquid; adhesive powder should be spread in the amount of water indicated on the package)
- 125 ml water
Do you want to convert measures and weights? here calculator ,
Do you like Dorothy's recipes?
Buy now the book in my store 20% CHEAPER.
Would you like to know more? "Superfood in Polish" is a book in which I show recipes for delicious dishes rich in vitamins, minerals and healthy fats by Polish superfoods that you buy at the bazaar and at your local store :). nine0047
You can see what it looks like inside and it is ONLY available for purchase in my online store - you will not find it in stationary bookstores!
The best salt mass for air drying and for making more complex, smaller items such as pendants and jewelry.
-
Sift the flour into a bowl.
-
Add some salt to the flour and form a mound.
-
We create a depression in the mound and, gradually adding water, alternating with wallpaper paste, we begin to knead. nine0047
-
We make the salt mass for about 10 minutes.
-
ATTENTION: the mass with the addition of wallpaper glue dries very easily and quickly, so when modeling it should be stored in a closed container.
Do you have Instagram?
Add me to see @dorotakaminska and take a photo of the dish by tagging #dorotakaminska.
Do you like Youtube?
Subscribe to my channel!
Dense salt mass for the production of larger models. This is a very strong salt mass with a high salt content. nine0047
☟ In my recipes, a glass is always 250 ml, a cube of butter is 200 g, and a spoon or teaspoon is flat, unless I explicitly state.
- 200 g flour
- 400 g salt
- 125 ml water
Do you want to convert measures and weights? here calculator ,
Do you like Dorothy's recipes?
Buy now the book in my store 20% CHEAPER.
Would you like to know more? "Superfood in Polish" is a book in which I show recipes for delicious dishes rich in vitamins, minerals and healthy fats by Polish superfoods that you buy at the bazaar and at your local store :). nine0047
You can see what it looks like inside and it is ONLY available for purchase in my online store - you will not find it in stationary bookstores!
-
Sift the flour into a bowl or onto the dough.
-
Add some salt to the flour and form a mound.
-
We create a hollow in the barrow and, gradually adding water, begin to knead.
-
We make salty mass for about 10 minutes.
Do you have Instagram?
Add me to see @dorotakaminska and take a photo of the dish by tagging #dorotakaminska.
Do you like Youtube?
Subscribe to my channel!
The ideal salt mass for simple models with a small amount of small decorations (eg decorative tiles).
☟ In my recipes, a glass is always 250 ml, a cube of butter is 200 g, and a spoon or teaspoon is flat, unless I explicitly state. nine0047
- 200 g flour
- 400 g salt
- 2 tablespoons wallpaper paste
- 125 ml water
Do you want to convert measures and weights? here calculator ,
Do you like Dorothy's recipes?
Buy now the book in my store 20% CHEAPER.
Would you like to know more? "Superfood in Polish" is a book in which I show recipes for delicious dishes rich in vitamins, minerals and healthy fats by Polish superfoods that you buy at the bazaar and at your local store :). nine0047
You can see what it looks like inside and it is ONLY available for purchase in my online store - you will not find it in stationary bookstores!
The ideal salt mass for simple models with a small amount of small decorations (eg decorative tiles).
-
Sift the flour into a bowl.
-
Add some salt to the flour and form a mound.
-
We create a depression in the mound and, gradually adding water, alternating with wallpaper paste, we begin to knead. nine0047
-
We make the salt mass for about 10 minutes.
-
ATTENTION: the mass with the addition of wallpaper glue dries very easily and quickly, so when modeling it should be stored in a closed container.
Do you have Instagram?
Add me to see @dorotakaminska and take a photo of the dish by tagging #dorotakaminska.
Do you like Youtube?
Subscribe to my channel!
Salt elastic mass, for making small models, easily kneaded and shaped. nine0047
☟ In my recipes, a glass is always 250 ml, a cube of butter is 200 g, and a spoon or teaspoon is flat, unless I explicitly state.
- 100 g flour
- 100 g salt
- 50 g potato flour
- 75 ml water
Do you want to convert measures and weights? here calculator ,
Do you like Dorothy's recipes?
Buy now the book in my store 20% CHEAPER.
Would you like to know more? "Superfood in Polish" is a book in which I show recipes for delicious dishes rich in vitamins, minerals and healthy fats by Polish superfoods that you buy at the bazaar and at your local store :). nine0047
You can see what it looks like inside and it is ONLY available for purchase in my online store - you will not find it in stationary bookstores!
This is a semi-elastic salt paste. Best used for modeling small animals, people, baskets, etc.
-
Sift both flours into a bowl or onto a pastry board.
-
Add salt to flour and form a mound.
-
We create a hollow in the barrow and, gradually adding water, begin to knead. nine0047
-
We make the salt mass for about 10 minutes.
Do you have Instagram?
Add me to see @dorotakaminska and take a photo of the dish by tagging #dorotakaminska.
Do you like Youtube?
Subscribe to my channel!
Salt mass - kneading
An alternative to manual kneading, especially when we need to prepare a large amount of salty mass, is to prepare it with a food processor or a hand mixer with spiral metal tips in the form of hooks (for kneading yeast dough). When making mass with a mixer or blender, it is worth remembering to gradually add liquid, not rotating too much or overloading the device so that its engine does not burn out. nine0047
Salt mass - drying and baking
There is no single universal method for drying salt mass. Each model, depending on the size, thickness and type of oven, will require a different amount of time and temperature to dry completely and achieve the correct golden brown color.
When drying salt in the oven, it is best to place it on baking paper or aluminum foil.
Air drying
The advantage of this method is primarily energy saving, very useful in the case of drying large models, but in the air the salt mass can dry out within a few weeks, and in houses with high humidity drying may not occur at all. The air-dried salted models can then be lightly browned in the oven to give them the desired golden brown color. nine0047
NOTE. For models with a thin surface, different drying processes (air + oven) cannot be combined, as they may crack.
Drying outdoors can be done by placing models of the salt mass on an electric heater (it is important that its surface is flat and the mass does not deform).
Drying in a gas oven
When drying salt mass in a gas oven, leave the oven door open because the air is quite humid and the temperature is high. nine0047
In a gas oven, the drying time will be about 3 hours, while in the first hour the door should be half open, in the second 1/4, and in the third completely closed.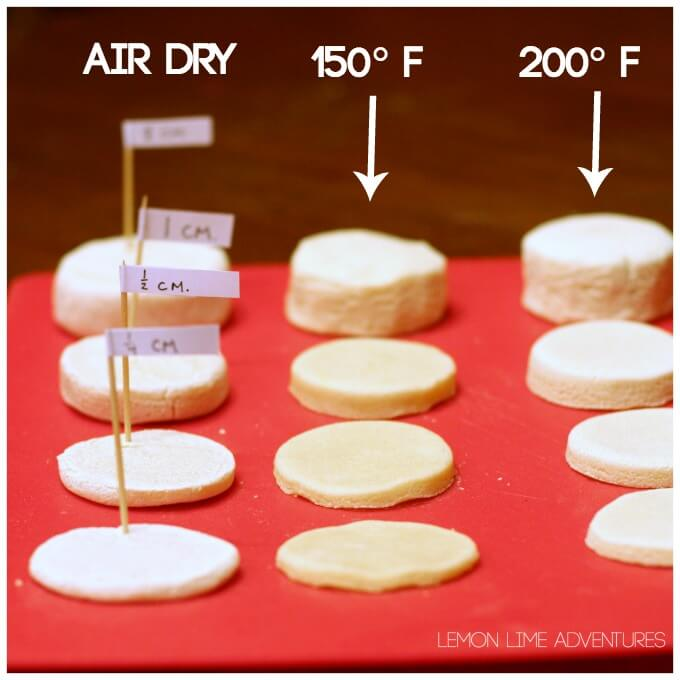
Browning of the desired color can be carried out at 200 ° C, making sure that the salt mass does not burn too quickly.
Drying in electric oven
Depending on the type of baking tray in the oven, the baking time of the salt mass can be determined depending on the thickness of the model. nine0047
Baking on black sheets, which heat up much faster than silver, you can adhere to the following principle:
- Salty mass model 1 cm thick - temperature 50 ° C - 1 hour
Baking on silver plates:
- Model 1 cm thick - temperature 75 degrees C - 1 hour
For example, a 3 cm thick model will bake for 3 hours at a temperature suitable for the type of plate.
If it is not possible to set such low temperatures in the oven, you can use another, approximate time for drying the salt mass:
- 1/2 hour - 100-125 degrees Celsius
- 1 hour - 150 degrees Celsius
- blush - 200 deg.
 C, making sure that the models do not burn. The shell dried on top makes it difficult to exit from the inside of the model.
 I do not recommend microwave drying as the mass of salt bubbles too much and destroys the shape given to it during modeling. nine0047
Salt mass - storage
Salt mass is best prepared in the amount that we will fully consume during the simulation. If part of the mass remains unused, wrap it tightly in a plastic bag or close it in a box and store in a cool place (but not in the refrigerator) for several days.
A few days of salted mass can be supplemented with the right proportions of fresh ingredients and re-formed into a whole.
Salt mass - dyeing
Salt paste can be colored before drying, using powder or gel food coloring or in poster paints. The tinted mass is only suitable for air drying.
Salt mass, which we want to paint with poster paints, should be dried without browning or, after baking, use white as a base, which, after drying, paints the desired color.

The painted salt mass should be fixed with a transparent varnish (preferably resin). The most durable are varnishes for floors or yachts. Aerosol varnishes can penetrate the center of mass too quickly without leaving a thick, shimmery outer coat, but you can also use them to varnish models twice, for example. nine0047
Salt mass models can be repainted if necessary after a few years. The way to get rid of dust is to blow the jewelry with cold air from the dryer.
Salt Mass
Source: "Salt Mass", Isolda Kiskalt, ed. Marba Crown LTD.
Similar
Traditional Donuts
Do you like this recipe? Share on 126 comments Delicious, classic donuts. They are fluffy, soft and very tender. This is better for me than from a candy store. As soon as they disappear they are still warm, although they are also delicious on the second day. Donut donut can also be made in the evening. Check out these offers! decoration
How to choose the right home decor Accessories and decorations will allow you to create a space that is completely tailored to your taste.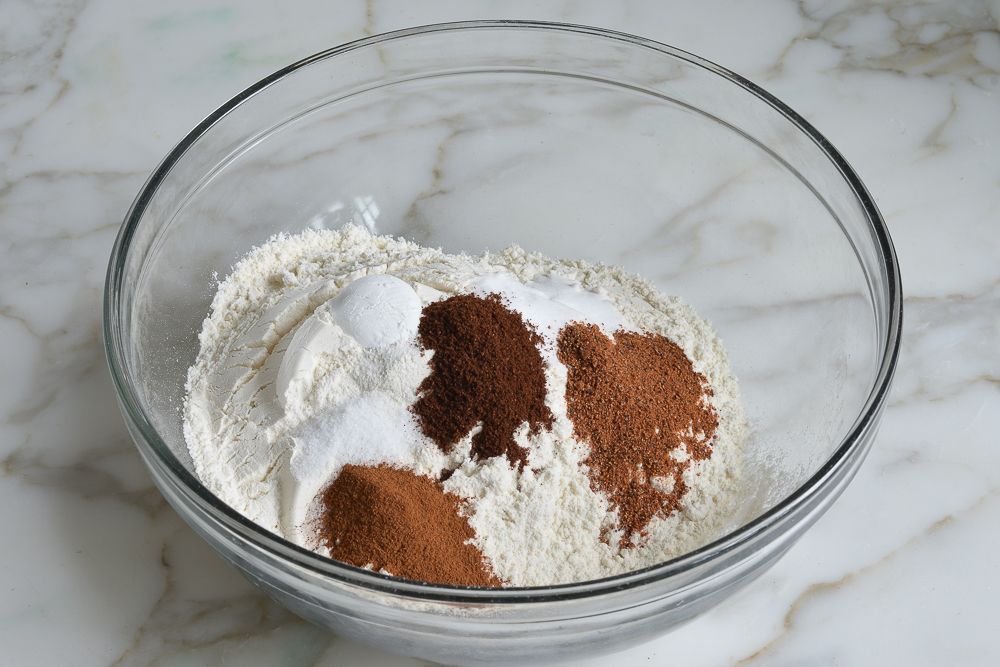 Even something as simple as a piece of art to hang on the wall or a new blanket to hang on the sofa can make a huge impact on the look of a room. But how should you decorate? We have broken down 10 different styles of design Washbasin conglomerate in the dream bathroom
Washbasins are one of the main pieces of equipment and decor for every bathroom. That is why it is very important that this product be of the highest quality, highly functional and serve users for many years. On the market, we can find conglomerate shells. They are, of course, a very good choice for the bathroom, however, when buying it is worth paying attention Biofireplaces - frequently asked questions and answers
If you are considering buying a bioethanol fireplace, you probably have a lot of questions. Questions about bioethanol fireplaces, how they are used and how they work, how they can be assembled. We do not want you to search for answers or ask any questions on your own - so we decided to create for you a list of the 15 most popular questions about biofireplaces.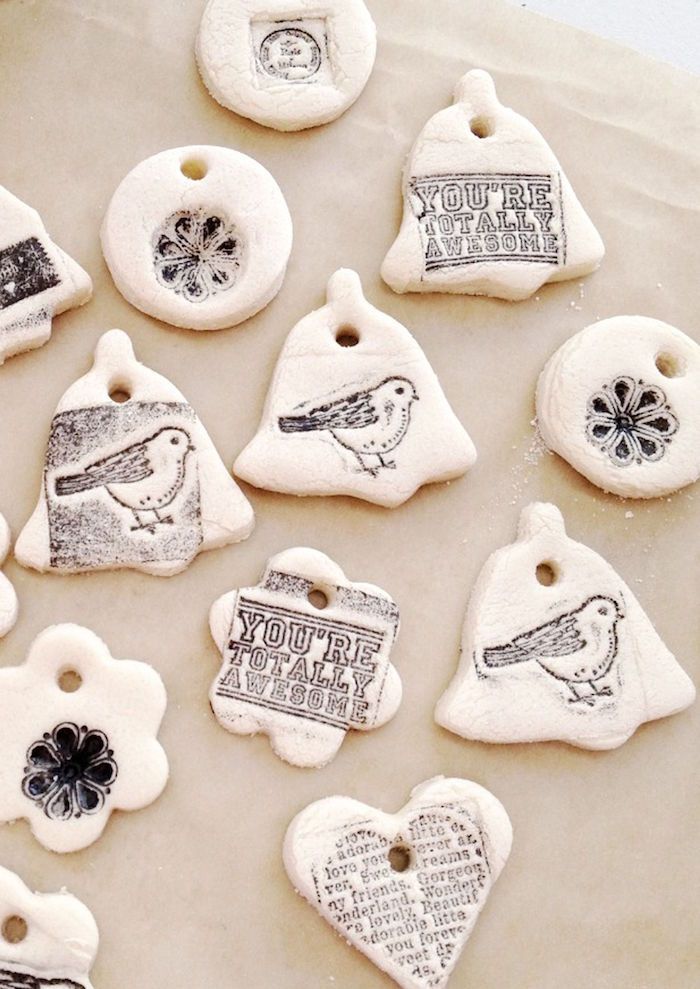 We hope you find all the answers to your questions here. And if any questions are still unclear, you can see whether flat-roofed houses will make a comeback. nine0430 ... a mass of storage compartments that perform the same function as the rooms mentioned earlier. Shelves have another important function - they reduce the amount of furniture needed for a home. Large cabinets are simply not needed. At the request of investors, I also offered a rather modest home interior decoration that perfectly matches the architecture of the building - kitchen robot Kenwood Chef Titanium XL review, test, reviews
... you have the ability to adjust the grinding speed. It can grind everything that was traditionally in a manual machine, except for frozen meat and bones. A set of three types of loops and additional tips for meatballs and sausages ensures that no other machine is needed at home. nine0428 Comments Do you like this recipe?
Do you like this recipe? Share on 126 comments Delicious, classic donuts. They are fluffy, soft and very tender. This is better for me than from a candy store. As soon as they disappear they are still warm, although they are also delicious on the second day. Donut donut can also be made in the evening. For that What about mothers who already have children?
What about mothers who already have children? If you can make a gift yourself, do the work. Do not be afraid to give your mother a handmade photo album, designer and made jewelry, an embroidered blanket. These gifts speak the most. And like no other perfect for Mother's Day! Culinary Feasts What if mom wakes up with a cheese sandwich and a fun song, then makes a simple dessert with the kids, mixing colorful jelly and fresh fruit? 7. Are there dirty objects or furniture nearby in the bioelement? nine0430 7. Are there dirty objects or furniture nearby in the bioelement? 8. What about the smell? 9. How to extinguish a biofireplace? 10. What does the biofireplace feed on? What can be burned in it? 11. Can you add Do you have any recommendations for favorite places to buy trees?
Do you have any recommendations for favorite places to buy trees? Do you like it?
Do you like it? Rate or leave a comment 🙂 Kenwood Chef Titanium XL - PLANETARY ROBOT AND MULTIPLE MIXER Value for money 9Appearance and finish 10 Are you wondering how to choose the perfect bridal bouquet?
Do you like it? Rate or leave a comment 🙂 Kenwood Chef Titanium XL - PLANETARY ROBOT AND MULTIPLE MIXER Value for money 9 Appearance and quality of finish 10 First off, do you need crampons and an ice ax at all?
First of all, do you need crampons and an ice ax at all? You will say that this equipment is for professionals. You are wrong and the answer is very simple. Cancers are indispensable wherever your health and even life may depend on the consequences of a simple slip. nine0445 Do you have Instagram?
Do you like Youtube?
Do you like Dorothy's recipes?
Do you have Instagram?
Do you like Youtube?
Do you like Dorothy's recipes?
Do you have Instagram?
Do you like Youtube?
Do you like Dorothy's recipes?
Do you have Instagram?
Salt dough product for the New Year.
We will send the material to you by e-mail
Autumn is quickly flying by, and the time is about to come when you want a fairy tale to break into the house. But we, adults, understand that we create magic ourselves, with our own hands. Therefore, today the editors of the site suggest starting to make New Year's crafts from salt dough - these are figurines, figurines, jewelry, candlesticks, panels that will perfectly decorate the decor for the winter holiday. nine0047
You can look at the photos as much as you like and admire the salt dough crafts, but it's better to try to make them yourself.
 In order for the first attempt to be successful and leave pleasant impressions and memories, you need to carefully read the instructions for making the working substance.
How to prepare the dough?This modeling material is based on three products: flour, water and fine salt. There are variable recipes that include, in addition to the three main ingredients, starch and hand cream. Someone uses a recipe with wallpaper paste. It makes sense to start getting acquainted with such material, starting with the main recipe, but if you have experience in modeling, then it makes sense to use recipes with cream or vegetable oil. This is especially true if the product involves a lot of small parts. nine0047
Premium flour contains a sufficient amount of gluten, and finely divided salt of a brand like "Extra" will allow products to achieve the desired smoothness.
Standard recipe:
- glass of flour;
- glass of salt;
- 125 ml water.
Different craftswomen insist on other proportions. It is proposed to take flour in two parts, and salt and water one by one. More salt will add strength to the product.
All ingredients are mixed by hand or with a mixer until smooth. For testing, tear off a piece and roll it into a ball. Dimples are made on the ball with a finger: the ideal dough will retain its shape and not blur.
Tip! If you add a little vegetable oil or hand cream while mixing the ingredients, the dough will not dry out during modeling and will not become excessively sticky to your hands.
How to paint the working material? Gouache, liquid watercolor, food coloring, cocoa, beetroot, carrot juice, cherry and spinach juice. nine0047
How to make crafts and how to save leftover doughThere are many ways to use this material for modeling. This is work with children to develop fine motor skills and imagination, and apartment decor, and holiday decorations, and figurines, and photo frames, and toy gifts.
Figures are made flat or three-dimensional, they use a base or not. In general, the work is not very different from plasticine modeling, but products made from salty material can be stored indefinitely. nine0047
Store leftover dough in the refrigerator, making sure to wrap the substance tightly in cling film or place it in a plastic container with a lid.
Tip! Dough will last longer if you add a sachet of citric acid to it for two cups of flour.
Material without citric acid is stored in the cold for 2-3 days, with acid - up to two weeks.
How to dry and dye productsSeveral drying options. nine0047
- Leave the items to dry at room temperature. The process is very lengthy.
- Drying handicrafts on the radiator is somewhat faster.
- In the oven, the products are not dried for so long, while the heating temperature is varied. First, crafts are dried in an oven at 50 ° C, then they are slightly browned at 150 ° C.
To make the product shine, it is varnished or glazed. Glazing is used for crafts in white, and colored items are varnished. nine0430 They also use the method of coating with an aqueous solution of salt and drying in an oven at low temperatures. Coating the finished product with egg white or yolk gives a pleasant golden brown hue.
If you want the thing to remain white, it is glazed and dried at 50°C until fully cooked.
Related article:
DIY symbol of the New Year (pig) : crochet, how to make origami out of paper, a plasticine pig toy for the New Year, pastries in the form of pigs, a potato pig for the New Year's table - read in the publication. nine0493
Tips for making salt dough crafts for the New YearLet's try to make crafts that will give you a good mood! There are several types of products that can be made using the modeling method: we use the layering of parts, we make volumetric products and we include small details in the work.
 The work welcomes the use of molds - convenient plastic or metal molds (you can take ready-made molds for baking cookies, buy or do it yourself from an aluminum can), any textured surfaces, toothpicks, a plastic knife for plasticine, covers from felt-tip pens, tree leaves. nine0047
Salt dough crafts to make: working together with a preschoolerFine motor skills in preschool children are usually not well developed, and modeling lessons form all the necessary skills, develop fantasy and imagination. The advice of a kind adult nearby will help the baby cope with difficulties.
Snowman "Shmyak"A child is able to make a good friend for winter games in the house. The help of an adult as a good adviser and leader is obligatory. Use a recipe where starch is added. You just need to take into account that how much starch is put in, it is better to remove so much flour. It will be useful to add 125 ml of hand cream.
 nine0047
 Make sure that the lumps are not too big, such work will take a very long time to dry and cracks may occur. Install the frame. It can be a rod stuck in a salt dough cake, a small stable object that can be used as a rod. The child makes three koloboks, putting each one on the rod in descending order. Help shape eyes and hands. For fixing parts, the place of gluing is lubricated with water.
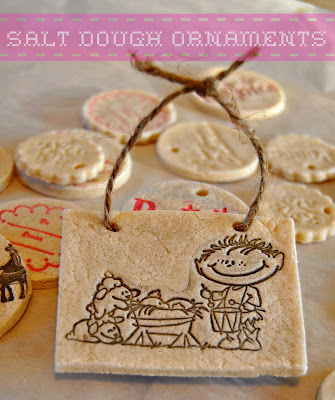
Salt dough commemorative panels nine0466It will be difficult for a preschooler to create something artistic, but there is a way to let the child participate in the work and cope with it almost independently.
Related article:
crepe paper, kusudama, origami, paper flowers; New Year's ball made of felt and fabric, decoration of a New Year's ball on the Christmas tree by various means - read in the publication.
Salt dough crafts for schoolchildren nine0429We have already seen photos of New Year's salt dough crafts and want to offer great options for working with dough for school-age children.
 They will cope with everything themselves, having listened to parting words and instructions. This does not mean that you need to go away and leave your son or daughter to their fate. Our task is to give an idea and explain the principle of action. It’s good if adults nearby also try their hand at such an exciting technique.
What are the best salt dough products for children? nine0466Depending on the age of the children, the subjects and the level of complexity of the work are selected.
Younger children can easily be trusted to work with molds. Those who have skills in modeling are entrusted with the manufacture of complex or voluminous figures. Salt dough angels
Angels are the perfect theme for Christmas decor. nine0047
Salt dough candle holderLet's prepare everything you need for crafts from salt dough and study the master class.
 We take a small round candle, ready-made dough, a garlic press, a plastic knife, a workplace, a rolling pin.
 Illustration Action description Tear off a small ball from the material and roll it into a dense bun. Put the kolobok on a plastic cutting board and turn it into a small cake. nine0658 Take a candle and punch a hole in the cake, moreover, make it slightly wider than the candle. Place a piece of dough in a garlic press, at this time dip the brush in water and grease the place where the Christmas tree needles will be located. We tear off the "vermicelli" and lay it in the form of spruce branches. We complement the product with decor. For leaves, use a plastic knife. nine0658 We make roses by rolling a strip of dough like a roller. We start to make a large rose in the same way as a small one, but add others around the central petal, one after another. 
The product is dried and painted. After the varnish is dry, you can insert a candle and light it, admiring your own creation.
More Christmas Salt Dough Ideas nine0466Salt dough products are not only painted and varnished. They are also decorated with rhinestones, sequins, beads. In this case, the crafts are dried naturally so as not to damage the decor.
Let's get acquainted with such a way of decorating crafts as decoupage.
Decoupage of finished productsFor work you need a New Year's napkin with a suitable pattern according to the size of the finished product, PVA glue and a brush.
Flat Christmas decorationsLet's learn how to make figures from salt dough, this will help a small master class.
Illustration Action description We will need dough, a string, a juice tube, molds for toys, acrylic paints - white, silver and gold, a brush, beads. 
Roll out the dough with a rolling pin and use the molds to make figures. nine0658 We pierce holes for the rope in each figure with a tube. Dry the figurines. We paint finished products with white paint. For decoration, it is better to take gold and silver paints. But you can use any color of your choice. We paint some of the figures with small strokes and leave the paint to dry. There is nothing cuter than New Year crafts made together with your child. Colored and shiny, a little uneven and this makes it even more touching and memorable.
On New Year's Eve, every adult, not to mention children, wakes up with a desire to create cute little things that bring a feeling of comfort and warmth to the house ... And although the shops are full of factory-made toys and New Year's accessories, I want to make something of my own, unique, inimitable .
 nine0047
 Elegant toys for the New Year's green beauty can be made from paper, fabric, thread. And you can use salt dough - another interesting and quite affordable material. How to make for the New Year? This is what will be discussed now.
How to make salty dough?
First, you need to prepare the right salt dough. To do this, prepare in advance one measure of fine salt and two measures of flour. Dissolve the salt in warm or hot water, and when it has cooled, gradually pour the salt solution into the flour, stirring constantly. You can add a little sunflower oil to the dough - it will make the mass more elastic and less sticky. However, it is more difficult to mold something from dough with the addition of butter, since its pieces do not stick together well. This option is good for simple single-layer crafts. nine0047
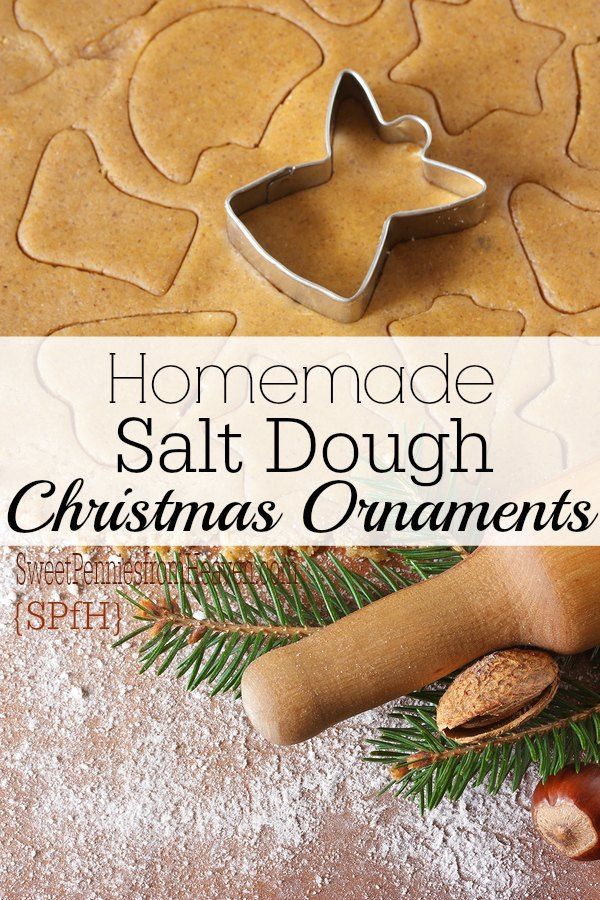
The dough should be firm enough to hold its shape. Let it stand for the gluten to disperse, and get to work. Salt dough Christmas decorations are easy to make with cookie cutters.

DIY Christmas crafts
The figurines made in this way are very reminiscent of traditional gingerbread cookies and create a feeling of being at home. You can make cute hearts, Christmas trees and stars: just roll the dough into a thin (about 1 cm) sheet and invite your child to make figures out of it. nine0047
If there are no ready-made molds, you can cut them out of cans from drinks, bending the edges inward so that the baby does not get hurt. Even simple round pendants that can be made using a glass, a glass or a small jar will look beautiful. Don't forget to make a hole for a loop in each figure.
Lay out the cut out figures on the grid and let them dry well; if drying on a dense, flat surface, periodically turn the crafts over. You can use the oven by carefully drying the workpieces at a low temperature. nine0047
Dried figurines are painted with bright colors and covered with sparkles.
On top of the crafts, you can cover with a transparent varnish - this will give them a beautiful gloss.

We thread a ribbon or a thick thread - and the decoration is ready.
Salt dough herringbone.
Salt dough heart.
You can color your Christmas tree decorations with paints.
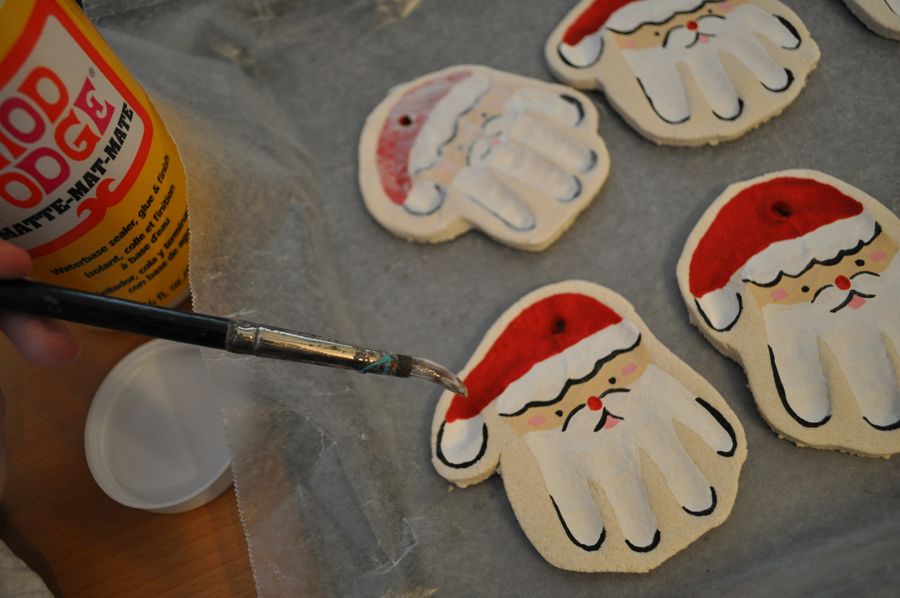
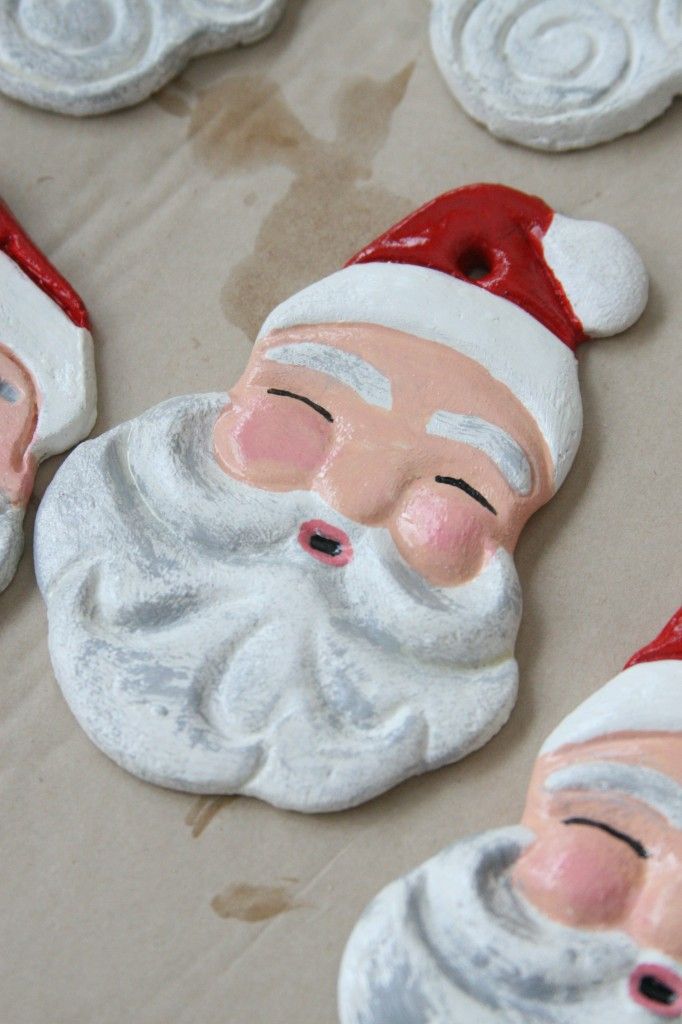
From the imprint of a child's hand, a charming Santa Claus is obtained. The craft is made in the same technique. Let the piece dry well.
Apply a coat of white paint.
We color the craft and varnish it. Santa Claus is ready!
Salt dough can be used to make a wonderful Christmas decoration “pig with wings”.
Do-it-yourself New Year crafts made from salt dough for children in this way will become especially expensive, and the children will be happy to join the process of decorating the main symbol of the New Year. nine0047
DIY Christmas crafts from salt dough (video)
Christmas decorations from salt dough (sweet and pink):
Tatyana Shemetova
Very soon, in a few hours, the most cheerful and noisy, joyful and magical, most long-awaited New Year will silently enter the doors of our houses and apartments! What he will bring us - we do not know, but to give our children joyful moments of communication and make New Year's together with them table decorations - of course we can.
 This lesson will not take you much time, but you get such a beauty! nine0047
 We are starting! If you have flour, salt "Extra", water, thick paper (not necessarily whatman paper, stapler and paints - it will take no more than 10 minutes to prepare.
The diameter of the circle depends on what size you want to make a Christmas tree. Cut the circle in half
Knead the dough . Half a glass of fine salt, half a glass of flour, water - knead dough like dumplings , add some sunflower oil (teaspoon) .Add green paint and mix everything until smooth (if you mix not very thoroughly, then Christmas tree will turn out even more original).
Wet the cone with water, cover it completely with a layer of dough , and then gently, with your finger, pull the dough down . We do this in a circle, starting from the bottom of the cone to the very top.
We got such beauties!
From the remaining dough nine0466 you can make toys for the Christmas tree.

A thin layer of dough dries quickly even on Christmas you have a finished decoration on the table. The tree is good , but you can decorate it as you wish.
Related publications:
Dwarf's house made of salt dough Far away in the edge of the forest Once upon a time there was an old, old dwarf. The gnome had an old house: He lived in it for three hundred years. I.
Consultation for parents "Modeling from salt dough" Advice for parents. Salt dough craft. Salt dough modeling is a very entertaining activity. they may well not get carried away. nine0047
Master class "Basket with roses" from salt dough teacher MADOU "Kindergarten No. 6", Perm Drozdova Nadezhda Ivanovna Dear colleagues.
You will need: Glass vase Plastic knife (stack) Oil for lubrication Gouache or watercolor Brush Ribbon Salty recipe.
I was a bit late with the topic, but still I really wanted to post our work with children on the site. We did the model and the children's work is shown.

Theme: painting from salt dough “Under the Mushroom” Prepared by: Martynova LV Recently, in my work with children, I have received a lot of attention. nine0047
At the beginning of my work, when the children were still small, I always kneaded the dough in the presence of the children. Gives you the opportunity to participate.
I have looked at Christmas trees from salt dough more than once, not only on this site, but also on others. I repeat again , I use my method of making a Christmas tree with children, and it differs from the rest. at the beginning of my master class, I wrote that there are similar master classes, but mine is just a lightweight version, for example, Larisa Ivanova has a version for adults — it’s hard for children to squeeze garlic out of garlic, and then turn it off ..... secondly, I twist the cone very quickly from everything that comes across and at the same time I do not decorate it and do not make it from colored cardboard. The last Christmas tree for little ones is designed by me.
 especially for kids, I wasn’t inspired by anyone. nine0465 My - master class is exactly my experience - how easy and affordable it is to work with children . Tell me why I have to point someone and put links on someone? The only inspiration for me is
 Her idea to use a garlic press was taken as the basis, but again, she doesn’t have a voluminous Christmas tree - everything was invented as she worked.
My photos are commented and it seems to me very detailed, none of the users asked again and everything is clear to everyone. nine0047
Manual
Start by preparing the salt dough. Pour 1 cup of salt into a bowl. It is best to take finely ground salt, then the dough will turn out to be more plastic and homogeneous. Pour it with one glass of hot water and stir until completely dissolved. Once the water has cooled to room temperature, add 1 cup of flour to the bowl. Knead the dough well.
To make sculpting more interesting, color the dough. To do this, divide it into as many parts as there are different colors.
 Add food coloring or gouache dissolved in water to the dough. Knead it again and check that all parts are the same in density. And if necessary, add some flour or water. nine0047
 Roll the colored parts of the dough into koloboks and arrange in bags to avoid chapping. When in contact with air, a salt crust appears on the dough, which needs to be cut off from time to time. Once the dough is ready, you can immediately start sculpting.
To make a dog toy, roll up a ball for the torso and draw it out into a bean shape. Decide where the dog will have a nose and where the tail is. Make paws from the dough and attach to the body. If the dough does not stick very well, run a wet brush over the junction of the parts. Shape the ears and tail and pin them in place. Make holes for the eyes and nose. nine0047
Put the modeled toy out in the sun to dry. In a day, it will be covered with a crust and will look quite strong, but this impression is deceptive - inside it will still remain raw.
 The craft will dry completely only after a week. If you are in a hurry, you can dry the toy in the oven. Preheat the oven to 70 degrees Celsius, put the toy on a baking sheet and leave the door open. For 0.5 cm of product thickness, 1 hour of drying is required.
 Paint your craft with gouache. Just keep in mind that the paint should be quite thick so that the dough does not have time to get wet. Let the paint dry for two days and coat the toy with wood varnish if you want it to last. nine0047
Dough crafts are not exactly cooking. This is already art. And besides, it's a good gift. You can make a variety of toys from the dough, and then decorate them with paints: gouache, watercolor or food coloring. The main thing is that the dough should be salty.
You will need
-
- Flour - 3 cups;
- Salt - 2 cups;
- Water - 1 glass;
- Paints and brushes for painting figurines. nine0004
Instructions
First, mix the ingredients to a consistency that does not stick and also to the bowl.
 As you cook, add a little more salt or vice versa, water. It all depends on how thick the dough will be. Don't be afraid to experiment with consistency.
 Now you can mold any kind of ready-made dough, for example, figurines of little men, fairy tales, animals and whatever your heart desires. After that, the finished figures must be dried. You can dry at room temperature, especially if the figures are small and not very voluminous. And you can dry in the oven at a temperature of 120-140 degrees Celsius. In large figures, it is necessary to make a puncture inside for better and faster drying. nine0047
Color the figurines. You can use watercolor and add PVA glue to it, and then use this mixture. This will keep the paint much better.
Related videos
Sources:
- how to make a figurine
Salt dough can be used to make a lot of crafts with children. Unlike plasticine, this material is suitable for kids of any age. Even if the child pulls the dough into his mouth, nothing will happen.
You can make these crafts at home with your child – all the ingredients are available and inexpensive. It is especially pleasant to make New Year's toys from salt dough. You can make them as many as you want and the way you want. Even the smallest children feel that they, along with everyone else, have worked hard for the holiday if the toys they made are hanging on the Christmas tree.
For the dough, take 2 cups of plain wheat flour, a glass of salt, 250 g of water. Mix everything well. The degree of readiness of the dough is determined during kneading - if it crumbles, add water, if it stretches, sticks to your hands, add flour. Roll the dough into a ball - if it holds its shape well, you're done. You can add a little vegetable oil - then the finished mass will not stick to your hands. nine0047
Christmas tree salt dough crafts
You can use cookie cutters to make Christmas decorations from salt dough. Even kids with their help perfectly cope with cutting out figures from rolled out dough.

Learn more