Following 2 step direction worksheets
Following Directions – Worksheets, Activities, Goals, and More
One Possible Hierarchy
Basic Worksheets and Activities
Click on picture to view a small preview of each activity. Click on Doc or PDF to download worksheets in preferred format.
(1) (2) (3) (4)
(5)(6) (7)
(1) “I don’t know” Activity 1 Doc PDF; (2) “I don’t know” Activity 2 Doc PDF; (3) Comprehension Questions – Days of the Week Doc PDF; (4) Comprehension Questions – Months Doc PDF; (5) Comprehension Questions – Numbers Doc PDF; (6) Feedback – Basic Doc PDF ; (7) Feedback #2 Doc PDF;
Additional Worksheets and Activities
Click on picture to view a small preview of each activity. Click on Doc or PDF to download worksheets in preferred format.
(1)(2) (3) (4) (5) (6)(7) (8)
(1)Unless and If Doc PDF; (2) Complex Directions Doc PDF ; (3) “Trick” Directions 1 Doc PDF; (4) “Trick Directions” 2 Doc PDF; (5) And and Or Doc PDF; (6) Checklist Doc PDF ; (7) Category Directions Activity – Basic 1: Doc PDF ; (8) Category Directions Activity – Basic 2 Doc PDF
Expanded Directions Comprehension StripsClick on picture to view a small preview of each activity. Click on Doc or PDF to download worksheets in preferred format.
(1)(2) (3) (4)
(1) Expanded Directions 1 DocPDF; (2) Expanded Directions 2 DocPDF ; (3) Expanded Directions 3 DocPDF ; (4) Expanded Directions 4 DocPDF
Background Information
Following directions involves using short term memory to hold known information while manipulating this information using language.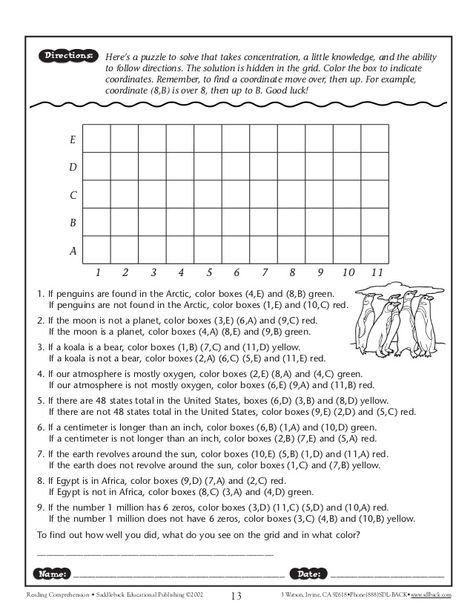 Some types of words appear more frequently in directions than others – conjunctions, negatives, adjectives, and prepositions, for example, are often used in directions. Nearly every test item on one of the most commonly used assessments of following directions, the CELF-4’s Concepts and Following Directions subtest, uses some combination of conjunctions, negatives, and prepositions. These concepts are particularly critical in academic directions.
The ability to follow any specific direction depends upon the ability to comprehend the specific words within the direction. Not all one step directions are created equal. For example, a one step direction containing a negative is often more difficult than one with a similarly placed adjective.
Obviously, following directions also requires aspects outside the domain of language, such as motivation, interest, and attention. Increasing proficiency in language should provide a natural boost to these overlapping aspects.
Goal Suggestions
Cleopatra will follow basic one step directions with functional vocabulary with _____ accuracy as measured by SLP criterion referenced assessment and SLP/ teacher/ parent observation.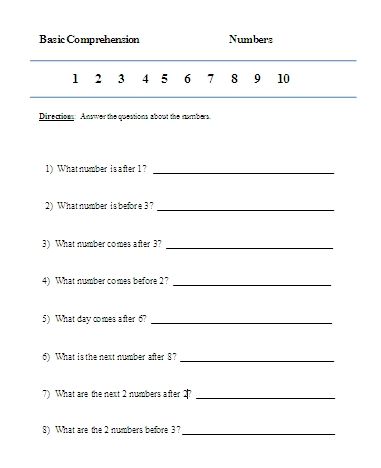
Marc will follow basic and expanded one step directions with curriculum relevant vocabulary…
Julius will follow basic and expanded two step directions with age appropriate curriculum relevant vocabulary…
Brutus will follow age appropriate complex directions including targeted syntax structures, such as prepositions, conjunctions, and negatives with _______ accuracy…
Functional Activity Ideas
Like this:
Like Loading...
Complex Following Directions Activities for Speech Therapy
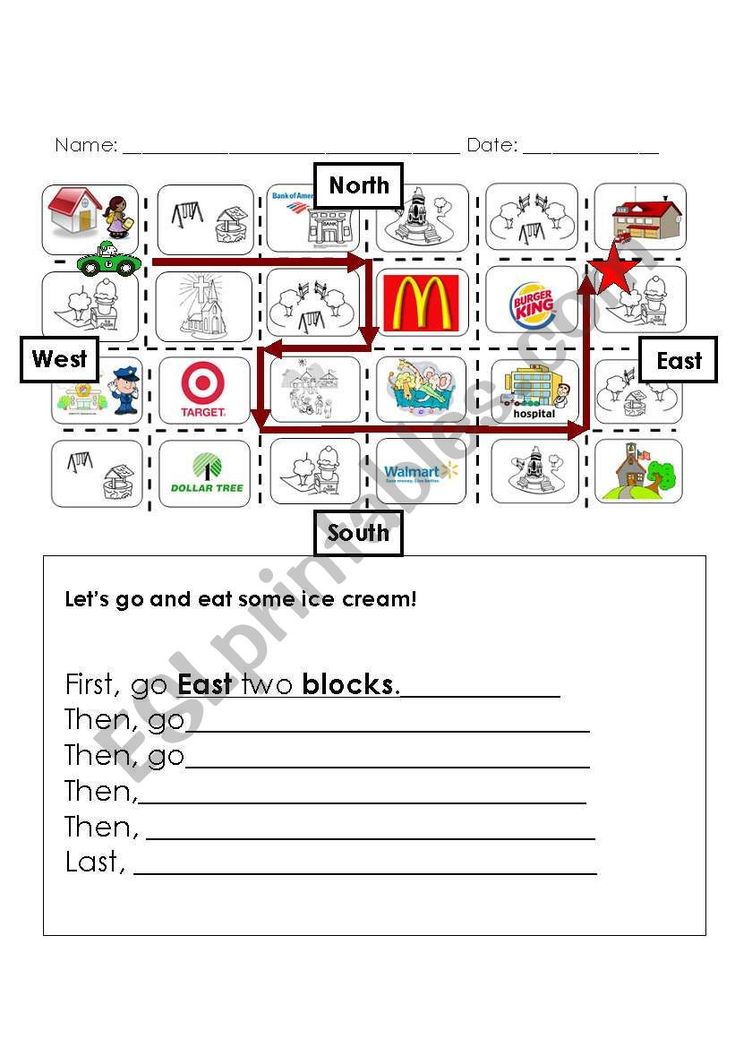
Are you an SLP trying to work on following complex directions in speech therapy with your older students? Teaching 3rd, 4th, and 5th graders the importance of listening closely to spoken instructions has been an area I have consistently focused on in speech and language therapy. This is such an important classroom – and life- skill.
So, how do you make working on this skill area fun- and help your students see how important it really is to stop and listen closely? In this blog post, I’ll provide you with 3 actionable steps to make teaching following complex directions a breeze in speech therapy.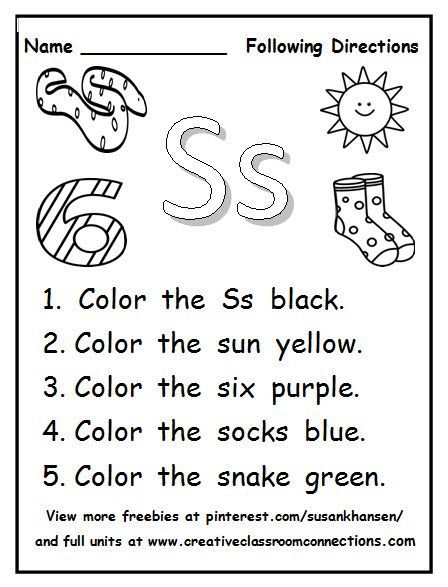
Step 1: Make Following Complex Directions a CHALLENGE
The key is to make it a challenge. My upper elementary students are so competitive, and I needed to use that to my advantage. The trick was making sure the directions included plenty of higher-level concepts and vocabulary, and that the activity itself wasn’t seen as “babyish”.
The answer: a following directions challenge.
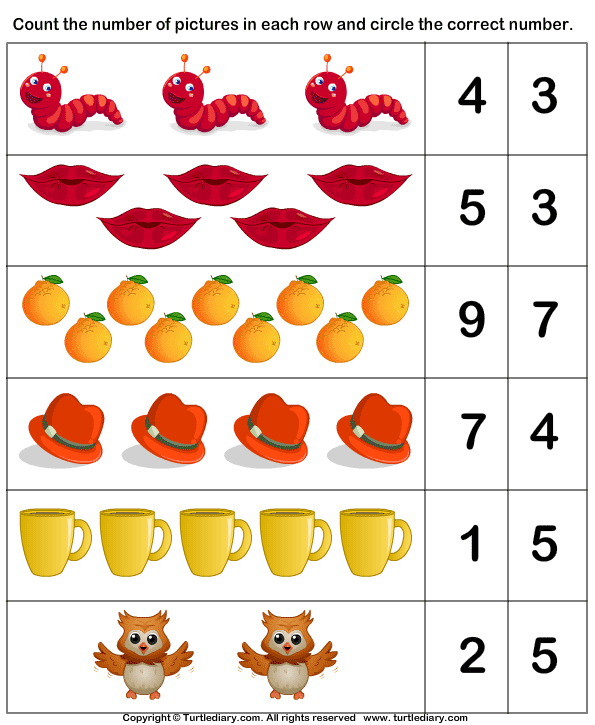
These direction challenges could be used in individual therapy sessions, but they were also great in mixed groups. I passed out the bottom half of the papers to each student. My students had pencils ready in hand, waiting for me to tell them the direction.
I would say the direction, and the students would follow them. After completing the task, they’d look around the table- and notice that not everyone had completed the activity in the same way.
For example, I’d stated in the direction that they needed to write their name in the top left corner- but they immediately noticed when one had written their name in the top right corner instead.
I reminded my students: it wasn’t necessarily who could follow the direction the fastest. This complex multistep following directions challenge was more about who listened closely to all of the small, but important, pieces of information included in the task.
My students weren’t just learning to follow directions- they were also learning to focus.
Step 2: Include a variety of complex direction following concepts
There are several concepts and embedded vocabulary that you will want to target for your students that need support with following directions that are perfect for speech therapy. For example, I made sure to include temporal directions (i.e. such as before, after). Time vocabulary can be very tricky for my students. But temporal concepts aren’t the only important concepts you’ll want to address to make your following directions activity “complex”.
Temporal and Sequential Directions for Speech Therapy
Temporal concepts- or time concepts – can be so confusing for my students. These include terms such as before and after. Sequential concepts include understanding the correct order of events for information.
Temporal and sequential concepts are important for our students to understand.
An example of how I target temporal and sequential concepts in speech therapy using this complex following directions activity: “Before you circle the third A, underline the second A.”
A little while later, I’ll give a similar direction, but I’ve changed WHERE I use the word “before” in the sentence: “Point to the third A before you understand the second A.”
The meaning of the sentence can change completely, depending on where the temporal or sequential vocabulary term is used. This is such an important thing to remember when teaching temporal and sequential concepts, and understanding it requires lots of practice and exposure.
Spatial Directions for Speech Therapy
Following spatial directions requires the understanding of spatial concepts (aka location concepts). It is understanding the positioning of an object, and the relationship of that object to something else.
For younger students, we start by teaching spatial concepts like above, below, behind, and in front of. But by 4th grade, we need to make things a little more complex.
I always start by making sure my students understand the difference between right and left. Most of them don’t.
I then throw in some multiple modifiers to make things a little more complex.
Sure, my student knows how to write their name at the top of the page. But things are a little trickier when they have to write their name in the top left corner of the page. My students often fail to hear all of the components in a direction that contains multiple modifiers.
An example of how I incorporate spatial concepts into complex directions (containing other embedded concepts) would be: “First, write the month in the top right corner of the page. Next, circle the last letter.”
Conditional Directions for Speech Therapy
Conditional concepts can be tricky for our speech therapy students to comprehend. What are conditional concepts? They involve the understanding of “if”. Understanding how “if” can change the meaning of a sentence is very important. It allows the student to know what might happen- or what might not happen.
If we get five feet of snow tonight, we’ll get a snow day tomorrow.
It’s not a guarantee- and if you only get two inches of snow, you better make sure to grab your bookbag.
An example of how I incorporate complex conditional directions in speech therapy would be: “If today is Tuesday, circle the K. If not, underline the L.”
Working your way up to compex directions
Your student might not be at the level of complex yet- but they’re past the level of beginner.
You’ll need to provide leveled instruction.
Some of my students need a little more support initially, so I start by giving them written directions as well as spoken directions. I explain, “This direction is going to contain a time vocabulary word- ‘before’. You have to listen closely so that you know the order I want you to follow this direction in.”
We’d do a quick review of the time vocabulary being targeted:
“Clap your hands before you touch your nose.” My student would complete this task.
“Great. Now, Touch your nose BEFORE you clap your hands.”
We reviewed how the placement of the time vocabulary word in the sentence could change the meaning of the sentence.
Following this, we would highlight any target words that were difficult for them to recall and interpret in the direction.
These complex following directions pages are super easy to store. I keep mine in a binder- but I also keep several extra copies on hand for “grab ‘n go” resources to use in therapy.
These directions activity worksheets are also super easy to modify.
Let’s say you don’t want to provide the written directions. No problem.
To work on following spoken directions only, I simply cut off the bottom of the page. I gave this to my students, then I kept the top part. Simple and easy, and great for data collection in a group. I just wrote their initials next to the direction, then had a quick “check” or “minus” data collection system.
Additional Uses for these Following Direction Challenge Activities
I have used these complex following directions challenges in several ways in speech therapy.
They make an excellent activity to use in individual therapy or small group therapy. It is easy to collect data using these sheets. You can use one as a warm-up, or combine several worksheets for an entire session targeting following complex directions.
These directions sheets also provide an easy way for me to gather data for the present levels section of an IEP when I’m planning to focus on complex directions objectives. I can get a percentage of accuracy, then re-assess several months later.
They also provide easy homework to send home for speech and language carryover practice.
No matter what, you’ll find these complex directions challenges becoming a “must-have” essential in your speech therapy room.
These worksheets offer a simple way to build complex listening skills and confidence with following directions tasks. They give upper elementary students the opportunity to practice following directions with a variety of embedded concepts.
They allow SLPs to have a grab ‘n go option to take students to that next level with following directions.
These following directions worksheets are challenging, fun and effective. My students have had a BLAST, and I’ve been amazed at the progress they have made in therapy.
Click here to grab these complex directions worksheets today!
Talk soon–
Karen
Autocomplete cells in Excel - statanaliz.
 info
info Autocomplete Excel cells is the automatic entry of a series of data into a certain range. Enter “Monday” into the cell, then hold down the autofill marker (square in the lower right corner) with the left mouse button, drag it down (or in the other direction). The result will be a list of the days of the week. You can use a short form like Mon, Tue, Wed, etc. Excel will understand. Similarly, a list of month names is created.
Automatic filling of cells is also used to extend the sequence of numbers with a given step (arithmetic progression). To make a list of odd numbers, you need to specify 1 and 3 in two cells, then select both cells and drag them down.
Excel can also recognize numbers in text. So, it's easy to create a list of quarters. Enter in the cell "1 quarter" and stretch it down.
This is where most Excel users end their knowledge of autocomplete. But this is not all, and other effective and interesting techniques will be considered further.
Autocomplete in Excel from a list of data
Clearly, other lists other than days of the week and months may be needed. Suppose you often have to enter a list of cities where the company's service centers are located: Minsk, Gomel, Brest, Grodno, Vitebsk, Mogilev, Moscow, St. Petersburg, Voronezh, Rostov-on-Don, Smolensk, Belgorod. First you need to create and save (in the right order) a complete list of titles. Go to File - Options - Advanced - General - Edit Lists .
The next window that opens shows those lists that exist by default.
As you can see, there are not many of them. But it's easy to add your own. You can use the window on the right, where either separated by a comma or a column, list the desired sequence. However, it will be faster to import, especially if there is a lot of data. To do this, first create a list of names somewhere on an Excel sheet, then make a link to it and click Import .
Click OK. The list has been created, you can use it for autocompletion.
In addition to text lists, it is more common to create sequences of numbers and dates. One of the options was considered at the beginning of the article, but it is primitive. There are more interesting tricks. First, you need to select one or several first values of the series, as well as the range (to the right or down), where the sequence of values will be extended. Next, we call the progression dialog box: Home - Fill - Progression .
Consider the settings.
In the left part of the window, use the switch to set the direction of building the sequence: down (by rows) or to the right (by columns).
The desired type is selected in the middle:
- arithmetic progression - each subsequent value is changed by the number specified in the Step field
- geometric progression - each subsequent value is multiplied by the number specified in the Step 9 field0056
- dates - creates a sequence of dates.
 When this type is selected, the switches to the right are activated, where you can select the type of unit of measure. There are 4 options:
-
-
- day - list of calendar dates (in increments below) fixed as in the first cell)
- year - only years change
-
- autocomplete - this command is equivalent to dragging with the left mouse button. That is, Excel itself determines: whether it should continue the sequence of numbers, or extend the list. If you pre-fill two cells with the values 2 and 4, then 6, 8, and so on will appear in the other selected cells. If more cells are prepopulated, then Excel will calculate the approximation using linear regression, i.e. forecast along a straight trend line (an interesting feature - see below for more details).
Lower part of window Progression is used to create a sequence of any length based on end value and step. For example, you need to fill a column with a sequence of even numbers from 2 to 1000. It is not convenient to drag with the mouse. Therefore, you first need to select only the cell with one first value. Next, in the window Progression , specify Location , Step and Limit value .
The result will be a filled column from 2 to 1000. Similarly, you can make a sequence of working days a year ahead (the limit value must be the last date, for example, 12/31/2016). The ability to fill a column (or row) with the last value is a very useful thing, because. eliminates a bunch of unnecessary actions during stretching. This completes the autocomplete settings. We go further.
Autofill numbers using the mouse
Autofill in Excel is more convenient to do with a mouse that has a right and left button. Both will be needed.
Suppose you need to make serial numbers of numbers, starting from 1. Usually, two cells are filled with numbers 1 and 2, and then an arithmetic progression is dragged with the left mouse button. You can do it differently. We fill only one cell with 1. We stretch it and get a column with units. Next, open the box that appears immediately after dragging in the lower right corner and select Fill .
If you select Fill only formats , only cell formats will be extended.
Make a sequence of numbers even faster. While dragging the cell, hold down the button Ctrl .
This trick only works with sequences of numbers. In other situations, holding Ctrl will copy data instead of autocomplete.
If you use the right mouse button while dragging, the context menu opens as soon as you release the button.
This adds several commands. Progression allows you to use additional autocomplete operations (see settings above). True, the range is selected and the length of the sequence will be limited to the last cell.
To autocomplete to the required limit value (number or date), you can do the following trick. We take with the right mouse button by the marker, slightly pull it down, immediately return it back and release the button - the autocomplete context menu opens. Choose a progression. This time only one cell is selected, so we specify the direction, step, limit value and create the desired sequence.
The menu items Linear and Exponential Approximation are very interesting. This is an extrapolation, i.e. forecasting data according to the specified model (linear or exponential). Usually, special Excel functions are used for the forecast or a trend (regression) equation is preliminarily calculated, into which the values of the independent variable for future periods are substituted and thus the forecast value is calculated. It's done like this. Suppose there is a dynamics of the indicator with uniform growth.
A linear trend is suitable for forecasting. Calculation of equation parameters can be done using Excel functions, but often, for clarity, a chart is used with settings for displaying a trend line, an equation, and predictive values.
To get a forecast in numerical terms, you need to calculate based on the resulting regression equation (or directly refer to Excel formulas). Thus, it turns out quite a lot of actions that require a good understanding.
So, the forecast using the linear regression method can be made without formulas and without graphs at all, using only autocomplete cells in Excel. To do this, select the data on which the forecast is based, drag the right mouse button to the required number of cells corresponding to the length of the forecast, and select Linear approximation . We get a forecast. Without noise, dust, formulas and diagrams.
If the data has an accelerating growth (like a deposit account), then an exponential model can be used. Again, in order not to suffer with calculations, you can use autocomplete by selecting Exponential approximation .
There is no faster way to predict.
Autofill dates using mouse
It's quite common to want to extend a list of dates. We take the date and drag it with the left mouse button. Open the box and choose the filling method.
Weekdays is a great option for accountants, HR and other professionals who deal with various plans. And here is another example. Let's say the scheduled payments come on the 15th and the last day of each month. Specify the first two dates, drag down and fill in by month (any mouse button).
Note that the 15th is fixed and the last day of the month is changed to always be the last.
Using the right mouse button , you can use the settings progression . For example, make a list of working days until the end of the year. In the list of commands through the right button there is also Instant filling . This function appeared in Excel 2013. It is used to fill cells according to the sample. But there was already an article about this, I recommend reading it. It will also save you hours of work.
That's about it. This video tutorial shows you how to autofill cells in Excel.
Social Share:
Move, Align, and Distribute Objects in Illustrator
User Guide Cancel
Search
- Illustrator User Guide
- Illustrator basics
- Introduction to Illustrator
- What's new in Illustrator
- Frequently Asked Questions
- Illustrator System Requirements
- Illustrator for Apple Silicon
- Work environment
- Work environment basics
- Create documents
- Toolbox
- Default key combinations
- Customizing keyboard shortcuts
- Introduction to artboards
- Managing artboards
- Work environment setup
- Properties panel
- Parameter setting
- Working environment "Touch control"
- Microsoft Surface Dial support in Illustrator
- Recovery, cancellation, history and automation
- Rotate view
- Rulers, grids and guides
- Accessibility in Illustrator
- Safe Mode
- Viewing graphic objects
- Working in Illustrator using the Touch Bar
- Files and templates
- Illustrator tools
- Selection tools
- Selection tools
- Partial selection
- Bulk selection
- Magic wand
- Lasso
- Artboard
- Selection tools
- Navigation tools
- Hand
- Rotate view
- Scale
- Drawing tools
- Gradient
- Mesh
- Creating Shapes
- Gradient
- Text tools
- Text
- Text on contour
- Vertical text
- Text
- Drawing tools
- Pen
- Add reference point
- Delete reference points
- Reference point
- Curvature
- Line segment
- Rectangle
- Rounded rectangle
- Ellipse
- Polygon
- Star
- Brush
- Blob brush
- Pencil
- Shaper
- Fragment
- Modification tools
- Rotation
- Reflection
- Scale
- Curvature
- Width
- Free Transform
- Pipette
- Mix
- Eraser
- Scissors
- Selection tools
- Introduction to Illustrator
- Illustrator on iPad
- Introducing Illustrator on iPad
- An overview of Illustrator on iPad.
- Illustrator on iPad FAQ
- System requirements | Illustrator on iPad
- Do's and Don'ts in Illustrator on iPad
- An overview of Illustrator on iPad.
- Workspace
- Workspace Illustrator on iPad
- Touch shortcuts and gestures
- Keyboard shortcuts for Illustrator on iPad
- Manage application settings
- Documents
- Work with documents in Illustrator on iPad
- Import Photoshop and Fresco documents
- Selecting and arranging objects
- Creating repeating objects
- Objects with transitions
- Drawing
- Creating and modifying paths
- Drawing and editing shapes
- Text
- Working with text and fonts
- Creating text labels along a path
- Adding custom fonts
- Image manipulation
- Bitmap vectorization
- Color
- Applying colors and gradients
- Introducing Illustrator on iPad
- Cloud documents
- Fundamentals
- Working with Illustrator cloud documents
- Share and collaborate on Illustrator cloud documents
- Cloud storage update for Adobe Illustrator
- Cloud documents in Illustrator | Frequently Asked Questions
- Troubleshooting
- Troubleshooting creating or saving cloud documents in Illustrator
- Troubleshoot cloud documents in Illustrator
- Fundamentals
- Adding and editing content
- Drawing
- Basic drawing
- Edit contours
- Drawing a graphic object with pixel-level precision
- Draw with the Pen, Curvature, and Pencil tools
- Drawing simple lines and shapes
- Image trace
- Contour simplification
- Definition of perspective grids
- Symbol tools and symbol sets
- Correction of contour segments
- Making a flower in five easy steps
- Drawing perspective
- Symbols
- Drawing pixel-aligned paths when creating projects for the web
- Adobe Substance 3D effects and materials
- Learn more about 3D effects in Illustrator
- Creation of 3D graphics
- Projecting a pattern onto 3D objects
- Creating 3D objects
- Creating 3D text
- Learn more about 3D effects in Illustrator
- Color
- About color
- Choice of colors
- Using and creating color swatches
- Color correction
- Adobe Color Themes Panel
- Color groups (harmonies)
- Color Themes Panel
- Recoloring a graphic object
- Coloring
- About coloring
- Coloring with fills and strokes
- Live Paint Groups
- Gradients
- Brushes
- Transparency and Blending Modes
- Apply strokes to objects
- Creating and editing patterns
- Nets
- Patterns
- Selecting and organizing objects
- Selecting objects
- Layers
- Grouping and collating objects
- Move, align and distribute objects
- Placement of objects
- Locking, hiding and deleting objects
- Duplicate objects
- Rotate and flip objects
- Redrawing objects
- Cropping images
- Transforming objects
- Combining objects
- Cutting, splitting and trimming objects
- Puppet deformation
- Scale, skew and distort objects
- Objects with transitions
- Redrawing with shells
- Redrawing objects with effects
- Creating shapes with the Shape Maker and Shape Builder tools
- Working with live corners
- Improved touch-enabled repaint processes
- Clipping Mask Editing
- Dynamic figures
- Creating shapes with the Shape Builder tool
- Global change
- Text
- Adding object types to text and work objects
- Creating bulleted and numbered lists
- Text area control
- Fonts and decorations
- Text formatting
- Import and export of text
- Paragraph formatting
- Special characters
- Creating text along a path
- Character and paragraph styles
- Tab
- Text and fonts
- Search for missing fonts (Typekit workflow)
- Update text from Illustrator 10
- Font for Arabic and Hebrew
- Fonts | Frequently Asked Questions and Troubleshooting Tips
- Creating a 3D text effect
- Creative Design
- Scaling and rotating text
- Leading and letter spacing
- Hyphenation and line breaks
- Text enhancements
- Spell checker and language dictionaries
- Asian character formatting
- Asian Composers
- Creation of text projects with transitions between objects
- Create a text poster using image tracing
- Creating special effects
- Working with effects
- Graphic styles
- Shading
- Appearance attributes
- Sketching and Mosaicing
- Shadows, glows and feathers
- Overview of effects
- Web graphics
- Web graphics best practices
- Diagrams
- SVG
- Animation creation
- Fragments and image maps
- Drawing
- Import, export and save
- Import
- Import graphics files
- Import bitmaps
- Import artwork from Photoshop
- Putting multiple files in a document
- Image extraction
- Import Adobe PDF files
- Import EPS, DCS and AutoCAD files
- Link details
- Creative Cloud Libraries in Illustrator
- Creative Cloud Libraries in Illustrator
- Save dialog box
- Save illustrations
- Export
- Using an Illustrator graphic in Photoshop
- Export illustration
- Collection of resources and their bulk export
- Packing files
- Create Adobe PDF files
- CSS extraction | Illustrator CC
- Adobe PDF Options
- File information and metadata
- Import
- Printing
- Preparing to print
- Setting up documents for printing
- Changing page size and orientation
- Setting crop marks for cropping and straightening
- Getting Started with Large Canvas
- Print
- Overlay
- Color managed printing
- PostScript printing
- Print styles
- Marks and bleed
- Printing and saving transparent graphics
- Trapping
- Printing of color plates
- Print gradients, meshes, and color overlays
- White overlay
- Preparing to print
- Automating tasks
- Combining data using the Variables panel
- Automation using scripts
- Automation using operations
- Troubleshooting
- Crash problems
- Restoring files after a crash
- Problems with files
- Supported file formats
- Problems with GPU driver
- Problems with Wacom devices
- Problems with DLL files
- Memory problems
- Settings file problems
- Problems with fonts
- Printer problems
- How to share a crash report with Adobe
You can move objects by dragging them with certain tools, by using the arrow keys on your keyboard, or by entering precise values in a palette or dialog box.
Anchors can be used to make it easier to position objects while dragging. For example, you can snap the cursor to guides and anchor points, and snap object boundaries to grid lines. You can also use the Alignment palette to position objects relative to each other.
You can use the Shift key to constrain the movement of one or more objects so that they move strictly horizontally, vertically, or diagonally relative to the current orientation of the X and Y axes. You can also use the Shift key to rotate objects by angles that are multiples of 45°.
Press and hold the Shift key while dragging to constrain the move to a 45° angle.
Move or duplicate an object using insert
-
Select one or more objects.
-
Choose Edit > Cut to move the selection, or Edit > Copy to duplicate the selection.
-
To insert an object into another file, open the file. (To insert objects between layers, see Inserting objects between layers).
-
Select one of the following commands:
Edit > Paste
Inserts an object in the center of the active window.
Edit > Paste Before
Inserts an object immediately before the selected object.
Edit > Paste After
Inserts an object directly after the selected object.
Edit > Paste in Place
Inserts the artwork at the location on the active artboard where it is on the original artboard.
Edit > Paste on All Artboards
Inserts the artwork at the location on all artboards where it is located on the current artboard.
Moving an object by dragging
-
Select one or more objects.
-
Drag the object to a new location.
If the selected object contains a fill, the object can be dragged from any point on it.
 If the selection has no fill, when viewing the image as outlines, or if the Select Object Only By Path setting is selected, the object must be dragged outside the path (see Duplicate Selections Using Drag).
 You can use the Snap To Point command in the View menu to snap the cursor to an anchor point or guide when you drag an object within 2 pixels of the anchor point or guide.
Move object with arrow keys
-
Select one or more objects.
-
Press any arrow key to move the object in the desired direction. Press Shift+Arrow key to move the object 10 times the amount specified by the Move Cursor.
The distance an object moves each time an arrow key is pressed is determined by the Move Cursor parameter. The default spacing is 1 point (1/72 inch or 0.3528 mm). To change the Cursor Move spacing value, choose Edit > Preferences > General (on Windows) or Illustrator > Preferences > General (on Mac OS).

Moving an object a certain distance
-
Select one or more objects.
-
Choose Object > Transform > Move.
With an object selected, you can also double-click the Selection, Direct Selection, or Group Selection tool to open the Move dialog box.
-
Do any of the following:
-
To move the object left or right, enter a negative value (move left) or a positive value (move right) in the Horizontal text box.
-
To move the object up or down, enter a negative value (move up) or a positive value (move down) in the Vertical text box.
-
To move the object by an angle about the object's X axis, enter a positive angle (counterclockwise move) or a negative angle (clockwise move) in the Distance or Angle text box. You can also enter values between 180° and 360°. These values are converted to their respective negative values (e.
 g. 270° is converted to -90°).
-
-
If objects contain pattern fills, select the Patterns option to move the pattern. Clear the Objects check box if you want to move the patterns while leaving the objects unchanged.
-
Click OK or Copy to move the copy of the objects.
Directions relative to the X-axis
Moving objects using X and Y coordinates
-
Select one or more objects.
-
In the Transform or Control panel, enter new values in the X, Y, or both fields.
To change the breakpoint, click the white square on the breakpoint locator before entering values.
Moving multiple objects at once
-
Select one or more objects.
-
Choose Object > Transform > Transform Each.
-
Set the distance to move the selected objects in the "Move" area of the dialog box.

-
Do one of the following:
-
Click OK to move objects by the specified distances.
-
To move objects randomly, but within distances specified, select the Random option. For example, if you want the bricks to be slightly offset from each other in an image of a brick wall, rather than perfectly aligned, you can select the Random option. Then click the "OK" button.
-
-
Select the object to be inserted.
-
Choose Edit > Copy or Edit > Cut.
-
Select the object before or after which you want to paste.
-
Choose Edit > Paste Before or Edit > Paste After.
When pasting multiple objects, all pasted objects are placed before or after the selected object. However, the relative position of the pasted objects remains the same.
The Paste Copied Layers option determines where the image will be pasted in the layer hierarchy. By default, the Paste Copied Layers option is off and the image is pasted on the active layer in the Layers palette. When Paste Copied Layers is enabled, the image is pasted on the layer it was copied from, regardless of which layer is active in the Layers palette.
To enable this option, choose the Paste Copied Layers command from the Layers panel menu. When the setting is enabled, a checkbox is displayed.
Turn on the Paste Copied Layers option if the image is pasted into documents and you want it to be automatically placed on a layer with the same name as the original layer from which the image was taken. If the target document does not have a layer with the same name, Illustrator creates a new layer.
The Paste in Place command is used to paste artwork on the active artboard. To execute this command, choose Edit > Paste in Place. You can also use the keyboard shortcut Ctrl+Shift+V (Windows) or Cmd+Shift+V (Mac).
The Paste on All Artboards command is used to paste the selected artwork on all artboards. Before using the Paste on All Artboards command, make sure you copy the object from the active artboard.
To execute this command, choose Edit > Paste On All Artboards when cutting or copying artwork.
If you copy an artwork and then choose Paste on All Artboards, the artwork is re-pasted on the artboard it was copied from. (Recommended) Cut and paste objects if you don't want to modify the original objects before running the Paste on All Artboards command.
The "Paste in Place" and "Paste in All Artboards" commands paste objects at the same location on all artboards from where they were copied on the active artboard.
The Alignment palette (Window > Alignment) and the alignment options in the Control panel are used to align and distribute selected objects along the specified axis. Object boundaries or anchor points can be used as a reference point, and can also be aligned to a selection, artboard, or key object. The key object is one specific object out of several selected objects.
Alignment options are displayed in the Control panel when an object is selected. If they don't appear, choose Alignment from the Control panel menu.
By default, Illustrator calculates alignment and distribution to object paths. However, if you are working with objects with different stroke widths, you can use the edge of the stroke to calculate the alignment and distribution. To do this, choose Use View Bounds from the Alignment panel menu.
Align or distribute to the bounding box of all selected objects
-
Select objects to align or distribute.
-
In the Alignment or Control palette, select Align To Selection, then click the button for the type of alignment or distribution you want.
Align or distribute to reference point
-
Select the Direct Selection tool, press the Shift key and select the anchor points you want to align or distribute. The anchor point selected last becomes the key anchor point.
The Align To Key Anchor Point option is automatically enabled in the Alignment and Control palettes.
-
In the Alignment palette or Control panel, click the button for the type of alignment or distribution you want.
Key object alignment or distribution
-
Select objects to align or distribute.
-
Click again on the object you want to use as the key (this time you do not need to hold down the Shift key while clicking).
A blue outline appears around the key object, and Align To Key Object is automatically checked in the Control panel and Alignment palette.
-
In the Alignment palette or Control panel, click the button for the type of alignment or distribution you want.
To stop aligning and distributing to an object, click the object again to remove the blue outline, or choose Deselect Key Object from the Align panel.
Align or distribute to artboard
-
Select objects to align or distribute.
-
Activate the desired artboard by Shift-clicking it with the Selection tool. The outline of the active artboard is darker than other areas.
-
In the Alignment or Control palette, select Align To Artboard and click the button for the type of alignment or distribution you want.
Distribute objects at specific distances
You can distribute objects by specifying exact distances between their outlines.
-
Select the objects to distribute.
-
Use the Selection tool to click the outline of the object around which you want to distribute other objects. The selected object will remain in its place.
-
In the Alignment palette, enter the distance between objects in the Distribute Spacing text box.
If the Distribute Spacing options are not displayed, choose Show Options from the panel menu.
-
Click the Evenly Spaced Vertical button or the Evenly Spaced Horizontal button.