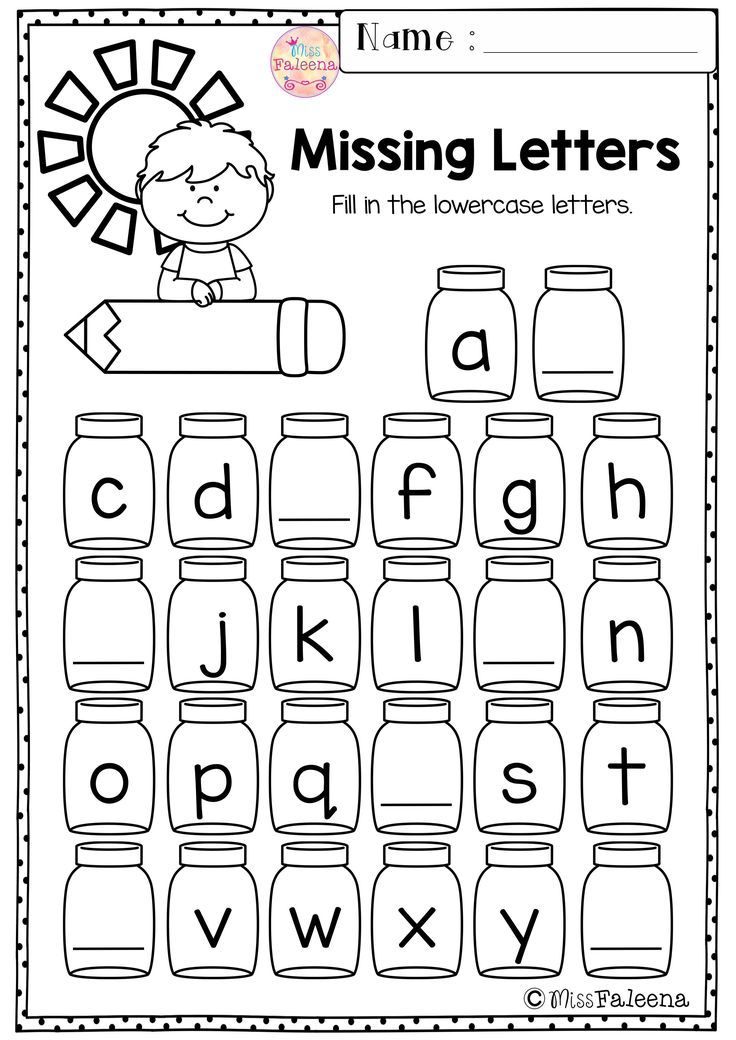
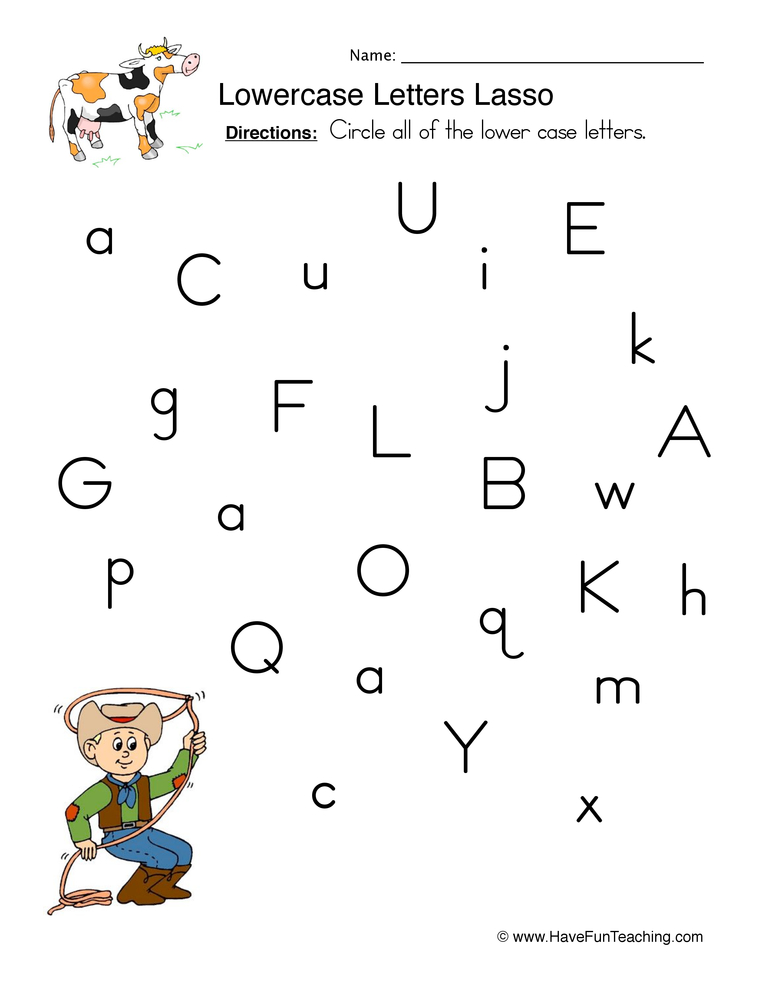
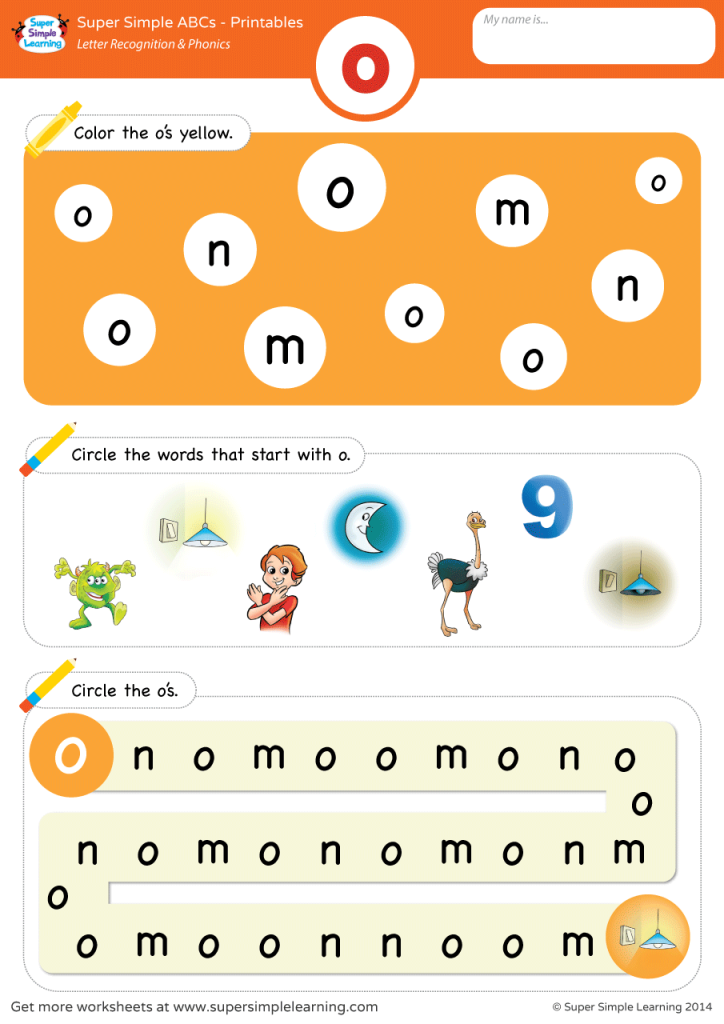
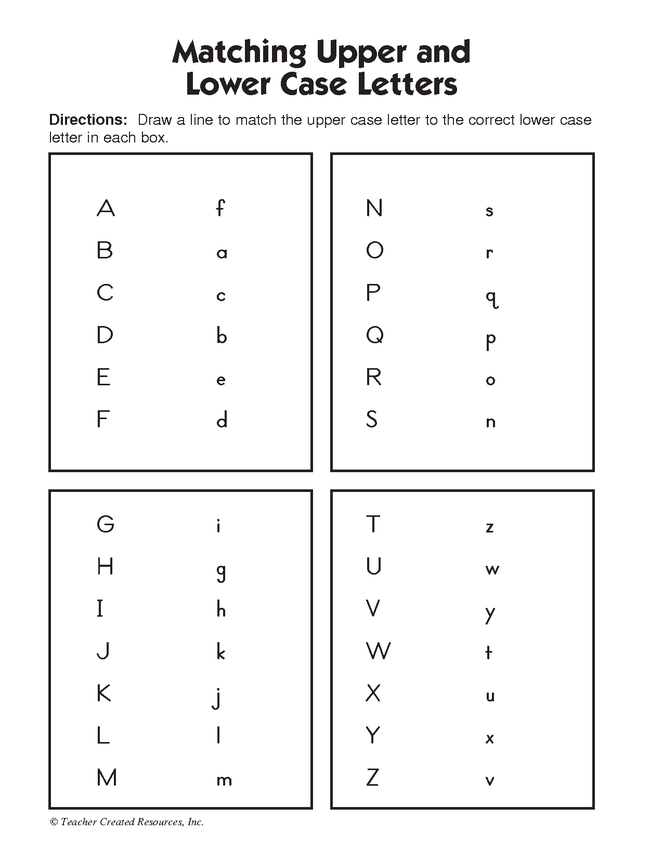
Learning lowercase letters
How To Teach Your Child Uppercase Letters And Lowercase Letters
If your little learner is showing an interest in exploring uppercase letters and lowercase letters, you’ve come to the right place! We’re here to help you and your child have fun while learning.
In this article, you’ll discover the best way to start teaching your child about uppercase and lowercase letters to set them up for success.
Plus, we’ll share 11 of our favorite activities for practicing letter recognition and forming letters so your child can build their skills and confidence while engaging in fun learning games!
Table of Contents
- Tips For Teaching Uppercase Letters and Lowercase Letters
- 11 Fun Ways To Practice Uppercase Letters And Lowercase Letters
- Learning Letters Is Fun With HOMER!
Tips For Teaching Uppercase Letters and Lowercase Letters
When children are beginning to learn the difference between uppercase letters and lowercase letters, many find it easiest to learn uppercase letters first. This is because letters are often simpler to draw and differentiate from other letters when they’re capitalized.
However, since lowercase letters are used more often throughout text, it’s important for children to learn that there are two forms of each letter and to understand how they connect to each other.
To accomplish this, start by teaching letters that have similarities between their uppercase and lowercase versions. For example, “T” and “t” are usually easier to link than “G” and “g.”
This process takes time, so don’t be afraid to go slow. Your child likely won’t master all 52 letters at the same time — it’s a huge task for their working memory! This skill will improve the more you practice together.
Additionally, while being able to identify the name of each letter is crucial, it’s more important for children to link the primary sound that each letter represents to both versions of a letter.
This will become a key tool they can use later when they begin to sound out words while reading, so it’s a good idea to practice early in the letter recognition process.
Depending on where your child is on their literacy learning journey, it can also be helpful to explain what the purpose of uppercase letters is. This way, your child can understand where uppercase letters fit into sentences and what they mean.
To do this, you’ll want to explain that uppercase letters are used at the beginning of a sentence and when you’re writing the name of a person or city, for instance. Of course, there are other times uppercase letters might be used (like in acronyms), but that’s a lesson for another day!
Letter Vocabulary To Teach Your Kids
When you’re talking about letters with your child, it’s important to help them understand the words people use when discussing the alphabet. These vocabulary words will ensure your child can communicate effectively and comprehend what others are saying.
Here are a few key words related to these activities your child should know:
- Letter: One of the 26 symbols that make up the English alphabet.
 Each letter has a name, like “A” or “B,” and represents a sound (or sounds).
 - Alphabet: The alphabet is the name for all of the letters.
- Uppercase letters: These letters have specific functions and usually come at the beginning of a sentence or proper noun, among other uses.
- Capital letters: Capital letters are another name for uppercase letters.
- Lowercase letters: These letters are the most common but can vary by font (more so than uppercase letters), which can be confusing for young learners.
You don’t need to quiz your child on these words or make them memorize the definition. Simply use these words when you’re talking about letters so your child can become familiar with the terms.
11 Fun Ways To Practice Uppercase Letters And Lowercase Letters
Learning letters doesn’t have to be boring! Here are some of our favorite games and activities that make learning fun.
1) Everyday Letter I-Spy
I-Spy is a fun, simple way to incorporate uppercase letters and lowercase letters into your child’s everyday life and help them practice letter recognition.
By drawing their attention to different letters throughout the day, you’ll strengthen their skills bit by bit without them even realizing it!
What You’ll Need:
- Signs or other words around you
What To Do
Simply start asking your child to identify letters as you go about your day together. Beginning with letters that matter to them, such as the letters in their own name, is a great way to begin.
Then you can work your way up to letters in other special words as their letter recognition skills improve. For example, try asking your child to identify the letter “L” in the sign for the laundromat, or how many of the letter “T” they can find in the menu at a restaurant.
This activity is a fantastic learning tool, as a game of letter I-Spy can be played practically anywhere, and you don’t need any equipment — all you need is a good eye for spotting letters!
Try adding this fun game into your daily routine to sneak in some letter recognition practice.
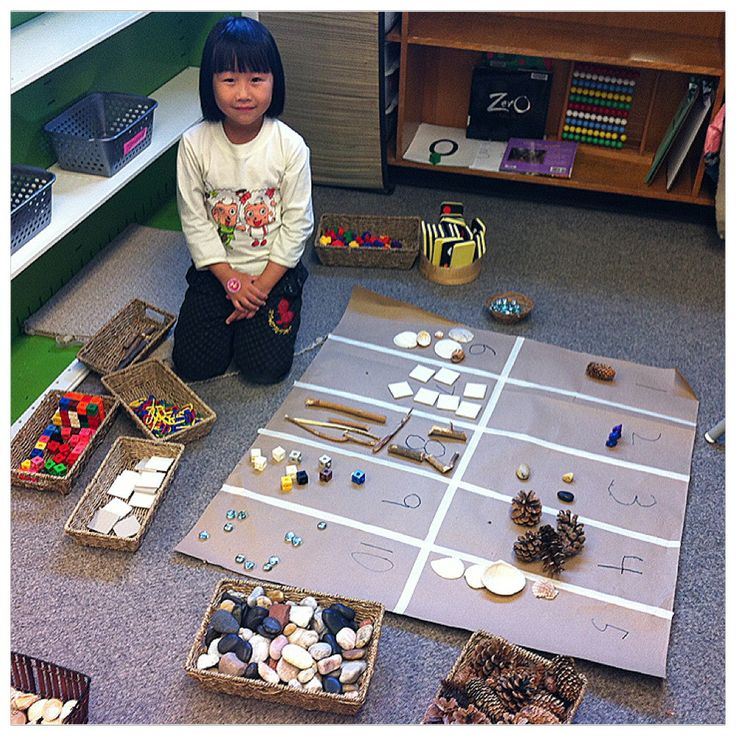
2) Create Letters In Nature
As an engaging way to bring learning outdoors, try practicing to form letters by using materials found in nature. Whether you take a walk around the neighborhood or create a scavenger hunt in the backyard, you’ll have fun collecting materials with your child.
What You’ll Need:
- A variety of natural materials, such as rocks, sticks, or leaves
What To Do:
Once you’ve gathered the natural materials you found, it’s time to practice forming uppercase letters and lowercase letters with these supplies.
Start by choosing a letter that your child is familiar with, and have them write it out by forming it with one of their chosen materials.
Note: Rocks and leaves are easiest for forming rounded letters (B, C, D), and sticks are best for letters with straight lines (A, F, T).
When your child has mastered a particular letter in uppercase, ask them to form the same letter in lowercase. Gradually move on to trickier letters that they might be less familiar with to challenge their skills.
With plenty of practice, your child will know all uppercase letters and lowercase letters by heart. (At that point, you could include a time limit to see how many letters they’re able to create within a particular time period as a fun challenge.)
3) Guess The Magnetic Letter
This is another easy letter recognition game that doesn’t require much equipment and can be really fun to play (especially when the kids are able to outsmart the grown-ups!).
What You’ll Need:
- A set of magnetic letters (we recommend the ones in the HOMER Explore Letters Kit)
What To Do:
Grab your magnetic letters. Then, have your child put their hands behind their back before handing them a single letter of your choice.
Ask your child to identify the letter in their hands — without peeking! — only by touch. For children who are still learning, provide choices for them to guess between (“Do you have a ‘T’ or a ‘B’ in your hands?”).
For older kids who are mastering letters, make the activity trickier by increasing the number of letter possibilities, and, eventually, have them guess without any hints at all.
It’s important to take turns so that you also give this letter recognition activity a go as the adult. It’s encouraging (and usually entertaining) for your child if you try and fail a few times by guessing a letter or two incorrectly.
Don’t be afraid to “mess up” in this game!
4) Letter Matching Cards
For this activity, you’re going to need a set of letter-matching cards. While you can purchase a variety of different types, we think it’s fun to make our own personalized set!
What You’ll Need:
- Paper or cardboard to cut into 52 cards
- Scissors
- A marker
What To Do:
Start by cutting out rectangles of paper or cardboard for your cards, one for each uppercase and lowercase letter. Then, write a letter on each of the cards, or have your child practice writing it themselves.
After the letters have been written, your child can decorate to their heart’s content! You might even want to draw (or glue a picture of) an object that corresponds to each letter to make it even more fun (like an apple on each of the “A” cards, a balloon for the “B” cards, and so forth).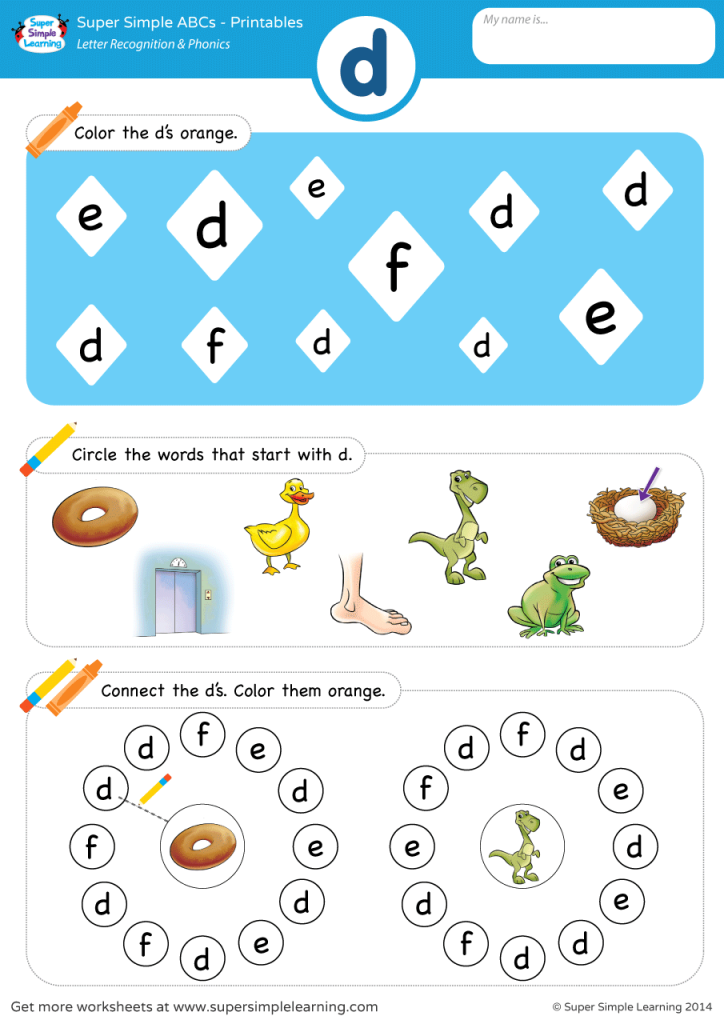
This will also make the matching portion of the activity easier for your child if they’re still mastering uppercase letters or lowercase letters.
When your letter cards are complete, mix them all up on the table and have your child select one. Their task is to find the corresponding uppercase or lowercase version of that letter from the selection in the pile.
This game might be difficult at first, so we suggest beginning with just 10 cards at a time: five uppercase letters and five lowercase letters. You can make more cards on different days and add them to the list as your child gets the hang of this activity.
With practice, your child will enjoy becoming a letter matching professional!
5) Get Crafty
This interactive learning activity is all about practicing letter formation using uppercase letters and lowercase letters. No matter which form of arts and crafts your child chooses for this activity, you’re sure to have a blast!
What You’ll Need:
- A variety of art supplies, such as pipe cleaners, Play-Doh, Fingerpaints, glue and glitter, ribbon, and construction paper
- Kid-safe scissors
What To Do:
Grab your art supplies and get ready to start the fun.
Say a letter aloud (or write it down for your child to visualize if that works best) and have your child form the letter using your chosen material. Then have them create the corresponding uppercase or lowercase letter to match.
Engaging in crafts is a great way to encourage your child to practice forming letters — they’ll be so busy having fun that it won’t feel like learning at all!
6) Hidden Letters
Get your child up and moving while they practice their letters with this simple game.
What You’ll Need:
- Your letter cards from activity number four
What To Do:
To make the game more manageable, pick out five to 10 letters your child is practicing. Then, make a deck out of the uppercase and lowercase cards for those letters.
While your child isn’t looking, hide the cards in one room of your home. That way, you’ll limit the area they have to search.
Once the cards are hidden, it’s time to go on a letter scavenger hunt! Your child will love finding all of the letter cards.
Encourage them to set their cards out in a matching set, with an uppercase letter next to a lowercase, so they can see at a glance which part of each set they’re missing.
7) Post-It Note Letter Challenge
Can your child select the matching letters to finish this challenge?
What You’ll Need:
- 52 Post-It Notes
- A pen
- A large area to hang the notes on, such as a blank wall or a whiteboard
What To Do:
Write an uppercase letter on 26 Post-It notes. Then, use the remaining ones for lowercase letters.
Next, alternate placing uppercase and lowercase letters onto your wall or whiteboard. You might have a capital “A” followed by a lowercase “b.”
Once you get to “Z,” set the remaining letters in a row so your child can see them. Point to the uppercase “A” and ask, “Can you find the lowercase letter that matches?” If your child correctly identifies the letter “a,” have them pick it up and stick it below the capital “A. ”
”
If they pick the wrong letter, that’s OK. Gently let them know that they picked a different letter and have them try again.
Once both “A’s” are together, move on to the next letter. When your child has returned all of the missing Post-Its to the wall, sing the ABC song together.
Note: If your child doesn’t yet know all of their letters, don’t start with all 52 Post-Its. Instead, pick a smaller number for them to practice with so they don’t get overwhelmed.
Also, once you finish with the Post-Its, they can save them and use them for this fun Letter Toss game.
8) The Learn & Grow App
If your child enjoys a bit of educational screen time, the HOMER Learn & Grow app is a great way to let them practice their letter identification skills.
What You’ll Need:
- A compatible device
- The HOMER Learn & Grow app
What To Do:
Our kid-friendly design makes it easy for your child to practice their letters on their own, so it’s perfect for those busy days when you just can’t squeeze in another activity.
Once you set up their learning pathway and create your parent account, you can let them play independently. The program takes them on a personalized learning journey that’ll meet them where they are now and help them grow.
Many of the games in the Pre-K section of Learn & Grow, as well as the Early Learners section, work on letter recognition and identification, so it’s a fun way to review what you’re working on together.
9) Letter Sort
Some uppercase letters look just like their matching lowercase friend. Others look nothing alike. This activity helps your child pay attention to the shape of each letter so they can sort them.
What You’ll Need:
- Letter cards (you can reuse the ones you made in activity number four)
- Two large bowls to sort the letters into
What To Do:
Start by mixing up all of the letter cards. Then, invite your child to help you sort them into two groups: those that look the same in upper and lowercase and those that look different.
You may need to model this for your child a few times. For example, hold up the capital “S” card and ask, “Do you see a lowercase letter that looks like this?”
When your child finds it, say, “Both the uppercase ‘S’ and the lowercase ‘s’ look similar. They have the same shape, but one is a little smaller. Let’s put these two letters in this bowl because they look the same.”
Then, pick up another uppercase letter, such as the “E.” Ask your child to find the lowercase “e.” If they have any trouble, give them a hand. Then ask, “Do these two letters look the same?”
Let your child examine both letters and highlight similarities and differences between the uppercase and lowercase versions. Then say, “Since they don’t look the same, we’re going to put them in this bowl.”
Continue sorting, letter by letter.
Once your child sorts all the letters, have them count the cards in each bowl and see if there are more that look alike or more that are different.
10) Identifying Letters In Books
When you’re sharing a book with your child, asking them to identify a few letters is a fun way to sneak in a little extra practice. It’s also a great way to get them excited about books and reading.
What You’ll Need:
A picture book your child will enjoy hearing (find some of our book recommendations in this post)
What To Do:
Start by choosing a book that you know your child will enjoy. Then, as you read it aloud, stop occasionally to point out a few letters and ask them to identify them. For example, you might say, “Oh, look, there’s an uppercase letter ‘B’ on this page. Do you see it?”
If your child has trouble finding the letter, point it out. Then, say the sound the letter makes and have them repeat it to you.
Once they’ve found the letter, invite them to look for other letters on the page. See if they can find an uppercase and a lowercase version of the same letter. If not, that’s okay. Just move on to another page and try again.
As you stop, pay attention to your child’s engagement level and enthusiasm. You don’t want them to get tired of finding letters, so try to quit while they’re still having fun and enjoying the activity.
You can always try again later!
11) Make A Letter Book
Your child can use their alphabet knowledge to create a special book from A-Z. It’s great for practice and can also be a neat keepsake to look back on when your child is older.
What You’ll Need:
- Construction paper for the cover
- Printer paper for the inside pages
- Crayons or colored pencils
- A pencil or pen
- A stapler or a hole punch and ribbon
What To Do:
Start by having your child select a title for their book and then decorate the cover. They can use crayons or colored pencils for this task. Just make sure you add their name as the author somewhere!
Once they finish the cover, it’s time to move on to the inside pages. For each letter of the alphabet, have your child write an uppercase and a lowercase letter. Then, have them illustrate the page by drawing things that begin with that letter.
For example, for the “D” page, they might have a picture of a donut, a dog, and a duck.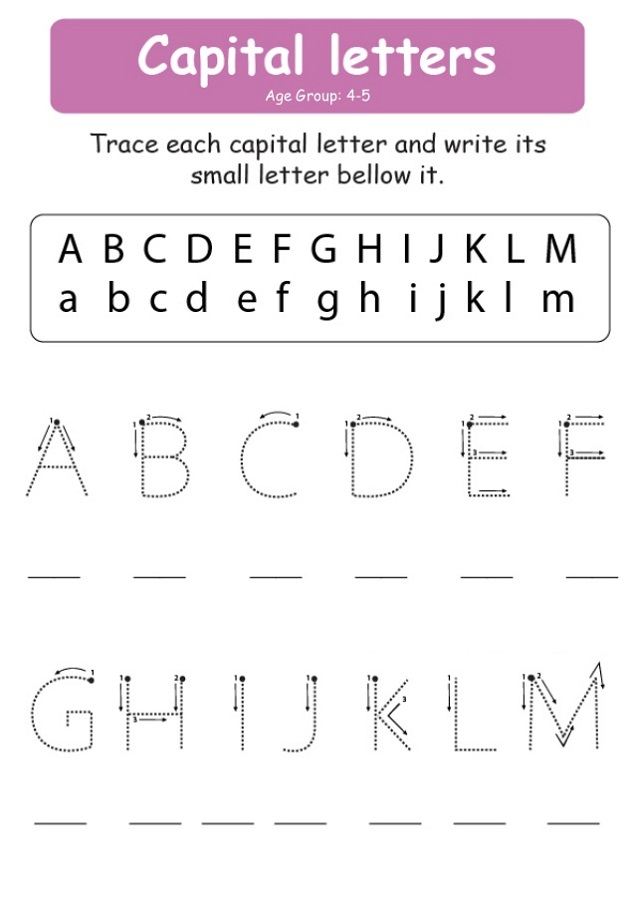
Once every page is ready, it’s time to put the book together.
First, lay the pages out in order from A-Z, and then put the cover on top. Flip through the book to make sure everything lines up.
When everything is together, use the stapler to bind the book. If you don’t have a stapler that’ll staple something that thick you can also use a hole punch and a ribbon to bind it.
Once you’ve finished, have your child read the book to you. They can say the letter on each page and then identify the items they’ve drawn that start with each letter. As they’re reading, have them point to the uppercase or lowercase letters on each page to practice.
Learning Letters Is Fun With HOMER!
With the help of our expert learning tips and fun, engaging activities, your young learner will begin to enjoy practicing uppercase letters and lowercase letters in no time!
From I-Spy and guessing games to enjoying crafts together, watch your child’s skills develop as they master letter recognition and letter formation, feeling more confident each time they practice.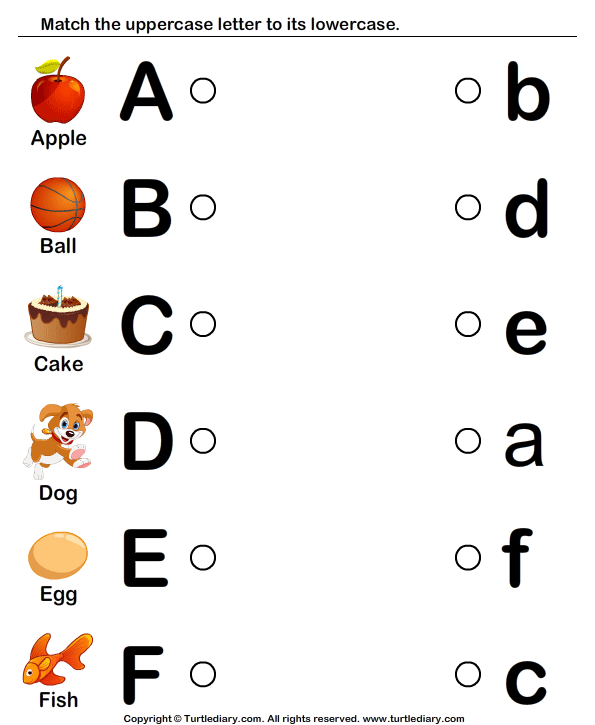
To experience even more “I did it!” moments with your child, try our Explore Letters Kit. Packed with thoughtfully designed activities and expert play tips to build their literacy skills, the possibilities are nearly endless!
Author
Should I Teacher Upper or Lower Case Letters First?
by Shirley Houston
I’ve been asked if you should teach upper or lower letters first, a few times recently, so in this month’s blog post I’ll address the debate and the impact of your choice on reading and spelling. I’ll also make recommendations for best teaching practice.
The Argument for Teaching Upper Case First
The ‘upper case first’ camp believe that ‘capitals’ are easier to identify, differentiate, and draw. They have a simpler visual structure than lower case letters. The only letters that are likely to cause orientation-based confusion are ‘M’ and ‘W’. The ‘capitals’ are predominantly formed with straight strokes (which are developmentally easier to draw than curves) and are all written on the lines on lined paper.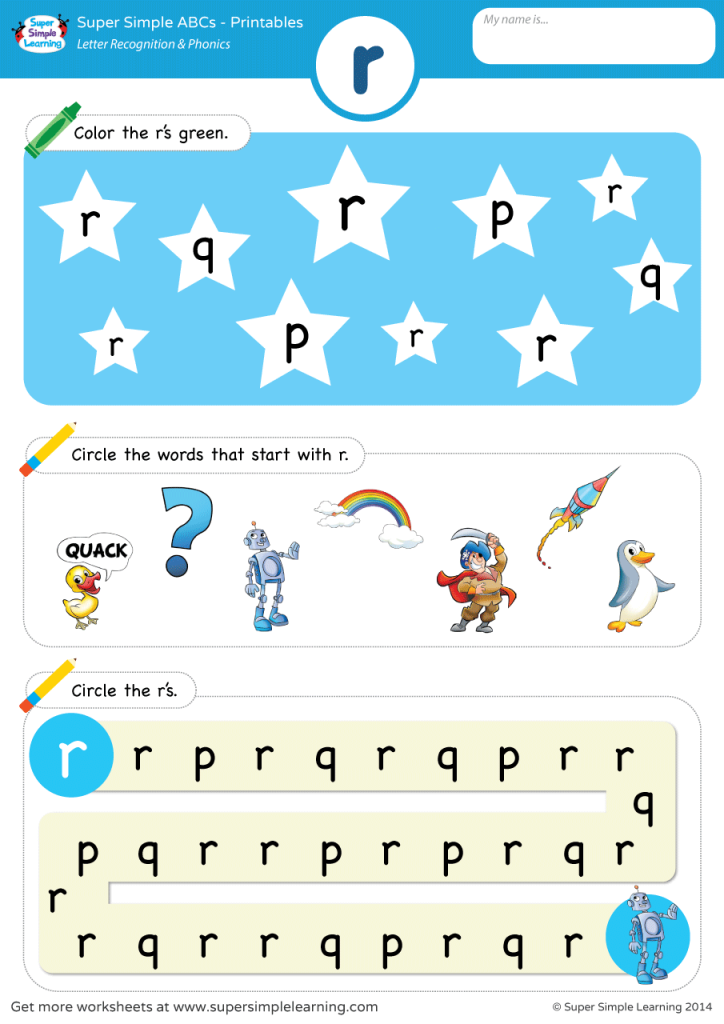 Upper case letters are relatively common in environmental print e.g. street signs.
Certainly, research (Worder & Boetcher, 1990) suggests that young children usually recognise more upper case letters than lower case, have a preference for upper case writing and write upper case letters better than lower case between the ages of 4 and 6. But is that because so many carers teach children to recognise and use upper case letters before they even start formal schooling?
The Argument for Teaching Lower Case First
I would argue that the practice of teaching upper case letters first, because they are considered ‘easier’, is more of a ‘societal tradition’ than sound educational practice. Upper case letters have minimal connection to early literacy skills; 95% of written text is in lower case letters. When children’s parents read books to them or when they attempt to read for themselves, children will not typically see text written in upper case. Visual recognition of lower case letters will be more helpful than that of upper case. This is why Phonics Hero teaches lower case letters in isolation and in isolated words (get access to free resources when you sign up for a Teacher Account).
How to Link Sounds to the Lower Case Letters:
- It is important when talking about the lower case letters, to refer to the letter sounds: “When your eyes see this letter, your mouth says ___”.
- Rather than begin with the order of the alphabet, it makes sense to teach the letters that appear most frequently first. Phonics Hero’s games come in two orders of sounds, the first letters to be taught are either:
- When the first letter-sound correspondences are mastered (i.e. the alphabet sounds), other sounds represented by a letter can be introduced, e.g. the ‘e’ of bed vs the ‘e’ of ‘he’.
- If you choose the Playing with Sounds order, our no-prep Phonics Lessons can guide you through how to teach the sounds and their connection to lower case letters.
 See a guide tour of a ‘sounds lesson’ here:
When to Teach the Upper Case
Beginning of names and sentences
The upper case letters have a special, important job and should be taught in context. They show the start of a sentence or a name. ‘Capitals’ are best taught initially as the first letter in a child’s name. They are often the first and only capital letter in product names and shop signs so attention can also be drawn to them here. A name is usually only written completely in upper case when it has to be seen from a significant distance. Once the child is able to read or write a sentence, attention should be drawn to the need for an upper case letter at the beginning.
Remember, unlearning is harder than learning
If we initially teach a child to write words all in upper case, we have to later teach him that it was actually totally incorrect practice and try to get him to ‘unlearn’ it. Learning is much easier than ‘unlearning’. This is why many students continue to use capitals incorrectly in words. Many programs, including Phonics Hero, use lower case letters to teach letter-sound correspondences and upper case letters to teach alphabet letter names.
This is because knowledge of the alphabet names does not help the child to ‘sound out’ words but will become useful when describing a spelling such as the ‘c’, ‘k’ or ‘ck’ spelling of the sound /k/.
Are upper case letters easier to write?
One argument people make for teaching upper case letters first is that they’re easier to form, but, actually, all of the types of hand movements are required by both upper and lower case. Upper case letters have more starting points and require more strokes/pencil pick ups, so are actually harder than lower case to draw. There are more diagonals in upper case letters, which is developmentally challenging. Consequently, it makes perfect sense to start writing with lower case letters. If cursive writing is being taught from the outset, it makes even more sense.
Linking Upper and Lower Case Letters
Logic suggests that we should build the essential foundations of sound and shape first, then add the ancillary concepts, such as capital letters and letter names. When you need to teach upper case letters for writing, explicitly teach them as ‘partners’, side by side. Provide a wall display and desk mat with both upper and lower case letters shown next to a relevant picture the child will recognise, like below. Many alphabet books, such as Dr Seuss’ ABC do this.
Multisensory ideas in making the link between lower and uppercase letters:
- Play board games such as Bingo for letter or letter-sound matching.
- Play partner matching games that involve movement, i.e. one half of class with upper case and one half with lower. Children must silently find their partner.
- Do plastic/magnetic letter sorts that involve the child feeling in 3D the shape of the letters.
- Get the child to make the letters with pipe cleaners, dough etc, saying the corresponding sound as each is completed.
- Have the child do letter/sound/lower case/upper case searches in mazes or text.
- As traditional keyboards show upper case but type lower case (unless Caps Lock is used), they can be used as tools to develop memory of the upper/lower case link.
- Have the child do air writing, letter tracing then copying on paper with the lower case and upper case alternated, drawing the upper case with gross movement in the air, in sand etc.
If you’re on board with teaching lower case letters first, the next question becomes: at what point do you teach the letter names and their capital letters? We’ve pinpointed the sweet point in our blog post: When to Teach Letter Names.
Author: Shirley Houston
With a Masters degree in Special Education, Shirley has been teaching children and training teachers in Australia for over 30 years. Working with children with learning difficulties, Shirley champions the importance of teaching phonics systematically and to mastery in mainstream classrooms. If you are interested in Shirley’s help as a literacy trainer for your school, drop the team an email on [email protected]Learning lowercase letters q and u | Presentation of a lesson for an interactive whiteboard in Russian on the topic:
Topic: Writing lowercase letters c, sh.
Objectives:
educational:
- to form an idea of the sounds u u ts about the letters denoting these sounds in writing, to teach how to write these letters;
educational:
- to educate accuracy, respect for things; develop the ability to work in a group and team;
developing:
- develop speech, thinking, attention, memory, spelling vigilance.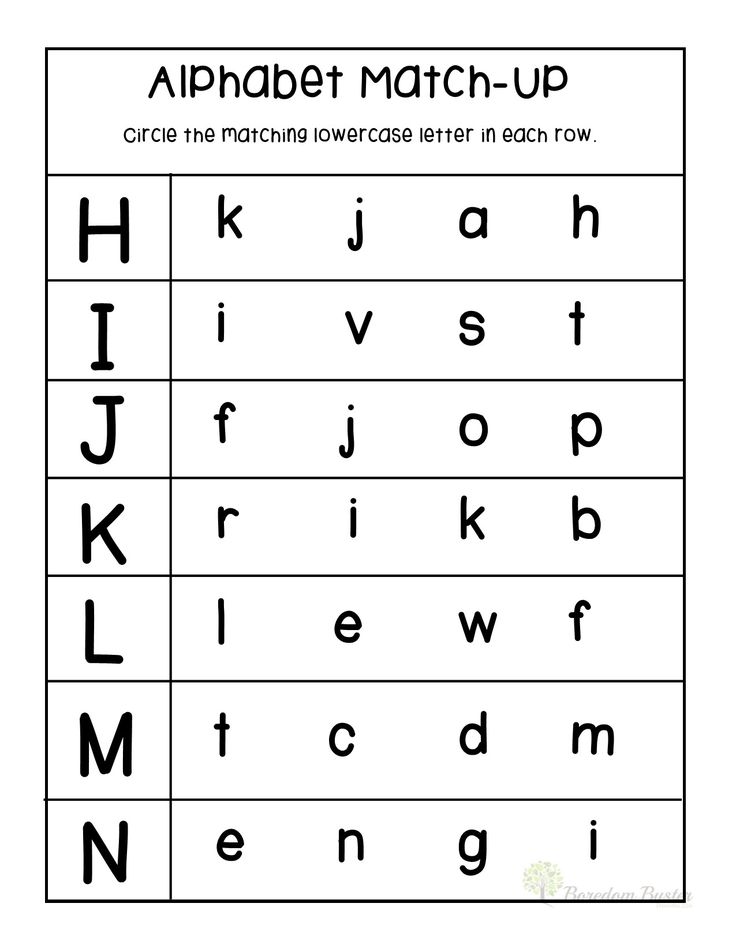
Equipment: drawing of a puppy and a chicken, instructions, presentation.
Lesson progress.
- Organizational moment.
- Setting the topic and objectives of the lesson.
- Helpers came to our lesson today.
- Who are they? (Puppy and chicken)
- What is the first letter in the word "chicken"? What is the first letter in the word puppy?
(letter c, w)
- Correct. What do you think is the topic of our today's lesson?
(Children's guesses) Today you will learn how to write lowercase letters q and u, learn about what sounds these letters have.
- Learning new material.
- Sound-letter work.
- Let's look at the sounds that these letters stand for in the words "chicken" and "puppy". And we will work according to the plan:
1 - Vowel ? Consonant
2 - Double ? Unpaired
3 - Voiced ? Silent
4 - Hard ? Soft
(The plan is written on the board and on the students' desks in the form of a memo)
- Think of words that contain the letter c.
(Words are analyzed in terms of the hardness-softness of the sounds that the letter c has).
- Formulate a conclusion.
- Think of words that contain the letter u.
(Words are analyzed in terms of the hardness-softness of the sounds that the letter u has).
- What conclusion can be drawn?
(The letter u has only a soft sound u)
- Open the copybook on page 25, find the "little men" - the letter c and the letter u. How should they be arranged?
(We will put on the letter ts in blue shoes, because it always has a hard sound ts, there will be a cylinder on the head, since it is deaf; the letter u will be in green shoes, because it has only a soft sound u u, on the head - a cylinder, so how deaf she is)
(Children draw letters)
- Graphical analysis of the written letters q and u. Writing letters.
- What letter do the letters c and u look like?
(On letters i and w)
- Which element is added?
(Small loop)
- Correct.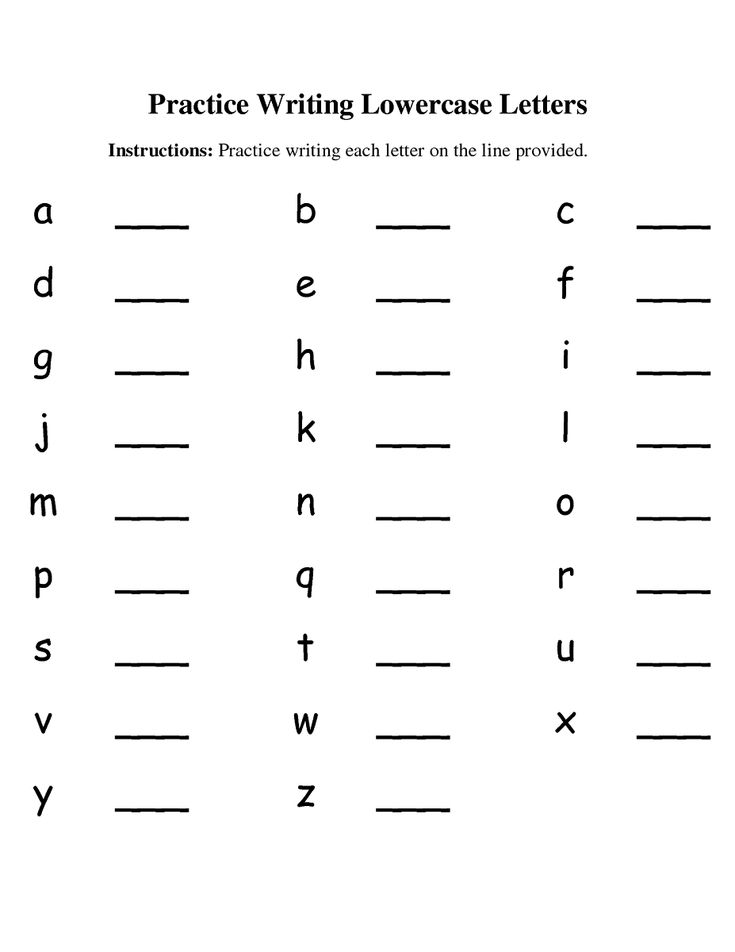
(The teacher shows the spelling of the letter q on the blackboard)
- I start writing from the middle of the working line, draw a straight oblique line, finish writing to the bottom line of the working line, round to the right, lead up to the middle of the working line, return along the written down to the bottom line working line, round to the right, write a loop down like the letter y, smaller in size. Write this letter on your palm with your index finger.
(Children complete the task)
- How many elements does the letter q consist of?
(Of two)
- What rules should always be remembered in order to write beautifully?
(Repetition of the rules of writing)
- Write this letter first along the light lines, then independently to the end of the line.
(Children complete the task)
(After completing the task, the teacher shows the letter u to be written on the blackboard) of the working line, I return along the written down to the bottom line of the working line, round to the right, lead up to the middle of the working line, return along the written down to the bottom line of the working line, round to the right, write a loop down like the letter y, smaller in size.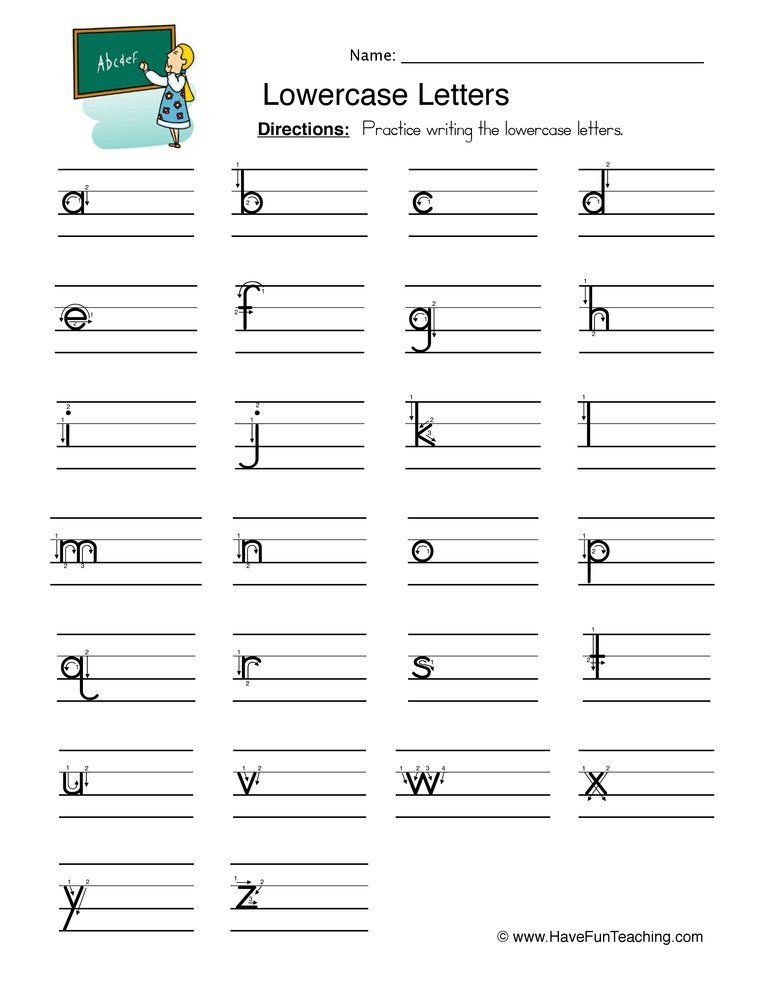 Write this letter on your palm with your index finger.
(Children complete the task)
- How many elements does the letter u consist of?
(Out of three)
- Write this letter first along the light lines, then independently until the end of the line.
(Children do the task)
Physical education minute.
What is it that we hear?
It's rain on the roof.
And now he went harder
And hits the roof faster.
- Recording of syllables with letters q and sh.
- Read the combinations with the letters q and u. Find those combinations that you need to remember.
(Scha, shu)
- Write on the next line only the combinations you need to remember.
(Children do the task)
Physical education minute.
- If the word is in the singular - stomp your foot once, if in the plural - clap your hands once. (Words: boots, apple, axe, berries, basket, tomatoes, drum, sheep, dog)
- Guys, what is special about all these words?
(These words must be memorized)
- Composing words with the combination tsa at the end of the word.
- Guys, why do you think the assistants came to our lesson?
(Children's suggestions)
- Helpers came with tasks.
(Working with an interactive whiteboard, chicken task).
- Look what an interesting flower the chick brought. Let's read the words that are written on the flower.
(Tit, street, bird, chicken, button).
- How many things does each word represent? (One).
- Change the word to mean many things.
(Tits, streets, birds, chickens, buttons).
- Let's write these words in copybook.
- Underline the combination of tsy with one line.
- Make a sentence with one of these words.
(Children voice their sentences)
- Let's make a diagram of one of the sentences
IV. Repetition of the studied material.
- The puppy also brought a task with him.
(Assignment in an envelope in the paws of a puppy)
- Guess the riddle and write down the answer.
We must walk,
We can wake up early.
We know how to beat, but not you,
We beat every hour.
(Hours).
- Guys, what rule should be remembered in order not to make a mistake in writing this word?
(Write with a)
- Divide this word into syllables.
(Watch).
- Let's write this word down from dictation.
(Children write down the word from dictation).
- Next riddle:
I puff, puff, puff,
I don't want to get warm anymore.
The lid clanged loudly:
“Drink tea, the water has boiled!”
(Kettle).
- Divide this word into syllables.
(Tea-nick).
- Let's write this word down from dictation.
(Children write down the word from dictation).
- Think of words with the combination shcha.
(Two words of choice are written down under dictation).
- Consolidation of the studied material.
Writing words from a printed sample p. 25.
25.
- Read the words to yourself. What questions do they answer?
(Who? What?)
- Emphasize the words.
(Children do the task, then the test follows)
- Write these words yourself.
(Children do the task).
- Summary of the lesson.
- What letters did you learn in the lesson?
- What sounds do they represent?
- How many elements does the letter q consist of?
- How many elements does the letter u consist of?
- Thank you for your work in the lesson… (Teacher calls out names and presents flowers)
CAPITAL AND SMALL LETTER Y, y
LETTER CAPITAL AND SMALL LETTER Y at
Objectives: to learn to write capital and small letters U , at ; reinforce writing skills; develop speech, imaginative thinking, phonemic hearing; enrich children's vocabulary.
Lesson progress
I. Introduction teachers. Updating of basic knowledge.
Game Find a Pair.
What can you say about these letters? What are they?
- What vowels are written after a hard consonant? (Letters a, o .) What vowels are written after soft consonant? (Letters i, ё .)
- Today we will learn to write the letter Y . What sound does this letter represent?
- You're right, vowel sound. It can be sung low and high, thick and thin voice. Let's try together!
The kettle is on the stove.
The teapot makes a thin voice: woo!
WOLF AND KOMARIK
Wolf caught a mosquito,
He broke his nose with his paw: woo!
Wait, mosquito, I'm asking (ooh),
I scratch my forehead (woo)!
II. Learning new material.
1. Work according to prescription.
The letter Y will remind you of ears
At the bunny on top.
The snail has horns too
So the letter Y are similar!
Let's draw a bough to the trunk -
And we will see the letter Y .
charcoal drawing,
Stick to stick - corner.
Corner. Coal. At we hear.
At we will write at the beginning of the words.
- About which letter - printed or written - is it said in a poem? Compare printed and written letters W . How are they similar?
2. Working with the sample capital letter Y .
– Consider the sample capital letter Y . Describe the direction of movement of the hand when writing the letter Y .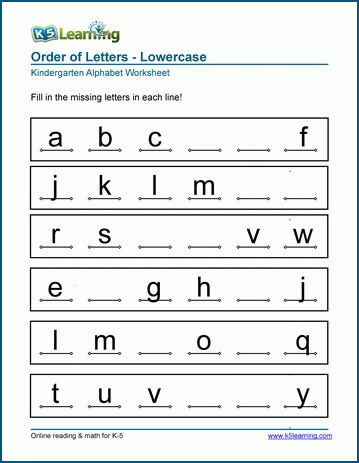 (Letter U consists of two elements. We start writing just below the middle of the wide auxiliary line. We lead the hand up to the right, round off, we lead the inclined line down to the bottom line of the working line. Near bringing to the top line of the working line, round to the right, bring to the top lines of the working line, we lead a little to the right up.
The second element must be at the same level as first. We lead down an inclined line. Almost reaching the bottom line of the working lines, round to the right and slightly rise above the bottom line of the working line.)
- Record these items in air; in a notebook.
- Independently circle and add letters on the 1-5th lines. (Teacher provides individual assistance to students.)
3. Reading letters and words.
Written on the board are lowercase letters a , y and words y , y . The teacher reads poetry, the children at his command read letters and words in unison.
MASHA GOT LOST
Masha is crying: ... ( а-а-а ),
And the wolf ... ( woo )!
Mashenka is scared in the forest,
Let's call her - ... ( ау )!
And we have a girl,
Her name is Alyonushka,
Chorus girl,
Round head.
All day ... ("wah-wah") -
That's all her words.
- Read the "words" written on the next line. Pay attention to the connection of letters.
4. Game "Collect the letter".
- Consider the elements of letters. Think what letters "crumbled". On an empty line, write the letters that can be built from these elements.
Independent work of students.
physical minute.
Wind d y et, howling: "Oooo!"
Our mill is spinning: "Vzh-vzh-vzh!"
One, two, three, four -
Twisted, twirled.
(Forward bends, arms to the sides.)
5. Working with the lowercase letter pattern at .
– Consider the lowercase letter pattern y . Compare capital and small letters. Are they the same or different are written? Tell us about the direction of movement of the hand when writing the letter y . (The letter consists of two elements. The first element is a short stick with rounded at the bottom. We start writing from the top line of the working line, leading down. Slightly not bringing to the bottom line of the working line, round to the right, bring to the bottom line, draw a line up to the right to the top line of the working line.
The second element is a stick with a loop at the bottom. Second element We start writing from the top line of the working line. We lead down a long stick, then by moving the hand to the left we write a loop, it should be small. The loop intersects with an inclined stick necessarily on the bottom line of the working line. We finish writing in the middle of the working line.)
prescription the second element of the lowercase letter y .
- Independently circle and add letters on the 1-4th lines. (Teacher provides individual assistance to students.)
6. Writing letters in words.
- Look at the pictures.