Pre reading activities pdf
15 Examples of Pre-Reading Activities
Today you are going to learn about 15 pre-reading activities that you can use to start your reading lessons on the right foot.
When reading is taught, teachers usually follow a framework to teach a lesson, that framework has three stages:
| The Pre-reading stage |
| The While-Reading stage |
| The Post-Reading Stage |
The Warm-up and the 3 stages made up what is known as the Stages of a Reading Lesson.
The Pre-Reading section consists of activities and exercises to prepare students before they do the actual reading
Let’s Learn some about why and how these activities contribute to the process of reading
Table of Contents
- 1 Why are Pre-Reading Activities Important?
- 2 Pre-Reading Activities for the Classroom
- 2.1 Pre-Reading Task #1: Discussion
- 2.2 Pre-Reading Task #2: I’m listening to You
- 2.
3 Pre-Reading Task #3: Quotes
- 2.4 Pre-Reading Task #4: Guessing from Words
- 2.5 Pre-Reading Task #5: Guessing from Pictures
- 2.6 Pre-Reading Task #6: Pictionary
- 2.7 Pre-Reading Task #7: Guessing from sentences
- 2.8 Pre-Reading Task #8: How many words do you know?
- 2.9 Pre-Reading Task #9: Speed chatting
- 2.10 Pre-Reading Task #10: Videos
- 2.11 Pre-Reading Task #11: Brainstorming
- 2.12 Pre-Reading Task #12:True or False
- 2.13 Pre-Reading Task #13: Introducing Vocabulary
- 2.14 Pre-Reading Task #14: KWL Charts
- 2.15 Pre-Reading Task #15: Debate
- 2.16 Pre-Reading Task #16: Pronunciation Tasks
- 3 More Teaching English Articles
Why are Pre-Reading Activities Important?
Pre-reading activities play an important role in a reading lesson.
Every reading lesson should start with activities to activate background knowledge and a series of activities to prepare students for the reading.
Pre-reading activities help students prepare for the reading activity by activating the relevant schemata and motivating them to read.
Pre-reading activities can also help learners anticipate the topic, vocabulary, and possibly important grammar structures in the texts.
Not doing pre-reading tasks will lead to students:
- Getting frustrated about know vocabulary
- Completing for no other reason than completing classwork
You have a lot to gain by teaching reading how it has been proven to work.
Pre-Reading Activities for the Classroom
There are many pre-reading activities that you can do in the classroom. More than we can even think of
Creativity leads to the creation of more activities to suit the needs and interests of a diverse community.
Here are some pre-reading activities that you can implement or modify to meet your student’s needs.
Pre-Reading Task #1: Discussion
The first pre-reading activity is about creating a discussion about the topic.
The Teacher prepares 4 sentences expressing opinions about the topic, then sticks them in the 4 corners of the classroom.
Students go and stand near the opinion they disagree with the most.
The groups explain why the disagree with the opinion.
Then students stand near the opinion they agree with the most and have a short discussion about it.
Pre-Reading Task #2: I’m listening to You
The second pre-listening task can help teachers promote oral interaction in the class.
This activity is called: “I am Listening to You”
This activity requires students to work in pairs. One of them talks while his or her partner listens for 1 minute about a topic.
Repeat with a new topic, students change roles and they can change partners after they have spoken and listened to each other.
Pre-Reading Task #3: Quotes
The third activity requires the use of quotes, you can choose quotes from great books or films
Good Reads, a very popular site for readers has a good list of quotes that you can choose from.
Find a quotation about the topic that you are going to cover and tell students to make groups of three and discuss the quotes you chose.
Students think about and answer questions like these:
- What does it mean?
- Do they agree with it? Why/Why not?
Note: Students can even bring their own quotes to the classroom
Pre-Reading Task #4: Guessing from Words
Before students look at the text they are going to read, the teacher writes 5 or 6 words from the text on the board and asks the students to guess the topic.
Students brainstorm ideas that could be written on the whiteboard for everyone to see and remember.
Additionally, the teacher can take a poll to see if students like ideas brainstormed by other students.
Finally, the teacher confirms how close or far they were.
Pre-Reading Task #5: Guessing from Pictures
The teacher finds 3 pictures or objects which are connected to the story or reading.
The teacher asks how those pictures and images are connected.
Finally, students read the text and check if they were right or wrong about the story connections they made.
Pre-Reading Task #6: Pictionary
Select some of the key words from the text.
Divide the class into two or three groups.
A learner from each group (at the same time) comes to the whiteboard.
They are told the word and they have to draw that word. They are not allowed to use letters or numbers in their drawing.
The other students try to guess what the word is and thus earn points for their team.
Pre-Reading Task #7: Guessing from sentences
The teacher dictates 3 sentences from the reading passage. Students write them down and check with a friend if they are correct.
The sentences are written on the board if necessary as a final check.
Then the teacher asks how these sentences might be connected.
Students predict and then read the text quickly to check their predictions.
Pre-Reading Task #8: How many words do you know?
The teacher prepares the board by writing the letters of the alphabet in 3 or 4 columns.
The students form two lines standing behind each other.
Use 2 colored markers so you know which team wrote what. The first student at the front of each team gets the board marker.
The teacher introduces a topic to the class.
The 2 students move to the board and write one word related to the topic on the board next to the letter it begins with, then pass the marker to the next student in their team and go to the back of the queue.
The 2 teams compete to write as many words as possible on the board in 3 minutes.
The team with the largest number of appropriate and correctly spelled answers wins!
Pre-Reading Task #9: Speed chatting
Prepare one or two simple questions related to the topic of the reading.
Ask the class to make two rows facing each other.
Then, encourage your learners to ask each other questions about the topic, but warn them that they only have 60 seconds to do so.
Once the 60 seconds are up, one of the rows rotates so each learner has a new partner.
Repeat the process several times.
Pre-Reading Task #10: Videos
There is so much good free content available these days. First, find a short video relating to the topic of the reading.
I would suggest something around three minutes long.
After watching the video yourself, prepare some simple discussion questions.
Play the video and then ask the students to talk with a partner about what they watched.
Pre-Reading Task #11: Brainstorming
The teacher gives the title of the reading to the learners and students have to share all their knowledge about the topic.
The goal of this activity is to help learners create expectations about what they are about to read and then see if their expectations were met.
For example,
If you have to teach about the influence of social media on teenagers, students can take turns and talk about the topic,
When they read the passage, they confirm their expectations.
Pre-Reading Task #12:True or False
Let’s take the example of the influence of social media on teenagers again.
You can come to the classroom and read a few statements and ask them if they think those statements are true or false.
Don’t reveal the answers.
Let them confirm if they were right or wrong when they are reading the text.
Pre-Reading Task #13: Introducing Vocabulary
In the context of an ESL Classroom, it will always be important to introduce key vocabulary so students don’t get discouraged by unknown words while they read.
Introducing vocabulary doesn’t have to be a boring task.
You can easily create a wordle with key vocabulary and see if students can tell you something about those words.
Another tool that can help you provide and study vocabulary is Wordwall.
Pre-Reading Task #14: KWL Charts
Have you ever used KWL Charts in the classrooms?
KWL Charts are simple.
Just have students write everything they know about the topic (K column) and everything they want to know (W column) and what they learned after the reading (L Column)
Pre-Reading Task #15: Debate
Prepare some controversial quotes related to the topic they are about to read.
Show the quotes to the learners and ask students to comment on them.
Ask how students feel about them.
Ask the class to comment on opposite views held by other learners.
Pre-Reading Task #16: Pronunciation Tasks
Another way to introduce vocabulary is to give students some words transcribed phonetically.
You can take the phonetic transcriptions from the Cambridge Online Dictionary.
You can use several online tools to show the phonetic transcriptions to your learners.
I use Wordwall (Random cards), alternatively, you can use Quizlet.
Students make groups of 3 and analyze what those words are and how they are related to the topic.
More Teaching English Articles
Remember that the pre-reading stage is the first of three stages, you should learn what types of while-reading activities you can do in the classroom and also the most common types of after-reading strategies.
When you manage all of them, your reading lessons will succeed
These are some posts that you might be interested in:
- Presentation, Practice, and Production
- Teacher-centered Methodology
- Student- centered Methodology
- Stages for Teaching Listening
- 19 Types of Pre-Listening Activities
- 10 Types of Post-Listening Activities
- 12 Examples of While-Listening Activities
If you have questions about pre-reading tasks, you can message me via Facebook or Twitter
10 Pre-reading Activities for THE GREAT GATSBY
Prime your class for engagement and achievement with The Great Gatsby pre-reading activities. Even advanced students benefit from an insightful introduction when starting an unfamiliar text. Select the pre-reading lessons / worksheets that best align to your instructional goals.
Overview:
The Great Gatsby Pre-reading Activities1. Introductory Slideshow
2. Anticipation Guide
3. Primary Source Gallery: The Roaring Twenties
4. Symbolism Refresher Activity
5. Unreliable Narrators (and How to Spot Them)
6. What does Modernism look like? (fine art activity)
7. Party like Gatsby (budget activity)
8. Style Preview
9. Historical Context Articles (nonfiction)
10. Personal Essay: Friends and Frenemies
1) Introductory Slideshow
Give students a helpful preview of the story and identify key literary concepts and elements. The Great Gatsby Pre-reading PowerPoint contains 35 slides introducing the characters, setting, historical context, theme subjects, and Fitzgerald’s style.
This resource is available in PDF or the larger PowerPoint file (PPTX). The slideshow introduces the characters and the initial situation, but it does not spoil the plot events. You may also want to use the notes worksheet that accompanies the presentation.
2) Anticipation Guide
How can you subtly introduce a novel’s theme subjects while still allowing the students to receive the author’s messages organically as they read? Anticipation guides prompt thought-provoking discussions on key theme subjects without establishing the ultimate themes developed by the text.
Students appreciate the opportunity to share their own views on life and human nature before considering the perspectives of the author. For example, students can discuss their opinions regarding wealth and privilege without knowing the corresponding message developed in The Great Gatsby.
Anticipation-Guide-THE-GREAT-GATSBY
GG Anticipation Guide PDF
Each statement in the anticipation guide correlates to a major theme in the novel. There are ten prompts on this one-page worksheet (PDF). Read on for more pre-reading questions and activities.
3) Primary Source Gallery: The Roaring Twenties
This pre-reading activity gets students exploring historical context by asking them to apply critical thinking skills to primary source visuals. Each group will study, analyze, and research one primary source image from “The Roaring Twenties Gallery” in order to share their findings and analysis with the class.
Pre-reading Activity PDF: The Roaring Twenties Gallery
Group presentations should explain…
- Relevant terms
- The subject and revealing details
- Context (How does it fit within the history of the era?)
- Purpose and audience (You may have to make reasonable guesses.
 )
) - Informative details from your research
- Possible connections to The Great Gatsby
4) Symbolism Refresher Activity
Fitzgerald uses symbolism extensively and to profound effect. This The Great Gatsby pre-reading activity prepares students to trace the development of meanings intertwined with the green light, the Valley of Ashes, Gatsby’s car, the geography of Long Island, the billboard of Dr. T.J. Eckleburg, and the rest.
Symbols and Famous Titles Challenge!
- Each slide will display a symbol from a famous title.
- Be first to call out the title (movie, book, or poem) and you win.
- For super-secret-mega-bonus points, identify a larger meaning behind the symbol.
Symbols and Famous Titles PDF or PPT
You might conclude that your students would benefit from a more extensive review of symbolism. Assign a short story for students to analyze with an emphasis on major symbols. The worksheet shown below is not specific to any one story.
Symbolism Practice Handout
Short story suggestions:
- “Marigolds” by Eugenia W. Collier (5 pages)—easy
- “Everyday Use” (8 pages) by Alice Walker—moderate
- “A White Heron” by Sarah Orne Jewett (7 pages)—moderate
- “The Minister’s Black Veil” by Nathaniel Hawthorne (12 pages)—challenging
5) Unreliable Narrators (and How to Spot Them)
It may be necessary to establish that narration should often be taken with a grain of salt. The lesson that follows reminds students to think critically about the point of view as they read.
- What is the narrator’s tone?
- Does the narrator take different tones toward certain subjects or people?
- What information do they emphasize?
- Is any information omitted?
- What motivates the narrator to share the story?
Note: This The Great Gatsby pre-reading lesson may be unnecessary for savvy readers.
Into:
Can you trust the source? This question is important when conducting research, but it is also important in reading fiction. Can you think of any instances in stories (including movies) where the narration turned out to be less than trustworthy?
The narrator might not understand the truth or they may perceive the events through a personal bias. The result might be as minor as diminishing certain details or as major as fabricating the entire story.
Helpful clip: “Who Can you Trust? Unreliable Narrators” (8 minutes) from PBS Digital.
Through:Read the narrative carefully in order to evaluate the reliability of the narrator. Is the narrator trustworthy and fair? How much should we believe?
Story suggestions:
- “The Cask of Amontillado” (5 pages) by Edgar Allen Poe – EASY
- “An Occurrence at Owl Creek Bridge” (10 Pages) by A.
 Pierce – MODERATE
 - “The Yellow Wallpaper” (15 pages) by Charlotte P. Gilman – CHALLENGING
Nick Carraway narrates The Great Gatsby and provides our only access to the details of the places, people, and events. How much faith should we place in his telling?
Think about what Nick says on the first page. What does he want us to think of him?
… In consequence I’m inclined to reserve all judgments, a habit that has opened up many curious natures to me and also made me the victim of not a few veteran bores. The abnormal mind is quick to detect and attach itself to this quality when it appears in a normal person, and so it came about that in college I was unjustly accused of being a politician, because I was privy to the secret griefs of wild, unknown men. Most of the confidences were unsought—frequently I have feigned sleep, preoccupation, or a hostile levity when I realized by some unmistakable sign that an intimate revelation was quivering on the horizon—for the intimate revelations of young men or at least the terms in which they express them are usually plagiaristic and marred by obvious suppressions. Reserving judgments is a matter of infinite hope. I am still a little afraid of missing something if I forget that, as my father snobbishly suggested, and I snobbishly repeat a sense of the fundamental decencies is parceled out unequally at birth.
And, after boasting this way of my tolerance, I come to the admission that it has a limit.
6) What does Modernism look like?
What is Romanticism? What is Realism? What is Modernism? Fine art can provide an engaging access point for students learning about literary movements. For many students visual representations mean more than lists of definitions. In this activity, recognizing Modernism in fine art creates a stepping stone for students learning about Modernism in literature.
The Great Gatsby Introduction Activity: Modernism in Art
Into:What comes to mind when you think of the word “modern?”
What might the word modern mean when talking about art or literature?
Through:Many creative works can be viewed as part of a larger artistic movement. For example, the famed revenge tale The Count of Monte Cristo is an example of Romanticism. Literature experts view The Great Gatsby as a work of Modernism.
What does that mean?
Realism (circa 1850-1900): An artistic movement portraying realistic people and relatable experiences. Includes familiar places and flawed people (often from the lower classes). Developed as a response to Romanticism.
Modernism (circa 1900-1950): A break with the past and a period of experimentation associated with the period after World War I. Modernists felt a growing alienation from Victorian morality, optimism, and convention. The horrors and consequences of WWI undermined humankind’s faith in the foundations of Western society. Modernists reflect a sense of disillusionment and fragmentation.
Industrialization, urbanization, globalized capitalism, rapid social change, and advances in science, psychology, and political theory characterized the era. As a result, artists and writers explored new approaches and forms of expression.
OK, but what do these fancy ideas look like?
We will visualize Modernism by analyzing examples in fine art. Start with a specific painting to guide your exploration. Be prepared to share the work and your knowledge with the class.
After familiarizing yourself with the work and its importance, explain the…
- Title and medium
- Author (and biography if relevant)
- Subject (and treatment)
- Artistic movement
- Modernism elements
- Message or Mood
- Techniques (creating emphasis)
- Related works or artists (This could include performances, architecture, consumer goods, etc.)
Note: Artistic movements do not follow orderly timelines. You will see elements of Modernism prior to WWI and elements of realism in modern art. Just go with it.
Related Post: The Great Gatsby Unit Plan: 23 Lessons and Materials
7) Party like Gatsby (budget activity)
The roaring, hedonistic, lavish parties hosted by Jay Gatsby have fascinated generations of readers, but what such an event cost? This activity asks students to create a budget (in today’s dollars) for a Gatsby-esque party.
The original lesson follows reading #1 (Chapters 1-3) of the unit, but it could also be a fun way to introduce the novel’s iconic party settings and descriptions. To use as a pre-reading activity, share party clips from a film adaptation or excerpts from the beginning of Chapter 3.
Clip: “The Great Gatsby 2013 Party Scene” (5 minutes) from Warner Bros.
From Chapter 3:
At least once a fortnight a corps of caterers came down with several hundred feet of canvas and enough coloured lights to make a Christmas tree of Gatsby’s enormous garden. On buffet tables, garnished with glistening hors-d’oeuvre, spiced baked hams crowded against salads of harlequin designs and pastry pigs and turkeys bewitched to a dark gold. In the main hall a bar with a real brass rail was set up, and stocked with gins and liquors and with cordials so long forgotten that most of his female guests were too young to know one from another.
By seven o’clock the orchestra has arrived, no thin five-piece affair, but a whole pitful of oboes and trombones and saxophones and viols and cornets and piccolos, and low and high drums. The last swimmers have come in from the beach now and are dressing upstairs; the cars from New York are parked five deep in the drive, and already the halls and salons and verandas are gaudy with primary colours, and hair bobbed in strange new ways, and shawls beyond the dreams of Castile. The bar is in full swing, and floating rounds of cocktails permeate the garden outside, until the air is alive with chatter and laughter, and casual innuendo and introductions forgotten on the spot, and enthusiastic meetings between women who never knew each other’s names.
8) Style Preview
Students may initially be overwhelmed or confused by Fitzgerald’s use of language. Mediate this challenge by preparing the students with key excerpts from the novel or shorter works by the author.
Moonspell-activity
“The Ice Palace” by F. Scott Fitzgerald (1920)
Southern socialite Sally Carrol Happer is bored with her predictable life. Her friends are surprised and dismayed to learn that she is engaged to Harry Bellamy, an unknown Yankee. She brushes off their concerns; she intends to live a new life on a large scale.
“Babylon Revisited” by F. Scott Fitzgerald (1931)
This story is set in the year after the stock market crash of 1929. Flashbacks give insight into the protagonist’s life back in the Jazz Age. It includes several references to the Great Depression and how the protagonist has had to adapt to changes in fortune.
“Winter Dreams” by F. Scott Fitzgerald (1922)
Teenage Dexter works part-time as a caddie at a golf club. On the job he meets a rich and spoiled girl named Judy Jones. He quits the job to avoid serving as Judy’s caddie; he cannot accept being one of her servants. Their paths cross again as they age.
“The Curious Case of Benjamin Button” by F. Scott Fitzgerald (1922)
Benjamin is born an old man and ages in reverse until he becomes a baby. Fitzgerald wrote, “This story was inspired by a remark of Mark Twain’s to the effect that it was a pity that the best part of life came at the beginning and the worst part at the end.”
“Bernice Bobs Her Hair” by F. Scott Fitzgerald (1920)
Marjorie makes it clear that her visiting cousin, Bernice, is a detriment to her social life. Bernice does not have the grace and charisma to keep men’s attention. Bernice takes her cousin’s advice to become more alluring, but the advice comes at a price.
The Offshore Pirate” by F. Scott Fitzgerald (1920)
Ardita Farnam is on a trip to Florida. When her boat is captured by pirates, she falls in love with the captain. This story originally ended with the weak explanation that it was all a dream.
“The Jelly Bean” by F. Scott Fitzgerald (1922)
A young man becomes a delivery boy after his father’s untimely death and soon descends into the seedier side of life and its cheap thrills. He becomes ashamed of his reputation as a “Jelly Bean” when he meets woman who makes him want more from life.
9) Historical Context Articles (nonfiction)
Incorporate nonfiction texts and explore historical context with these relevant articles. For this The Great Gatsby pre-reading activity you might have the entire class read the same article or assign student groups different articles. If time allows, student groups can share what they learned with the class.
Think about our society today.
- What are the strengths and successes of our society today?
- What are the pitfalls or shortcomings of our society today?
The Great Gatsby is an entertaining story that is also a critique American society. To understand Fitzgerald’s views on American society in the 1920s, we must have some understanding of the historical context. What must we understand about the era known as “The Jazz Age?”
- Helpful clip: “The Roaring 20’s” (13 minutes) from CrashCourse
- Fun clip: “Jazz Age Dance Moves” (3 minutes) from Vintage Swing Dance
- “What Caused the Roaring Twenties? Not the End of a Pandemic (Probably)” by Lila Thulin
- “The Lost Generation” by Mike Kubic
- “World War I and the Great Migration” from U.
 S. House of Representatives
 - “Jazz Age New York” by Caelynn Robinson
- “The Soaring 20s” from Forbes Magazine
- “A New African American Identity: The Harlem Renaissance” from NMAAHC
- “The Roaring Twenties” by Mike Kubic
- “The 19th Amendment at 100” by Alex Cohen
- “Flappers in the Roaring Twenties” by Jennifer Rosenberg
- “Henry Ford and the Auto Assembly Line” by Jennifer Goss
- “Unintended Consequences” by Michael Lerner
10) Personal Essay: Friends and Frenemies
One of the most confounding aspects of adulthood is the complexity of friendship. High school students recognize this issue as their relationships develop, change, and sometimes dissolve. Before exposing students to the iconic frenemies found in The Greet Gatsby, encourage them to reflect on friendship in a personal essay.
Writing Task:
In The Great Gatsby you will meet a memorable circle of friends. Some of these “friendships” are not exactly healthy or supportive. Explain your views on friendship in the form of a personal essay. You can take this topic in any direction you choose. Support your ideas with details and examples from your experience.
NOTE: Personal, but not too personal! Do not share anything that you want to keep private!
To start thinking about your views on friendship, consider the following:
- What are the different forms of friendship that you see in life?
- What personal experiences have influenced your views on friendship?
- How are adult friendships different than childhood friendships?
- Can you be friends with someone that you do not respect?
- Can you be friends with someone even if you do not care about their wellbeing?
- Do you know people that are “frenemies?” What does this even mean?
Note: This The Great Gatsby pre-reading activity originally comes from later in the unit when students have the examples of Nick, Jordan, Tom, Gatsby, Daisy, and the rest to use as illustrations.
Wrap-up:
The Great Gatsby Pre-reading ActivitiesThanks for checking out The Great Gatsby Pre-reading Activities. Expert teachers know that preparing students before reading an unfamiliar text pays significant dividends. If these The Great Gatsby introduction activities / worksheets align to your instructional goals, consider using the comprehensive The Great Gatsby unit from TeachNovels.
34_Bredikhina_Teaching Methods.cdr
%PDF-1.3 % 453 0 obj > endobj 452 0 obj >stream application/pdf
 7јz؝cx϶[-xg۳c S?= r˯Ўuz'J ۳;ɫi:{\[әCq4vg mG|mK8go~Z?9!b(Zjv{NbjÓÛE}≥[xׇ[˞1]kxMjWRxoj1]dI-CK,ʰmQg]m%,/O("#[1v%{2\IG
 PDF Reading Order Tool (Adobe Acrobat Pro)
- Acrobat User Guide
- Introduction to Acrobat
- Access Acrobat from desktops, mobile devices, and the web
- What's new in Acrobat
- Key combinations
- System requirements
- Workspace
- Workspace basics
- Opening and viewing PDF files
- Opening PDF documents
- Navigating the pages of a PDF document
- View settings PDF
- Setting PDF View Modes
- Enable thumbnail preview of PDF files
- Display PDF in browser
- Working with online cloud storage accounts
- Accessing files from Box
- Accessing files from Dropbox
- Access files from OneDrive
- Accessing files from SharePoint
- Accessing files from Google Drive
- Acrobat and macOS
- Acrobat notifications
- Grids, guides and measurements in PDF
- Use of Asian text, Cyrillic and left-to-right text in PDF documents
- Workspace basics
- Creating PDF documents
- Overview of the procedure for creating PDF documents
- Create PDF files in Acrobat
- Creating PDF documents with PDFMaker
- Using the Adobe PDF Printer
- Converting web pages to PDF
- Create PDF files with Acrobat Distiller
- Adobe PDF conversion settings
- Fonts PDF
- Editing PDF documents
- Editing text in PDF documents
- Editing images and objects in a PDF document
- Rotate, move, delete and renumber PDF pages
- Edit scanned PDF documents
- Enhance document photos taken with a mobile device camera
- Optimizing PDF documents
- PDF document properties and metadata
- Links and attachments in PDF
- Layers of PDF documents
- Thumbnails and bookmarks in PDF documents
- Action Wizard (Acrobat Pro)
- PDF files converted to web pages
- Customize PDF Documents for Use in Presentation
- Articles PDF
- Geospatial PDF files
- Applying actions and scripts to PDF files
- Changing the default font for adding text
- Deleting pages from PDF documents
- Scanning and OCR
- Scanning Documents to PDF
- Document Photo Enhancement
- Troubleshooting scanner problems when using Acrobat to scan
- Forms
- Fundamentals of Working with PDF Forms
- Create forms from scratch in Acrobat
- Create and distribute PDF forms
- Filling out PDF forms
- PDF form field properties
- Filling out and signing PDF forms
- Configuring Buttons to Perform Actions on PDF Forms
- Publish interactive web forms PDF
- Fundamentals of working with PDF form fields
- PDF form fields for barcode
- Collect and manage PDF form data
- Form Inspector
- Help with PDF forms
- Send PDF forms to recipients using email.
 mail or internal server
- Merge files
- Merge or merge files into one PDF file
- Rotate, move, delete and renumber pages PDF
- Add headers, footers, and Bates numbering to PDF documents
- Crop PDF 9 pages0004
- Adding watermarks to PDF documents
- Adding a background to PDF documents
- Working with PDF Portfolio Files
- Publish and share PDF Portfolio
- PDF portfolio overview
- Creating and customizing a PDF portfolio
- Sharing, editing and annotating
- Sharing and tracking PDF documents online
- Mark text when editing
- Preparing to edit a PDF document
- Starting PDF editing process
- Hosting collaborative reviews on SharePoint or Office 365 sites
- Participation in the editing of a PDF document
- Adding comments to PDF documents
- Adding a stamp to a PDF file
- Approval processes
- Comment management | view, add answer, print
- Import and export of comments
- PDF editing tracking and management
- Saving and exporting PDF documents
- Saving PDF
- Convert PDF files to Word format
- Convert PDF document to JPG file
- Converting and exporting PDF documents to other file formats
- File format options for PDF export
- Reusing PDF content
- Security
- Enhanced security for PDF documents
- Protecting PDF documents with passwords
- Digital ID Management
- Protecting PDF Documents with Certificates
- Opening protected PDF documents
- Removing sensitive data from PDF documents
- Setting security policies for PDF files
- Selecting the protection method for PDF documents
- Security warnings when opening PDF documents
- Protecting PDF files with Adobe Experience Manager
- PDF Protected View
- Overview of security features in Acrobat and PDF files
- JavaScript in PDF files is a security risk
- Attachments as a security risk
- Allow or block links in PDF files
- Electronic signatures
- Signing PDF documents
- Capture a signature on a mobile device and use it in any application
- Sending documents for electronic signatures
- About certificate signing
- Signatures based on certificate
- Confirmation of digital signatures
- Trusted list approved by Adobe
- Proxy Management
- Printing
- Basic tasks for printing PDF files
- PDF Brochure & Portfolio Printing
- PDF advanced print settings
- Print to PDF
- Print color PDF documents (Acrobat Pro)
- Printing PDF files using custom sizes
- Accessibility, tagging, and reflow
- Create and test accessibility tools for PDF documents
- Accessibility features in PDF files
- PDF Reading Order tool
- Reading PDF documents using accessibility and reflow features
- Edit document structure in the Content and Tags panels
- Create Accessible PDF Documents
- Search and indexing
- PDF indexing
- Search in PDF documents
- 3D Models and Media
- Add Audio, Video, and Interactive Objects to PDF Files
- Add 3D models to PDF files (Acrobat Pro)
- Displaying 3D models in PDF files
- Interaction with 3D models
- Measuring 3D objects in PDF files
- Setting up 3D views in PDF files
- Enable 3D content in a PDF document
- Adding multimedia content to PDF documents
- Add comments for 3D layouts in PDF files
- Play video, audio and multimedia formats in PDF files
- Adding comments to videos
- Prepress Tools (Acrobat Pro)
- Prepress Tools Overview
- Printing marks and fine lines
- Color separation preview
- Processing transparency
- Color conversion and ink management
- Color Trapping
- Preflight (Acrobat Pro)
- PDF/X-, PDF/A-, and PDF/E compliant files
- Preflight profiles
- Enhanced Preflight
- Preflight reports
- Viewing preflight results, objects, and resources
- PDF output methods
- Fixing problem areas with the Preflight tool
- Automating Document Analysis with Droplets or Preflight Operations
- Analyzing documents with the Preflight tool
- Additional check with the Preflight tool
- Preflight Libraries
- Preprint variables
- Color Management
- Color Consistency
- Color settings
- Document color management
- Working with color profiles
- Basic Color Management
Using the Reading Order tool provides the easiest way to correct reading order and tagging errors. When you select a tool, a dialog box appears that displays the main elements of the layout with the order in which the page content is displayed. Each highlighted area is numbered and labeled with gray or colored blocks, the number showing the placement of the area in sequential reading order. After checking the reading order of the page, you can change other, more detailed tag settings if necessary.
The Reading Order tool is designed to correct PDF documents that have been tagged using Acrobat, rather than being converted from a document created in the source application. Whenever possible, refer to the source file and add accessibility features already in the source application. Preparing the source file allows you to get rid of additional text processing on the next cycles of processing the PDF document in Acrobat.
The Reading Order tool is used to perform the following Accessibility-related tasks:
-
visual check and subsequent restoration of the page content reading order;
-
adding tags to fillable forms and descriptions of form fields;
-
add additional text to pictures and descriptions to form fields;
-
correction of simple table tags, preparation of complex tables for additional actions within the logical structure tree;
-
Remove non-meaningful content from the logical structure tree, such as page borders marked with ornaments.
To set advanced reading order and tag placement tasks, such as fixing complex tables, removing old tags, and adding extra text to links, you must use the Tags panel. For more information, see Editing tags in the Tags panel.
Tips for using the Reading Order tool
- Before using the Reading Order tool, save the document or a copy of it because undo or redo is not supported for some operations. For more information, see Undo and redo tag changes using the Reading Order tool.
- Select View > Page View > Page if you are using the Reading Order tool. If you click Clear Page Structure , Acrobat removes all tags from all visible pages, including pages that are only partially visible.
Select Reading Order tool
- Select Tools > Accessibility and then Reading Order on the panel on the right.
 The Reading Order tool dialog box appears.
Reading Order tool options
To set the Reading Order tool options, right-click the selection and select the appropriate option from the context menu. Or go to the Options menu in the Order panel. The Reading Order tool includes the following options.
Text/paragraph
Marks the selected area as text.
figure
Allows you to mark the selected area as a picture. The text contained in a picture tag is defined as part of the picture and is not read by screen readers.
Form field
Allows you to mark the selection as a form field.
Drawing with caption
Allows you to mark the selected drawing and caption as one object. Any text contained within this tag is marked as an accompanying caption. Useful for tagging photographs and accompanying captions; prevents caption text from being added to adjacent text blocks. Figures may require additional text.
Heading 1, Heading 2, Heading 3, Heading 4, Heading 5, Heading 6
Marks the selection as a first, second, third, fourth, fifth, or sixth level heading tag. You can convert title tags to bookmarks to help users navigate through the document.
Table
Allows you to mark a selection as a table after the selection has been analyzed to determine the location of headings, columns, and rows.
Cell
Marks the selected area as a table cell or header. This option is used to merge incorrectly split cells.
Formula
Marks the selection as a formula. Since text reader software may not treat tagged formulas the same way as regular text, you can add a description in the form of additional text.
Note
Marks the selected area as a note.
Footnote
Marks the selected area as a footnote.
Background element/artifact
Marks the selection as a background element or artifact, removing the element from the tag tree. Thus, it does not appear in the reflowed document and screen readers do not read it.
Table editor
Allows you to automatically analyze the selected table by cells and places the necessary tags. Before using the editor, the table must be tagged as a table.
Show content groups per page
Displays content items as highlighted areas with numbers corresponding to the reading order. Specify the highlight color by clicking the color swatch.
Show table cells
Allows you to highlight the contents of individual table cells with color. Specify the highlight color by clicking the color swatch.
Display as items in the same block
Adjacent squares with the same tag type collapse into one larger square with a common tag type that covers the original square.
Show tables and figures
Marks each figure and table with a strikethrough box. It also indicates whether additional text is set for this element. Specify the frame color by clicking the color swatch.
Clear page structure
Removes the tag structure from the page. This option is used to start over and create a new structure if there are too many flaws in the existing one.
Show Order panel
Opens the Order tab to reorder the selected content.
Edit additional text
Available from the menu that appears when you right-click on the selected pattern. Allows the user to add or modify a textual description of the drawing properties that is read by screen readers or other assistive technologies.
Edit form field text
Available from the menu that appears when you right-click on a form field. Allows the user to add or modify a textual description of a form field that is readable by screen readers or other assistive devices.
Edit Table Summary
Available from the menu that appears when you right-click on a selected table. Allows the user to add or modify a textual description of table properties that is readable by screen readers or other assistive devices.
The Reading Order tool lets you quickly check the reading order of a tagged PDF page. You can also use this tool to add additional text to images and fix many markup issues that are shown in the report that Acrobat generates when you add tags to a PDF document.
The Reading Order tool makes it easy to spot problems with reading order. Each section of the adjacent page is shown as a separate highlighted area and numbered according to its place in the reading order. In each area, the text is read from left to right and from top to bottom (this order can be changed in the adjustment options). If a single area highlighted in color contains columns of text or text that is read out of order, then the area should be divided into parts whose order can be redefined. Since the highlighted areas are rectangular in shape, they can overlap, especially if the page content has an irregular geometric shape. If the content on the page does not overlap, or does not match the two highlighted areas, then no problem message is displayed in the reading order. Page content should not be part of more than one color-coded area.
You can change the reading order of the highlighted areas by moving the Order panel object or by dragging it onto the page in the document panel. You can make a figure and its accompanying caption read at a specific point in the text by changing the reading order of the highlighted areas of the page. When you change the serial number of the highlighted area, the ordinal position of the specified item changes without changing the actual appearance of the PDF document.
Checking reading order with the Reading Order tool
-
Select the Reading Order tool from the right panel.
-
In the Reading Order dialog, select Show content groups on page and then click Content order on page .
If the highlighted areas are not shown in the document panel, this means that the document does not contain tags.
-
(Optional) Do one of the following.
-
To specify a highlight color, click the color swatches, then click the desired color.
-
To highlight tables and figures, and to see additional text for figures, select Show Tables and Figures.
-
-
Check the reading order of the text within each highlighted area.
An increase can make this task easier.
-
Check the numbering order of the highlighted areas. If the order is consistent, but the numbered areas do not follow each other, then readjust the order in the Order panel.
-
Click Show Order Panel , then select each content object (in brackets [ ]) in the Order panel to highlight the content area in the document panel. This method is used to find numbered areas that are not visible and cannot be found on the page.
Changing the reading order in the Order panel
-
Select the Reading Order tool from the right panel.
-
In the Reading Order dialog, select Show Order Panel .
-
In the Order panel, view the list of highlighted areas shown in the document panel.
-
In the Order panel, drag the selection tag where you want it. As you drag, a line will appear where the tag can be placed. After you drag an object to a new location, the highlighted areas are renumbered according to the new reading order. You can select and move several adjoining areas at once.
Changing the reading order by dragging elements on a page
-
Select the Reading Order tool.
-
In the Reading Order dialog, select Show content groups on page and then click Content order on page .
-
In the document area, move the mouse pointer over the number of the selection you want to move. Then drag it to the place where you want it to read. The text cursor shows the possible placement of the region within the text.
If you release the highlighted area, the location of the text cursor becomes a separator line. In this case, the original area highlighted in color is split into two areas highlighted in color. All highlighted areas are renumbered according to the new order.
You can use the Reading Order tool to create tags in an untagged PDF document, or to add new tags to an existing structure. However, manually adding tags this way does not provide the same level of tag structure detail as the Add Tags to Document command, such as creating paragraphs, bulleted or numbered lists, line breaks, and hyphens. Before you clean up the existing structure, make sure that manual tagging is the only resource available.
-
Using the Reading Order tool inside the document pane, drag and drop an area of a page that has one type of content (for example, a text block).
-
Do one of the following.
-
Shift-drag to add additional page content to the selection.
-
To remove page content from the selection, drag it while holding down the Ctrl key.
-
-
Click the desired button in the Reading Order dialog box to specify the tag type.
Changing the tag for an area
If Acrobat assigns the wrong tag to a page element, you can change the tag type for the highlighted area.
-
Select the Reading Order tool from the right panel.
-
In the Reading Order dialog, select Show content groups on page and then click Content order on page .
-
To select a highlighted area, do one of the following:
-
Click the button to specify the type of tag you want to add to the highlighted area.
Undoing and redoing tag changes using the Reading Order tool
Undoing or redoing reading order changes is supported for all tags except the following:
- "Table", "Table Editor" and related tags.
- Creating tags and modifying tags is done using the drag and drop feature in the Reading Order tool.
To undo reading order changes in Acrobat, click Edit > Undo Editing. To redo your changes, click Edit > Redo Edit.
Adding or removing content from a selection
The Reading Order tool always displays as few colored areas as possible. If the contents of a highlighted area are not read in order, then you may need to split the area and reorder the order. Highlighted areas can also include content on an adjacent page that doesn't match, or content that requires a different tag. Page content may not be related to the desired elements, especially if such content does not fit into the shape of a rectangle. Use the Reading Order tool to add or remove content from a region, or to split a region and then reorder it.
-
Select the Reading Order tool.
-
In the Reading Order dialog, select Show content groups on page and then click Content order on page .
-
Select the highlighted area in the document panel.
-
Do one of the following.
-
To add content to the selection, Shift-click the content you want to add. The cursor changes to a cursor that includes a plus sign (+).
-
To remove content from the selection, click on it while holding down the Ctrl key. The cursor changes to a cursor that includes a minus sign (-).
-
-
Click the button to specify the type of tag you want to add to the highlighted area.

Dividing the area into two parts
-
Select the Reading Order tool.
-
In the Reading Order dialog box, select Show Content Groups Per Page, and then click Content Per Page Order.
-
In the document panel, drag and drop a small area of content near the border of the first area you want to create.
-
In the dialog box, click the Background Element/Artifact button. The highlighted area will be divided into two areas numbered from right to left.
-
To change the reading order, click Show Order Panel and drag the new selection to the desired position in the Order panel.
-
Drag to select the first content area created that includes the "Background/Artifact". Then set the tag by clicking the appropriate button in the Reading Order dialog box.
Applying the heading tag
To help readers navigate through the document and find the information they need, make sure headings are tagged at the right level to reflect the hierarchical structure of the content.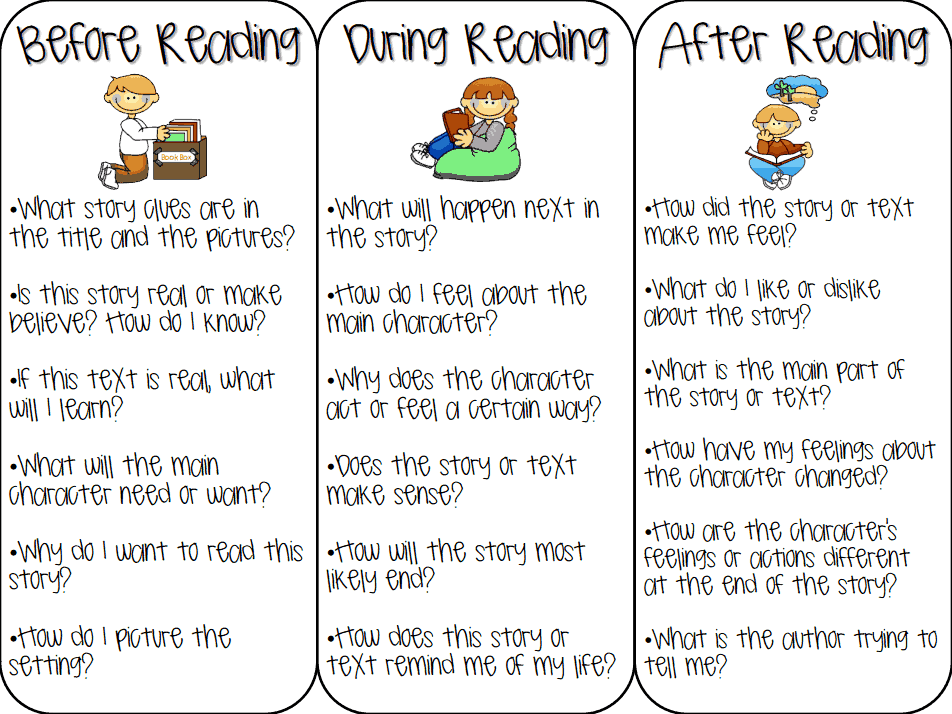
-
Select the Reading Order tool, then select the title text of the PDF document.
-
In the Reading Order dialog box, click the button corresponding to the heading tag (eg Heading 1, Heading 2).
After you apply tags for headings, you can change the headings to bookmarks for easier navigation. For more information, see Add bookmarks with tags.
Deleting page elements and tag structure
When tagging a PDF document, Acrobat may not always be able to distinguish between graphics and page decorations. Objects that decorate a page, such as decorative borders, lines, or background elements, can overly complicate the structural layout and should be removed. This can cause Acrobat to incorrectly add image tags to artifacts and page elements. You can remove artifacts and redundant page elements from the tag structure by redefining those elements with Background Element/Artifact tags, or by removing the tags. If a tagged image does not contain useful or illustrative information, then that element can be removed from the tag structure so that it is not readable or rearranged.
-
Select the Reading Order tool.
-
In the Reading Order dialog, select Show content groups on page and click Content order on page . Then select Show tables and figures .
-
Delete the page element by doing one of the following.
-
In the document panel, select the page element, then click Background element/artifact in the dialog box.
-
In the Order panel, select a page element, then click Delete.
-
You can use the Reading Order tool to add and edit tags and additional text for figures and tables.
Applying a picture tag
You can select an item and define it as a picture using the Reading Order tool. Once an object is defined as a drawing, additional text can be added to it to describe the drawing.
-
Select a picture with the Reading Order tool.
-
In the Reading Order dialog, select Figure .
-
In the document panel, right-click this area and select Edit Additional Text .
-
Enter additional text, then press OK .
Checking and correcting pattern tags
The Reading Order tool can be used to detect and correct tagging results for pictures. The presence or requirement of additional text to be correctly read by assistive technologies should be determined. Ideally, tags for a picture should point to the contents of the picture as content that has meaning in the context of the entire document, such as graphics or illustrations. If backgrounds/artifacts that you don't want to read have picture tags inserted, redefine them as backgrounds/artifacts.
-
Select the Reading Order tool, and then click Show Tables and Figures in the dialog that appears.
-
Do one of the following:
-
If the picture is not tagged as such, select the desired content area and click the Picture or Picture Captioned buttons in the dialog box that appears.
-
To delete text that is incorrectly aligned with the picture, drag and drop the text, then press the Text/paragraph in the dialog box.
-
To include a caption that makes up one group with a picture, select the picture and caption and click the Picture Caption button in the dialog box.
-
Checking and adding extra text to pictures
If you want screen readers to describe graphic elements that explain important points in a document, you need to insert a description using extra text. Screen readers cannot recognize or read pictures unless additional text is added to the tag properties. If you apply additional text to text elements, only the description is read, not the text itself.
-
Select the Reading Order tool.
-
In the dialog box, select Show tables and figures.
-
Right-click the picture, then select Edit Additional Text from the pop-up menu.
-
In the Edit Extra Text dialog box, enter a new (or edit an existing) picture description, then click OK .
Editing table tags and tagging unrecognized tables
Tables are especially difficult for screen readers to read because they contain textual or numeric data in a way that is most visually readable. Table cell content can be complex and contain lists, paragraphs, form fields, or other tables.
For best results when tagging tables with tags, use the application that created the document to add tags when creating a PDF document. If the PDF document does not contain tags, then you can add them using the Add Tags to Document command. Most tables are successfully recognized with this command, but the command may not recognize a table that lacks clear borders, headings, columns, and rows. Use the Reading Order tool to determine how well a table is recognized and correct recognition errors. To add specialized formatting for tables and table cells, use the Tags panel.
The table editor can be used to analyze its components and apply the necessary tags, but some tags may need to be corrected manually. When viewing table tags, you can verify that columns, rows, and cells are correctly defined. Tables that lack well-defined borders and lines are often tagged incorrectly or include adjoining page elements. You can fix tables with incorrectly placed tags by selecting and redefining those tags; you can break combined cells by creating a separate tag for each of them.
To fix difficult problems when tagging tables, you often have to resort to using the Tags panel.
-
Select the Reading Order tool, then click Show Tables and Figures .
-
If the table is not clearly defined in the document pane, select the entire table by dragging and dropping, then click Table in the dialog box.
-
Press button Show table cells to make sure all table cells are recognized as separate elements.
-
If the table cells do not appear as separate items, do one of the following:
-
If one or more cells are merged with others, use the Reading Order tool to select an area within one cell, then click Cell in the dialog box. Repeat for each merged cell.
-
If the cells are not highlighted, it is possible that the table uses a non-standard format. Recreate the table using the original application.
-
-
If the table contains cells that span two or more columns, set the ColSpan and RowSpan attributes for them in the tag structure.
If adding tags to a PDF document in Adobe Acrobat results in a tagging structure that is too confusing or too problematic to customize, you can use the Reading Order tool to remove or replace the current structure. If your document contains mostly text, you can select a page and then remove headings, tables, and other elements from the page to create a cleaner, simpler tagging structure.
Acrobat may re-tag an existing tagged document after all existing tags have been removed from the tree.
Remove all tags from a PDF document
-
Open the Tags panel ( View > Show/Hide > Navigation Panes > Tags ) and select the root (topmost) tag.
-
In the Tags panel, select Delete Tag in the options menu.
Replacing an existing tag structure
This operation is optimal for pages containing a single column of text.