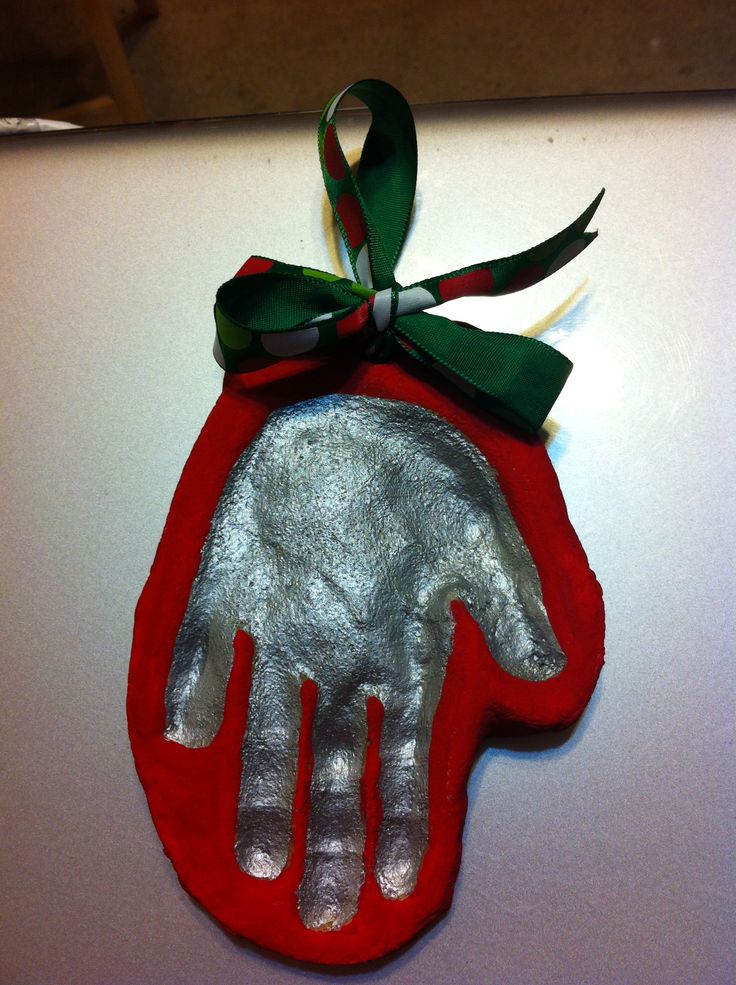
Salt dough ornaments handprint
Salt Dough Recipe - The Easiest Way to Make Salt Dough!
Kim146 Comments
All activities should be supervised by an adult. As an Amazon Associate, I earn from qualifying purchases. This post may contain affiliate links.
Learn how to make your own salt dough handprint ornament with this easy Salt Dough Recipe. You only need a few ingredients from your kitchen to make this salt dough! We cover all of our tips and tricks to make sure your salt dough ornaments will last for years!
RELATED: Salt Dough Ornament Recipe
Table of Contents
- Salt Dough Recipe – for Handprints & Ornaments
- Salt Dough Ingredients
- How to Make Salt Dough – an Easy Salt Dough Recipe!
- Why Is My Salt Dough Puffing Up?
- How Do I Seal Salt Dough Ornaments?
- What Kind of Paint Should I Use?
- How to Decorate Salt Dough Handprints
- How Many Ornaments Does this Make?
- Tips for Making Perfect Salt Dough
- Salt Dough Handprint & Ornament Recipe
- Get the Recipe
- More Salt Dough Ornament Ideas
Salt Dough Recipe – for Handprints & Ornaments
One of our favorite things to do with salt dough is to make handprint ornaments. But you can also use this same recipe and use cookie cutters and paint shapes instead!
For the handprint ornaments – you can make a new one every year and have a nice memento for the Christmas tree!
Don’t forget to add the year on the back of the salt dough ornament to keep track of the different years.
Salt Dough Ingredients
- 4 cups all purpose flour (Note: you want regular all purpose flour, not self-rising)
- 1 cup salt
- 1.5 cups warm water
How to Make Salt Dough – an Easy Salt Dough Recipe!
1. Combine all of your ingredients (flour, salt, warm water) and mix well until it starts to form a dough.
2. Take the dough out of the bowl and knead for at least 10 minutes.
If your dough is too dry, add a little bit more water in and continue to knead.
The dough should be smooth and roll out with not too many bumps. It should also be easy to press a handprint into it.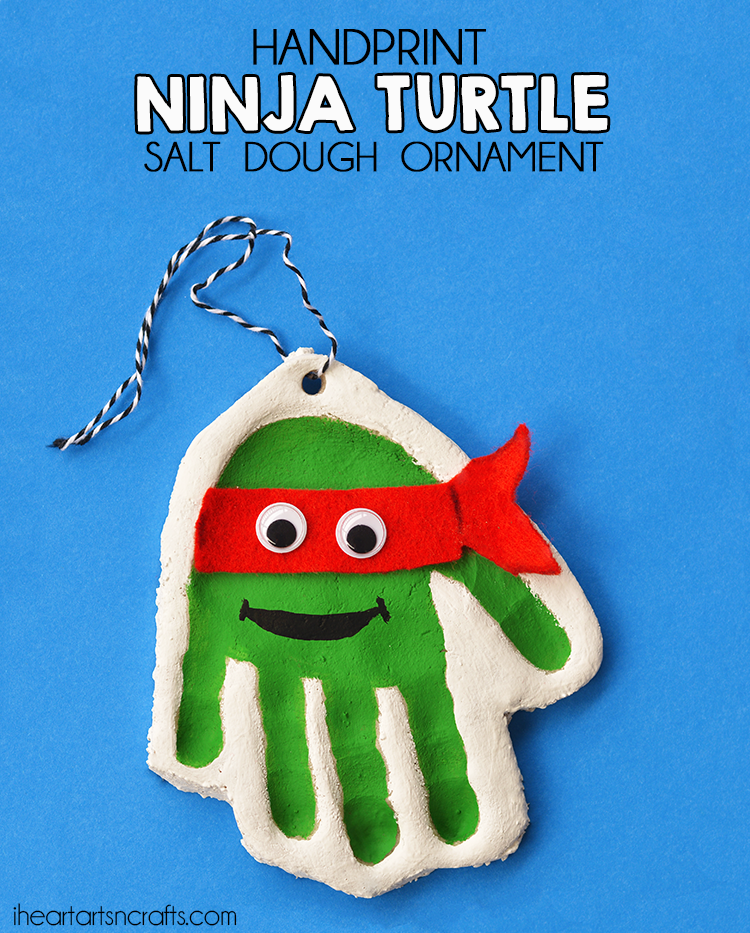 If you’re finding it’s too hard or not smooth enough, continue to knead some more. If it’s still too dry, add a little bit more water (but not too much or it may get too wet).
Roll out the dough to between 1/4 to 1/2 inch thickness. If the dough is too thick it will take too long to dry.
Press the hand into the dough.
3. Use a circle shaped bowl to trace around your handprint.
Cut out the handprint with a knife (adults to do this part).
You can also print off a circle shape or heart shape to trace around with a knife (adults to do this part).
If you have a smaller handprint you can use a circle or large heart cookie cutter.
TIP: It’s easier to press the handprint first, and then trace around it. If you have dough left over you can roll it out again and do another handprint.
4. Using a straw, make a hole in the top of the ornament.
5. Let the ornaments air dry for a day.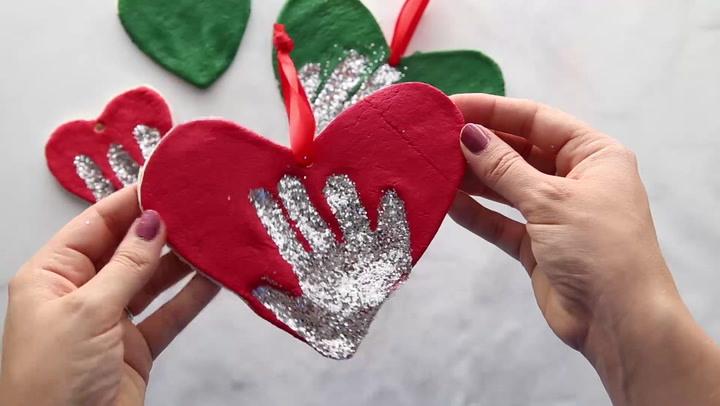
If you have time, let the ornaments air dry for a day. This will cut down on the baking time required and help to prevent puffing. If you do not have time, you can bake right away instead.
Bake at 250 degrees Fahrenheit for 1-2 hours. Once the top of the ornaments look dry and solid, flip over and bake on the other side.
NOTE: It’s important that you check that your oven temperature is set to Fahrenheit. One of the most common reasons the ornaments burn and puff up is that the oven temperature is Celsius. If you have a Celsius setting then you’ll want to use the lowest oven temperature, closer to 120 degrees Celsius.
If your ornaments are still doughy, put them back in for another hour. It will depend on your thickness how long you need to bake for. The thinner ornaments will take less time but thicker may take more. If it’s taking too long in the oven, let them finish drying by air drying them for a few more days. Make sure to flip them over so the bottoms also get exposed to air.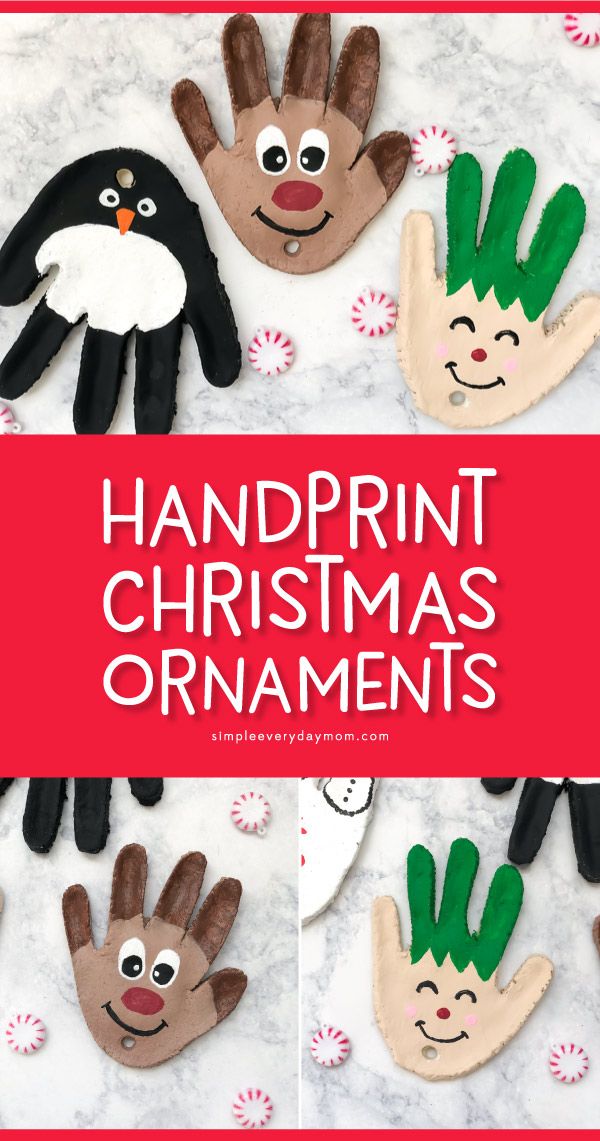
6. Once your ornaments are fully dry you can paint them.
Paint the handprint and leave the remaining ornament plain. Or you can paint the whole ornament white and then paint the center handprint once the base coat has dried.
If you want to add glitter into the handprint, decorate the whole ornament with paint first, then fill the handprint with glue. Shake glitter onto the glue.
After the paint has dried, make sure to seal with with either mod podge or a clear glaze spray. Seal the ornaments after you paint them and the paint has fully dried.
7. Tie ribbon or twine through the hole for hanging on the Christmas tree.
Why Is My Salt Dough Puffing Up?
The number one reason salt dough is puffing is due to the oven temperature. If the temperature is too high the salt dough will puff up. It is better to let your ornaments air dry for a day and then bake them.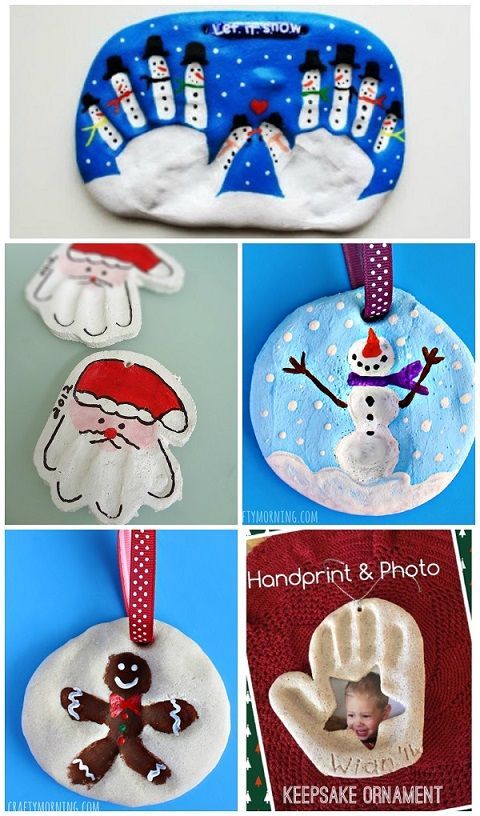 This will prevent the puffing. If you need to bake right away, bake at the lowest temperature (200-250 degrees Fahrenheit).
Note: Make sure to check your oven temperature is Fahrenheit and not Celsius.
You also want to make sure you are using regular, all purpose flour and not self-rising flour.
How Do I Seal Salt Dough Ornaments?
Once you are done, don’t forget to seal with either mod podge or a clear glaze spray. We like this spray for a durable finish. Adults should do the spraying and always follow directions of the product chosen.
Sealing the final ornaments will help stop them from cracking in a few years and prevent moisture from getting in.
What Kind of Paint Should I Use?
I like to use non-toxic acrylic paint for salt dough ornaments. The color will go on much thicker and more vibrant than kids paint. We like this brand of acrylic paint.
How to Decorate Salt Dough Handprints
You can use a heart for the shape around the handprints or you can use a circle.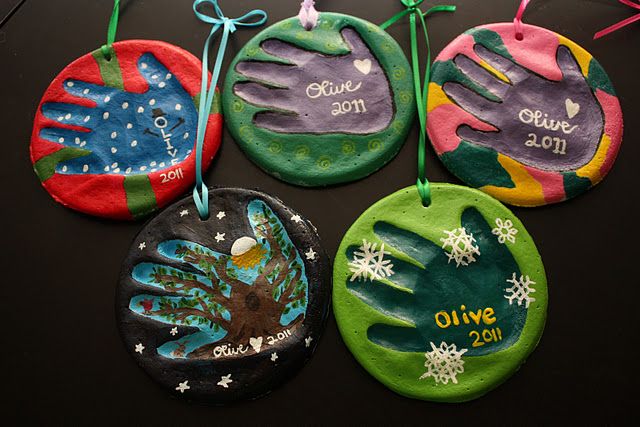
For this one, we used a large heart cookie cutter as the handprints were small (baby handprints):
If you have larger handprints, you can trace around a heart print-out or use a knife (adults only) to draw a heart shape around the handprint.
We painted this one with acrylic red paint but you could choose green or even silver or gold. Then you can leave the handprint portion of the salt dough ornament either natural or use glue and add glitter to it like we did.
How Many Ornaments Does this Make?
Depending on the handprint size and thickness of the salt dough – you can get approximately 8 handprints. If you’re using the dough to make small cookie cutter ornaments you’ll get approximately 15.
If you’re hoping to make this for a classroom or with a larger group of kids, I would recommend bringing an extra batch just in case. The quantity can vary depending on size of cookie cutters, handprints and thickness of the dough. I like to roll out the dough and continue to knead together the scraps to use as much as I can.
Tips for Making Perfect Salt Dough
- Knead well to make the dough smooth – I like to knead at least 10 minutes.
- Let the ornaments air dry for a day first, if possible. This cuts back on the oven baking time and helps to prevent puffing.
- Don’t forget to flip the ornaments when baking or air drying so that the bottoms will be exposed to air.
- Seal with our recommended sealers mentioned above so that the ornaments will last for many years.
- Store the ornaments in a cool, dry place and keep away from moisture. Sealing the ornaments also prevents moisture from getting in.
Prep Time15 mins
Active Time2 hrs
- ▢ 4 cups all purpose flour
- ▢ 1 cup salt
- ▢ 1.5 cups warm water
- ▢ Clear Glaze Finish or Mod Podge
Combine all of your ingredients and knead for 10 minutes.
 If your dough is too dry add a little bit more water in and continue to knead.
Roll out the dough to a thickness that you'd like your salt dough ornament to be. We like between 1/4 to 1/2 inch thickness.
Using a large cookie cutter, cut out different shapes for your salt dough ornaments. If making handprints, place the handprints first and then trace around them.
Have your child place their hand into the salt dough ornament. If the dough is too hard to get an imprint it may be too dry. Continue to knead until smooth. You can also add in a little bit more water.
Using a straw, make a hole in the top for where you want to hang your salt dough ornament.
If possible, let the ornaments air dry for a day.
Preheat your oven to 250 degrees Fahrenheit. Bake for 1-2 hours. If your ornaments are still doughy, put back in for another hour. (It will depend on your thickness how long you need to bake for. The thinner ornaments will take less time but thicker may take more).
If you encounter too much puffing, roll out thinner ornaments and this will help reduce the puffing. If the ornament is still a bit doughy, bake for longer or let sit out a few days to harden before decorating. The thickness of the dough will determine how long you have to bake them for. We prefer to bake them at 250 degrees Fahreneheit for longer and let them air dry for a few days to prevent puffing.
Once cool, you can decorate by painting with non-toxic acrylic paint.
Spray with a clear glaze finish or finish with mod podge. Do this before adding the glitter.
To make the hand glittery, fill the handprint with glue then sprinkle glitter on top of the glue, shake off the excess and let it dry.
Kids will love helping to make this salt dough recipe. They will also have fun decorating the salt dough ornaments by painting them.
Finally, just a friendly reminder to keep these out of reach of pets (they can be toxic to dogs due to the salt content).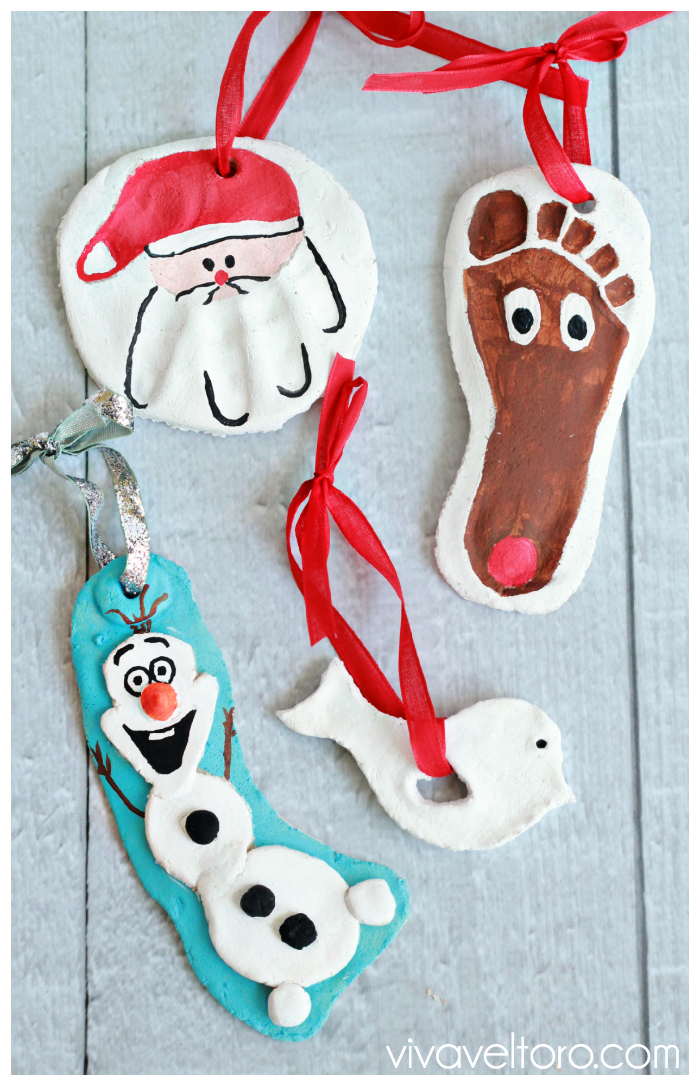
More Salt Dough Ornament Ideas
See over 25+ of the best Salt Dough Ornaments here for more great ideas!
These salt dough glitter ornaments are so fun to make – and you can make these for any season or holiday too!
DIY SALT DOUGH HANDPRINT ORNAMENT
Making DIY gifts is a lot of fun. Salt Dough Crafts are popular and this salt dough handprint is such a fun project to make and also to give as a gift.
You will find a “how-to” video at the bottom of this post.
DIY SALT DOUGH HANDPRINT ORNAMENTThis page may contain affiliate links for your shopping convenience. The links help support the blog as we may earn a small commission at no extra cost to you, our readers.
If you like salt dough crafts, these adorable thumbprint salt dough magnets are quick and easy to make. This DIY photo lamp using your own family pictures is also a unique gift idea you can make at home.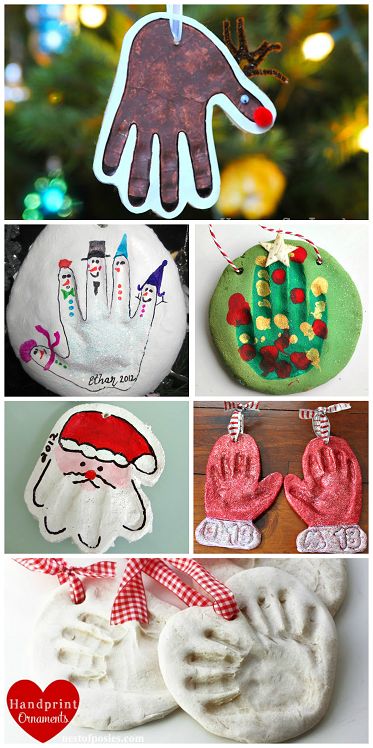
DIY Salt Dough is something that has been around for ages! I remember making a salt dough handprint ornament when I was little around Christmas time. I thought it would be cute to do all of my boy’s handprints and hang them on the wall.
Salt Dough keepsakes are a very inexpensive craft, made with items from around the house. If you’re wanting to send a handprint kit as a gift, I found an affordable one here: baby’s handprint ornament kit.
I also found this one: marshmallow clay handprint kit. I think marshmallow clay would be super fun to make at home!
SALT DOUGH RECIPEPRINTABLE RECIPE AT END OF POST
- 1 cup flour
- 1 cup salt
- 1/2 cup water
- Bowls (one for mixing, another for cutting out your circle)
- Spoon
INSTRUCTIONS:
- Mix the salt and flour in a large bowl
- Make a well in the salt/flour mixture and add the water
- Knead until smooth and shape into a ball
If you want to color your salt dough, simply mix in a few drops of food coloring while you are kneading it.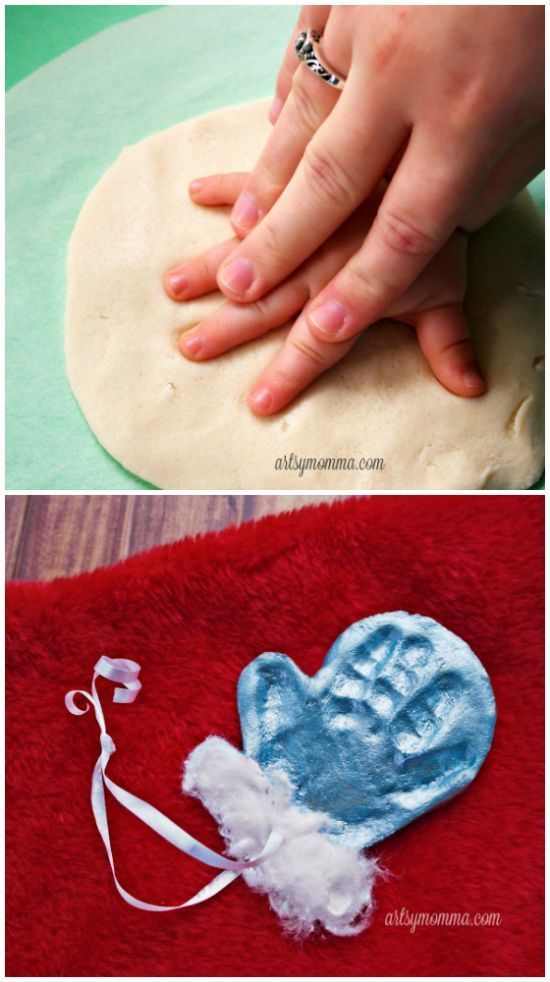
You can let your salt dough handprints air dry, but they can also be dried in the oven. Bake at 200 F until dry. The amount of time on the size and thickness of your masterpiece.
Thin flat ornaments may only take 45-60 minutes, but thicker ones like the ones I did can take 2-3 hours or more.
Make sure you store any leftover dough in an airtight container or it will get all dry and crumbly.
I can’t wait to have the salt dough handprint hanging on the wall, it’s going to be a great addition to our home décor and one that I can treasure as my children grow.
There are many other ornaments you can make with kids, to give as gifts at Christmas or anytime, really. I like buying the DIY ornaments (plastic if you have little ones!) and filling them with glitter. There are tons of things you can do with them, though.
Ingredients
- 1 cup flour
- 1 cup salt
- 1/2 cup water
- Bowls (one for mixing, another for cutting out your circle)
- Spoon
Instructions
Mix the salt and flour in a large bowl.
Make a well in the salt/flour mixture and add the water.
Knead until smooth and shape into a ball.
If you want to color your salt dough, simply mix in a few drops of food coloring while you are kneading it.
You can let your salt dough handprints air dry, but they can also be dried in the oven. Bake at 200 F until dry. The amount of time on the size and thickness of your masterpiece.
Thin flat ornaments may only take 45-60 minutes, but thicker ones like the ones I did can take 2-3 hours or more.
Make sure you store any leftover dough in an airtight container or it will get all dry and crumbly.
If you enjoyed this post be sure to check out our boards on Pinterest.
Love salt dough projects? Get more inspiration from these books:
Let’s Get Crafty With Salt Dough
Salt Dough Crafts for Kids (FREE ebook)
You’ll love this FAIRY GARDEN with SALT DOUGH FAIRY GARDEN ACCESSORIES.
You may also like this after school routine clock.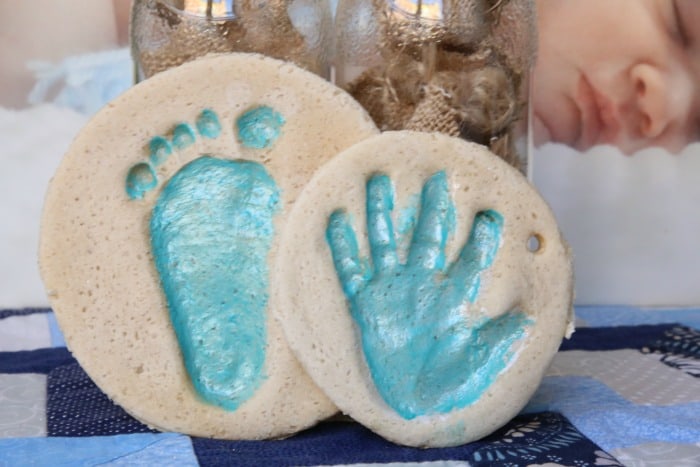
You can sign-up to get an email update each day. You can also connect with us on:
- Google+
- Blog Lovin’
Post submitted to Mommy Moment by Jennifer H.
This post is linked up to I Gotta Create, Tutorials Tips and Tidbits, The Style Sisters, Tidy Mom, Craftberry Bush, Growing Home, Sew Creative
HANDPRINT SALT DOUGH CHRISTMAS DECORATIONS | INSTRUCTIONS | DIY
There is no need to buy an expensive set of handprint ornaments from the store. Make your own adorable souvenirs from scratch using this traditional salt dough recipe.
Expenses
$
Skill level
Start to finish
Day
Tools
- knife or cookie cutter
- The main kitchen materials
Show all
materials
- 1 cup flour
- 3/4 cup salt
- 1/2 cup of water (double the amount for two handles)
- Permanent marker
- Body
- gloss
- acrylic paint
- transparent polyurethane
Show all
How is it? Here's more:
CraftsBy: Jess Abbott
Intro
A lasting impression
They grow so fast.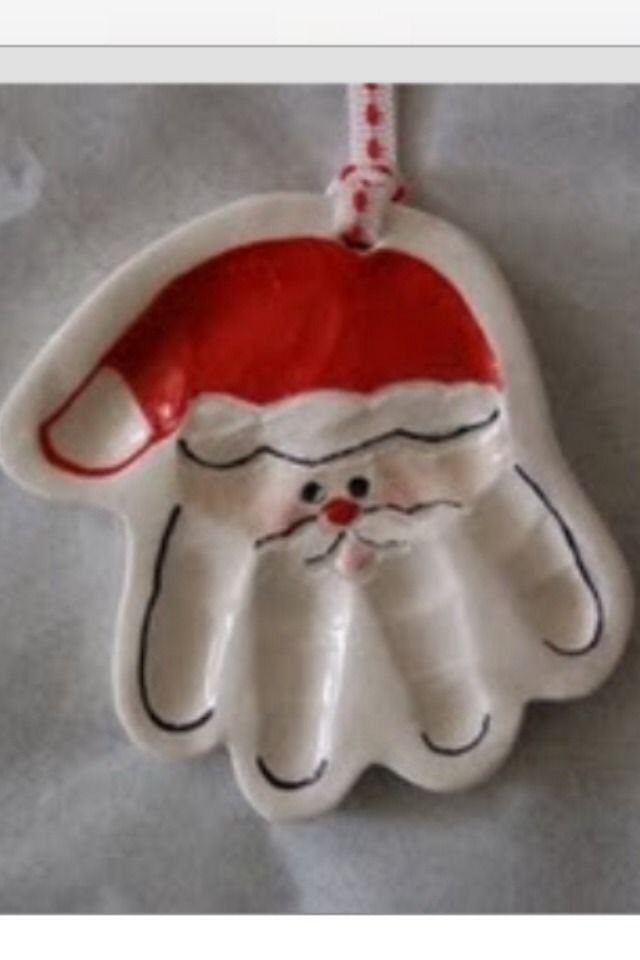 Make unforgettable memories by capturing your little one's handprint. Display it all year round or use it as a Christmas decoration like us.
Step 1
Gather Your Materials
Step 2
Mix Dry Ingredients
In a large bowl, combine flour and salt.
Step 3
Add water
Slowly add water while stirring.
Step 4
Knead
Knead the dough with your hands until the salt dough is firm, smooth and ball-shaped.
Step 5
Cut out shape
On a lightly floured surface, roll out the dough smoothly and evenly. You want the dough to be at least 1/4 thick. Use a knife or cookie cutter to cut the dough into the desired shape. Make sure your figure is bigger than your child's hand.
STEP 6
Imprint
Use a spatula to carefully move the pan onto the non-stick cookie sheet. Place the child's hand so that the print is nice and evenly pressed.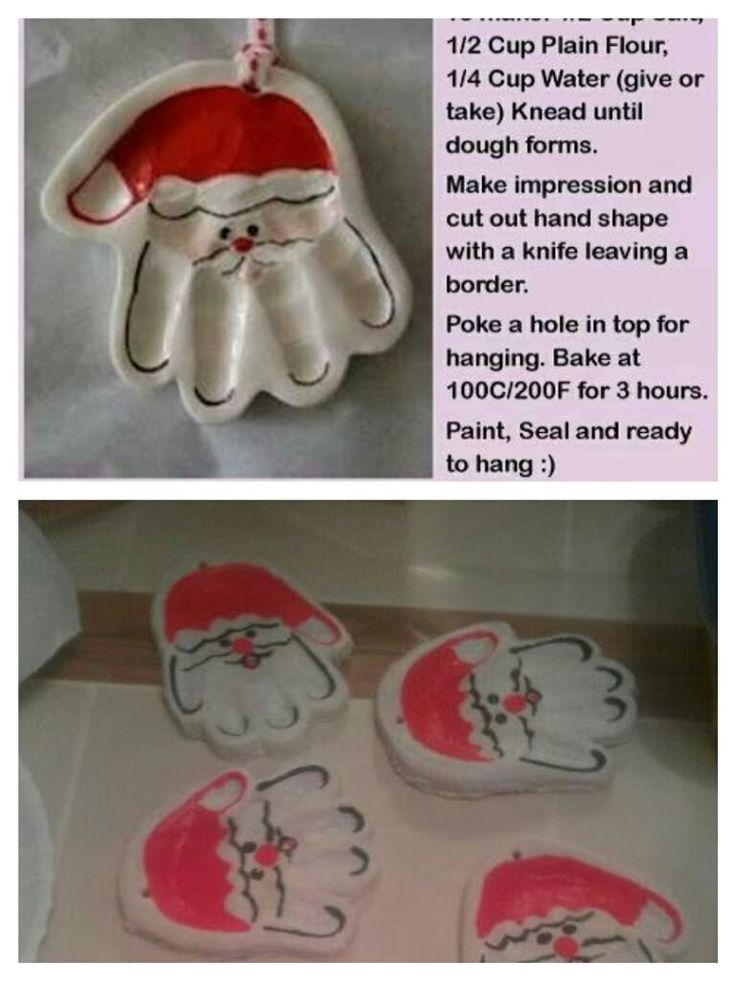
Step 7.
Poke Holes
If you plan to hang a handprint, use a straw or pencil to make a hole(s) on the top. Bake at 200 degrees for two hours or air dry for at least two to three days.
Step 8
Paints and Glitter
You can stop there, but if you want to give your handprints a snow print, you will need some white glitter, acrylic paint and polyurethane spray. Color the handprint white and then sprinkle glitter on top. Let it dry completely.
Step 9
Seal it
When the handprint is dry, apply polyurethane to set the gloss.
Step 10.
Label it
Use permanent marker to write your child's name, age or year.
Step 11
Add Ribbon
Cut a piece of ribbon to make a hanging loop, thread it through the holes at the top and tie both ends in a knot.
Step 12
Leftover Doughboys
If you have extra salt dough, have the kids make snowmen.
Next
How to make a pom-pom Christmas stocking
This is a simple and adorable holiday craft to make with your kids.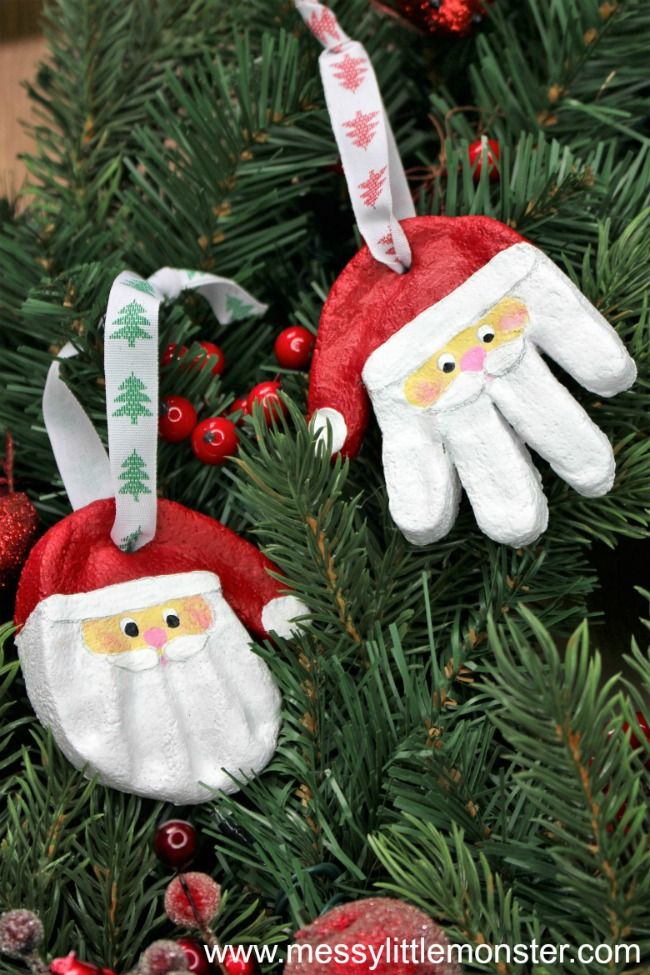 Use a store-bought stocking or sew from our easy pattern, then let the kids play with the colorful pompoms.
How to Make Baby Handprint Snowman Ornaments
Create sentimental decorations for your Christmas tree that you will cherish for years to come. This is a fun craft that kids make and makes great gifts for relatives.
3 ways for kids to dress up store-bought Christmas stockings
Looking for a simple no-sew Christmas stocking to make with your kids? With a little creativity, you can decorate standard stockings and turn them into memories and jewelry that will last a lifetime.
How to Turn a Sweater into a Christmas Stocking
Turn a sweater you love but never wear again into adorable holiday stockings. It's simple and very inexpensive.
How to make embroidered burlap napkins
Make embroidered burlap napkins for an inexpensive holiday accent on your dinner table. We made ours for a Mexican themed Christmas party, but they can be made for any occasion in any color.
How to Make a Christmas Pine Cone Garland
Instead of using a regular garland, opt for a more natural look (and save money) by creating a strand of pine cones.
How to make a checkered Christmas reindeer
Do you need more patterns in your holiday decor? Create custom and inexpensive pieces of art to hang a fireplace or decorate foyers anywhere in your home.
How to make a burlap Christmas stocking
Check out how we made a bohemian-style Christmas stocking with frayed burlap and colorful tassels.
How to sew a Christmas fleece stocking
This lightweight fleece stocking is great for those who want to celebrate the season in DIY style without spending hours in front of the sewing machine.
How to Make Peace Sign Christmas Ornaments
Add some retro flair to your Christmas decoration with these handmade peace sign pompoms.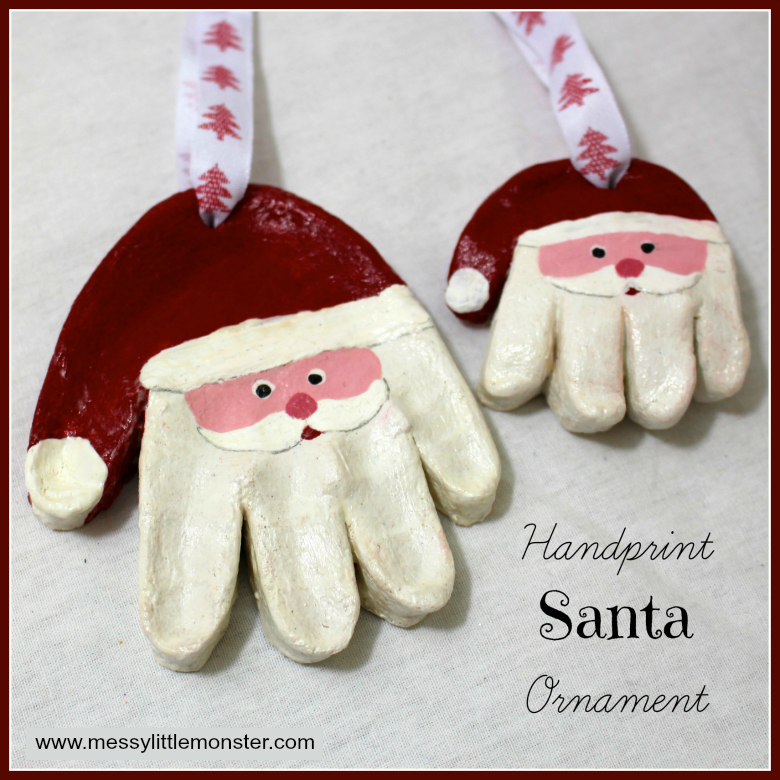
DIY modeling dough: recipes, flour salts, handprints
Salty modeling dough. Children are very fond of sculpting from it, as well as from plasticine and clay. This activity is not only very pleasant for them, but also very useful. After all, the child through it develops fine motor skills and, whatever one may say, their aesthetic feelings. In general, now, regardless of age, many are engaged in modeling from salt dough, because this hobby is not at all expensive! You can make figurines from salt dough, and which ones are beautiful pictures are obtained! You can also make souvenirs for memory - prints of children's hands and feet.
Flour salts are children's crafts or decorations made from salt dough. Support the child's desire to create something beautiful with his own hands and prepare dough for future crafts with him - flour salts.
Dough recipe:
1 cup flour
1/2 cup fine salt
3/4 cup water
Please note that the dough must not be dry or runny.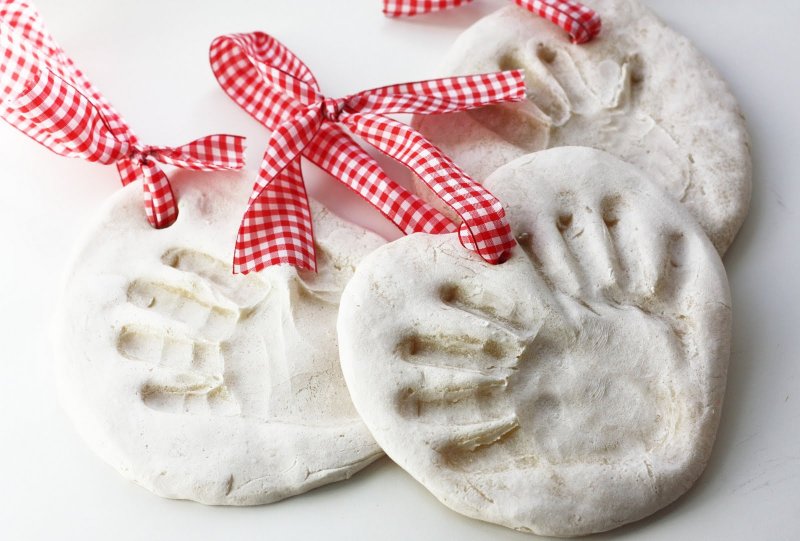 Sometimes a tablespoon of sunflower oil and a spoonful of starch are added to the dough so that it does not stick to hands and is elastic.
You can mold anything you like from the prepared dough. You can even create a whole plot picture. To make it easier to cut out the details, use a small knife or plasticine stack.
Or you can just use different tin cookie cutters and use them to cut out stars, Christmas trees, snowflakes, bunnies from rolled out dough (0.5-1 cm thick). Of these, New Year's decorations will be obtained (they will fit at least on the Christmas tree, at least hang them all over the house). For a change, use curly caps, grains (soy, peas, rice, pearl barley), buttons.
If you want to match small details, dip the brush in a glass of water and brush over the joins.
A toothpick is useful for making even small holes in the dough for threads or ribbons.
When the figurines dry (and to speed up this process, place your crafts for a short time in the oven - slightly heated), they are usually painted with gouache or other paints.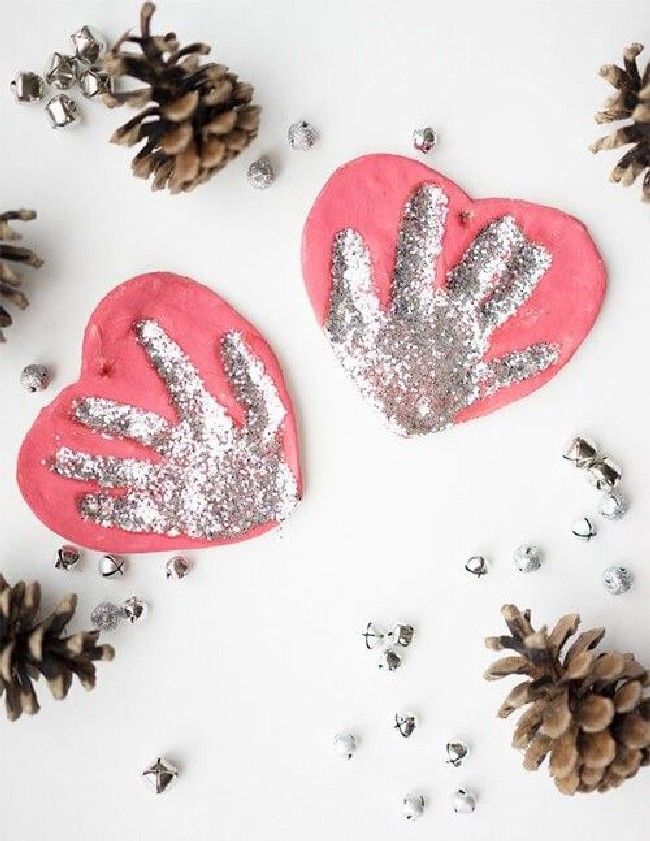 Or you can do it differently - immediately add food coloring to the dough. Stir the dough in different containers, adding your own color to each. And only then from the test of different shades sculpt the details you need.
Ready-made flour salts can be varnished (transparent furniture is suitable), so that they are better preserved, and framed. The background for the salt dough composition can be colored cardboard, to which the figures are glued. Many people choose fabric as a background, for example, burlap. In addition to dough figures, you can add coins, beads, dried flowers, etc. to the composition.
If you have some dough left, put it in a plastic bag in the refrigerator - it will come in handy another time.
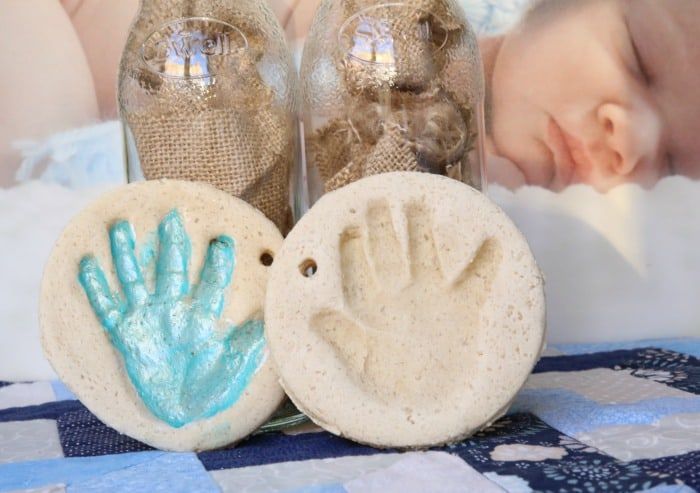
Handprints
Handprint art makes great keepsakes for parents and grandparents and can be done with kids of all ages - babies, toddlers, preschoolers and school kids!
Dough recipe:
2 cups flour
1/2 cup light salt
3/4 - 1 cup water
1. Turn on the oven, setting the temperature to 200 degrees.
2. Mix flour and salt.
3. Add some water and stir. Do this until the mixture becomes pliable and not crumbly.
4. Using the mixer's kneading attachment or your hands, knead the dough for approximately 5-10 minutes.
5. Roll out the dough to the desired thickness.
6. Press your child's hand firmly against the test to get a print.
7. Cut it out with a knife.
8. Use a toothpick or cocktail straw to make a hole for the ribbon.
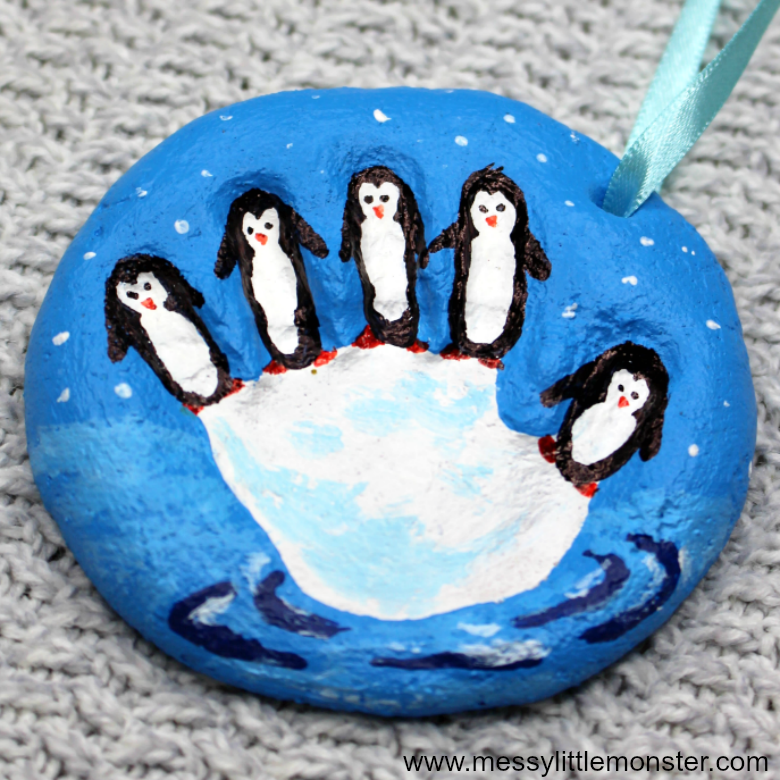
If you decide to decorate the palms, as in the picture, then for the elf, reindeer and snowman, make holes in the upper part of the middle finger; for a penguin - in the lower part of the palm.
9. Place parchment paper dough balls on a baking sheet and bake for 1-2 hours.
Let them cool completely before painting.
Note: If your decorations are thinner, they will bake faster. Just check and make sure the decorations are completely baked and not loose.