How do i make salt dough
Best Salt Dough Recipe for Ornaments & Crafts
Our test results for the best salt dough recipe for DIY ornaments, crafts, gifts & Christmas decorations, with great tips on baking & drying.
Everyone loves salt dough crafts. It’s inexpensive, fun and non-toxic to work with for kids and family, especially around holiday time. So, what is the best easy salt dough recipe? Why does my salt dough puff up when baked? Is it better to bake or air dry salt dough? What’s best to seal salt dough?
These were the questions many of us had when creating our first salt dough projects. So I decided to test 4 most popular recipes, different baking temperatures and techniques to find the best salt dough recipe that is most durable and easy to work with.
Today I am going to share all my findings with you, plus some beautiful salt dough Christmas crafts and decoration ideas to make!
* Some resources in article are affiliate links. Full disclosure here .
How to make salt dough
The ingredients for salt dough are very simple: just flour, salt and water. The most popular salt dough recipes call for the ratio of 1 cup of flour, 1/2 to 1 cup of salt, 1/2 cup to 1 cup of water. ( See our tests in next step to find the best salt dough recipe!)
Mix all the ingredients in a large bowl, knead a little bit until smooth, that’s it! You can make salt dough ahead of time and store them in airtight plastic bag or container for about 5 days or even longer.
Testing the best salt dough recipe ratios
I tested the following ingredients ratios using all purpose flour and regular table salt.
*NOTE: add 1-2 tablespoon more water if the dough is too stiff
- Recipe 1: 1 cup of flour, 1 cup of salt, 1/2 cup of water*
- Recipe 2: 1 cup of flour, 2/3 cup of salt, 1/2 cup of water*
- Recipe 3: 1 cup of flour, 1/2 cup of salt, 1/2 cup of water*
- Recipe 4: 1 cup of flour, 1/2 cup of salt, 1 cup of water
Final results: recipe 2 and 3 are my favorites! Now let’s go into details of why.
IMPORTANT: keep our furry friends safe! Many things safe to humans such as salt dough, play dough, and even chocolate, can be harmful if eaten by dogs or other pets. So please take necessary precautions, and remind others too!
Which salt dough recipe is the easiest to work with?
We tested each dough by making some stamped salt dough ornaments using rolling pin and cookie cutters. Recipe 1 has the most salt and the texture felt gritty to work with. Recipe 4 was nice but a little soft and sticky, and it took longer to bake than the others. I would add a little more flour to this recipe to make it better in future.
Recipe 2 and 3 are both nice and smooth to work with.
Which salt dough recipe dries the fastest and strongest?
They were all very durable without any cracking. I was able to break a test piece made from recipe 1 when I tried very hard, but I could not break any pieces made with the other recipes.
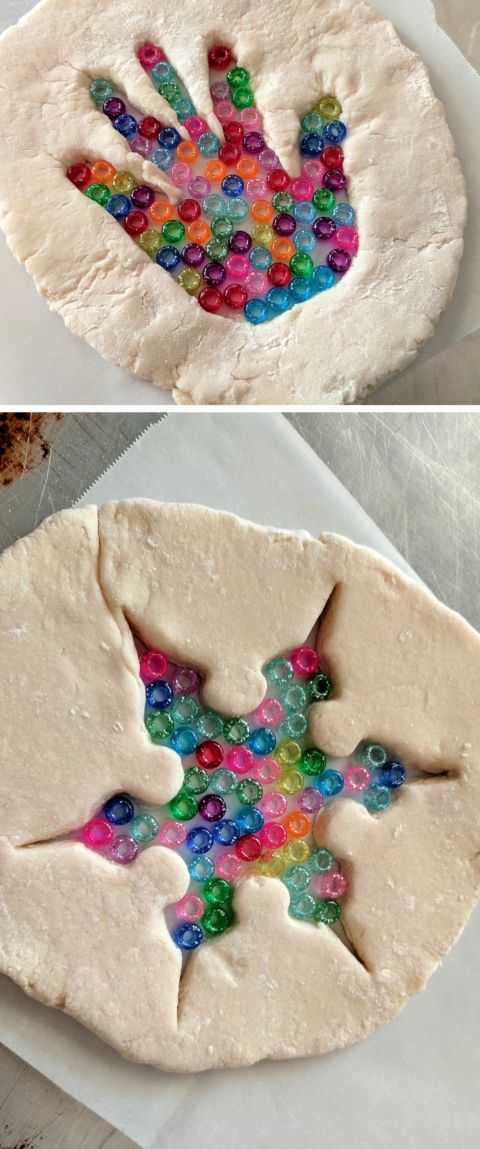
Which recipe is the best for making impressions such as salt dough handprints?
As you can see, they are all good enough to catch the fine details in these leaf impressions.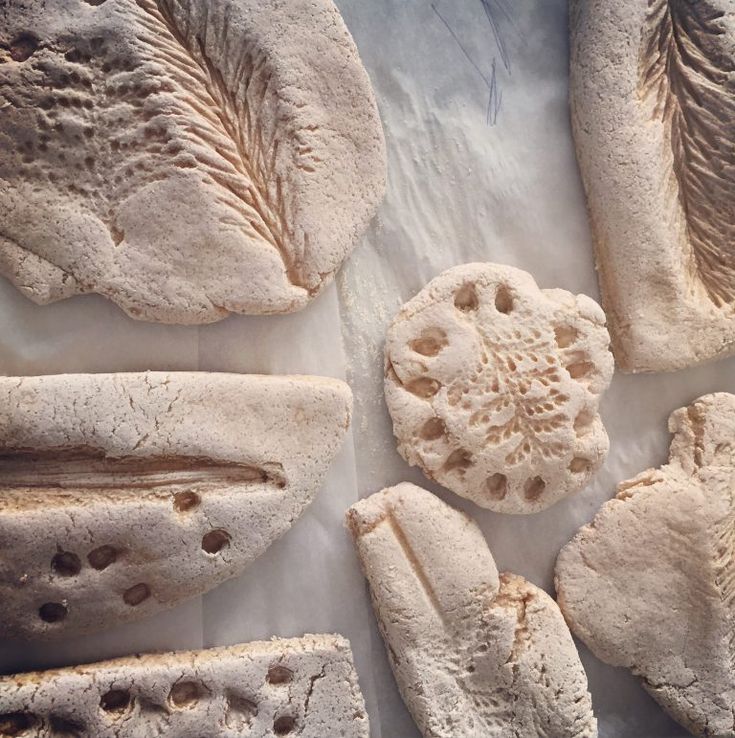 However recipe 3 and 4 retains the most details. They should all be great for salt dough handprint ornaments ad keepsakes.
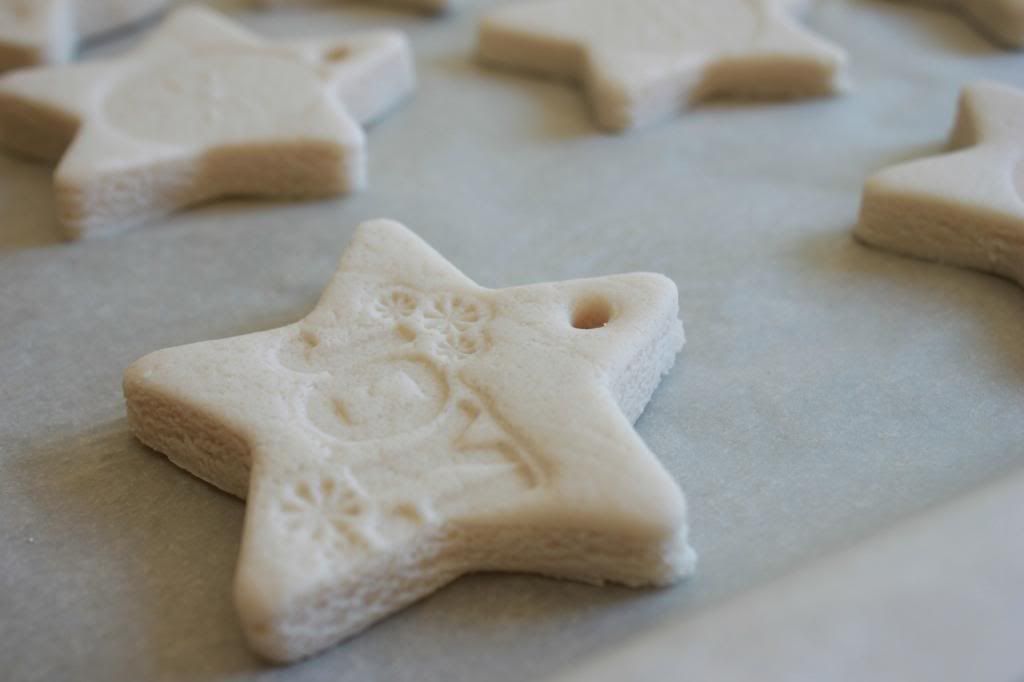
If you want to make a project like these stamped vintage salt dough Christmas ornaments below with small details, choose recipe 3 or 4!
Is it better to bake or air dry salt dough ornaments?
The short answer is: it is better to bake your salt dough at 190 to 200 Fahrenheit oven temperature on a baking sheet. The salt dough ornaments will come out with nice color and retain their shape much better than those baked at hotter temperatures. My favorite is actually a “hybrid” method of baking and air drying salt dough, which I will share below!
If you have some kind of heat vent that create hot and dry air, you can definitely put your salt dough creations near the vent to air dry. Otherwise, air drying in normal to cool temperature takes a very long time, and the salt dough can discolor over the course of a few days.
How long does it take for salt dough to bake until dry?
The thicker and wetter the dough, the longer the amount of time it takes to dry.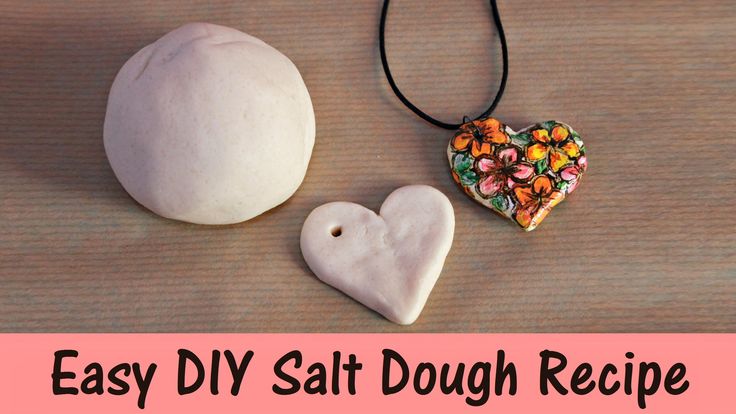 For 1/8” to 1/4” thick dough, it can take 3 to 6+ hours.
However, you don’t have to leave you oven on the entire time. My favorite way to bake salt dough is to put them in the oven, let the oven heat to 200, leave it on for about 20-30 minutes, then turn the oven off so the dough keeps drying in the residual heat for the 1-2 hours, or overnight if it’s bed time.
Repeat this process for 3-5 times, your salt dough ornaments will be ready for decorating!
Why do my salt dough Christmas ornaments puff up?
Salt dough can get puffy like a pita bread, or curl in all directions if we bake them too hot.
It is totally understandable we want to bake them hotter so they dry faster. If you don’t mind them getting a little puffy or darker in color, go for it!
However, if you want them relatively flat, bake them at 200 Fahrenheit, or use a flat weighted sheet pan on top to keep them flat if you bake them at 225 F to 325 F. Keep in mind the dough turn a darker color if baked at these temperatures.
Is there a no-bake salt dough recipe?
Yes! Here’s our homemade air dry clay recipe with baking soda / cornstarch and glue! It is also more white than salt dough. I have to say I like both salt dough and the air dry clay for different reasons!
What’s the best sealer to seal homemade salt dough crafts?
Mod Podge is great for sealing homemade salt dough ornaments and crafts, such as these DIY salt dough photo ornaments we just made here! Some people use varnish, polyurethane spray or resin for even more durability, especially when they intend to sell their salt dough creations.
If you paint the salt dough with acrylic paints, that can act as a sealer as well.
That’s it for today! If you have any questions or tips to share, feel free to leave us a comment and we will make sure to reply!
Stay tuned for more slat dough projects! See you soon!
Easy Salt Dough Recipe for Kids (3 Ingredients!)
Jump to RecipeThis simple and easy salt dough recipe is the perfect rainy day activity… Kids will master valuable kitchen skills while learning how to make salt dough, and then spend hours playing with it!
Salt Dough Recipe for Kids
We encourage our kids to get outside and play as much as possible during the summer, but inevitably there’s going to be those rainy days when outside play isn’t an option — like today…
Rather than turning to video games and television for entertainment though, I gathered up my younger three children for a quick kitchen lesson on how to make salt dough. And it actually turned out to be loads of fun AND educational! #momwin
Learning How To Make Salt Dough
While my kids think making and playing with this salt dough recipe is all fun and games, they’re actually learning a whole slew of valuable skills — like brushing up on their math, how to measure solids and liquids, and what happens when you mix certain ingredients. Just to name a few!
RELATED: How To Make Oobleck With Cornstarch and Water
And with only three ingredients — flour, salt, and water — this simple salt dough recipe is the perfect intro to kitchen basics. Luckily, I picked up some inexpensive fresh flour and salt at the grocery store earlier this week in anticipation of a rainy day!
I gave Camden the job of measuring out the flour, showing her how to level it off for a consistent measurement.
Addie measured the salt, again leveling it off using a butter knife.
And I helped Drew measure the water, showing them all how the liquid should be level with the lines on our Pyrex measuring cup.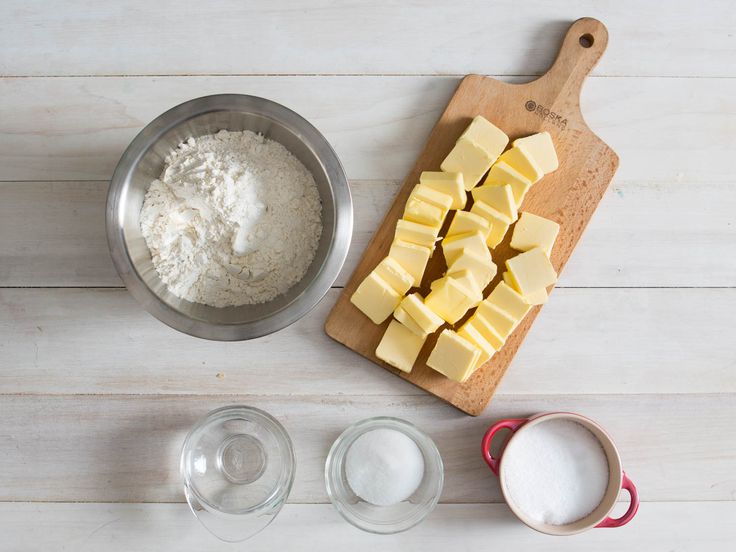
Then they all took turns mixing the salt dough, and I gave a quick demonstration on how to knead dough. You know they were getting quite antsy to start playing by this point!
They had a blast playing with their salt dough. I gave them a kid-sized rolling pin and some cookie cutters to use. This kept them busy ALL afternoon! These plastic clay tools are super inexpensive and would be fun to play with, as well.
RELATED: 4-Ingredient Glitter Slime Recipe (No Borax!)
Ingredients
- 2 cups all-purpose flour*
- 1 cup salt
- 1 cup water
Instructions
- Combine the flour and salt in a large mixing bowl.
- Gradually add water while stirring and mixing to form a dough with a Play-Doh like consistency.
- Form the dough into a ball and knead for approximately 5-7 minutes, until the dough is smooth and firm. Additional water may be needed, depending upon humidity. Add a teaspoon of water at a time until the dough reaches the proper texture.
 On the other hand, if the dough is too sticky, add more flour by the teaspoon until it's no longer tacky.
 - Store the salt dough in a Ziploc bag when it's not in use to prevent it from drying out.
Notes
I recommend covering your work/play area with an inexpensive plastic tablecloth to make cleanup easier!
How Long To Bake Salt DoughIf you want to bake your salt dough crafts, place them on a foil-covered baking sheet in a 250-degree oven. Baking time will vary depending on the size and thickness of your crafts. For each 1/4" in thickness, allow approximately a half hour of baking time, or bake until surface turns light golden brown. Turn each piece frequently so that they dry out evenly. If an area puffs up, poke a hole in it with a pin or toothpick to release the air.
*Gluten-Free Salt DoughIf you or your child has a gluten sensitivity, substituting your favorite gluten-free flour one for one will work well in this recipe.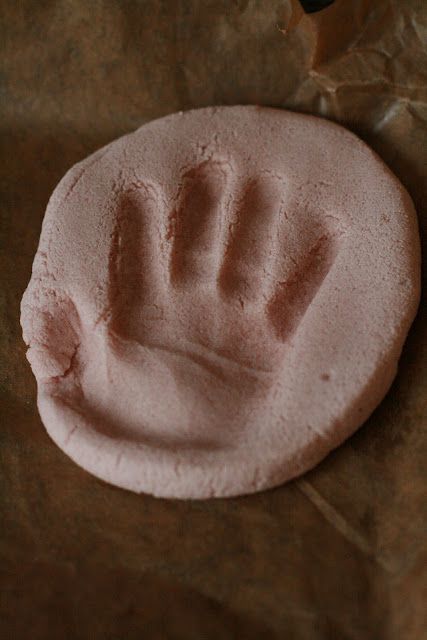
Recommended Products
As an Amazon.com Services LLC Associates and member of other affiliate programs, I earn from qualifying purchases.
-
Silicone Rolling Pins For Kids (2-pk.)
-
Heavy Duty Plastic Table Cloth
-
Plastic Clay Tools For Kids (10-ct.)
Nutrition Information:
Yield: 1 Serving Size: 2.5 cupsAmount Per Serving: Calories: 0Total Fat: 0gSaturated Fat: 0gTrans Fat: 0gUnsaturated Fat: 0gCholesterol: 0mgSodium: 0mgCarbohydrates: 0gFiber: 0gSugar: 0gProtein: 0g
Important: while salt dough may look good enough to eat, it should not be consumed. Young children should be supervised while playing with salt dough playdoh.
No Bake Salt Dough Recipe
You can store salt dough in an airtight container for future use. Or you can let your creations dry and paint them with acrylic paints.
RELATED: DIY Easy Bake Oven Recipes
If you do want to speed up the drying process by baking them, just place your salt dough crafts on a baking sheet and pop them into a 200-degree oven.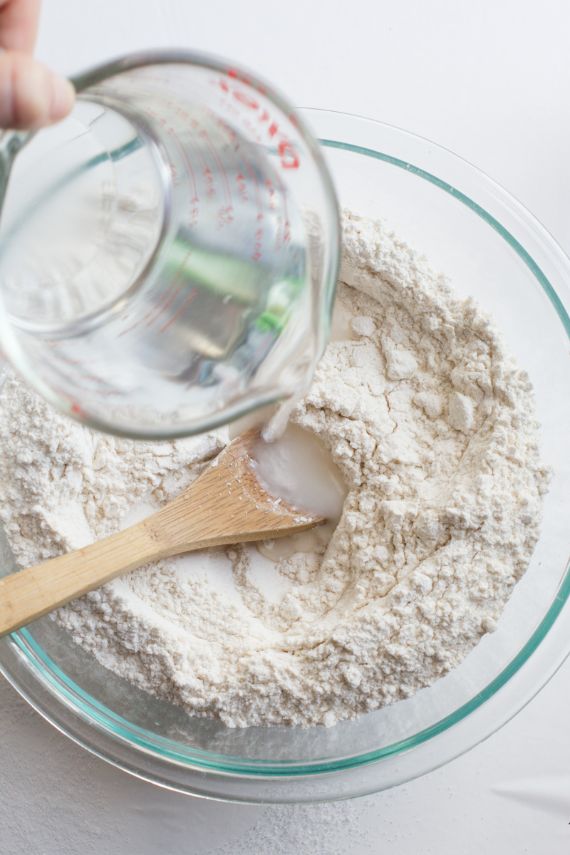 Baking time will vary based on the size and thickness of your crafts, so just keep a close eye on them.
I’d love to see how your salt dough crafts turn out… Tag me @Unsophisticook on Instagram or use the hashtag #Unsophisticook so I can check them out. Enjoy!
Salt dough - 3 answers
Helpful tips:
1. It is advisable to put the finished salt dough in a plastic bag for 2-3 hours in the refrigerator and also store for further use.
2. If you add some spices (nutmeg, cumin, cinnamon) to the dough, it will acquire a pleasant aroma.
3. Sculpt the figurine immediately on the baking sheet or board where it will dry.
4. It is advisable to cover the table with oilcloth and free from foreign objects.
5. The dough dries very quickly when exposed to air, so it must be kept in tightly sealed containers during operation. Each time, take out the right amount of dough from there, and immediately put the excess back.
6. Almost any paint sticks to the dough, so the possibilities for painting are almost unlimited.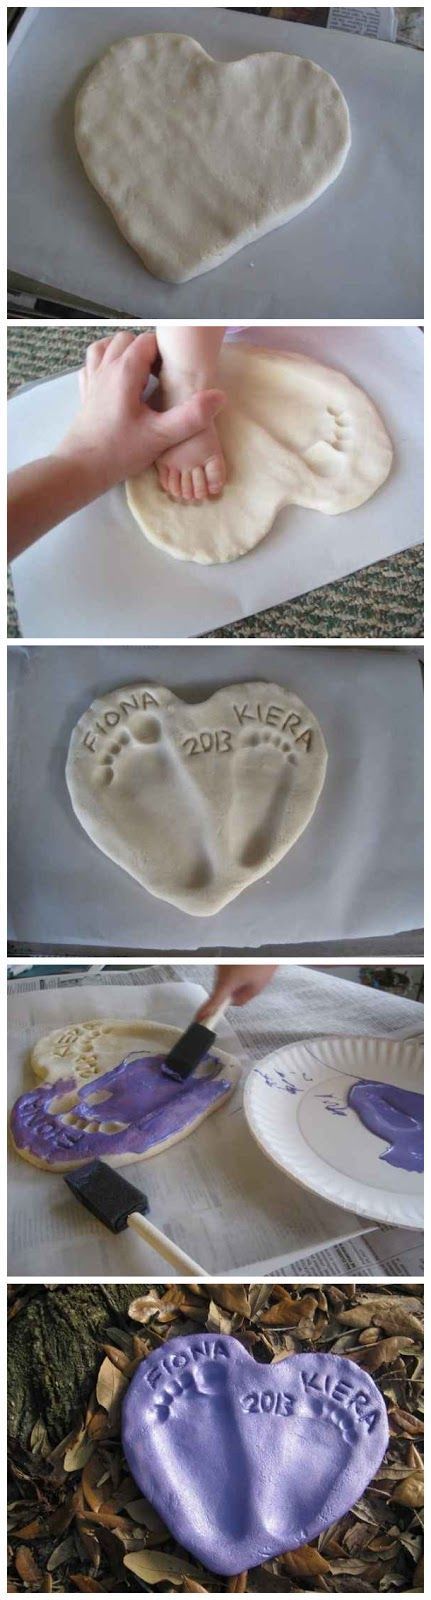 On top of the paint, finished products are well varnished.
7. Glue all the details with water, and the texture can be done with a toothpick or with a pen rod.
8. Avoid wrinkles and cracks on the outside of the product. The surface should be flat and smooth, because in the process of varnishing the product, even the smallest crack will become bright and spoil the look of the craft.
9. Salt dough is a safe product to make with kids (as long as you don't add glue!). As a rule, once having tasted the dough, the baby no longer tries to take it into his mouth.
Basic data (Internet):
Modeling from dough is very interesting and quite simple. Most importantly, apply a little patience and imagination. Testoplasty will not require almost any material costs, because all that is required is salt, flour and water. Often, in addition to the main components, additional components are added, such as starch, vegetable oil, glue, etc.
Be sure to remember that the salt should be finely ground for quick dissolution. Otherwise, crystals will appear in the finished product and it will not be possible to make the surface smooth. If only coarse salt is at hand, then before you start kneading the dough, you need to dilute it with the amount of water indicated in the recipe or grind it in a coffee grinder. The water must be cold only. It is better to take flour of inexpensive varieties, without baking powder, emulsifiers and other additives.
Consider the main recipe, on the basis of which all the rest are prepared.
In a deep dish, mix two cups of wheat flour with one cup of salt and add about 2/3 cup of water. The amount of water depends on the type of flour. Knead the dough well, in density it should resemble softened plasticine. If it sticks to your hands, add a little more flour. To give more elasticity, wrap it with oilcloth so that it does not dry out, and put it in the refrigerator for several hours. Now you can get to work.
For large items, a slightly different recipe is used. The dough is four parts salt, two parts flour and one part water.
Small details when sculpting require special care, in this case, it is better to connect 200 gr. salt, 300 gr. flour, 3 tablespoons of glycerin and 2 tablespoons of wallpaper paste diluted in 125 ml of water. Glycerin will give the dough good plasticity and softness, and glue strength.
There is also a recipe for salt dough with the addition of starch. Mix 1 cup flour, 1 cup cornstarch, 1 cup salt and 2/3 cup water. It turns out soft, airy and plastic dough, which is a pleasure to work with.
If you do not want to color the finished product, but are thinking of giving it the natural color of baked ruddy bread, then for kneading take half of the rye and wheat flour from the indicated amount in the recipe. It is undesirable to use only rye flour, as the dough will turn out to be inelastic, hard and will crumble during work. Also, it’s a good idea to add a tablespoon of vegetable oil or fat cream to the main ingredients.
The test is handled in two ways. You can roll out the layer and cut out various flat figures from it.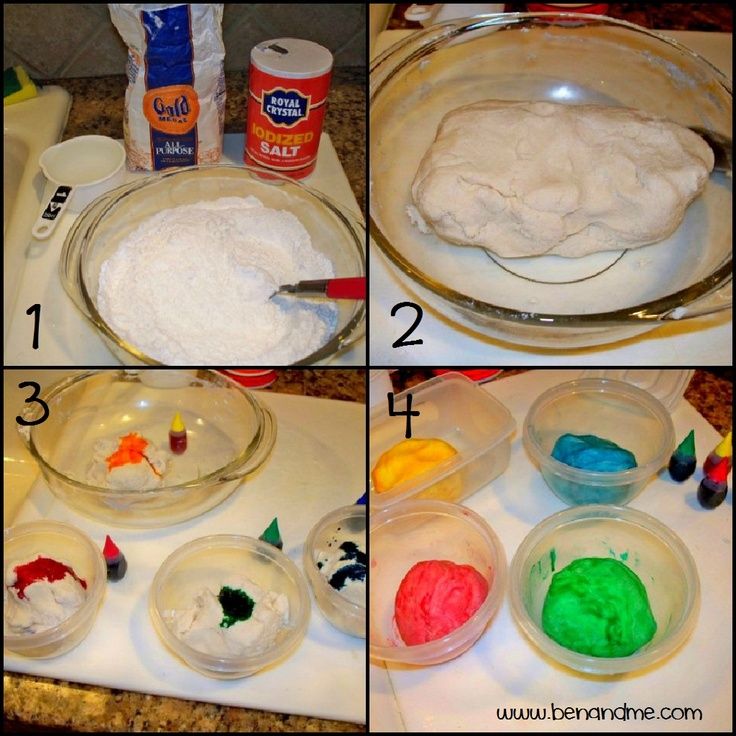 But if you want to add volume, it is better to sculpt individual parts, and when they dry out a little, combine them into the intended composition and bake. When working with vertical volumetric figures (statuettes), a wire frame is used.
Masters are often asked how to dry salt dough. The best option for drying puff pastry is roasting in the oven. The ideal temperature for firing is 100 - 120 degrees. If the temperature is higher, your products may turn black and crack. The firing time should be about 30 minutes.
If you have an electric oven, setting the temperature is easy. But the owners of gas stoves will have a harder time, they will have to set the temperature empirically. In order not to spoil the finished product, it is worth choosing the temperature by burning a piece of unnecessary dough.
Some advise to dry the dough in the microwave. However, this is also not worth doing, because the finished product will definitely crack. Of course, you can dry the product in the sun or a heating radiator, however, it is very difficult to say how long the salt dough dries in such conditions.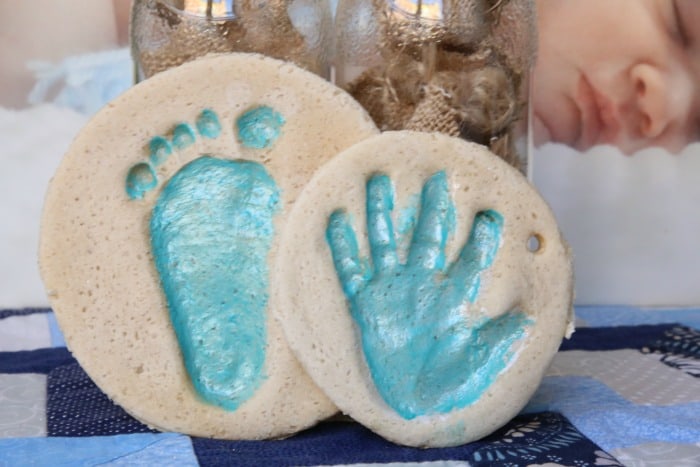 This process can take two or three days or a week. It depends on many factors, including the size of the product.
In order to prevent cracking and fading of crafts, they can be coated with ordinary acrylic varnish. The varnish dries in a few hours, it is non-toxic and can be used without fear for children's creativity.
Salt dough: collections of master classes, articles, publications about needlework and creativity
Found 113 topics with this keyword
Sculpting a circus baby elephant
Sculpting a circus baby elephant
Elena Kubrina Toys - Dobryushki!
Knead the salt dough and call the children, we will sculpt! Today I want to invite you to make a circus elephant with a ball of salt dough with me. You will need salt dough: mix 1 cup of fine salt and two cups of flour and gradually add water when kneading the dough, water need a little less ...
Not just a garland, but a Christmas tradition
Not just a garland, but a Christmas tradition
Anna
Plunge into childhood childhood, she grew up as a creative person: she constantly painted, sculpted, dragged cones with moss home and glued them into some awkward little things.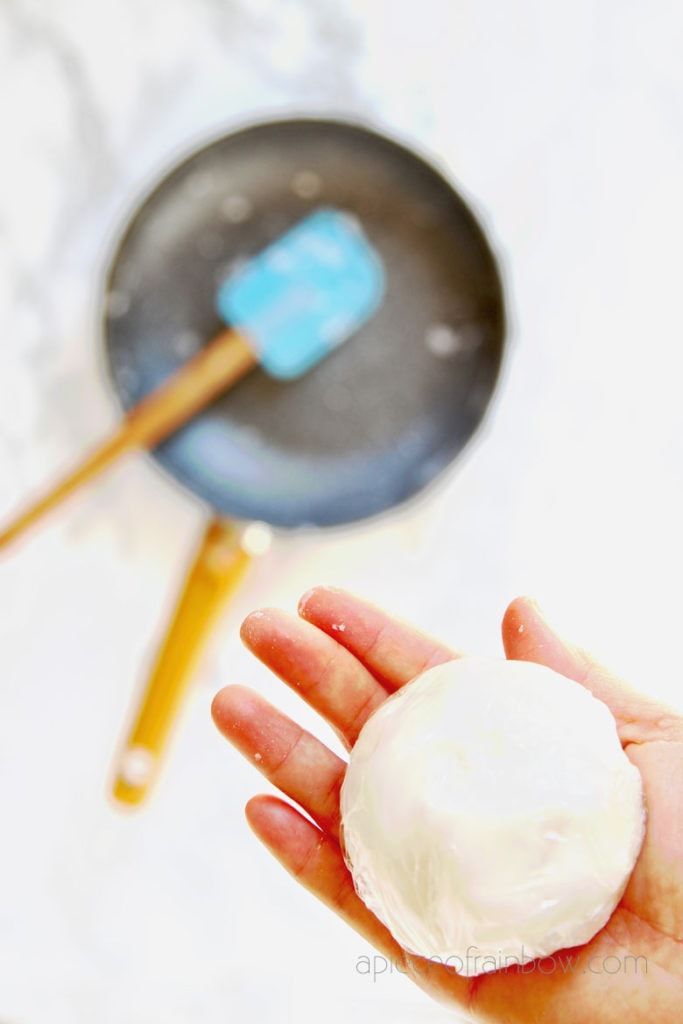 So my ...
Sculpting a tiger - a symbol of 2022 from salt dough
We sculpt a tiger - a symbol of 2022 from salt dough
Elena Kubrina Toys - Dobryushki!
Preparations for the New Year have begun! And the traditional master class of the symbol of the year tiger from salt dough is ready from me! Knead the dough, call the children and sculpt with me! I will sculpt from colored dough, and then finish the strips with black gouache. The easiest recipe for salt dough. All you need is ...
Sculpting a squirrel from salt dough
Sculpting a squirrel from salt dough
Elena Kubrina Toys - Dobryushki!
A new workshop is ready! I propose to mold a squirrel with a bump with me. Children can also cope with this work, as work is molded from simple forms. Prepare salt dough for work. The simplest and most tested recipe for me: flour 2 cups, fine salt 1 cup and water a little less than a glass.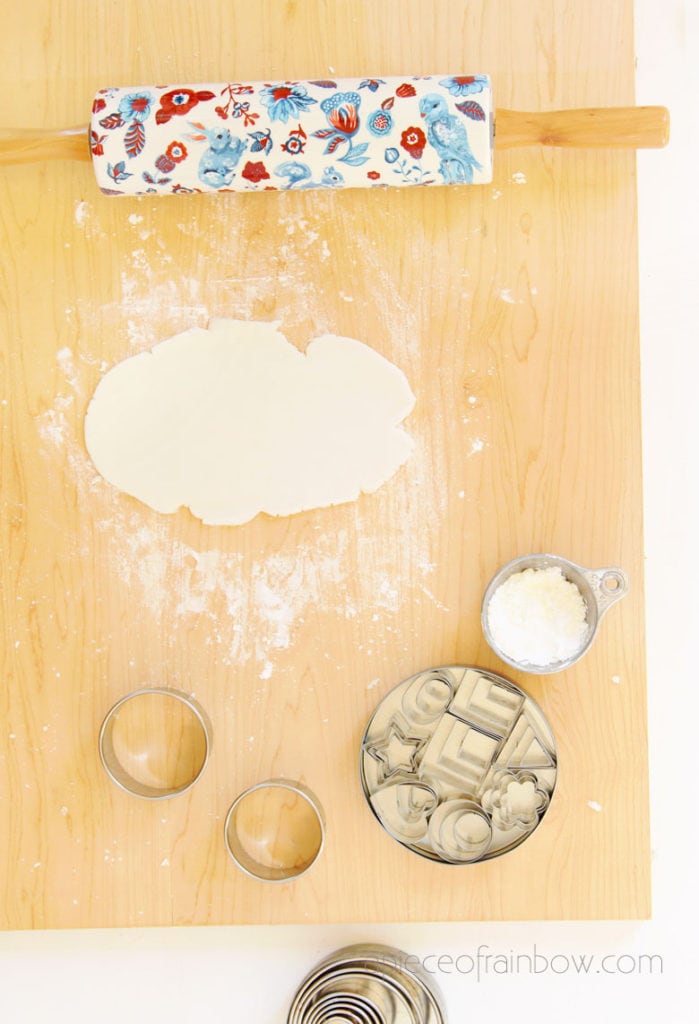 Mixing the salt with ...
Salt dough "ceramic" fish for home decor
Salt dough "ceramic" fish for home decor
Evgenia Vashchenko
Today we will return to the decor of the house again and finally start modeling from salt dough. As a result, we will get two charming fish, molded according to one pattern and painted like ceramics. Such fish can decorate a corridor, a kitchen, a living room, and, of course, very well ...
Create decorative houses
Create decorative houses
Bright Create
Scandinavian style and wanted to repeat them. They are only made of clay, and this requires a special oven, and I wanted to do everything at home. And that's what I got. I start by drawing a layout of the future house on paper, observing ...We make the symbol of the year: the “Salt barrel bull” magnet
We make the symbol of the year: the “salt barrel bull” magnet
Evgenia
Traditionally, I make a souvenir magnet for all my colleagues and relatives - the symbol of the year.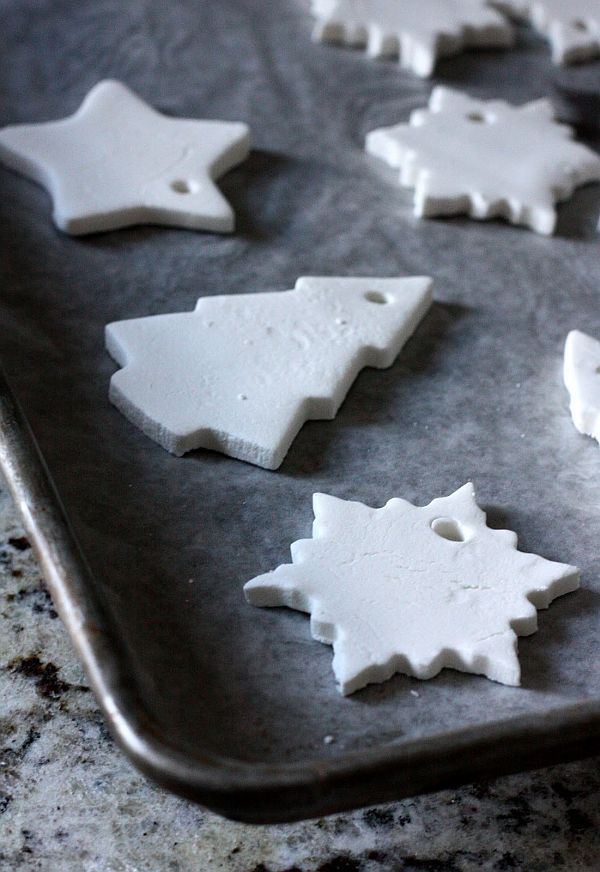 But this time I decided to share a master class. Very simple, easy, you can blind with children. Almost step by step photo. As a result, you will get such a bull-salt barrel. For work, the classic version of the dough: a glass of flour, half a glass ...
We mold a bull. Symbol of 2021
We sculpt a bull. Symbol of 2021
Elena Kubrina Toys - Dobryushki!
There is very little left before the New Year, which means it's time to make gifts with your own hands! I propose to mold the symbol of 2021 of the bull from salt dough with me. Knead the dough and join. Salt dough recipe: Flour 2 cup Fine salt 1 cup Water 1 cup gouache, but after ...
Baba-Yozhka's home charm
Baba-Yozhka's home charm
Varvara
The talisman in the form of Baba Yaga is a talisman for the home and family. In ancient times, it was believed that Baba Yaga is a revered woman who has access to secret knowledge, is subject to the forces of nature. Therefore, the image of Baba Yaga in the house is well-being and protection from the evil eye. Grandmother Yozhka protects peace, tranquility and ...
Creating a painting "Morning Roses" from salt dough
Creating a painting "Morning Roses" from salt dough
ViktoriyaStreltsova -art
Today we are creating a painting from salt dough “Morning Roses”. Roses for this picture must be made in advance, dried well, covered with paint and varnish. Leaves, stems and buds will be molded and immediately glued to the base. I use improved salt dough, with the addition of starch, PVA glue and napkins. ...
Preparing improved salt dough for modeling flowers
Preparing improved salt dough for modeling flowers
ViktoriyaStreltsova-art
Today I want to share with all lovers of salt dough modeling a recipe for improved salt dough, from which I mold delicate flowers with thin petals. The composition of this test, in addition to the classic ingredients (flour, salt and water), includes starch, PVA glue, and paper napkins.