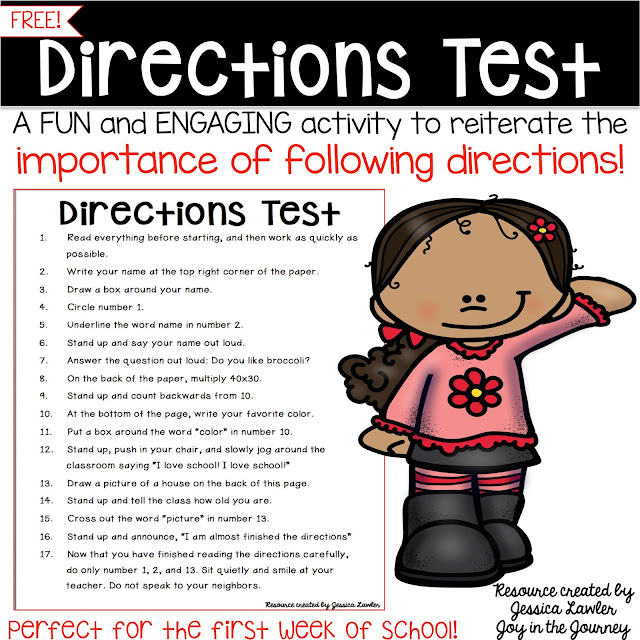
How to make 8
Lesson Video: Making 8 and 9
Video Transcript
Making Eight and Nine
In this video, we will learn how to use models and addition equations to show all the different ways to make eight and nine. We could use cubes to help us find all the ways to make eight. We can see from the model that we can make eight using one red cube plus seven blue cubes. One and seven is eight. We could also make eight using two red cubes and six blue cubes. One plus seven is eight. Two plus six is eight.
Can you predict what the next number bond would be? In the first number bond, we had one red cube. In the second, we had two. We’re increasing the number of red cubes by one each time, one, two, three. We can make eight using three red cubes, but how many blue cubes? The number of blue cubes is decreasing by one each time.
We’re taking away one blue cube each time, seven, six, five. So far, we found three different ways to make eight: one plus seven, two plus six, and three plus five.
It helps to use a strategy to find all the possible ways of making a number. We started with one red brick. We added one red brick each time and took away one blue brick each time. This helped us to find all the possible ways of making eight. We didn’t find all the possible ways of making eight. We’re going to do that with some practice questions.
We call the pairs of numbers which make nine number bonds to nine. Seven and two makes nine. Seven blue bricks and two red bricks is nine. We didn’t record all the ways of making nine or use a strategy. Let’s practise, finding all the ways to make eight and nine using models and addition equations.
There are lots of ways to make eight. What is the missing expression? Zero plus eight. One plus seven. Two plus six. What plus what. Four plus four. Five plus three. Six plus two. Seven plus one. And eight plus zero.
There are nine ways to make eight, but one of the expressions is missing. We could use the cube train to help us find the missing expression. We could also find the missing expression by working out the strategy that’s been used. If we look carefully at the pairs of numbers or the number bonds, we can spot some patterns.
If we write down the number of red bricks and blue bricks we’ve used to make eight, that will help us to spot the pattern. What’s happening to the number of red bricks? Zero, one, two, three, four, five, six, seven, eight. The number of red bricks is going up by one each time. We’re counting in ones. Now we found the first missing number. Zero, one, two, three.
What’s happening to the number of blue bricks? Eight, seven, six. The missing number is five. Eight, seven, six, five, four, three, two, one, zero. The number of blue bricks is getting smaller each time; it’s decreasing. We’re counting back in ones, eight, seven, six, five. The missing expression is three plus five. Zero and eight make five, one and seven, two and six, and three and five. So do four plus four, five plus three, six plus two, seven plus one, and eight plus zero.
We found all the ways to make eight using our model and a strategy. We wrote the number bonds down and looked for the pattern. This helped us to find the missing addition expression. Three plus five makes eight.
Find the missing addition sentence. Nine plus zero is nine. Eight plus one is nine. Seven plus two is nine. Six plus three is nine. Five plus four is nine. What plus what is nine. Three plus six is nine. Two plus seven is nine. And one plus eight is nine.
The model shows all the number bonds to nine. The pictures use blue and green tennis balls to model the addition expressions. Let’s look more closely at the strategy that’s been used to find the pairs. In other words, let’s look closely at the numbers in the number bonds. Let’s see if we can spot any patterns.
Nine blue tennis balls and no green tennis balls makes nine. Eight and one is nine. Seven and two is nine. Six and three is nine. Five plus four is nine. Have you spotted the pattern yet? Did you notice what’s happening to the number of blue balls each time? Nine, eight, seven, six, five.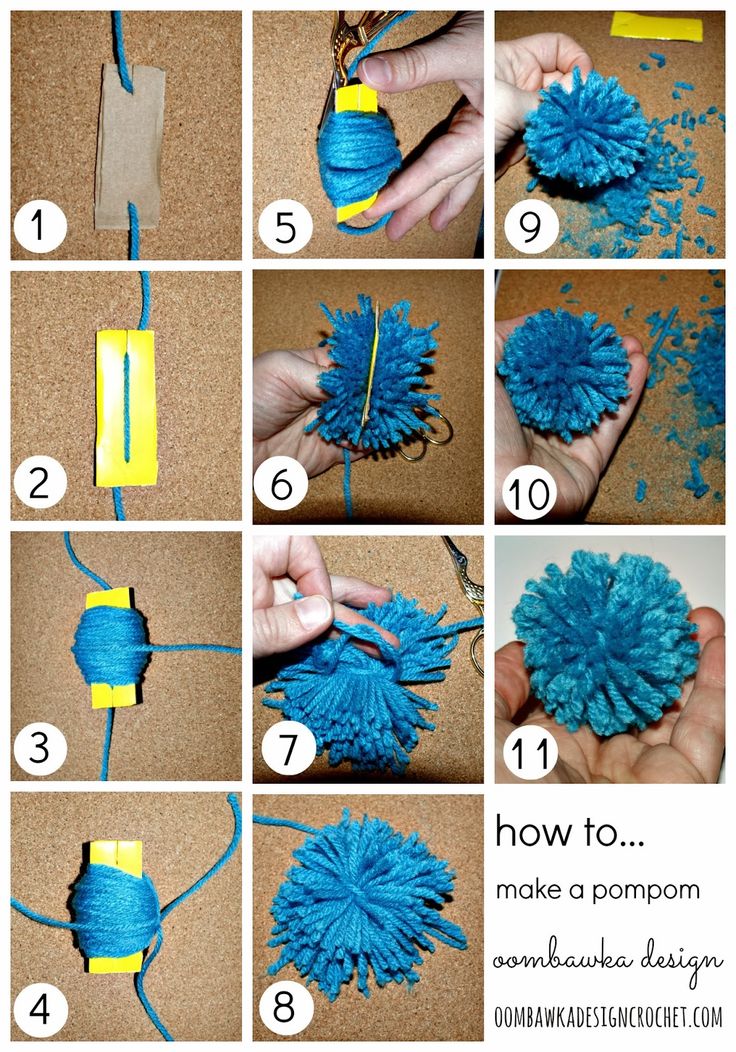 The numbers are decreasing. The number of blue balls is going down. There’s one less blue ball each time. Which number would come next? Nine, eight, seven, six, five, four.
Now we need to work out the number of green balls. Let’s see if we can spot the pattern. Zero, one, two, three, four, five. The number of green balls increases by one each time. We’re adding one green ball each time. The missing addition sentence is four plus five is nine.
We found the missing addition sentence by looking closely at what happened to the number of blue and green balls each time. We could use the model to help us check the answer. Are there four blue balls? One, two, three, four. Yes, there are. Let’s check there are five green balls.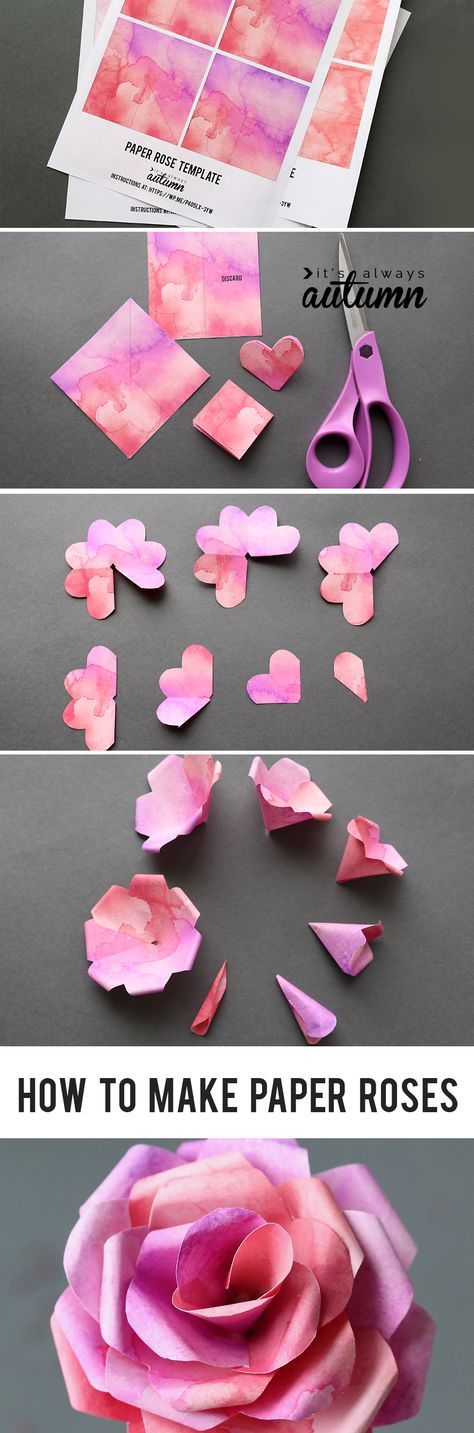 One, two, three, four, five. Four plus five is nine.
Think about making eight. Find the missing numbers. What plus one equals eight. Three plus what equals eight.
We’re given two addition expressions which make eight. Something plus one equals eight and something plus three equals eight. What do we add to one to make eight? To find the answer, we could count the number of squares. One, two, three, four, five, six, seven. Seven plus one equals eight.
Let’s find the missing number in the second pair of numbers. Three and what makes eight. Three and one, two, three, four, five makes eight. Seven add one equals eight. Three add five equals eight. The missing numbers are seven and five. We used part-whole models and bar models to help us find the missing numbers.
What number is missing? Nine is five and what more.
Let’s use a part-whole model to help. We know that the two groups of counters make nine. We know that five blue counters and a number of orange counters total nine. How many orange counters are there? One, two, three, four. Nine is five and four more. We used the number of counters and a part-part-whole model to help us find the missing number. Nine is five and four more.
What have we learned in this video? We’ve learned how to use models and addition equations to show all the ways to make eight and nine.
How to Create a Social Media Marketing Strategy [Template]
A social media marketing strategy is a summary of everything you plan to do and hope to achieve on social media. It guides your actions and lets you know whether you’re succeeding or failing.
The more specific your plan is, the more effective it will be. Keep it concise. Don’t make it so lofty and broad that it’s unattainable or impossible to measure.
In this post, we’ll walk you through a nine-step plan to create a winning social media strategy of your own.
Step 1. Choose social media marketing goals that align to business objectives
Step 2. Learn everything you can about your audience
Step 3. Get to know your competition
Step 4. Do a social media audit
Step 5. Set up accounts and improve profiles
Step 6. Find inspiration
Step 7. Create a social media content calendar
Step 8. Create compelling content
Step 9. Track performance and adjust your social media strategy accordingly
Bonus: Get a free social media strategy template to quickly and easily plan your own strategy. Also use it to track results and present the plan to your boss, teammates, and clients.
What is social media marketing?
Social media marketing is the practice of using social media channels to sell or promote a brand, product or service.
Social media marketing helps businesses:
- Increase brand awareness
- Build engaged communities
- Sell products and services
- Measure brand sentiment
- Provide social customer service
- Advertise products and services to target audiences
- Track performance and adjust larger marketing strategies accordingly
What is a social media marketing strategy?
A social media strategy is a document outlining your social media goals, the tactics you will use to achieve them and the metrics you will track to measure your progress.
Your social media marketing strategy should also list all of your existing and planned social media accounts along with goals specific to each platform you’re active on.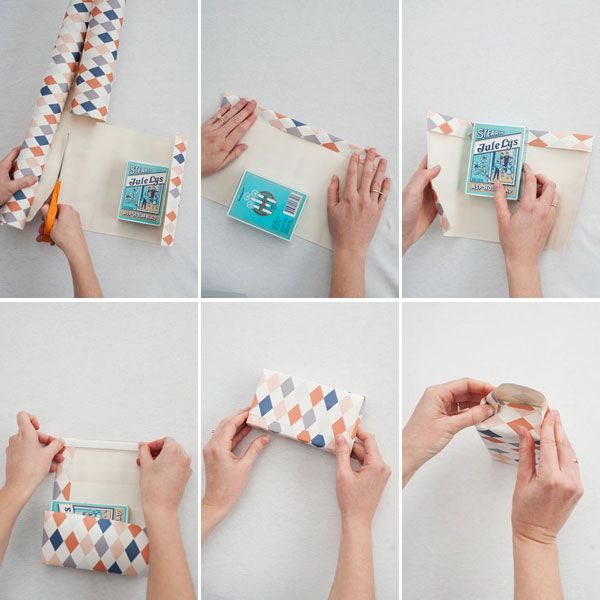 These goals should align with your business’s larger digital marketing strategy.
Finally, a good social media plan should define the roles and responsibilities within your team and outline your reporting cadence.
Creating your own social media marketing strategy (video guide)
No time to read the whole article? Let Amanda, Hootsuite’s own Senior Manager of Social Media Marketing, guide you through our free social media marketing strategy template in less than 10 minutes:
How to create a social media marketing strategy in 9 stepsStep 1. Choose social media marketing goals that align to business objectivesSet S. M.A.R.T. goals
The first step to creating a winning social media strategy is to establish clear objectives and goals. Without goals, you have no way to measure success and return on investment (ROI).
Each of your goals should be SMART: specific, measurable, attainable, relevant and time-bound.
Psst: If you need examples of smart social media goals<, we’ve got you covered.
Track meaningful metricsVanity metrics like number of followers and likes are easy to track, but it’s hard to prove their real value. Instead, focus on things like engagement, click-through, and conversion rates.
For inspiration, take a look at these 19 essential social media metrics.
You may want to track different goals for different social media networks, or even different uses for each network.
For example, if you use LinkedIn to drive traffic to your website, you would measure click-throughs.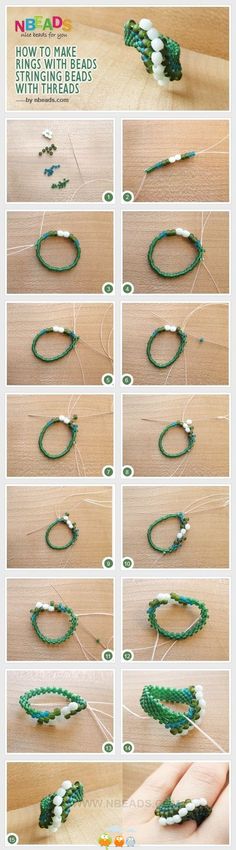 If Instagram is for brand awareness, you might track the number of Instagram Story views. And if you advertise on Facebook, cost-per-click (CPC) is a common success metric.
Social media goals should align with your overall marketing objectives. This makes it easier to show the value of your work and secure buy-in from your boss.
Start developing a successful social media marketing plan by writing down at least three goals for social media.
Step 2. Learn everything you can about your audienceGet to know your fans, followers, and customers as real people with real wants and needs, and you will know how to target and engage them on social media.
When it comes to your ideal customer, you should know things like:
- Age
- Location
- Average income
- Typical job title or industry
- Interests
- etc.
Here’s a simple guide and template for creating audience/buyer personas.
Social media analytics can also provide a ton of valuable information about who your followers are, where they live, and how they interact with your brand on social media.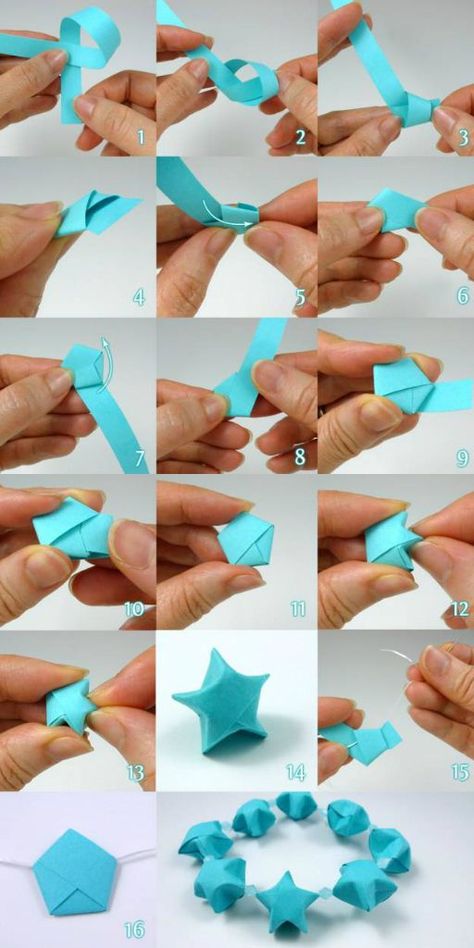 These insights allow you to refine your strategy and better target your audience.
Jugnoo, an Uber-like service for auto-rickshaws in India, used Facebook Analytics to learn that 90% of their users who referred other customers were between 18- and 34-years-old, and 65% of that group was using Android. They used that information to target their ads, resulting in a 40% lower cost per referral.
Check out our guide to using social media analytics and the tools you need to track them.
Step 3. Get to know your competitionOdds are your competitors are already using social media, and that means you can learn from what they’re doing.
Conduct a competitive analysisA competitive analysis allows you to understand who the competition is and what they’re doing well (and not so well). You’ll get a good sense of what’s expected in your industry, which will help you set social media targets of your own.
It will also help you spot opportunities.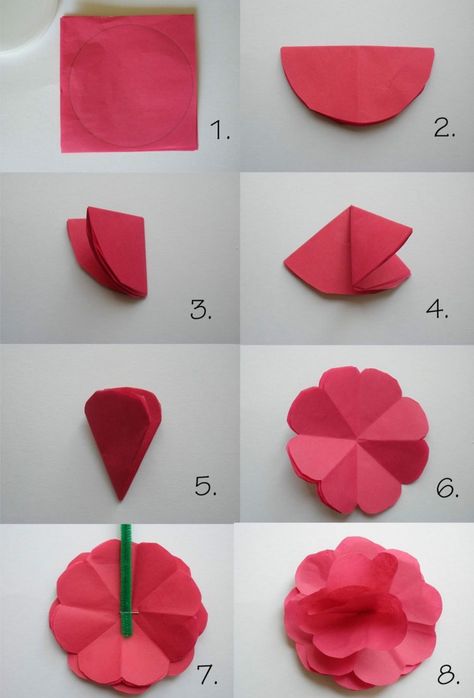
Maybe one of your competitors is dominant on Facebook, for example, but has put little effort into Twitter or Instagram. You might want to focus on the social media platforms where your audience is underserved, rather than trying to win fans away from a dominant player.
Use social media listeningSocial listening is another way to keep an eye on your competitors.
Do searches of the competition’s company name, account handles, and other relevant keywords on social media. Find out what they’re sharing and what other people are saying about them. If they’re using influencer marketing, how much engagement do those campaigns earn them?
Pro tip: Use Hootsuite Streams to monitor relevant keywords, hashtags and accounts in real-time.
Try It Free
As you track, you may notice shifts in how your competitors and industry leaders are using social media. You may come across new, exciting trends. You might even spot specific social content or a campaign that really hits the mark—or totally bombs.
Use this kind of intel to optimize and inform your own social media marketing strategy.
Bonus: Get a free social media strategy template to quickly and easily plan your own strategy. Also use it to track results and present the plan to your boss, teammates, and clients.
Get the template now!
Step 4. Do a social media auditIf you’re already using social media, take stock of your efforts so far. Ask yourself the following questions:
- What’s working, and what’s not?
- Who is engaging with you?
- What are your most valuable partnerships?
- Which networks does your target audience use?
- How does your social media presence compare to the competition?
Once you collect that information, you’ll be ready to start thinking about ways to improve.
We’ve created an easy-to-follow social media audit guide and template to walk you through each step of this process.
Your audit should give you a clear picture of what purpose each of your social accounts serves. If the purpose of an account isn’t clear, think about whether it’s worth keeping.
To help you decide, ask yourself the following questions:
- Is my audience here?
- If so, how are they using this platform?
- Can I use this account to help achieve my goals?
Asking these tough questions will keep your social media strategy focused.
Look for impostor accountsDuring the audit, you may discover fake accounts using your business name or the names of your products.
These imposters can be harmful to your brand—never mind that they’re capturing followers that should be yours.
Report them.
You may want to get your accounts verified too to ensure your fans know they are dealing with the real you.
Here’s how to get verified on:
- TikTok
 Set up accounts and improve profilesDecide which networks to use
As you decide which social networks to use, you will also need to define your strategy for each.
Benefit Cosmetics’ social media manager, Angela Purcaro, told eMarketer: “For our makeup tutorials … we’re all about Snapchat and Instagram Stories. Twitter, on the other hand, is designated for customer service.”
Hootsuite’s own social team even designates different purposes for formats within networks. On Instagram, for example, they use the feed to post high-quality educational infographics and product announcements and Stories to cover live events or quick social media updates.
View this post on Instagram
A post shared by Hootsuite 🦉 (@hootsuite)
Pro tip: Write out a mission statement for each network. A one-sentence declaration to keep you focused on a specific goal.
Example: “We will use Twitter for customer support to keep email and call volumes down.”
Or: “We will use LinkedIn for promoting and sharing our company culture to help with recruitment and employee advocacy.”
One more: “We will use Instagram to highlight new products and repost quality content from influencers.”
If you can’t create a solid mission statement for a particular social media channel, you may want to ask yourself if it’s worth it.
Note: While larger businesses can and do tackle every platform, small businesses may not be able to — and that’s ok! Prioritize social platforms that will have the most impact on your business and make sure your marketing team has the resources to handle content for those networks.
Set up your profilesOnce you’ve decided which networks to focus on, it’s time to create your profiles. Or improve existing ones so they align with your strategy.
- Make sure you fill out all profile fields
- Include keywords people would use to search for your business
- Use consistent branding (logos, images, etc.) across networks so your profiles are easily recognizable
Pro tip: Use high-quality images that follow the recommended dimensions for each network. Check out our always-up-to-date social media image size cheat sheet for quick reference.
We’ve also got step-by-step guides for each network to walk you through the process:
- Create a Facebook business page
- Create an Instagram business account
- Create a TikTok account
- Create a Twitter business account
- Create a Snapchat account
- Create a LinkedIn Company Page
- Create a Pinterest business account
- Create a YouTube channel
Don’t let this list overwhelm you. Remember, it’s better to use fewer channels well than to stretch yourself thin trying to maintain a presence on every network.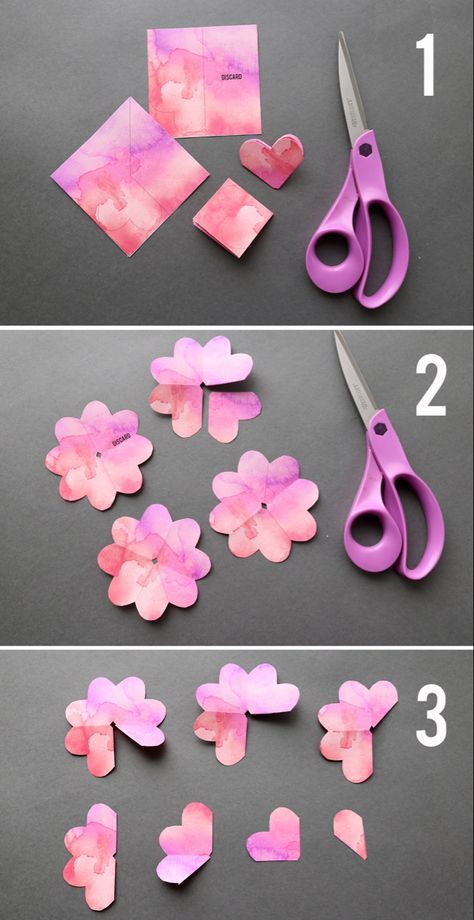
While it’s important that your brand be unique, you can still draw inspiration from other businesses that are great on social.
Social media success storiesYou can usually find these on the business section of the social network’s website. (Here’s Facebook’s, for example.)
Case studies can offer valuable insights that you can apply to your own social media plan.
Award-winning accounts and campaignsYou could also check out the winners of The Facebook Awards or The Shorty Awards for examples of brands that are at the top of their social media game.
For learning and a laugh, check out Fridge-Worthy, Hootsuite’s bi-weekly awards show highlighting brands doing smart and clever things on social media.
Your favorite brands on social mediaWho do you enjoy following on social media? What do they do that compels people to engage and share their content?
National Geographic, for example, is one of the best on Instagram, combining stunning visuals with compelling captions.
View this post on Instagram
A post shared by National Geographic (@natgeo)
Then there’s Shopify. The ecommerce brand uses Facebook to sell themselves by showcasing customer stories and case studies.
And Lush Cosmetics is a great example of superior customer service on Twitter. They use their 280 characters to answer questions and solve problems in an extremely charming and on-brand way.
Hey lovely! 💕 We are sorry to hear how much you are missing Scrub Scrub Scrub. We will make sure our team knows you'd love to see it back on the shelves. In the meantime, check out Magic Crystals for a similar scrubtastic feel 😍💜
— Lush North America (@lushcosmetics) October 15, 2021
Notice that each of these accounts has a consistent voice, tone, and style. That’s key to letting people know what to expect from your feed. That is, why should they follow you? What’s in it for them?
Consistency also helps keep your content on-brand even if you have multiple people on your social media team.
For more on this, read our guide on establishing a compelling brand voice on social media.
Ask your followersConsumers can also offer social media inspiration.
What are your target customers talking about online? What can you learn about their wants and needs?
If you have existing social channels, you could also ask your followers what they want from you. Just make sure that you follow through and deliver what they ask for.
Step 7. Create a social media content calendarSharing great content is essential, of course, but it’s equally important to have a plan in place for when you’ll share content to get the maximum impact.
Your social media content calendar also needs to account for the time you spend interacting with the audience (although you need to allow for some spontaneous engagement as well).
Your social media content calendar lists the dates and times at which you will publish types of content on each channel. It’s the perfect place to plan all of your social media activities—from images, link sharing, and re-shares of user-generated content to blog posts and videos. It includes both your day-to-day posting and content for social media campaigns.
Your calendar also ensures your posts are spaced out appropriately and published at the best times to post.
Pro tip: You can plan your whole content calendar and get recommended best times to post on every network based on your past engagement rate, impressions, or link click data in Hootsuite.
Hootsuite’s Best Time to Publish featureDetermine the right content mixMake sure your content strategy and calendar reflect the mission statement you’ve assigned to each social profile, so that everything you post is working to support your business goals.
(We know, it’s tempting to jump on every meme, but there should always be a strategy behind your social media marketing efforts!)
You might decide that:
- 50% of content will drive traffic back to your website
- 25% of content will be curated from other sources
- 20% of content will support lead-generation goals (newsletter sign-ups, ebook downloads, etc.)
- 5% of content will be about your company culture
Placing these different post types in your content calendar will ensure you maintain the right mix.
If you’re starting from scratch and you’re not sure what types of content to post, try the 80-20 rule:
- 80% of your posts should inform, educate, or entertain your audience
- 20% can directly promote your brand.
You could also try the social media content marketing rule of thirds:
- One-third of your content promotes your business, converts readers, and generates profit.

- One-third of your content shares ideas and stories from thought leaders in your industry or like-minded businesses.
- One-third of your content is personal interactions with your audience
Don’t post too much or too little
If you’re starting a social media marketing strategy from scratch, you may not have figured out how often to post to each network for maximum engagement yet.
Post too frequently and you risk annoying your audience. But, if you post too little, you risk looking like you’re not worth following.
Start with these posting frequency recommendations:
- Instagram (feed): 3-7 times per week
- Facebook: 1-2 times per day
- Twitter: 1-5 times per day
- LinkedIn: 1-5 times per day
Pro tip: Once you have your social media content calendar planned out, use a scheduling tool to prepare messages in advance rather than updating constantly throughout the day.
We might be biased, but we think Hootsuite is the best social media management tool.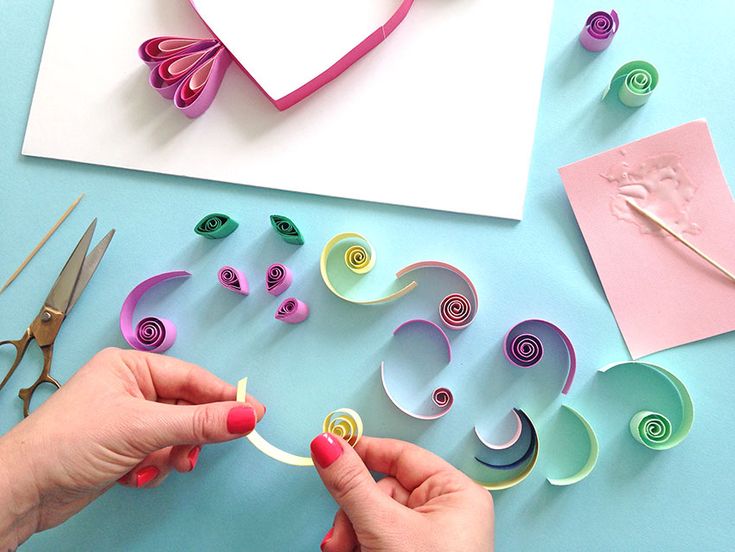 You can schedule social media posts to every network and the intuitive calendar view gives you a full picture of all your social activity each week.
Here’s a quick video overview of how scheduling works in Hootsuite’s post composing tool.
Try It Free
Step 8. Create compelling content
Remember those mission statements you created for each channel in Step 5? Well, it’s time to go a bit deeper, a.k.a. provide some examples of the type of content you’ll post to fulfill your mission on each network.
If you’re not sure what to post, here’s a long list of social media content ideas to get you started.
The idea here is to:
- Keep your content aligned with the purpose of each network;
- Show other stakeholders (if applicable) what kind of content they can expect to see on each network.
This last point especially will help you avoid any tension when your colleagues want to know why you haven’t posted their case study/whitepaper/blog post to TikTok yet. It’s not in the strategy, Linda!
Ideally, you will generate content types that are both suited to the network and the purpose you’ve set out for that network.
For example, you wouldn’t want to waste time posting brand awareness tweets if you’ve designated Twitter for primarily customer support. And you wouldn’t want to post super polished corporate video ads to TikTok, as users expect to see short, unpolished videos on that platform.
It might take some testing over time to figure out which type of content works best on which type of network, so prepare to update this section frequently.
This brings us to Step 9.
Step 9. Track performance and adjust your social media strategy accordinglyYour social media marketing strategy is a hugely important document for your business, and you can’t assume you’ll get it exactly right on the first try. As you start to implement your plan and track your results, you may find that some strategies don’t work as well as you’d anticipated, while others are working even better than expected.
In addition to the analytics within each social network (see Step 2), you can use UTM parameters to track social visitors as they move through your website, so you can see exactly which social posts drive the most traffic to your website.
Re-evaluate, test, and do it all againOnce this data starts coming in, use it to re-evaluate your strategy regularly. You can also use this information to test different posts, social marketing campaigns, and strategies against one another. Constant testing allows you to understand what works and what doesn’t, so you can refine your social media marketing strategy in real time.
You’ll want to check the performance of all your channels at least once a week and get to know the basics of social media reporting so you can track your growth over time.
Pro tip: If you use Hootsuite, you can review the performance of all your posts on every network in one place. Once you get the hang of checking your analytics, you may even want to customize different reports to show specific metrics over a variety of different time periods.
Try It Free
Surveys can also be a great way to find out how well your social media strategy is working. Ask your followers, email list, and website visitors whether you’re meeting their needs and expectations, and what they’d like to see more of. Then make sure to deliver on what they tell you.
Finalizing your social media strategy
Spoiler alert: nothing is final.
Social media moves fast. New networks emerge, others go through demographic shifts.
Your business will go through periods of change as well.
All of this means that your social media marketing strategy should be a living document that you review and adjust as needed. Refer to it often to stay on track, but don’t be afraid to make changes so that it better reflects new goals, tools, or plans.
When you update your social strategy, make sure to let everyone on your team know. That way they can all work together to help your business make the most of your accounts.
Social media strategy templateBonus: Get a free social media strategy template to quickly and easily plan your own strategy. Also use it to track results and present the plan to your boss, teammates, and clients.
What’s next? When you’re ready to put your plan into action, we’re here to help…
Save time managing your social media marketing strategy with Hootsuite. From a single dashboard you can easily:
- Plan, create, and schedule posts to every network
- Track relevant keywords, topics, and accounts
- Stay on top of engagement with a universal inbox
- Get easy-to-understand performance reports and improve your strategy as needed
Try Hootsuite for Free
With files from Shannon Tien.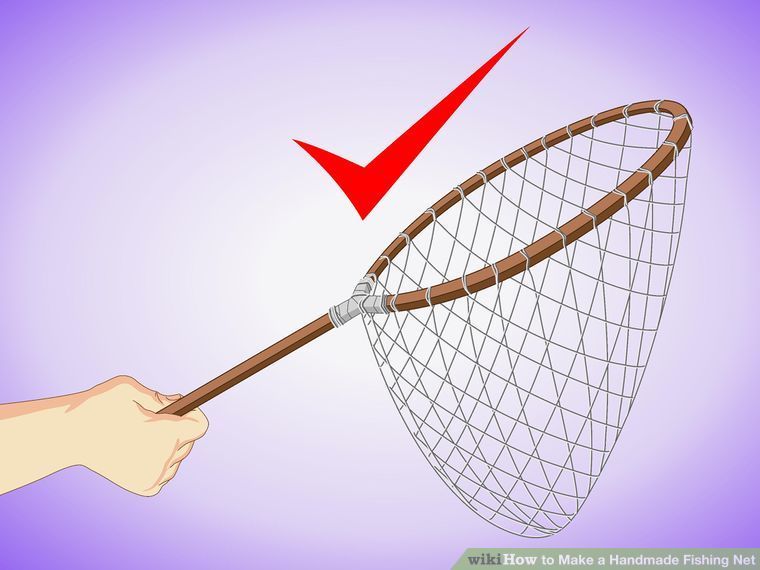
Do it better with Hootsuite, the all-in-one social media toolkit. Stay on top of things, grow, and beat the competition.
Free 30-Day Trial (risk-free!)
20 ways to make beautiful postcards on March 8 with your own hands
February 24, 2021LikbezDo it yourself
Postcards with flowers, butterflies, hearts and more will show off in a conspicuous place for a long time.
Share
0How to make three-dimensional cards with flowers for March 8
What you need
- Black paper;
- ruler;
- pencil;
- scissors;
- patterned paper;
- glue;
- white paper;
- green double-sided paper;
- pink double-sided paper;
- red double-sided paper;
- peach double-sided paper;
- black felt pen or marker.
How to
Fold black paper in half crosswise. From the top edge, measure down 8 cm and 19 cm and make marks. From the first, draw a line 6.5 cm long to the right, and 2 cm from the second. Cut the paper along the marked lines.
Frame: Being Artistic / YouTubeMeasure 3 cm from the small incision and make a mark. Bend the cut paper to it. The video shows in detail how to do it. Open the future postcard and align along the fold lines.
Frame: Being Artistic / YouTubePlace the closed postcard on the patterned paper and outline the volumetric detail. Cut out two small and large triangles and glue them on the inside of the cut figure. Glue the black paper to the white. In order for the cut parts to remain voluminous, they do not need to be glued.
Frame: Being Artistic / YouTube Cut out many 10 cm long narrow strips of green paper. Glue them to the inside of the three-dimensional part, as shown in the video. From pink, red and peach paper, cut out many squares with sides of 3 cm. Fold them in half three times, cut off the corner and unfold.
Glue the flowers to the green stems, behind the voluminous figure and next to the bouquet. Cut off excess strips. Draw a bow on pink paper, cut it out and trace it around, and then glue it on the bouquet between two volumetric parts.
Frame: Being Artistic / YouTubeWhat other options are there
A postcard with a voluminous tulip is even easier to make. Print the template, cut out the necessary parts and glue as shown in the instructions:
Stems can be easily and quickly made from accordion folded paper, and buds from hearts. Such unusual flowers also somewhat resemble tulips:
And here is another beautiful voluminous postcard:
Create beauty with your own hands 💐
- 10 Paper Flowers You Can't Distinguish From the Real
How to Make DIY Flower Lattice Cards
What You Need
- Thick peach double-sided paper;
- ruler;
- pencil;
- scissors;
- glue;
- pink double-sided paper;
- beads;
- green double-sided paper.
How to make
This postcard looks like a gazebo wall covered with climbing flowers.
Fold peach paper in half crosswise. On all sides on the front side, make marks at a distance of 1 cm from the edges. Connect them with lines and cut out the window.
Cut many strips of 0.5 cm wide from another sheet of peach paper. Glue them diagonally to the inside of the window, cutting off the excess. Then glue the strips diagonally to the other side, interlacing them with those already glued. The process is shown in detail in the video. From the inside, glue a frame 1 cm wide onto the grate.
Cut a small square out of pink paper and fold it in half diagonally three times. Draw a petal, cut out and open the flower. In the same way, make the flower smaller and twist the petals with scissors. Glue two flowers together and decorate with a bead in the middle. Do the same with a few more colors. Petals can be given a different shape.
Draw a small leaf on green paper and cut it out. Fold it in half lengthwise and twist it slightly to make folds on it. Make some more leaves. Glue the flowers and leaves to the bottom of the card.
What else is there
Try decorating the card differently:
Make your gift unique
What you need
- Thick pink double-sided paper;
- ruler;
- scissors;
- pencil;
- white paper;
- glue;
- narrow pink ribbon.
How to
Fold the paper in half crosswise. To make it easier, run down the middle with scissors or a pen without cutting all the way through. On the front side, make a mark on top at a distance of 4 cm from the fold, and on the left - 3 cm from the corner. From the last mark, measure 3 cm to the right.
Connect the first and third points with a smooth line. Connect the last mark with the lower right corner with the same line - see the video for details. Cut the paper along the marked lines.
Cut out a rectangle slightly smaller than the postcard from white paper. Glue it inside. Attach the ribbon to the waist on the inside of the dress and mark the fold. Cut a hole in this place, stretch a piece of tape and tie in front. Write your congratulations in a prominent place on the white paper.
What else is the option
Write the original congratulation 🎆
- 40 congratulations from March 8, which will definitely like
How to make postcards with flowers from paper strips
- CASES;
- ruler;
- pencil;
- pink double-sided paper;
- orange double-sided paper;
- cyan double-sided paper;
- green double-sided paper;
- glue;
- thick white paper;
- narrow peach ribbon.
- 16 gifts for March 8 that are nice to give and receive
- white What you need
- ;
- pencil;
- black marker pen or marker;
- scissors;
- note paper pink;
- peach note paper;
- adhesive-backed rhinestones;
- glue;
- narrow red ribbon.
How to
Cut six 1 cm strips from each sheet of colored paper. Take the pink, orange or blue strip and glue the edges together to form a small loop.
Glue its base and make a bigger loop around it. In the same way, make another loop and glue the remaining edge of the strip - you will get a petal. You will need six petals of each color. Glue them together to form flowers.
At the end of the green strip, make a loop slightly larger than the petals. Wrap the strip around the loop and glue the tip. Give the shape a leaf shape. Make two more such details.
Fold thick paper in half to make a postcard. Glue the resulting flowers on it. Tie the ribbon into a bow and attach it to the bottom of the card. Glue green paper stems to each flower and under the bow, and leaves to them.
What other options are there
Paper roses are just as easy to make. Cut small circles in a spiral and twist them to form flowers:
On a postcard, you can make a figure eight of daisies. Here is a detailed master class:
Postcards made using the quilling technique look very nice. Paper compositions are made from tightly rolled strips. To save time and not cut the strips by hand, you can purchase ready-made quilling paper.
Pick a cool gift 🎁
How to make DIY cards with butterflies
Heavy paper 9014
How to
Fold white paper in half. Draw a semicircle on the front side as shown in the video and cut it out. Outline the semicircle with a felt-tip pen or marker.
For decoration you will need three pink butterflies and two peach butterflies. You can use ordinary colored double-sided paper, but it is more convenient to make them from note paper.
Take a piece of paper from the block and cut off the adhesive layer, if any. Fold the paper in half and draw a butterfly on it so that its middle is on the fold. Cut out the shape and open. Make the butterfly smaller in the same way.
Decorate the little butterfly with rhinestones. Lubricate its fold with glue and glue it to the fold of a large part. Make a few more butterflies in the same way. Glue them along the contour of the semicircle. Write any congratulatory inscription in the window and paste over it from the inside with rhinestones.
Cut out some paper hearts and glue them in the upper left corner inside the card. These will be balloons. Draw the threads coming from them and attach a ribbon bow at the bottom.
What other options are there? 8 March worth buying right now
How to make handmade vase cards
What you need
- Scissors;
- ruler;
- pencil;
- green double-sided paper;
- orange double-sided paper;
- glue;
- pink double-sided paper;
- cyan double-sided paper;
- white paper.
How to
Cut a 21 x 9 rectangle out of green papercm and fold it in half crosswise. From the side of the fold, measure 1.5 cm from the edges and make marks. Connect them to the opposite corners. Cut the paper along the marked lines. Bend each part of the resulting part 2.5 cm.
Cut a 30 cm × 0.8 cm strip of orange paper and fold it in half. From the fold, make marks at a distance of 2. 5 cm and 5 cm. Bend the folded strip along these marks, as shown in the video. Unfold and tuck the strip along the folds inward to the central fold. Glue the resulting bow and glue it to the top of the green pot.
From orange, pink and blue paper, cut out pieces 3 cm wide. Fold each piece into an accordion shape with sides 2-2.5 cm. To make a tulip bud, glue three petals of each color together. Details are in the video. You will need 7 tulips in total.
Cut out a 10 x 5.5 cm rectangle from green paper and a 7 x 5 cm piece from white paper. Glue the white piece to the bottom of the green piece. Write your congratulations on white paper. Glue tulips on top. Insert the detail with congratulations into the vase so that the flowers are visible.
What else is there? -heart on March 8
What you need
- Scissors;
- ruler;
- pencil;
- white paper;
- red crepe paper;
- glue;
- black double-sided paper;
- red double-sided paper.

How to
Cut out an 18 cm square from white paper. Fold it in half and unfold it. The fold in the middle should be clearly visible. From two opposite edges of the sheet, make marks at a distance of 2 cm from each other. Connect them with lines.
Cut out 4 squares of red crepe paper with sides of 16 cm. Apply glue to the fold of the sheet and glue one square in the middle. Glue the rest to this square in the same way.
Fold the card in half. Draw half a heart in the center of the paper so that its middle is located on the fold - see the video for details. Cut out the shape along the outline. At this stage, you will have a book with corrugated pages.
Apply glue to the first, third and fifth strips drawn on the white paper on the right. Glue crepe paper to it. On it, glue the outlines of even stripes drawn on white paper with glue, and glue the next corrugated page. If the stripes are not visible, glue the parts by eye. In the same way, alternating strips, glue the rest of the pages.
Fold a sheet of black paper in half and draw on it a larger heart than the finished one. Glue the last to the black and close the postcard. Make a 6 cm square out of red paper, fold in half and cut out a heart. Similarly, get a small heart. Lubricate their folds with glue and glue to the outside of the card.
Surprise your beloved 👩🏼🦰
- 17 cool gifts for a girlfriend or wife on March 8
How to make a carved card especially for mom
What you need
- Template;
- white paper;
- red heavy paper;
- tape;
- utility knife;
- heavy white paper;
- double sided tape.
How to
Print the template on white paper. Attach it to the red paper with tape on all sides for reliability. Cut out hearts and outlines of numbers and letters. Mark the fold lines.
Remove template. Bend the white thick paper in half lengthwise, and the carved part along the marked lines. Glue the piece to the white paper using double sided tape as shown in the video.
Make the most precious person happy 👩🏻🦳
- 14 gifts for mom on March 8 that will definitely please
How to make a flower card with your own hands
What you need
- Scissors;
- ruler;
- yellow double-sided paper;
- red paper;
- glue;
- plastic straw or wooden stick;
- tape;
- green paper;
- white paper;
- red marker;
- black marker;
- paper clip.
How to
Cut a square out of yellow paper and fold it in half. Unfold and fold in half again, but from the other side. Unfold, fold diagonally, unfold again and fold diagonally from the other side.
Fold the square into a triangle along the fold lines. The video shows in detail how to do it. Fold the triangle in half and cut out the heart so that its middle is on the fold.
From red paper, cut out the same piece, but smaller. Glue it to the center of the yellow flower and write a congratulation. Fold the flower into a heart shape and glue it to the tube or stick with tape. Glue leaves cut out of green paper to the stem.
Cut out a ladybug from white paper and color it. Glue a paper clip to it with tape and fasten the edges of the flower with it.
Read also 🎁💄👠
- 15 gifts for a friend on March 8 that will make her smile
- How to effectively pack a gift of any shape and size
- What to give a grandmother on March 8
- 11 gifts for March 8 that you can make yourself
- What to give a woman on March 8: 24 interesting ideas
Do-it-yourself postcards for March 8: how to make paper with a child, draw with a pencil
Any child, regardless of age, wants to make beautiful postcards for March 8 with their own hands. They can be presented to mother, grandmother, beloved teacher or educator. For children, this is the most affordable gift, as it does not require much time and high costs for materials.
But it is very pleasant to receive such surprises as postcards for March 8 with your own hands. You can take a template or sample as the basis of a postcard, but add a little of your imagination, warmth and love to it. Mom or grandmother will definitely keep such a card as a keepsake.
You can make March 8 cards out of paper or cardboard in just an hour or less. But do not postpone this task until the last day. If you want to make an original and unique postcard for March 8 with your child, then use bright and varied materials.
Contents
Do-it-yourself children's card for mom on March 8
Most women and girls love bouquets and flowers in any form. Therefore, making a card with the image of flowers is the most successful option. They can be in the form of a bouquet - drawn or glued in the form of an application of colored paper, or you can put them in a vase, and make the flowers themselves voluminous.
Flowers on a postcard can be depicted using the quilling technique.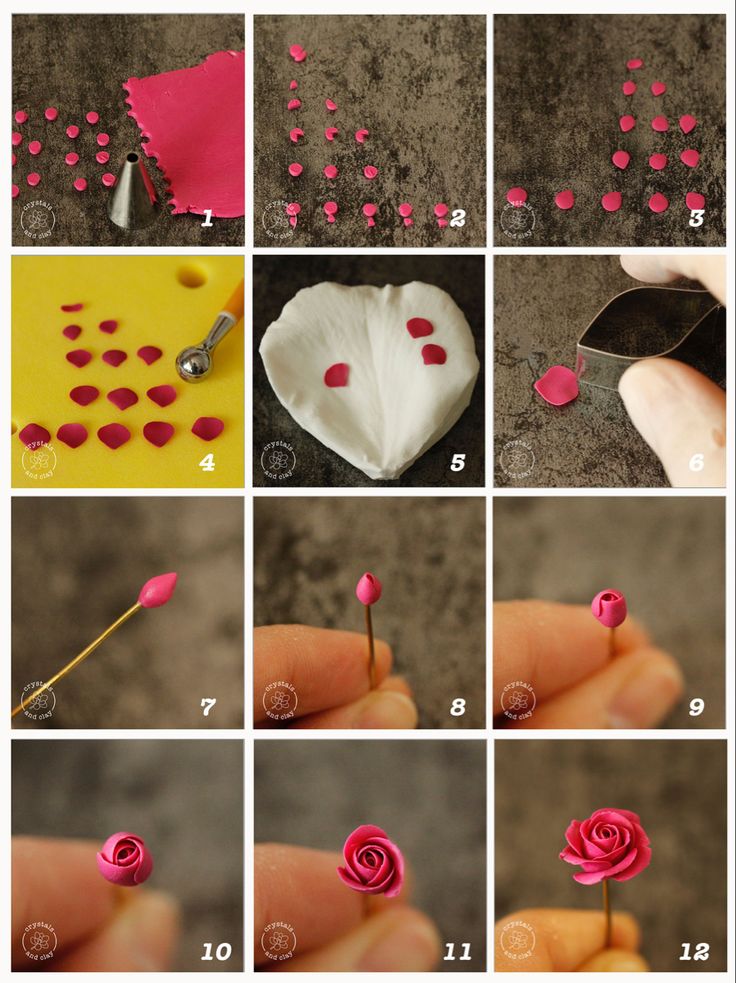
You can also make a postcard with flowers from various materials at hand.
With the help of scrapbooking materials, namely beautiful paper, you can make a very delicate version of a postcard for mom on March 8th.
Application card for mother on March 8
Given that children love to do paper crafts, a postcard for March 8 with the help of an application can be made in a few minutes.
The base of the postcard can be made from a sheet of white thick paper or cardboard, but any pastel color paper can also be used.
Fold the sheet in half. From colored paper we cut out a figure in the form of a flower pot, and from a different color - the edging of the pot.
Cut out thin strips of green paper to act as stems. You will also need leaves. From colored paper we cut out flowers with five petals, and from a contrasting color we cut out the middle in the form of a circle.
Use the ready-made template to make a card for your mother on March 8 quickly and beautifully. Templates are useful for those who are afraid of not being able to cope with the preparation of colored paper parts. Cut out the details and transfer them to colored paper. Lay folds on parts B, C, D.
Pieces D play the role of flower centers - glue them together dotted in the center, and cut the edges with a fringe.
You can print out the blank on a color printer and immediately start cutting and gluing.
Another version of a flower card for March 8 for mom or grandmother.
Screw the petals marked A, B with scissors.
Pieces D Glue together dotted in the center and cut the edges with a fringe.
Drawn postcards for March 8: draw with pencil and paints
The main story on postcards from March 8 is flowers. There are flowers - it means there is a holiday. Therefore, first of all, learn how to draw flowers, as well as a beautiful number 8.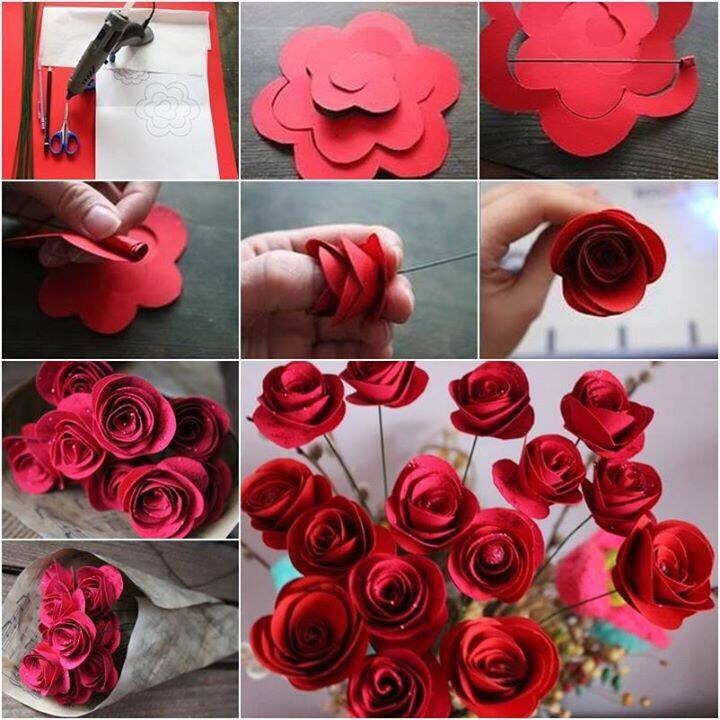 Try to draw the flowers that mom loves.
Let's start by drawing a beautiful holiday inscription.
The title page of the postcard can be decorated with a simple inscription, but placed in a beautiful floral wreath.
Any child can draw a postcard for March 8 with their own hands, regardless of the talents of the artist.
If you plan to draw a wall newspaper or arrange a gift on a large sheet of paper, then this option will be the most suitable. Use paint to color the drawing.
Start by drawing a sheet of paper with one edge curled up. Wipe off excess lines immediately. With short strokes, mark the contours of the number 8. To write the name of the month below it, draw a line.
Decorate the leaf and its corners with beautiful leaves and flowers. Around a sheet of paper, we denote the contours where our flowers will be drawn. Flowers can be completely different.
It remains only to pick up watercolors and brighten up the hand-drawn postcard by March 8th.
How can drawn cards for March 8 look like.
Volumetric paper card for March 8: a step-by-step description
Consider several options for volumetric cards that you can make with your own hands from paper. March 8 is a favorite women's day, which is not complete without flowers. But if you can’t give your mother or grandmother a bouquet of flowers, then make an application and place it on a postcard.
Materials:
- Multi -colored paper
- Hofrarton
- Glue
- Scissors
- Flomasters
- Red foil
Volumetric bouquet we will put inside the postcard.
how to make flowers: take colored paper and cut out the same squares. Fold three times to get a triangle. And we create a petal shape from the blank, the rest of the paper must be cut off. Expanding it, we will see a flower. For a beautiful postcard you need 7 flowers.
Cut off one petal of the flower, and glue the outer petals, laying one on top of the other.
Let's glue one flower on top of the other, and on the other side we'll attach the third one.
Fold a sheet of corrugated cardboard in half and place flowers inside.
The outside can be decorated with any design.
Red foil can be used to make hearts.
If you know that your mother will appreciate the original version of the craft, then the next option is worth considering.
Splash this wrinkled leaf with white paint. We put flowers inside the envelope.
Don't forget to tie the envelope with twine.
Variants of beautiful three-dimensional postcards made of paper and cardboard0009
Beautiful postcards are obtained if you use bright and varied materials to create them. It can be openwork napkins, colored buttons, ribbons and much more.
Do not think that it is difficult to make beautiful cards for March 8th.
All beautiful women love dresses, so a card with a picture or dress can be made from paper or fabric.
Here is one of the ways to make a beautiful postcard - a dress with your own hands.
Fold the base sheet in half. From the fold line, mark 4 cm from the top and 3 cm to the left, another 3 cm from this mark to the right. Connect the dots with smooth lines.
Cut along the line, and glue a white sheet of paper inside.
We will write congratulations on a white sheet, and you can decorate the dress as you wish - draw a beautiful print, glue beads and ribbons.
A postcard dress can be made from a napkin and glued onto the base
See below for how to fold a card dress.
Roll the round napkin slightly above the middle. Fold over the edge so that the sides match. Cut off the top. This part of the napkin will be the skirt of the dress, cut off at the waist.
Cut out a heart from a napkin, which can be combined with a skirt to make a dress. Trim the sides of the dress to get the dress. Align the two pieces.
Use a ribbon for the belt of the dress.
Postcards for March 8 to kindergarten: what you can do with your own hands
Children cannot sit in one place for a long time, so a postcard from children by March 8 cannot be complicated. But it will turn out no less beautiful if done carefully. For him, appliqué options from ready-made templates, or drawing with paints are suitable. The easiest option is to draw colors on a postcard with your fingers.
Materials:
- Paint: white, green, brown
- Brush
- Cardboard
Draw a stripe of green paint on a piece of cardboard and a brown circle on top. Now the most interesting thing for the baby is to dip his finger in white paint to make a dandelion on paper.
Pasta cards will also please the little ones.
Postcard Mimosa: step by step tutorial
Traditional flowers associated with the 8th of March are tulips and mimosa.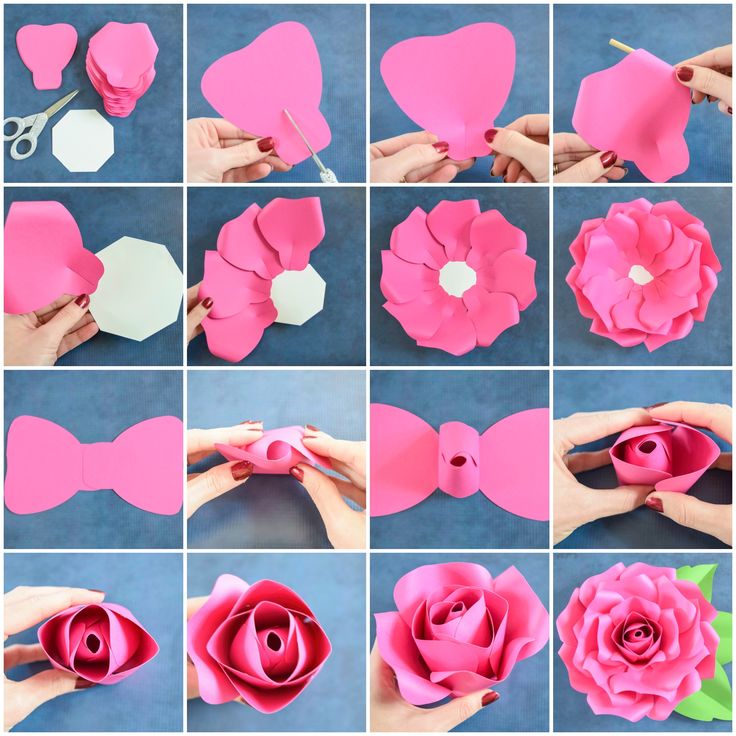
Materials:
- Colored paper
- Cardboard
- Napkins
- Glue
- Scissors-
We fold a sheet of white cardboard in half and cut out a square of pink cardboard, which will be slightly smaller than the folded postcard.
Cut out identical squares from yellow napkins and twist them into balls.
Cut out leaves from light green paper - the shape of an oval, which are folded in half. We make a fringe along the edge.
Make a blue paper square. Fold it in half and cut off the corners. Bend them to the middle and glue the bow.
You can make beautiful postcards from improvised material.
Do-it-yourself card for dear grandmother on March 8
Grandmothers even more than mothers love to receive pleasant surprises and gifts from their grandchildren. Therefore, making a postcard to grandmother by March 8 is one of the most important things.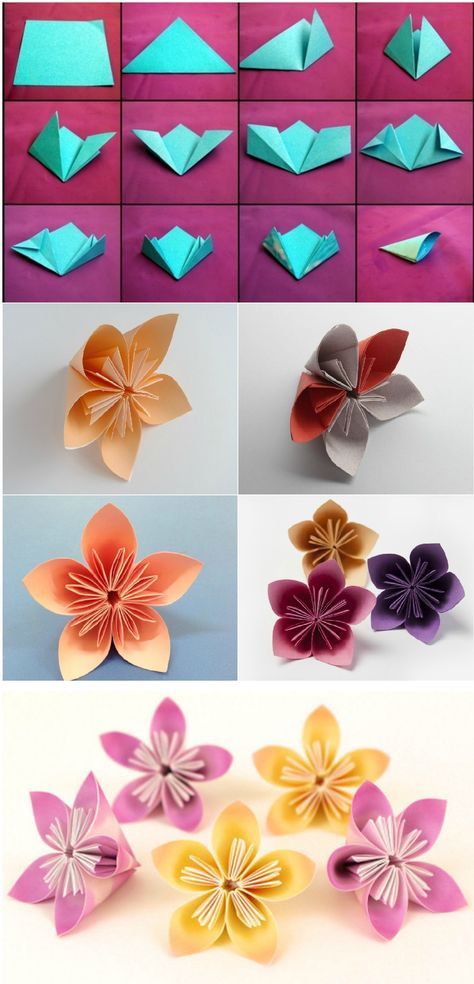 Any version of a beautiful postcard can be used to make a postcard for your grandmother.
An unusual solution would be to make a card in the shape of a vase of flowers.
Materials:
- Colored paper
- Cardboard
- Glue
- Scissors Pleshok
- Threads for knitting
Little threads for fingers in several layers. We remove and tie a thread in the middle. Cut out the shape of a vase from green paper and glue it onto the cardboard, leaving a free edge on top. We will insert our flowers into it.
Glue multi-colored confetti onto the finished flower vase and cut it out along the contour.
Grandma will definitely be delighted with such a homemade surprise. Kids from the kindergarten learn to make postcards with their own hands to give to their mother or grandmothers, because this is a very pleasant sign of attention.
Postcard for March 8 using scrapbooking technique
Postcards using scrapbooking technique are the most interesting and original. They use a lot of decorative material and paper with beautiful prints. The recipient will be happy to consider every detail of the postcard.
March 8 should be full of flowers, nice words and congratulations. Delicate and colorful postcard can give any woman or girl a smile and a pleasant experience.
Use the scrapbooking technique to make postcards for your closest ones - your mother and grandmother, and maybe your sister.
Materials:
- Watercolor paper
- Acrylic primer
- Stencil
- Texture paste
- Acrylic paints
- Embossing powder
- Beer and binding board
- Decor
- Lace
- Hairdryer/lighter
- Ruler, scissors, rug
Backing will be made of watercolor paper Sew a sheet of white paper with stitches first. Apply acrylic primer and dry with a hair dryer.
Take a butterfly stencil and apply texture paste to the card. You can make a diagonal pattern. Next, apply powder to the pattern to give color to the butterflies.
Paint sprays can create a beautiful effect
To line up the base paper, stick it onto the beer board using double-sided tape.
Attach the rest of the decor on top - lace, beads, half beads, buttons, flowers.
The decoration of your card can make a big difference. Therefore, in this way you can make a couple of completely different postcards.
Scrapbooking materials provide a great field for action.
With the approach of spring dates in the calendar, there are less and less days left until the wonderful holiday of all women and girls. No wonder this day was chosen in early spring. Not only men, but also children prefer to prepare for this holiday. Only, unlike men, children do not get by with purchased gifts, but like to make postcards for their mother on March 8 with their own hands.