Soak n grow
Why shop at Lucky Duck Toys?
Sorry, but the Product you've requested wasn't found!
| Categories | ||
| New Items! | Staff Favorites! | |
| Fidgets! | Easter Items | Holiday Themed Items |
| Action Figures | Arts & Crafts | Baby Toys & Gifts |
| Banks and Safes | Beyblades | |
| Dinosaur Themed Items | ||
| Fun Stuff! | ||
| Fun Things for Travel! | Gift Cards | |
| Kid's Cooking | Kid's Masks, Wallets, Umbrellas | Lego |
| Magic Sets & Prank Kits | Makeup for Kids | Musical Toys & Speakers |
| Nightlights & Room Decor | Paw Patrol | |
| Playmobil | Plush Toys | Pokemon |
| Preschool Toys | ||
| Rubber Ducks | ||
| Space Themed Toys | Spy Gear | Tattoos |
| Tonies | Trains | Tweens |
If you need help selecting the perfect gift, give us a call at (610) 525-5825!
Sprouting seeds at home: methods, terms
- DzagiGrow
- / Blog
- / In the beginning there was a seed. Golden rules for sprouting.
You have finally built a box for your babies, chosen fertilizers and a beautiful watering can. The start is actually given, it remains to acquire a plant. It's time to talk about seed germination (and we have already talked about cloning in detail here).
Optimum conditions for germination
The painful choice of the variety is completed, the parcel arrived successfully and now you are the happy owner of pot-bellied baby seeds. They are still sleeping, and it is very important to awaken them carefully and faithfully. Remember the THREE necessary conditions for successful and proper germination of seeds at home:
- warm +24…+29°C;
- no light;
- and access to fresh air, but in any case not a draft.

How to germinate seeds at home
There are many different methods. Gardeners are constantly inventing new original technologies. Below we will give step-by-step instructions for germinating seeds in the most popular and effective ways.
Sprouting in gauze or cotton
The first and easiest option is to germinate the seeds in cheesecloth, bandage, cotton wool, cotton pad or mineral wool cube.
- Moisten the bandage/cotton pad with plenty of water (preferably settled and at room temperature).
- Squeeze out excess water, but not hard.
- Place the seed between layers of bandage, between two discs or inside a cotton ball.
- Place all of this in a container, but do not close it tightly - there must be access to fresh air. Can be wrapped in cling film with slits.
- Move to a dark and warm place free of drafts and temperature fluctuations.
After 12-24 hours, the first roots should hatch.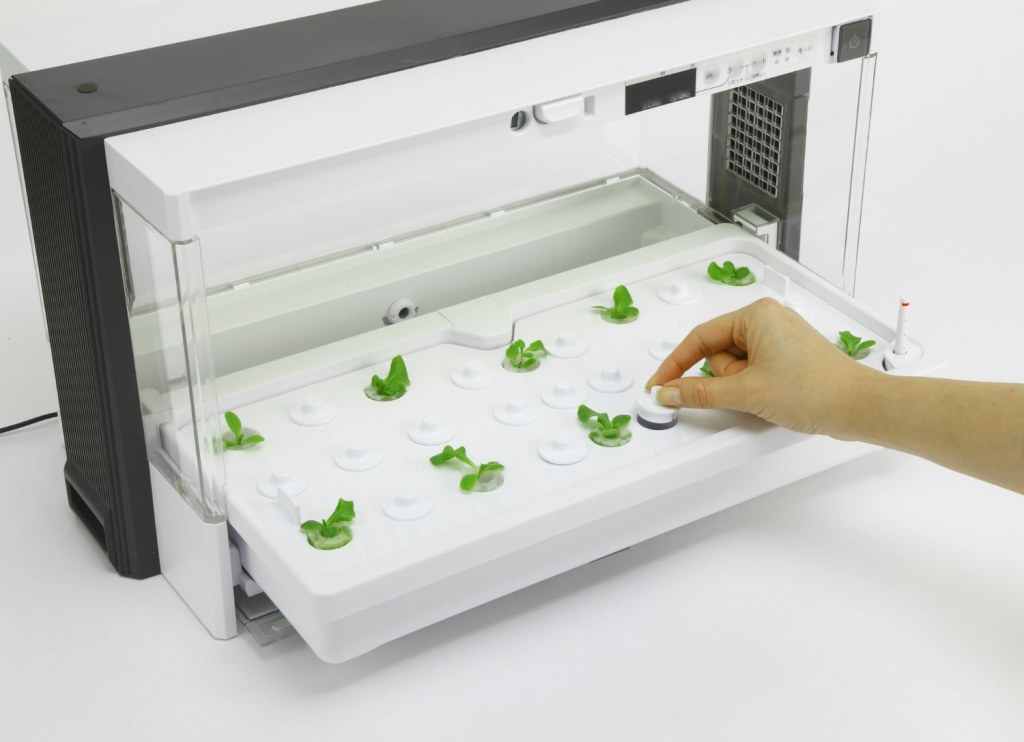
Germination in hydrogel
This method is very simple and reliable.
- Put a teaspoon of hydrogel into a container with a volume of about a liter, fill it with 1 liter of clean water with a pH level of 6.3-6.8.
- After about an hour, the granules will swell and you will get about 0.5 l of the finished mass. If excess water remains, drain.
- Seeds are placed on top of the hydrogel, it is not necessary to sink deep.
- Also loosely cover with a lid or cling film with slots.
- Put in a dark and warm place.
In this way, the seeds germinate in 1-3 days.
Sprouting in perlite
This is another way that does not require special skills. Perlite must first be washed with plenty of water with a pH of 6.5. It is also advisable to soak the seed in advance in clean, settled water for several hours.
- Fill a sprouting container with washed perlite.
- Make a 10 mm hole and place the pre-soaked seed in it.
- Sprinkle a small layer of perlite on top and place in a dark, warm place, previously covered with a glass or film.
After 2-3 days, the seed will germinate.
Hydroponics
In a hydroponic system, the seed can be placed directly into a cube of mineral wool or coconut fiber. By maintaining constant moisture in the substrate, the seeds will germinate and take root automatically. This method has one drawback - elongated and still weak seedlings will have to be supported with additional props.
In general, there is enough water to germinate seeds in a hydroponic setup. But if you are not sure about the quality of the seeds or just want to help them germinate quickly, you can add a root stimulator from any manufacturer. You can read more in the article About growth stimulants. Part 1 - root formation and metabolism.
Germination of seeds in toilet paper
The method is ancient, like our world itself, for it you will need:
- toilet paper, plain, grey;
- container;
- film;
- atomizer.
The sequence of actions is as follows:
- prepare paper and film, cut them into equal long pieces;
- lay one layer of paper on the film, moisten with water and place the seeds at a distance of 2.5 cm from each other;
- we cover with another layer of paper, this layer must also be wet;
- we cover with a layer of film on top, then carefully roll it into a roll, while preventing the seeds from moving;
- we fix with a thread or an elastic band without strong squeezing;
- put the rolls in a plastic container vertically so that the seeds are at the top;
- we fill the container with water, it should not reach 2 cm to the seeds.
Additionally, the resulting structure can be placed in a plastic bag to create greenhouse conditions. However, do not forget about regular ventilation!
Germination container
Or in other words, a seed germinator is a special container in which an aerator is located, also known as a sprayer. Seeds are located on top in a special tray, after connecting the aerator, water vapor begins to flow to the seeds. Within a few days, the seed coat bursts and the roots of the sprout begin to reach for water.
You can assemble such a device yourself with your own hands or consider ready-made options: a universal germinator or a seed germinator AeroSAD Health KLAD.
Sprouting mat
Another ingenious invention of mankind, which can help you grow seedlings. The principle of operation is similar to a conventional household heating pad. Install it in any place convenient for you, for example, on the windowsill. Place a container with already planted seeds on top and connect the mat to a 220 W network, the optimum temperature for germination is 21-25 C. That's it! The magic has begun, most importantly, do not forget to turn on the lighting. :)
Planting germinated seeds
The germination process looks like this: the outer shell of the seed bursts and something white is visible, then this whitish piece keeps growing and growing, and turns into a decorated young root.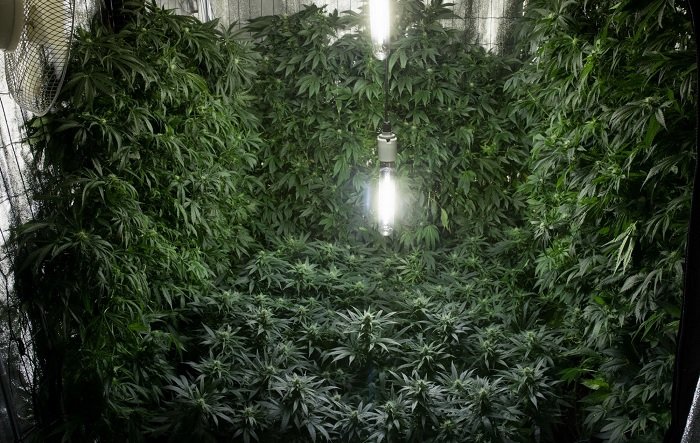
When the root grows by 1-1.5 cm, you can plant it. When planting in the ground, this root will need to be directed down. Burying deep is not worth it - 1.5 cm is enough, otherwise the young sprout may not have enough strength to break through. It is recommended to grow seedlings in a small amount of soil, for example, in a 250 ml plastic cup. It has been proven that the plant forms the root system much more efficiently in a small confined space. The glass should not be transparent (you can glue it with paper), as direct light is detrimental to the roots. And they, believe me, will quickly enough braid the entire volume of soil provided.
At the stage of young seedlings, it is necessary to use blue spectrum lamps, which promotes the growth of green mass. So wait a moment to light HPS and DNAZ, a simple fluorescent or energy-saving lamp (ESL) of the desired spectrum is enough.
The nutrition of seedlings should be treated very carefully, the plant is small and tender, so it is very easy to harm. Until the first true pair of leaves appears (note: the two leaves that you will see the very first are cotyledons, not leaves), it is best to water with just clean water with adjusted pH. After the seedlings get stronger and show the first or second pair of leaves, you can start feeding fertilizers according to the instructions for use for the growing season. Rooting stimulants will also work very well. It is important not to overwater, so that the young roots can breathe in the ground. With proper care, the seedlings will quickly stretch, and already on the 10-14th day it will be possible to transplant it to the place of further growth.
Previous Article
21 October 2020
Plant Pest Control: 5 Proven Remedies
Next Article
June 22, 2016
Peat. Use as a substrate.
Comments
To leave comments you need to log in with your account. If you are not yet
registered, you can register, which will take just a couple of minutes.
Be the first to comment on this article
Knowledge
Become an advanced grower. Get useful articles every two weeks!I agree to the processing of personal data, as well as the terms of subscription
Knowledge
Become an advanced grower. Get useful articles every two weeks!
I agree to the processing of personal data, as well as the terms of subscription
© 2013 - 2022 IP Ezhov A.A.
All rights reserved.
EcoZhivchik (herbal) - photo instructions for use
Photo instructions for EcoZhivchik Dragon:
EcoZhivchik was created with love by the family creative workshop "Skomorokh" of the Smolev family, masters of folk crafts of the Samara region.
Where to start?
Before the EcoZivchik comes to life under the rays of the sun on the windowsill, it must be soaked in warm water at room temperature so that the seeds in the toy wake up and begin to germinate.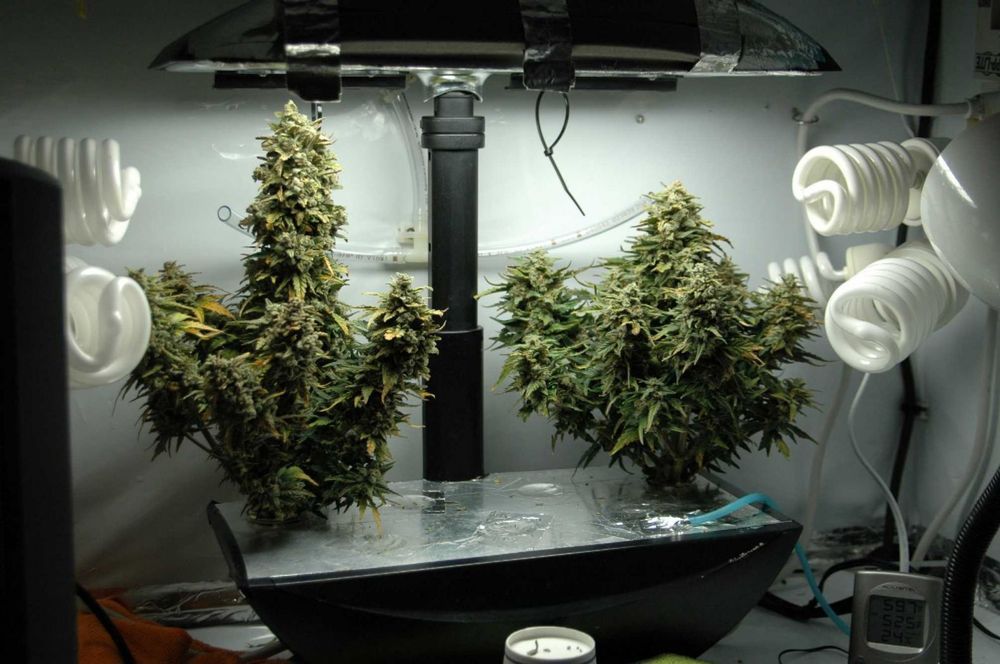 Minimum soak time 30 minutes. In the evening, we recommend lowering it into a container (deep plate or pan) with water, press it on top, for example, with a lid (otherwise it swims well), so it will be better saturated with water and put on a saucer the next morning - permanent residence.
Where to place?
As soon as the souvenir is well saturated with water, place it in a place where it will be warm and light enough. Until the blades of grass have sprouted, do not place it under the direct rays of the sun, especially in summer, because the herb will dry out instantly and the growth process will stop. It is recommended to put it inside the room on a table or bookshelf. As soon as all the blades of grass hatch, you can put the toy anywhere.
How to water?
EcoZivchik loves water very much, it is not possible to overfill, the materials and coloring are waterproof, so feel free to give your friend water every day. From time to time you can bathe him in a bowl of water or even under the tap.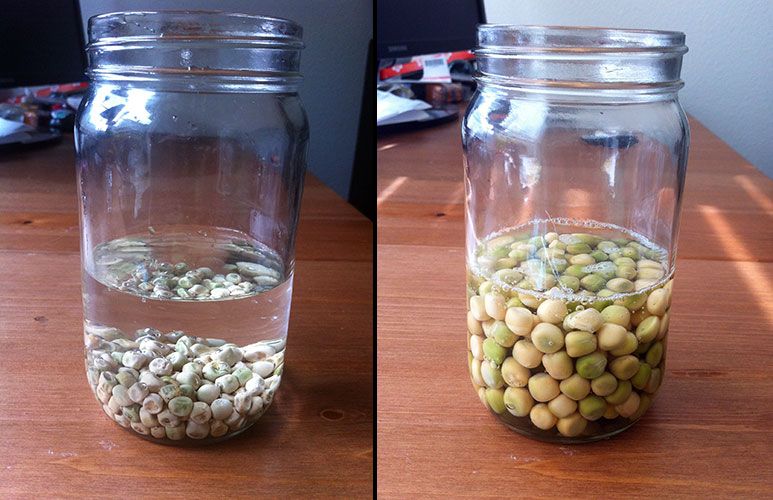 In summer, in especially hot weather, a souvenir can be sprayed, which is convenient to do from a spray bottle.
How to cut?
Not only children like to cut their pet, but their parents, it is such an exciting activity! Somewhere in two weeks, the blades of grass will grow about 12 centimeters and you can be a hairdresser for your pet, making him a stylish hairstyle. But do not forget that you can not cut too short, leave 5-7 centimeters for recovery. Indeed, after the next 14 days, the hairstyle will fluff up again, providing the opportunity for a new creative fantasy!
How to feed?
With frequent trimming, the plant needs to be fed, because it is limited in nutrients only by the presence of sawdust in the filler. For this purpose, universal fertilizers for plant rooms, which are sold in abundance in flower shops, are suitable. A capful of concentrate per liter of water is enough.
Is grass allowed for pets?
If you have pets, you can entrust them with the EcoZive trimming.